

"Cutting-Edge Methods to Reduce YouTube Video Size for 2024"
Cutting-Edge Methods to Reduce YouTube Video Size
How to Trim YouTube Videos?

Richard Bennett
Mar 27, 2024• Proven solutions
The world’s largest video sharing platform currently has nearly two billion active monthly users who upload over 400 hours of video content to their channels each minute. It is to see from these statistics why every video aspiring YouTubers post on their channels has to be perfect in every way in order to reach a wide audience. Fortunately, trimming a video even after you’ve uploaded it to YouTube is a quick and easy process, and in this article, we are going to show you a few different methods you can use to trim the videos you upload to YouTube. So, let’s get started.
In this article
- How to Trim a Video After You Upload it to Your YouTube Channel?
- Trimming a Video Before Posting On YouTube with Filmora Video Editor [4 Ways]
- Using Online Video Editing Platforms to Trim YouTube Videos
How to Trim a Video After You Upload it to Your YouTube Channel?
The YouTube Studio is no longer in beta phase, which means that the feature is here to stay. This is good news for all video creators who frequently update their YouTube videos after they upload them, as they no longer have to go through the endless uploads just because they wanted to trim a video.
Make sure that you’re signed into your YouTube channel, then click on your profile picture and select the YouTube Studio (Beta) option. On the left side of the screen, you’ll be able to see a menu that contains different subcategories like Analytics, Dashboard or Videos, so just click on the Videos option and proceed to select a video you’d like to trim. After the Videos submenu appears on the screen you should click on the Editor option and the video you selected will open in the YouTube’s video editor.

Click on the Trim button to start trimming the video and drag the blue bars located at the start and the end of the file to designate the portion of the video you’d like to remove. Preview the changes and confirm what you’ve made by clicking on the Save button located in the upper right corner of the screen and the new shortened version of the video will become available within a couple of hours.

In this way, you don’t need to take down the original video, edit it and re-upload. One of the benefits of trimming YouTube videos with the Trim feature in YouTube Editor is that this will keep your video URL and views and ranks etc.
Trimming a Video Before Posting On YouTube with Filmora Video Editor


Method 1: Trim on Timeline
YouTubers who don’t want to rely on YouTube’s video editing capabilities can trim their footage with Filmora (to be honest, the Editor in YouTube platform has limited features). Filmora video editing software for PC and Mac computers offers a few different tools for trimming videos. After you’ve created a new project in Filmora, you should import a video clip into the editor by clicking on the Import drop-down menu and select the Import Media Files option. Each file you add to a project will be displayed in the Media tab, and you can just drag and drop it to a video track on the timeline.
All you have to do in order to trim a video after you’ve placed it on the timeline is drag one of its ends to the left or to the right. As you drag one of the clip’s edges the editor will only display the remaining footage while rendering the rest invisible. If at any point you want to access a portion of the video you’ve trimmed you just have to extend the file by dragging it until you’re able to see the segment you’re searching for.

Method 2: Using Filmora Split Tool
Filmora’s Split tool can help you separate the portion of the clip you want to remove from the segment you’d like to keep. Simply place the playhead at the exact location in the video clip where you want to make a cut, and click on the Split icon that looks like a pair of scissors. After the video is split, you should click on the clip you no longer need in order to select it and then hit the Delete button on your keyboard to remove it from the timeline.
Method 3: Using Scene Detection
Wondershare’s video editor also offers an automatic way to split a video clip into a number of separate scenes. Right-click on the video file located in the Filmora’s Media tab, and select the Scene Detection option from the menu and proceed to click on the Detect button, after the Scene Detection window pops up on the screen. The software will then automatically analyze the footage and divide it into separate scenes. Simply click on the Add to Timeline button once the process is completed to continue editing the video clip you’ve just split.

Method 4: Using Instant Cutter Tool
The Instant Cutter Tool enables you to quickly trim or merge high-resolution files recorded on action cameras as soon as you import them into a project in Filmora. Select the Import with Instant Cutter Tool option from the Import drop-down menu and wait for the Filmora Instant Cutter window to appear on the screen. In the upper left corner of this window, you will be able to see Trim and Merge tabs. Make sure that the Trim tab is selected and then click on the Open File button to import a video clip you’d like to trim. You can then use the trimming sliders to designate the parts of the video you’d like to remove or the set the In and Out points by clicking on the Set In Point or Set Out Point icons. Click on the Export button to save the new version of the video clip and click OK to complete the process.

Using Online Video Editing Platforms to Trim YouTube Videos
In case you’re looking for a tool that lets you save extracts of scenes from YouTube to your computer free of charge YT Cutter may be one of your best options.

This online video editing platform is remarkably easy to use since you just have to copy the link to the YouTube video you’d like to trim into YT Cutter’s URL box and then select how long the new video should be. Click on the Start and End buttons to set the duration of the video and click on the Download button to choose if you want to create a video, GIF or an audio file. The trimmed YouTube video will be available for download as soon as the platform processes it, and you just need to specify a folder on your hard drive before clicking on the Save button.
There’re many online video trimmers available on the market, some of them are totally free to use, check our guide about How to Trim Videos for Free Online .
Read More to Get : How to Download YouTube Videos without Any Software Easily >>
Conclusion
Trimming a video online or with a video editing software like Filmora is an effortless task that can be completed in just a couple of minutes. However, it is better to complete the entire video editing process before you upload a video to your YouTube channel because YouTube Studio and other online video editing platforms still offer only a limited amount of video editing tools. Which method of trimming YouTube videos do you like using the most? Leave a comment and share your opinions with us.
Richard Bennett
Richard Bennett is a writer and a lover of all things video.
Follow @Richard Bennett
Richard Bennett
Mar 27, 2024• Proven solutions
The world’s largest video sharing platform currently has nearly two billion active monthly users who upload over 400 hours of video content to their channels each minute. It is to see from these statistics why every video aspiring YouTubers post on their channels has to be perfect in every way in order to reach a wide audience. Fortunately, trimming a video even after you’ve uploaded it to YouTube is a quick and easy process, and in this article, we are going to show you a few different methods you can use to trim the videos you upload to YouTube. So, let’s get started.
In this article
- How to Trim a Video After You Upload it to Your YouTube Channel?
- Trimming a Video Before Posting On YouTube with Filmora Video Editor [4 Ways]
- Using Online Video Editing Platforms to Trim YouTube Videos
How to Trim a Video After You Upload it to Your YouTube Channel?
The YouTube Studio is no longer in beta phase, which means that the feature is here to stay. This is good news for all video creators who frequently update their YouTube videos after they upload them, as they no longer have to go through the endless uploads just because they wanted to trim a video.
Make sure that you’re signed into your YouTube channel, then click on your profile picture and select the YouTube Studio (Beta) option. On the left side of the screen, you’ll be able to see a menu that contains different subcategories like Analytics, Dashboard or Videos, so just click on the Videos option and proceed to select a video you’d like to trim. After the Videos submenu appears on the screen you should click on the Editor option and the video you selected will open in the YouTube’s video editor.
Click on the Trim button to start trimming the video and drag the blue bars located at the start and the end of the file to designate the portion of the video you’d like to remove. Preview the changes and confirm what you’ve made by clicking on the Save button located in the upper right corner of the screen and the new shortened version of the video will become available within a couple of hours.
In this way, you don’t need to take down the original video, edit it and re-upload. One of the benefits of trimming YouTube videos with the Trim feature in YouTube Editor is that this will keep your video URL and views and ranks etc.
Trimming a Video Before Posting On YouTube with Filmora Video Editor
Method 1: Trim on Timeline
YouTubers who don’t want to rely on YouTube’s video editing capabilities can trim their footage with Filmora (to be honest, the Editor in YouTube platform has limited features). Filmora video editing software for PC and Mac computers offers a few different tools for trimming videos. After you’ve created a new project in Filmora, you should import a video clip into the editor by clicking on the Import drop-down menu and select the Import Media Files option. Each file you add to a project will be displayed in the Media tab, and you can just drag and drop it to a video track on the timeline.
All you have to do in order to trim a video after you’ve placed it on the timeline is drag one of its ends to the left or to the right. As you drag one of the clip’s edges the editor will only display the remaining footage while rendering the rest invisible. If at any point you want to access a portion of the video you’ve trimmed you just have to extend the file by dragging it until you’re able to see the segment you’re searching for.
Method 2: Using Filmora Split Tool
Filmora’s Split tool can help you separate the portion of the clip you want to remove from the segment you’d like to keep. Simply place the playhead at the exact location in the video clip where you want to make a cut, and click on the Split icon that looks like a pair of scissors. After the video is split, you should click on the clip you no longer need in order to select it and then hit the Delete button on your keyboard to remove it from the timeline.
Method 3: Using Scene Detection
Wondershare’s video editor also offers an automatic way to split a video clip into a number of separate scenes. Right-click on the video file located in the Filmora’s Media tab, and select the Scene Detection option from the menu and proceed to click on the Detect button, after the Scene Detection window pops up on the screen. The software will then automatically analyze the footage and divide it into separate scenes. Simply click on the Add to Timeline button once the process is completed to continue editing the video clip you’ve just split.
Method 4: Using Instant Cutter Tool
The Instant Cutter Tool enables you to quickly trim or merge high-resolution files recorded on action cameras as soon as you import them into a project in Filmora. Select the Import with Instant Cutter Tool option from the Import drop-down menu and wait for the Filmora Instant Cutter window to appear on the screen. In the upper left corner of this window, you will be able to see Trim and Merge tabs. Make sure that the Trim tab is selected and then click on the Open File button to import a video clip you’d like to trim. You can then use the trimming sliders to designate the parts of the video you’d like to remove or the set the In and Out points by clicking on the Set In Point or Set Out Point icons. Click on the Export button to save the new version of the video clip and click OK to complete the process.
Using Online Video Editing Platforms to Trim YouTube Videos
In case you’re looking for a tool that lets you save extracts of scenes from YouTube to your computer free of charge YT Cutter may be one of your best options.
This online video editing platform is remarkably easy to use since you just have to copy the link to the YouTube video you’d like to trim into YT Cutter’s URL box and then select how long the new video should be. Click on the Start and End buttons to set the duration of the video and click on the Download button to choose if you want to create a video, GIF or an audio file. The trimmed YouTube video will be available for download as soon as the platform processes it, and you just need to specify a folder on your hard drive before clicking on the Save button.
There’re many online video trimmers available on the market, some of them are totally free to use, check our guide about How to Trim Videos for Free Online .
Read More to Get : How to Download YouTube Videos without Any Software Easily >>
Conclusion
Trimming a video online or with a video editing software like Filmora is an effortless task that can be completed in just a couple of minutes. However, it is better to complete the entire video editing process before you upload a video to your YouTube channel because YouTube Studio and other online video editing platforms still offer only a limited amount of video editing tools. Which method of trimming YouTube videos do you like using the most? Leave a comment and share your opinions with us.
Richard Bennett
Richard Bennett is a writer and a lover of all things video.
Follow @Richard Bennett
How to Seamlessly Reorganize Video Playlists on YT
We often create playlists on YouTube for different moods, genres, and occasions, but you may want to change the order of the videos or songs in your list. This is where the shuffling feature can help you.
Shuffling your YouTube playlist is an excellent way to mix things up and play various videos or songs from different channels without manually selecting each one.
But if you don’t know how to use the “Shuffle” feature, we’ll show you how to shuffle YouTube playlists on PCs, phones, and TVs. So, keep reading to start randomizing your YouTube playlist to mix up your music or video collection!
How To Shuffle YouTube Playlist On PCs/Phones/TVs?
Whether it’s a mix of our favorite songs, a set of dance videos to help get us through our workout, or a compilation of cat videos that never fail to make us smile, we all have that one go-to playlist we want to listen to over and over again.
But sometimes, even our favorite playlist can feel a little stale. That’s when it’s time to shuffle things up and give the playlist a fresh new feel.
To help you with this, we’ve provided step-by-step tutorials to help you shuffle Youtube playlists on your computer, phone, or Smart TV without having much trouble.
Part 1. How to Shuffle YouTube Playlist on PC?
Here is the step-by-step guide that can help you quickly shuffle your YouTube playlist on your PC, whether it’s before playback while watching, or from the Library:
How To Shuffle the Playlist Before Playlist Playback
The following is a quick rundown of the steps you need to take to shuffle the playlist before playback:
Step 1: First, open a browser on your PC to visit the YouTube website and log in to your account using your credentials.
Step 2: Now, click the “Menu” (hamburger) icon on the top left of the YouTube home page and select your playlist from the menu.

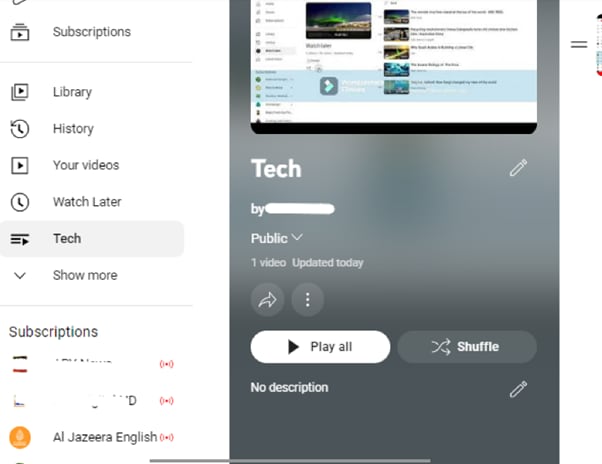
Step 3: On the next page, click the “Shuffle” button next to the “Play All” option in the playlist details section to randomize your YouTube playlist.
That’s about it! Your videos/songs will now play in random order.
How To Shuffle The Playlist While Listening
To learn how to shuffle a YouTube playlist while listening to your favorite songs, do the following steps in sequence:
Step 1: Launch your preferred browser on your PC and head to the “YouTube” homepage.
Step 2: Now, use the search icon to find your favorite song’s playlist or choose from the left “Menu” panel, and click “Play All” to listen to the music.
Step 3: When you start playing, you’ll find your playlist next to the video player. Click the crisscrossed arrows “Shuffle” icon below the playlist title, and the songs will start playing randomly instead of in proper order.

How To Shuffle The Playlist In the Library
If you want to randomize your YouTube playlist in the library section, follow these step-by-step instructions:
Step 1: In the first step, head to the YouTube website using your preferred browser on the PC and sign in to your account.
Step 2: Click the “Library” option from the left side panel on the YouTube homepage and scroll down to the “Playlists” section.
Step 3: In the next step, find your playlist and click the “View Full Playlist” option below. This will take you to the playlist page.
Step 4: Finally, on the playlist page, click the “Shuffle” option next to “Play All” in the details section. Now, when you start watching the videos in the playlist, they will play randomly.
Part 2. How To Shuffle YouTube Playlist On Handy?
It is possible to shuffle your YouTube playlist on your handy (iPhone or Android) with the following workarounds.
How To Shuffle The Playlist Before Playlist Playback/From Library
The following steps will help you shuffle your favorite playlists before playlist playback or from the Library:
Step 1: If the YouTube app is not installed on your phone, head to the “App Store “ or “Google Play Store “ and install the app.
Step 2: Now, launch the YouTube app on your handy and tap the “Library” option at the bottom right corner of the app’s home screen.
Step 3: Now, scroll down to the “Playlist” section and tap the playlist you want to shuffle. On the playlist screen, tap “Shuffle” next to the “Play All” option, and that’s it!

You can now enjoy your favorite videos and songs in a new order.
How To Shuffle The Playlist While Listening
To change the order of your favorite songs in the YouTube playlist while listening to it on your mobile device, do the following steps:
Step 1: First, open the “YouTube” app on your device and log into your account if you are not signed in already.
Step 2: On the app’s home screen, tap the “Search” bar, type the playlist name, and tap to open it to start listening to your favorite songs.
Step 3: You will find the playlist available under the video player. Simply tap the crisscrossed arrows “Shuffle” icon below the playlist’s title.

That’s all to it! Now you can enjoy your YouTube playlist in totally random order.
Part 3. How To Shuffle YouTube Playlist on TV?
The YouTube app is also available on smart TVs, which many people find to be a more enjoyable experience than watching YouTube videos on a small screen.
However, unfortunately, there is no way to shuffle a YouTube playlist on a Smart TV. This is a feature that is currently only available on the YouTube website and apps.
But if your Smart TV comes with a built-in Chromecast option, you can screen mirror the YouTube app on your TV and shuffle the playlist to your liking in the following way:
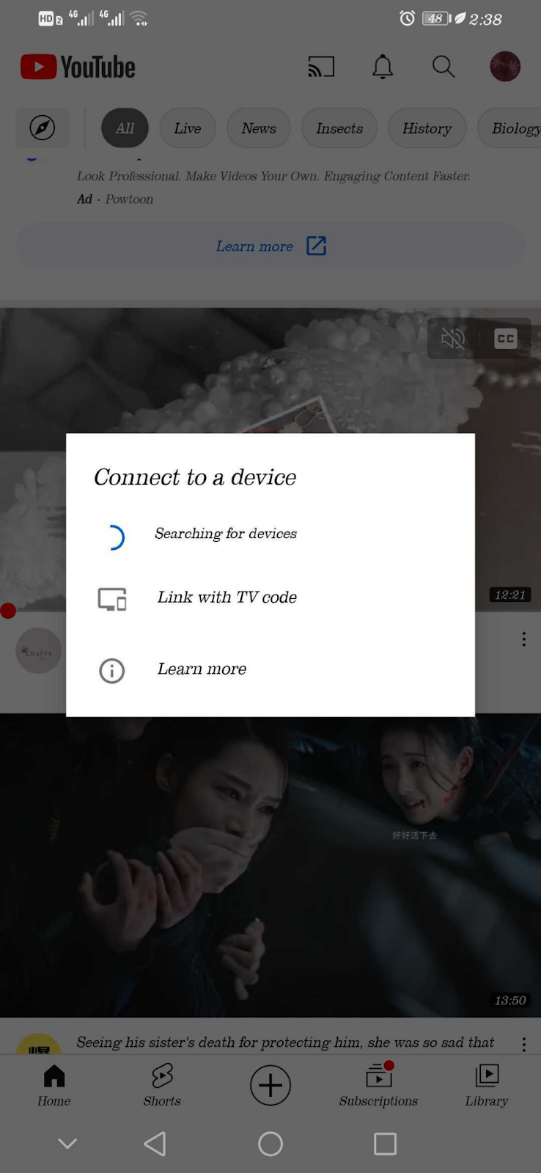
Step 1: In the first step, make sure your Smart TV and mobile device are connected to the same internet connection.
Step 2: In the next step, launch the YouTube app on your device, and access your playlist under the “Library” tab. Tap the “Shuffle” icon in the playlist details section and play your playlist
Step 3: In the final step, tap the “Cast” icon at the top-right of the screen and select your TV from the list to cast to.
Now you can enjoy randomly listen to your favorite songs on a more prominent display without getting bored.
Note:
You can also use other streaming devices like Firestick or Apple Airplay to cast YouTube on your Smart TV.
A Bouns Tip: How To Make a Music Video by Yourself?
We hope you have found appropriate solutions to shuffle your YouTube Playlist. Besides, supposing you are a music and YouTube lover, do you want to create videos with your favourite music? If yes, you can watch the video we have prepared for you. In this video, you will learn how to easily use a user-friendly video editor, Filmora, to make music videos!
In this comprehensive guide, we’ve provided a detailed step-by-step guide to show you how to shuffle YouTube playlists on your computer, mobile device, or Smart TV.
Hopefully, you’ve found this article informative and can now enjoy watching or listening to your favorite video/song in a random order in your YouTube playlist.
We often create playlists on YouTube for different moods, genres, and occasions, but you may want to change the order of the videos or songs in your list. This is where the shuffling feature can help you.
Shuffling your YouTube playlist is an excellent way to mix things up and play various videos or songs from different channels without manually selecting each one.
But if you don’t know how to use the “Shuffle” feature, we’ll show you how to shuffle YouTube playlists on PCs, phones, and TVs. So, keep reading to start randomizing your YouTube playlist to mix up your music or video collection!
How To Shuffle YouTube Playlist On PCs/Phones/TVs?
Whether it’s a mix of our favorite songs, a set of dance videos to help get us through our workout, or a compilation of cat videos that never fail to make us smile, we all have that one go-to playlist we want to listen to over and over again.
But sometimes, even our favorite playlist can feel a little stale. That’s when it’s time to shuffle things up and give the playlist a fresh new feel.
To help you with this, we’ve provided step-by-step tutorials to help you shuffle Youtube playlists on your computer, phone, or Smart TV without having much trouble.
Part 1. How to Shuffle YouTube Playlist on PC?
Here is the step-by-step guide that can help you quickly shuffle your YouTube playlist on your PC, whether it’s before playback while watching, or from the Library:
How To Shuffle the Playlist Before Playlist Playback
The following is a quick rundown of the steps you need to take to shuffle the playlist before playback:
Step 1: First, open a browser on your PC to visit the YouTube website and log in to your account using your credentials.
Step 2: Now, click the “Menu” (hamburger) icon on the top left of the YouTube home page and select your playlist from the menu.
Step 3: On the next page, click the “Shuffle” button next to the “Play All” option in the playlist details section to randomize your YouTube playlist.
That’s about it! Your videos/songs will now play in random order.
How To Shuffle The Playlist While Listening
To learn how to shuffle a YouTube playlist while listening to your favorite songs, do the following steps in sequence:
Step 1: Launch your preferred browser on your PC and head to the “YouTube” homepage.
Step 2: Now, use the search icon to find your favorite song’s playlist or choose from the left “Menu” panel, and click “Play All” to listen to the music.
Step 3: When you start playing, you’ll find your playlist next to the video player. Click the crisscrossed arrows “Shuffle” icon below the playlist title, and the songs will start playing randomly instead of in proper order.
How To Shuffle The Playlist In the Library
If you want to randomize your YouTube playlist in the library section, follow these step-by-step instructions:
Step 1: In the first step, head to the YouTube website using your preferred browser on the PC and sign in to your account.
Step 2: Click the “Library” option from the left side panel on the YouTube homepage and scroll down to the “Playlists” section.
Step 3: In the next step, find your playlist and click the “View Full Playlist” option below. This will take you to the playlist page.
Step 4: Finally, on the playlist page, click the “Shuffle” option next to “Play All” in the details section. Now, when you start watching the videos in the playlist, they will play randomly.
Part 2. How To Shuffle YouTube Playlist On Handy?
It is possible to shuffle your YouTube playlist on your handy (iPhone or Android) with the following workarounds.
How To Shuffle The Playlist Before Playlist Playback/From Library
The following steps will help you shuffle your favorite playlists before playlist playback or from the Library:
Step 1: If the YouTube app is not installed on your phone, head to the “App Store “ or “Google Play Store “ and install the app.
Step 2: Now, launch the YouTube app on your handy and tap the “Library” option at the bottom right corner of the app’s home screen.
Step 3: Now, scroll down to the “Playlist” section and tap the playlist you want to shuffle. On the playlist screen, tap “Shuffle” next to the “Play All” option, and that’s it!
You can now enjoy your favorite videos and songs in a new order.
How To Shuffle The Playlist While Listening
To change the order of your favorite songs in the YouTube playlist while listening to it on your mobile device, do the following steps:
Step 1: First, open the “YouTube” app on your device and log into your account if you are not signed in already.
Step 2: On the app’s home screen, tap the “Search” bar, type the playlist name, and tap to open it to start listening to your favorite songs.
Step 3: You will find the playlist available under the video player. Simply tap the crisscrossed arrows “Shuffle” icon below the playlist’s title.
That’s all to it! Now you can enjoy your YouTube playlist in totally random order.
Part 3. How To Shuffle YouTube Playlist on TV?
The YouTube app is also available on smart TVs, which many people find to be a more enjoyable experience than watching YouTube videos on a small screen.
However, unfortunately, there is no way to shuffle a YouTube playlist on a Smart TV. This is a feature that is currently only available on the YouTube website and apps.
But if your Smart TV comes with a built-in Chromecast option, you can screen mirror the YouTube app on your TV and shuffle the playlist to your liking in the following way:
Step 1: In the first step, make sure your Smart TV and mobile device are connected to the same internet connection.
Step 2: In the next step, launch the YouTube app on your device, and access your playlist under the “Library” tab. Tap the “Shuffle” icon in the playlist details section and play your playlist
Step 3: In the final step, tap the “Cast” icon at the top-right of the screen and select your TV from the list to cast to.
Now you can enjoy randomly listen to your favorite songs on a more prominent display without getting bored.
Note:
You can also use other streaming devices like Firestick or Apple Airplay to cast YouTube on your Smart TV.
A Bouns Tip: How To Make a Music Video by Yourself?
We hope you have found appropriate solutions to shuffle your YouTube Playlist. Besides, supposing you are a music and YouTube lover, do you want to create videos with your favourite music? If yes, you can watch the video we have prepared for you. In this video, you will learn how to easily use a user-friendly video editor, Filmora, to make music videos!
In this comprehensive guide, we’ve provided a detailed step-by-step guide to show you how to shuffle YouTube playlists on your computer, mobile device, or Smart TV.
Hopefully, you’ve found this article informative and can now enjoy watching or listening to your favorite video/song in a random order in your YouTube playlist.
Also read:
- Mastering Insta-Video Sharing From YouTube
- [Updated] Discovering Youtube's Green Magic for Effective Filming
- 2024 Approved Eliminated Non-Display of Shorts Videos
- Essential List 7 Cost-Free Video Tags Extractors on YouTube for 2024
- Top 20 Essential YouTube Tips for Optimal Engagement
- From Conference Call to Online Showcase Google Meet on YouTube
- Guide to 10 Top-Ranked Entrepreneurial YouTube Platforms
- In 2024, Cost-Effective Recorder Selections for YouTube Vloggers
- In 2024, Accelerate Your YouTube Channel's Growth to 1K+
- Going Against Gravity Innovative Ways to Rewind YouTube Content
- In 2024, Creative Command Center Studio for YouTubers
- 2024 Approved Breaking Down the Monetization Barriers
- [New] Break Through Boundaries 15+ Best Free Video Starters
- MCB Video Graphics Pack for YouTube Channels
- [Updated] Captivate Audiences with Imaginative Thumbnails
- Elevate Video Popularity with Smart Thumbnails
- Monetizing YouTube Success Story with Sourav Joshi - Forecast 2024
- Cultivating Growth Selecting the Right Co-Stars for YouTube
- Boosting Revenue with YouTube Short Videos – A Complete Plan
- [Updated] 8 Premium Complimentary Streaming Media Processors
- Bringing in the Crowd The Top Ten Reasons and Fixes to Boost YouTube Views for 2024
- Quantifying the Fortune of Mr. Beast
- Elevate Engagement Enhancing Videos with Pro Editing Skills
- Quick Tips for Seamless Embedding of YouTube Playlists on a Website
- A Comprehensive Tour YouTube Creator Suite
- 2024 Approved Digital Influencers Galore Leading 10 by Subs
- [New] Elevating Video Revenue YouTube's Path
- Crafting Your Own YouTube Subscribe Shortcut
- Charting a Path to Monthly Earnings From YouTube
- 2024 Approved Analyzing View Count to Cash Out on YouTube
- Unlocking Your YouTube Monetization Potential Essential View Numbers
- Everything You Need to Know About the YouTube Shorts Fund for 2024
- [New] 3 Efficient Methods for Saving YouTube's Standardized Images
- [Updated] 2024 Approved Crafting Spectaculous 1080P Streams on FB Groups
- How to Stop My Spouse from Spying on My Vivo V30 | Dr.fone
- All About Factory Reset, What Is It and What It Does to Your Xiaomi 13T Pro? | Dr.fone
- Updated FCP 2023 The Ultimate Guide to Editing and Mixing Audio for 2024
- 4 Feasible Ways to Fake Location on Facebook For your Apple iPhone 12 mini | Dr.fone
- 10 Premier iOS Games, Fully Enjoyable without Wireless Connection
- Read This Guide to Find a Reliable Alternative to Fake GPS On Nokia C02 | Dr.fone
- Odin’s Children Ragnarok’s Reign for 2024
- Zoom Breakout Rooms for Newcomers Explored for 2024
- 2024 Approved Navigating the Vibrancy of TikTok's Anime The Art of Movement and Expression
- [New] In 2024, Cloaked Observer of Facebook Snapshots
- Pattern Locks Are Unsafe Secure Your Samsung Galaxy A54 5G Phone Now with These Tips
- Prank Your Friends! Easy Ways to Fake and Share Google Maps Location On Oppo Find X7 | Dr.fone
- Free electronic signature - For .docx file
- Instant Inspiration - Free Video Intro Kits
- 2024 Approved Troubleshoot Android Facebook Videos Not Playing
- Real-Time AI Voice Changer Revolutionizing Communication
- Updated Unleash the Power of Animated Photos Top 10 Tools and Techniques for 2024
- Title: "Cutting-Edge Methods to Reduce YouTube Video Size for 2024"
- Author: Kevin
- Created at : 2024-06-26 14:16:49
- Updated at : 2024-06-27 14:16:49
- Link: https://youtube-videos.techidaily.com/cutting-edge-methods-to-reduce-youtube-video-size-for-2024/
- License: This work is licensed under CC BY-NC-SA 4.0.
