
Creator Payment Frequency on YouTube Platform

Creator Payment Frequency on YouTube Platform
Any YouTuber can earn passive income monthly if they’ve reached the YouTube Partner Programme (YPP) requirement? Yes, the YouTube Partner Program gives creators access to start generating revenue with their channel once they reach a minimum of 1,000 YouTube subscribers and 4,000 watch ours in the last twelve months.
For anyone looking to start earning passive income via YouTube, but have the question, “Does YouTube pay monthly?” The answer is YES YouTube pays monthly. However, there are other things you must know if you want to start making money from YouTube. So, in this article, we will discuss all you need to know about how often YouTube pays and other YouTube monetization tips.
Part 1: How Often Does YouTube Pay
As mentioned earlier, YouTube pays monthly. It’s usually within the first 10-14 days of a new month (10th day or 14th day of a new month). However, to be able to receive your funds, you must reach the minimum threshold of your local currency as required by YouTube. For example, $100 for content creators within the United States.
Also, you must comply with the YouTube monetization policies and not be suspended by YouTube in the past month.
Part 2: How Does YouTube Pay – Typical Methods Used
Research shows that YouTube’s average pay rate is within the range of $0.01 to $0.03 per ad view. This means for every 1,000 ad views, a YouTuber could earn $18, while for every 1,000 video views, you could earn $3 to $5. You might ask “Does YouTube pay creators per view?’ Well, the answer is NO, YouTube doesn’t pay creators per view. They pay per monetized view.
However, to get started making money per monetized views, you need to join the YouTube Partnership Program. As mentioned earlier, YouTube Partner Program (YPP) gives creators access to start generating revenue with their channel once they reach a minimum of 1,000 YouTube subscribers and 4,000 watch ours in the last twelve months. It gives creators access to different monetization features like advertising, merchandise sales, fan funding, and lots more.
● Earn Money Through Ad Views
Advertisers pay for YouTube ads based on clicks and impressions, and YouTube monetizes creators’ videos by displaying these ads in different advertising formats like pre-roll, display, etc. So, once these ads display in your video and your subscribers click on them, you get paid.
As mentioned earlier, YouTube’s average pay rate is within the range of $0.01 to $0.03 per ad view, while for every 1,000 video views, you could earn $3 to $5. But, out of the money earned, YouTube pays creators 55% and keeps the remaining 45%.
With Ads, you can earn money based on every 1,000 views get from your video and the number of clicks you get on ads placed on your video. However, for ads to be displayed on your videos, you must adhere to YouTube’s creator guidelines, as videos that contain foul language, violence, adult content, and other unwanted subjects won’t have ads displayed on them.
The image below displays the requirement to start displaying ads on your YouTube videos;

Part 3: More Opportunities To Earn More Money From YouTube
Besides ads, there are other ways to monetize your YouTube channel. You could also earn through a corporate sponsorship from brands, selling your products, etc. Keep reading to find out more ways to earn money from YouTube.
1. Affiliate Marketing

You might have come across YouTube videos where the creators talk about their favorite brands and add links to the platform for the brand. Well, that’s a form of affiliate marketing.
YouTube Affiliate marketing involves a creator reviewing a product like makeup, digital cameras, mobile phone, and lots more including services in their video. Plus, the links to the recommended product or services are usually added to the description of the video. So, once a viewer clicks on the link and purchases the product or service, the YouTuber gets a certain percentage of the money.
If you get an affiliate link to a product on a platform, you can create a video relating to that product, then in your video description, you’ll add the affiliate link there. So, when anyone purchases the product using your affiliate link, you’ll get your percentage off the price they paid. On average, companies will be willing to pay within 5% to 50% of the purchase price.
2. Brand Sponsorship

The fact YouTube is the most used video-playing platform makes it a great spot for businesses and organizations to promote their product or services. So, once you grow your YouTube subscribers to a certain level, you’ll receive emails from companies and brands to partner with you to sponsor their products or service. Honestly, there are lots of brands who will be happy to pay you to promote their products/services,
Research shows that sponsorship deals are usually within the range of $200 to over $10k. It all depends on how the brand/organization is willing to cooperate. It could be pre-roll, post-roll, etc.
Also, your YouTube channel data statistics such as total subscribers, average video impressions in the past months, likes, comments, and more are other factors that will determine how much brands will offer you to seal a sponsorship deal.
3. Selling Own Products or Services

Selling your products or services is another great way to monetize your YouTube channel. You could sell your merch, gaming tools, and other things related to the theme of the content you create for your loyal fans to purchase.
If you don’t have a product, you could charge your viewers for exclusive content, sell online courses for dropshipping, sell cryptocurrency trading e-books, etc. The only thing is you need to have a large following to earn well from this YouTube monetization option.
Part 4: More FAQs About How Much YouTubers Make
At this point, you should already have a brief idea of how YouTube monetization works. However, if you still want to discover more information, keep reading to check out more FAQs on how much YouTubers make.
1. Who is The Richest YouTuber?
The richest YouTuber as of 2021 is Mr. Beast. He has made up to $54 million in revenue from his YouTube channel.
2. Do YouTubers Get Paid Well?
The rate at which YouTubers get paid depends on certain factors like the audience they aim for, how frequently they publish the nature of their material, and lots more. As we mentioned in the article, the average pay rate on YouTube is within the range of $0.01 to $0.03 per ad view, while for every 1,000 video views, you could earn $3 to $5. Also, research shows that the highest-paying YouTube category is the “Make Money Online” category with an average CPM of $13.52.
3. How much does a YouTuber make a year?
Honestly, there’s no specific answer to how much a YouTuber makes a year. However, research shows that an average YouTuber makes up to $60,000 annually.
Final Words
As you can see, there are different ways you could monetize your YouTube channel. Be it via affiliate marketing, ads, selling products, or more. Regardless of how you want to monetize your YouTube channel, the article has covered the basics you must know to make the process easier.
Free Download For Win 7 or later(64-bit)
Free Download For macOS 10.14 or later
Part 1: How Often Does YouTube Pay
As mentioned earlier, YouTube pays monthly. It’s usually within the first 10-14 days of a new month (10th day or 14th day of a new month). However, to be able to receive your funds, you must reach the minimum threshold of your local currency as required by YouTube. For example, $100 for content creators within the United States.
Also, you must comply with the YouTube monetization policies and not be suspended by YouTube in the past month.
Part 2: How Does YouTube Pay – Typical Methods Used
Research shows that YouTube’s average pay rate is within the range of $0.01 to $0.03 per ad view. This means for every 1,000 ad views, a YouTuber could earn $18, while for every 1,000 video views, you could earn $3 to $5. You might ask “Does YouTube pay creators per view?’ Well, the answer is NO, YouTube doesn’t pay creators per view. They pay per monetized view.
However, to get started making money per monetized views, you need to join the YouTube Partnership Program. As mentioned earlier, YouTube Partner Program (YPP) gives creators access to start generating revenue with their channel once they reach a minimum of 1,000 YouTube subscribers and 4,000 watch ours in the last twelve months. It gives creators access to different monetization features like advertising, merchandise sales, fan funding, and lots more.
● Earn Money Through Ad Views
Advertisers pay for YouTube ads based on clicks and impressions, and YouTube monetizes creators’ videos by displaying these ads in different advertising formats like pre-roll, display, etc. So, once these ads display in your video and your subscribers click on them, you get paid.
As mentioned earlier, YouTube’s average pay rate is within the range of $0.01 to $0.03 per ad view, while for every 1,000 video views, you could earn $3 to $5. But, out of the money earned, YouTube pays creators 55% and keeps the remaining 45%.
With Ads, you can earn money based on every 1,000 views get from your video and the number of clicks you get on ads placed on your video. However, for ads to be displayed on your videos, you must adhere to YouTube’s creator guidelines, as videos that contain foul language, violence, adult content, and other unwanted subjects won’t have ads displayed on them.
The image below displays the requirement to start displaying ads on your YouTube videos;

Part 3: More Opportunities To Earn More Money From YouTube
Besides ads, there are other ways to monetize your YouTube channel. You could also earn through a corporate sponsorship from brands, selling your products, etc. Keep reading to find out more ways to earn money from YouTube.
1. Affiliate Marketing

You might have come across YouTube videos where the creators talk about their favorite brands and add links to the platform for the brand. Well, that’s a form of affiliate marketing.
YouTube Affiliate marketing involves a creator reviewing a product like makeup, digital cameras, mobile phone, and lots more including services in their video. Plus, the links to the recommended product or services are usually added to the description of the video. So, once a viewer clicks on the link and purchases the product or service, the YouTuber gets a certain percentage of the money.
If you get an affiliate link to a product on a platform, you can create a video relating to that product, then in your video description, you’ll add the affiliate link there. So, when anyone purchases the product using your affiliate link, you’ll get your percentage off the price they paid. On average, companies will be willing to pay within 5% to 50% of the purchase price.
2. Brand Sponsorship

The fact YouTube is the most used video-playing platform makes it a great spot for businesses and organizations to promote their product or services. So, once you grow your YouTube subscribers to a certain level, you’ll receive emails from companies and brands to partner with you to sponsor their products or service. Honestly, there are lots of brands who will be happy to pay you to promote their products/services,
Research shows that sponsorship deals are usually within the range of $200 to over $10k. It all depends on how the brand/organization is willing to cooperate. It could be pre-roll, post-roll, etc.
Also, your YouTube channel data statistics such as total subscribers, average video impressions in the past months, likes, comments, and more are other factors that will determine how much brands will offer you to seal a sponsorship deal.
3. Selling Own Products or Services

Selling your products or services is another great way to monetize your YouTube channel. You could sell your merch, gaming tools, and other things related to the theme of the content you create for your loyal fans to purchase.
If you don’t have a product, you could charge your viewers for exclusive content, sell online courses for dropshipping, sell cryptocurrency trading e-books, etc. The only thing is you need to have a large following to earn well from this YouTube monetization option.
Part 4: More FAQs About How Much YouTubers Make
At this point, you should already have a brief idea of how YouTube monetization works. However, if you still want to discover more information, keep reading to check out more FAQs on how much YouTubers make.
1. Who is The Richest YouTuber?
The richest YouTuber as of 2021 is Mr. Beast. He has made up to $54 million in revenue from his YouTube channel.
2. Do YouTubers Get Paid Well?
The rate at which YouTubers get paid depends on certain factors like the audience they aim for, how frequently they publish the nature of their material, and lots more. As we mentioned in the article, the average pay rate on YouTube is within the range of $0.01 to $0.03 per ad view, while for every 1,000 video views, you could earn $3 to $5. Also, research shows that the highest-paying YouTube category is the “Make Money Online” category with an average CPM of $13.52.
3. How much does a YouTuber make a year?
Honestly, there’s no specific answer to how much a YouTuber makes a year. However, research shows that an average YouTuber makes up to $60,000 annually.
Final Words
As you can see, there are different ways you could monetize your YouTube channel. Be it via affiliate marketing, ads, selling products, or more. Regardless of how you want to monetize your YouTube channel, the article has covered the basics you must know to make the process easier.
Free Download For Win 7 or later(64-bit)
Free Download For macOS 10.14 or later
The Creative Edge: Filmmaker’s Blueprint for Captivating Anime Subscribers (Filmora)
How to Make Your YouTube Animated Subscribe Button Easily With Filmora

Richard Bennett
Mar 27, 2024• Proven solutions
The main goal of every content creator is to increase its audience to expand its reach and views. To do so, it’s essential to provide something unique and different to the viewer. Without providing them the content they are looking for, it is impossible to grow your channel and reach. Once your content is ready and you are getting many views, it is essential to make these potential viewers your permanent viewers. The animated subscribe button will help you achieve this goal. While your viewers are watching your videos, you must remind them about subscribing to your channel for receiving such incredible content in the future. Subscribe animation plays a vital role in converting your viewers into subscribers.
There are so many platforms on the internet from where you can get Youtube subscribe button animation free, and you can also purchase these subscribe png gifs. But creating your own animated subscribe button can make you stand out from the crowd and make your videos unique and exclusive. Because it enables you to design it the way you want according to your brand, so, let’s create your own subscribe animation using Wondershare Filmora .
Step-By-Step guide
Step 1: To get started,open Filmora X. On your upper left corner, click on the “Sample Colors,” select the Green color and drag it to Video Track into the timeline. We are using a Green background to easily remove it using the green screen feature in Filmora to use it in our future projects after exporting it, without creating it again. Adjust the duration of this track according to your requirement. In my case, I am trying to make an animated subscribe button of 5 seconds.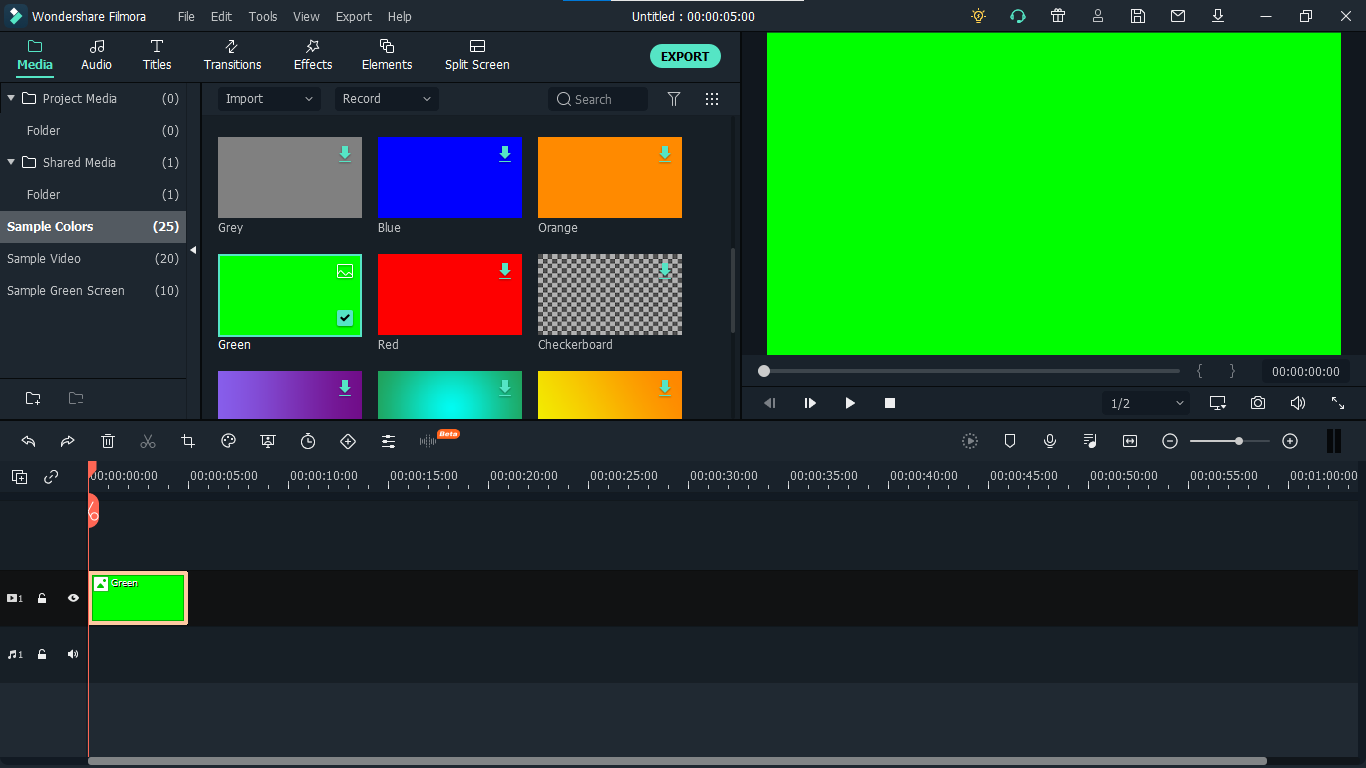
Step 2: Lock this track by clicking on the lock icon to work on subscribe animation without disturbing the background easily.
Step 3: Now it’s time to design the subscribe png gif. Go to the Sample colors again and drag the red color into the time above the green background.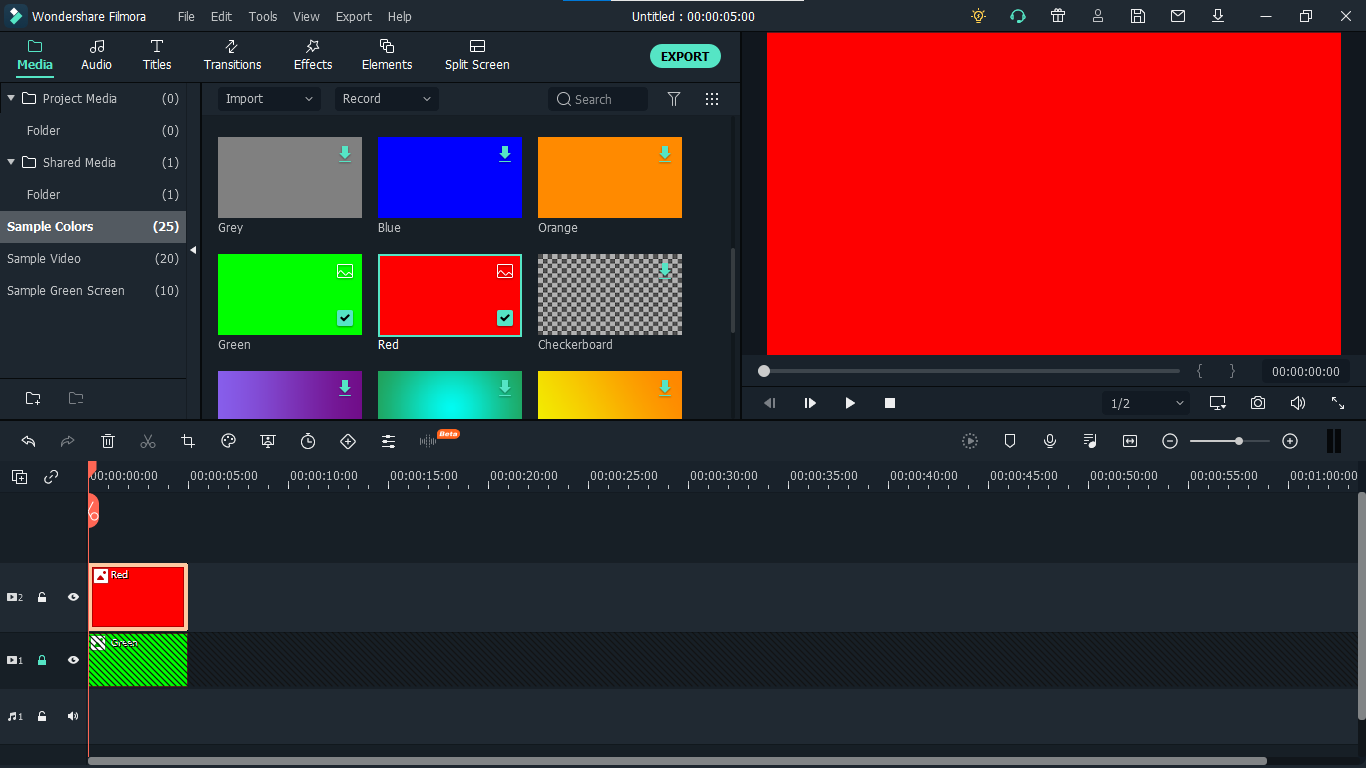
Step 4: Double click on the red color in the timeline and adjust its size. Make it look like a subscribe button that is a rectangle and place it at the bottom center of the background. You can put it anywhere you want it to appear in your future videos.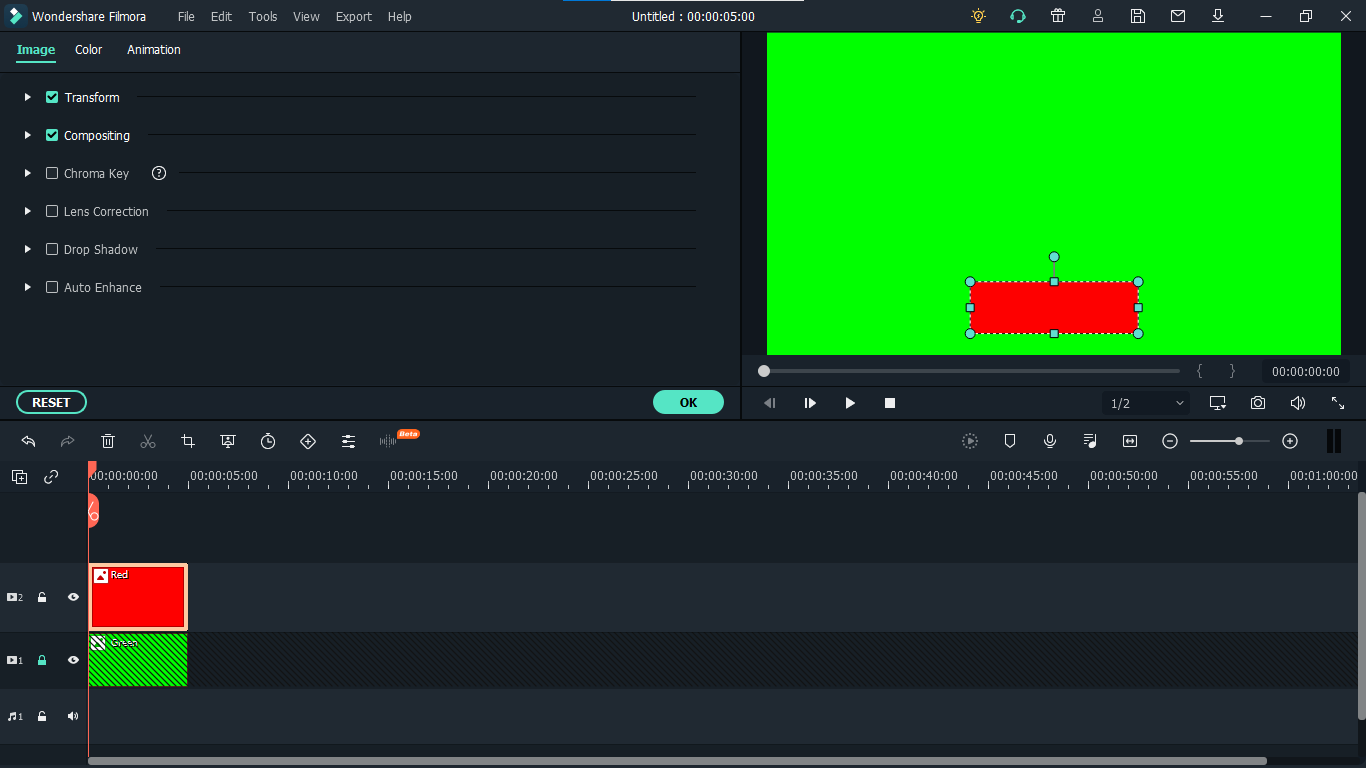
Step 5: Now, let’s add Subscribe text into the button. Go to the Title and select any style that you like. “Basic 6” will work perfectly fine for this purpose. Drag and drop it into the timeline above all tracks.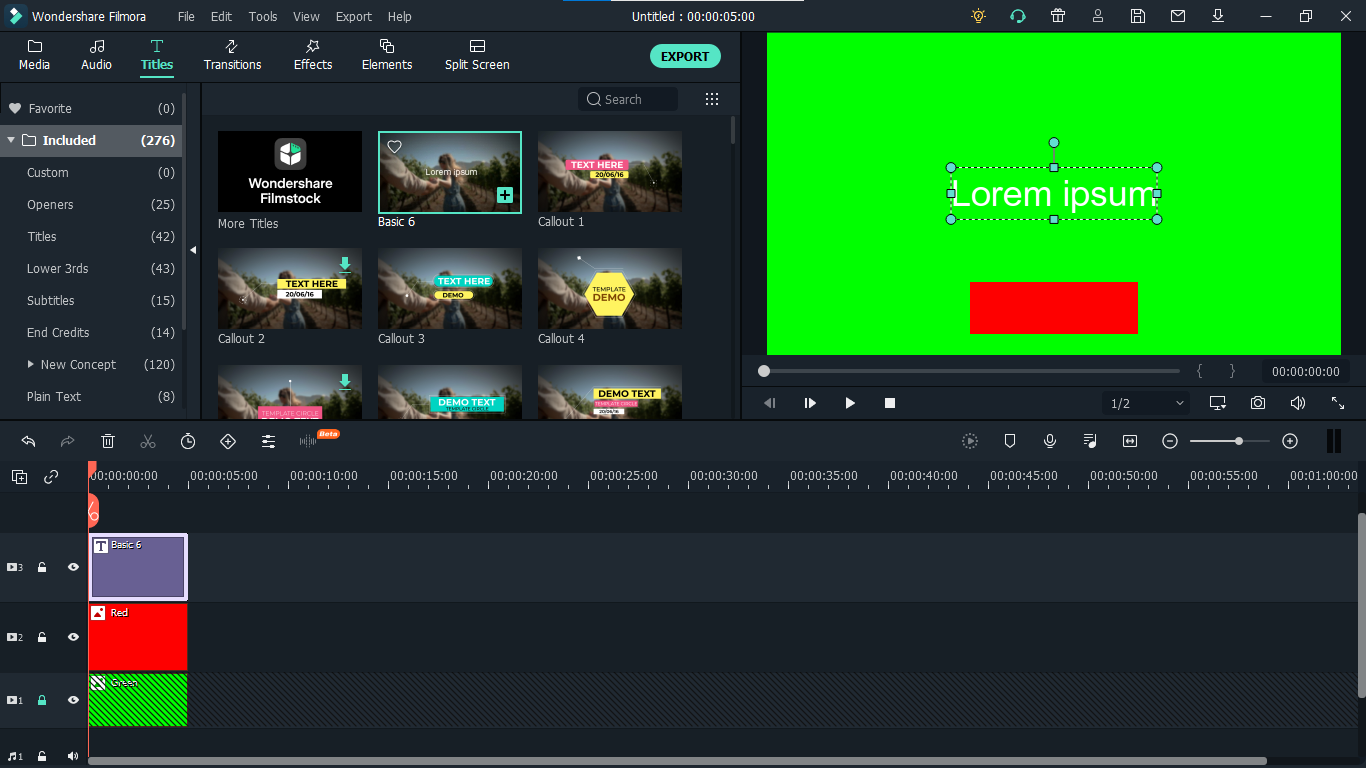
Step 6: Double click on the Title on the timeline and edit it with “Subscribe” and place it under the red rectangle and click OK.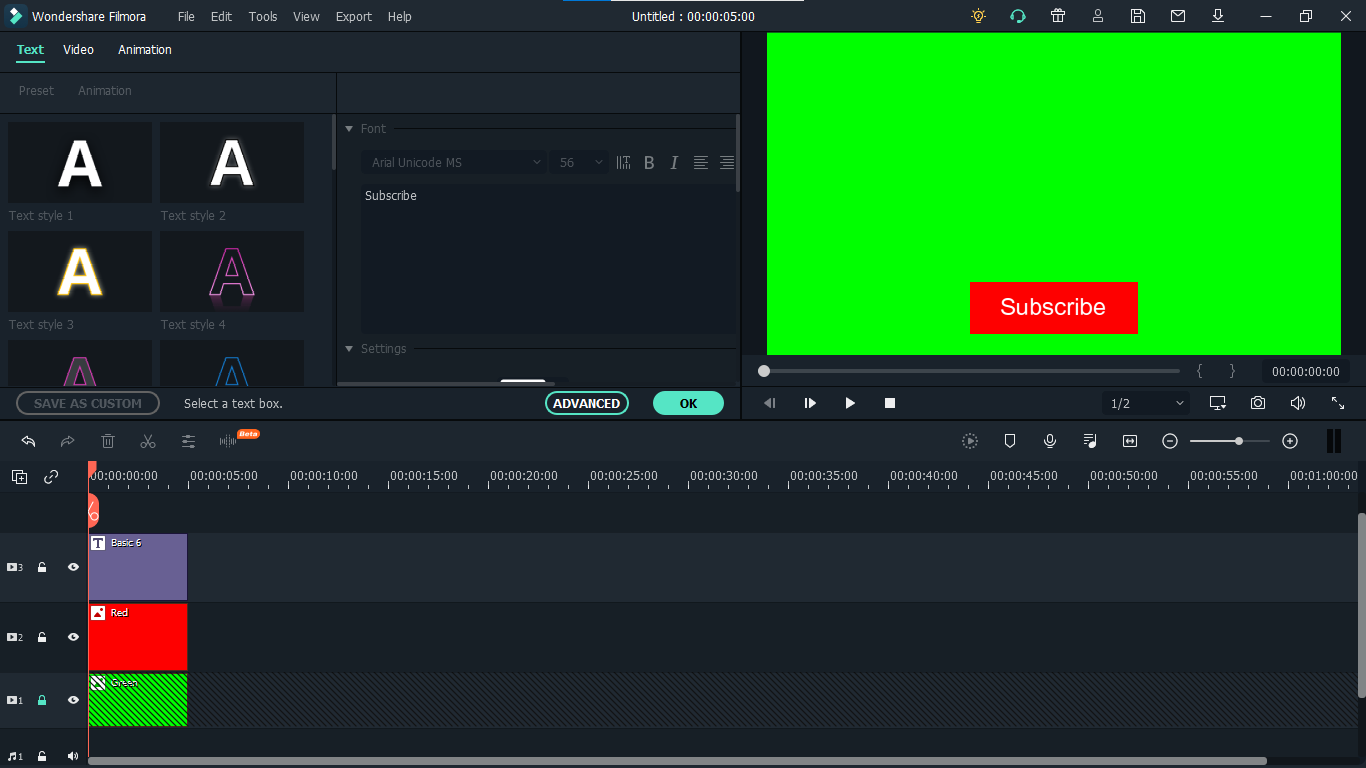
Step 7: We have put a cursor that can click on the animated subscribe button. You can use Google Search to find a transparent cursor. Make sure to save it in png format. Download it and import it into Filmora.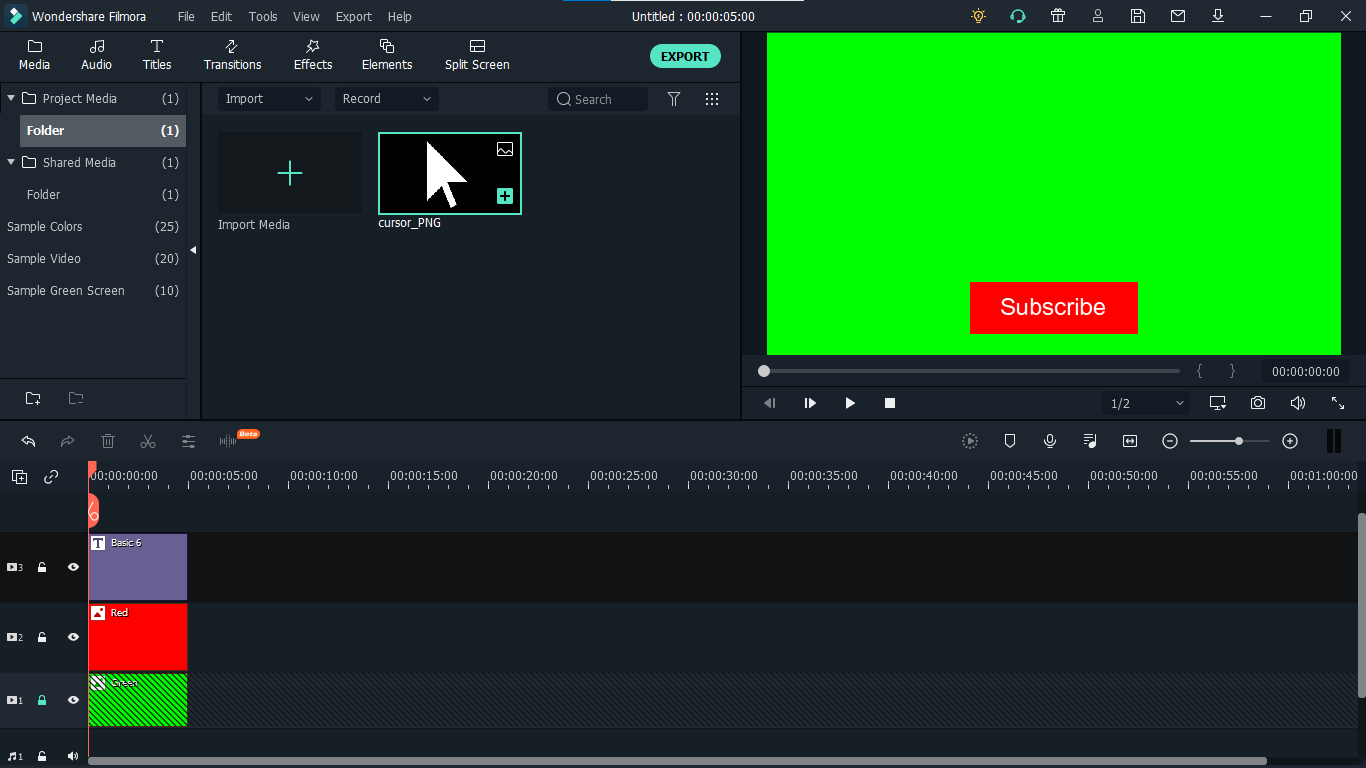
Step 8: Drag and drop the cursor into the timeline and place it above all the other three tracks to make it prominent. Adjust the size of the cursor place it on the Subscribe button where you want it to appear.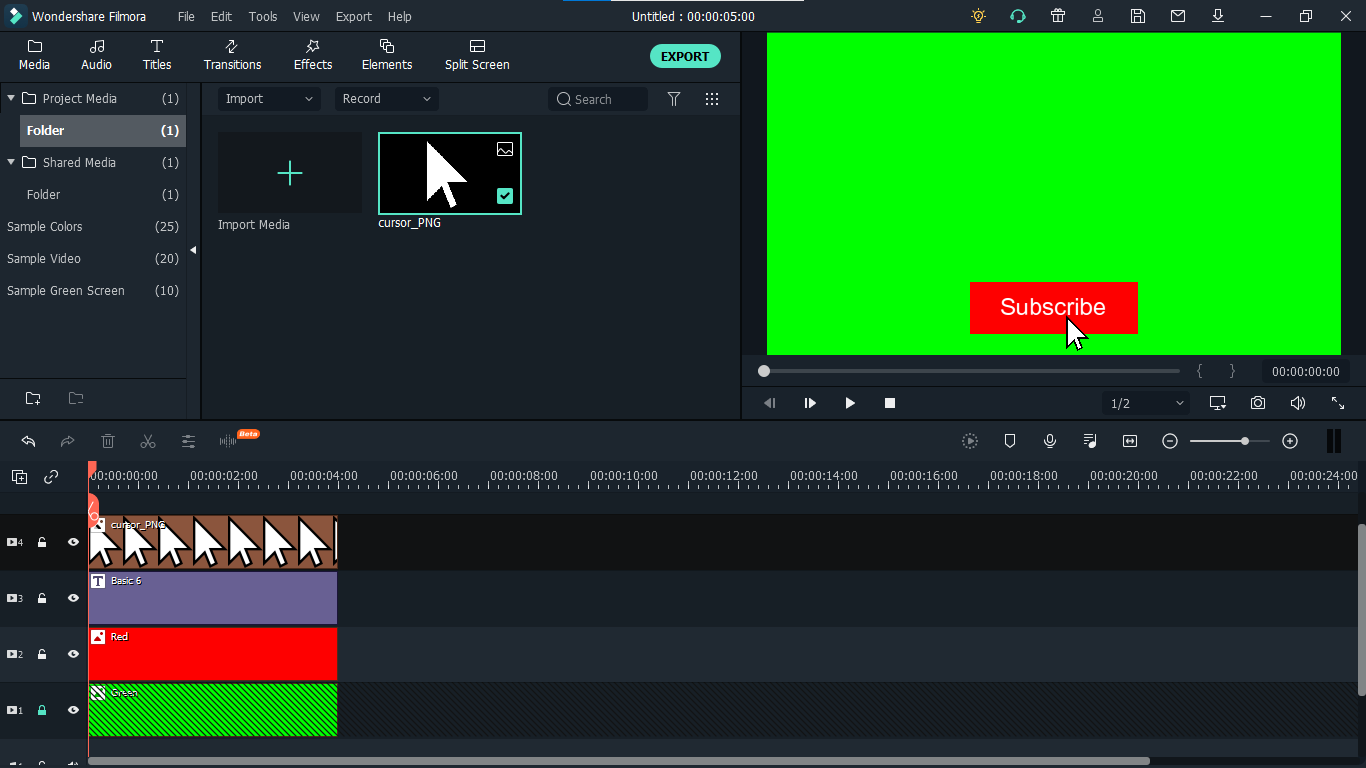
Step 9: Now, it’s time to animate the design using keyframes. First of all, let’s animate the red rectangle. Double click on the red color on the timeline. Go to the ‘Animation’ tab and then click ‘Customize.’ Move to the 1 second in the timeline and click ‘Add.’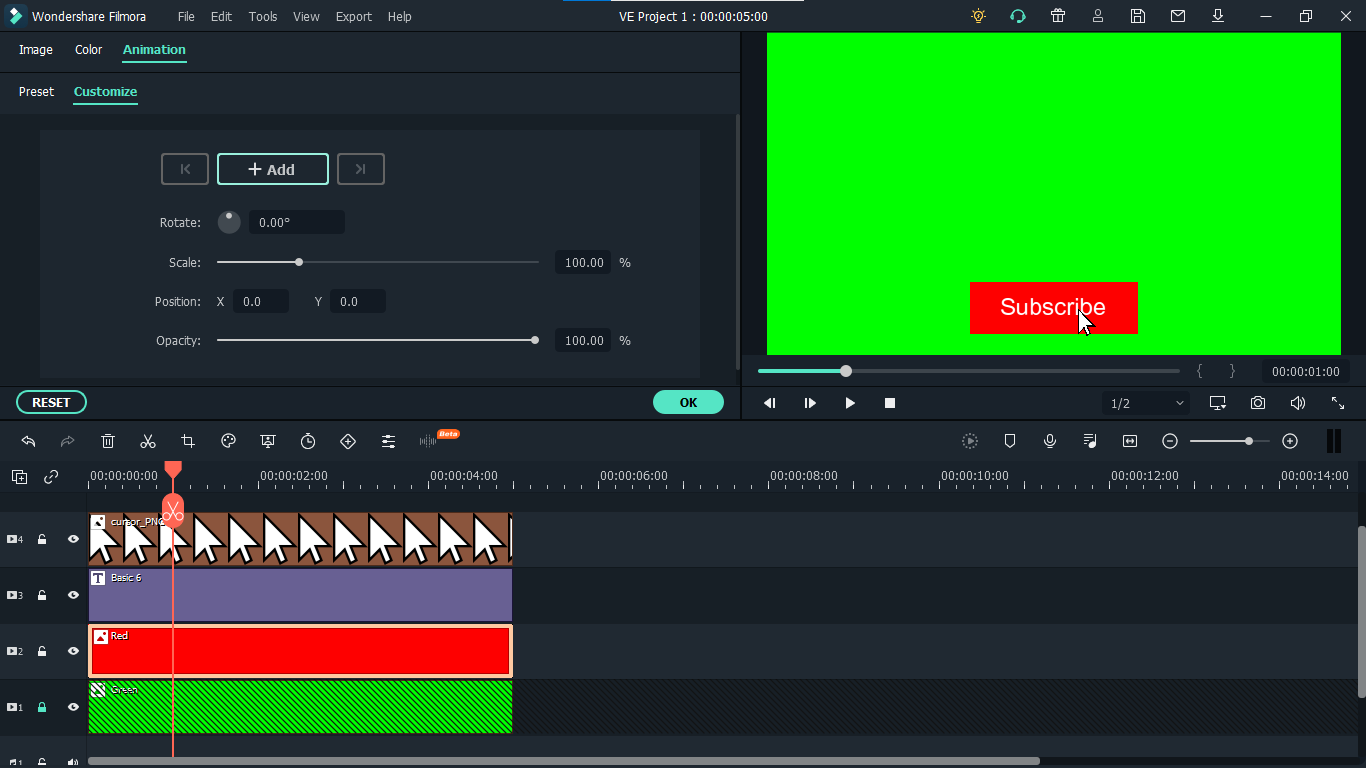
Step 10: Now go back to the beginning in the timeline and adjust the scale to 0%. It will make the rectangle pop up when you play the clip.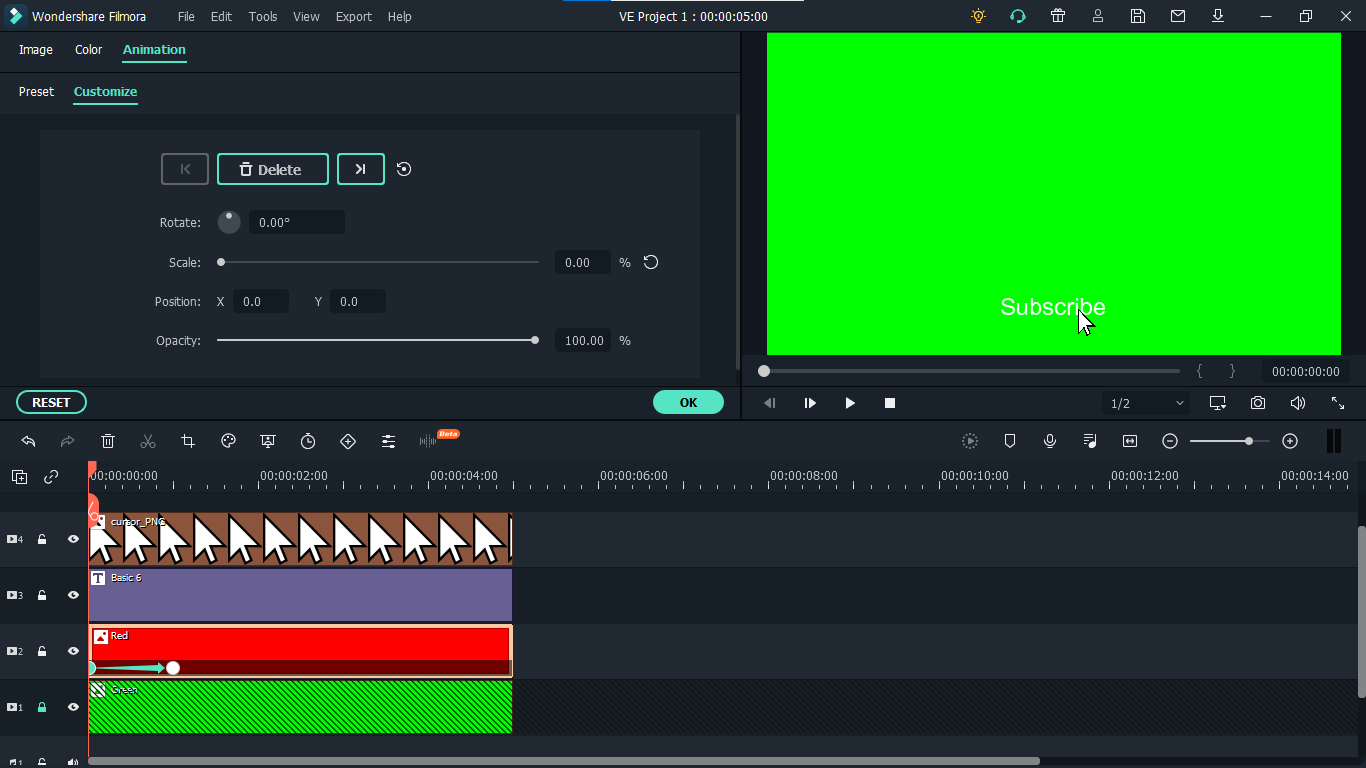
Step 11: Text needs to be animated as well to match it with the rectangle. Double click on the text in the timeline and click ‘ADVANCED.’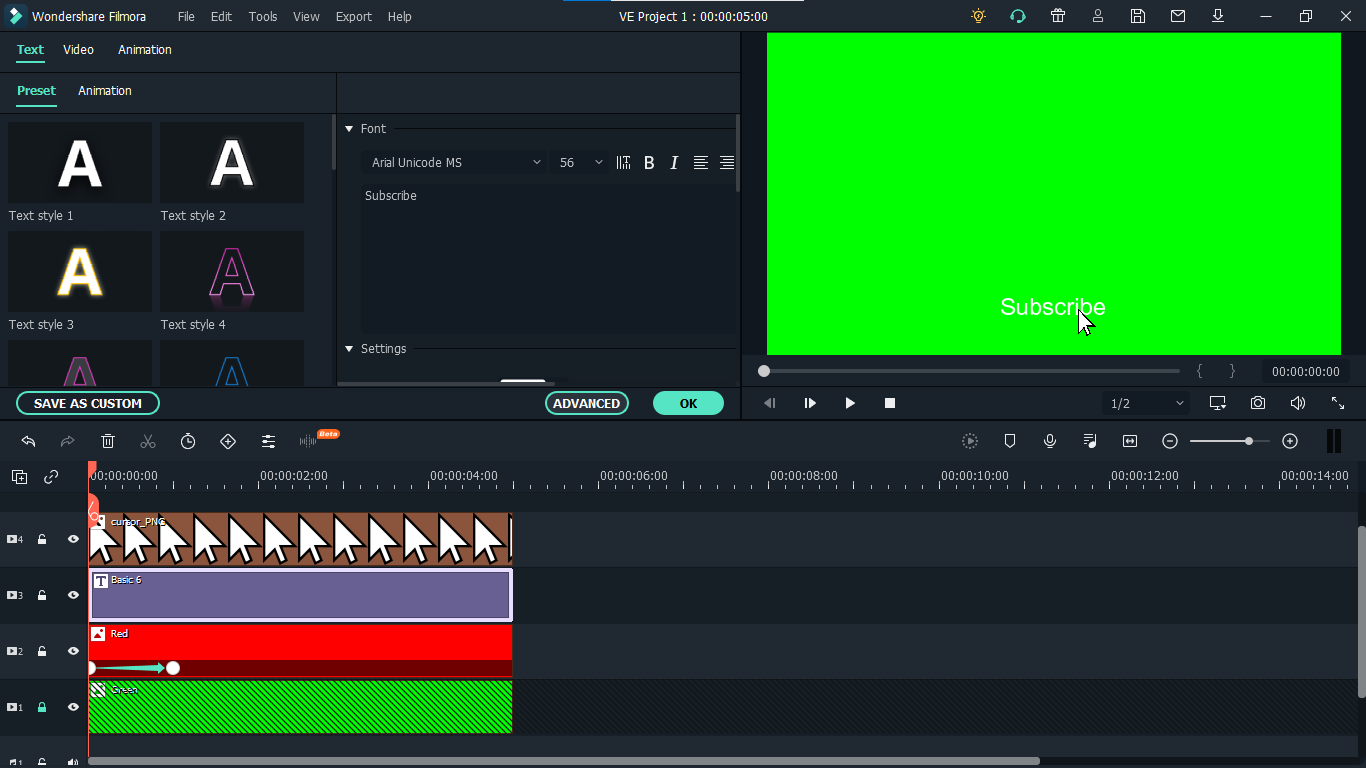
Step 12: In this Advance text editor, go to the ‘Animation’ tab and select any animation that you like. On the timeline under the preview screen, adjusts the dark areas according to the time you set on the rectangle, which was 1 second. We want the text to appear on the screen in 1 second, like the rectangle. Also, adjust the ending time when you want the text to disappear again. We have set it on 4 seconds. Which means it will start to fade after 4 seconds.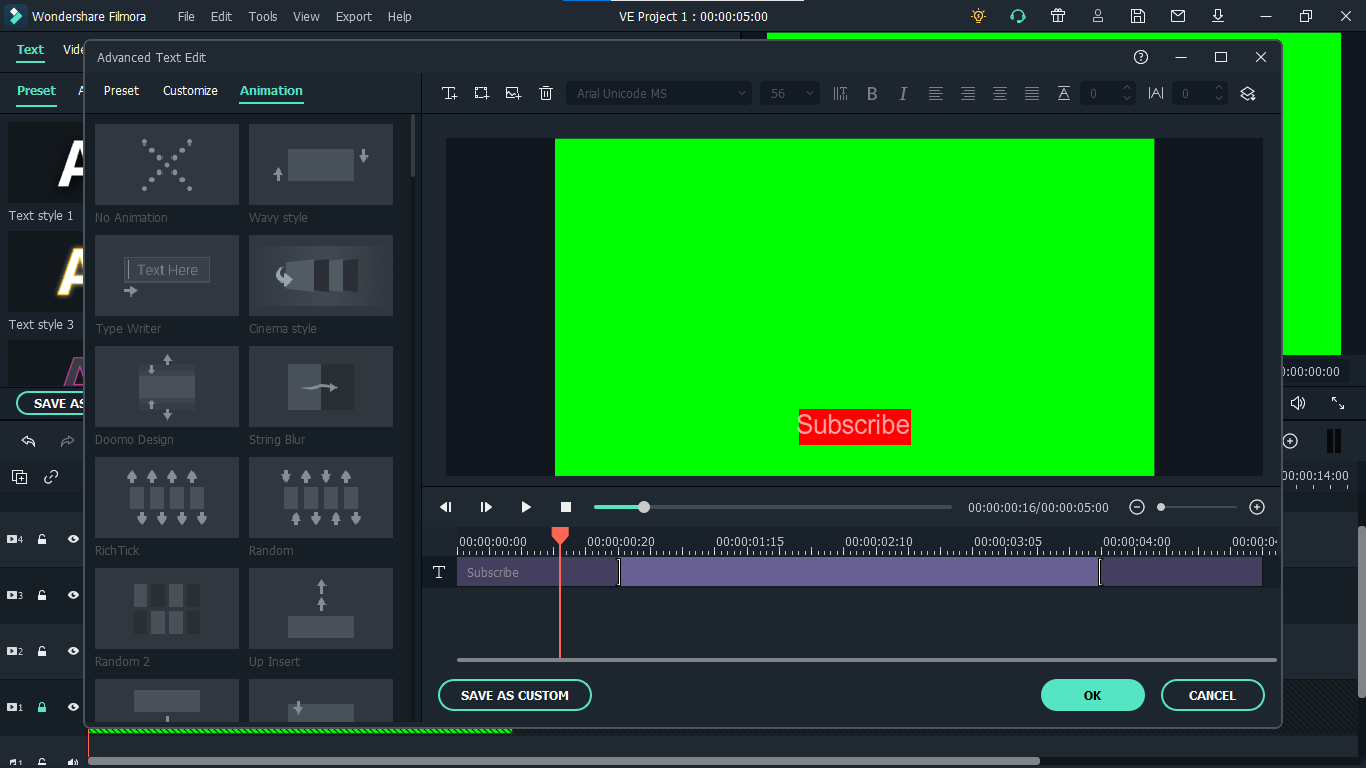
Step 13: Now, to animate the mouse cursor, we will use the same process we used for a rectangle that is key framing. Double click on the cursor track on the timeline and move the time on your timeline to a point when you want the cursor to appear. Now add a key frame by clicking ‘Add’.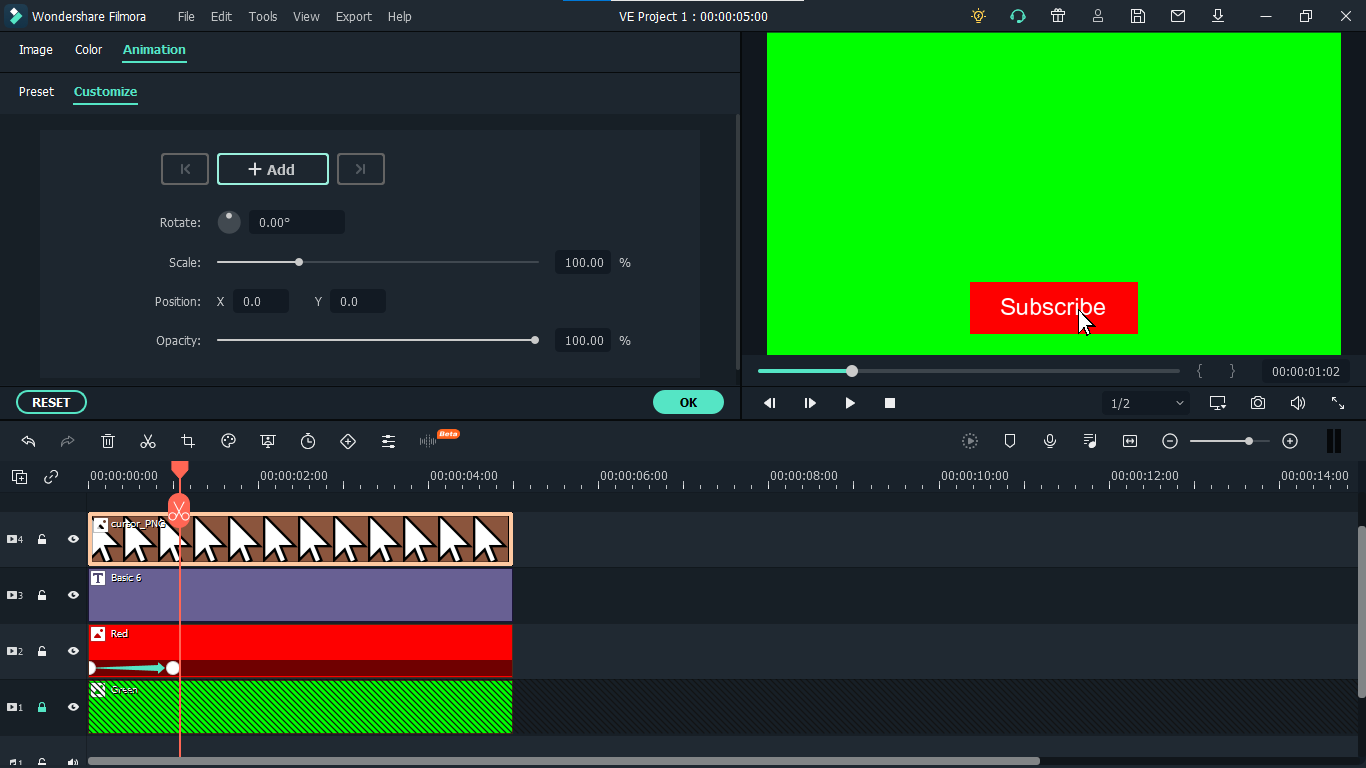
Step 14: Now jump back to a point in your timeline, when the cursor will start appearing from outside the screen. Move the cursor outside the screen from where you want it to start moving toward the subscribe animation.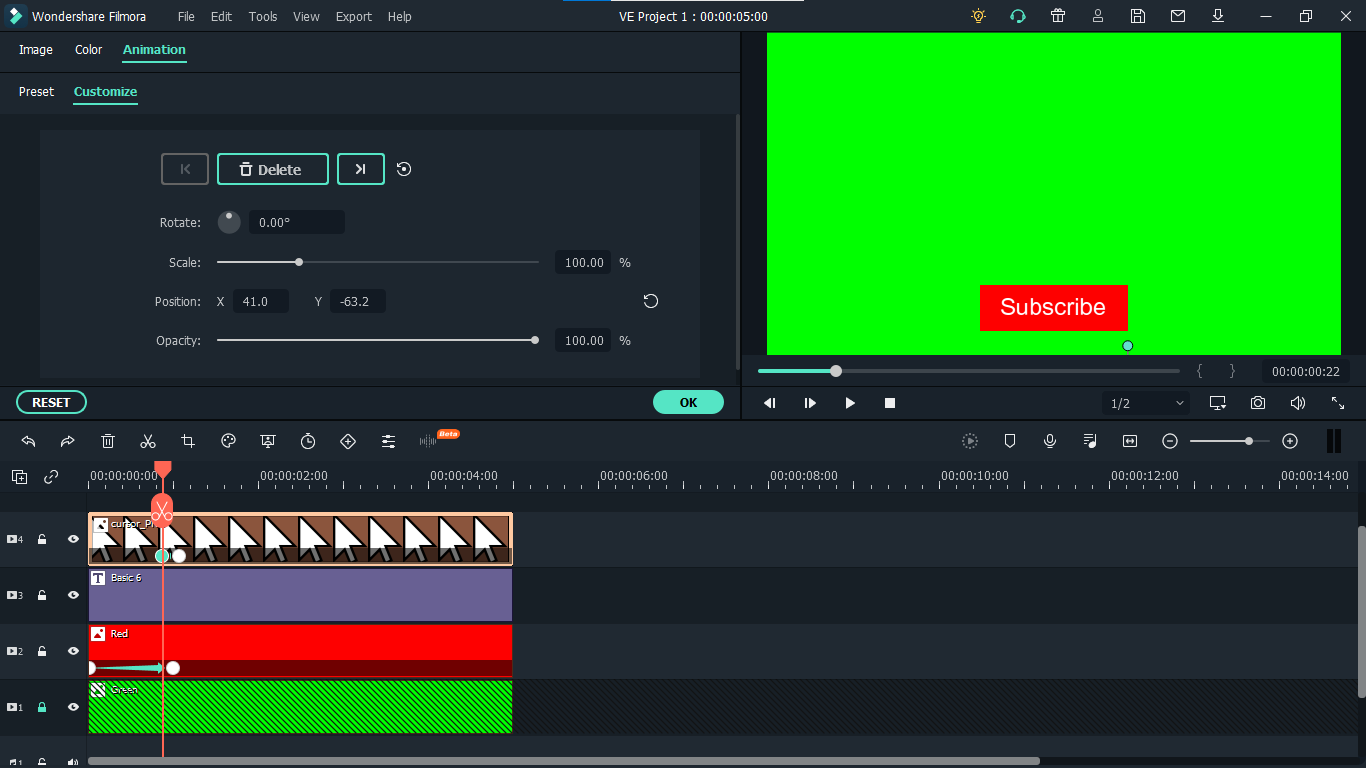
Step 15: To animate the click of the cursor, move ahead a little bit into your timeline and scale down the cursor to around 70%. Move it a little further and scale it up to 100%.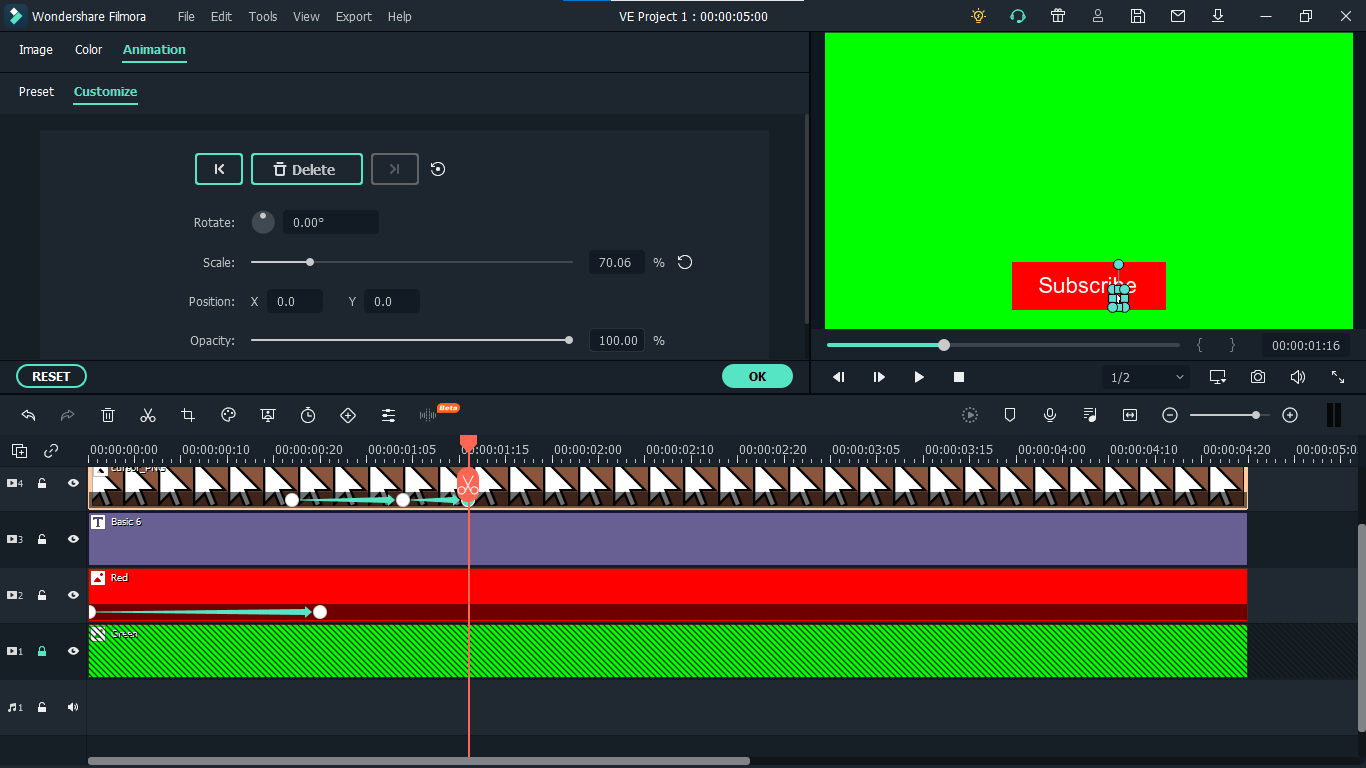
Step 16: You can add the sound of mouse click to make it more realistic. You can find this sound anywhere on the internet. Download it and import it into Filmora. Now place it into the timeline where it can match the movement of the cursor.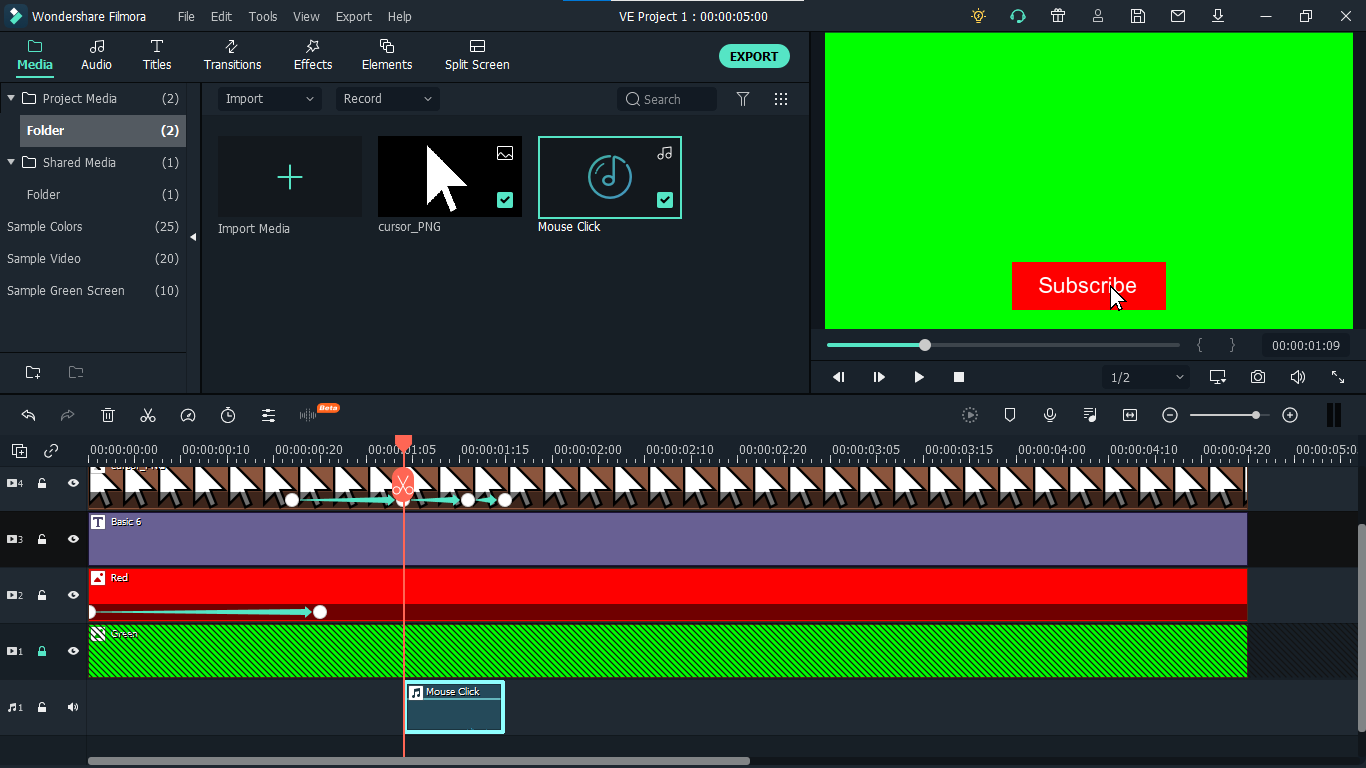
Step 17: Now it’s time to make this subscribe animation button disappear. Move forward into the time to the end, at around 4 seconds. Double click on the red button in the timeline and add a key frame at its actual scale.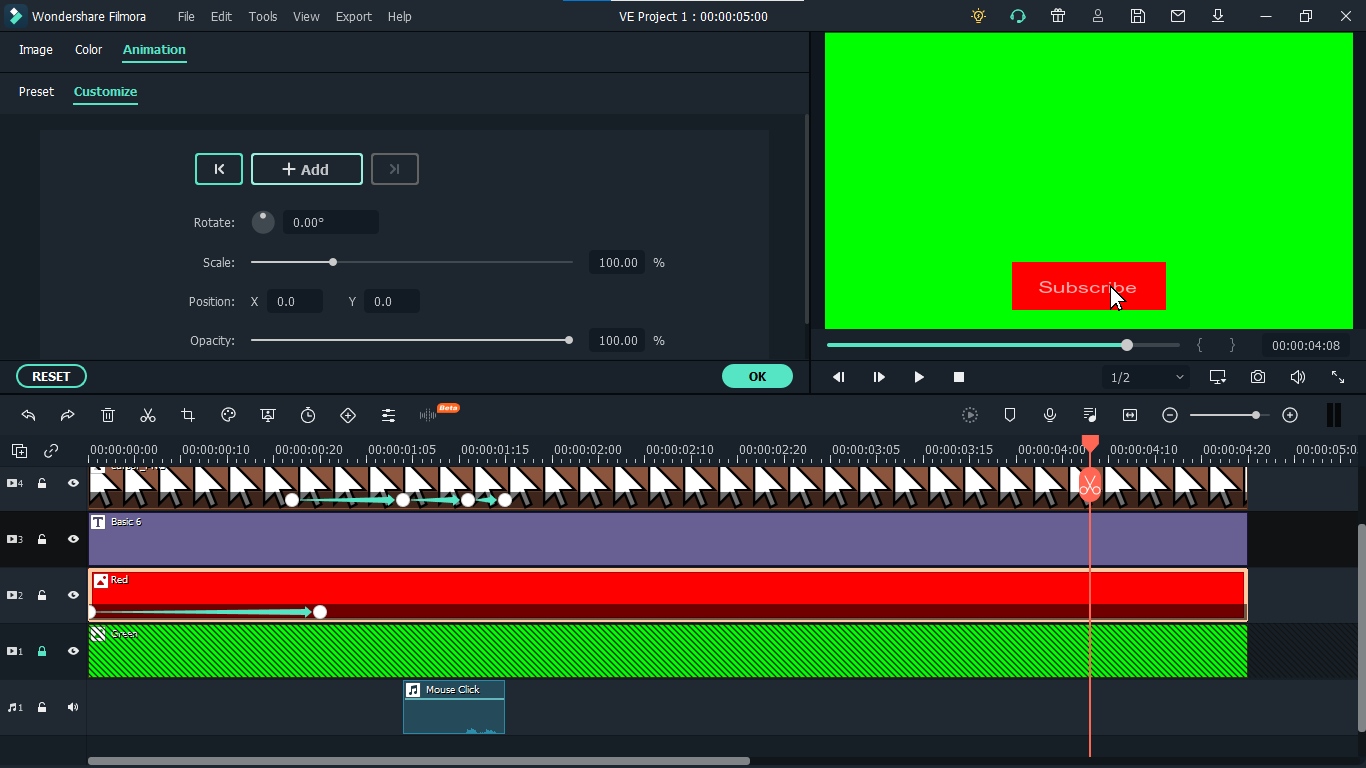
Step 18: After that, move further in the timeline to the end and make its scale 0. It will make it disappear.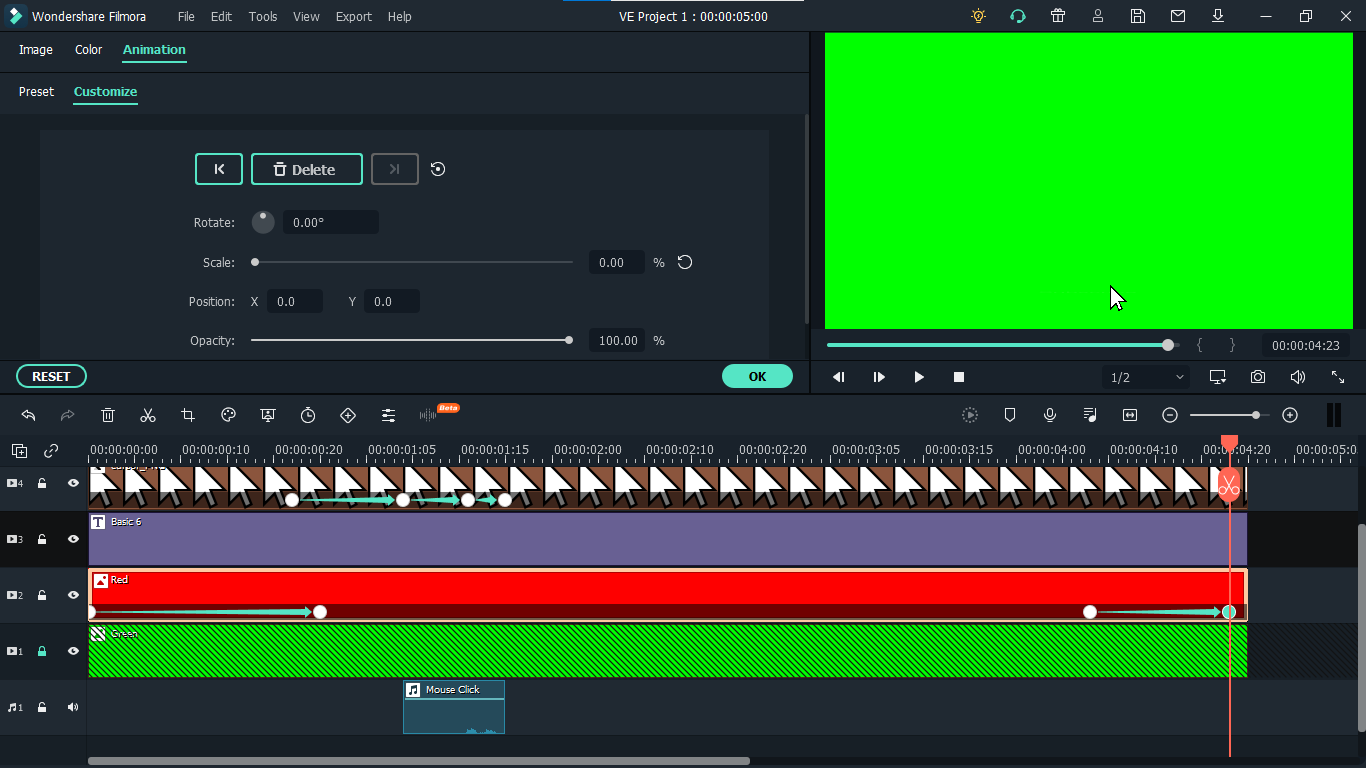
Step 19: Do the same with the cursor. Double click on the cursor in the time and add a key frame at its actual position.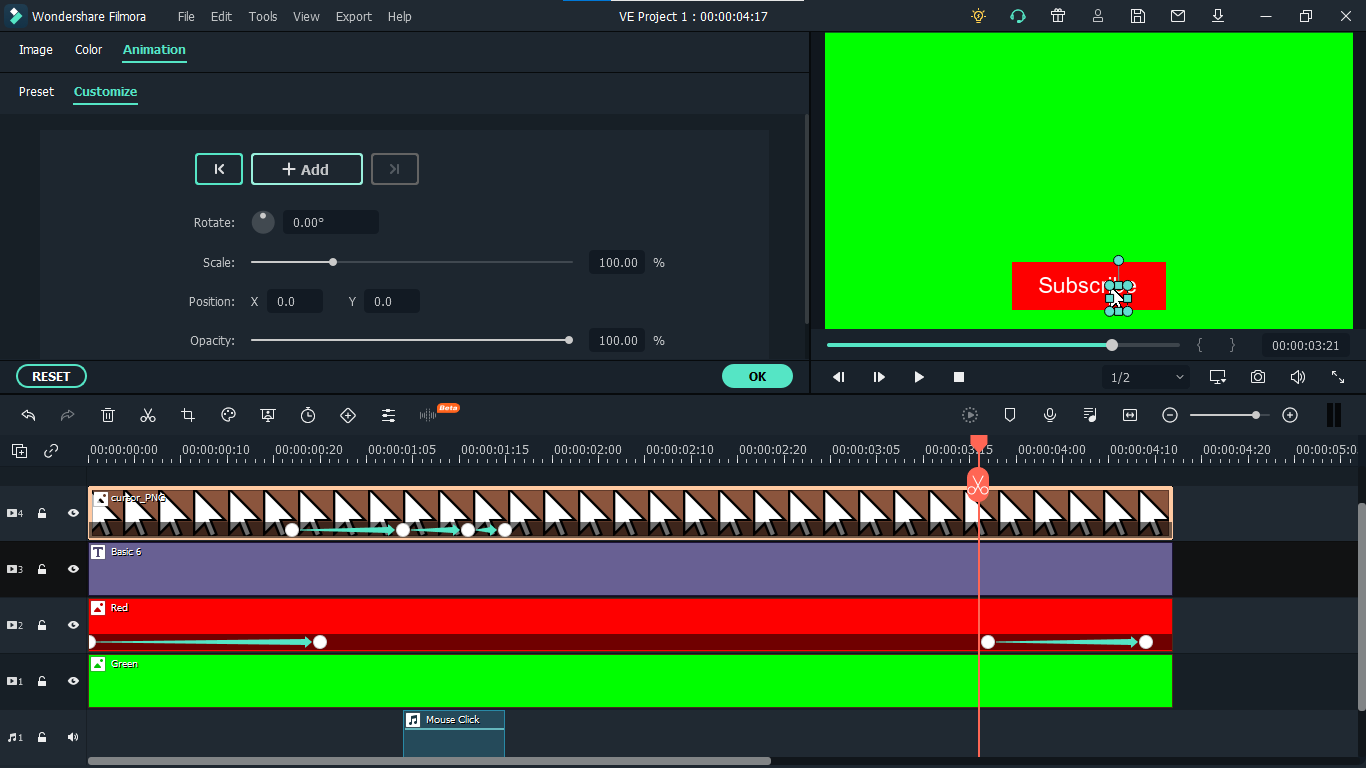
Step 20: Move ahead when you want it to disappear. Move the cursor out of the screen and click ‘OK’.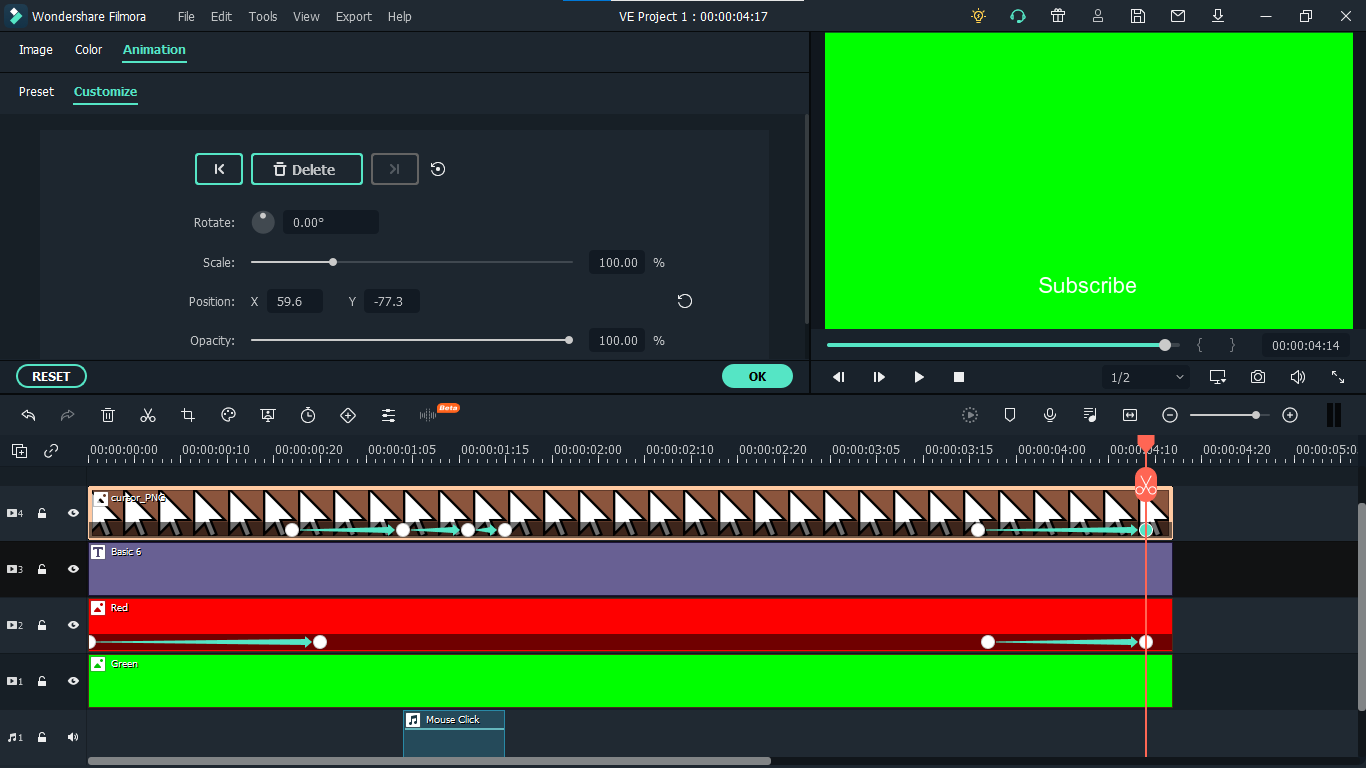
Step 21: Your Subscribe png gif is ready to be exported and used in your videos. Click on export and choose from various formats and options to choose from while exporting it.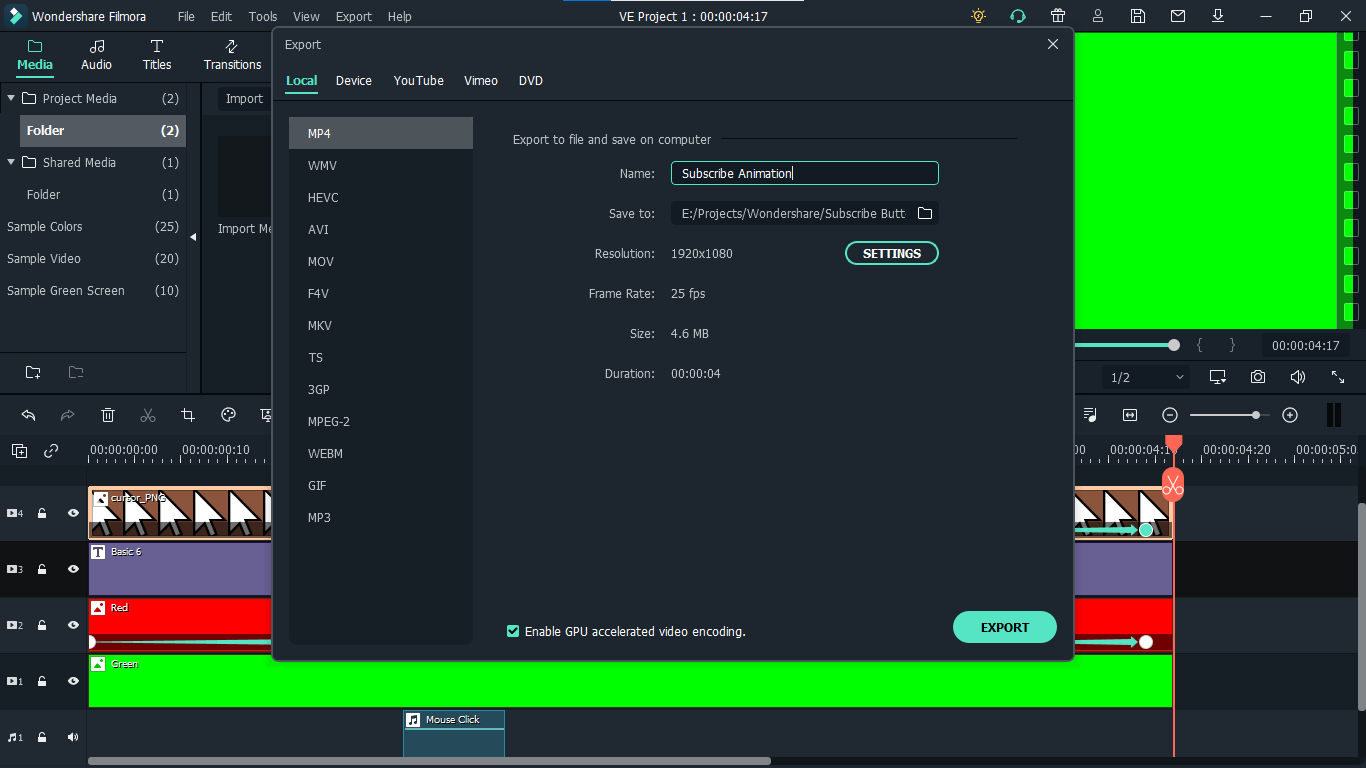
You may also like: How to Get People to Subscribe Channel
Conclusion:Your own Animated Subscribe Button is ready to be used in your future videos and projects. This is a ready-to-use subscribe button that can be easily used using the green screen effect in Filmora. Just import the clip, remove the green screen, and you are good to go. You can also customize this Subscribe Animation using your channel and more. Keep experimenting with new things using Filmora.

Richard Bennett
Richard Bennett is a writer and a lover of all things video.
Follow @Richard Bennett
Richard Bennett
Mar 27, 2024• Proven solutions
The main goal of every content creator is to increase its audience to expand its reach and views. To do so, it’s essential to provide something unique and different to the viewer. Without providing them the content they are looking for, it is impossible to grow your channel and reach. Once your content is ready and you are getting many views, it is essential to make these potential viewers your permanent viewers. The animated subscribe button will help you achieve this goal. While your viewers are watching your videos, you must remind them about subscribing to your channel for receiving such incredible content in the future. Subscribe animation plays a vital role in converting your viewers into subscribers.
There are so many platforms on the internet from where you can get Youtube subscribe button animation free, and you can also purchase these subscribe png gifs. But creating your own animated subscribe button can make you stand out from the crowd and make your videos unique and exclusive. Because it enables you to design it the way you want according to your brand, so, let’s create your own subscribe animation using Wondershare Filmora .
Step-By-Step guide
Step 1: To get started,open Filmora X. On your upper left corner, click on the “Sample Colors,” select the Green color and drag it to Video Track into the timeline. We are using a Green background to easily remove it using the green screen feature in Filmora to use it in our future projects after exporting it, without creating it again. Adjust the duration of this track according to your requirement. In my case, I am trying to make an animated subscribe button of 5 seconds.
Step 2: Lock this track by clicking on the lock icon to work on subscribe animation without disturbing the background easily.
Step 3: Now it’s time to design the subscribe png gif. Go to the Sample colors again and drag the red color into the time above the green background.
Step 4: Double click on the red color in the timeline and adjust its size. Make it look like a subscribe button that is a rectangle and place it at the bottom center of the background. You can put it anywhere you want it to appear in your future videos.
Step 5: Now, let’s add Subscribe text into the button. Go to the Title and select any style that you like. “Basic 6” will work perfectly fine for this purpose. Drag and drop it into the timeline above all tracks.
Step 6: Double click on the Title on the timeline and edit it with “Subscribe” and place it under the red rectangle and click OK.
Step 7: We have put a cursor that can click on the animated subscribe button. You can use Google Search to find a transparent cursor. Make sure to save it in png format. Download it and import it into Filmora.
Step 8: Drag and drop the cursor into the timeline and place it above all the other three tracks to make it prominent. Adjust the size of the cursor place it on the Subscribe button where you want it to appear.
Step 9: Now, it’s time to animate the design using keyframes. First of all, let’s animate the red rectangle. Double click on the red color on the timeline. Go to the ‘Animation’ tab and then click ‘Customize.’ Move to the 1 second in the timeline and click ‘Add.’
Step 10: Now go back to the beginning in the timeline and adjust the scale to 0%. It will make the rectangle pop up when you play the clip.
Step 11: Text needs to be animated as well to match it with the rectangle. Double click on the text in the timeline and click ‘ADVANCED.’
Step 12: In this Advance text editor, go to the ‘Animation’ tab and select any animation that you like. On the timeline under the preview screen, adjusts the dark areas according to the time you set on the rectangle, which was 1 second. We want the text to appear on the screen in 1 second, like the rectangle. Also, adjust the ending time when you want the text to disappear again. We have set it on 4 seconds. Which means it will start to fade after 4 seconds.
Step 13: Now, to animate the mouse cursor, we will use the same process we used for a rectangle that is key framing. Double click on the cursor track on the timeline and move the time on your timeline to a point when you want the cursor to appear. Now add a key frame by clicking ‘Add’.
Step 14: Now jump back to a point in your timeline, when the cursor will start appearing from outside the screen. Move the cursor outside the screen from where you want it to start moving toward the subscribe animation.
Step 15: To animate the click of the cursor, move ahead a little bit into your timeline and scale down the cursor to around 70%. Move it a little further and scale it up to 100%.
Step 16: You can add the sound of mouse click to make it more realistic. You can find this sound anywhere on the internet. Download it and import it into Filmora. Now place it into the timeline where it can match the movement of the cursor.
Step 17: Now it’s time to make this subscribe animation button disappear. Move forward into the time to the end, at around 4 seconds. Double click on the red button in the timeline and add a key frame at its actual scale.
Step 18: After that, move further in the timeline to the end and make its scale 0. It will make it disappear.
Step 19: Do the same with the cursor. Double click on the cursor in the time and add a key frame at its actual position.
Step 20: Move ahead when you want it to disappear. Move the cursor out of the screen and click ‘OK’.
Step 21: Your Subscribe png gif is ready to be exported and used in your videos. Click on export and choose from various formats and options to choose from while exporting it.
You may also like: How to Get People to Subscribe Channel
Conclusion:Your own Animated Subscribe Button is ready to be used in your future videos and projects. This is a ready-to-use subscribe button that can be easily used using the green screen effect in Filmora. Just import the clip, remove the green screen, and you are good to go. You can also customize this Subscribe Animation using your channel and more. Keep experimenting with new things using Filmora.

Richard Bennett
Richard Bennett is a writer and a lover of all things video.
Follow @Richard Bennett
Richard Bennett
Mar 27, 2024• Proven solutions
The main goal of every content creator is to increase its audience to expand its reach and views. To do so, it’s essential to provide something unique and different to the viewer. Without providing them the content they are looking for, it is impossible to grow your channel and reach. Once your content is ready and you are getting many views, it is essential to make these potential viewers your permanent viewers. The animated subscribe button will help you achieve this goal. While your viewers are watching your videos, you must remind them about subscribing to your channel for receiving such incredible content in the future. Subscribe animation plays a vital role in converting your viewers into subscribers.
There are so many platforms on the internet from where you can get Youtube subscribe button animation free, and you can also purchase these subscribe png gifs. But creating your own animated subscribe button can make you stand out from the crowd and make your videos unique and exclusive. Because it enables you to design it the way you want according to your brand, so, let’s create your own subscribe animation using Wondershare Filmora .
Step-By-Step guide
Step 1: To get started,open Filmora X. On your upper left corner, click on the “Sample Colors,” select the Green color and drag it to Video Track into the timeline. We are using a Green background to easily remove it using the green screen feature in Filmora to use it in our future projects after exporting it, without creating it again. Adjust the duration of this track according to your requirement. In my case, I am trying to make an animated subscribe button of 5 seconds.
Step 2: Lock this track by clicking on the lock icon to work on subscribe animation without disturbing the background easily.
Step 3: Now it’s time to design the subscribe png gif. Go to the Sample colors again and drag the red color into the time above the green background.
Step 4: Double click on the red color in the timeline and adjust its size. Make it look like a subscribe button that is a rectangle and place it at the bottom center of the background. You can put it anywhere you want it to appear in your future videos.
Step 5: Now, let’s add Subscribe text into the button. Go to the Title and select any style that you like. “Basic 6” will work perfectly fine for this purpose. Drag and drop it into the timeline above all tracks.
Step 6: Double click on the Title on the timeline and edit it with “Subscribe” and place it under the red rectangle and click OK.
Step 7: We have put a cursor that can click on the animated subscribe button. You can use Google Search to find a transparent cursor. Make sure to save it in png format. Download it and import it into Filmora.
Step 8: Drag and drop the cursor into the timeline and place it above all the other three tracks to make it prominent. Adjust the size of the cursor place it on the Subscribe button where you want it to appear.
Step 9: Now, it’s time to animate the design using keyframes. First of all, let’s animate the red rectangle. Double click on the red color on the timeline. Go to the ‘Animation’ tab and then click ‘Customize.’ Move to the 1 second in the timeline and click ‘Add.’
Step 10: Now go back to the beginning in the timeline and adjust the scale to 0%. It will make the rectangle pop up when you play the clip.
Step 11: Text needs to be animated as well to match it with the rectangle. Double click on the text in the timeline and click ‘ADVANCED.’
Step 12: In this Advance text editor, go to the ‘Animation’ tab and select any animation that you like. On the timeline under the preview screen, adjusts the dark areas according to the time you set on the rectangle, which was 1 second. We want the text to appear on the screen in 1 second, like the rectangle. Also, adjust the ending time when you want the text to disappear again. We have set it on 4 seconds. Which means it will start to fade after 4 seconds.
Step 13: Now, to animate the mouse cursor, we will use the same process we used for a rectangle that is key framing. Double click on the cursor track on the timeline and move the time on your timeline to a point when you want the cursor to appear. Now add a key frame by clicking ‘Add’.
Step 14: Now jump back to a point in your timeline, when the cursor will start appearing from outside the screen. Move the cursor outside the screen from where you want it to start moving toward the subscribe animation.
Step 15: To animate the click of the cursor, move ahead a little bit into your timeline and scale down the cursor to around 70%. Move it a little further and scale it up to 100%.
Step 16: You can add the sound of mouse click to make it more realistic. You can find this sound anywhere on the internet. Download it and import it into Filmora. Now place it into the timeline where it can match the movement of the cursor.
Step 17: Now it’s time to make this subscribe animation button disappear. Move forward into the time to the end, at around 4 seconds. Double click on the red button in the timeline and add a key frame at its actual scale.
Step 18: After that, move further in the timeline to the end and make its scale 0. It will make it disappear.
Step 19: Do the same with the cursor. Double click on the cursor in the time and add a key frame at its actual position.
Step 20: Move ahead when you want it to disappear. Move the cursor out of the screen and click ‘OK’.
Step 21: Your Subscribe png gif is ready to be exported and used in your videos. Click on export and choose from various formats and options to choose from while exporting it.
You may also like: How to Get People to Subscribe Channel
Conclusion:Your own Animated Subscribe Button is ready to be used in your future videos and projects. This is a ready-to-use subscribe button that can be easily used using the green screen effect in Filmora. Just import the clip, remove the green screen, and you are good to go. You can also customize this Subscribe Animation using your channel and more. Keep experimenting with new things using Filmora.

Richard Bennett
Richard Bennett is a writer and a lover of all things video.
Follow @Richard Bennett
Richard Bennett
Mar 27, 2024• Proven solutions
The main goal of every content creator is to increase its audience to expand its reach and views. To do so, it’s essential to provide something unique and different to the viewer. Without providing them the content they are looking for, it is impossible to grow your channel and reach. Once your content is ready and you are getting many views, it is essential to make these potential viewers your permanent viewers. The animated subscribe button will help you achieve this goal. While your viewers are watching your videos, you must remind them about subscribing to your channel for receiving such incredible content in the future. Subscribe animation plays a vital role in converting your viewers into subscribers.
There are so many platforms on the internet from where you can get Youtube subscribe button animation free, and you can also purchase these subscribe png gifs. But creating your own animated subscribe button can make you stand out from the crowd and make your videos unique and exclusive. Because it enables you to design it the way you want according to your brand, so, let’s create your own subscribe animation using Wondershare Filmora .
Step-By-Step guide
Step 1: To get started,open Filmora X. On your upper left corner, click on the “Sample Colors,” select the Green color and drag it to Video Track into the timeline. We are using a Green background to easily remove it using the green screen feature in Filmora to use it in our future projects after exporting it, without creating it again. Adjust the duration of this track according to your requirement. In my case, I am trying to make an animated subscribe button of 5 seconds.
Step 2: Lock this track by clicking on the lock icon to work on subscribe animation without disturbing the background easily.
Step 3: Now it’s time to design the subscribe png gif. Go to the Sample colors again and drag the red color into the time above the green background.
Step 4: Double click on the red color in the timeline and adjust its size. Make it look like a subscribe button that is a rectangle and place it at the bottom center of the background. You can put it anywhere you want it to appear in your future videos.
Step 5: Now, let’s add Subscribe text into the button. Go to the Title and select any style that you like. “Basic 6” will work perfectly fine for this purpose. Drag and drop it into the timeline above all tracks.
Step 6: Double click on the Title on the timeline and edit it with “Subscribe” and place it under the red rectangle and click OK.
Step 7: We have put a cursor that can click on the animated subscribe button. You can use Google Search to find a transparent cursor. Make sure to save it in png format. Download it and import it into Filmora.
Step 8: Drag and drop the cursor into the timeline and place it above all the other three tracks to make it prominent. Adjust the size of the cursor place it on the Subscribe button where you want it to appear.
Step 9: Now, it’s time to animate the design using keyframes. First of all, let’s animate the red rectangle. Double click on the red color on the timeline. Go to the ‘Animation’ tab and then click ‘Customize.’ Move to the 1 second in the timeline and click ‘Add.’
Step 10: Now go back to the beginning in the timeline and adjust the scale to 0%. It will make the rectangle pop up when you play the clip.
Step 11: Text needs to be animated as well to match it with the rectangle. Double click on the text in the timeline and click ‘ADVANCED.’
Step 12: In this Advance text editor, go to the ‘Animation’ tab and select any animation that you like. On the timeline under the preview screen, adjusts the dark areas according to the time you set on the rectangle, which was 1 second. We want the text to appear on the screen in 1 second, like the rectangle. Also, adjust the ending time when you want the text to disappear again. We have set it on 4 seconds. Which means it will start to fade after 4 seconds.
Step 13: Now, to animate the mouse cursor, we will use the same process we used for a rectangle that is key framing. Double click on the cursor track on the timeline and move the time on your timeline to a point when you want the cursor to appear. Now add a key frame by clicking ‘Add’.
Step 14: Now jump back to a point in your timeline, when the cursor will start appearing from outside the screen. Move the cursor outside the screen from where you want it to start moving toward the subscribe animation.
Step 15: To animate the click of the cursor, move ahead a little bit into your timeline and scale down the cursor to around 70%. Move it a little further and scale it up to 100%.
Step 16: You can add the sound of mouse click to make it more realistic. You can find this sound anywhere on the internet. Download it and import it into Filmora. Now place it into the timeline where it can match the movement of the cursor.
Step 17: Now it’s time to make this subscribe animation button disappear. Move forward into the time to the end, at around 4 seconds. Double click on the red button in the timeline and add a key frame at its actual scale.
Step 18: After that, move further in the timeline to the end and make its scale 0. It will make it disappear.
Step 19: Do the same with the cursor. Double click on the cursor in the time and add a key frame at its actual position.
Step 20: Move ahead when you want it to disappear. Move the cursor out of the screen and click ‘OK’.
Step 21: Your Subscribe png gif is ready to be exported and used in your videos. Click on export and choose from various formats and options to choose from while exporting it.
You may also like: How to Get People to Subscribe Channel
Conclusion:Your own Animated Subscribe Button is ready to be used in your future videos and projects. This is a ready-to-use subscribe button that can be easily used using the green screen effect in Filmora. Just import the clip, remove the green screen, and you are good to go. You can also customize this Subscribe Animation using your channel and more. Keep experimenting with new things using Filmora.

Richard Bennett
Richard Bennett is a writer and a lover of all things video.
Follow @Richard Bennett
Also read:
- [New] Ajey's YouTube Profit Milestones
- [New] Masterclass Crafting Cinematic YouTube Videos with Adobe Premiere
- [Updated] Brighten Up Techniques for Improving Video Lighting on YouTube
- [Updated] Does Instant Subscription Strategy Improve User Engagement?
- [Updated] Innovative Auditory Transitions with Logic Pro X for 2024
- A Comprehensive Guide to VMware vSphere Operations: Licenses and Variants Explained
- Discovering the Excellent 10 Yoga Programs for Better Wellness
- In 2024, 3 Ways to Fake GPS Without Root On Oppo Reno 11 5G | Dr.fone
- In 2024, 6 Ways to Change Spotify Location On Your Apple iPhone XR | Dr.fone
- In 2024, 8 Tips on How to Vlog Confidently Like Popular YouTubers
- In 2024, Does Life360 Notify When You Log Out On Vivo Y27 5G? | Dr.fone
- In 2024, Unlock Your Boost Mobile Apple iPhone 13 Pro Before the Plan Expires
- Leveraging YouTube's Profit Potential The 500 Subscribers Gateway
- Simplified Techniques for Reordering YT Videos for 2024
- Twice the Joy Television Looping of Online Video
- Title: Creator Payment Frequency on YouTube Platform
- Author: Kevin
- Created at : 2025-02-06 18:33:59
- Updated at : 2025-02-10 22:13:34
- Link: https://youtube-videos.techidaily.com/creator-payment-frequency-on-youtube-platform/
- License: This work is licensed under CC BY-NC-SA 4.0.

