Create Compelling Animation Subscribe Bars for Your YouTube Channel (Filmora) for 2024
Create Compelling Animation Subscribe Bars for Your YouTube Channel (Filmora)
How to Make Your YouTube Animated Subscribe Button Easily With Filmora

Richard Bennett
Mar 27, 2024• Proven solutions
The main goal of every content creator is to increase its audience to expand its reach and views. To do so, it’s essential to provide something unique and different to the viewer. Without providing them the content they are looking for, it is impossible to grow your channel and reach. Once your content is ready and you are getting many views, it is essential to make these potential viewers your permanent viewers. The animated subscribe button will help you achieve this goal. While your viewers are watching your videos, you must remind them about subscribing to your channel for receiving such incredible content in the future. Subscribe animation plays a vital role in converting your viewers into subscribers.
There are so many platforms on the internet from where you can get Youtube subscribe button animation free, and you can also purchase these subscribe png gifs. But creating your own animated subscribe button can make you stand out from the crowd and make your videos unique and exclusive. Because it enables you to design it the way you want according to your brand, so, let’s create your own subscribe animation using Wondershare Filmora .
Step-By-Step guide
Step 1: To get started,open Filmora X. On your upper left corner, click on the “Sample Colors,” select the Green color and drag it to Video Track into the timeline. We are using a Green background to easily remove it using the green screen feature in Filmora to use it in our future projects after exporting it, without creating it again. Adjust the duration of this track according to your requirement. In my case, I am trying to make an animated subscribe button of 5 seconds.
Step 2: Lock this track by clicking on the lock icon to work on subscribe animation without disturbing the background easily.
Step 3: Now it’s time to design the subscribe png gif. Go to the Sample colors again and drag the red color into the time above the green background.
Step 4: Double click on the red color in the timeline and adjust its size. Make it look like a subscribe button that is a rectangle and place it at the bottom center of the background. You can put it anywhere you want it to appear in your future videos.
Step 5: Now, let’s add Subscribe text into the button. Go to the Title and select any style that you like. “Basic 6” will work perfectly fine for this purpose. Drag and drop it into the timeline above all tracks.
Step 6: Double click on the Title on the timeline and edit it with “Subscribe” and place it under the red rectangle and click OK.
Step 7: We have put a cursor that can click on the animated subscribe button. You can use Google Search to find a transparent cursor. Make sure to save it in png format. Download it and import it into Filmora.
Step 8: Drag and drop the cursor into the timeline and place it above all the other three tracks to make it prominent. Adjust the size of the cursor place it on the Subscribe button where you want it to appear.
Step 9: Now, it’s time to animate the design using keyframes. First of all, let’s animate the red rectangle. Double click on the red color on the timeline. Go to the ‘Animation’ tab and then click ‘Customize.’ Move to the 1 second in the timeline and click ‘Add.’
Step 10: Now go back to the beginning in the timeline and adjust the scale to 0%. It will make the rectangle pop up when you play the clip.
Step 11: Text needs to be animated as well to match it with the rectangle. Double click on the text in the timeline and click ‘ADVANCED.’
Step 12: In this Advance text editor, go to the ‘Animation’ tab and select any animation that you like. On the timeline under the preview screen, adjusts the dark areas according to the time you set on the rectangle, which was 1 second. We want the text to appear on the screen in 1 second, like the rectangle. Also, adjust the ending time when you want the text to disappear again. We have set it on 4 seconds. Which means it will start to fade after 4 seconds.
Step 13: Now, to animate the mouse cursor, we will use the same process we used for a rectangle that is key framing. Double click on the cursor track on the timeline and move the time on your timeline to a point when you want the cursor to appear. Now add a key frame by clicking ‘Add’.
Step 14: Now jump back to a point in your timeline, when the cursor will start appearing from outside the screen. Move the cursor outside the screen from where you want it to start moving toward the subscribe animation.
Step 15: To animate the click of the cursor, move ahead a little bit into your timeline and scale down the cursor to around 70%. Move it a little further and scale it up to 100%.
Step 16: You can add the sound of mouse click to make it more realistic. You can find this sound anywhere on the internet. Download it and import it into Filmora. Now place it into the timeline where it can match the movement of the cursor.
Step 17: Now it’s time to make this subscribe animation button disappear. Move forward into the time to the end, at around 4 seconds. Double click on the red button in the timeline and add a key frame at its actual scale.
Step 18: After that, move further in the timeline to the end and make its scale 0. It will make it disappear.
Step 19: Do the same with the cursor. Double click on the cursor in the time and add a key frame at its actual position.
Step 20: Move ahead when you want it to disappear. Move the cursor out of the screen and click ‘OK’.
Step 21: Your Subscribe png gif is ready to be exported and used in your videos. Click on export and choose from various formats and options to choose from while exporting it.
You may also like: How to Get People to Subscribe Channel
Conclusion:Your own Animated Subscribe Button is ready to be used in your future videos and projects. This is a ready-to-use subscribe button that can be easily used using the green screen effect in Filmora. Just import the clip, remove the green screen, and you are good to go. You can also customize this Subscribe Animation using your channel and more. Keep experimenting with new things using Filmora.


Richard Bennett
Richard Bennett is a writer and a lover of all things video.
Follow @Richard Bennett
Richard Bennett
Mar 27, 2024• Proven solutions
The main goal of every content creator is to increase its audience to expand its reach and views. To do so, it’s essential to provide something unique and different to the viewer. Without providing them the content they are looking for, it is impossible to grow your channel and reach. Once your content is ready and you are getting many views, it is essential to make these potential viewers your permanent viewers. The animated subscribe button will help you achieve this goal. While your viewers are watching your videos, you must remind them about subscribing to your channel for receiving such incredible content in the future. Subscribe animation plays a vital role in converting your viewers into subscribers.
There are so many platforms on the internet from where you can get Youtube subscribe button animation free, and you can also purchase these subscribe png gifs. But creating your own animated subscribe button can make you stand out from the crowd and make your videos unique and exclusive. Because it enables you to design it the way you want according to your brand, so, let’s create your own subscribe animation using Wondershare Filmora .
Step-By-Step guide
Step 1: To get started,open Filmora X. On your upper left corner, click on the “Sample Colors,” select the Green color and drag it to Video Track into the timeline. We are using a Green background to easily remove it using the green screen feature in Filmora to use it in our future projects after exporting it, without creating it again. Adjust the duration of this track according to your requirement. In my case, I am trying to make an animated subscribe button of 5 seconds.
Step 2: Lock this track by clicking on the lock icon to work on subscribe animation without disturbing the background easily.
Step 3: Now it’s time to design the subscribe png gif. Go to the Sample colors again and drag the red color into the time above the green background.
Step 4: Double click on the red color in the timeline and adjust its size. Make it look like a subscribe button that is a rectangle and place it at the bottom center of the background. You can put it anywhere you want it to appear in your future videos.
Step 5: Now, let’s add Subscribe text into the button. Go to the Title and select any style that you like. “Basic 6” will work perfectly fine for this purpose. Drag and drop it into the timeline above all tracks.
Step 6: Double click on the Title on the timeline and edit it with “Subscribe” and place it under the red rectangle and click OK.
Step 7: We have put a cursor that can click on the animated subscribe button. You can use Google Search to find a transparent cursor. Make sure to save it in png format. Download it and import it into Filmora.
Step 8: Drag and drop the cursor into the timeline and place it above all the other three tracks to make it prominent. Adjust the size of the cursor place it on the Subscribe button where you want it to appear.
Step 9: Now, it’s time to animate the design using keyframes. First of all, let’s animate the red rectangle. Double click on the red color on the timeline. Go to the ‘Animation’ tab and then click ‘Customize.’ Move to the 1 second in the timeline and click ‘Add.’
Step 10: Now go back to the beginning in the timeline and adjust the scale to 0%. It will make the rectangle pop up when you play the clip.
Step 11: Text needs to be animated as well to match it with the rectangle. Double click on the text in the timeline and click ‘ADVANCED.’
Step 12: In this Advance text editor, go to the ‘Animation’ tab and select any animation that you like. On the timeline under the preview screen, adjusts the dark areas according to the time you set on the rectangle, which was 1 second. We want the text to appear on the screen in 1 second, like the rectangle. Also, adjust the ending time when you want the text to disappear again. We have set it on 4 seconds. Which means it will start to fade after 4 seconds.
Step 13: Now, to animate the mouse cursor, we will use the same process we used for a rectangle that is key framing. Double click on the cursor track on the timeline and move the time on your timeline to a point when you want the cursor to appear. Now add a key frame by clicking ‘Add’.
Step 14: Now jump back to a point in your timeline, when the cursor will start appearing from outside the screen. Move the cursor outside the screen from where you want it to start moving toward the subscribe animation.
Step 15: To animate the click of the cursor, move ahead a little bit into your timeline and scale down the cursor to around 70%. Move it a little further and scale it up to 100%.
Step 16: You can add the sound of mouse click to make it more realistic. You can find this sound anywhere on the internet. Download it and import it into Filmora. Now place it into the timeline where it can match the movement of the cursor.
Step 17: Now it’s time to make this subscribe animation button disappear. Move forward into the time to the end, at around 4 seconds. Double click on the red button in the timeline and add a key frame at its actual scale.
Step 18: After that, move further in the timeline to the end and make its scale 0. It will make it disappear.
Step 19: Do the same with the cursor. Double click on the cursor in the time and add a key frame at its actual position.
Step 20: Move ahead when you want it to disappear. Move the cursor out of the screen and click ‘OK’.
Step 21: Your Subscribe png gif is ready to be exported and used in your videos. Click on export and choose from various formats and options to choose from while exporting it.
You may also like: How to Get People to Subscribe Channel
Conclusion:Your own Animated Subscribe Button is ready to be used in your future videos and projects. This is a ready-to-use subscribe button that can be easily used using the green screen effect in Filmora. Just import the clip, remove the green screen, and you are good to go. You can also customize this Subscribe Animation using your channel and more. Keep experimenting with new things using Filmora.
Richard Bennett
Richard Bennett is a writer and a lover of all things video.
Follow @Richard Bennett
Seamless Navigation to Your Individual Playlist Library on YouTube
YouTube Music has become a popular go-to platform for music lovers to find new songs and artists to enjoy. The content is uploaded regularly, so there’s always something new to discover.
But with so much music content on YouTube Music, finding the right mix for you can take time and effort. That’s why we’ve put together this guide on how to find my playlists on YouTube.
We’ll also answer some frequently asked questions to help you find solutions regarding the YouTube Mix queries. So, without wasting time, let’s get on with the guide!
Basic Information of YouTube Mix
Before starting, let’s learn some basic information about the YouTube Music Mix playlists:
Three Ways Of YouTube Music Mix
YouTube has popularized three personalized mixes to keep you up-to-date on newly released music and introduce more artists to you:
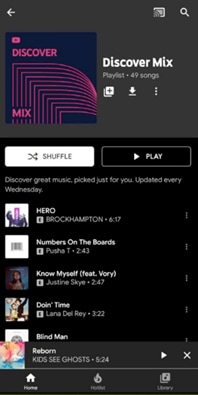
Discover Mix: Discover Mix introduces you to 50 new tracks every week, expanding your musical horizons and introducing you to contemporary artists. This playlist mix provides new updates every Wednesday, making it a go-to playlist for discovering new music to your taste.
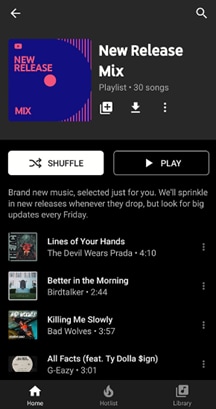
New Release Mix: In the New Release Mix playlist, you can find all the newest tracks from your favorite artists, and some music is recommended. New updates are provided every Friday (when most new releases come out), and mid-week releases the entire week to ensure you’re always up-to-date on the latest music.
Your Mix: Your Mix is a playlist full of songs by popular and well-known artists, as well as some new tunes and performers you’ve never discovered before, which are recommended based on your preferences, making it ideal for unwinding and listening to something you’re guaranteed to love. The playlist is updated regularly, so the music never gets dull, and there’s always something new to listen to.
What Is YouTube Music Replay Mix?
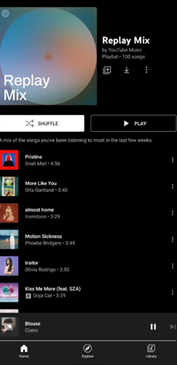
YouTube Music Replay Mix is a feature of YouTube Music that is automatically generated via the YouTube algorithm and contains a personalized mix of tracks based on your listening history. The mix is updated daily and includes up to 100 songs.
You can access it by tapping the “Replay Mix” option on the YouTube app’s main screen or the YouTube Music website. This feature is perfect for those who want a continuously updated mix of their favorite songs.
So, if you’re always on the go and need more time to create your playlist, YouTube Music Replay Mix is a great option. Since it’s based on your listening history, you can be sure that you’ll always hear songs that you love.
The Things You Want To Know About YouTube Mix
Now that you’ve what YouTube Mix is, you might have some queries in mind. To help you resolve them, we’ve provided solutions to the most frequently asked questions:
1. How Do I Save My Mix Playlist On YouTube?
To save My Mix playlist on YouTube, launch the YouTube app, tap “More” on the app’s main interface, and tap “Add to Library.” You can also save the playlist by going to the Mix page and tapping “Save” below the description.
2. How Do I Find My Playlist On YouTube?
The YouTube Music Replay Mix playlist is located on the home screen of the YouTube Music app and website under the “Mixed for you” header. Here you can also find other playlists, including “Your likes,” “New Release Mix,” “My Supermix,” and “Discover Mix.”
3. How Do I Add Songs To The Replay Mix Playlist?
You can’t manually add songs to the Replay Mix because YouTube Music automatically adds tracks that you listen to more than once.
The more often you hear a soundtrack, the higher it will appear on the YouTube list. Conversely, songs you’ve only played once or twice will appear lower on the list.
4. How Do I Delete A Mix Playlist On YouTube?
To delete a saved YouTube playlist from the Music library:
- Launch YouTube Music app on your mobile device or head to its website on your computer.
- Tap “Library” on the home screen or homepage and tap the “Mix” you want to delete.
- Tap the**”More”** option on the playlist panel and tap “Remove Playlist From Library.”
5. How Do I Turn Off YouTube Mixes?
To turn off YouTube Mixes, you can use Google extensions or create one yourself if you are an expert in coding.
6. Are YouTube Mixes Endless?
YouTube Music offers an endless personalized music playlist called “My Mixes.” Every time you click or tap the playlist, a new queue of your most listened or favorite tracks is generated for you.
The playlist contains about 100 songs with an endless auto-play feature once you reach the end of the list.
A Bonus Tip: How To Make a Music Video?
Hopefully, you have got the information you need about YouTube Mixes. Supposing you are YouTube music lover, we wonder, do you want to create YouTube videos for your channel or add music to your clips? In that case, we prepared a video tutorial for you - How To Make a Music Video. If you have any interests, you can watch it and learn about how to use the user-friendly video editor to make it:
Here’s why Wondershare Filmora is an excellent option for making YouTube videos or adding music to them:
- Huge royalty-free music library
- Easy to use, even for novice users
- Record videos from your webcam and screen simultaneously
- Multiple advanced video editing features, such as green screen, background blur, keyframe, split screen, motion tracking, and preset templates
- Adds effects, filters, transitions, and animations to your video footage to make it more eye-catching
- Quick “export to YouTube” feature to help you instantly share your final project on your channel
Free Download For Win 7 or later(64-bit)
Free Download For macOS 10.14 or later
If you want additional guidance on adding YouTube Music to your videos using Filmora,click here to learn everything you need to know!
Conclusion
This comprehensive guide explored some basic information about YouTube Music Mix and discussed how to find My Playlist on YouTube Music quickly. We’ve also provided solutions to help you save, find, delete, or turn off YouTube Mix playlists.
In addition, we’ve provided a bonus tip to use Filmora to add music to your YouTube videos and discussed its key features.
Hopefully, you’ve found this article helpful and can now locate your YouTube Music Mix playlist without issues.
Also read:
- [New] Decipher High-Impact Content Selecting Premier Rank Trackers for YouTubers
- [Updated] In 2024, Maximize Impact Best Practices for FB Video Posts
- Ajey's YouTube Earnings Insight - 2023
- Best Voice Conversion Tools for Vlogging Professionals for 2024
- Discovering Your Favorite Makeup Vloggers on YouTube
- Download & Install Drivers for HP Officejet 4650 Printer on Windows PC
- Get the Latest Intel Iris Xe Graphics Driver for Windows 10/11 - Fast!
- Navigating the Volatile Gold Markets: Insights From Investors on the 'Roller Coaster' Trends and Strategies for Brand Risk Management - YL Computing
- Step-by-Step Guide: How to Open SWF Files on Various Versions of Windows (11, 10, 8 & ^9)
- Title: Create Compelling Animation Subscribe Bars for Your YouTube Channel (Filmora) for 2024
- Author: Kevin
- Created at : 2025-02-06 22:49:54
- Updated at : 2025-02-10 21:35:53
- Link: https://youtube-videos.techidaily.com/create-compelling-animation-subscribe-bars-for-your-youtube-channel-filmora-for-2024/
- License: This work is licensed under CC BY-NC-SA 4.0.