
Crafting Video Magic with iMovie, Directed to YouTube
Crafting Video Magic with iMovie, Directed to YouTube
How to Upload a Video from iMovie to YouTube?

Liza Brown
Aug 18, 2022• Proven solutions
“Is iMovie good for YouTube?”
The iMovie is not only good for YouTube but various other social media platforms. The thing is, you have to compromise with the quality offered by Apple’s video editor iMovie. Well, iMovie is perfect for getting started for beginners. But, the professionals and ones who want a bit high features than basic ones should look elsewhere. Thus, we always recommend alternatives to a particular software for our audience. In this article, there is a mention of Wondershare Filmora to overcome the drawbacks of iMovie.
Without further ado, let’s begin with how to upload a video from iMovie to YouTube. We want to lead with the best iMovie export settings, specific troubleshooting issues, and our alternative intro section to overcome iMovie’s limitations.
Part 1: How to Upload a Video from iMovie to YouTube?
iMovie is ideal for making YouTube videos if you are too basic and are not looking for advanced features. Remember that professionalism pays in these platforms and helps you stand better among others. If you’re still interested in making introductory videos, here is a step-by-step guide on uploading a video to YouTube from iMovie on Mac first and leading with iPhone.
Step-by-Step Tutorial on how to upload a video from iMovie to YouTube on Mac
Step 1: Create a Project
On the first step, go to iMovie on Mac and click the Create New tab below.
Step 2: Import Media
Click the Import Media button and browse the files on your computer, as shown below.
Step 3: Edit Clips
It’s time to edit video footage. Drag your video to the timeline, as shown below.
Then, you can trim and drag the edges of video clips to allow editing.
Step 4: Add Titles
You can add titles by clicking the Title tab and further drag the Title’s template into the timeline.
Step 5: Export the Video
Click the Export button as follows after editing is over.
Select YouTube to upload your video over the platform directly.
Step 6: Save
After selecting the desired platform, click the Next tab to proceed with saving the file.
At last, save your video as shown below.
Step-by-Step Tutorial on how to upload iMovie to YouTube from iPhone
Step 1: Share the iMovie Project
Go to iMovie on your iPhone. Open the iMovie project on your iPhone and tap the Share button to select YouTube. Enter the information of Title, Description, Size, Tags, Privacy, and Location (optional).
Step 2: Upload iMovie Files
For ease of use, you can upload saved videos in Photo Library on your iPhone. Then, you can upload iMovie videos via the YouTube iOS app. Sign In to YouTube and click the Camera icon at the top of the Home page. Select your iPhone Photo Library file and set the video Title, Description, Size, Tags, and Privacy. Then, hit the Upload button to confirm.
Part 2: The Best iMovie Export Settings for YouTube Videos
As we all know that iMovie consists of a bit long procedure to export projects. Here are some tips on the best iMovie export settings to avoid an unnecessary headache.
- Set small resolution: Small resolution plays a more significant role, especially while uploading. Thus, you can set the smallest resolution in the Email tab of the Export button.
2. Change Export settings in the File tab: There is a File tab under the Export button. Click it and find various settings that you need to change to get the best export settings for YouTube 2021. Make the Title of the video as small as possible. Set the resolution at 1080P than 4K.
However, it isn’t going to upgrade the resolution if your video is already in the 1080P definition. Now, the last setting that will crazily offer you the best quality and lots of space-saving. You have to select Best (ProRes) in quality settings for this purpose. These settings also take less time to upload to YouTube.
3. Compress is not for speed: Various options you see in the Compresstab are not for speed. They are for how you save the video on a desktop. Thus, always choose the Better Quality tab than Faster.
- Do not export directly to YouTube: iMovie is pretty basic and doesn’t offer great settings to upload your video instantly. You may have to make changes to the uploaded video even if you do this as per our step-by-step guide mentioned above.
Part 3: How to fix the “Failed to Upload to YouTube” Error on iMovie?
The “iMovie to YouTube failed” problem occurs when you directly upload a YouTube video from iMovie. The issue will result if you upload from any third-party uploader. That is why the direct upload doesn’t work, especially in iMovie. You can opt to share your video to the desktop first and then drag it to upload to the YouTube platform.
Part 4: Upload Videos to YouTube with the Best Alternative to iMovie - Wondershare Filmora
“What can I use instead of iMovie to overcome its limitations?”
When you see that iMovie is not uploading to YouTube or iMovie upload to YouTube got stuck, go for a better alternative. In this section, we’d like to recommend Wondershare Filmora that offers the best export settings compared to iMovie. It is the go-to solution if you can’t upload video from iMovie to YouTube directly. Filmora further provides intuitive editing tools that professionally make your YouTube video projects.
Export Key Aspects of Wondershare Filmora in comparison to iMovie:
- It offers a long list of export resolutions to choose from.
- You get separate video and audio settings such as Encoder, Channel, Frame Rate, Bit Rate, Resolution, etc.
- It is further compatible with export to various devices including the iPhone, Samsung, iPod, Apple TV, iPad, Google Pixel, PSP, Smart TV, etc.
Step-by-Step Guide on how to upload a video from iMovie to YouTube via Wondershare Filmora
Step 1: Click the Export button and select resolution
After your project in Wondershare Filmora is over, click the Export tab and select video resolution from the Local tab, as shown below.
It has a list of formats. You can also edit the Name and saving location here.
Step 2: Select Quality
Select the Settings button and choose from three quality levels of Best, Better, and Good. You can also adjust video and audio parameters, including the Encoder, Frame Rate, Resolution, Bit Rate, etc.
Step 3: Select platform
Select the YouTube tab, Sign In to your YouTube account, and hit the Export button after modifying the Title and Quality if needed. Also, make sure to check the Enable GPU accelerated video encoding tab.
Select Wondershare Filmora as the ultimate solution even if iMovie upload to YouTube not showing up.
Conclusion
Hopefully, we’ve informed you of the relevant facts on how to upload a video from iMovie to YouTube. We have also examined the number of troubleshooting issues involved in the iMovie video editor. Well, you will get to face similar kinds of export difficulties in the iMovie editor. Also, the entire procedure to end the exporting task is a bit long in iMovie compared to any other video editing software. Thus, it’s crucial to check out what other alternatives the technological world has today. We can’t state to you a better beginner-friendly yet advanced editing option than Wondershare Filmora that rightly outtakes the iMovie video editor in all aspects.
Liza Brown
Liza Brown is a writer and a lover of all things video.
Follow @Liza Brown
Liza Brown
Aug 18, 2022• Proven solutions
“Is iMovie good for YouTube?”
The iMovie is not only good for YouTube but various other social media platforms. The thing is, you have to compromise with the quality offered by Apple’s video editor iMovie. Well, iMovie is perfect for getting started for beginners. But, the professionals and ones who want a bit high features than basic ones should look elsewhere. Thus, we always recommend alternatives to a particular software for our audience. In this article, there is a mention of Wondershare Filmora to overcome the drawbacks of iMovie.
Without further ado, let’s begin with how to upload a video from iMovie to YouTube. We want to lead with the best iMovie export settings, specific troubleshooting issues, and our alternative intro section to overcome iMovie’s limitations.
Part 1: How to Upload a Video from iMovie to YouTube?
iMovie is ideal for making YouTube videos if you are too basic and are not looking for advanced features. Remember that professionalism pays in these platforms and helps you stand better among others. If you’re still interested in making introductory videos, here is a step-by-step guide on uploading a video to YouTube from iMovie on Mac first and leading with iPhone.
Step-by-Step Tutorial on how to upload a video from iMovie to YouTube on Mac
Step 1: Create a Project
On the first step, go to iMovie on Mac and click the Create New tab below.
Step 2: Import Media
Click the Import Media button and browse the files on your computer, as shown below.
Step 3: Edit Clips
It’s time to edit video footage. Drag your video to the timeline, as shown below.
Then, you can trim and drag the edges of video clips to allow editing.
Step 4: Add Titles
You can add titles by clicking the Title tab and further drag the Title’s template into the timeline.
Step 5: Export the Video
Click the Export button as follows after editing is over.
Select YouTube to upload your video over the platform directly.
Step 6: Save
After selecting the desired platform, click the Next tab to proceed with saving the file.
At last, save your video as shown below.
Step-by-Step Tutorial on how to upload iMovie to YouTube from iPhone
Step 1: Share the iMovie Project
Go to iMovie on your iPhone. Open the iMovie project on your iPhone and tap the Share button to select YouTube. Enter the information of Title, Description, Size, Tags, Privacy, and Location (optional).
Step 2: Upload iMovie Files
For ease of use, you can upload saved videos in Photo Library on your iPhone. Then, you can upload iMovie videos via the YouTube iOS app. Sign In to YouTube and click the Camera icon at the top of the Home page. Select your iPhone Photo Library file and set the video Title, Description, Size, Tags, and Privacy. Then, hit the Upload button to confirm.
Part 2: The Best iMovie Export Settings for YouTube Videos
As we all know that iMovie consists of a bit long procedure to export projects. Here are some tips on the best iMovie export settings to avoid an unnecessary headache.
- Set small resolution: Small resolution plays a more significant role, especially while uploading. Thus, you can set the smallest resolution in the Email tab of the Export button.
2. Change Export settings in the File tab: There is a File tab under the Export button. Click it and find various settings that you need to change to get the best export settings for YouTube 2021. Make the Title of the video as small as possible. Set the resolution at 1080P than 4K.
However, it isn’t going to upgrade the resolution if your video is already in the 1080P definition. Now, the last setting that will crazily offer you the best quality and lots of space-saving. You have to select Best (ProRes) in quality settings for this purpose. These settings also take less time to upload to YouTube.
3. Compress is not for speed: Various options you see in the Compresstab are not for speed. They are for how you save the video on a desktop. Thus, always choose the Better Quality tab than Faster.
- Do not export directly to YouTube: iMovie is pretty basic and doesn’t offer great settings to upload your video instantly. You may have to make changes to the uploaded video even if you do this as per our step-by-step guide mentioned above.
Part 3: How to fix the “Failed to Upload to YouTube” Error on iMovie?
The “iMovie to YouTube failed” problem occurs when you directly upload a YouTube video from iMovie. The issue will result if you upload from any third-party uploader. That is why the direct upload doesn’t work, especially in iMovie. You can opt to share your video to the desktop first and then drag it to upload to the YouTube platform.
Part 4: Upload Videos to YouTube with the Best Alternative to iMovie - Wondershare Filmora
“What can I use instead of iMovie to overcome its limitations?”
When you see that iMovie is not uploading to YouTube or iMovie upload to YouTube got stuck, go for a better alternative. In this section, we’d like to recommend Wondershare Filmora that offers the best export settings compared to iMovie. It is the go-to solution if you can’t upload video from iMovie to YouTube directly. Filmora further provides intuitive editing tools that professionally make your YouTube video projects.
Export Key Aspects of Wondershare Filmora in comparison to iMovie:
- It offers a long list of export resolutions to choose from.
- You get separate video and audio settings such as Encoder, Channel, Frame Rate, Bit Rate, Resolution, etc.
- It is further compatible with export to various devices including the iPhone, Samsung, iPod, Apple TV, iPad, Google Pixel, PSP, Smart TV, etc.
Step-by-Step Guide on how to upload a video from iMovie to YouTube via Wondershare Filmora
Step 1: Click the Export button and select resolution
After your project in Wondershare Filmora is over, click the Export tab and select video resolution from the Local tab, as shown below.
It has a list of formats. You can also edit the Name and saving location here.
Step 2: Select Quality
Select the Settings button and choose from three quality levels of Best, Better, and Good. You can also adjust video and audio parameters, including the Encoder, Frame Rate, Resolution, Bit Rate, etc.
Step 3: Select platform
Select the YouTube tab, Sign In to your YouTube account, and hit the Export button after modifying the Title and Quality if needed. Also, make sure to check the Enable GPU accelerated video encoding tab.
Select Wondershare Filmora as the ultimate solution even if iMovie upload to YouTube not showing up.
Conclusion
Hopefully, we’ve informed you of the relevant facts on how to upload a video from iMovie to YouTube. We have also examined the number of troubleshooting issues involved in the iMovie video editor. Well, you will get to face similar kinds of export difficulties in the iMovie editor. Also, the entire procedure to end the exporting task is a bit long in iMovie compared to any other video editing software. Thus, it’s crucial to check out what other alternatives the technological world has today. We can’t state to you a better beginner-friendly yet advanced editing option than Wondershare Filmora that rightly outtakes the iMovie video editor in all aspects.
Liza Brown
Liza Brown is a writer and a lover of all things video.
Follow @Liza Brown
Leveraging Google Trends Data for Idea Genesis in Videography
How to Use Google Trends to Come up with Video Ideas [Easy Guide]

Richard Bennett
Oct 26, 2023• Proven solutions
There is always something to make a video about. It’s a big world where new things happen every day, in every YouTube niche . One of the best ways to climb to the top of YouTube’s search engine results is to be among the first creators to make a video about a trending topic.
But how do you know what’s trending? If you’re in a huge genre like beauty or technology then it’s not impossible to keep track of the latest news and trends, but you probably hear about things as other people start making videos and as websites start publishing articles. How do you get on top of trends just as they’re becoming trends?
Google Trends, of course!
Google Trends is a completely free tool you can use to determine what’s trending on YouTube or in Google’s search engine. Here’s how you can use Google Trends to figure out what’s trending in your niche and make a video before there’s tons of competition.
Part 1: Seeing The Big Picture
You’ll need to be signed into your Google account to use Google Trends.
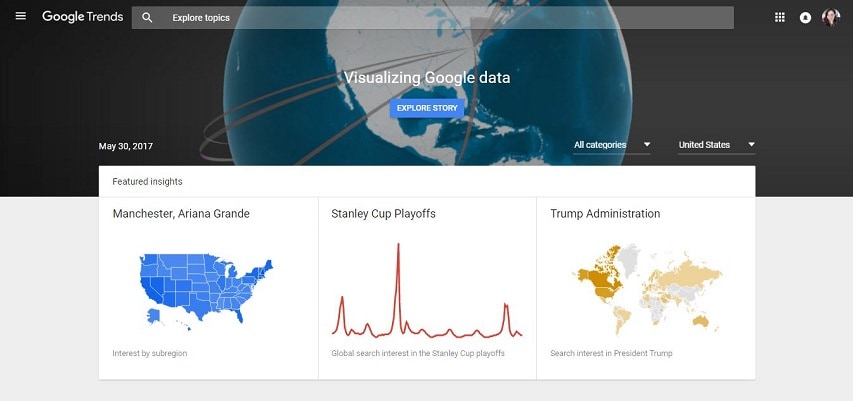
Start off at trends.google.com and you’ll see what’s trending in general – usually big news stories or things like sports finals. The data is laid out like this: at the top there are three ‘Featured Insights’. These are three of the most popular trending topics paired with graphs of their recent search traffic. Underneath these there will be a list of stories that are currently trending. You can click on them to see charts of their search data and links to where the stories are being covered online.
Unless you do news or political commentary on your channel these probably aren’t topics you want to cover, but if you like to insert some topical references into your other videos then it’s still good to be aware of these things.
To get information more relevant to your channel you’re going to have to do some filtering.
Part 2: Getting Results That Matter to You
In the Google Trend home page, scroll down to the ‘Recently Trending’ section and click on ‘More Trending Searches’.
Then click from ‘Daily Search Trends’ to ‘Realtime Search Trends’.
On top you will see two drop-down menus, one is for the category and one is for location.
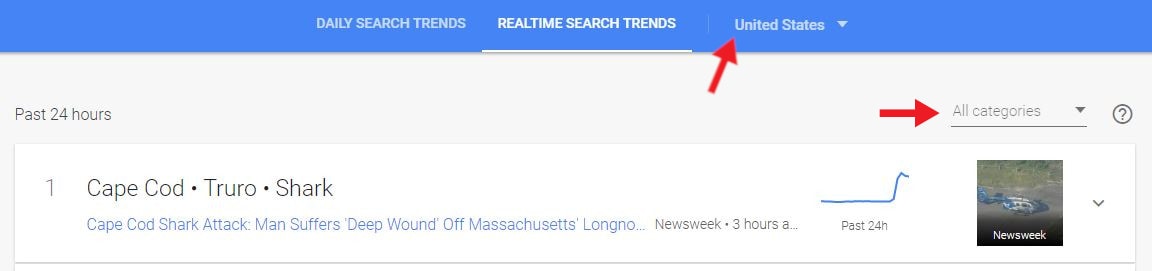
Under All categories select the general theme your channel falls under.
Your options are business, entertainment, health, Sci/Tech, sports, and top stories.
It might be the case that your channel doesn’t fall under any of these themes, but there could still be related stories for you in other categories. For example, if you have a beauty channel then there could be something that’d interest you under health, entertainment, or even business.
Under the location menu choose the region most of your viewers are from. This might not be the same as where you are from – you could be in Australia and most of your viewers could be in the U.S. If you’re not sure where your viewers are from you can find out in your Creator Studio under Analytics > Demographics.
Once you have narrowed down your results you can just scroll through and pick out a topic related to your channel’s theme that you have something to say about.
For example, if you have a gaming channel and you’re looking for a non-gameplay topic to make a video on, you would look under Sci/Tech. If I look under that category today (May 29, 2017) and specify that I want topics trending in the United States then these are my top 5 results:
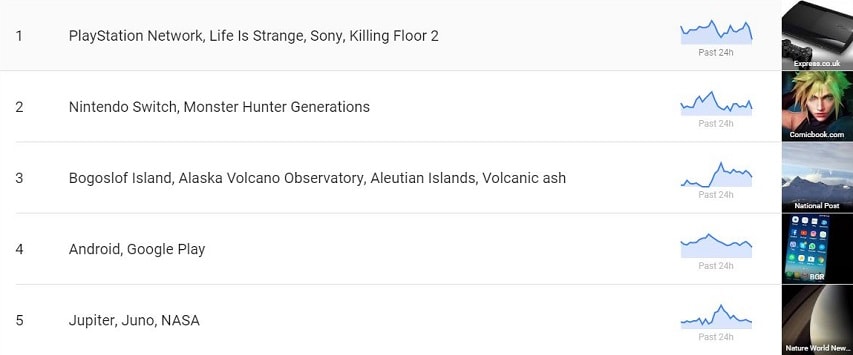
The first two happen to be about gaming. If you, as a gamer, had any strong reaction to either of these topics – whether it’s that you feel like you’re knowledgeable about them, or that you’re excited by something that’s coming up, or that something made you groan – then that would be a sign that you should make a video. Capitalizing on a trend while also covering a topic you have a lot to say about is always a good move.
Having something to say doesn’t have to mean having a strong opinion. If you just find something interesting and want to pass the information along to your viewers then that’s great too.
Clicking on these results will give you more specific data including how often the topic has been searched recently and links to recent news articles. These can give you a better idea of why it is trending and help you come up with what you want to say.
Part 3: Battle of the Keywords
Once you have a topic in mind for your next video – whether it came from Google Trends or your own noggin – think about what the most important keyword for that topic might be.
A keyword is a word or short phrase that people type into a search engine like Google or YouTube. In order for people to find your videos, you’ll have to include a keyword in your video’s title.
Once you have a keyword in mind, type it into the Explore bar at the top of your page in Google Trends.
What happens after you click enter is pretty much magic. Say I want to make a video on how to use Filmora. The first thing I’ll type into that Explore bar is ‘Filmora’.
You can see near the top that this chart represents searches for the topic over the last 5 years, which isn’t necessarily useful (although it is sort of cool that you can see when Filmora was ‘born’). I’m going to narrow that down to results from the U.S in the last week.
There, now I can see how the popularity of Filmora as a search term has spiked on specific days and times (if you hover over a spike it tells you the time and day) and plan to post my video at a time that capitalizes on these trends.
Next, what other words do I want to include in my video title? Is this a review, a tutorial, or a how-to? By clicking on my search term Filmora, I can edit it to read ‘filmora review’. Then I can click + Compare and type in ‘filmora tutorial’ and ‘how to use Filmora’. Google Trends will create a chart comparing the popularity of those 3 terms.
I also ‘zoomed out’ to 90 days – if I’d only looked at how they compared over the last week my results could have been skewed.
It’s pretty clear from the chart that ‘filmora review’ is the strongest of those 3 search terms. The title of my video should definitely start with the words Filmora Review because that is what most people are searching for when they want information about Filmora. Putting your most important keyword/search term first in your video titles will help them rank better in the viewer’s search results.
Although, when you do a comparison like this you should also go to YouTube and search for each potential keyword/phrase individually. It might turn out that there is a ton of strong competition for the most popular search term, and not as much for the second or third most popular. Here’s a search for ‘Filmora Review’ on YouTube:
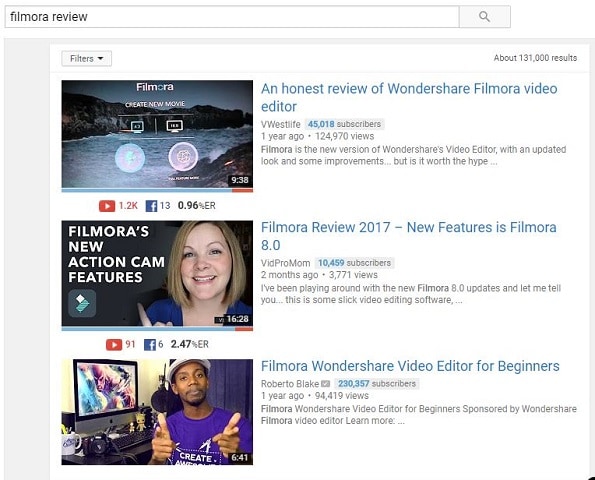
If my view of YouTube looks different from yours it’s because I’m using the VidIQ plugin for Chrome . It’s free and it gives you all kinds of extra info about videos and channels.
The second-highest ranked result is only 2 months old and isn’t from a huge channel. Although there is competition for this keyword, ranking for it is not impossible. It also helps that software reviews are a topic where people will always be looking for the latest information/newest videos.
If the search results for your keyword are dominated by monster channels with millions of subs, and you can’t think of an angle you can use to crack into those top results (i.e. having newer information people will be looking for, which the more established videos are lacking), then maybe try the search with your second best keyword and see if there’s a better opportunity for you to rank there.
One of the biggest benefits of identifying trends and making videos about them quickly is that you can get in before there’s a lot of competition for the first few pages of search results on YouTube or Google, and before larger channels start making videos of their own on the same topic.
Want to make coming up with YouTube video ideas a habit? This post here will help you develop a process to generate more ideas and properly evaluate them.
Making Better YouTube Videos with Filmora
As one of the most widely used video editing software among YouTubers, Filmora provides plentiful editing tools, such as cut, trim, video stabilization , noise removal , chroma key compositing , and color grading. Besides, there are royalty-free music track and sound effects available in the built-in Audio library, and title templates and presets, as well as elements and effects. Download the free trial version below and get started now.


Richard Bennett
Richard Bennett is a writer and a lover of all things video.
Follow @Richard Bennett
Richard Bennett
Oct 26, 2023• Proven solutions
There is always something to make a video about. It’s a big world where new things happen every day, in every YouTube niche . One of the best ways to climb to the top of YouTube’s search engine results is to be among the first creators to make a video about a trending topic.
But how do you know what’s trending? If you’re in a huge genre like beauty or technology then it’s not impossible to keep track of the latest news and trends, but you probably hear about things as other people start making videos and as websites start publishing articles. How do you get on top of trends just as they’re becoming trends?
Google Trends, of course!
Google Trends is a completely free tool you can use to determine what’s trending on YouTube or in Google’s search engine. Here’s how you can use Google Trends to figure out what’s trending in your niche and make a video before there’s tons of competition.
Part 1: Seeing The Big Picture
You’ll need to be signed into your Google account to use Google Trends.
Start off at trends.google.com and you’ll see what’s trending in general – usually big news stories or things like sports finals. The data is laid out like this: at the top there are three ‘Featured Insights’. These are three of the most popular trending topics paired with graphs of their recent search traffic. Underneath these there will be a list of stories that are currently trending. You can click on them to see charts of their search data and links to where the stories are being covered online.
Unless you do news or political commentary on your channel these probably aren’t topics you want to cover, but if you like to insert some topical references into your other videos then it’s still good to be aware of these things.
To get information more relevant to your channel you’re going to have to do some filtering.
Part 2: Getting Results That Matter to You
In the Google Trend home page, scroll down to the ‘Recently Trending’ section and click on ‘More Trending Searches’.
Then click from ‘Daily Search Trends’ to ‘Realtime Search Trends’.
On top you will see two drop-down menus, one is for the category and one is for location.
Under All categories select the general theme your channel falls under.
Your options are business, entertainment, health, Sci/Tech, sports, and top stories.
It might be the case that your channel doesn’t fall under any of these themes, but there could still be related stories for you in other categories. For example, if you have a beauty channel then there could be something that’d interest you under health, entertainment, or even business.
Under the location menu choose the region most of your viewers are from. This might not be the same as where you are from – you could be in Australia and most of your viewers could be in the U.S. If you’re not sure where your viewers are from you can find out in your Creator Studio under Analytics > Demographics.
Once you have narrowed down your results you can just scroll through and pick out a topic related to your channel’s theme that you have something to say about.
For example, if you have a gaming channel and you’re looking for a non-gameplay topic to make a video on, you would look under Sci/Tech. If I look under that category today (May 29, 2017) and specify that I want topics trending in the United States then these are my top 5 results:
The first two happen to be about gaming. If you, as a gamer, had any strong reaction to either of these topics – whether it’s that you feel like you’re knowledgeable about them, or that you’re excited by something that’s coming up, or that something made you groan – then that would be a sign that you should make a video. Capitalizing on a trend while also covering a topic you have a lot to say about is always a good move.
Having something to say doesn’t have to mean having a strong opinion. If you just find something interesting and want to pass the information along to your viewers then that’s great too.
Clicking on these results will give you more specific data including how often the topic has been searched recently and links to recent news articles. These can give you a better idea of why it is trending and help you come up with what you want to say.
Part 3: Battle of the Keywords
Once you have a topic in mind for your next video – whether it came from Google Trends or your own noggin – think about what the most important keyword for that topic might be.
A keyword is a word or short phrase that people type into a search engine like Google or YouTube. In order for people to find your videos, you’ll have to include a keyword in your video’s title.
Once you have a keyword in mind, type it into the Explore bar at the top of your page in Google Trends.
What happens after you click enter is pretty much magic. Say I want to make a video on how to use Filmora. The first thing I’ll type into that Explore bar is ‘Filmora’.
You can see near the top that this chart represents searches for the topic over the last 5 years, which isn’t necessarily useful (although it is sort of cool that you can see when Filmora was ‘born’). I’m going to narrow that down to results from the U.S in the last week.
There, now I can see how the popularity of Filmora as a search term has spiked on specific days and times (if you hover over a spike it tells you the time and day) and plan to post my video at a time that capitalizes on these trends.
Next, what other words do I want to include in my video title? Is this a review, a tutorial, or a how-to? By clicking on my search term Filmora, I can edit it to read ‘filmora review’. Then I can click + Compare and type in ‘filmora tutorial’ and ‘how to use Filmora’. Google Trends will create a chart comparing the popularity of those 3 terms.
I also ‘zoomed out’ to 90 days – if I’d only looked at how they compared over the last week my results could have been skewed.
It’s pretty clear from the chart that ‘filmora review’ is the strongest of those 3 search terms. The title of my video should definitely start with the words Filmora Review because that is what most people are searching for when they want information about Filmora. Putting your most important keyword/search term first in your video titles will help them rank better in the viewer’s search results.
Although, when you do a comparison like this you should also go to YouTube and search for each potential keyword/phrase individually. It might turn out that there is a ton of strong competition for the most popular search term, and not as much for the second or third most popular. Here’s a search for ‘Filmora Review’ on YouTube:
If my view of YouTube looks different from yours it’s because I’m using the VidIQ plugin for Chrome . It’s free and it gives you all kinds of extra info about videos and channels.
The second-highest ranked result is only 2 months old and isn’t from a huge channel. Although there is competition for this keyword, ranking for it is not impossible. It also helps that software reviews are a topic where people will always be looking for the latest information/newest videos.
If the search results for your keyword are dominated by monster channels with millions of subs, and you can’t think of an angle you can use to crack into those top results (i.e. having newer information people will be looking for, which the more established videos are lacking), then maybe try the search with your second best keyword and see if there’s a better opportunity for you to rank there.
One of the biggest benefits of identifying trends and making videos about them quickly is that you can get in before there’s a lot of competition for the first few pages of search results on YouTube or Google, and before larger channels start making videos of their own on the same topic.
Want to make coming up with YouTube video ideas a habit? This post here will help you develop a process to generate more ideas and properly evaluate them.
Making Better YouTube Videos with Filmora
As one of the most widely used video editing software among YouTubers, Filmora provides plentiful editing tools, such as cut, trim, video stabilization , noise removal , chroma key compositing , and color grading. Besides, there are royalty-free music track and sound effects available in the built-in Audio library, and title templates and presets, as well as elements and effects. Download the free trial version below and get started now.
Richard Bennett
Richard Bennett is a writer and a lover of all things video.
Follow @Richard Bennett
Also read:
- In 2024, Elevate Your Content's Appeal Professional BG Techniques for YouTube Thumbnails
- 2024 Approved Elite 10 Audio Boosters for OS X, iOS, Android
- Best 5 Video Editing Platforms That Don't Feature in YouToo
- In 2024, Enhance Visibility The Most Effective 30 FreeFire Tags for Video Marketing
- What's In Your Wallet From One Million YouTube Sights?
- 2024 Approved 5 Dynamic Fitness Series Ideas to Enhance Viewer Retention
- 10 Power Players YouTube's Ladies in Gaming
- In 2024, Adding Impact Strategies for Youtubes' Last Impressions
- [Updated] 2023'S Premier Movie Options Beyond The Top Selections
- Controlling Comment Visibility on YouTube Videos for 2024
- 2024 Approved Elevating Engagement Optimal Size & Ratio on YouTube
- Crafting Success on YouTube Standard Studio or Beta
- Innovative Filmmaking Tools Best Lenses for Content Makers
- [Updated] Entryway Investments Cost-Effective Channels for Newbies
- How to Edit YouTube Videos in Finalcut Pro for 2024
- Aural and Visual Summary Synthesizer
- Cutting-Edge Unboxing Strategies to Boost Viewership and Engagement for 2024
- Crafting the Perfect Pitch Inviting Listeners to Join Us for 2024
- A Beginner's Guide to Embedding YouTube Playlists in Code
- Crafting YouTube Entrance Videos with the Top Tools for 2024
- Trailblazers Creating Engaging Marvellous Universe
- YouTube Entrepreneurship Building a Recognizable Brand
- A Journey Through the Digital Landscape Six Engaging Quizzes for Every Vlogger Admirer for 2024
- Insider's Look at Top 9 FREE Platforms for Designing YouTube Logos
- Leading 5 Audio Caps for Streaming Enthusiasts
- Enhance Your Online Skills A Guide to YouTube Editing via Sony Vegas for 2024
- Nine All-Inclusive Free Holiday Movies Streamed on YouTube
- Mastering the Art of Acquiring YT Channel Revenue
- [Updated] Affordable YouTube Intro Designs and Templates
- 8 Best Webspots FREE Eco-Backdrops and Footage Collection for 2024
- In 2024, Break Through the Crowd Key YouTube SEO Strategies to Rank High
- Revolutionary Tools for Next-Gen Streaming Experience
- 2024 Approved Epic Entertainment A Rundown of Hilarious YouTuber Hits
- Cutting-Edge Free Audio for YouTube Visionaries for 2024
- The Newcomer's Playbook for Youtube Success Setup & Revenue Generation
- Chuckle Factory Designing 7 Video Ideas for Humorists
- [Updated] Cashing In on Content The Carminati Effect (AJay)
- Step-by-Step Guide to Cutting-Edge Unboxing
- Ultimate Guide to the Best 10 Video Saving Devices
- [Updated] Effortlessly Convert YouTube Audio - Top 4 Low-Cost Apps
- Discovering New Horizons in Online Videos The Best 27 Non-YouTube Sites
- Speedy Solutions to Unsettle and Reorder YouTube Songs
- Strategies to Dodge Content Advisory Strikes
- [Updated] Crafting a Sports Highlight Step-by-Step Tutorial
- [New] Crafting Perfect Youtube Channel Names A Comprehensive Guide for Video Content Creators (Maximum Length 156 Characters)
- Skyrocketing Subscribers on YouTube Step-by-Step
- Maximizing Earnings on YouTube Universal Device Accessibility
- Your Daily Dose of Joy Top 15 Online Anime Shows
- 2024 Approved Elite's Free Guide to 10 Caption Download Tools
- [New] Club Vibes Best DJ Template Video Selections
- In 2024, Top 4 SIM Location Trackers To Easily Find Your Lost Samsung Galaxy A34 5G Device
- [Updated] 2024 Approved Unlink Discord From PC/Mobile
- [New] In 2024, Resume Your TikTok Journey Post-Reload Error
- Android Safe Mode - How to Turn off Safe Mode on Honor Magic5 Ultimate? | Dr.fone
- In 2024, Bring Clarity to Your Feed A Guide to Crafting Square Videos in iMovie
- [Updated] Transmit Live Camera Feed Using VLC Media Player for 2024
- New In 2024, Converting Text to MP3 Insider Secrets for Maximum Impact
- [New] 2024 Approved Solve Invisible Buffer Problems in Video Games
- Perfect Your Videography Skills with Our Expert Tutorial Series for 2024
- Prevent Cross-Site Tracking on Tecno Camon 20 Premier 5G and Browser | Dr.fone
- [Updated] Command the Clicks Mastering Engagement Tactics for Instagram
- Which is the Best Fake GPS Joystick App On Nokia C110? | Dr.fone
- [Updated] 2024 Approved A Pocket Guide for Channel Setup and Management on Discord
- [New] 2024 Approved Creative Loss Unexpectedly Banished Vid
- [Updated] What Is a Watermark? How to Watermark Your Facebook Photos/Videos for 2024
- [New] 2024 Approved Pioneering Patterns Screen Cast with Loom Pro
- Tutorial to Change Vivo Y27 4G IMEI without Root A Comprehensive Guide
- Does Airplane Mode Turn off GPS Location On Lava Blaze 2 Pro? | Dr.fone
- [New] Capture the Rhythm Rapid Tap Into TikTok Videos
- Breaking Down This Year's Latest TikTok Wave for 2024
- Updated Free Voice Creation Platforms Speak Your Text Now, In 2024
- Hard Reset Motorola Moto G 5G (2023) in 3 Efficient Ways | Dr.fone
- How to Unlock Disabled Apple iPhone SE (2020)/iPad Without Computer
- In 2024, Top 12 Prominent Vivo X90S Fingerprint Not Working Solutions
- [Updated] 2024 Approved Bridging the Gap Converting Snapchat's Flash Into Files
- [Updated] In 2024, Zero Clutter, Max Impact Professional Tips for Striking Virtual Presence
- [Updated] 2024 Approved Enhancing Communication Strategies for Effective Call Logging
- [Updated] IMovie Techniques for Squaring Up Your Instagram Feed for 2024
- Reasons for Samsung Galaxy M34 5G Stuck on Boot Screen and Ways To Fix Them | Dr.fone
- In 2024, Life360 Learn How Everything Works On Honor Play 40C | Dr.fone
- Best Android Data Recovery - Retrieve Lost Contacts from C12 Plus.
- [New] In 2024, Income on Instagram Comprehensive Step-by-Step Guide
- New Premium Audio Excision Tools for Windows Media Files
- Updated Top 15 Soundtracks Without Copyrights for Montage Projects
- In 2024, The Best Methods to Unlock the iPhone Locked to Owner for iPhone 13 mini
- In 2024, How to Change Credit Card from Your Apple iPhone 8 Apple ID and Apple Pay
- How to Bypass Google FRP Lock on Realme 12 Pro 5G Devices
- In 2024, How to Fake GPS on Android without Mock Location For your Motorola Edge 40 Neo | Dr.fone
- [Updated] In 2024, Elite Gamers' Screen Capture Software
- Reclaiming Acoustics Lost in Social Media Videos
- Title: Crafting Video Magic with iMovie, Directed to YouTube
- Author: Kevin
- Created at : 2024-06-18 20:20:22
- Updated at : 2024-06-19 20:20:22
- Link: https://youtube-videos.techidaily.com/crafting-video-magic-with-imovie-directed-to-youtube/
- License: This work is licensed under CC BY-NC-SA 4.0.
