
:max_bytes(150000):strip_icc()/JanetPhan-ProfessionalWeb-82f9b60035e04a31bd8db9f8df8d44a5.jpg)
Crafting Engaging Life Journeys in Video Formats
Crafting Engaging Life Journeys in Video Formats
How to Create a Lifestyle Video to Inspire Your Audience

Richard Bennett
Mar 27, 2024• Proven solutions
Do you wish to show your brand or product to inspire your audience with the lifestyle that they aspire to have? Are you on the lookout for innovative ways to earn intensely loyal and interactive followers for your business? Creating a lifestyle video that appeals to a niche demographic and helps your audience visualize how your products fit into their way of life is the ideal way to motivate them to take action and become your customer.
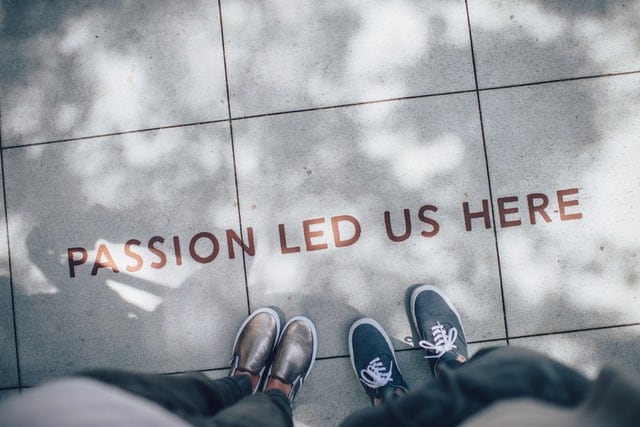
Whether you are a lifestyle brand or not, you need to offer content that educates and informs your audience and stands out amongst the best in the industry. Videos are an excellent way to connect with the audience, especially for brands that wish to engage their customers with meaningful content.
Today, businesses of every size tend to favor lifestyle videos that better appeal to the audience and communicate the brand’s values. Creating an attractive lifestyle video can thus be the ticket to reach a wider audience and upgrade the digital presence of every business.
- Part 1: What is Lifestyle Video?
- Part 2: 6 Key Benefits of Creating a Lifestyle Video
- Part 3: How to Create a Lifestyle Video?
- Part 4: How to Promote Your Lifestyle Video?
What is Lifestyle Video?
Lifestyle content exemplifies the ‘lifestyle’ behind a product or service and appeals to the demographic that you are trying to reach. It is a form of video marketing that pushes products and services to customers by showing the quality of life associated with a particular brand.
The principal objective of lifestyle content is appealing to a specific demographic, culture, or subculture. With these videos, you can focus on your products and services, using stunning visuals and action shots to portray a beautiful picture of what your brand’s potential customers’ lives will be like if they become the consumer of your product and services.
6 Key Benefits of Creating a Lifestyle Video
1. Informing & Educating
One of the most significant benefits of lifestyle content is that it helps customers understand products. With a plethora of choices out there, marketers today are no longer taking the pitching kind of approach. They want to approach their audience with a value-based offer instead of sales. And with lifestyle videos, you can excel at giving customers a close-up look at your products and services.
2. Caters to Your Audience’s Interests
Lifestyle content caters to the target audience. Since these videos define your market and your brand, it carries a specific style that’s based on your aesthetics or looks. What makes video marketing so effective is that they can introduce your story and brand in an interesting way to potential customers.
3. Search Engine Optimization
Search engines love high-quality content like videos. Using lifestyle videos in your web pages and other types of content can thus work wonders for search engine optimization. As long as your lifestyle video is well-optimized with the right keywords, a solid title, and a good meta description, your video content can increase your web traffic.
4. Great Promotional Tool
Brands can distribute lifestyle content on different channels for reaching your target audience right away. Once you post the video on your website, you can share it on your social networking platforms or promote it with paid ads. This way, you can get customers excited about what you are offering them.
5. Taps into Emotions
Emotions are a significant component of the purchasing decision of consumers. Studies have found that ad campaigns with only emotional content perform about twice as well compared to those with only rational content. So, creating lifestyle video content that makes your audience feel good can put your business in a positive light.
6. Boosts Conversions
Lifestyle videos are excellent for conversions on websites as they influence visitors by promoting the lifestyle a customer can achieve if they patronize the product or service. What makes such content more compelling is that they excite customers about what you offer them.
How to Create a Lifestyle Video?
The most stunning lifestyle videos are polished, sleek, and visually appealing. Developing a lifestyle video content that exceeds your target audience’s expectations is vital to appeal to your customer’s perfect lifestyle. Creating these videos is easy if you follow the step-by-step guide.
Step 1: Pre-Production
The pre-production stage is when the planning happens for a video. From creative brainstorming to innovative storyboarding, everything happens here. Pre-production begins with experts getting a feel of your product, who it appeals to, and how it works. Next, is the stage of scripting out your video, writing down the visual ideas, and the product features and dialogue that go alongside it. Finally, you need to round up talents like actors, voice-actors, locations, and extras needed to film.
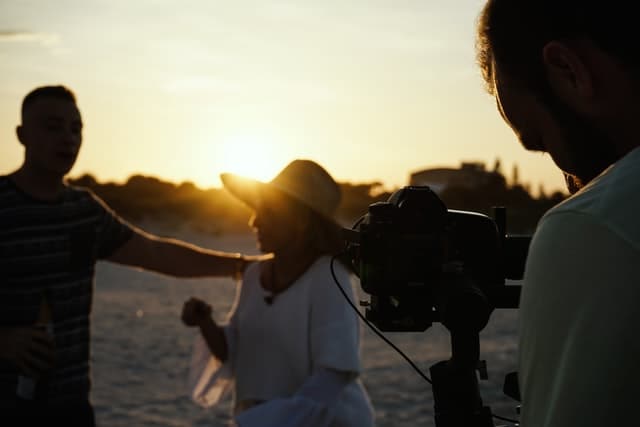
Step 2: Production
Once your lifestyle video is meticulously planned out, your next step is to film it. While shooting an average video takes eight hours, some videos with several locations can require two full shooting days or more. The exact shooting schedule depends on what the script demands.
Since these videos are meant to capture a particular way of life for appealing to a specific kind of person, you should not cut corners in terms of quality. Remember, the better the quality of the footage, the more appealing the end product will be.
Step 3: Post-Production
It is the stage where you need to gather the footage you have shot so far and put them along with voice-over or music depending on your script demands. The main goal in this stage is to put the visuals together in a captivating way to promote your service and product. Here, using a powerful video editing tool seems necessary because you need to make your lifestyle video stand out from the crowd.


How to Promote Your Lifestyle Video?
A lifestyle video is one of the popular marketing tools for businesses of every size today. These videos are more memorable, more engaging, and much more popular than any other kinds of content among consumers. But, are you curious as to how to promote your lifestyle content to gain maximum exposure? All you need to do is distribute your lifestyle content on the proper channels to grab your audience’s attention and engage with new consumers.

Social Media
Lifestyle videos are aspirational, enlightening in nature, and made to appeal to specific demographics. It makes them great content for sharing on social networking platforms – an active digital marketing channel. Share your lifestyle content across various social media accounts. Ensure you attach a call-to-action for your friends and followers to share.
Your Company’s Website
Hosting your promotional videos on your website, particularly your homepage is an excellent way to immediately introduce incoming web traffic to your products and services, thus increasing your site’s SEO ranking. Besides the homepage, sharing the video content on your blogs is another unique way of re-purposing your content.
Media Outlets
Find out related media outlets that your potential customers read and follow daily. It would help if you also pitched journalists who take an interest in your brand or consider purchasing advertising space on their website. Since there are both correct and incorrect ways to do so, ensure you conduct thorough research on how to pitch media outlets beforehand.
Paid Advertising
You can also pay for featuring your lifestyle video on popular blogs and social networking sites. This way, you can take advantage of hyper-specific tools for reaching your target audience. Advertising on social media platforms like YouTube, Twitter, Facebook, and LinkedIn is an excellent way to reach the right demographic.
Niche Groups & Forums
When targeting a particular demographic, you will want to reach out to where your audience hangs out online. Do research on the industry chat rooms your target demographic frequently uses. While sharing your video content on these channels, just ensure that they are relevant to your potential customer-base, regularly updated, and also includes active users.
Conclusion
Lifestyle videos allow brands to connect with their consumers better. Whether you are a start-up, an SME, or an established company, lifestyle videos may be just what you need to create a unique brand statement or get people excited about your product or service. So what are you still waiting for? It’s time to create content that resonates with your target market and establish your business as a top choice!
Richard Bennett
Richard Bennett is a writer and a lover of all things video.
Follow @Richard Bennett
Richard Bennett
Mar 27, 2024• Proven solutions
Do you wish to show your brand or product to inspire your audience with the lifestyle that they aspire to have? Are you on the lookout for innovative ways to earn intensely loyal and interactive followers for your business? Creating a lifestyle video that appeals to a niche demographic and helps your audience visualize how your products fit into their way of life is the ideal way to motivate them to take action and become your customer.
Whether you are a lifestyle brand or not, you need to offer content that educates and informs your audience and stands out amongst the best in the industry. Videos are an excellent way to connect with the audience, especially for brands that wish to engage their customers with meaningful content.
Today, businesses of every size tend to favor lifestyle videos that better appeal to the audience and communicate the brand’s values. Creating an attractive lifestyle video can thus be the ticket to reach a wider audience and upgrade the digital presence of every business.
- Part 1: What is Lifestyle Video?
- Part 2: 6 Key Benefits of Creating a Lifestyle Video
- Part 3: How to Create a Lifestyle Video?
- Part 4: How to Promote Your Lifestyle Video?
What is Lifestyle Video?
Lifestyle content exemplifies the ‘lifestyle’ behind a product or service and appeals to the demographic that you are trying to reach. It is a form of video marketing that pushes products and services to customers by showing the quality of life associated with a particular brand.
The principal objective of lifestyle content is appealing to a specific demographic, culture, or subculture. With these videos, you can focus on your products and services, using stunning visuals and action shots to portray a beautiful picture of what your brand’s potential customers’ lives will be like if they become the consumer of your product and services.
6 Key Benefits of Creating a Lifestyle Video
1. Informing & Educating
One of the most significant benefits of lifestyle content is that it helps customers understand products. With a plethora of choices out there, marketers today are no longer taking the pitching kind of approach. They want to approach their audience with a value-based offer instead of sales. And with lifestyle videos, you can excel at giving customers a close-up look at your products and services.
2. Caters to Your Audience’s Interests
Lifestyle content caters to the target audience. Since these videos define your market and your brand, it carries a specific style that’s based on your aesthetics or looks. What makes video marketing so effective is that they can introduce your story and brand in an interesting way to potential customers.
3. Search Engine Optimization
Search engines love high-quality content like videos. Using lifestyle videos in your web pages and other types of content can thus work wonders for search engine optimization. As long as your lifestyle video is well-optimized with the right keywords, a solid title, and a good meta description, your video content can increase your web traffic.
4. Great Promotional Tool
Brands can distribute lifestyle content on different channels for reaching your target audience right away. Once you post the video on your website, you can share it on your social networking platforms or promote it with paid ads. This way, you can get customers excited about what you are offering them.
5. Taps into Emotions
Emotions are a significant component of the purchasing decision of consumers. Studies have found that ad campaigns with only emotional content perform about twice as well compared to those with only rational content. So, creating lifestyle video content that makes your audience feel good can put your business in a positive light.
6. Boosts Conversions
Lifestyle videos are excellent for conversions on websites as they influence visitors by promoting the lifestyle a customer can achieve if they patronize the product or service. What makes such content more compelling is that they excite customers about what you offer them.
How to Create a Lifestyle Video?
The most stunning lifestyle videos are polished, sleek, and visually appealing. Developing a lifestyle video content that exceeds your target audience’s expectations is vital to appeal to your customer’s perfect lifestyle. Creating these videos is easy if you follow the step-by-step guide.
Step 1: Pre-Production
The pre-production stage is when the planning happens for a video. From creative brainstorming to innovative storyboarding, everything happens here. Pre-production begins with experts getting a feel of your product, who it appeals to, and how it works. Next, is the stage of scripting out your video, writing down the visual ideas, and the product features and dialogue that go alongside it. Finally, you need to round up talents like actors, voice-actors, locations, and extras needed to film.
Step 2: Production
Once your lifestyle video is meticulously planned out, your next step is to film it. While shooting an average video takes eight hours, some videos with several locations can require two full shooting days or more. The exact shooting schedule depends on what the script demands.
Since these videos are meant to capture a particular way of life for appealing to a specific kind of person, you should not cut corners in terms of quality. Remember, the better the quality of the footage, the more appealing the end product will be.
Step 3: Post-Production
It is the stage where you need to gather the footage you have shot so far and put them along with voice-over or music depending on your script demands. The main goal in this stage is to put the visuals together in a captivating way to promote your service and product. Here, using a powerful video editing tool seems necessary because you need to make your lifestyle video stand out from the crowd.
How to Promote Your Lifestyle Video?
A lifestyle video is one of the popular marketing tools for businesses of every size today. These videos are more memorable, more engaging, and much more popular than any other kinds of content among consumers. But, are you curious as to how to promote your lifestyle content to gain maximum exposure? All you need to do is distribute your lifestyle content on the proper channels to grab your audience’s attention and engage with new consumers.
Social Media
Lifestyle videos are aspirational, enlightening in nature, and made to appeal to specific demographics. It makes them great content for sharing on social networking platforms – an active digital marketing channel. Share your lifestyle content across various social media accounts. Ensure you attach a call-to-action for your friends and followers to share.
Your Company’s Website
Hosting your promotional videos on your website, particularly your homepage is an excellent way to immediately introduce incoming web traffic to your products and services, thus increasing your site’s SEO ranking. Besides the homepage, sharing the video content on your blogs is another unique way of re-purposing your content.
Media Outlets
Find out related media outlets that your potential customers read and follow daily. It would help if you also pitched journalists who take an interest in your brand or consider purchasing advertising space on their website. Since there are both correct and incorrect ways to do so, ensure you conduct thorough research on how to pitch media outlets beforehand.
Paid Advertising
You can also pay for featuring your lifestyle video on popular blogs and social networking sites. This way, you can take advantage of hyper-specific tools for reaching your target audience. Advertising on social media platforms like YouTube, Twitter, Facebook, and LinkedIn is an excellent way to reach the right demographic.
Niche Groups & Forums
When targeting a particular demographic, you will want to reach out to where your audience hangs out online. Do research on the industry chat rooms your target demographic frequently uses. While sharing your video content on these channels, just ensure that they are relevant to your potential customer-base, regularly updated, and also includes active users.
Conclusion
Lifestyle videos allow brands to connect with their consumers better. Whether you are a start-up, an SME, or an established company, lifestyle videos may be just what you need to create a unique brand statement or get people excited about your product or service. So what are you still waiting for? It’s time to create content that resonates with your target market and establish your business as a top choice!
Richard Bennett
Richard Bennett is a writer and a lover of all things video.
Follow @Richard Bennett
Navigating the World of Time Stamps in YouTube Links (Desktop/Mobile)
How to Add Timestamps on YouTube Video Link?
Richard Bennett
Mar 27, 2024• Proven solutions
It is a well-known fact that internet users have a short interest span, about just eight seconds. This attention span applies to all internet platforms including YouTube. YouTube is the second largest and most visited search engine after Google. It provides users with information through engaging and eye-catchy videos. However, certain videos are longer where only a particular section of the video holds the important information. Viewers tend to skip the long videos and if you do not want this to happen to you, you can link to that specific part on your video adding value for your channel viewers with a link known as the YouTube Timestamp link.
When you have a Timestamp link on your video, you can help your viewers directly reach the specific time in the video. This helps avoid the viewers from losing interest or to search for the key part in your video themselves.
Here in this article, we will explain Timestamp links, how to add Timestamp to YouTube video links, and what are the benefits of Timestamp.
- Part 1: YouTube Timestamp Links Introduction
- Part 2: Adding a Timestamp to YouTube Video Link on Desktop
- Part 3: How to Share Specific Parts of YouTube Video
- part 4: Getting YouTube Timestamp Link on Mobile
- Part 5: FAQ About YouTube Timestamps
Part 1: What is YouTube Timestamp Links
In this fast-paced world where viewers have limited time at hand, YouTube Timestamp links are extremely helpful. These links are anchor text or video hyperlinks found either in the description beneath the video or at the video link end.

The Timestamps links allow you to put a link to a key moment in your YouTube video allowing the viewers and subscribers to view the video at the precise time specified. Your YouTube video maybe half an hour long or maybe your users do not have the time now or forget to later watch your video, but when you add Timestamp to the YouTube link, you provide them ways to get to the content quickly enhancing the user experience.
In addition to this, you can even provide a reference in minutes and hours where necessary. The YouTube Timestamp link acts as a guide that directs viewers to the part of the video, which is most relevant to them without having to watch the entire video.
Part 2: How to Add a Timestamp to YouTube Video Link on Desktop?
In the following section, I will show you how to add timestamp to YouTube video link in several ways.
Use YouTube’s Share Feature
Using YouTube’s share feature is the simplest way to add Timestamp to YouTube videos. Here are easy steps to follow to do this.
- Open the YouTube video on your desktop that you want to share.
- Play the video or navigate the timeline and stop at the key moment you wish to apply the timestamp to.
- Now click on the Share button, a pop-up will appear. Under the URL, you will see a small box indicating Start at. The Timestamp is generated automatically, but you can adjust it.

- Copy the updated URL with Timestamp to share the video or click on the social sharing icons to do so.
- When your viewers click on this URL, the video will begin at the specified Timestamp.
Use the Browser URL to add Timestamp manually
You can add Timestamp manually as well. Follow the step-by-step guide below to add a Timestamp manually.
- Open your YouTube video in a browser on your desktop and then find the URL in the browser’s address bar.
- Enter the specific time you want the viewers to watch the video from at the end of the video URL.
You can add time manually in two ways depending on the URL.
?t=As or
&t=As
“youtu.be/” Format
If your YouTube video link is a youtu.be format, then just add ?t=As at the end of the video link. The A denotes the seconds at which you want the viewer to watch your video. The time can also be specified in minutes and seconds and when you want to do that just add ?t=AmBs. For instance, ?t=2m40s.
“youtube.com/” Format
When your YouTube video link has a youtube.com format, the adjustment starts with an ampersand. &t=As or &t=AmBs is what you can use. If you are looking to add the Timestamp at 2m40s, just add “&t=2m40s at the end of the video URL.
Whenever anybody uses the URL with Timestamp, the video will start from the specified time.
However, when adding a Timestamp manually, always leave include whole numbers. For example, if the time starts at 4m, use 4 and not 04.
Copy video URL at current time
You can use YouTube’s built-in feature to share the key parts of your YouTube video. Follow the steps here.
- Visit YouTube and open the video you want to add Timestamp link to.
- Play the video or navigate the timeline to reach the specific part you like to use in Timestamp.
- Now either press Ctrl + click or right-click anywhere on the video. A pop-up opens where you can see various texts, click on the Copy video URL at current time and share the link.

- Anyone who clicks on this link will be instantly transported to the exact segment of your YouTube video.
Part 3: How to Share Specific Parts of Videos with Vibby and Get YouTube Link with Timestamp
The above-mentioned methods to add and send YouTube link with timestamp are quick and easy, but they have a few limitations. If you need more control and share highlighted parts of YouTube video without cutting the video, you need to use a third-party tool known as Vibby.
Vibby allows you to not only share specific parts of videos from YouTube but other platforms as well like Vimeo and Twitch. With the tool, you can clip multiple sections of the video and share them with others.
- To get started, signup either with mail, Google, Twitter, Facebook, or Twitch account.
- Once signed in, go to Create vib at the top left corner and then paste the URL of the YouTube video you would like to share and then click on the Start button.

- Your video will load in the Vibby editor, now click on Highlight the parts to share.
- Here you will see the Start highlight button, jump 5-sec option, option to switch between HD and SD video quality, and volume control button. Navigate to the part you want to share and click on Start highlight.

- When you reach the end of the part, click on Finish highlight. Repeat the process to highlight multiple parts of the video. All the highlighted parts will appear in a list on the right side of the screen.
- Add a description to each part and format it, you have the option to preview before hitting the Save vib button.
- Name the vib and assign a category and then publish it to Vibby or make it a private vib.
- You get a dedicated link to your vib with the ability to embed it on your website or blog.
In this way, you can share the highlights of the YouTube video or Vimeo video easily.
Part 4: How to Get YouTube Timestamp Link on iPhone and Android?
Linking to specific YouTube Timestamp Link is straightforward on both iPhone and Android.
- Go to YouTube and select the video you want to share.
- Move through the progress bar of the video to reach the key part and click on the Share button.
- A pop-up menu appears, highlight the URL and click on the Copy button.
- Paste the URL and manually add the Timestamp using the steps mentioned in add a Timestamp manually.
Part 5: Is Timestamp Beneficial for your Video?
Timestamping your YouTube videos may decrease the watch time, but it enhances the user experience, and they want to see more of your videos. Apart from this, adding Timestamps to your videos make your videos discoverable through Google search. YouTube and Google will reward you for the videos in form of a high search engine ranking.
Bonus: How to Add YouTube Timestamp Link in YouTube Video Description
Adding a YouTube Timestamp link in your video description is easy. Here are the steps to do so.
- Go to your YouTube channel and select the video you want to add Timestamp to and then navigate to the description below it.
- Edit the description by clicking on the Edit Video button.
- You are redirected to the Video Details page. Here write 0:00 at the first part of the timecode, and then continue with the time of the key part of the video you want to add the Timestamp to in 2:40 format. You can add more Timestamp as well and then click on the Save button.

- Reload the video page and you will see auto-generated Timestamp Links at the specific time you provided in the description.
Note: You need to add at least three timestamps which are 10 seconds or longer in order to add timestamps successfully.
Conclusion
As much as possible YouTubers want to make videos short and to the point. However, if a video needs to be longer, you can still help users navigate through to find what is important to them by adding Timestamp to YouTube link or Timestamp the YouTube descriptions. This can help your viewers jump straight to the interesting part in the video, rather than viewing the entire video saving their time and boost user experience.
Richard Bennett
Richard Bennett is a writer and a lover of all things video.
Follow @Richard Bennett
Richard Bennett
Mar 27, 2024• Proven solutions
It is a well-known fact that internet users have a short interest span, about just eight seconds. This attention span applies to all internet platforms including YouTube. YouTube is the second largest and most visited search engine after Google. It provides users with information through engaging and eye-catchy videos. However, certain videos are longer where only a particular section of the video holds the important information. Viewers tend to skip the long videos and if you do not want this to happen to you, you can link to that specific part on your video adding value for your channel viewers with a link known as the YouTube Timestamp link.
When you have a Timestamp link on your video, you can help your viewers directly reach the specific time in the video. This helps avoid the viewers from losing interest or to search for the key part in your video themselves.
Here in this article, we will explain Timestamp links, how to add Timestamp to YouTube video links, and what are the benefits of Timestamp.
- Part 1: YouTube Timestamp Links Introduction
- Part 2: Adding a Timestamp to YouTube Video Link on Desktop
- Part 3: How to Share Specific Parts of YouTube Video
- part 4: Getting YouTube Timestamp Link on Mobile
- Part 5: FAQ About YouTube Timestamps
Part 1: What is YouTube Timestamp Links
In this fast-paced world where viewers have limited time at hand, YouTube Timestamp links are extremely helpful. These links are anchor text or video hyperlinks found either in the description beneath the video or at the video link end.
The Timestamps links allow you to put a link to a key moment in your YouTube video allowing the viewers and subscribers to view the video at the precise time specified. Your YouTube video maybe half an hour long or maybe your users do not have the time now or forget to later watch your video, but when you add Timestamp to the YouTube link, you provide them ways to get to the content quickly enhancing the user experience.
In addition to this, you can even provide a reference in minutes and hours where necessary. The YouTube Timestamp link acts as a guide that directs viewers to the part of the video, which is most relevant to them without having to watch the entire video.
Part 2: How to Add a Timestamp to YouTube Video Link on Desktop?
In the following section, I will show you how to add timestamp to YouTube video link in several ways.
Use YouTube’s Share Feature
Using YouTube’s share feature is the simplest way to add Timestamp to YouTube videos. Here are easy steps to follow to do this.
- Open the YouTube video on your desktop that you want to share.
- Play the video or navigate the timeline and stop at the key moment you wish to apply the timestamp to.
- Now click on the Share button, a pop-up will appear. Under the URL, you will see a small box indicating Start at. The Timestamp is generated automatically, but you can adjust it.
- Copy the updated URL with Timestamp to share the video or click on the social sharing icons to do so.
- When your viewers click on this URL, the video will begin at the specified Timestamp.
Use the Browser URL to add Timestamp manually
You can add Timestamp manually as well. Follow the step-by-step guide below to add a Timestamp manually.
- Open your YouTube video in a browser on your desktop and then find the URL in the browser’s address bar.
- Enter the specific time you want the viewers to watch the video from at the end of the video URL.
You can add time manually in two ways depending on the URL.
?t=As or
&t=As
“youtu.be/” Format
If your YouTube video link is a youtu.be format, then just add ?t=As at the end of the video link. The A denotes the seconds at which you want the viewer to watch your video. The time can also be specified in minutes and seconds and when you want to do that just add ?t=AmBs. For instance, ?t=2m40s.
“youtube.com/” Format
When your YouTube video link has a youtube.com format, the adjustment starts with an ampersand. &t=As or &t=AmBs is what you can use. If you are looking to add the Timestamp at 2m40s, just add “&t=2m40s at the end of the video URL.
Whenever anybody uses the URL with Timestamp, the video will start from the specified time.
However, when adding a Timestamp manually, always leave include whole numbers. For example, if the time starts at 4m, use 4 and not 04.
Copy video URL at current time
You can use YouTube’s built-in feature to share the key parts of your YouTube video. Follow the steps here.
- Visit YouTube and open the video you want to add Timestamp link to.
- Play the video or navigate the timeline to reach the specific part you like to use in Timestamp.
- Now either press Ctrl + click or right-click anywhere on the video. A pop-up opens where you can see various texts, click on the Copy video URL at current time and share the link.
- Anyone who clicks on this link will be instantly transported to the exact segment of your YouTube video.
Part 3: How to Share Specific Parts of Videos with Vibby and Get YouTube Link with Timestamp
The above-mentioned methods to add and send YouTube link with timestamp are quick and easy, but they have a few limitations. If you need more control and share highlighted parts of YouTube video without cutting the video, you need to use a third-party tool known as Vibby.
Vibby allows you to not only share specific parts of videos from YouTube but other platforms as well like Vimeo and Twitch. With the tool, you can clip multiple sections of the video and share them with others.
- To get started, signup either with mail, Google, Twitter, Facebook, or Twitch account.
- Once signed in, go to Create vib at the top left corner and then paste the URL of the YouTube video you would like to share and then click on the Start button.
- Your video will load in the Vibby editor, now click on Highlight the parts to share.
- Here you will see the Start highlight button, jump 5-sec option, option to switch between HD and SD video quality, and volume control button. Navigate to the part you want to share and click on Start highlight.
- When you reach the end of the part, click on Finish highlight. Repeat the process to highlight multiple parts of the video. All the highlighted parts will appear in a list on the right side of the screen.
- Add a description to each part and format it, you have the option to preview before hitting the Save vib button.
- Name the vib and assign a category and then publish it to Vibby or make it a private vib.
- You get a dedicated link to your vib with the ability to embed it on your website or blog.
In this way, you can share the highlights of the YouTube video or Vimeo video easily.
Part 4: How to Get YouTube Timestamp Link on iPhone and Android?
Linking to specific YouTube Timestamp Link is straightforward on both iPhone and Android.
- Go to YouTube and select the video you want to share.
- Move through the progress bar of the video to reach the key part and click on the Share button.
- A pop-up menu appears, highlight the URL and click on the Copy button.
- Paste the URL and manually add the Timestamp using the steps mentioned in add a Timestamp manually.
Part 5: Is Timestamp Beneficial for your Video?
Timestamping your YouTube videos may decrease the watch time, but it enhances the user experience, and they want to see more of your videos. Apart from this, adding Timestamps to your videos make your videos discoverable through Google search. YouTube and Google will reward you for the videos in form of a high search engine ranking.
Bonus: How to Add YouTube Timestamp Link in YouTube Video Description
Adding a YouTube Timestamp link in your video description is easy. Here are the steps to do so.
- Go to your YouTube channel and select the video you want to add Timestamp to and then navigate to the description below it.
- Edit the description by clicking on the Edit Video button.
- You are redirected to the Video Details page. Here write 0:00 at the first part of the timecode, and then continue with the time of the key part of the video you want to add the Timestamp to in 2:40 format. You can add more Timestamp as well and then click on the Save button.
- Reload the video page and you will see auto-generated Timestamp Links at the specific time you provided in the description.
Note: You need to add at least three timestamps which are 10 seconds or longer in order to add timestamps successfully.
Conclusion
As much as possible YouTubers want to make videos short and to the point. However, if a video needs to be longer, you can still help users navigate through to find what is important to them by adding Timestamp to YouTube link or Timestamp the YouTube descriptions. This can help your viewers jump straight to the interesting part in the video, rather than viewing the entire video saving their time and boost user experience.
Richard Bennett
Richard Bennett is a writer and a lover of all things video.
Follow @Richard Bennett
Also read:
- Mastering YouTube Live Imagery A Comprehensive Overview
- 2024 Approved Best Microphone for Different YouTube Channel Types
- Strategic Hash Tags Chart Your Way to $60,000 in Views
- Digital Delegates Top YouTube Creators by Followers for 2024
- Deciphering the Innovative World of YouTube Studio for 2024
- [Updated] Elevating the Art of Unboxing Techniques and Tips for Success
- [New] Convert & Edit Wonders 10 Best YouTube Tools Feat. Audio
- [Updated] Cutting-Edge Tips for Professional YouTube Content Creation
- Coordinated Labeling Processes in YTB, Ins, Fb Worlds
- Boost Your Channel's Subscribers on a Shoestring Budget
- How to Easily Add Subtitles and Closed Captions to YouTube Video for 2024
- 2024 Approved Elevating Videography Mastery of the Green Screen Effect
- [New] Elevate Your Brand with AI-Enhanced Naming Solutions
- [Updated] Charting a Course Through YT's Creative Space
- From Zero to Hero in the Youtube World Starting Your Channel & Earning Money
- Elevate Video Popularity with Strategic #Hashtags
- Maximize Impact Aspect Ratio Expertise for YouTube Experts
- EditPrime Vision for 2024
- [New] Comprehensive Guide Your Shorts' Hidden Thumbnails
- [Updated] A Vlogger's Guide To Camera Lenses | Wondershare Filmora
- 2024 Approved Best of Both Worlds YouTube’s VR Gems
- Unraveling YouTube’s Platform for Content Crafting
- Mastering YouTube’s Creative Commons Licensing Guide
- 2024 Approved Average Gain for YouTubers per Ad Exposure?
- 2024 Approved Amplify Your Content Two Approaches to Skyrocket Traffic
- End Scenes Unlocked Tutorials to Enhance Viewing Experience for 2024
- [Updated] Channel Identity Constructing Memorable Templates for Gamers
- [New] Enhance Your Content Creation with These Top 12 Cameras
- Hard Reset Oppo A56s 5G in 3 Efficient Ways | Dr.fone
- The Seven Keys to Auditory Mastery for Fresh Audio Creation Techniques for 2024
- In 2024, How to Screen Share Mac to Apple iPhone 11 Pro? | Dr.fone
- New Complete Guide of Top Video Language Translators
- [New] Android & iPhone's Powerful Picklist Boosting Facebook Likeability
- In 2024, Twist Your Imagery Instagram's Video Rotation Guide
- [New] 2024 Approved Exclusive List 20 Complimentary Tools for Fb Ad Producers
- [Updated] Foodie Festivals Viral Virtues of TikTok Meals for 2024
- Exploring Chromatics From Theory to Tangible
- In 2024, Top 5 Time-Lapse Screen Recorder
- How to Amplify Your Online Presence with Google Meet's Aesthetic Tools for 2024
- A Comprehensive List of Prime Tablets for Photo Editing Lovers for 2024
- 2024 Approved Tips for Incorporating Songs in Your FB Story
- [New] In 2024, Exclusive List Top 5 Advanced Webcams for Remote Meetings
- Hard Reset Xiaomi 14 in 3 Efficient Ways | Dr.fone
- [Updated] IOS Screen Recording The Updated Process
- [Updated] Mac Owners' Guide to Downloading Snapchat
- [Updated] In 2024, Amazon’s Hot List - TikTok Trends You Can't Miss
- [Updated] In 2024, Uncover the Secret Correcting Mobile Video Sharing on FB Messenger
- [New] Posting Vimeo Perfecting Your Instagram Content
- In 2024, Easiest Guide How to Clone Poco M6 5G Phone? | Dr.fone
- [Updated] 20 Most Popular TikTok Dances [Trending & Easy] for 2024
- Title: Crafting Engaging Life Journeys in Video Formats
- Author: Kevin
- Created at : 2024-05-25 14:53:25
- Updated at : 2024-05-26 14:53:25
- Link: https://youtube-videos.techidaily.com/crafting-engaging-life-journeys-in-video-formats/
- License: This work is licensed under CC BY-NC-SA 4.0.
