"Crafting Content Step by Step Guide to YouTube Video Editing for 2024"
Crafting Content: Step by Step Guide to YouTube Video Editing
How to Edit Youtube Videos by the YouTube Video Editor

Richard Bennett
Mar 27, 2024• Proven solutions
Note: From 20th September 2017 users will no longer be able to use the complimentary editing suite. Check the best YouTube video editor alternatives from this complete guide. Now, it is back again.
Video editing usually requires a fair amount of technical knowledge and professional software. But YouTube has introduced its new YouTube Video Editor. It’s deceptively simple compared to the traditional desktop editing programs.
If you haven’t tried the YouTube editor , it’s time to get started.
It’s easy to learn and the guide below will give you an introduction for editing videos on YouTube.
You May Also Like:
Royalty free music for YouTube Videos >>
Best Screen Recorders for YouTube >>
YouTube Video Dimensions/Size: Guide for Upload Settings >>
The Best Video Editors for YouTube >>
How to edit a YouTube video with Filmora
If you want to have more controls on editing YouTube video, here we recommend using Filmora .
You can use it to trim/cut/split YouTube videos with handy tools. It also offer more than 50 royal free music to use. Various video filters and effects are available to make your videos amazing. The best part is you can apply animated text/titles to videos like a pro. After editing, you can directly upload videos to YouTube.
Now, download it now to have a try!
 Download Mac Version ](https://tools.techidaily.com/wondershare/filmora/download/ )
How to Use YouTube Video Editor to Edit Video on YouTube
Step 1. Get access to YouTube Video Editor
Sign in to your YouTube (or Google) account. To get access to YouTube Video Editor, you can go directly to YouTube studio (video editor) . Or click avatar icon in your YouTube site > YouTube Studio.
Learn more about Upload MP3 to YouTube

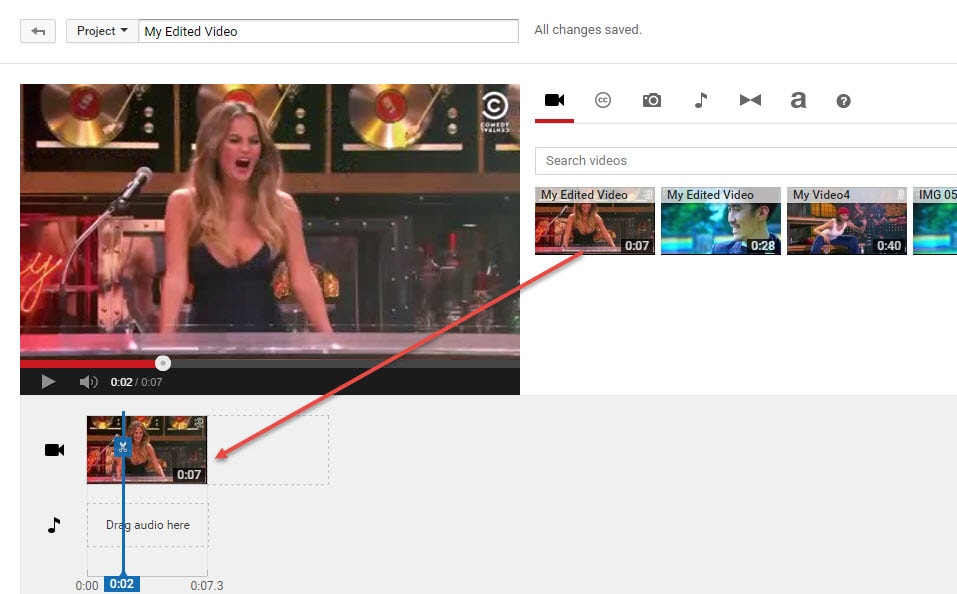
Step 2. Add your videos to the timeline
After getting to the editor, all your YouTube videos will appear. If you want to add a clip from the pool of videos into the project, simply drag it onto the timeline or hit the plus icon in the top right hand corner of each clip. You can also add any YouTube videos that were uploaded with a “Creative Commons” license.
To do this, go to the CC tab, find a video and drag it to the timeline.

Looking for best YouTube video editor alternatives? Check this complete guide here >>
Step 3. Edit the videos as you like
With the YouTube video editor, you can quick fix your videos, add audio track of your video, add texts, use various filters and more. Below is a detailed guide on how to use YouTube video Editor.
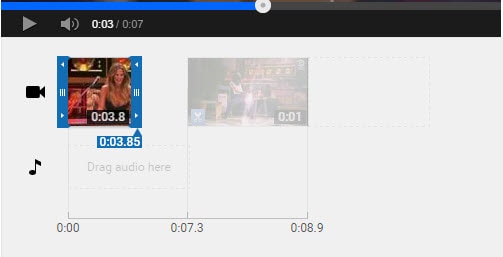
#1 Trim/Cut/Split video
To cut or split your video, hover over the target clip and hit the scissor icon to cut the clip into pieces. You can also cursor over the edge of your video in the timeline and drag the handle to shorten or trim your video.

#2 Change video settings
YouTube Video Editor also provides the “Quick fixes” function which does a quick analysis of the video and tweaks its color, brightness, and contrast settings automatically.
You can just double click the video to enter the “Quick fixes” tab and easily change brightness and contrast, add slow motion and pan zoom effect, and stabilize, audio fix or rotate video.

#3 Add filters
You can also add stunning video filters provided by this editor. To get access this function, double click the video and switch to the “Filter” tab.

#4 Add text to video
To add text to video, go to the “Text” tab, tick “Enable text” and enter the text to the text column. Then customize the font, size, color, position of the text as you like.

#5 Add music to video
YouTube also allows you to swap out the audio with one of its licensed tracks. To do this, go back to the main interface of the editor and click the Audio tab. Then select a song from the library and either drag it to the soundtrack timeline or press the plus sign to the right of each title.

Note: You should note that some are songs are subject to licensing agreements, which means YouTube will automatically add advertisements to the video clip.
Another short coming is that you can’t edit the audio track at all. If a song is longer than your video, you can do nothing but let it play from the beginning until your video stops.
#6 Add transitions to video
If several video clips have been added to the timeline, you need transition to make the whole project smoother. To add transition, go to the Transition tab and choose from 16 transition effects.

YouTube Video Editor is really easy to use, but it only provides some basic video editing functions and is really easy to crash when dealing with large file. If you want to make your video more professional, try Wondershare Filmora .
This desktop video editing tool can help you easily complete video editing tasks.
Download it now to have a try!
Download Mac Version ](https://tools.techidaily.com/wondershare/filmora/download/ )
Richard Bennett
Richard Bennett is a writer and a lover of all things video.
Follow @Richard Bennett
Richard Bennett
Mar 27, 2024• Proven solutions
Note: From 20th September 2017 users will no longer be able to use the complimentary editing suite. Check the best YouTube video editor alternatives from this complete guide. Now, it is back again.
Video editing usually requires a fair amount of technical knowledge and professional software. But YouTube has introduced its new YouTube Video Editor. It’s deceptively simple compared to the traditional desktop editing programs.
If you haven’t tried the YouTube editor , it’s time to get started.
It’s easy to learn and the guide below will give you an introduction for editing videos on YouTube.
You May Also Like:
Royalty free music for YouTube Videos >>
Best Screen Recorders for YouTube >>
YouTube Video Dimensions/Size: Guide for Upload Settings >>
The Best Video Editors for YouTube >>
How to edit a YouTube video with Filmora
If you want to have more controls on editing YouTube video, here we recommend using Filmora .
You can use it to trim/cut/split YouTube videos with handy tools. It also offer more than 50 royal free music to use. Various video filters and effects are available to make your videos amazing. The best part is you can apply animated text/titles to videos like a pro. After editing, you can directly upload videos to YouTube.
Now, download it now to have a try!
Download Mac Version ](https://tools.techidaily.com/wondershare/filmora/download/ )
How to Use YouTube Video Editor to Edit Video on YouTube
Step 1. Get access to YouTube Video Editor
Sign in to your YouTube (or Google) account. To get access to YouTube Video Editor, you can go directly to YouTube studio (video editor) . Or click avatar icon in your YouTube site > YouTube Studio.
Learn more about Upload MP3 to YouTube
Step 2. Add your videos to the timeline
After getting to the editor, all your YouTube videos will appear. If you want to add a clip from the pool of videos into the project, simply drag it onto the timeline or hit the plus icon in the top right hand corner of each clip. You can also add any YouTube videos that were uploaded with a “Creative Commons” license.
To do this, go to the CC tab, find a video and drag it to the timeline.
Looking for best YouTube video editor alternatives? Check this complete guide here >>
Step 3. Edit the videos as you like
With the YouTube video editor, you can quick fix your videos, add audio track of your video, add texts, use various filters and more. Below is a detailed guide on how to use YouTube video Editor.
#1 Trim/Cut/Split video
To cut or split your video, hover over the target clip and hit the scissor icon to cut the clip into pieces. You can also cursor over the edge of your video in the timeline and drag the handle to shorten or trim your video.
#2 Change video settings
YouTube Video Editor also provides the “Quick fixes” function which does a quick analysis of the video and tweaks its color, brightness, and contrast settings automatically.
You can just double click the video to enter the “Quick fixes” tab and easily change brightness and contrast, add slow motion and pan zoom effect, and stabilize, audio fix or rotate video.
#3 Add filters
You can also add stunning video filters provided by this editor. To get access this function, double click the video and switch to the “Filter” tab.
#4 Add text to video
To add text to video, go to the “Text” tab, tick “Enable text” and enter the text to the text column. Then customize the font, size, color, position of the text as you like.
#5 Add music to video
YouTube also allows you to swap out the audio with one of its licensed tracks. To do this, go back to the main interface of the editor and click the Audio tab. Then select a song from the library and either drag it to the soundtrack timeline or press the plus sign to the right of each title.
Note: You should note that some are songs are subject to licensing agreements, which means YouTube will automatically add advertisements to the video clip.
Another short coming is that you can’t edit the audio track at all. If a song is longer than your video, you can do nothing but let it play from the beginning until your video stops.
#6 Add transitions to video
If several video clips have been added to the timeline, you need transition to make the whole project smoother. To add transition, go to the Transition tab and choose from 16 transition effects.
YouTube Video Editor is really easy to use, but it only provides some basic video editing functions and is really easy to crash when dealing with large file. If you want to make your video more professional, try Wondershare Filmora .
This desktop video editing tool can help you easily complete video editing tasks.
Download it now to have a try!
Download Mac Version ](https://tools.techidaily.com/wondershare/filmora/download/ )
Richard Bennett
Richard Bennett is a writer and a lover of all things video.
Follow @Richard Bennett
The Precision of Portioning: Video Length Optimization on YouTube
How to Edit the Length of a Video on YouTube
Richard Bennett
Mar 27, 2024• Proven solutions
Apart from providing video hosting and sharing features, the YouTube platform also has an online editor which is going to provide you with the possibility to make changes and additions online without having to download any particular program. In this guide, we are going to show you how to make your video shorter or longer with YouTube online video editor.
A Better Alternative on How to Edit YouTube Video Length - Wondershare Filmora is a perfect alternative to edit every single clip frame by frame. Not just to shorten or lengthen the video. It offers quite a lot of opportunities. Watch the video below to know more:
Download Mac Version ](https://tools.techidaily.com/wondershare/filmora/download/ )
For instance, the application is offering non-linear ripple video editing. This is going to allow you to combine multiple video clips and pin them together conveniently. What is more, you can also apply PIP and Green Screen professional effects with just a few clicks. Sure, the YouTube video editor is a perfect solution for those who don’t want to achieve professional quality, but if you do, Wondershare Filmora is without a doubt the far better alternative. This is something that’s going to enable you to edit and re-touch your videos as well as to size them appropriately. Instead of dragging two bars together, you will be able to touch every single frame and size it according to your own particular needs. This is going to result in flawless videos.
How to Edit YouTube Video Length Using the built-in Video Editor
The YouTube video editor is easy to use, and you can easily learn how to do all sorts of changes to your video. Let’s see the things that you need to go through in order to edit the length.
Note: From 20th September 2017 users will no longer be able to use the complimentary editing suite. Check the best YouTube video editor alternatives from this complete guide.
Step 1 Get to the video editor

In order to do so, you would have to go ahead and login into your account. Then, go to the “My Channel” panel and select the video that you want to cut. Once you’ve done this, click on the “Video manager” option and click on the “create” tab which should be located on the right side for the page. There, you will be able to find the “Video Editor”. Of course, you can also add “/editor” to YouTube’s URL, and you would be good to go.
Step 2 Import Your Video
Once you’ve done all of the above, you would have to drag your video in order to cut it’s time. Keep in mind that the videos are made out of a maximum of 50 clips. The site is going to save every single video that you upload as a particular clip which could be properly combined with the rest in order to make one larger video. This is important.
Step 3 Edit the Length
This is the part where you actually get to edit the length of your video. In order to do so effectively, you have to drag the bar at either end of your clip towards the other end in order to shorten the clip conveniently.
What is more, if you want to increase the length, you have to drag the bar to the opposite end – outwards. There is going to be an indicator which is going to appear at the bottom of the clip, and it’s going to show you the overall duration of the file, and it’s going to adjust itself as you slide the bars accordingly.
Step 4 Save the Clip
Of course, you would have to save the clip in order for the changes to reflect. Even though this might seem like a particularly obvious thing to do, you would be surprise to find out that a lot of people get everything done and then discard the changes by forgetting to save them and their effort goes to waste.
Richard Bennett
Richard Bennett is a writer and a lover of all things video.
Follow @Richard Bennett
Richard Bennett
Mar 27, 2024• Proven solutions
Apart from providing video hosting and sharing features, the YouTube platform also has an online editor which is going to provide you with the possibility to make changes and additions online without having to download any particular program. In this guide, we are going to show you how to make your video shorter or longer with YouTube online video editor.
A Better Alternative on How to Edit YouTube Video Length - Wondershare Filmora is a perfect alternative to edit every single clip frame by frame. Not just to shorten or lengthen the video. It offers quite a lot of opportunities. Watch the video below to know more:
Download Mac Version ](https://tools.techidaily.com/wondershare/filmora/download/ )
For instance, the application is offering non-linear ripple video editing. This is going to allow you to combine multiple video clips and pin them together conveniently. What is more, you can also apply PIP and Green Screen professional effects with just a few clicks. Sure, the YouTube video editor is a perfect solution for those who don’t want to achieve professional quality, but if you do, Wondershare Filmora is without a doubt the far better alternative. This is something that’s going to enable you to edit and re-touch your videos as well as to size them appropriately. Instead of dragging two bars together, you will be able to touch every single frame and size it according to your own particular needs. This is going to result in flawless videos.
How to Edit YouTube Video Length Using the built-in Video Editor
The YouTube video editor is easy to use, and you can easily learn how to do all sorts of changes to your video. Let’s see the things that you need to go through in order to edit the length.
Note: From 20th September 2017 users will no longer be able to use the complimentary editing suite. Check the best YouTube video editor alternatives from this complete guide.
Step 1 Get to the video editor
In order to do so, you would have to go ahead and login into your account. Then, go to the “My Channel” panel and select the video that you want to cut. Once you’ve done this, click on the “Video manager” option and click on the “create” tab which should be located on the right side for the page. There, you will be able to find the “Video Editor”. Of course, you can also add “/editor” to YouTube’s URL, and you would be good to go.
Step 2 Import Your Video
Once you’ve done all of the above, you would have to drag your video in order to cut it’s time. Keep in mind that the videos are made out of a maximum of 50 clips. The site is going to save every single video that you upload as a particular clip which could be properly combined with the rest in order to make one larger video. This is important.
Step 3 Edit the Length
This is the part where you actually get to edit the length of your video. In order to do so effectively, you have to drag the bar at either end of your clip towards the other end in order to shorten the clip conveniently.
What is more, if you want to increase the length, you have to drag the bar to the opposite end – outwards. There is going to be an indicator which is going to appear at the bottom of the clip, and it’s going to show you the overall duration of the file, and it’s going to adjust itself as you slide the bars accordingly.
Step 4 Save the Clip
Of course, you would have to save the clip in order for the changes to reflect. Even though this might seem like a particularly obvious thing to do, you would be surprise to find out that a lot of people get everything done and then discard the changes by forgetting to save them and their effort goes to waste.
Richard Bennett
Richard Bennett is a writer and a lover of all things video.
Follow @Richard Bennett
Also read:
- [New] 2024 Approved Proficient Approaches for TikTok Bios with Linked Content
- [New] 5-Star Channel Cutting Long URLs Down for YouTube Videos
- [New] Comparative Review Smartphone Usage of the Leading Video Apps
- [New] In-Depth Look at CamStudio's Capturing Capabilities
- [Updated] C-Span's Watchlist for the Curious Netizen
- [Updated] In 2024, Recording Success with Top Software Choices
- 2024 Approved Leading E-Learning Titling Toolkit
- AutoPlay YouTube on Mobile, No Distractions
- Comprehensive Tips for Correcting 'mso.dll' Errors in Microsoft Office
- Convert & Share Simplified MP3 to YouTube Process [3 Phases] for 2024
- Creating Compelling Content with Powerful YouTube Titles
- Earn Wisely The Simple Triad Method for Scrutinizing YouTube Profits
- Fixing Playback Lags in the 2022 Update of Spotify's Desktop Application - Expert Tips and Tricks
- FreeFire Gaming Guide Maximizing Video Impact
- Global Gala of Greatest Video Views for 2024
- In 2024, Clearer Streams YouTube Video Borderless Adjustment
- Unlocking Free Speech Transcription - A Triad of Simple Approaches
- Title: Crafting Content Step by Step Guide to YouTube Video Editing for 2024
- Author: Kevin
- Created at : 2025-02-07 03:38:43
- Updated at : 2025-02-10 20:03:47
- Link: https://youtube-videos.techidaily.com/crafting-content-step-by-step-guide-to-youtube-video-editing-for-2024/
- License: This work is licensed under CC BY-NC-SA 4.0.