
"Crafting Content Gold YouTube Studio's Path to Perfection for 2024"
Crafting Content Gold: YouTube Studio’s Path to Perfection
Create High-Quality Video - Wondershare Filmora
An easy and powerful YouTube video editor
Numerous video and audio effects to choose from
Detailed tutorials provided by the official channel
Have you ever wished to modify a video on YouTube? If that’s the case, this guide will show you how. YouTube Studio Editor is built right into YouTube, allowing you to modify videos straight in your browser. You may add text subtitles and outline overlays to your videos to make them more accessible.
This article will lead you through the steps required to edit your YouTube videos and give them the highest quality possible on their platform.
In this article
02 How to Edit Videos With YouTube Studio?
03 Is YouTube Studio editor enough for editing videos?
What Is YouTube Studio?
YouTube Studio is a free, cloud-based video production software. It’s the ideal way to create, distribute, and measure the overall success of your films on YouTube, Google+, and the web. It provides powerful editing tools, real-time feedback on how your films are performing, and one-click posting from your PC or smartphone. YouTube Studio provides several features:
1. Manages Multiple Channels
YouTube Studio makes managing a couple of channels a lot easier. You can see all of your channels on one screen and switch from one to the other without difficulty. Simply select Manage Channels from the account icon in the top right corner. When you have a lot of money owing to you, you can modify it.
2. Get Real-Time Data On Your Channels
It’s critical to monitor where your YouTube channel is at all times as a YouTube content creator. If you want to access your YouTube channel analytics and use all of the other equipment and features in the app, go to the analytics section of the menu.
2. Get Real-Time Data On Your Channels
It’s critical to monitor where your YouTube channel is at all times as a YouTube content creator. If you want to access your YouTube channel analytics and use all of the other equipment and features in the app, go to the analytics section of the menu.
3. Make video edits
The YouTube Studio app is most useful for creating fast, vlog-style videos, but it can also handle other types of material. With titles, photographs and captions, transitions, and even music, it could create a number of videos with different purposes.
4. Scheduled Video Uploads
A few films will need to be posted later, given a content creator’s schedule or habit. When you’re in the publishing section of your project, you’ll see a visibility option that lets you schedule the release of your video.
5. Add more Users
It is possible to add partners to the studio if you are working on a project requiring teamwork. To make this option available, go to your settings and then adjust permissions. Authenticate the account you’re using and click the + symbol to add other users.
How to Edit Videos With YouTube Studio?
Get Started with YouTube Studio
Step 1: Go to YouTube Studio and sign in with your desired account. A menu will appear on the left side of the home screen.
Step 2: Select the video you want to modify by clicking its title or thumbnail.

Step 3: From the left-hand menu, choose Editor, and then click Get Started in the center of the page.
Trim your video’s beginning or ending
1. Go to the Trim button. In the Editor, a blue box will appear.

2. Click and drag the blue box’s sides. Stop when the box encloses the video segment that you want to save. You will eliminate anything from the video that is not in the box.
3. Select Preview to double-check your changes and save your file.
Remove a segment of your video
- Go to the Trim menu. In the Editor, a blue box will appear.
- Select the blue box at the start of the section you want to delete.
- Choose Split.
- Drag the blue bar to the end of the part you want to delete by clicking and dragging it.
Is YouTube Studio editor enough for editing videos?
For film editing, YouTube’s video editor is insufficient. It includes a few basic features, but if you want to do some serious altering, you’ll need a third-party program.
Modern video editing software is fairly complex, and it allows you to make professional-looking movies without a lot of training. Several video editing tools are available that take things to the next level. They can use unique effects, transitions, and even 360-degree rotation to change the scene. Here are a few video editors to choose from.
1. Adobe Premiere Pro

One of the most well-known video editing software programs is Adobe Premiere Pro. It’s been used for professional video editing, design, and rendering by editors. Adobe’s most essential seasoned academic courses will teach you how to utilize the video editing program as well as its advanced features.
Adobe Premiere Pro may be used in a variety of unique ways. It may be used as a simple video editor or a program for editing motion pictures.
2. Filmora
Filmora Video Editor is an easy-to-use video editing program for beginners. Filmora Video Editor is the best solution for you if you are seeking a simple but efficient video editor that will assist you in making your movies seem professional. With this video editor, you can easily create a professional video with no learning curve.
It allows you to make the most beautiful and delicious videos for YouTube, social media channels or posting on many websites such as Facebook, Instagram, Vimeo, and YouTube.
For Win 7 or later (64-bit)
For macOS 10.12 or later
3. Blender

Blender is a free and open-source 3D computer graphics software tool program. Modeling, rigging, animation, simulation, rendering, compositing, and movement tracking, as well as video enhancement and game development, are all aided by it. Its straightforward and easy-to-use foundation makes it simple for beginners to start improving right away.
4. Hitfilm Pro
Hitfilm is a video editor with a wide range of features and effects to help you make your videos stand out. It has a variety of video editing features, such as the ability to trim and merge clips, making it simple to build personalized motion pictures and add finishing touches. It also features excellent color-correcting, which you can use to give your videos a professional look.
5. Lightworks
Lightworks is a strong, easy-to-use enhancement tool that works with a variety of codecs. It contains equipment that keeps the user in control and is built for speed, performance, and accessibility.
Their basic software package is available for free download and includes a wide range of features. The software program can export to various formats and supports 1080p HD images.
Conclusion
● As you can see, using YouTube Studio Editor to enhance your video is simple. We hope that these suggestions will help you edit and proportion your videos more efficiently in the future. If you liked the piece, please consider sharing it on social media or by email with a friend. Are there any more tidbits or tricks you’d want to learn more about?
Have you ever wished to modify a video on YouTube? If that’s the case, this guide will show you how. YouTube Studio Editor is built right into YouTube, allowing you to modify videos straight in your browser. You may add text subtitles and outline overlays to your videos to make them more accessible.
This article will lead you through the steps required to edit your YouTube videos and give them the highest quality possible on their platform.
In this article
02 How to Edit Videos With YouTube Studio?
03 Is YouTube Studio editor enough for editing videos?
What Is YouTube Studio?
YouTube Studio is a free, cloud-based video production software. It’s the ideal way to create, distribute, and measure the overall success of your films on YouTube, Google+, and the web. It provides powerful editing tools, real-time feedback on how your films are performing, and one-click posting from your PC or smartphone. YouTube Studio provides several features:
1. Manages Multiple Channels
YouTube Studio makes managing a couple of channels a lot easier. You can see all of your channels on one screen and switch from one to the other without difficulty. Simply select Manage Channels from the account icon in the top right corner. When you have a lot of money owing to you, you can modify it.
2. Get Real-Time Data On Your Channels
It’s critical to monitor where your YouTube channel is at all times as a YouTube content creator. If you want to access your YouTube channel analytics and use all of the other equipment and features in the app, go to the analytics section of the menu.
2. Get Real-Time Data On Your Channels
It’s critical to monitor where your YouTube channel is at all times as a YouTube content creator. If you want to access your YouTube channel analytics and use all of the other equipment and features in the app, go to the analytics section of the menu.
3. Make video edits
The YouTube Studio app is most useful for creating fast, vlog-style videos, but it can also handle other types of material. With titles, photographs and captions, transitions, and even music, it could create a number of videos with different purposes.
4. Scheduled Video Uploads
A few films will need to be posted later, given a content creator’s schedule or habit. When you’re in the publishing section of your project, you’ll see a visibility option that lets you schedule the release of your video.
5. Add more Users
It is possible to add partners to the studio if you are working on a project requiring teamwork. To make this option available, go to your settings and then adjust permissions. Authenticate the account you’re using and click the + symbol to add other users.
How to Edit Videos With YouTube Studio?
Get Started with YouTube Studio
Step 1: Go to YouTube Studio and sign in with your desired account. A menu will appear on the left side of the home screen.
Step 2: Select the video you want to modify by clicking its title or thumbnail.
Step 3: From the left-hand menu, choose Editor, and then click Get Started in the center of the page.
Trim your video’s beginning or ending
1. Go to the Trim button. In the Editor, a blue box will appear.
2. Click and drag the blue box’s sides. Stop when the box encloses the video segment that you want to save. You will eliminate anything from the video that is not in the box.
3. Select Preview to double-check your changes and save your file.
Remove a segment of your video
- Go to the Trim menu. In the Editor, a blue box will appear.
- Select the blue box at the start of the section you want to delete.
- Choose Split.
- Drag the blue bar to the end of the part you want to delete by clicking and dragging it.
Is YouTube Studio editor enough for editing videos?
For film editing, YouTube’s video editor is insufficient. It includes a few basic features, but if you want to do some serious altering, you’ll need a third-party program.
Modern video editing software is fairly complex, and it allows you to make professional-looking movies without a lot of training. Several video editing tools are available that take things to the next level. They can use unique effects, transitions, and even 360-degree rotation to change the scene. Here are a few video editors to choose from.
1. Adobe Premiere Pro
One of the most well-known video editing software programs is Adobe Premiere Pro. It’s been used for professional video editing, design, and rendering by editors. Adobe’s most essential seasoned academic courses will teach you how to utilize the video editing program as well as its advanced features.
Adobe Premiere Pro may be used in a variety of unique ways. It may be used as a simple video editor or a program for editing motion pictures.
2. Filmora
Filmora Video Editor is an easy-to-use video editing program for beginners. Filmora Video Editor is the best solution for you if you are seeking a simple but efficient video editor that will assist you in making your movies seem professional. With this video editor, you can easily create a professional video with no learning curve.
It allows you to make the most beautiful and delicious videos for YouTube, social media channels or posting on many websites such as Facebook, Instagram, Vimeo, and YouTube.
For Win 7 or later (64-bit)
For macOS 10.12 or later
3. Blender
Blender is a free and open-source 3D computer graphics software tool program. Modeling, rigging, animation, simulation, rendering, compositing, and movement tracking, as well as video enhancement and game development, are all aided by it. Its straightforward and easy-to-use foundation makes it simple for beginners to start improving right away.
4. Hitfilm Pro
Hitfilm is a video editor with a wide range of features and effects to help you make your videos stand out. It has a variety of video editing features, such as the ability to trim and merge clips, making it simple to build personalized motion pictures and add finishing touches. It also features excellent color-correcting, which you can use to give your videos a professional look.
5. Lightworks
Lightworks is a strong, easy-to-use enhancement tool that works with a variety of codecs. It contains equipment that keeps the user in control and is built for speed, performance, and accessibility.
Their basic software package is available for free download and includes a wide range of features. The software program can export to various formats and supports 1080p HD images.
Conclusion
● As you can see, using YouTube Studio Editor to enhance your video is simple. We hope that these suggestions will help you edit and proportion your videos more efficiently in the future. If you liked the piece, please consider sharing it on social media or by email with a friend. Are there any more tidbits or tricks you’d want to learn more about?
Optimize Engagement & Analytics - Harnessing TubeBuddy’s Insights
The Benefits of TubeBuddy | Manage Your YouTube Channel More Easily

Richard Bennett
Nov 01, 2022• Proven solutions
TubeBuddy is a YouTube certified extension for your Google Chrome browser. When you visit YouTube after installing TubeBuddy a whole new set of useful tools becomes available.
TubeBuddy’s tools were designed to save you time and effort when performing some of the more mundane tasks involved in running a YouTube channel, like adding cards. Many of TubeBuddy’s tools are completely free to use, but others might require a paid license. There are three levels of licensing: $9, $19, or $39 per month.
The Benefits of Using TubeBuddy for YouTube
- Increased Productivity
- Bulk Tools for Annotations, Cards, Thumbnails and More
- Quick Optimization for Your Video’s Tags
- Useful Data
Benefits of TubeBuddy
YouTubers who use TubeBuddy are able to spend less time on busy-work and more time on coming up with creative video ideas. Here are some of the ways TubeBuddy can help you, especially if you have a large or mid-sized channel:
1. Increased Productivity
Most of TubeBuddy’s Productivity Tools are available for free, but some require a $9 per month Pro license.
You can use these tools to get your videos ready for posting faster, embed them off-YouTube more easily, and save time by creating canned responses or templates for cards and annotations.
For example, you might find yourself creating the same YouTube Card over and over again to include it in every video you make. Creating a template through TubeBuddy will save you this effort.
Another great productivity tool is the Video Topic Planner. You can save video ideas you come up with, or ideas viewers have suggested to you, and arrange them in a queue so you never forget what you are planning to make next.
2. Bulk Tools for Annotations, Cards, Thumbnails and More
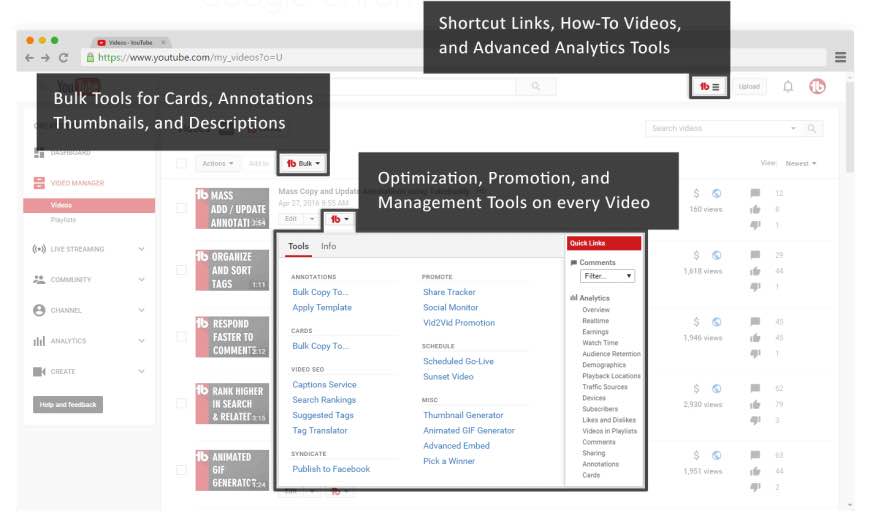
Most of TubeBuddy’s bulk processing tools require a $19 per month Star license.
Two of the most time-saving tools in this section are the Bulk Copy tools for cards and annotations. They will save you from having to recreate the same ones over and over. Then, using the Bulk Update tools, you will be able to make changes to all of your cards or annotations at once.
For example: if you use a YouTube Card to link to your personal website and include it in every video, and then you change your website, you change the link in all of your existing cards at once.
Another useful Bulk tool is Bulk Thumbnail Overlays, which will allow you to add a logo to all of your existing video thumbnails at once.
3. Quick Optimization for Your Video’s Tags
The SEO Tools in TubeBuddy will help you find the best tags for your videos and suggest tags you might want to target. Many of these tools are free, but others require a $19 Star license.
One of the best free tools in this category is View and Copy Video Tags. It allows you to see and copy the tags of other people’s videos. You will be able to see which keywords your competitors are targeting (and look for opportunities to target them more effectively). This can also save you a lot of time writing out tags that should really be the same as the ones on an existing video.
4. Useful Data
The most useful piece of data under Data and Research Tools is the Best Time to Publish. How many views you get on a video could vary greatly depending on when you post, and the best times to post vary depending on the demographics of your audience. This free tool from TubeBuddy will show you when you should be uploading.
Another interesting tool, which is unfortunately only available with $39 licenses, is the Competitor Scoreboard. It allows creators to compare their channels stats to those of their rival channels.
Have you ever tried TubeBuddy for YouTube?
Richard Bennett
Richard Bennett is a writer and a lover of all things video.
Follow @Richard Bennett
Richard Bennett
Nov 01, 2022• Proven solutions
TubeBuddy is a YouTube certified extension for your Google Chrome browser. When you visit YouTube after installing TubeBuddy a whole new set of useful tools becomes available.
TubeBuddy’s tools were designed to save you time and effort when performing some of the more mundane tasks involved in running a YouTube channel, like adding cards. Many of TubeBuddy’s tools are completely free to use, but others might require a paid license. There are three levels of licensing: $9, $19, or $39 per month.
The Benefits of Using TubeBuddy for YouTube
- Increased Productivity
- Bulk Tools for Annotations, Cards, Thumbnails and More
- Quick Optimization for Your Video’s Tags
- Useful Data
Benefits of TubeBuddy
YouTubers who use TubeBuddy are able to spend less time on busy-work and more time on coming up with creative video ideas. Here are some of the ways TubeBuddy can help you, especially if you have a large or mid-sized channel:
1. Increased Productivity
Most of TubeBuddy’s Productivity Tools are available for free, but some require a $9 per month Pro license.
You can use these tools to get your videos ready for posting faster, embed them off-YouTube more easily, and save time by creating canned responses or templates for cards and annotations.
For example, you might find yourself creating the same YouTube Card over and over again to include it in every video you make. Creating a template through TubeBuddy will save you this effort.
Another great productivity tool is the Video Topic Planner. You can save video ideas you come up with, or ideas viewers have suggested to you, and arrange them in a queue so you never forget what you are planning to make next.
2. Bulk Tools for Annotations, Cards, Thumbnails and More
Most of TubeBuddy’s bulk processing tools require a $19 per month Star license.
Two of the most time-saving tools in this section are the Bulk Copy tools for cards and annotations. They will save you from having to recreate the same ones over and over. Then, using the Bulk Update tools, you will be able to make changes to all of your cards or annotations at once.
For example: if you use a YouTube Card to link to your personal website and include it in every video, and then you change your website, you change the link in all of your existing cards at once.
Another useful Bulk tool is Bulk Thumbnail Overlays, which will allow you to add a logo to all of your existing video thumbnails at once.
3. Quick Optimization for Your Video’s Tags
The SEO Tools in TubeBuddy will help you find the best tags for your videos and suggest tags you might want to target. Many of these tools are free, but others require a $19 Star license.
One of the best free tools in this category is View and Copy Video Tags. It allows you to see and copy the tags of other people’s videos. You will be able to see which keywords your competitors are targeting (and look for opportunities to target them more effectively). This can also save you a lot of time writing out tags that should really be the same as the ones on an existing video.
4. Useful Data
The most useful piece of data under Data and Research Tools is the Best Time to Publish. How many views you get on a video could vary greatly depending on when you post, and the best times to post vary depending on the demographics of your audience. This free tool from TubeBuddy will show you when you should be uploading.
Another interesting tool, which is unfortunately only available with $39 licenses, is the Competitor Scoreboard. It allows creators to compare their channels stats to those of their rival channels.
Have you ever tried TubeBuddy for YouTube?
Richard Bennett
Richard Bennett is a writer and a lover of all things video.
Follow @Richard Bennett
Also read:
- [New] How to Seamlessly Upload Videos Onto YouTube's Platform for 2024
- [Updated] Best Practices for YouTube Card Implementation
- [Updated] Conquer YouTube Creator Studio A Comprehensive Guide
- [Updated] The Financial Frontier Acquiring High-Value Youtubes
- 2024 Approved 5 Innovative YT Tales Share Your Life Journey
- 4 Solutions to Fix Unfortunately Your App Has Stopped Error on Google Pixel 8 | Dr.fone
- Can United Airlines Be Sexy? Staff Says No, Despite Marketing Efforts
- Cut Down Clutter Discover These 7 Ultimate Android App Blockers
- Disabling Facebook Video Ad Pop-Ups Quickly
- Elevating Video Popularity on YouTube for 2024
- Enhancing Television Experience Playback Tips for YouTube Content for 2024
- How the New Pixel Watch 3 Tackles Key User Complaints About Google Wearables Analysis
- In 2024, Amplify Your Video Reach with These Key SEO Insights (1-11)
- In 2024, Looking For A Location Changer On Oppo A2? Look No Further | Dr.fone
- Seamless Integration Tailor-Made YouTube Shorts Images Made Easy
- Teaching with Technology Incorporating YouTube Into Lessons
- Tom's Computer Guide: Your Ultimate Tech Destination
- Title: Crafting Content Gold YouTube Studio's Path to Perfection for 2024
- Author: Kevin
- Created at : 2025-02-09 21:45:40
- Updated at : 2025-02-11 00:08:42
- Link: https://youtube-videos.techidaily.com/crafting-content-gold-youtube-studios-path-to-perfection-for-2024/
- License: This work is licensed under CC BY-NC-SA 4.0.