
"Crafting Compelling YouTube Content Through Split-Screens for 2024"
Crafting Compelling YouTube Content Through Split-Screens
How to Make a Creative Split-screen Video for YouTube?

Liza Brown
Oct 26, 2023• Proven solutions
If we talk about post-production techniques and visual effects, then Split Screen has to be one of the smartest picks. After all, it lets us narrate our story via two (or more) screens and gives our audience a superior viewing experience. Though, a lot of users find it hard to implement the split-screen effect on YouTube videos. Here, I will let you know how to come up with all kinds of YouTube split-screen videos by using a professional video editor.
Part 1: The Diverse Applications of Split-screen Videos
Before we discuss how to work on YouTube split-screen videos, let’s quickly consider some major applications of this video effect.
One of the most popular applications of split-screen videos is for comparing two or more instances or perspectives in the same frame. For example, you might wish to depict the lifestyle of two people from different parts of the world or simply compare the effect of various seasons in a single video.

Videos are the best visual storytelling tools and just like any story, they can also have different perspectives. Ideally, the split-screen effect would be one of the best ways to show your audience all kinds of perspectives that can take place in your story.
One of the best examples was depicted in the movie “500 Days of Summer” in which we got several Expectations vs. Reality shots. These split-screen shots depicted the two major perspectives of the story in a single frame.

Have you ever wondered how filmmakers create a clone of a person in movies? To do that, we make the protagonist record both the scenes in front of the same background. Later, we implement a split-screen effect in which both the clips are combined in such a way that it makes the audience believe as if the scene has both, the character and their clone placed flawlessly.

Watch Video! Use Split-Screen for Your YouTube Videos
Part 2: How to Make Creative YouTube Split-screen Videos with Wondershare Filmora ?
If you want to come up with professional YouTube split-screen videos, then consider using a resourceful tool like Wondershare Filmora. Recently, the company has launched Wondershare Filmora for Mac V10.2 with an upgraded set of newly-added split-screen templates . Therefore, you can simply use the wide range of split-screen templates in Filmora and drag-and-drop your videos to implement the effect.
- Wondershare Filmora has recently added an extensive range of split-screen templates that you can instantly use and customize to meet your requirements.
- Apart from YouTube split-screen templates, you can also find options for other social platforms such as Instagram, Facebook, TikTok, etc.
- Without undergoing any technical hassle, you can just drag and drop your videos to the split-screen template and further make the needed changes.
- There are also dedicated options to edit the split-screen video, apply color correction, and even implement different stunning animated effects.
- Besides that, you can use Filmora to access numerous other editing options like motion tracking, keyframing, audio ducking, auto reframing, action cam editing, and more.


Creating or editing YouTube split-screen videos in Wondershare Filmora is extremely easy and can be done in the following way:
Step 1: Import the Videos You Want to Edit to Wondershare Filmora
Before you edit your YouTube split-screen video, you need to import clips to the application. To do this, just launch Wondershare Filmora on your system and click on the “Import” button to load your videos. You can also go to its Menu > File > Import Media to do the same.

Step 2: Select the Split-screen Template and Add Your Videos
Great! Once you have loaded the interface of Filmora, you can locate a “Split Screen” section from the top. Just click on it to browse a wide range of split-screen video templates for YouTube to include two, three, or more clips. You can just double-click any template to get its preview and drag-and-drop it to the timeline to start working on it.

If you want, you can take the playhead and drag the pointer to adjust the length of the split-screen template on the timeline. To add your clips, just double-click on the split-screen template and click on the drop icon from the preview window. Now, click on the source clip to add it to the template and adjust its position to get the desired effects.

Step 3: Edit Your YouTube Split-screen Video
Following the same drill, you can include multiple clips to the YouTube split-screen template. You can further go to its editing features and explore the “Video” tab to scale, reposition, or rotate your clips. There are also options to add borders in the split-screen effect to separate the clips distinctively in the video.

Apart from that, you can also go to the “Color” section to access various color correction features. From here, you can adjust the brightness, temperature, saturation, tint, and other effects in the video.

If you want to make your YouTube split-screen video more appealing, then go to the “Motion” feature. Here, you can easily implement any existing animated template for transitions and other effects.

Besides that, you can also click on the edit icon from the bottom panel of the Preview section to edit your videos separately.

Step 4: Export the YouTube Split-screen Video
That’s it! Once you are done editing the split-screen video, you can export it from Filmora and save it on your Mac. Just click on the Export option and select a location to save the YouTube split-screen video. There are also additional features to save the video in different formats, video resolutions, and frame rates here that you can explore.

There you go! After following this guide, you would be able to come up with all kinds of YouTube split-screen videos on your Mac. Ideally, with the help of a resourceful tool like Wondershare Filmora, working on a split-screen video is an effortless task. Since the tool has numerous split-screen templates for YouTube, you can just select any template, and customize it to create a stunning YouTube split-screen video in minutes.
Liza Brown
Liza Brown is a writer and a lover of all things video.
Follow @Liza Brown
Liza Brown
Oct 26, 2023• Proven solutions
If we talk about post-production techniques and visual effects, then Split Screen has to be one of the smartest picks. After all, it lets us narrate our story via two (or more) screens and gives our audience a superior viewing experience. Though, a lot of users find it hard to implement the split-screen effect on YouTube videos. Here, I will let you know how to come up with all kinds of YouTube split-screen videos by using a professional video editor.
Part 1: The Diverse Applications of Split-screen Videos
Before we discuss how to work on YouTube split-screen videos, let’s quickly consider some major applications of this video effect.
One of the most popular applications of split-screen videos is for comparing two or more instances or perspectives in the same frame. For example, you might wish to depict the lifestyle of two people from different parts of the world or simply compare the effect of various seasons in a single video.
Videos are the best visual storytelling tools and just like any story, they can also have different perspectives. Ideally, the split-screen effect would be one of the best ways to show your audience all kinds of perspectives that can take place in your story.
One of the best examples was depicted in the movie “500 Days of Summer” in which we got several Expectations vs. Reality shots. These split-screen shots depicted the two major perspectives of the story in a single frame.
Have you ever wondered how filmmakers create a clone of a person in movies? To do that, we make the protagonist record both the scenes in front of the same background. Later, we implement a split-screen effect in which both the clips are combined in such a way that it makes the audience believe as if the scene has both, the character and their clone placed flawlessly.
Watch Video! Use Split-Screen for Your YouTube Videos
Part 2: How to Make Creative YouTube Split-screen Videos with Wondershare Filmora ?
If you want to come up with professional YouTube split-screen videos, then consider using a resourceful tool like Wondershare Filmora. Recently, the company has launched Wondershare Filmora for Mac V10.2 with an upgraded set of newly-added split-screen templates . Therefore, you can simply use the wide range of split-screen templates in Filmora and drag-and-drop your videos to implement the effect.
- Wondershare Filmora has recently added an extensive range of split-screen templates that you can instantly use and customize to meet your requirements.
- Apart from YouTube split-screen templates, you can also find options for other social platforms such as Instagram, Facebook, TikTok, etc.
- Without undergoing any technical hassle, you can just drag and drop your videos to the split-screen template and further make the needed changes.
- There are also dedicated options to edit the split-screen video, apply color correction, and even implement different stunning animated effects.
- Besides that, you can use Filmora to access numerous other editing options like motion tracking, keyframing, audio ducking, auto reframing, action cam editing, and more.
Creating or editing YouTube split-screen videos in Wondershare Filmora is extremely easy and can be done in the following way:
Step 1: Import the Videos You Want to Edit to Wondershare Filmora
Before you edit your YouTube split-screen video, you need to import clips to the application. To do this, just launch Wondershare Filmora on your system and click on the “Import” button to load your videos. You can also go to its Menu > File > Import Media to do the same.
Step 2: Select the Split-screen Template and Add Your Videos
Great! Once you have loaded the interface of Filmora, you can locate a “Split Screen” section from the top. Just click on it to browse a wide range of split-screen video templates for YouTube to include two, three, or more clips. You can just double-click any template to get its preview and drag-and-drop it to the timeline to start working on it.
If you want, you can take the playhead and drag the pointer to adjust the length of the split-screen template on the timeline. To add your clips, just double-click on the split-screen template and click on the drop icon from the preview window. Now, click on the source clip to add it to the template and adjust its position to get the desired effects.
Step 3: Edit Your YouTube Split-screen Video
Following the same drill, you can include multiple clips to the YouTube split-screen template. You can further go to its editing features and explore the “Video” tab to scale, reposition, or rotate your clips. There are also options to add borders in the split-screen effect to separate the clips distinctively in the video.
Apart from that, you can also go to the “Color” section to access various color correction features. From here, you can adjust the brightness, temperature, saturation, tint, and other effects in the video.
If you want to make your YouTube split-screen video more appealing, then go to the “Motion” feature. Here, you can easily implement any existing animated template for transitions and other effects.
Besides that, you can also click on the edit icon from the bottom panel of the Preview section to edit your videos separately.
Step 4: Export the YouTube Split-screen Video
That’s it! Once you are done editing the split-screen video, you can export it from Filmora and save it on your Mac. Just click on the Export option and select a location to save the YouTube split-screen video. There are also additional features to save the video in different formats, video resolutions, and frame rates here that you can explore.
There you go! After following this guide, you would be able to come up with all kinds of YouTube split-screen videos on your Mac. Ideally, with the help of a resourceful tool like Wondershare Filmora, working on a split-screen video is an effortless task. Since the tool has numerous split-screen templates for YouTube, you can just select any template, and customize it to create a stunning YouTube split-screen video in minutes.
Liza Brown
Liza Brown is a writer and a lover of all things video.
Follow @Liza Brown
Gentle Request for a Greater, Genuine Community
How to Get People to Subscribe to Your YouTube Channel

Richard Bennett
Oct 26, 2023• Proven solutions
The following is a step-by-step tutorial on how to get more subscribers by asking the right way. People are more likely to do something if you give them a bit of a nudge, and that includes subscribing to your YouTube channel.
There are people who think that if people like their videos they’ll subscribe, so they shouldn’t bother people by asking. This is, simply put, wrong. When people are browsing YouTube their minds are on what video they want to watch next, not whether or not they want to subscribe – unless you remind them.
What is a ‘Call To Action’?
It has become the norm for YouTubers to ask viewers to subscribe in their sign-offs. A typical CTA (‘call to action’) goes something like this:
“Thanks for watching. If you liked this video, make sure to subscribe for more!”
That’s great. At the end of a video is a good place to ask people to subscribe, but is it the best and only place you should be reminding them? If you take a peek at your analytics and you might find that most of your viewers aren’t watching to the ends of your videos (people have short attention spans).
A More Effective Way of Asking For Subscribers
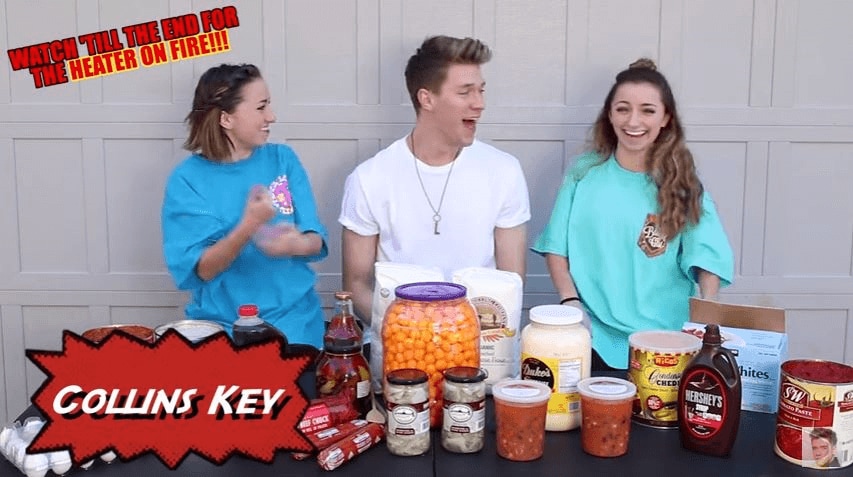
Collins Key is one YouTuber who has mastered asking for subscribers early on, and given that he has over 7 million subscribers himself I’d say it’s working out. Check out the technique in this video collab with Brooklyn and Bailey:
Step 1: How to Hook The Viewer
As you can see, the video starts with a ‘flash forward’ to one of the twins saying the heater is on fire and then a reminder of what’s going to happen later – the heater catching fire – is written in the top left of the screen so it stays on the viewers’ mind. This is one way in which the viewer is immediately hooked.
Step 2: Get to The Point Quickly
Shortly after, while still in the first 30 seconds of the video, Collins gets right to the point and introduces the Twin Telepathy Challenge promised in the title of the video. The hook with the heater catching fire is effective, but it’s not essential. It happens to suit Collins’ style, and it happens to have happened. Getting to the main point of the video quickly – usually in the first 15 seconds, not the first 30 (it’s in the first 15 seconds that most viewers click away) – is vital. People click on videos for a reason, and if they don’t see a sign of that payoff quickly they’ll leave.
Step 3: Create A Moment - Make Subscribing Part of the Experience
It’s only after hooking the viewer in and reiterating the promise of the title that Collins asks viewers to subscribe. The really clever thing about how he asks is that he carves out time in the video for the viewer to comply with his request. He gives 5 seconds and does a countdown.
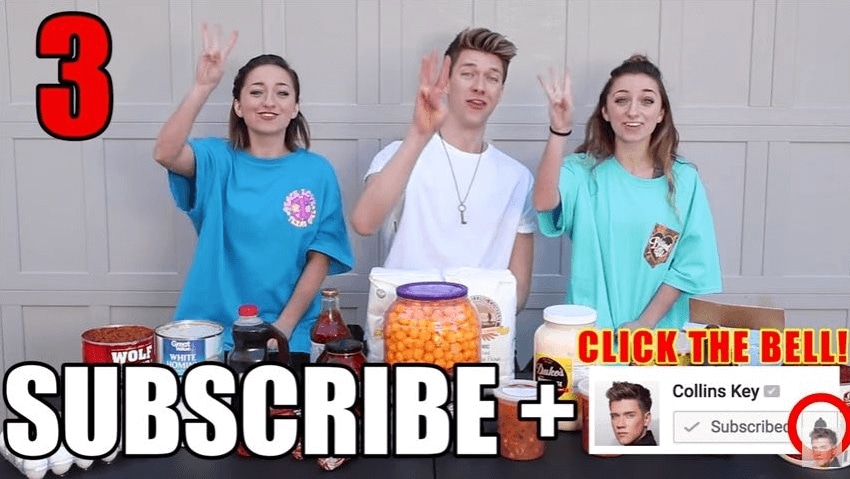
Collins Key has been one of the fastest-growing channels on YouTube. He does not implement this strategy in every video, but it’s not a stretch to think it’s had something to do with his success. Instead of simply asking you to subscribe at the end of the video, he creates a part of the video early on – before people who don’t watch until the end will have clicked away – where you feel as if you’re ‘supposed to’ subscribe.
Polish Your YouTube Videos with Filmora
Even with the above tricks, you may not get the subscribers as you wish unless you can make sure your videos and contents are of high quality. As YouTube is getting more and more popular and more YouTubers are competing for subscribers, you will need to polish your YouTube videos.
As one of the most widely used video editing software in YouTube video editing, Filmora video editor provides lots of templates and effects with an intuitive interface, which saves much time. Its features like motion tracking, audio ducking, keyframing, color matching and effects will help make your video impressive enough to get pepople to subscribe to your channel.
Here is a tutorial video about how to use Filmora to edit your YouTube video. Check it out and try Filmora if you are interested.
That’s how you can get more YouTube subscribers by asking the right way. You may follow the instructions and try it yourself. Do not forget to track your YouTube subscribers in real time to make necessary adjustments.
Richard Bennett
Richard Bennett is a writer and a lover of all things video.
Follow @Richard Bennett
Richard Bennett
Oct 26, 2023• Proven solutions
The following is a step-by-step tutorial on how to get more subscribers by asking the right way. People are more likely to do something if you give them a bit of a nudge, and that includes subscribing to your YouTube channel.
There are people who think that if people like their videos they’ll subscribe, so they shouldn’t bother people by asking. This is, simply put, wrong. When people are browsing YouTube their minds are on what video they want to watch next, not whether or not they want to subscribe – unless you remind them.
What is a ‘Call To Action’?
It has become the norm for YouTubers to ask viewers to subscribe in their sign-offs. A typical CTA (‘call to action’) goes something like this:
“Thanks for watching. If you liked this video, make sure to subscribe for more!”
That’s great. At the end of a video is a good place to ask people to subscribe, but is it the best and only place you should be reminding them? If you take a peek at your analytics and you might find that most of your viewers aren’t watching to the ends of your videos (people have short attention spans).
A More Effective Way of Asking For Subscribers
Collins Key is one YouTuber who has mastered asking for subscribers early on, and given that he has over 7 million subscribers himself I’d say it’s working out. Check out the technique in this video collab with Brooklyn and Bailey:
Step 1: How to Hook The Viewer
As you can see, the video starts with a ‘flash forward’ to one of the twins saying the heater is on fire and then a reminder of what’s going to happen later – the heater catching fire – is written in the top left of the screen so it stays on the viewers’ mind. This is one way in which the viewer is immediately hooked.
Step 2: Get to The Point Quickly
Shortly after, while still in the first 30 seconds of the video, Collins gets right to the point and introduces the Twin Telepathy Challenge promised in the title of the video. The hook with the heater catching fire is effective, but it’s not essential. It happens to suit Collins’ style, and it happens to have happened. Getting to the main point of the video quickly – usually in the first 15 seconds, not the first 30 (it’s in the first 15 seconds that most viewers click away) – is vital. People click on videos for a reason, and if they don’t see a sign of that payoff quickly they’ll leave.
Step 3: Create A Moment - Make Subscribing Part of the Experience
It’s only after hooking the viewer in and reiterating the promise of the title that Collins asks viewers to subscribe. The really clever thing about how he asks is that he carves out time in the video for the viewer to comply with his request. He gives 5 seconds and does a countdown.
Collins Key has been one of the fastest-growing channels on YouTube. He does not implement this strategy in every video, but it’s not a stretch to think it’s had something to do with his success. Instead of simply asking you to subscribe at the end of the video, he creates a part of the video early on – before people who don’t watch until the end will have clicked away – where you feel as if you’re ‘supposed to’ subscribe.
Polish Your YouTube Videos with Filmora
Even with the above tricks, you may not get the subscribers as you wish unless you can make sure your videos and contents are of high quality. As YouTube is getting more and more popular and more YouTubers are competing for subscribers, you will need to polish your YouTube videos.
As one of the most widely used video editing software in YouTube video editing, Filmora video editor provides lots of templates and effects with an intuitive interface, which saves much time. Its features like motion tracking, audio ducking, keyframing, color matching and effects will help make your video impressive enough to get pepople to subscribe to your channel.
Here is a tutorial video about how to use Filmora to edit your YouTube video. Check it out and try Filmora if you are interested.
That’s how you can get more YouTube subscribers by asking the right way. You may follow the instructions and try it yourself. Do not forget to track your YouTube subscribers in real time to make necessary adjustments.
Richard Bennett
Richard Bennett is a writer and a lover of all things video.
Follow @Richard Bennett
Also read:
- [New] Become a YT Hub Pro Complete Guide Revealed
- [New] Decoding YouTube's Clandestine Content with Orderliness
- [New] Seamless Tweet-to-Facebook Video Transfers Users
- [Updated] Dive Into DIY The Beginner’s Guide to Eye-Catching Mac Videos
- [Updated] In 2024, Top 3 Beyond Youtube Innovative Videostreaming Communities
- How to Change your Poco X6 Pro Location on Twitter | Dr.fone
- In 2024, A Step-by-Step Approach to Enhanced Roblox Views
- In 2024, Digital Portraits Proven The Science of Social Snap Validation
- In 2024, Enhancing YouTube Visibility with TubeBuddy
- In 2024, How to Lock Apps on Vivo Y02T to Protect Your Individual Information
- In 2024, How to Remove iPhone 12 mini Device from iCloud
- Top 5 Alternative Editors Beyond Youtube's Limits
- Windows 10における高品質のマイクまたは内蔵オーディオ機能を使って簡単に録音する手引き
- Title: Crafting Compelling YouTube Content Through Split-Screens for 2024
- Author: Kevin
- Created at : 2025-02-04 18:26:41
- Updated at : 2025-02-10 17:42:33
- Link: https://youtube-videos.techidaily.com/crafting-compelling-youtube-content-through-split-screens-for-2024/
- License: This work is licensed under CC BY-NC-SA 4.0.