

"Crafting Captivating Animations Creating GIFs From Your Favorite YouTube Videos"
Crafting Captivating Animations: Creating GIFs From Your Favorite YouTube Videos
How to Create GIFs from YouTube Videos

Shanoon Cox
Mar 27, 2024• Proven solutions
Who doesn’t love Gifs? They are one of the most entertaining means to communicate on the internet. But have you tried creating a GIF from YouTube videos? Generally, GIFs use humorous or relevant scenes from movies or shows to make them relatable to the situation. If you’re someone who wants to create GIFs from YouTube, this is for you.
The article below will show you how to create GIFs from YouTube videos on the desktop computers and mobile devices with some free online GIF makers and apps.
Part 1: How to Create GIFs from a YouTube Video on the Computer?
1. FreeGifMAKER.me
FreeGifMaker is a simple online tool that allows the creation of animated Gifs free of cost. A minimum of two pictures has to be uploaded out of ten. It’s super easy and takes a couple of minutes to make a GIF from a YouTube video.
Find out how to create GIFs using FreeGifMaker.me using these steps.
- Open the website on your desktop by typing http://freegifmaker.me/youtube-to-gif/
- Go to YouTube and copy the URL of the video you want to make a GIF. Paste it on the above-mentioned website.
- Click on “Load YouTube Video” below the URL space and wait for a few seconds while the tool checks the video source.
- After the YouTube video is loaded, finally enter the gif duration, start time and click on the “Make a GIF button” and it will redirect you to the result page.
2. VEED.IO
VEED is another easy way to make GIFs from YouTube videos. VEED allows you to copy a YouTube video link of your choice and paste it on VEED without any difficulty. VEED not only creates GIFs from YouTube videos but also gives few more facilities like trimming, adding text, cropping to the clip which helps in creating super-cool GIFs. VEED has both free and Pro versions and is a perfect browser software.
How to use VEED only in 3 steps, know about it below:
- First, you need to copy the link to the YouTube video of your choice and paste it into VEED. From there the software will start importing the video into its project editor and you can start creating the GIF from there.
- For the editing part, you need to trim the part of the video in which you want to make the GIF and crop the GIF. You can easily do that by choosing the canvas size menu available. After that, you can add text, font style, color, and size to your GIF.
- In the last step, you just have to download the GIF which you have made in VEED.
3. Kapwing
Kapwing is a great stage for creating GIFs as well as videos and images. Kapwing is one of the most used and liked online video editors available. It provides one single step for all the things to do while creating a GIF – upload, editing, and sharing the file.
To create unique GIFs with Kapwing, follow these easy steps.
- First, you need to open Kapwing video editor and copy the URL of the YouTube video of your choice and paste it on Kapwing to create your GIF from the video. Any video which is shorter than 30 minutes and less than 500 MB is supported by Kapwing.
- Once you have uploaded the video, you will find the video appearing in the timeline. The section of the video that you want to make the GIF of needs to be cut with the sliders which are available at the end. A GIF can be usually of any length but to maintain good resolution, it is always advised to not make the segment more than 10 seconds.
- You can preview the GIF you created after trimming the video which will allow you to see how the final output would be like. Other edits such as cropping, adding text, and experimenting with the speed can be done on Kapwing as well.
- In the last and final step, you just need to export the GIF which you will find in the dropdown arrow available just beside the red “Export Video” button. Then click on the dropdown button and choose the option “Export as GIF”.
After processing the GIF, you need to save it by downloading it.
4. File-converter-online.com
This online free video editor can convert videos into GIF without any watermark and the maximum length of the GIF from the video clip can be 20 seconds, which can be set by you as needed. It provides a simple and free GIF maker that again offers special effects as well such as setting up the speed of the video.
You can create your desirable GIF from YouTube video in 3 easy steps.
- First, provide the specific link of the YouTube video which you want to create the GIF of in the space given.
- Apply the start time of the video by sliding with the given slider and then set the desirable duration of the GIF which is available in the next “Duration (seconds)” by sliding the seconds.
- Next, you can choose the speed of the video which is optional, and then set the resolution from higher to lower as per your choice.
- The final step involves creating the GIF which you can do by clicking on the red button “Create GIF from the video” available below the resolution option and finally the downloading will start after a short waiting on the next page.
5. Clideo
Clideo is one of the most reliable video converters available online. It can create an animated GIF from YouTube videos without much complication.
You can make GIF on your own by following the 3 easy steps mentioned below.
- First, you need to copy your YouTube video that you want to create a GIF with. Come back on Clideo and you will find a dropdown menu beside “Choose file”, there paste the link that you have copied earlier in the URL space. You can also select Google Drive or Dropbox for the same.
- After pasting the URL, you have to choose the ‘infinity sign’ given on the right side which will create an endless GIF without sound. Click on the ‘loop’ button available just below the panel on the right side.
- After completing the steps, you can watch the preview of the GIF and go back to editing if you need to change anything. Else save the output on your PC or Mobile phone.
Part 2: How to Make a GIF from a YouTube Video on the Android and iPhone?
1. GIF Toaster – GIF Maker
Gif Toaster is one of the video editing apps which makes the work of creating Gif from YouTube video super-easy. It can convert photos, panoramas and, videos into GIFs easily. You just need to download the app to make GIFs of your own choice.

You need to follow a few simple steps to create GIFs on your own.
- It is accessible on the iOS App Store and the Google Play for free so you need to install GIF Toaster on your device. Once done, tap the “Make GIF” option available below, you can also click “Combine GIFs” to combine more than one video. After completing, scroll down the dropdown menu beside “Video>GIF” and select the video which you want to convert into GIF.
- Once the selection is done, you will be provided with various options like “Basic Option”, “Direction Option”, “Effect Option” where you can control the playback speed, range along with other options available. You also get the option to choose “Filters” for making the GIF.
- After selecting the options of your choice, you have to scroll back to the top again and press “Convert” to quickly convert the video into GIF.
- Once the GIF is ready, you will be able to see the final result and you just need to ‘Save’ the file.
Part 3: Bonus: How to Create GIFS from YouTube video on iPhone without installing any app?
It is now possible to convert YouTube videos into GIFs by using the 5SecondsApp available for iOS. To make this possible you just require few things in your iPhone – the device should be iOS 11 or more, YouTube in the browser or app, and the 5SecondsApp already available in the App store.
First, you need to find a video that is not more than 10 seconds then begin the screen recording on the iOS recording feature and go back to YouTube to play the video and record the portion you need. To make the GIF you have to launch the app and tap the plus option there. Later, trim the video as you see fit. After you’re done, crop the video with the help of the crop tool and finally save it.
Part 4: Why Should You Use GIFs?
1. GIFs don’t prevent web pages from loading quickly
GIFs which are animated becomes more popular for any website as it gives meaning compacted in a small video the website uses to boost its chances of getting more views. While GIF does not make a website much slow but for better performance, it can be converted into lossy optimizations which do not make a huge difference in front of the human eyes or it can also be converted into HTML5 videos which makes the GIF 95% smaller in size.
2. GIF is an integral part of communicating on social media
Using GIFs makes any communication bright and friendly. It delivers great messages through short animated videos and has become the spotlight for communication in the past few years. Almost everyone using social media is using GIF for communicating with their friends and family.
Final Thoughts
There are many apps and video editors available today available free of cost. You can easily make GIFs from your most-liked video on YouTube. It is smooth to create GIFs on your own with the help of these editors mentioned above. Each one of them is having a free version and easy to handle so do not forget to try them next time you are making a GIF from YouTube videos.
Shanoon Cox
Shanoon Cox is a writer and a lover of all things video.
Follow @Shanoon Cox
Shanoon Cox
Mar 27, 2024• Proven solutions
Who doesn’t love Gifs? They are one of the most entertaining means to communicate on the internet. But have you tried creating a GIF from YouTube videos? Generally, GIFs use humorous or relevant scenes from movies or shows to make them relatable to the situation. If you’re someone who wants to create GIFs from YouTube, this is for you.
The article below will show you how to create GIFs from YouTube videos on the desktop computers and mobile devices with some free online GIF makers and apps.
Part 1: How to Create GIFs from a YouTube Video on the Computer?
1. FreeGifMAKER.me
FreeGifMaker is a simple online tool that allows the creation of animated Gifs free of cost. A minimum of two pictures has to be uploaded out of ten. It’s super easy and takes a couple of minutes to make a GIF from a YouTube video.
Find out how to create GIFs using FreeGifMaker.me using these steps.
- Open the website on your desktop by typing http://freegifmaker.me/youtube-to-gif/
- Go to YouTube and copy the URL of the video you want to make a GIF. Paste it on the above-mentioned website.
- Click on “Load YouTube Video” below the URL space and wait for a few seconds while the tool checks the video source.
- After the YouTube video is loaded, finally enter the gif duration, start time and click on the “Make a GIF button” and it will redirect you to the result page.
2. VEED.IO
VEED is another easy way to make GIFs from YouTube videos. VEED allows you to copy a YouTube video link of your choice and paste it on VEED without any difficulty. VEED not only creates GIFs from YouTube videos but also gives few more facilities like trimming, adding text, cropping to the clip which helps in creating super-cool GIFs. VEED has both free and Pro versions and is a perfect browser software.
How to use VEED only in 3 steps, know about it below:
- First, you need to copy the link to the YouTube video of your choice and paste it into VEED. From there the software will start importing the video into its project editor and you can start creating the GIF from there.
- For the editing part, you need to trim the part of the video in which you want to make the GIF and crop the GIF. You can easily do that by choosing the canvas size menu available. After that, you can add text, font style, color, and size to your GIF.
- In the last step, you just have to download the GIF which you have made in VEED.
3. Kapwing
Kapwing is a great stage for creating GIFs as well as videos and images. Kapwing is one of the most used and liked online video editors available. It provides one single step for all the things to do while creating a GIF – upload, editing, and sharing the file.
To create unique GIFs with Kapwing, follow these easy steps.
- First, you need to open Kapwing video editor and copy the URL of the YouTube video of your choice and paste it on Kapwing to create your GIF from the video. Any video which is shorter than 30 minutes and less than 500 MB is supported by Kapwing.
- Once you have uploaded the video, you will find the video appearing in the timeline. The section of the video that you want to make the GIF of needs to be cut with the sliders which are available at the end. A GIF can be usually of any length but to maintain good resolution, it is always advised to not make the segment more than 10 seconds.
- You can preview the GIF you created after trimming the video which will allow you to see how the final output would be like. Other edits such as cropping, adding text, and experimenting with the speed can be done on Kapwing as well.
- In the last and final step, you just need to export the GIF which you will find in the dropdown arrow available just beside the red “Export Video” button. Then click on the dropdown button and choose the option “Export as GIF”.
After processing the GIF, you need to save it by downloading it.
4. File-converter-online.com
This online free video editor can convert videos into GIF without any watermark and the maximum length of the GIF from the video clip can be 20 seconds, which can be set by you as needed. It provides a simple and free GIF maker that again offers special effects as well such as setting up the speed of the video.
You can create your desirable GIF from YouTube video in 3 easy steps.
- First, provide the specific link of the YouTube video which you want to create the GIF of in the space given.
- Apply the start time of the video by sliding with the given slider and then set the desirable duration of the GIF which is available in the next “Duration (seconds)” by sliding the seconds.
- Next, you can choose the speed of the video which is optional, and then set the resolution from higher to lower as per your choice.
- The final step involves creating the GIF which you can do by clicking on the red button “Create GIF from the video” available below the resolution option and finally the downloading will start after a short waiting on the next page.
5. Clideo
Clideo is one of the most reliable video converters available online. It can create an animated GIF from YouTube videos without much complication.
You can make GIF on your own by following the 3 easy steps mentioned below.
- First, you need to copy your YouTube video that you want to create a GIF with. Come back on Clideo and you will find a dropdown menu beside “Choose file”, there paste the link that you have copied earlier in the URL space. You can also select Google Drive or Dropbox for the same.
- After pasting the URL, you have to choose the ‘infinity sign’ given on the right side which will create an endless GIF without sound. Click on the ‘loop’ button available just below the panel on the right side.
- After completing the steps, you can watch the preview of the GIF and go back to editing if you need to change anything. Else save the output on your PC or Mobile phone.
Part 2: How to Make a GIF from a YouTube Video on the Android and iPhone?
1. GIF Toaster – GIF Maker
Gif Toaster is one of the video editing apps which makes the work of creating Gif from YouTube video super-easy. It can convert photos, panoramas and, videos into GIFs easily. You just need to download the app to make GIFs of your own choice.
You need to follow a few simple steps to create GIFs on your own.
- It is accessible on the iOS App Store and the Google Play for free so you need to install GIF Toaster on your device. Once done, tap the “Make GIF” option available below, you can also click “Combine GIFs” to combine more than one video. After completing, scroll down the dropdown menu beside “Video>GIF” and select the video which you want to convert into GIF.
- Once the selection is done, you will be provided with various options like “Basic Option”, “Direction Option”, “Effect Option” where you can control the playback speed, range along with other options available. You also get the option to choose “Filters” for making the GIF.
- After selecting the options of your choice, you have to scroll back to the top again and press “Convert” to quickly convert the video into GIF.
- Once the GIF is ready, you will be able to see the final result and you just need to ‘Save’ the file.
Part 3: Bonus: How to Create GIFS from YouTube video on iPhone without installing any app?
It is now possible to convert YouTube videos into GIFs by using the 5SecondsApp available for iOS. To make this possible you just require few things in your iPhone – the device should be iOS 11 or more, YouTube in the browser or app, and the 5SecondsApp already available in the App store.
First, you need to find a video that is not more than 10 seconds then begin the screen recording on the iOS recording feature and go back to YouTube to play the video and record the portion you need. To make the GIF you have to launch the app and tap the plus option there. Later, trim the video as you see fit. After you’re done, crop the video with the help of the crop tool and finally save it.
Part 4: Why Should You Use GIFs?
1. GIFs don’t prevent web pages from loading quickly
GIFs which are animated becomes more popular for any website as it gives meaning compacted in a small video the website uses to boost its chances of getting more views. While GIF does not make a website much slow but for better performance, it can be converted into lossy optimizations which do not make a huge difference in front of the human eyes or it can also be converted into HTML5 videos which makes the GIF 95% smaller in size.
2. GIF is an integral part of communicating on social media
Using GIFs makes any communication bright and friendly. It delivers great messages through short animated videos and has become the spotlight for communication in the past few years. Almost everyone using social media is using GIF for communicating with their friends and family.
Final Thoughts
There are many apps and video editors available today available free of cost. You can easily make GIFs from your most-liked video on YouTube. It is smooth to create GIFs on your own with the help of these editors mentioned above. Each one of them is having a free version and easy to handle so do not forget to try them next time you are making a GIF from YouTube videos.
Shanoon Cox
Shanoon Cox is a writer and a lover of all things video.
Follow @Shanoon Cox
Crafting an Impactful Online Presence with Perfect YT Dimensions
Best YouTube Banner Size and Channel Art Dimension (The Ultimate Guide)

Richard Bennett
Oct 26, 2023• Proven solutions
YouTube is a social platform that relies on visually exciting material to attract the audience. Just like a book with an appealing cover compels a person to pick it up and read, it is significant to display and advertise your YouTube channel in a way that makes viewers click and browse through the channel.
Despite creating a beautiful banner on your desktop screen, it might end up distorted on a mobile screen if the recommended sizes for all kinds of gadgets are not followed. Hence, choosing your YouTube channel art dimension is essential since it is the viewer’s first impression. To commence with, you must be careful about your YouTube banner size and channel art dimensions. Are you wondering how to create the perfect banner or cover photo as we know it? Worry not as we are going to tell you the exact details to achieve an ideal YouTube banner size that fits all devices from computers to phones.
- Part 1: The Recommended YouTube Banner Size
- Part 2: The Best YouTube Banner Size on Different Devices
- Part 3: The Best YouTube Video Maker–Wondershare Filmora
Part 1: The Recommended YouTube Banner Size
According to YouTube’s official standards, the recommended banner size is 2560×1440 pixels. However, the minimum image dimensions are 2048×1152 pixels. To ensure that your text is visible regardless of the screen size, sticking to the “safe area” of 2560×423 pixels is the best option. Why are these sizes significant? Well, it’s essential to keep in mind the fact that people worldwide will be using different kinds of gadgets to access YouTube, and it is crucial to optimize your YouTube banner size for it to be ideal.
Part 2: The Best YouTube Banner Size on Different Devices
For the best results on all devices, your YouTube banner size should be:
YouTube Channel Art/Banner Dimensions Displayed on TVs
2560 x 1440 px
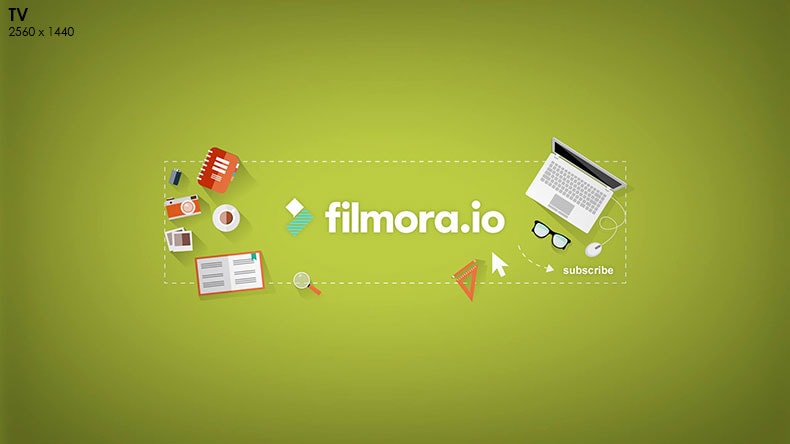
YouTube will display your entire channel art on TVs

Here’s what our YouTube channel art example would look like on a TV.
YouTube Channel Art/Banner Dimensions Displayed on Smaller Desktop Monitors and Mobile Phones
1546 x 423 px
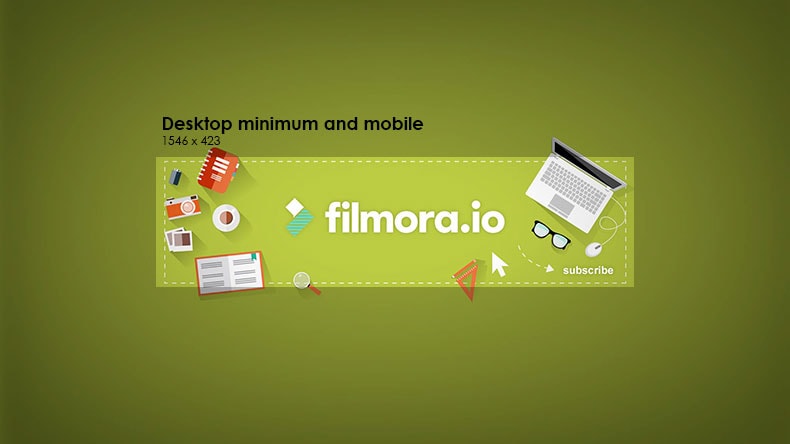
On small desktop monitors and mobile devices, YouTube will display less than 20% of your entire channel art, the center area measuring a width of 1546 pixels and a height of 423 pixels. You want to make sure that your text and logo make it into this part.

Here’s what our YouTube channel art example would look like on a mobile phone.
YouTube Channel Art/Banner Dimensions Displayed on Tablets
1855 x 423 px
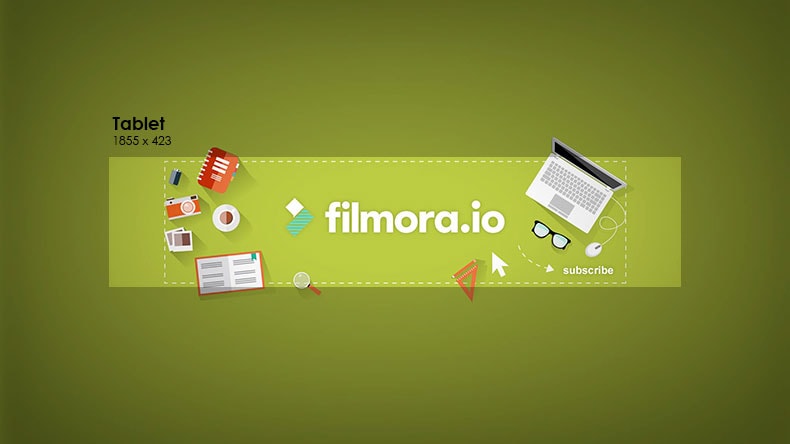
On tablet devices, YouTube will display around 20% more of your channel art, just to the sides of your smaller desktop monitor and mobile device area.

Here’s what our YouTube channel art example would look like on a tablet device.
YouTube Channel Art/Banner Dimensions Displayed on Larger Desktop Monitors
2560 x 423 px
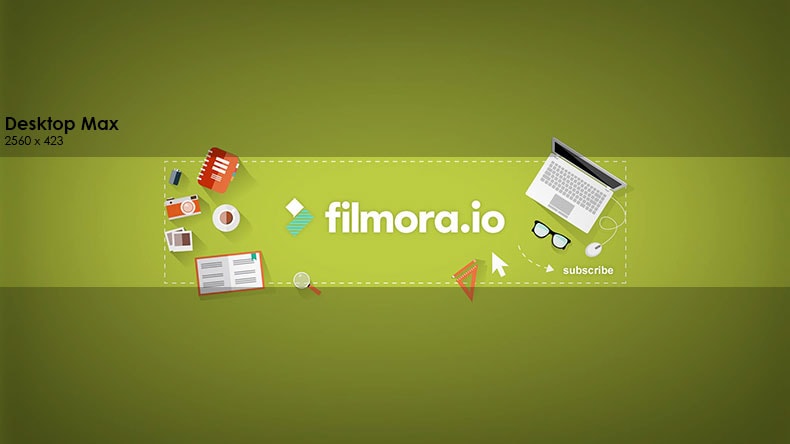
On larger desktop monitors, YouTube will display the entire width of your channel art but not the upper and lower part.

Here’s what our YouTube channel art example would look like on a large desktop monitor.
By following these dimensions in the design of your YouTube channel art/banner, you can be sure to have a responsive image that works best across different devices.
Have you ever had trouble with your YouTube banner size?
If you’d like to make your own channel art, check out our list of Top 9 YouTube Channel Art Makers .
Part 3: The Best YouTube Video Maker–Wondershare Filmora
Want to create a spectacular YouTube video with excellent graphics but lack the expertise? Don’t stress! Wondershare Filmora is here to save the day with its incredible video editing features. Despite the professional outcome it provides, it has been customized for easy use by the beginners.


Key Features:
- Supports GIF and 4K Resolution with advanced text editing features.
- Directly import files from any social media platform, for example, Facebook.
- Transform your video by layering multiple video clips and adding titles, filters, and overlays.
- Time-lapse, noise reduction, and split-screen preset available.
Compatibility:
- Windows: Microsoft Windows 7/Windows 8/Windows 10 (64 bit OS recommended).
- Processor: Intel i3 or better multicore processor, 2GHz or above.
- RAM: 4 GB RAM (8GB required for HD and 4K videos).
To Sum Up
So, are you ready to optimize your channel by following the YouTube banner size’s basic requirements? We hope you are now aware of the importance your YouTube channel art dimension has.
Also, for your channel to be distinctive and attractive enough, it must be edited, which is now relatively easy through video editing apps like the Wondershare Filmora. What are you waiting for? Invest in this pocket-friendly application to create stunning videos in no time and take your channel to the next level.
Richard Bennett
Richard Bennett is a writer and a lover of all things video.
Follow @Richard Bennett
Richard Bennett
Oct 26, 2023• Proven solutions
YouTube is a social platform that relies on visually exciting material to attract the audience. Just like a book with an appealing cover compels a person to pick it up and read, it is significant to display and advertise your YouTube channel in a way that makes viewers click and browse through the channel.
Despite creating a beautiful banner on your desktop screen, it might end up distorted on a mobile screen if the recommended sizes for all kinds of gadgets are not followed. Hence, choosing your YouTube channel art dimension is essential since it is the viewer’s first impression. To commence with, you must be careful about your YouTube banner size and channel art dimensions. Are you wondering how to create the perfect banner or cover photo as we know it? Worry not as we are going to tell you the exact details to achieve an ideal YouTube banner size that fits all devices from computers to phones.
- Part 1: The Recommended YouTube Banner Size
- Part 2: The Best YouTube Banner Size on Different Devices
- Part 3: The Best YouTube Video Maker–Wondershare Filmora
Part 1: The Recommended YouTube Banner Size
According to YouTube’s official standards, the recommended banner size is 2560×1440 pixels. However, the minimum image dimensions are 2048×1152 pixels. To ensure that your text is visible regardless of the screen size, sticking to the “safe area” of 2560×423 pixels is the best option. Why are these sizes significant? Well, it’s essential to keep in mind the fact that people worldwide will be using different kinds of gadgets to access YouTube, and it is crucial to optimize your YouTube banner size for it to be ideal.
Part 2: The Best YouTube Banner Size on Different Devices
For the best results on all devices, your YouTube banner size should be:
YouTube Channel Art/Banner Dimensions Displayed on TVs
2560 x 1440 px
YouTube will display your entire channel art on TVs
Here’s what our YouTube channel art example would look like on a TV.
YouTube Channel Art/Banner Dimensions Displayed on Smaller Desktop Monitors and Mobile Phones
1546 x 423 px
On small desktop monitors and mobile devices, YouTube will display less than 20% of your entire channel art, the center area measuring a width of 1546 pixels and a height of 423 pixels. You want to make sure that your text and logo make it into this part.
Here’s what our YouTube channel art example would look like on a mobile phone.
YouTube Channel Art/Banner Dimensions Displayed on Tablets
1855 x 423 px
On tablet devices, YouTube will display around 20% more of your channel art, just to the sides of your smaller desktop monitor and mobile device area.
Here’s what our YouTube channel art example would look like on a tablet device.
YouTube Channel Art/Banner Dimensions Displayed on Larger Desktop Monitors
2560 x 423 px
On larger desktop monitors, YouTube will display the entire width of your channel art but not the upper and lower part.
Here’s what our YouTube channel art example would look like on a large desktop monitor.
By following these dimensions in the design of your YouTube channel art/banner, you can be sure to have a responsive image that works best across different devices.
Have you ever had trouble with your YouTube banner size?
If you’d like to make your own channel art, check out our list of Top 9 YouTube Channel Art Makers .
Part 3: The Best YouTube Video Maker–Wondershare Filmora
Want to create a spectacular YouTube video with excellent graphics but lack the expertise? Don’t stress! Wondershare Filmora is here to save the day with its incredible video editing features. Despite the professional outcome it provides, it has been customized for easy use by the beginners.
Key Features:
- Supports GIF and 4K Resolution with advanced text editing features.
- Directly import files from any social media platform, for example, Facebook.
- Transform your video by layering multiple video clips and adding titles, filters, and overlays.
- Time-lapse, noise reduction, and split-screen preset available.
Compatibility:
- Windows: Microsoft Windows 7/Windows 8/Windows 10 (64 bit OS recommended).
- Processor: Intel i3 or better multicore processor, 2GHz or above.
- RAM: 4 GB RAM (8GB required for HD and 4K videos).
To Sum Up
So, are you ready to optimize your channel by following the YouTube banner size’s basic requirements? We hope you are now aware of the importance your YouTube channel art dimension has.
Also, for your channel to be distinctive and attractive enough, it must be edited, which is now relatively easy through video editing apps like the Wondershare Filmora. What are you waiting for? Invest in this pocket-friendly application to create stunning videos in no time and take your channel to the next level.
Richard Bennett
Richard Bennett is a writer and a lover of all things video.
Follow @Richard Bennett
Also read:
- Deciphering Digital Dominance YouTube Content Strategy Comparison
- The Mobile Filmmaker's Blueprint Crafting Viral Thumbnails for YouTubes
- Navigating YouTube Triumphs An In-Depth Guide to Creator Studio
- Achieve Sharpness Camera Tips Without a Tripod for 2024
- Attract More Viewers Crafting Impressive Youtube Description with Custom Templates for 2024
- From Script to Screenplay Expert Video Editing Insights
- Repeat Revelry Televised Looping of Online Media Content
- 2024 Approved An Overview of YouTube Short Content Basics
- A Comparative Analysis of Youtube's Ownership Vs. CC Licenses
- [Updated] Connoisseur of Cinematic Composition
- Free Converters at Your Fingertenaside Download & Enjoy Videos Anywhere
- In 2024, Apex Media Merge Sleek PC Video & Music Harmony
- The Best Software to Start Your YouTube Videos Off Strongly
- 2024 Approved Access Royalty-Free Beats for Your Vlog & More
- In 2024, Discover the Power of YouTube Editing A Compre Written in Code The Intricacies of JavaScript Functions
- Step-by-Step Success on Youtube with Spectacision Music Videos
- [New] Breaking Barriers YouTube Marketing Mastery
- Preparing Your 4K Footage for Smooth YouTube Integration
- Breezy Collage Creation with Picshot's Innovations
- Updated 2024 Approved How To Make A Political Video
- Disabling iPhone XS Max Parental Restrictions With/Without Password | Dr.fone
- [Updated] Ultimate Tutorial Uploading 360-Degree Footage on Facebook
- New Achieving Sonic Clarity Overcoming Hiss and Other Unwanted Noises in Audio Tracks for 2024
- [Updated] Hasty Handlings of Slideshow Documentation
- New Reducing Noise in Videos Made Easy with Premiere Pro All Workable Methods
- Complete guide for recovering photos files on Realme Narzo N53.
- How to Unlock Verizon iPhone 15
- New 2024 Approved Best Automatic Video Reframing Software for Creators
- [Updated] In 2024, Step Up Your Game Mastering Discord Message Embellishments
- Harmonizing Messages WhatsApp's Audio Update
- New In 2024, Is Minitool Movie Maker the Right Choice for You? Review, Comparison, and Alternatives
- Title: "Crafting Captivating Animations Creating GIFs From Your Favorite YouTube Videos"
- Author: Kevin
- Created at : 2024-06-10 00:24:44
- Updated at : 2024-06-11 00:24:44
- Link: https://youtube-videos.techidaily.com/crafting-captivating-animations-creating-gifs-from-your-favorite-youtube-videos/
- License: This work is licensed under CC BY-NC-SA 4.0.
