
:max_bytes(150000):strip_icc()/5365WomanworkingonSpaceGrayMacBook-840cbcd31a35450fb53c51b287f6ea6d.jpg)
"Crafting a Sports Highlight Step-by-Step Tutorial for 2024"
Crafting a Sports Highlight: Step-by-Step Tutorial
How to Create a Sports Highlight Video

Richard Bennett
Mar 27, 2024• Proven solutions
“I want to make a sports highlight video, but I don’t know how to edit it or what kind of tools I need to use. Can someone tell me how to work on a sports video?”
As I read this query posted on a popular online forum, I realized that so many people out there find it hard to create a sports video. Well, unlike a standard video, working on a sports highlight video can be tough. This is because it needs a lot of editing and we need to handpick the right moments from hours of footage. Though, if you use the right tools, then you can easily work on highlight videos like a pro. In this guide, I will let you know how to create sports videos in a step by step manner.
- Part 1: Why is a sports highlight video and why important?
- Part 2: Highlight Video vs. Skills Video
- Part 3: Use Excellent Video Editor to Make a Sports Highlight Video
- Part 4: How to Create a Sports Highlight Video?
- Part 5: Expert Tips for Creating Highlight Videos
Why is a sports highlight video and why important?
As the name suggests, a highlight video basically includes all the vital events of a game in a short duration of time. You can include the details of some players at the start or focus on a particular player as well. Besides that, a sports highlight video would have fast-forward, slow motion, and frozen clips to skip or focus on certain details.
A lot of times, people don’t have the time to watch the entire game, which can span for a couple of hours. Therefore, they can watch a sports highlight video that would include all the major events of the game and will let them enjoy their thrill in a few moments.

Besides that, if you are applying for a college/academy or just want to showcase your skills, then you can consider making a sports video of an impressive game of yours. You can simply showcase a player and try to highlight their skills in the video.
Highlight Videos vs. Skills Videos: the Major Differences
While making a sports video, you might encounter two different types of content – a highlight video and a skills video. As I have mentioned above, a sports highlight video would include the shots of an actual game. You can either focus on the event of a single game or include clips from multiple games that were played in a genuine setup. If you want, you can highlight a particular player while making the video as well.
On the other hand, a skills video is mostly made to demonstrate the skills of a player and is not focused on the game. In fact, most of the skills videos are made outside of a real game setting. For instance, if you have mastered a skill or would like to demonstrate your game-related actions, then you can make a skills video. Some of these videos are also tutorial game-plays to teach others about a particular skill that they can master.
Use Excellent Video Editor to Make a Sports Highlight Video
If you want to come up with engaging and visually appealing highlight videos, then consider using a versatile video editor like Filmora. Equipped with several video editing tools, it will let you create a sports highlight video in no time. Since the tool has so many features, you can save your time in editing and come up with a new sports video in minutes.


- Filmora is extremely easy to use and runs on all the leading Windows and macOS versions without any issue.
- Using its inbuilt tools, you can clip out the most important events from a sports video or include them in your highlights.
- There are also features to change the motion and pace of the video (like fast forward or slow motion).
- You can also focus on any athlete and freeze a frame on a particular skill or action.
- Besides that, you can also add voiceovers in your sports highlight video, add media layers, use its inbuilt transitions, and fine-tune the overall aesthetics of your videos.
- There are also tons of filters and presets in Filmora that you can use to save your time in editing. You can work on videos of almost every format with seamless 4K support.
Why we picked it
- Options to import/export files in different formats
- Tons of features in one place (extremely easy to use)
- Split-screen support to include multiple events in a highlight video
How to Create a Sports Highlight Video with Filmora?
With the help of Filmora , anyone can create a sports video without even prior editing/designing experience. Firstly, you can install Filmora on your Windows or Mac by visiting its website and have the footage you wish to edit. Now, you can just follow these steps to work on your next sports highlight video.
Filmstock Stock Media Library ](https://filmstock.wondershare.com/creative-theme-sports?spm=rs.filmora%5Fweb&source%5Fchannel=seo%5Farticle )
Step 1: Add a video to Filmora
To start with, just launch Filmora on your computer and add the video that you wish to work on. You can just drag and drop the video to its interface or go to its Menu > File > Import Media to browse and load the file.

Step 2: Edit the Sports Video
In order to create a sports highlight video, the first thing that people do is trim any unwanted part. Once the video is loaded, you can view it on the timeline of the interface. Now, go to the timeline and get the trim tool to manually select the part of the video you wish to trim. After selecting the desired fragment, you can trim the clip or just delete it by clicking on their respective icons.

In the same way, you can also split your video and make other changes in it. You can also include multiple videos together and include them in your timeline as well.
If you are including multiple videos, then make sure they have the same dimensions and aspect ratio. For this, you can select the video, right-click on the timeline, and click on the crop icon. Now, select the same aspect ratio for the entire video to keep it uniform.

Most of the game highlights that we see have different speeds for various sections. That is, some actions would be fast-forwarded while some would be in slow motion. To apply this, simply select the section in the timeline, right-click, and go to the Speed and Duration settings. This will open a dedicated interface from where you can change the speed of the sports video.
Apart from manually setting the speed, you can also take the assistance of the custom speed options that are available in the timeline tools.

Step 3: Make Advanced Edits in your Sports Video
With the user-friendly interface of Filmora, you can do some basic edits and make a sports highlight video in minutes. Though, if you want to focus on some parts and make more changes, then you can use its advanced options as well.
For instance, in a highlight video, we often wish to freeze certain frames. To do this, just select a frame and use the “Freeze Frame” option from the timeline tools. You can even set the duration to freeze the selected frame.
If you have included clips from different videos, then you can apply all kinds of transitions from Filmora. In the end, you can go to its edit options and choose to close gaps as well.
To give your video a uniform and aesthetically pleasing appeal, you can also add different overlays and effects on it from Filmora’s library.
Lastly, make sure that you added sound or voiceover to your video. You can add a sound from its library or import any other music file to it. Since highlight videos mostly have voiceovers, you add the same by visiting the Record > Record Voiceover option.

Step 4: Export your video in the desired format
That’s it! Once your sports highlight video is ready, you can export it in different formats. Just go to the Export option and select the location to save the video and a preferred resolution. You can save your video in formats like MP4, WMV, AVI, FLV, MKV, and so on.
Expert Tips for Creating Highlight Videos
As you can see, making a sports highlight video with a tool like Filmora is extremely easy. Although to be a pro and make better videos, you can consider the following tips:
Keep it short
Make sure that you only include the highlights of the game in your video to keep it interesting. Your aim is to have a short and crisp video without any unwanted footage.
Use freeze frames and slow motion
Some games can be pretty fast-paced and the viewers might miss out on a few key details. To showcase them, you can freeze certain frames or apply slow motion.
Include other details
A sports highlight video can also be informative. You can include details about the players or the team at the start. Also, it is recommended to have sound or a voiceover in the background to narrate the events.
Pick the best clips
When you watch a game, make a note of the best moments that you know your viewers would enjoy. You can also focus on different skills that you found impressive and include them in your sports video.
I’m sure that after reading this guide, you would be able to come up with an impressive sports highlight video as well. Since you might need to make a lot of edits on a sports video, I would recommend using a diverse tool like Filmora. With the tons of editing options that it provides, you can easily create all sorts of highlight videos while saving your time and resources.
Richard Bennett
Richard Bennett is a writer and a lover of all things video.
Follow @Richard Bennett
Richard Bennett
Mar 27, 2024• Proven solutions
“I want to make a sports highlight video, but I don’t know how to edit it or what kind of tools I need to use. Can someone tell me how to work on a sports video?”
As I read this query posted on a popular online forum, I realized that so many people out there find it hard to create a sports video. Well, unlike a standard video, working on a sports highlight video can be tough. This is because it needs a lot of editing and we need to handpick the right moments from hours of footage. Though, if you use the right tools, then you can easily work on highlight videos like a pro. In this guide, I will let you know how to create sports videos in a step by step manner.
- Part 1: Why is a sports highlight video and why important?
- Part 2: Highlight Video vs. Skills Video
- Part 3: Use Excellent Video Editor to Make a Sports Highlight Video
- Part 4: How to Create a Sports Highlight Video?
- Part 5: Expert Tips for Creating Highlight Videos
Why is a sports highlight video and why important?
As the name suggests, a highlight video basically includes all the vital events of a game in a short duration of time. You can include the details of some players at the start or focus on a particular player as well. Besides that, a sports highlight video would have fast-forward, slow motion, and frozen clips to skip or focus on certain details.
A lot of times, people don’t have the time to watch the entire game, which can span for a couple of hours. Therefore, they can watch a sports highlight video that would include all the major events of the game and will let them enjoy their thrill in a few moments.
Besides that, if you are applying for a college/academy or just want to showcase your skills, then you can consider making a sports video of an impressive game of yours. You can simply showcase a player and try to highlight their skills in the video.
Highlight Videos vs. Skills Videos: the Major Differences
While making a sports video, you might encounter two different types of content – a highlight video and a skills video. As I have mentioned above, a sports highlight video would include the shots of an actual game. You can either focus on the event of a single game or include clips from multiple games that were played in a genuine setup. If you want, you can highlight a particular player while making the video as well.
On the other hand, a skills video is mostly made to demonstrate the skills of a player and is not focused on the game. In fact, most of the skills videos are made outside of a real game setting. For instance, if you have mastered a skill or would like to demonstrate your game-related actions, then you can make a skills video. Some of these videos are also tutorial game-plays to teach others about a particular skill that they can master.
Use Excellent Video Editor to Make a Sports Highlight Video
If you want to come up with engaging and visually appealing highlight videos, then consider using a versatile video editor like Filmora. Equipped with several video editing tools, it will let you create a sports highlight video in no time. Since the tool has so many features, you can save your time in editing and come up with a new sports video in minutes.
- Filmora is extremely easy to use and runs on all the leading Windows and macOS versions without any issue.
- Using its inbuilt tools, you can clip out the most important events from a sports video or include them in your highlights.
- There are also features to change the motion and pace of the video (like fast forward or slow motion).
- You can also focus on any athlete and freeze a frame on a particular skill or action.
- Besides that, you can also add voiceovers in your sports highlight video, add media layers, use its inbuilt transitions, and fine-tune the overall aesthetics of your videos.
- There are also tons of filters and presets in Filmora that you can use to save your time in editing. You can work on videos of almost every format with seamless 4K support.
Why we picked it
- Options to import/export files in different formats
- Tons of features in one place (extremely easy to use)
- Split-screen support to include multiple events in a highlight video
How to Create a Sports Highlight Video with Filmora?
With the help of Filmora , anyone can create a sports video without even prior editing/designing experience. Firstly, you can install Filmora on your Windows or Mac by visiting its website and have the footage you wish to edit. Now, you can just follow these steps to work on your next sports highlight video.
Filmstock Stock Media Library ](https://filmstock.wondershare.com/creative-theme-sports?spm=rs.filmora%5Fweb&source%5Fchannel=seo%5Farticle )
Step 1: Add a video to Filmora
To start with, just launch Filmora on your computer and add the video that you wish to work on. You can just drag and drop the video to its interface or go to its Menu > File > Import Media to browse and load the file.
Step 2: Edit the Sports Video
In order to create a sports highlight video, the first thing that people do is trim any unwanted part. Once the video is loaded, you can view it on the timeline of the interface. Now, go to the timeline and get the trim tool to manually select the part of the video you wish to trim. After selecting the desired fragment, you can trim the clip or just delete it by clicking on their respective icons.
In the same way, you can also split your video and make other changes in it. You can also include multiple videos together and include them in your timeline as well.
If you are including multiple videos, then make sure they have the same dimensions and aspect ratio. For this, you can select the video, right-click on the timeline, and click on the crop icon. Now, select the same aspect ratio for the entire video to keep it uniform.
Most of the game highlights that we see have different speeds for various sections. That is, some actions would be fast-forwarded while some would be in slow motion. To apply this, simply select the section in the timeline, right-click, and go to the Speed and Duration settings. This will open a dedicated interface from where you can change the speed of the sports video.
Apart from manually setting the speed, you can also take the assistance of the custom speed options that are available in the timeline tools.
Step 3: Make Advanced Edits in your Sports Video
With the user-friendly interface of Filmora, you can do some basic edits and make a sports highlight video in minutes. Though, if you want to focus on some parts and make more changes, then you can use its advanced options as well.
For instance, in a highlight video, we often wish to freeze certain frames. To do this, just select a frame and use the “Freeze Frame” option from the timeline tools. You can even set the duration to freeze the selected frame.
If you have included clips from different videos, then you can apply all kinds of transitions from Filmora. In the end, you can go to its edit options and choose to close gaps as well.
To give your video a uniform and aesthetically pleasing appeal, you can also add different overlays and effects on it from Filmora’s library.
Lastly, make sure that you added sound or voiceover to your video. You can add a sound from its library or import any other music file to it. Since highlight videos mostly have voiceovers, you add the same by visiting the Record > Record Voiceover option.
Step 4: Export your video in the desired format
That’s it! Once your sports highlight video is ready, you can export it in different formats. Just go to the Export option and select the location to save the video and a preferred resolution. You can save your video in formats like MP4, WMV, AVI, FLV, MKV, and so on.
Expert Tips for Creating Highlight Videos
As you can see, making a sports highlight video with a tool like Filmora is extremely easy. Although to be a pro and make better videos, you can consider the following tips:
Keep it short
Make sure that you only include the highlights of the game in your video to keep it interesting. Your aim is to have a short and crisp video without any unwanted footage.
Use freeze frames and slow motion
Some games can be pretty fast-paced and the viewers might miss out on a few key details. To showcase them, you can freeze certain frames or apply slow motion.
Include other details
A sports highlight video can also be informative. You can include details about the players or the team at the start. Also, it is recommended to have sound or a voiceover in the background to narrate the events.
Pick the best clips
When you watch a game, make a note of the best moments that you know your viewers would enjoy. You can also focus on different skills that you found impressive and include them in your sports video.
I’m sure that after reading this guide, you would be able to come up with an impressive sports highlight video as well. Since you might need to make a lot of edits on a sports video, I would recommend using a diverse tool like Filmora. With the tons of editing options that it provides, you can easily create all sorts of highlight videos while saving your time and resources.
Richard Bennett
Richard Bennett is a writer and a lover of all things video.
Follow @Richard Bennett
Navigating YouTube Rights: An Expert’s Handbook
The Ultimate Guide to YouTube Copyright
Richard Bennett
Nov 01, 2022• Proven solutions
One of the trickiest terrains for new YouTubers to navigate is the land of copyright rules.
We get it, it’s confusing and stressful, especially when what you want to focus on is making videos, but instead, you are worried about getting your account terminated or being sued.
Can you or can’t you use that song or that clip from the movie? That’s all you want to know.
In this article, we are going to address the key areas that YouTubers need to understand when it comes to YouTube copyright. What is okay and what isn’t? What may be considered risky or what would be worth taking a chance?
Remember that everything discussed in this article is only best practices and shouldn’t be taken as definitive legal advice.
Now that we are set, let’s dive in:
Part 1: What is Fair Use?
When we talk about YouTube copyright, we have to talk about fair use.
Without fair use, there wouldn’t be any flexibility for creators. There wouldn’t be mashups, parodies, or lip dubs. Without fair use, any video with copyright content such as music in the background or a reference to a scene from a famous movie will require approval from the content owner and can be removed. Because of fair use, you can publish a video with copyrighted material in it and not have to ask anyone.
Think of fair use as exceptions to copyright rules.
Part 2: What YouTube Considers Fair Use
There are a few aspects YouTube looks at when it comes to determining whether creators are using copyrighted content that meets the fair use exceptions.
- Is the copyrighted content being creatively or purposefully used?
- Are there more original content used than copyrighted content in the video?
- Will your video benefit the original copyrighted content?
Part 3: Types of Content That Meet Fair Use
Some acceptable styles of videos that allow you to exercise fair use are:
Critiques and Reviews: You can use clips of a movie that you review or play a chorus from a song that you are analyzing in a video and it will be okay to use because it’s serving a purpose of educating the viewer.
Tutorials and Commentary: A YouTube gamer streaming the video games and making comments throughout, that is within fair use, because it can be said that it is giving the video game exposure. Additionally, anything that can be classified as tutorials can also fall under fair use. If you have a video teaching people how to play a famous song, like The Beatles’ Let It Be , on piano, that’s fine!
Mashups: Mashups tend to be built entirely out of copyrighted material, but when done well this style of videos are very creative and often serve to promote the original work as opposed to replacing it.
There couldn’t be two more different movies than Toy Story and Fight Club, but somehow thanks the the creativity of a YouTube creator, there is a now a mashup of it. Some might call it an abomination, but this type of recycled art takes skills and planning, and it wouldn’t exist without fair use.
Parody: Imitation for comedic or dramatic effect is an artistic pursuit as long as it is done in a transformative manner. What does transformative mean? It means in some way, the original is being examined.
In this example from The Hillywood Show, we see a parody of both BBC’s Sherlock Holmes and Macklemore & Ryan Lewis’s Thrift Shop. The nuisance of the show and song recreated are there, but nobody who enjoys the originals will sit down and appreciate it in the same way. A parody is in no way trying to replace the original, but rather using the subject, structure, and style of the original as a vessel to another creative work.
Part 4: What To Do When You Get a YouTube Copyright Strike
If you are reading this, you may have already gotten a YouTube copyright strike.
This may have surprised you. Don’t be too concerned. If it was a mistake, the copyright strike merely acts as a warning, letting you know that the content in your video is copyrighted material.
However, if you were to get 3 copyright strikes in 90 days, you may be penalized by:
- Having all your accounts and videos removed
- Not being able to create a new channel
So what should you do? Here are the steps to take after you receive a copyright strike:
- Review the copyright strike by going into Creator Studio > Video Manager > Copyright notice
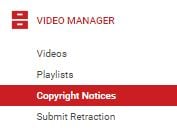
- Click on the “Copyright Strike” link beside the flagged video to see details
- Decide how to respond to the strike:
- Allow the strike to expire after 90 days and complete the YouTube’s copyright school
- Contact the person who reported your video and get the claim retracted
- Dispute the claim with a counter notification
Part 5: 5 Ways to Avoid Copyright Strike
It’s not always clear what YouTube deems fair use, but there are a few things you can do to improve your chances of meeting the qualification.
1. Use non-fictional copyright content instead of creative and fictional copyrighted content. You’ll have a better chance of meeting fair use if you use footages from a news broadcast than you would from a movie or television show.
The intent is clear when using non-fictional copyright content, such as in Bad Lip Reading. They aren’t trying to rebroadcast the Mark Zuckerberg integration, they are parodying it. The easier it is for the public to recognize that the content is from a source, and understand that the creator isn’t trying to take credit for it, the more likely it’ll pass the fair use qualification.
However, if Bad Lip Reading posted the content without lip dubbing, then one can argue that they are taking views away from the original news sources and that wouldn’t be fair use.
2. Make sure your video with copyrighted content isn’t replacing the original one. Only use enough of the source material to get your point across and ensure you are not negatively affecting the original through views and sales.
In this example from Screen Prism, we see scenes from Wes Anderson movies all through the video, however, it is not replacing any of the original films. In fact, you can say that because of this video, people will be motivated to go and watch a Wes Anderson movie, those benefiting the original creator.
3. The copyrighted material is essential to your video. Whether the copyrighted content is needed in order to illustrate a point or if that one moment from a well-recognized movie helps tie together the message, as long as the copyrighted material is serving the video in some significant way, then it will be consider fair use.
4. Give the original creator credit. Just because you give the original creator credit doesn’t mean you can rightfully use their content, however, it does give you a better chance at avoiding copyright strike. Most often, the original creators simply want credit for their work. If they see that you have noted that the content was made by them, it will only give them more exposure.
5. Keep it short. There is no precise number of seconds or ratio of copyrighted to original footage you should have in your video to qualify as fair use. But generally, if the copyrighted clip is short and/or broken up, then it stands a better chance at being approved by YouTube.
Part 6: What to Do When Other YouTubers Are Copying Your Content
As a new YouTuber, it’s a little freaky to think that someone is taking your content and republishing it or using your creations in their video without your permission.
If you ever notice that your content is being copied without your approval — if they have duplicated your video completely or is using your video without giving credit — and it is not benefiting your channel in any way, don’t worry, YouTube is designed to protect you.
Steps to Report Copyright Infringements on YouTube
- View the video that contains your copyrighted material.
- Click on “Report”
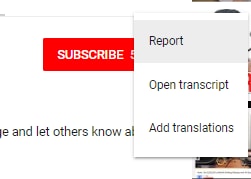
- Select “Infringes my rights” in the pop up window and click “infringes my copyright” in the dropdown options.

- Supply additional information to the report form, including the URL of the video infringing your copyrighted content and the URL of your own video.
- Submit report and wait for an email confirmation that the infringing content has been removed.
Part 7: YouTube Copyright Match
In 2018, YouTube launched a new feature called Copyright Match Tool, which automatically finds videos that are very similar or the same as the ones you’ve created. This gives you the power to determine what to do once you know the video exist.
- You can choose to do nothing.
- You can contact the publisher.
- You can report the video to YouTube for removal.
Key Takeaways
I hope this article has clarified what you can and cannot do with copyrighted content. Here is a quick summary of what we touched on in this post:
- Avoid having 3 copyright strikes on your channel at all costs.
- When using copyrighted material, ensure it is essential to the video and you are not overdoing it.
- Make sure that the copyrighted content does not take views and sales away from the original source.
- Strive to use the copyrighted content in a transformative way, as a parody or a commentary, to educate or inform.
- Give the original creator credit or have it benefit the original by giving more publicity.
- Report any creator that is infringing on your content.
Got any questions on YouTube copyright? Leave a comment below and we’ll help you answer it.
Richard Bennett
Richard Bennett is a writer and a lover of all things video.
Follow @Richard Bennett
Richard Bennett
Nov 01, 2022• Proven solutions
One of the trickiest terrains for new YouTubers to navigate is the land of copyright rules.
We get it, it’s confusing and stressful, especially when what you want to focus on is making videos, but instead, you are worried about getting your account terminated or being sued.
Can you or can’t you use that song or that clip from the movie? That’s all you want to know.
In this article, we are going to address the key areas that YouTubers need to understand when it comes to YouTube copyright. What is okay and what isn’t? What may be considered risky or what would be worth taking a chance?
Remember that everything discussed in this article is only best practices and shouldn’t be taken as definitive legal advice.
Now that we are set, let’s dive in:
Part 1: What is Fair Use?
When we talk about YouTube copyright, we have to talk about fair use.
Without fair use, there wouldn’t be any flexibility for creators. There wouldn’t be mashups, parodies, or lip dubs. Without fair use, any video with copyright content such as music in the background or a reference to a scene from a famous movie will require approval from the content owner and can be removed. Because of fair use, you can publish a video with copyrighted material in it and not have to ask anyone.
Think of fair use as exceptions to copyright rules.
Part 2: What YouTube Considers Fair Use
There are a few aspects YouTube looks at when it comes to determining whether creators are using copyrighted content that meets the fair use exceptions.
- Is the copyrighted content being creatively or purposefully used?
- Are there more original content used than copyrighted content in the video?
- Will your video benefit the original copyrighted content?
Part 3: Types of Content That Meet Fair Use
Some acceptable styles of videos that allow you to exercise fair use are:
Critiques and Reviews: You can use clips of a movie that you review or play a chorus from a song that you are analyzing in a video and it will be okay to use because it’s serving a purpose of educating the viewer.
Tutorials and Commentary: A YouTube gamer streaming the video games and making comments throughout, that is within fair use, because it can be said that it is giving the video game exposure. Additionally, anything that can be classified as tutorials can also fall under fair use. If you have a video teaching people how to play a famous song, like The Beatles’ Let It Be , on piano, that’s fine!
Mashups: Mashups tend to be built entirely out of copyrighted material, but when done well this style of videos are very creative and often serve to promote the original work as opposed to replacing it.
There couldn’t be two more different movies than Toy Story and Fight Club, but somehow thanks the the creativity of a YouTube creator, there is a now a mashup of it. Some might call it an abomination, but this type of recycled art takes skills and planning, and it wouldn’t exist without fair use.
Parody: Imitation for comedic or dramatic effect is an artistic pursuit as long as it is done in a transformative manner. What does transformative mean? It means in some way, the original is being examined.
In this example from The Hillywood Show, we see a parody of both BBC’s Sherlock Holmes and Macklemore & Ryan Lewis’s Thrift Shop. The nuisance of the show and song recreated are there, but nobody who enjoys the originals will sit down and appreciate it in the same way. A parody is in no way trying to replace the original, but rather using the subject, structure, and style of the original as a vessel to another creative work.
Part 4: What To Do When You Get a YouTube Copyright Strike
If you are reading this, you may have already gotten a YouTube copyright strike.
This may have surprised you. Don’t be too concerned. If it was a mistake, the copyright strike merely acts as a warning, letting you know that the content in your video is copyrighted material.
However, if you were to get 3 copyright strikes in 90 days, you may be penalized by:
- Having all your accounts and videos removed
- Not being able to create a new channel
So what should you do? Here are the steps to take after you receive a copyright strike:
- Review the copyright strike by going into Creator Studio > Video Manager > Copyright notice
- Click on the “Copyright Strike” link beside the flagged video to see details
- Decide how to respond to the strike:
- Allow the strike to expire after 90 days and complete the YouTube’s copyright school
- Contact the person who reported your video and get the claim retracted
- Dispute the claim with a counter notification
Part 5: 5 Ways to Avoid Copyright Strike
It’s not always clear what YouTube deems fair use, but there are a few things you can do to improve your chances of meeting the qualification.
1. Use non-fictional copyright content instead of creative and fictional copyrighted content. You’ll have a better chance of meeting fair use if you use footages from a news broadcast than you would from a movie or television show.
The intent is clear when using non-fictional copyright content, such as in Bad Lip Reading. They aren’t trying to rebroadcast the Mark Zuckerberg integration, they are parodying it. The easier it is for the public to recognize that the content is from a source, and understand that the creator isn’t trying to take credit for it, the more likely it’ll pass the fair use qualification.
However, if Bad Lip Reading posted the content without lip dubbing, then one can argue that they are taking views away from the original news sources and that wouldn’t be fair use.
2. Make sure your video with copyrighted content isn’t replacing the original one. Only use enough of the source material to get your point across and ensure you are not negatively affecting the original through views and sales.
In this example from Screen Prism, we see scenes from Wes Anderson movies all through the video, however, it is not replacing any of the original films. In fact, you can say that because of this video, people will be motivated to go and watch a Wes Anderson movie, those benefiting the original creator.
3. The copyrighted material is essential to your video. Whether the copyrighted content is needed in order to illustrate a point or if that one moment from a well-recognized movie helps tie together the message, as long as the copyrighted material is serving the video in some significant way, then it will be consider fair use.
4. Give the original creator credit. Just because you give the original creator credit doesn’t mean you can rightfully use their content, however, it does give you a better chance at avoiding copyright strike. Most often, the original creators simply want credit for their work. If they see that you have noted that the content was made by them, it will only give them more exposure.
5. Keep it short. There is no precise number of seconds or ratio of copyrighted to original footage you should have in your video to qualify as fair use. But generally, if the copyrighted clip is short and/or broken up, then it stands a better chance at being approved by YouTube.
Part 6: What to Do When Other YouTubers Are Copying Your Content
As a new YouTuber, it’s a little freaky to think that someone is taking your content and republishing it or using your creations in their video without your permission.
If you ever notice that your content is being copied without your approval — if they have duplicated your video completely or is using your video without giving credit — and it is not benefiting your channel in any way, don’t worry, YouTube is designed to protect you.
Steps to Report Copyright Infringements on YouTube
- View the video that contains your copyrighted material.
- Click on “Report”
- Select “Infringes my rights” in the pop up window and click “infringes my copyright” in the dropdown options.
- Supply additional information to the report form, including the URL of the video infringing your copyrighted content and the URL of your own video.
- Submit report and wait for an email confirmation that the infringing content has been removed.
Part 7: YouTube Copyright Match
In 2018, YouTube launched a new feature called Copyright Match Tool, which automatically finds videos that are very similar or the same as the ones you’ve created. This gives you the power to determine what to do once you know the video exist.
- You can choose to do nothing.
- You can contact the publisher.
- You can report the video to YouTube for removal.
Key Takeaways
I hope this article has clarified what you can and cannot do with copyrighted content. Here is a quick summary of what we touched on in this post:
- Avoid having 3 copyright strikes on your channel at all costs.
- When using copyrighted material, ensure it is essential to the video and you are not overdoing it.
- Make sure that the copyrighted content does not take views and sales away from the original source.
- Strive to use the copyrighted content in a transformative way, as a parody or a commentary, to educate or inform.
- Give the original creator credit or have it benefit the original by giving more publicity.
- Report any creator that is infringing on your content.
Got any questions on YouTube copyright? Leave a comment below and we’ll help you answer it.
Richard Bennett
Richard Bennett is a writer and a lover of all things video.
Follow @Richard Bennett
Also read:
- Beginning the Video Odyssey How to Create an Engaging YouTube Channel
- [New] Comprehensive Guide to Embedding Multiple YouTube Playlists in Websites
- A Step-by-Step Guide to Edit YouTube Videos in FinalCut
- Access a World of Content Anywhere, Anyplace with the Leading 6 Best and Cost-Free Tools to Download YouTubes' Short Videos
- Rapid Growth Tactics Hit and Maintain a Stellar 10,000 Views Mark
- 2024 Approved Channel Trailers that Convert Viewers Into Customers
- Navigating Two Worlds A Practical Guide to Multistream on Youtube and Twitch
- A Decade of YouTube Dominance Breakthrough Videos Hitting a Billion Views for 2024
- [New] Add Visual Appeal with These Methods for YT Video Inclusion in PPT
- Elevate Video Popularity with Smart Thumbnails
- A Step-by-Step Guide on Applying CC Rights Effectively for 2024
- Elevating Your Videography YouTube Enhancements Explained
- Cutting-Edge Techniques Top Lenses for YouTube Stars
- Uncover These Ten YouTube Sources with the Fastest Growth Rates
- The Best Mirrorless Cams Top Picks for Your Next Vlog Project
- [New] Choosing the Best Camera for Filming Mirrorless or DSLR
- 2024 Approved Boosting Viewership A Guide to Captivating Haul Content
- Secrets to Crafting Compelling Openers in Game Videos (YT Free/Premium)
- [Updated] Achieving Excellence in Work and Online Content
- The Insider Guide to Gaming Channel Header Templates
- Copyright Laws and Screencasting of Online Video Platforms (YouTube) for 2024
- 2024 Approved Basics of Online Videos The Easiest 10 Ideas for Beginners on YouTube
- Discover the Top 7 Free YouTube Tag Extractor Vendors for 2024
- SplitScreen ProEditor
- [New] 8 Premier Resources Download Free, High-Quality Green Screen Footage
- Is Hasty Subscription a Gateway to Better Viewing Habits?
- In 2024, Dazzle Viewers with Brightly Outlined YT Snapshots
- In 2024, Budget-Friendly Broadcaster Gear for Video Voyeurs
- [Updated] Counteract Vibration for Clear Captures
- [Updated] Dive Into the Art of ASMR Recording – A Comprehensive Overview
- [New] How to Create a YouTube Channel Trailer to Increase Revenue
- [New] Cutting Edge MP4 Utilities Choosing the Right One for Mac
- Top 10 Hashtags to Boost Your Youtube Views Beyond Six Figures
- Captivate and Enchant Explore the Best Creative Reactions on YT for 2024
- In 2024, Crafting Content, Cultivating Capital Your Videography Voyage
- Step-in-Stride Guide Sharing Personalized YouTube Videos with Google
- [Updated] Discover the Top Free Tools for YouTube Image Downloads
- Viral Beats Cutting-Edge Music for YouTube Short Videos
- Top Auditory Alteration Aids for Streamers and Clips
- 7 Fixes for Unfortunately, Phone Has Stopped on Samsung Galaxy A25 5G | Dr.fone
- [Updated] 2024 Approved The Essential Guide to Uploading and Sharing YouTube Vids in Insta Stories
- Download X-Recorder for PC
- Updated In 2024, Free Android Video Editing Apps No Watermark, No Catch
- Quick Fixes for Why Is My Infinix Zero 30 5G Black and White | Dr.fone
- Top Recommended ASMRists for Nighttime Calmness
- Everything You Need to Know about Lock Screen Settings on your Lava
- List of Pokémon Go Joysticks On Vivo Y27 5G | Dr.fone
- 3 Ways to Track Nubia Red Magic 8S Pro+ without Them Knowing | Dr.fone
- How to make a digital signature for .odt file
- How to Change Your Tecno Phantom V Flip Location on life360 Without Anyone Knowing? | Dr.fone
- Updated Add Flesh to Your Video Content Before Posting Them for Your Audience to See Using Meme Texts. Use the Tutorial Guide Shared in This Post
- Updated 2024 Approved Add Wow to Your Videos Best Animated Text Apps for Phone
- Unlock Your Infinix Hot 40 Phone with Ease The 3 Best Lock Screen Removal Tools
- How Marketers Should Use Hashtags on Facebook Properly for 2024
- New Unleash Your Creativity A Beginners Guide to Mac Movie Maker Software
- 2024 Approved Bring Your Movies to Life A Comprehensive Guide to Adding Audio in Final Cut Pro
- In 2024, How to Reset a Locked Xiaomi Redmi Note 12 Pro 4G Phone
- In 2024, Does Apple iPhone 6 Plus Have Find My Friends? | Dr.fone
- [New] Enhancing Visual Storytelling on Instagram With Loops for 2024
- In 2024, The Ultimate Guide to Poco Pattern Lock Screen Everything You Need to Know
- [Updated] In 2024, Unveiling the Prospects of SplitCam for Videographers
- [Updated] 2024 Approved Mastering Pre-Upload TikTok's Copyright Guidelines
- In 2024, The Ultimate Guide to Get the Rare Candy on Pokemon Go Fire Red On Tecno Spark 20 Pro+ | Dr.fone
- Updated 2024 Approved Edit Like a Pro Free and Easy GoPro Video Editing Solutions
- 8 Useful Tool to Pixelate Face on Photo
- [New] 2024 Approved Export PPT as Animated Film
- In 2024, Overview of the Best Nokia C12 Screen Mirroring App | Dr.fone
- In 2024, How to Track Apple iPhone 8 Plus Location by Number | Dr.fone
- 2024 Approved Mastering Screen Capture A Compreenas Android Guide
- 7 Top Ways To Resolve Apple ID Not Active Issue For iPhone 13 Pro | Dr.fone
- 8 Ultimate Fixes for Google Play Your Honor 90 GT Isnt Compatible | Dr.fone
- How to Bypass Android Lock Screen Using Emergency Call On Xiaomi 14 Ultra?
- [Updated] 2024 Approved Top Internet Speech Capture Tools
- Title: "Crafting a Sports Highlight Step-by-Step Tutorial for 2024"
- Author: Kevin
- Created at : 2024-05-25 14:52:41
- Updated at : 2024-05-26 14:52:41
- Link: https://youtube-videos.techidaily.com/crafting-a-sports-highlight-step-by-step-tutorial-for-2024/
- License: This work is licensed under CC BY-NC-SA 4.0.
