
Comprehensive Insights Into iMovie Techniques for YouTube Creators
Comprehensive Insights Into iMovie Techniques for YouTube Creators
Easy Way to Edit YouTube Videos in iMovie

Richard Bennett
Mar 27, 2024• Proven solutions
iMovie is the built-in video editor that allows you to combine several video clips. It is available for both Mac and iOS devices. This app was first released in 1999 when it came with the iMac DV model.
With the use of the iMovie, you are able to create movies that include sound effects, menus, transitions, titles, themes, and music, just to name a few. The resulting movie can be saved onto physical media or as a file on the hard drive.
If you are a Mac user, then you can easily edit YouTube videos in iMovie. All you need to do is to follow the simple steps below. In this article, you will learn how to import videos, organize videos, add YouTube titles and add transitions.
Part 1. Steps on Editing YouTube Videos Using iMovie
To edit a video for YouTube with iMovie, you can follow these steps.
Step 1: Import Video Clips into iMovie
If you have recorded the video clips with the use of a videocam, then connect the camera to the Mac and open the app. You can import the videos by manually selecting the clips that will be part of the YouTube video.
Note: If you want to import videos that you have already published on your YouTube channel, then you can download them from the channel, and save them as MP4. However, if the videos were uploaded by other users, then you need to use a video converter, this article will let you know the 8 best video converters to convert video to MP4.
Step 2: Edit the Video Clips
Once you have all the clips that you need, the next step is to edit YouTube videos in iMovie. When you import the clips, you have created an Event in the app. If you want to include a clip in your final video, just drag the file to the project browser, where you can edit the video.

You can also add videos from other Events into the current project. You can select the parts of the video by dragging across the video from the chosen start to stop points. Edit the video until you are satisfied with the results.
Step 3: Enhance the Video
Once you have edited the video, you can then add background music, themes, sound effects, onscreen text, transitions between clips, and photos. The best thing about iMovie is that it comes with a sound effects library. It also allows you to upload audio from your iTunes library, iLife, and GarageBand.
iMovie allows you to add text to any part of the video, whether it is a title screen at the start, credits at the end, and everything in between. Try to enhance the video until you think it is ready to be uploaded to YouTube.
- Add YouTube title : If you want to add a title for YouTube Video, all you need to do is click Title in the toolbar, and then highlight My Movie on the left. From here, enter the title you like.
- Organize videos : You also can rearrange video clips in the timeline. Just drag the video on the timeline to wherever you want.
- Add transitions : If you have more than one video clip, you definitely need transitions between them. Click the Transitions tab, and then select one transition you like. In the end, drag it to stop between two clips.
Step 4: Export and Upload the Video to YouTube

When you edit YouTube videos in iMovie, you have the option to export the video straight to the video streaming website. All you need to do is to click on the Share button found at the top of the screen. Then select YouTube. Add your YouTube account in iMovie by entering your username and password. Then you choose a title, description, and tags for the video.
You can choose the resolution and size of the video that includes HD 720p and HD 1080p, mobile, medium, and large. Click on Publish to upload the video to YouTube. Uploading the video will take several minutes to a couple of hours, depending on the resolution and size of the video.
Part 2. A Better Choice to Edit YouTube Videos
There’s a better way to edit YouTube videos. It involves the use of Wondershare Filmora . It is user-friendly and allows beginners to make videos professional-looking videos.


This software has more than 300 video effects for family, weddings, love, and travel, etc. You can also add animated captions to photos that will help tell the story. It comes with an array of intro and credit templates that will enhance your video.
Lastly, you can easily share the resulting movie on YouTube, DVD, other devices, and a lot more.
Richard Bennett
Richard Bennett is a writer and a lover of all things video.
Follow @Richard Bennett
Richard Bennett
Mar 27, 2024• Proven solutions
iMovie is the built-in video editor that allows you to combine several video clips. It is available for both Mac and iOS devices. This app was first released in 1999 when it came with the iMac DV model.
With the use of the iMovie, you are able to create movies that include sound effects, menus, transitions, titles, themes, and music, just to name a few. The resulting movie can be saved onto physical media or as a file on the hard drive.
If you are a Mac user, then you can easily edit YouTube videos in iMovie. All you need to do is to follow the simple steps below. In this article, you will learn how to import videos, organize videos, add YouTube titles and add transitions.
Part 1. Steps on Editing YouTube Videos Using iMovie
To edit a video for YouTube with iMovie, you can follow these steps.
Step 1: Import Video Clips into iMovie
If you have recorded the video clips with the use of a videocam, then connect the camera to the Mac and open the app. You can import the videos by manually selecting the clips that will be part of the YouTube video.
Note: If you want to import videos that you have already published on your YouTube channel, then you can download them from the channel, and save them as MP4. However, if the videos were uploaded by other users, then you need to use a video converter, this article will let you know the 8 best video converters to convert video to MP4.
Step 2: Edit the Video Clips
Once you have all the clips that you need, the next step is to edit YouTube videos in iMovie. When you import the clips, you have created an Event in the app. If you want to include a clip in your final video, just drag the file to the project browser, where you can edit the video.
You can also add videos from other Events into the current project. You can select the parts of the video by dragging across the video from the chosen start to stop points. Edit the video until you are satisfied with the results.
Step 3: Enhance the Video
Once you have edited the video, you can then add background music, themes, sound effects, onscreen text, transitions between clips, and photos. The best thing about iMovie is that it comes with a sound effects library. It also allows you to upload audio from your iTunes library, iLife, and GarageBand.
iMovie allows you to add text to any part of the video, whether it is a title screen at the start, credits at the end, and everything in between. Try to enhance the video until you think it is ready to be uploaded to YouTube.
- Add YouTube title : If you want to add a title for YouTube Video, all you need to do is click Title in the toolbar, and then highlight My Movie on the left. From here, enter the title you like.
- Organize videos : You also can rearrange video clips in the timeline. Just drag the video on the timeline to wherever you want.
- Add transitions : If you have more than one video clip, you definitely need transitions between them. Click the Transitions tab, and then select one transition you like. In the end, drag it to stop between two clips.
Step 4: Export and Upload the Video to YouTube
When you edit YouTube videos in iMovie, you have the option to export the video straight to the video streaming website. All you need to do is to click on the Share button found at the top of the screen. Then select YouTube. Add your YouTube account in iMovie by entering your username and password. Then you choose a title, description, and tags for the video.
You can choose the resolution and size of the video that includes HD 720p and HD 1080p, mobile, medium, and large. Click on Publish to upload the video to YouTube. Uploading the video will take several minutes to a couple of hours, depending on the resolution and size of the video.
Part 2. A Better Choice to Edit YouTube Videos
There’s a better way to edit YouTube videos. It involves the use of Wondershare Filmora . It is user-friendly and allows beginners to make videos professional-looking videos.
This software has more than 300 video effects for family, weddings, love, and travel, etc. You can also add animated captions to photos that will help tell the story. It comes with an array of intro and credit templates that will enhance your video.
Lastly, you can easily share the resulting movie on YouTube, DVD, other devices, and a lot more.
Richard Bennett
Richard Bennett is a writer and a lover of all things video.
Follow @Richard Bennett
Video Quality Edge: Mirrorless Versus DSLR Cameras
Mirrorless vs. DSLR Cameras: Which is Better for Videos?
Richard Bennett
Oct 26, 2023• Proven solutions
If you’re looking to shoot your videos with interchangeable lenses, your camera set up will either have to have a mirrorless camera body or a DSLR camera body. In this post, I’ll be comparing the two camera body types for recording video.
- Part 1: What is a DSLR Camera?
- Part 2: What is a Mirrorless Camera?
- Part 3: Mirrorless vs. DSLR - a Complete Comparison
- Part 4: Mirrorless vs. DSLR - Which One is Better for Video?
What is a DSLR Camera?
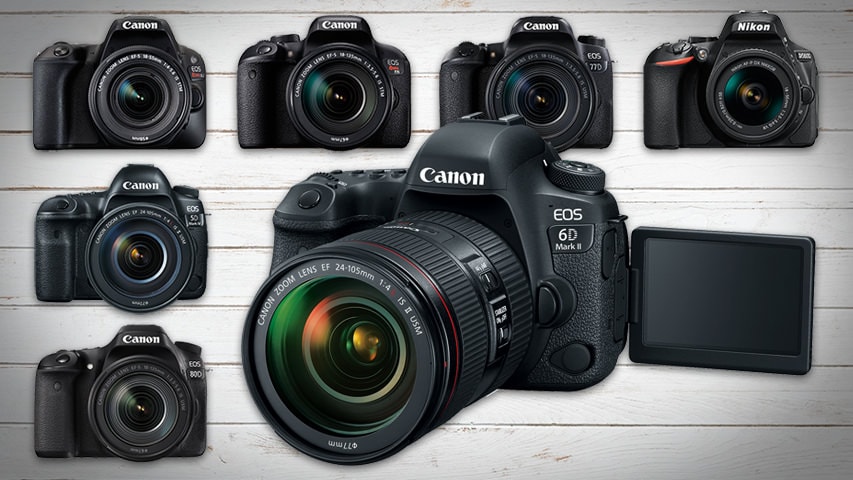
DSLR cameras are digital single-lens reflex cameras. Like 35mm film cameras of the past, DSLR cameras are built with an angled mirror inside its camera body. This mirror allows you to look into your camera’s optical viewfinder and see exactly what your camera sees.
The mirror inside a DSLR camera flips up out of the way when you open the shutter to allow light to reach the camera’s image sensor.
Check out our list of the 7 Best DSLR Cameras For Vlogging .
What is a Mirrorless Camera?
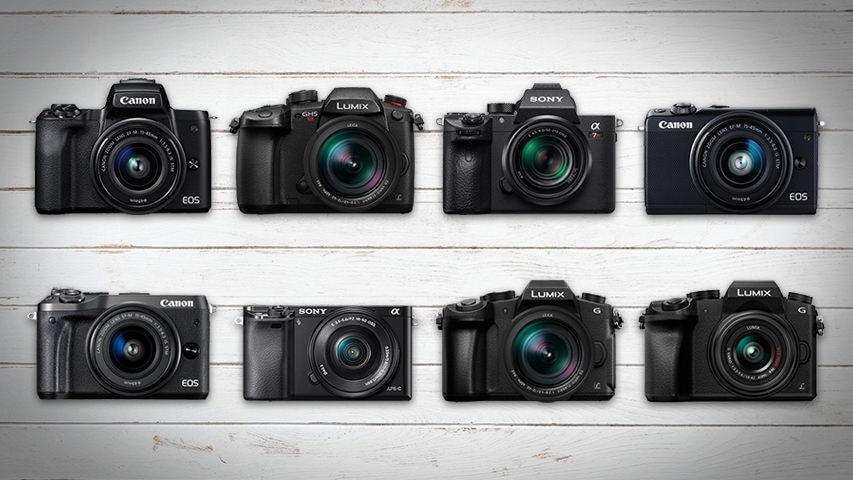
Mirrorless cameras are interchangeable lens cameras without a mirror inside the camera body. With nothing to reflect your image, you won’t find any optical viewfinder to look through to see exactly what your camera sees.
Light passes through the lens of a mirrorless camera and lands directly onto the camera’s sensor.
Check out our list of the 8 Best Mirrorless Cameras For Vlogging .
Mirrorless vs. DSLR - a Complete Comparison
Size and Weight
DSLR cameras are larger and heavier than mirrorless cameras because there are more parts that go into their camera bodies. DSLR cameras require enough space inside for an angled mirror to flip up out of the way.
If your video shooting style is more on-the-go, like that of a daily vlogger or travel vlogger, the smaller size and lighter weight of a mirrorless camera may be more suitable for you.
Previewing Images
When you’re using a DSLR camera, your optical viewfinder will show you exactly what your camera sees as opposed to a digital preview of what your image sensor picks up. No matter how bright or dark your scene actually is, through the optical viewfinder, you’ll be able to clearly see what your camera sees with the power of your eye.
Mirrorless cameras, on the other hand, display on your camera’s screen or electronic viewfinder a digital preview of what your camera is looking at. You will notice a lag, especially in low light, between actions that are taking place in front of the camera and the same actions being displayed in your live preview.
Lenses and Accessories
Having been around much longer, there are plenty more options for lenses and accessories when it comes to shooting with DSLR cameras. You can choose from all kinds of different quality levels and price ranges.
Video Resolution
4K video recording is more readily available in mirrorless cameras than DSLR cameras. At a much more affordable budget, you can get your hands on a 4K mirrorless camera. If you want to shoot 4K video on a DSLR camera, though, you will have to pay for some of the most expensive DSLR cameras on the market.
Image Stabilization
Up until quite recently, you needed to get the right lens with built-in optical image stabilization if you wanted to shoot stabilized photos and videos with an interchangeable lens camera. Image stabilization had not been readily available in the bodies of these cameras.
In recent years, however, mirrorless cameras have been much more active in their development of camera bodies equipped with shifting image sensors. Your shots can be even more stabilized when the optical image stabilization of your lens is combined with your camera’s in-body sensor-shift image stabilization.
Battery Life
When it comes to shooting video, DSLR cameras and mirrorless cameras consume about the same amount of power. It’s still safe to say, though, that DSLR cameras, for the most part, have better battery life than mirrorless cameras because their bigger batteries are packed with more power.
Mirrorless vs. DSLR - Which One is Better for Video?
In my opinion, when it comes to filming a video, mirrorless cameras are the way to go. In such a short time, mirrorless cameras have made huge leaps in their capabilities. It won’t be long before the ultimate vlogging camera comes out on the mirrorless market.
In the end, if you need to edit videos futhermore, try Filmora video editor . It’s a video editor which has significantly improved overall performance, making the product faster, and more powerful, and taking the user editing experience to a new level.
It is perfect for helping beginners, and intermediate users create stylish videos by providing an intuitive user interface and built-in effects.
![]()
Richard Bennett
Richard Bennett is a writer and a lover of all things video.
Follow @Richard Bennett
Richard Bennett
Oct 26, 2023• Proven solutions
If you’re looking to shoot your videos with interchangeable lenses, your camera set up will either have to have a mirrorless camera body or a DSLR camera body. In this post, I’ll be comparing the two camera body types for recording video.
- Part 1: What is a DSLR Camera?
- Part 2: What is a Mirrorless Camera?
- Part 3: Mirrorless vs. DSLR - a Complete Comparison
- Part 4: Mirrorless vs. DSLR - Which One is Better for Video?
What is a DSLR Camera?
DSLR cameras are digital single-lens reflex cameras. Like 35mm film cameras of the past, DSLR cameras are built with an angled mirror inside its camera body. This mirror allows you to look into your camera’s optical viewfinder and see exactly what your camera sees.
The mirror inside a DSLR camera flips up out of the way when you open the shutter to allow light to reach the camera’s image sensor.
Check out our list of the 7 Best DSLR Cameras For Vlogging .
What is a Mirrorless Camera?
Mirrorless cameras are interchangeable lens cameras without a mirror inside the camera body. With nothing to reflect your image, you won’t find any optical viewfinder to look through to see exactly what your camera sees.
Light passes through the lens of a mirrorless camera and lands directly onto the camera’s sensor.
Check out our list of the 8 Best Mirrorless Cameras For Vlogging .
Mirrorless vs. DSLR - a Complete Comparison
Size and Weight
DSLR cameras are larger and heavier than mirrorless cameras because there are more parts that go into their camera bodies. DSLR cameras require enough space inside for an angled mirror to flip up out of the way.
If your video shooting style is more on-the-go, like that of a daily vlogger or travel vlogger, the smaller size and lighter weight of a mirrorless camera may be more suitable for you.
Previewing Images
When you’re using a DSLR camera, your optical viewfinder will show you exactly what your camera sees as opposed to a digital preview of what your image sensor picks up. No matter how bright or dark your scene actually is, through the optical viewfinder, you’ll be able to clearly see what your camera sees with the power of your eye.
Mirrorless cameras, on the other hand, display on your camera’s screen or electronic viewfinder a digital preview of what your camera is looking at. You will notice a lag, especially in low light, between actions that are taking place in front of the camera and the same actions being displayed in your live preview.
Lenses and Accessories
Having been around much longer, there are plenty more options for lenses and accessories when it comes to shooting with DSLR cameras. You can choose from all kinds of different quality levels and price ranges.
Video Resolution
4K video recording is more readily available in mirrorless cameras than DSLR cameras. At a much more affordable budget, you can get your hands on a 4K mirrorless camera. If you want to shoot 4K video on a DSLR camera, though, you will have to pay for some of the most expensive DSLR cameras on the market.
Image Stabilization
Up until quite recently, you needed to get the right lens with built-in optical image stabilization if you wanted to shoot stabilized photos and videos with an interchangeable lens camera. Image stabilization had not been readily available in the bodies of these cameras.
In recent years, however, mirrorless cameras have been much more active in their development of camera bodies equipped with shifting image sensors. Your shots can be even more stabilized when the optical image stabilization of your lens is combined with your camera’s in-body sensor-shift image stabilization.
Battery Life
When it comes to shooting video, DSLR cameras and mirrorless cameras consume about the same amount of power. It’s still safe to say, though, that DSLR cameras, for the most part, have better battery life than mirrorless cameras because their bigger batteries are packed with more power.
Mirrorless vs. DSLR - Which One is Better for Video?
In my opinion, when it comes to filming a video, mirrorless cameras are the way to go. In such a short time, mirrorless cameras have made huge leaps in their capabilities. It won’t be long before the ultimate vlogging camera comes out on the mirrorless market.
In the end, if you need to edit videos futhermore, try Filmora video editor . It’s a video editor which has significantly improved overall performance, making the product faster, and more powerful, and taking the user editing experience to a new level.
It is perfect for helping beginners, and intermediate users create stylish videos by providing an intuitive user interface and built-in effects.
![]()
Richard Bennett
Richard Bennett is a writer and a lover of all things video.
Follow @Richard Bennett
Also read:
- [New] 2024 Approved Media Matrix The Battle of Podcasts Vs. YouTube
- [New] Saving the Ephemeral A Guide to Online Audio Recording
- [Updated] 2024 Approved Step-by-Step Tutorial for Efficient Video Capturing via ZD
- [Updated] 2024 Approved Unraveling the Best Free SRT Translators Your Essential Guidebook
- 無料でDVD-VR/DVDビデオを動画にする:複数選び自由なコンバータプログラム案内!
- Banter Bonanza The Best Comedians on the Web for 2024
- Biometrics Explained: Unveiling the Secrets of Personal Identification Techniques
- Boost Site Engagement and Tracking Using the Innovative Cookiebot Technology
- Charting Creator's Fortune Revenue Generated From Youtube Advertisements?
- Charting New Territory YouTube's Revised Policies for 2024
- Free Minecraft Branding Tools Download
- In 2024, Dive Into the Do's and Don'ts of YouTube Beauty Channels
- Title: Comprehensive Insights Into iMovie Techniques for YouTube Creators
- Author: Kevin
- Created at : 2025-02-09 03:41:22
- Updated at : 2025-02-10 21:31:13
- Link: https://youtube-videos.techidaily.com/comprehensive-insights-into-imovie-techniques-for-youtube-creators/
- License: This work is licensed under CC BY-NC-SA 4.0.