
:max_bytes(150000):strip_icc():format(webp)/Apple-Watch-Ultra-2-23e8ec3e4ee04c6e98c9d654a35f59ec.jpg)
"Compiling Leading Short-Form Video Editors IOS/Android Edition for 2024"
Compiling Leading Short-Form Video Editors: IOS/Android Edition
Best YouTube Shorts Video Editing Apps for iOS and Android

Richard Bennett
Mar 27, 2024• Proven solutions
Even though Shorts is integrated within the YouTube app and still in beta, you can still edit your videos. At this writing, the only additional elements that you can add to your short videos are background music and captions. While these two are good enough to make your clips informative, they might not be able to attract as many viewers as there would have been if the footages were well-decorated with a couple of filters, effects, stickers, etc.
That said, listed below are some of the efficient and feature-packed third-party apps that can help you beautify your videos before they can be published as Shorts on your YouTube channel:
Best Shorts Video Editing Apps for iOS and Android (Free and Paid)
Top 10 short video editing apps for smartphones, along with their attributes, include:
1. Wondershare Filmora
This was developed by one of the IT giants called Wondershare. The elder sibling of Filmora is Filmora, a PC program for both Windows and Mac platforms that gives tough competition to some of the commonly used post-production applications like Adobe Premiere Pro, Final Cut Pro X, etc.
Supported Platforms: Android and iOS (11.0 and above)
Users’ Star Rating (Out of 5): 4.6
Main Features: Allows video editing (trimming, cutting, etc.), adds or extracts music from the videos, supports HD quality exporting, etc.
Aspect Ratio: Almost all widely used sizes
Sharing: Allows publishing directly to YouTube
Pros: Free to use, available for both iOS and Android, a complete package for video editing enthusiasts
Cons: Free version adds a watermark to the exported videos
2. VideoLeap – Video Editor – Film Photo Editor
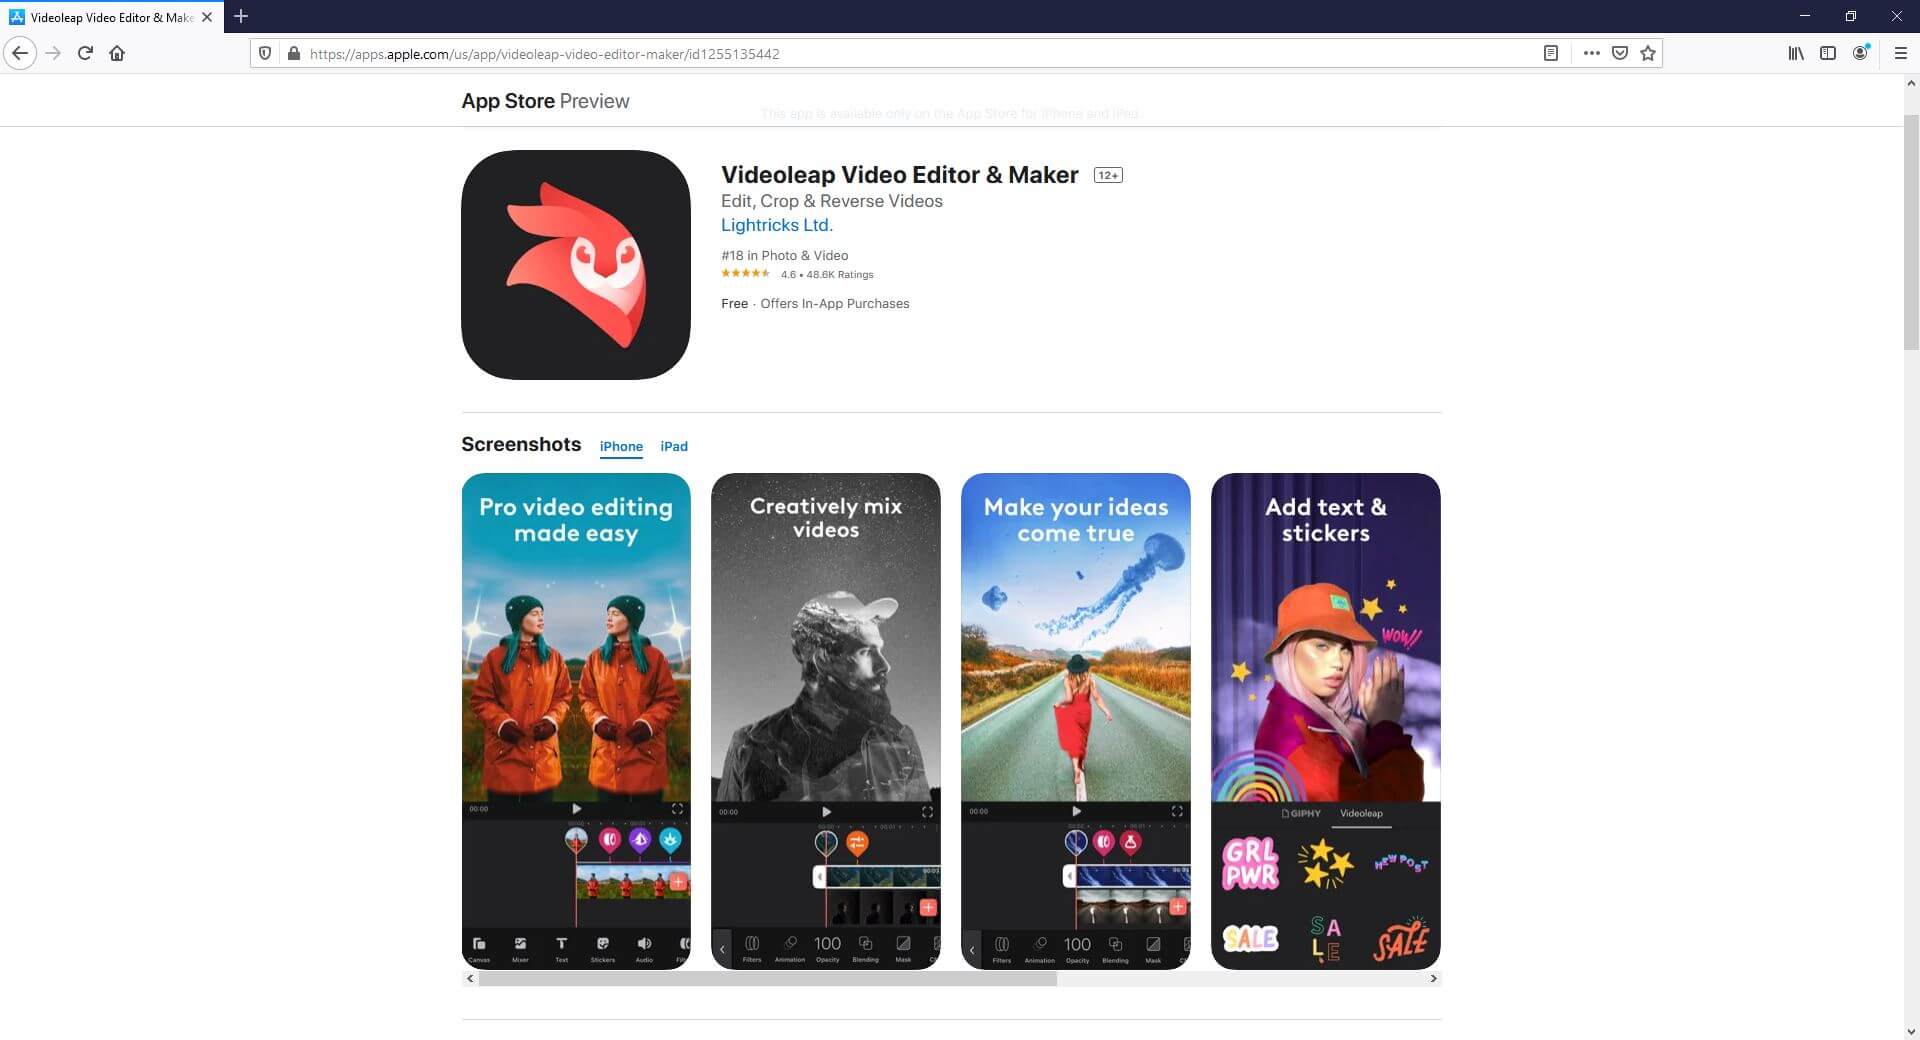
Another lightweight video editor for mobile devices, VideoLeap, lets you edit the videos simply and quickly.
Supported Platforms: Android (4.3 and above) and iOS (12.0 and above)
Users’ Star Rating (Out of 5): 4.3
Main Features: Has more than 200 filters, allows trimming and cropping, offers a practically unlimited number of undoes and redoes
Aspect Ratio: Almost all widely used sizes
Sharing: Exports videos to the device
Pros: Offers layer-based editing, gives access to the professional-level filters for video decoration, has more than 60 overlays, etc.
Cons: Paid subscription is needed to access features like edit, crop, and reverse
3. KineMaster Video Editor
KineMaster is probably one of the most popular video editors among vloggers, beginners, and teenagers. With simple UI, the app offers easy access to many of its features to edit the videos.
Supported Platforms: Android (6.0 and above) and iOS (12.4 and above)
Users’ Star Rating (Out of 5): 4.7
Main Features: Color correction, video reversal, trimming, splitting, cutting, voice changer, sound effects, etc.
Aspect Ratio: Almost all widely used sizes
Sharing: Allows publishing directly to YouTube
Pros: Can export videos to 4K 60 FPS, can be used for free, supports multiple languages
Cons: A premium subscription must be purchased to access advanced features
4. Video Maker for YouTube – Video.Guru
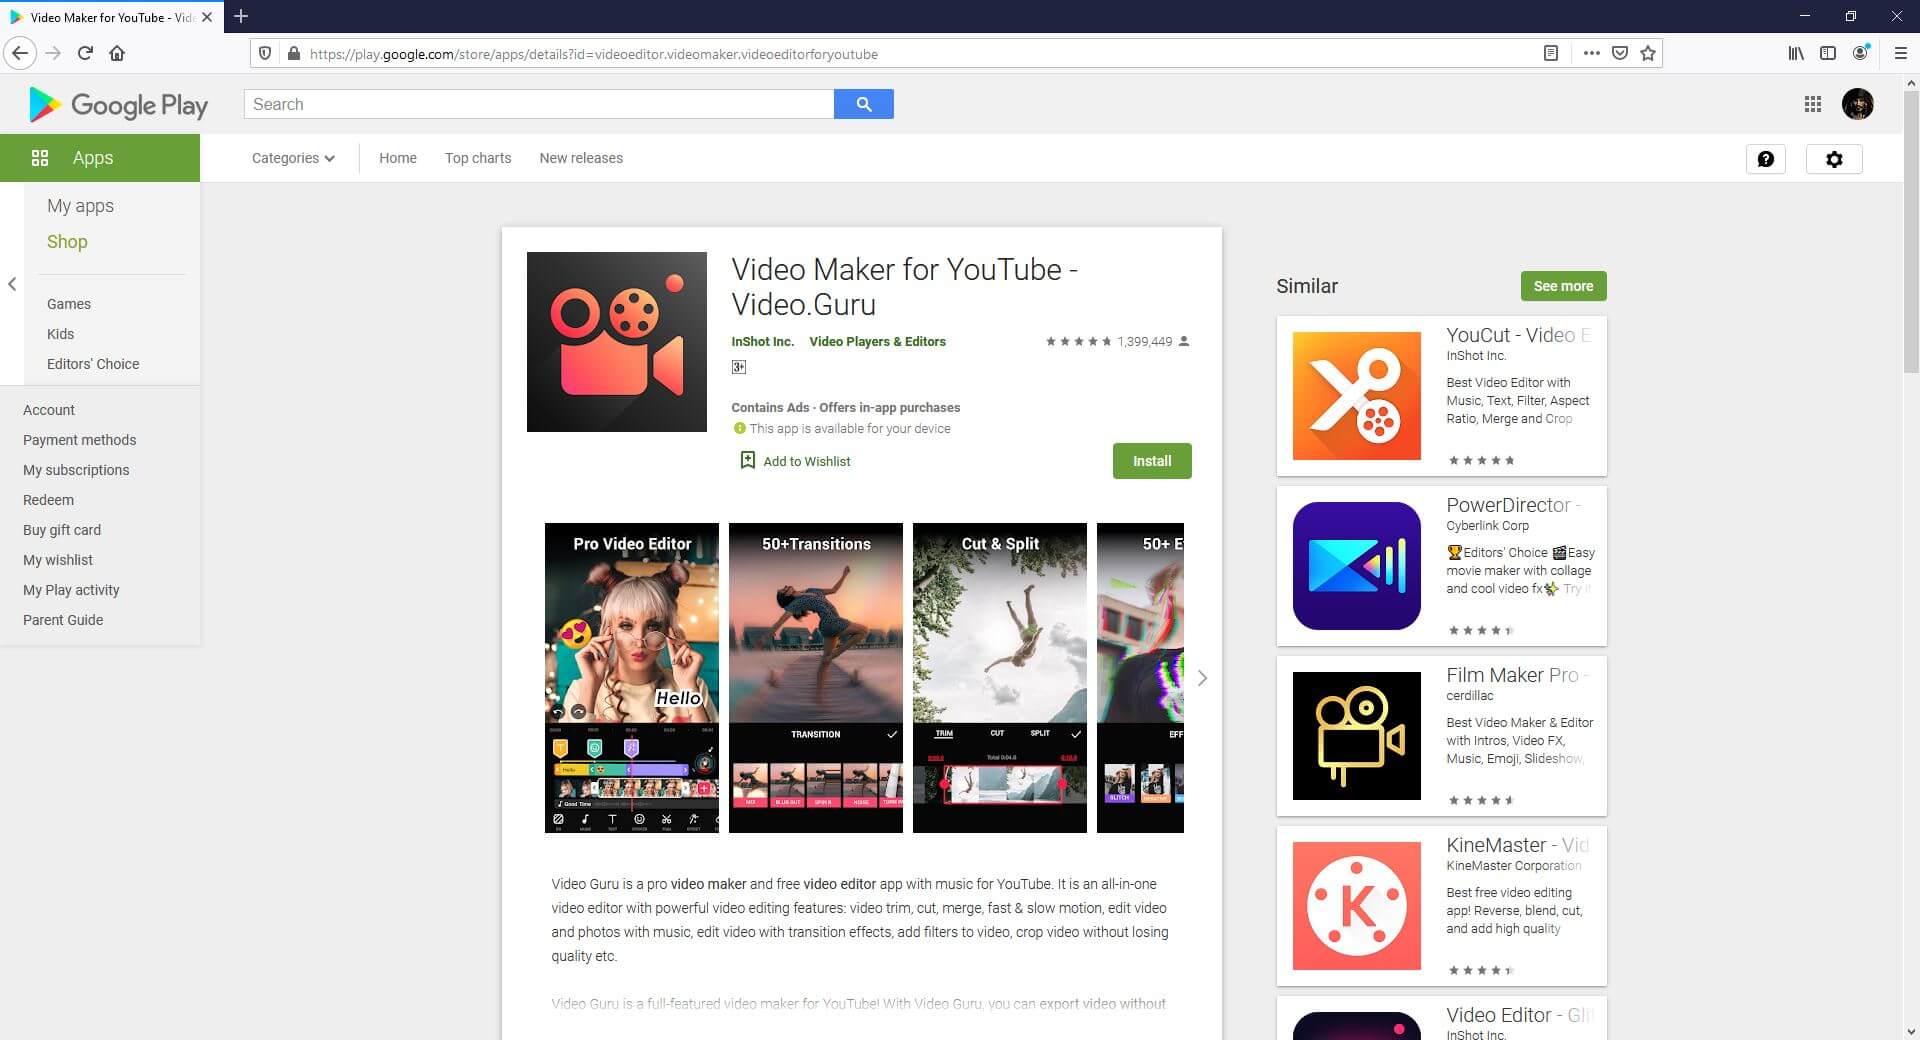
This one is specifically designed and developed for short videos that are prepared for Tik Tok, Facebook, etc.
Supported Platforms: Android (5.0 and above)
Users’ Star Rating (Out of 5): 4.8
Main Features: Supports multi-layer editing, allows voice recording and voiceovers, can be used to create videos for YouTube, has several filters and effects, etc.
Aspect Ratio: Almost all widely used sizes
Sharing: Allows publishing directly to YouTube
Pros: Offers fully licensed music for a video background, allows audio fade-in and fade-out effects, allows music video creation, lets you merge two or more clips into one, etc.
Cons: Some users experience distortion while using an external microphone
5. Adobe Premiere Rush
Developed by the creative application developing giant, Adobe, this app has everything you would possibly need to prepare YouTube Shorts. Because the developer is Adobe, the program can be trusted without any doubts.
Supported Platforms: Android and iOS (13.0 and above)
Users’ Star Rating (Out of 5): 4.6
Main Features: Allows video recording with the built-in camera, allows adding animated titles using the available templates, has a multi-track timeline, etc.
Aspect Ratio: Almost all widely used sizes
Sharing: Allows publishing directly to YouTube
Pros: Offers several editing effects, has a plethora of royalty-free soundtracks, etc.
Cons: Advanced tools can be accessed only after buying a premium subscription
6. Funimate Video Editor & Maker
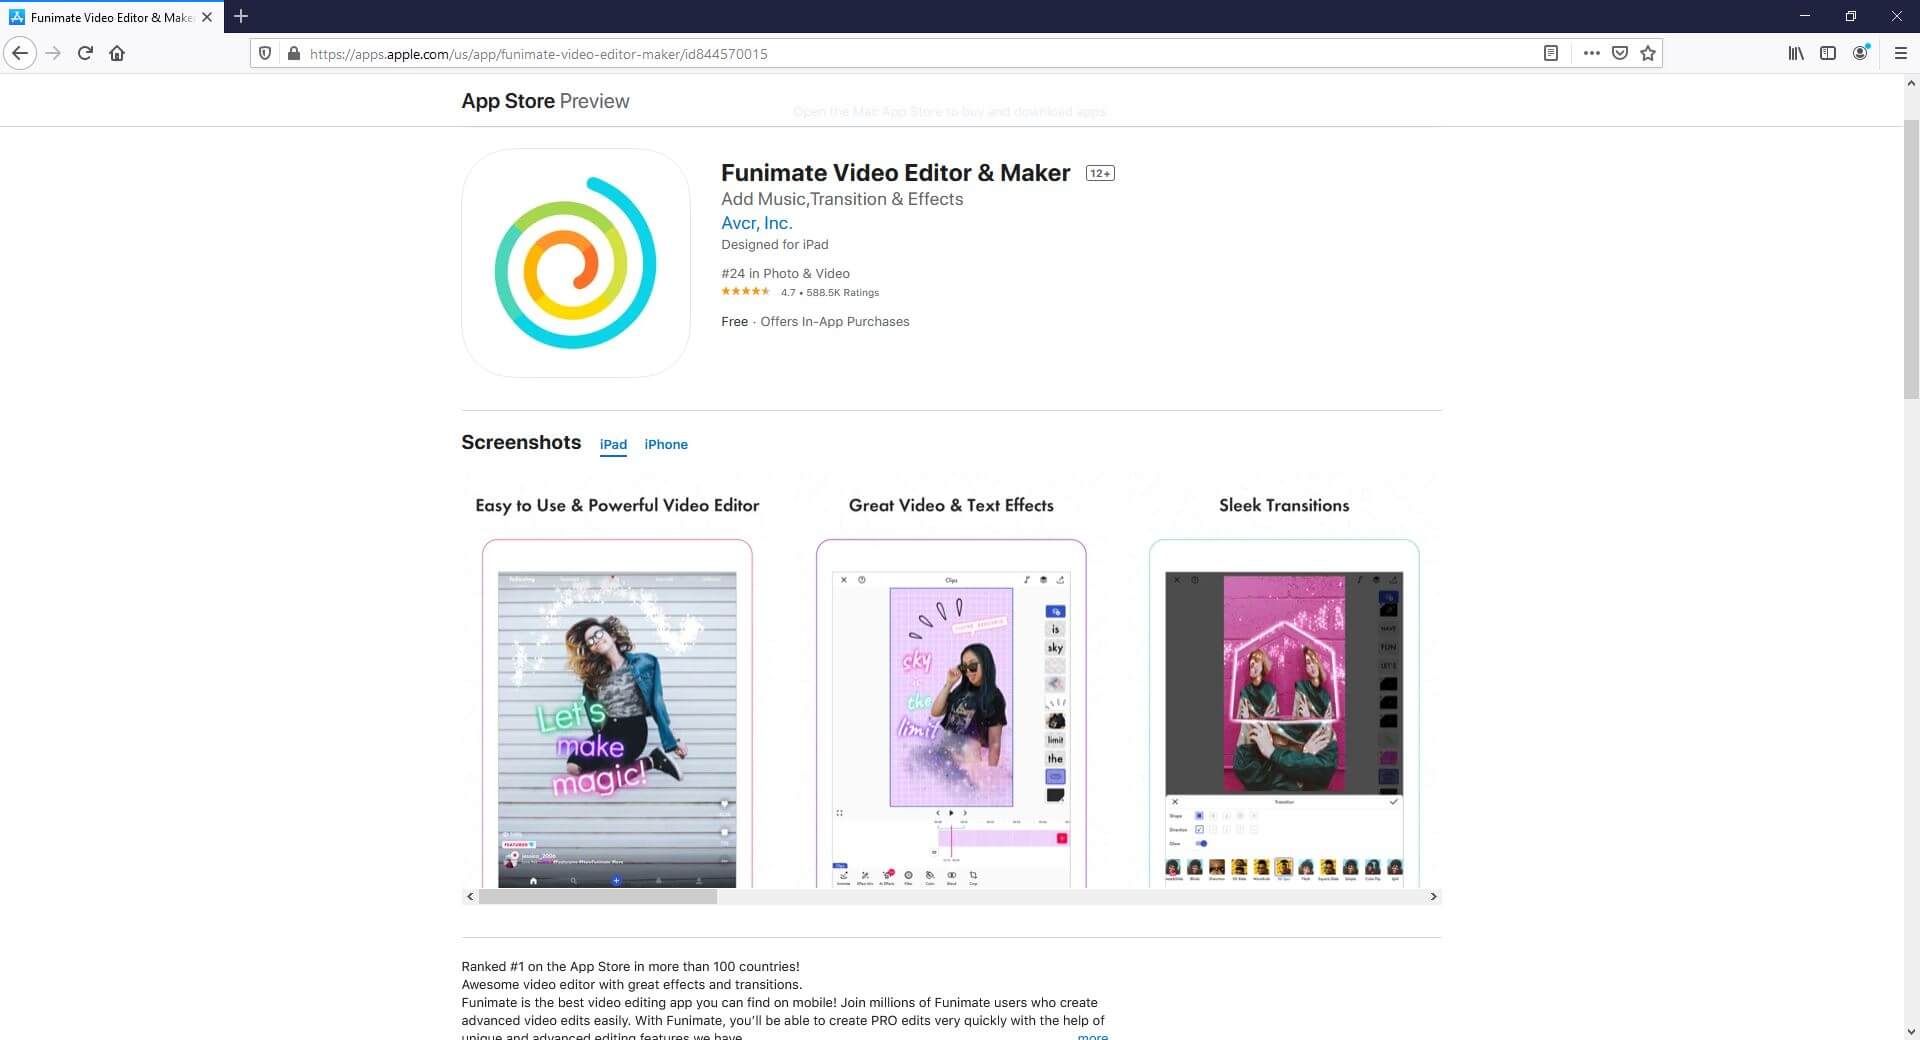
With a 4.7-star rating, this app has been ranked as the best in more than 100 countries. The program has several built-in video effects to make your clips more engaging.
Supported Platforms: Android (5.0 and above) and iOS (12.0 and above)
Users’ Star Rating (Out of 5): 4.7
Main Features: Enables lip-sync, allows keyframe-oriented animations and effects, supports video masking, etc.
Aspect Ratio: Almost all widely used sizes
Sharing: Allows publishing directly to social platforms like YouTube, Tik Tok, Instagram, etc.
Pros: Has intro and outro effects, allows you to add music to the videos, is free to use, etc.
Cons: Paid subscription is needed to unlock all the advanced tools and features of the app
7. LumaFusion
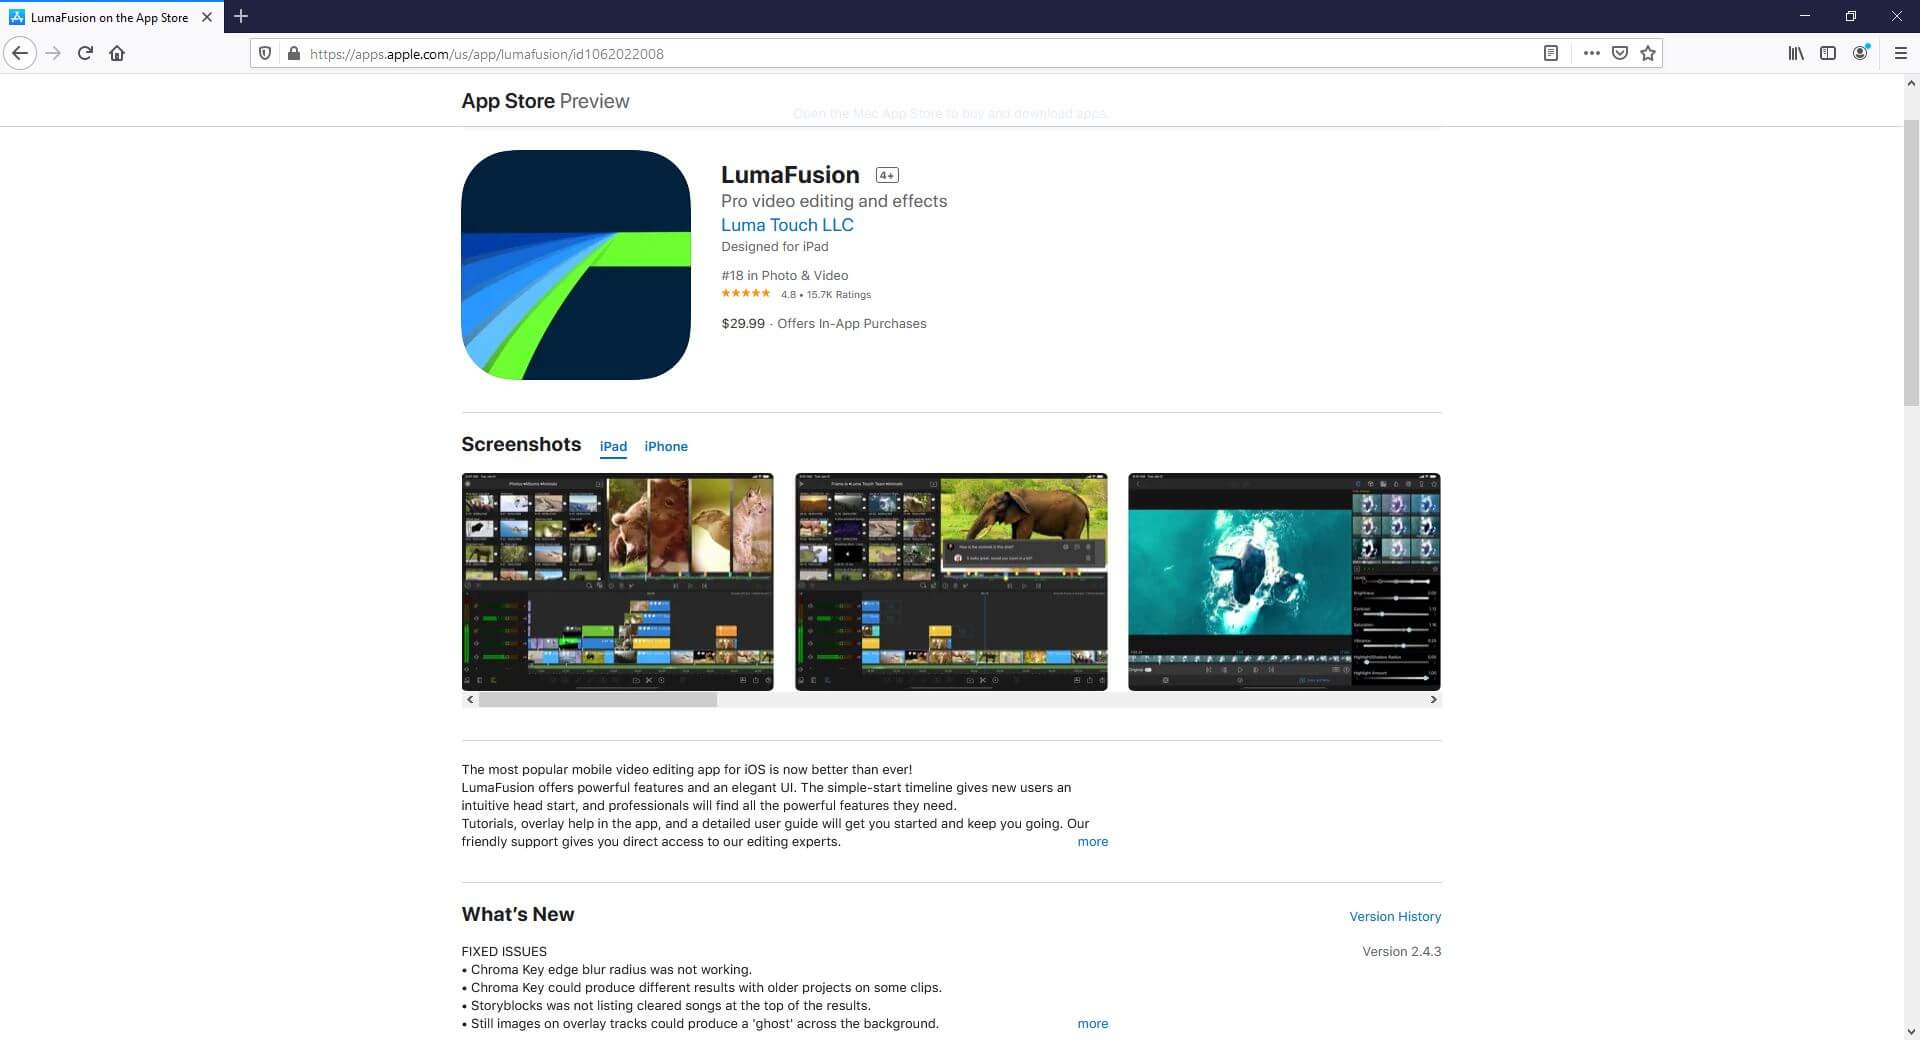
LumaFusion is crowned with a 4.8-star rating and is packed with options like media library, slow and fast motion playback, additional audio tracks, and much more.
Supported Platforms: iOS (13.3 and above)
Users’ Star Rating (Out of 5): 4.8
Main Features: Frame rates that range between 18 FPS to 240 FPS, color correction, keyframe-oriented color, and effects animations, etc.
Aspect Ratio: Almost all widely used sizes
Sharing: Allows publishing directly to almost all platforms
Pros: Can export projects as Final Cut Pro X files for further editing
Cons: Paid subscription is needed for exporting projects for Final Cut Pro X
8. VivaCut – PRO Video Editor APP
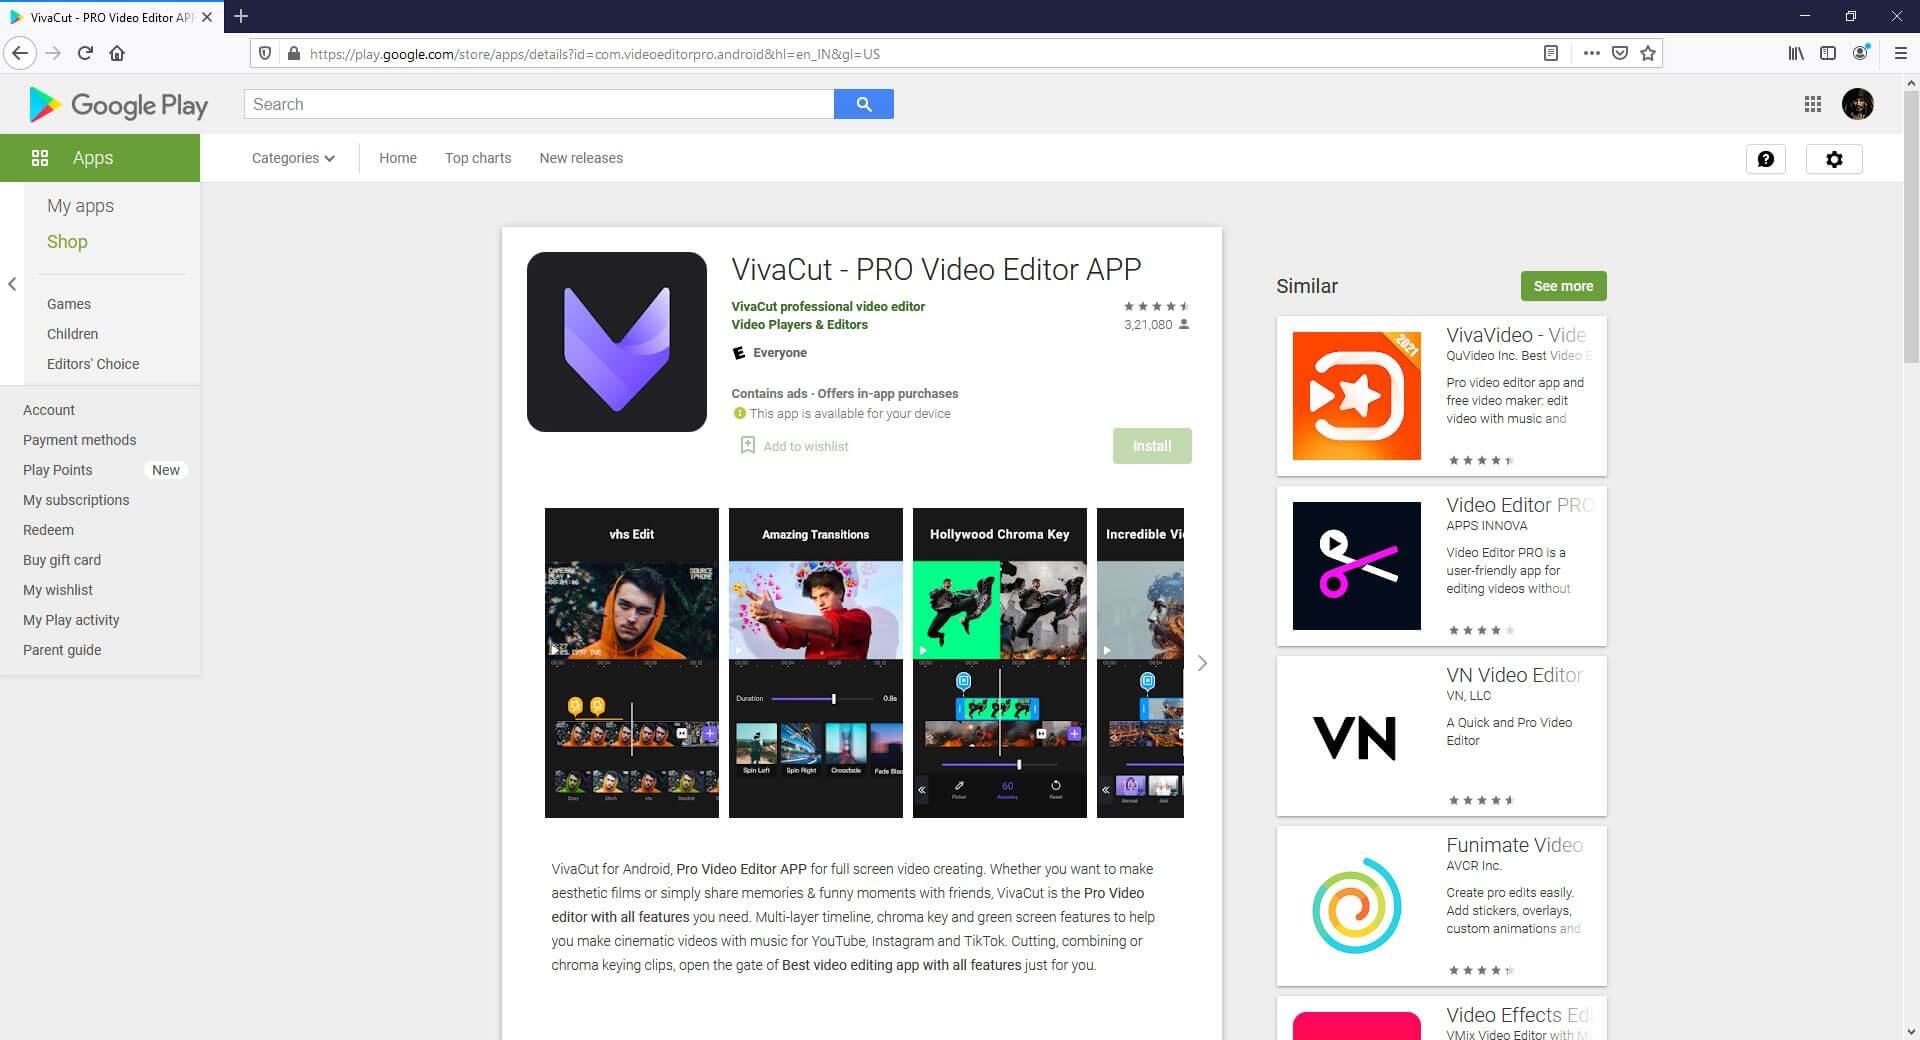
As the name suggests, VivaCut is a professional-level video editing tool for mobile devices that enjoys a decent star rating.
Supported Platforms: Android (5.0 and above) and iOS (9.0 and above)
Users’ Star Rating (Out of 5): 4.7
Main Features: Offers visual effects like VHS, RGP, Glitch, etc., allows Picture-in-Picture (to be released soon), allows video trimming, cropping, and merging, etc.
Aspect Ratio: Almost all widely used sizes
Sharing: Allows one-click publishing directly on YouTube
Pros: Supports up to 4K video resolution
Cons: Paid subscription is required to access the Pro-level features and options
9. Filmmaker Pro – Video Editor
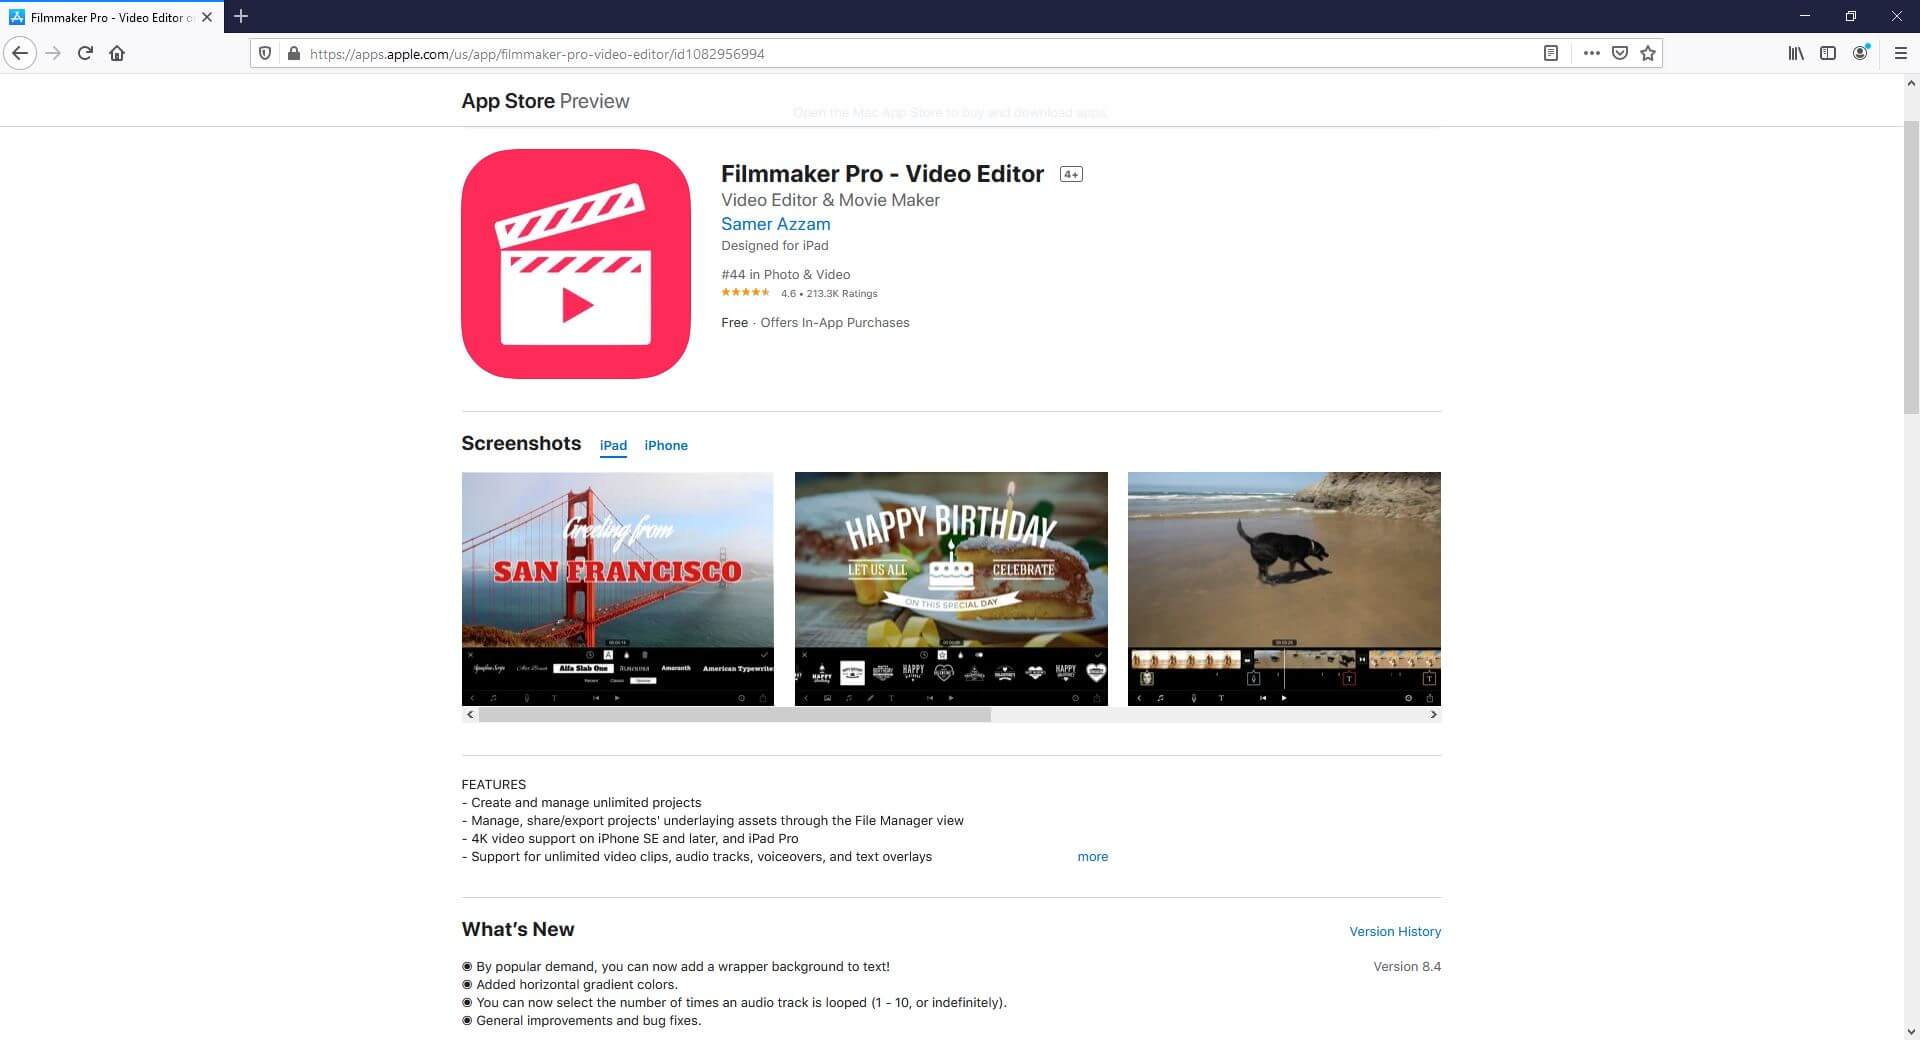
Filmmaker Pro is a free video editing app for mobile devices equipped with a plethora of pro features to make your post-production experience convenient and fun.
Supported Platforms: Android (4.4 and above) and iOS (11.0 and above)
Users’ Star Rating (Out of 5): 4.6
Main Features: Supports video playback reversal, allows Picture-in-Picture for videos and photos, supports green screen (chroma key), and much more.
Aspect Ratio: Almost all widely used sizes
Sharing: Exports videos to the device
Pros: Offers several text animation options, has drawing tools, etc.
Cons: Paid subscription is required to remove watermark from the exported videos
10. Video Editor for YouTube & Video Maker – My Movie
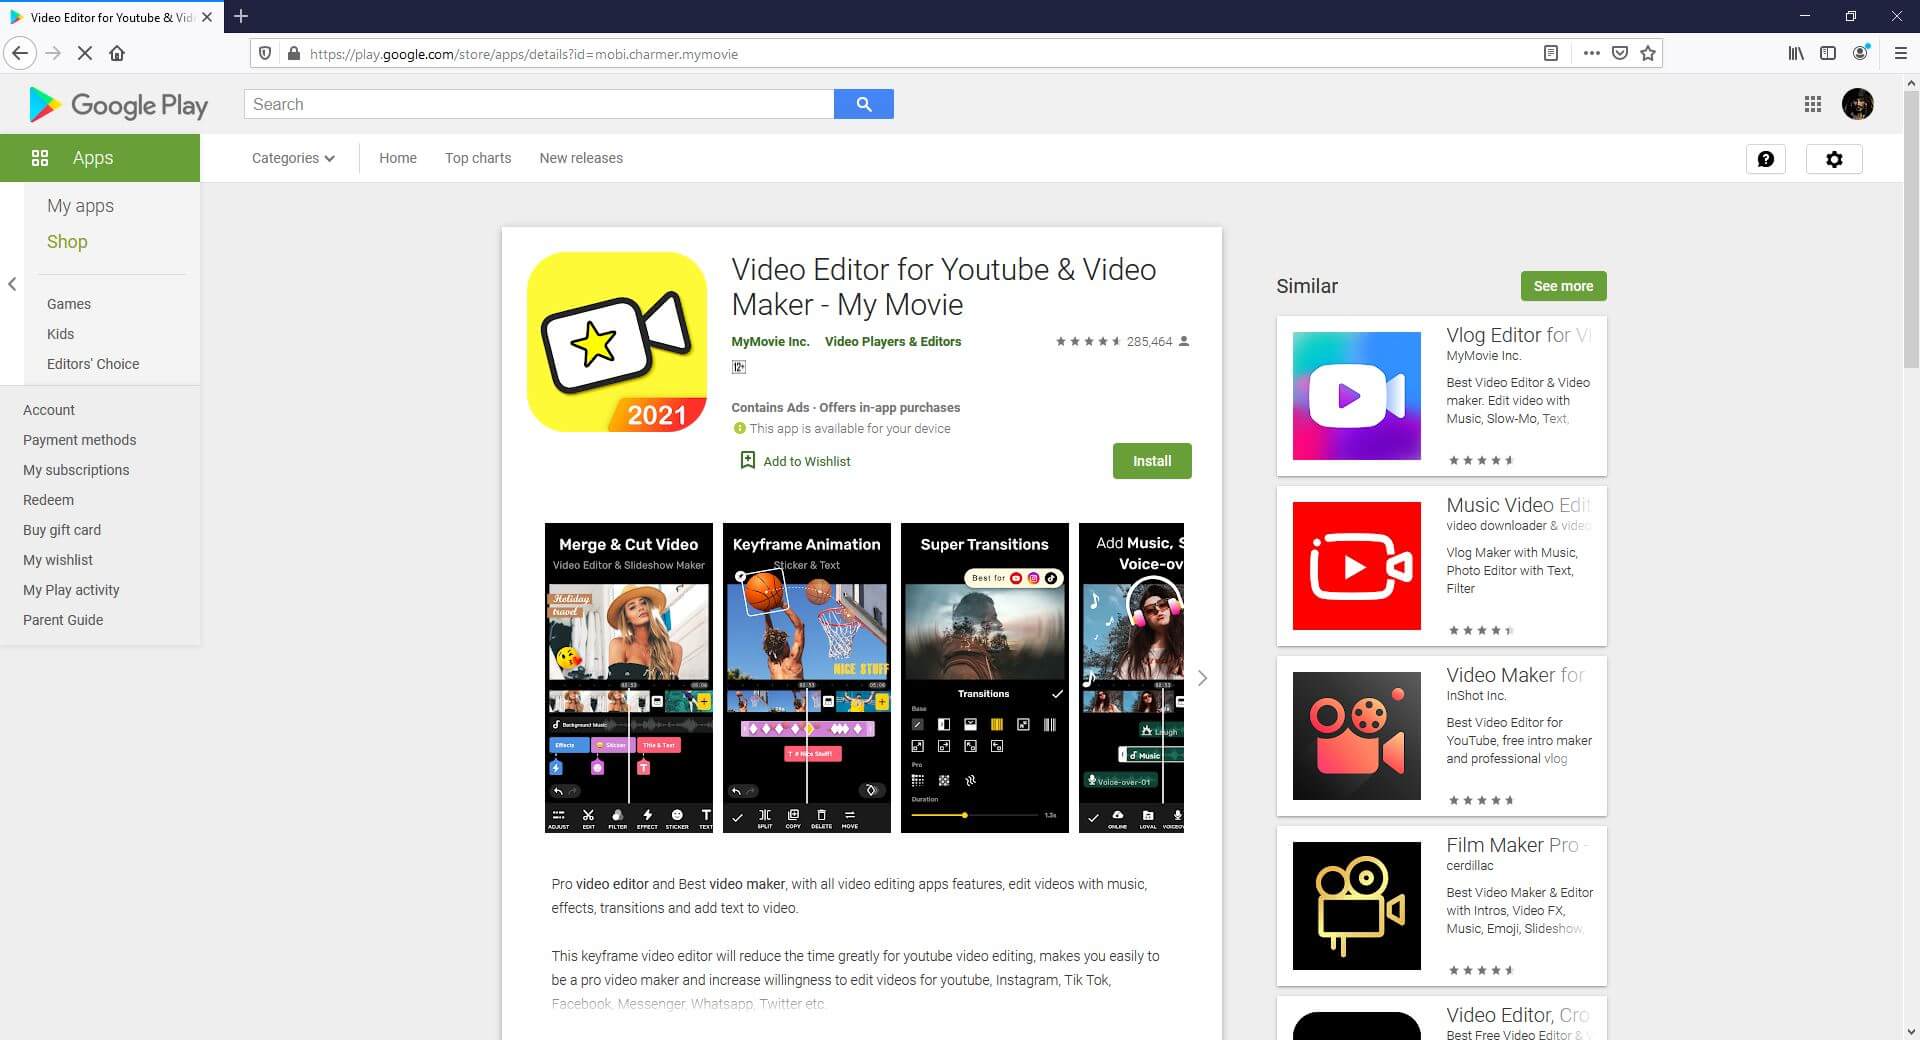
Yet another editor for both amateurs and professionals, Video Editor for YouTube, consists of all the features that a YouTube Shorts video needs to prepare engaging content.
Supported Platforms: Android (5.0 and above)
Users’ Star Rating (Out of 5): 4.6
Main Features: Allows cropping, flipping, and rotating the video clips, allows audio recording for voiceovers, lets you control the playback speed, etc.
Aspect Ratio: Almost all widely used sizes
Sharing: Allows publishing directly on YouTube
Pros: Has keyframe-oriented animation effects, can merge multiple video clips into one, etc.
Cons: Some content might not be suitable for kids below 12 years of age
Above are some of the best video editing apps that you can use on iPhone or Android phones to create YouTube Shorts videos. Besides those third-party apps, you can also create a Shorts video from the YouTube app directly. Check this article to get detailed information about making and uploading a YouTube Shorts Video with Shorts App .
Use Filmora to Create YouTube Shorts Video on PC
If you prefer to convert or make videos on a computer, I recommend you to try our video editor Filmora X , which is an ideal solution for YouTubers.
You can make a vertical video with Filmora easily as it provides a 9:16 aspect ratio that works perfectly for editing YouTube Shorts videos. Compared with mobile apps, desktop softwares like Filmora allows you to add more elements and effects to your video to make it impressive. Check out the below video about how to edit vertical video using our Filmora X and try it out if you are impressed.
For Win 7 or later (64-bit)
 Secure Download
For macOS 10.14 or later
Secure Download
Click here to get Filmora for PC by email
or Try Filmora App for mobile >>>
download filmora app for ios ](https://app.adjust.com/b0k9hf2%5F4bsu85t ) download filmora app for android ](https://app.adjust.com/b0k9hf2%5F4bsu85t )
Conclusion
Making videos less than 60 seconds in duration and then publishing them on YouTube with the ‘#Shorts’ tag in the title or description lets you create short videos for YouTube. The apps listed above help you in this, and you can easily prepare attractive and engaging short clips pretty quickly using any of them. However, the most recommended, widely used, and the much-appreciated program is Wondershare Filmora that is not merely limited to mobile application-level features, it even has tools that usually compete with those available in the desktop software.
Richard Bennett
Richard Bennett is a writer and a lover of all things video.
Follow @Richard Bennett
Richard Bennett
Mar 27, 2024• Proven solutions
Even though Shorts is integrated within the YouTube app and still in beta, you can still edit your videos. At this writing, the only additional elements that you can add to your short videos are background music and captions. While these two are good enough to make your clips informative, they might not be able to attract as many viewers as there would have been if the footages were well-decorated with a couple of filters, effects, stickers, etc.
That said, listed below are some of the efficient and feature-packed third-party apps that can help you beautify your videos before they can be published as Shorts on your YouTube channel:
Best Shorts Video Editing Apps for iOS and Android (Free and Paid)
Top 10 short video editing apps for smartphones, along with their attributes, include:
1. Wondershare Filmora
This was developed by one of the IT giants called Wondershare. The elder sibling of Filmora is Filmora, a PC program for both Windows and Mac platforms that gives tough competition to some of the commonly used post-production applications like Adobe Premiere Pro, Final Cut Pro X, etc.
Supported Platforms: Android and iOS (11.0 and above)
Users’ Star Rating (Out of 5): 4.6
Main Features: Allows video editing (trimming, cutting, etc.), adds or extracts music from the videos, supports HD quality exporting, etc.
Aspect Ratio: Almost all widely used sizes
Sharing: Allows publishing directly to YouTube
Pros: Free to use, available for both iOS and Android, a complete package for video editing enthusiasts
Cons: Free version adds a watermark to the exported videos
2. VideoLeap – Video Editor – Film Photo Editor
Another lightweight video editor for mobile devices, VideoLeap, lets you edit the videos simply and quickly.
Supported Platforms: Android (4.3 and above) and iOS (12.0 and above)
Users’ Star Rating (Out of 5): 4.3
Main Features: Has more than 200 filters, allows trimming and cropping, offers a practically unlimited number of undoes and redoes
Aspect Ratio: Almost all widely used sizes
Sharing: Exports videos to the device
Pros: Offers layer-based editing, gives access to the professional-level filters for video decoration, has more than 60 overlays, etc.
Cons: Paid subscription is needed to access features like edit, crop, and reverse
3. KineMaster Video Editor
KineMaster is probably one of the most popular video editors among vloggers, beginners, and teenagers. With simple UI, the app offers easy access to many of its features to edit the videos.
Supported Platforms: Android (6.0 and above) and iOS (12.4 and above)
Users’ Star Rating (Out of 5): 4.7
Main Features: Color correction, video reversal, trimming, splitting, cutting, voice changer, sound effects, etc.
Aspect Ratio: Almost all widely used sizes
Sharing: Allows publishing directly to YouTube
Pros: Can export videos to 4K 60 FPS, can be used for free, supports multiple languages
Cons: A premium subscription must be purchased to access advanced features
4. Video Maker for YouTube – Video.Guru
This one is specifically designed and developed for short videos that are prepared for Tik Tok, Facebook, etc.
Supported Platforms: Android (5.0 and above)
Users’ Star Rating (Out of 5): 4.8
Main Features: Supports multi-layer editing, allows voice recording and voiceovers, can be used to create videos for YouTube, has several filters and effects, etc.
Aspect Ratio: Almost all widely used sizes
Sharing: Allows publishing directly to YouTube
Pros: Offers fully licensed music for a video background, allows audio fade-in and fade-out effects, allows music video creation, lets you merge two or more clips into one, etc.
Cons: Some users experience distortion while using an external microphone
5. Adobe Premiere Rush
Developed by the creative application developing giant, Adobe, this app has everything you would possibly need to prepare YouTube Shorts. Because the developer is Adobe, the program can be trusted without any doubts.
Supported Platforms: Android and iOS (13.0 and above)
Users’ Star Rating (Out of 5): 4.6
Main Features: Allows video recording with the built-in camera, allows adding animated titles using the available templates, has a multi-track timeline, etc.
Aspect Ratio: Almost all widely used sizes
Sharing: Allows publishing directly to YouTube
Pros: Offers several editing effects, has a plethora of royalty-free soundtracks, etc.
Cons: Advanced tools can be accessed only after buying a premium subscription
6. Funimate Video Editor & Maker
With a 4.7-star rating, this app has been ranked as the best in more than 100 countries. The program has several built-in video effects to make your clips more engaging.
Supported Platforms: Android (5.0 and above) and iOS (12.0 and above)
Users’ Star Rating (Out of 5): 4.7
Main Features: Enables lip-sync, allows keyframe-oriented animations and effects, supports video masking, etc.
Aspect Ratio: Almost all widely used sizes
Sharing: Allows publishing directly to social platforms like YouTube, Tik Tok, Instagram, etc.
Pros: Has intro and outro effects, allows you to add music to the videos, is free to use, etc.
Cons: Paid subscription is needed to unlock all the advanced tools and features of the app
7. LumaFusion
LumaFusion is crowned with a 4.8-star rating and is packed with options like media library, slow and fast motion playback, additional audio tracks, and much more.
Supported Platforms: iOS (13.3 and above)
Users’ Star Rating (Out of 5): 4.8
Main Features: Frame rates that range between 18 FPS to 240 FPS, color correction, keyframe-oriented color, and effects animations, etc.
Aspect Ratio: Almost all widely used sizes
Sharing: Allows publishing directly to almost all platforms
Pros: Can export projects as Final Cut Pro X files for further editing
Cons: Paid subscription is needed for exporting projects for Final Cut Pro X
8. VivaCut – PRO Video Editor APP
As the name suggests, VivaCut is a professional-level video editing tool for mobile devices that enjoys a decent star rating.
Supported Platforms: Android (5.0 and above) and iOS (9.0 and above)
Users’ Star Rating (Out of 5): 4.7
Main Features: Offers visual effects like VHS, RGP, Glitch, etc., allows Picture-in-Picture (to be released soon), allows video trimming, cropping, and merging, etc.
Aspect Ratio: Almost all widely used sizes
Sharing: Allows one-click publishing directly on YouTube
Pros: Supports up to 4K video resolution
Cons: Paid subscription is required to access the Pro-level features and options
9. Filmmaker Pro – Video Editor
Filmmaker Pro is a free video editing app for mobile devices equipped with a plethora of pro features to make your post-production experience convenient and fun.
Supported Platforms: Android (4.4 and above) and iOS (11.0 and above)
Users’ Star Rating (Out of 5): 4.6
Main Features: Supports video playback reversal, allows Picture-in-Picture for videos and photos, supports green screen (chroma key), and much more.
Aspect Ratio: Almost all widely used sizes
Sharing: Exports videos to the device
Pros: Offers several text animation options, has drawing tools, etc.
Cons: Paid subscription is required to remove watermark from the exported videos
10. Video Editor for YouTube & Video Maker – My Movie
Yet another editor for both amateurs and professionals, Video Editor for YouTube, consists of all the features that a YouTube Shorts video needs to prepare engaging content.
Supported Platforms: Android (5.0 and above)
Users’ Star Rating (Out of 5): 4.6
Main Features: Allows cropping, flipping, and rotating the video clips, allows audio recording for voiceovers, lets you control the playback speed, etc.
Aspect Ratio: Almost all widely used sizes
Sharing: Allows publishing directly on YouTube
Pros: Has keyframe-oriented animation effects, can merge multiple video clips into one, etc.
Cons: Some content might not be suitable for kids below 12 years of age
Above are some of the best video editing apps that you can use on iPhone or Android phones to create YouTube Shorts videos. Besides those third-party apps, you can also create a Shorts video from the YouTube app directly. Check this article to get detailed information about making and uploading a YouTube Shorts Video with Shorts App .
Use Filmora to Create YouTube Shorts Video on PC
If you prefer to convert or make videos on a computer, I recommend you to try our video editor Filmora X , which is an ideal solution for YouTubers.
You can make a vertical video with Filmora easily as it provides a 9:16 aspect ratio that works perfectly for editing YouTube Shorts videos. Compared with mobile apps, desktop softwares like Filmora allows you to add more elements and effects to your video to make it impressive. Check out the below video about how to edit vertical video using our Filmora X and try it out if you are impressed.
For Win 7 or later (64-bit)
Secure Download
For macOS 10.14 or later
Secure Download
Click here to get Filmora for PC by email
or Try Filmora App for mobile >>>
download filmora app for ios ](https://app.adjust.com/b0k9hf2%5F4bsu85t ) download filmora app for android ](https://app.adjust.com/b0k9hf2%5F4bsu85t )
Conclusion
Making videos less than 60 seconds in duration and then publishing them on YouTube with the ‘#Shorts’ tag in the title or description lets you create short videos for YouTube. The apps listed above help you in this, and you can easily prepare attractive and engaging short clips pretty quickly using any of them. However, the most recommended, widely used, and the much-appreciated program is Wondershare Filmora that is not merely limited to mobile application-level features, it even has tools that usually compete with those available in the desktop software.
Richard Bennett
Richard Bennett is a writer and a lover of all things video.
Follow @Richard Bennett
Epicurean Escapades: Crafting Kitchen Films
How to Make a Cooking Video in Steps - an Ultimate Guide
Richard Bennett
Mar 27, 2024• Proven solutions
Cooking and food-oriented videos are among the most outreaching and popular categories of content to publish online, notably, on YouTube, Facebook, or Instagram. So if you are a cooking aficionado, you have excellent potential to gain positive attention and a loyal audience. But to create engaging videos, you’d need a lot more than excellent culinary skills. This article aims to enlighten aspiring food and recipe vloggers about the essentials of video making straight out of the oven, to create enriched content that’s professional, neat, and viral-worthy.
- Part 1: What to Prepare Before Making a Recipe Video?
- Part 2: Make a Cooking Video with Filmora: a Step-by-Step Guide
- Part 3: Tips to Make Your Cooking Videos Stand Out
- Part 4: How to Promote Your Cooking Channel on YouTube?
What to Prepare Before Making a Recipe Video
While you would know best about the prep work needed for the recipes, the prep work for making a video starts with a plan. What goes into the plan?
Brainstorm this equation - Main Content + Duration + Light + Sound + Camera + Camera Angle, Shots & Transition.
The main content is how you picture the finished video. Ask yourself - Do you want an intro gig? Are you going to talk in the video or show only hands and the cooking with a piece of background music? How do you wish to present the ingredients? Would there be additional tips? At what platform are you going to publish your content? How long should be your clippings? Consider all these questions to chalk out a basic framework of your video
The camera is a pivotal element. Whether it is a smartphone or a hi-fidelity digital camera, it is worthwhile to familiarise the best positions and light orientations and the capacity of the device to produce the best quality picture.
How is your sound going to be like? If you are going to talk in the video, it is recommended that you use a microphone. Or else, you can also use background sound. But to mix sound with the video, you’d need an excellent sound editing tool.
Finally, comes the editing and finishing part. Eventually, you’ll need purposive video-editing software to help you work out the video transitions, sound, and visual effects.Choose a toolkit that is easy to learn and that you can get comfortable with so that the job of video editing doesn’t take the focus away from the main task of cooking.

Now, once you have all the essential ingredients to create your video, start practicing. Remember that it is the most natural thing for the first videos to appear amateurish or inept. And that is part of the plan. Don’t be disheartened and keep going.
Make a Cooking Video with Filmora: a Step-by-Step Guide
As one of the easiest-to-use video editing tools, the full-featured Filmora is the right choice considering it can fit most of your needs. Moreover, you’d be delighted to know that the software also has a series of features and functions and even tutorial videos dedicated to cooking videos.


Step 1: Filming the Video
Whether you are going to present a traditional cook-with-me style video or feature the contemporary “jump-cut” style focusing on speedy short videos, you need to prepare all the equipment and ingredients to suit the frame by frame shots. Consider spills, drops, overcooking, etc. as part of the process, so keep adequate substitutes to continue with your project unwaveringly. If you are using a phone, keep it fully charged up. And have a plan beforehand about what you should do when you get an urgent call while shooting. Also, consider doing a site investigation of the shooting spot for any fragile items, pointy corners, slippery areas, curious pets, etc. to avoid trips and falls in the middle of the filming, especially when working with a cameraman who’s following your movement. If you are using a tripod, and floor-standing lights, remember to secure the equipment with plenty of adhesive tapes, lest they bump into an expensive trip or fall.
Step 2: mport Your Video In Filmora
You need to sync the device that you used to film the video with the computer that has Filmora installed. It may be a phone or a camcorder. Once the devices are synced, you should launch the Filmora software and go the “Media” button at the top right toolbar. There you will find the “Import” button. You will get a pop-up message asking you to choose the type of device. Select the right one, and your video will be imported in the Filmora interface.
Step 3: Edit Video Pace: Time-Lapse, Jump Cut, Slow Motion
To create crisp, fast-paced videos, you don’t have to gobble up the content eyeing at the duration. Think smart when you have the resources of a tool like Filmora. Here are the three best features that help you create fast-paced yet well-defined recipes.
Time-Lapse: The time-lapse feature allows you to adjust the speed of the video from slow-motion to 10x faster. To use this, double click on a specific clip in your imported video and open the custom speed settings. Use the adjusting meter beside speed to make your clip as fast or slow as you want. You may use the same feature to introduce the slow-motion effects in certain areas of the video.
Now, when you are using either the fast-forward or slow-motion effects, it is best to have stable video footage with consistent lighting and a static background. There are also the options of Reverse Speed that can play the clip backward, as in flash-back. The Ripple edit feature allows you to cut short a long clip seamlessly.
Jump Cut: The Jump Cut is about snipping unwanted areas in the clip. It may sound like the Ripple edit mentioned above, but the ripple edit is more functional for cutting short a continuous video so that the viewer won’t realize the snip. For the Jump Cut, it doesn’t have to be a constant clip. You can get to the next frame or scene with an abracadabra move.
To use Jump Cut, place the cursor over the starting of the clip that you want to cut, and right-click on it and select “Split” (the “scissors” feature on the toolbar does the same thing). To make this look neat, preview the portion of the clip once again and delete the cuts between two clips with the same right-click.
Step 4: Understanding Transitions on Filmora
Transitions make your video more interactive and help you segregate the video from frame-to-frame with effects like dissolve, fade, flash, etc. there are numerous transition options available within the Filmora suit.
The best way to do this drag and drop the clips on the timeline is to trim parts of the clip to shorten it. Once you have all the clips in place, go to the “Transitions” options at the top toolbar to apply it on the end or start of each clip.
Step 5: Audio, Playback & Sound Edits
There are plenty of options that you can remove background noise, add voiceover, add music, and detach audio from video. Refer to the Audios section from your toolbar.
Step 6: Save to Drive/ Emport/ Publish
Once you are satisfied with your content, then go to Export. Choose the format of the video, MOV, MP4, MPG, etc. and whether you wish to publish directly or save to drive.
Tips to Make Your Cooking Videos Stand Out
- Lighting is your best friend. Invest in some quality spotlights or use the best of daylight.
- Mind your video duration. Short and Simple videos get the most views, but your content should not look incomplete. It is not a fact that long and elaborate videos do not get a place on the table; it is all about the relevance of your content. So don’t stop till you get enough.
- If you appear in the video, keep yourself always look good.
- Keep your video titles relevant and prominent, so that people looking for it can readily find it.
- Have a scrumptious custom thumbnail.
How to Promote Your Cooking Channel on YouTube
- Create an inventory before publishing videos. YouTube vlogging is valued for consistency. If you have a list of 10, 15, 20 videos, then you can have enough time in hand to film your next videos.
- Have a consistent style to create brand recognition. Do you think branding is not for Vlogs? Well, I suppose you might be wrong. Branding is for anyone who uses it.
- Share the link of your YouTube videos on other platforms like Twitter and Facebook.
- Encourage your viewers to comment on the video.
- Explore the different YouTube SEO strategies and use the accurate keywords in your video descriptions with hashtags.
With prior planning and practicing, you are bent on developing more confident moves and camera angles. Once you have that, follow this step by step guide to gain speed and prowess and also enjoy the whole adventure.
Richard Bennett
Richard Bennett is a writer and a lover of all things video.
Follow @Richard Bennett
Richard Bennett
Mar 27, 2024• Proven solutions
Cooking and food-oriented videos are among the most outreaching and popular categories of content to publish online, notably, on YouTube, Facebook, or Instagram. So if you are a cooking aficionado, you have excellent potential to gain positive attention and a loyal audience. But to create engaging videos, you’d need a lot more than excellent culinary skills. This article aims to enlighten aspiring food and recipe vloggers about the essentials of video making straight out of the oven, to create enriched content that’s professional, neat, and viral-worthy.
- Part 1: What to Prepare Before Making a Recipe Video?
- Part 2: Make a Cooking Video with Filmora: a Step-by-Step Guide
- Part 3: Tips to Make Your Cooking Videos Stand Out
- Part 4: How to Promote Your Cooking Channel on YouTube?
What to Prepare Before Making a Recipe Video
While you would know best about the prep work needed for the recipes, the prep work for making a video starts with a plan. What goes into the plan?
Brainstorm this equation - Main Content + Duration + Light + Sound + Camera + Camera Angle, Shots & Transition.
The main content is how you picture the finished video. Ask yourself - Do you want an intro gig? Are you going to talk in the video or show only hands and the cooking with a piece of background music? How do you wish to present the ingredients? Would there be additional tips? At what platform are you going to publish your content? How long should be your clippings? Consider all these questions to chalk out a basic framework of your video
The camera is a pivotal element. Whether it is a smartphone or a hi-fidelity digital camera, it is worthwhile to familiarise the best positions and light orientations and the capacity of the device to produce the best quality picture.
How is your sound going to be like? If you are going to talk in the video, it is recommended that you use a microphone. Or else, you can also use background sound. But to mix sound with the video, you’d need an excellent sound editing tool.
Finally, comes the editing and finishing part. Eventually, you’ll need purposive video-editing software to help you work out the video transitions, sound, and visual effects.Choose a toolkit that is easy to learn and that you can get comfortable with so that the job of video editing doesn’t take the focus away from the main task of cooking.
Now, once you have all the essential ingredients to create your video, start practicing. Remember that it is the most natural thing for the first videos to appear amateurish or inept. And that is part of the plan. Don’t be disheartened and keep going.
Make a Cooking Video with Filmora: a Step-by-Step Guide
As one of the easiest-to-use video editing tools, the full-featured Filmora is the right choice considering it can fit most of your needs. Moreover, you’d be delighted to know that the software also has a series of features and functions and even tutorial videos dedicated to cooking videos.
Step 1: Filming the Video
Whether you are going to present a traditional cook-with-me style video or feature the contemporary “jump-cut” style focusing on speedy short videos, you need to prepare all the equipment and ingredients to suit the frame by frame shots. Consider spills, drops, overcooking, etc. as part of the process, so keep adequate substitutes to continue with your project unwaveringly. If you are using a phone, keep it fully charged up. And have a plan beforehand about what you should do when you get an urgent call while shooting. Also, consider doing a site investigation of the shooting spot for any fragile items, pointy corners, slippery areas, curious pets, etc. to avoid trips and falls in the middle of the filming, especially when working with a cameraman who’s following your movement. If you are using a tripod, and floor-standing lights, remember to secure the equipment with plenty of adhesive tapes, lest they bump into an expensive trip or fall.
Step 2: mport Your Video In Filmora
You need to sync the device that you used to film the video with the computer that has Filmora installed. It may be a phone or a camcorder. Once the devices are synced, you should launch the Filmora software and go the “Media” button at the top right toolbar. There you will find the “Import” button. You will get a pop-up message asking you to choose the type of device. Select the right one, and your video will be imported in the Filmora interface.
Step 3: Edit Video Pace: Time-Lapse, Jump Cut, Slow Motion
To create crisp, fast-paced videos, you don’t have to gobble up the content eyeing at the duration. Think smart when you have the resources of a tool like Filmora. Here are the three best features that help you create fast-paced yet well-defined recipes.
Time-Lapse: The time-lapse feature allows you to adjust the speed of the video from slow-motion to 10x faster. To use this, double click on a specific clip in your imported video and open the custom speed settings. Use the adjusting meter beside speed to make your clip as fast or slow as you want. You may use the same feature to introduce the slow-motion effects in certain areas of the video.
Now, when you are using either the fast-forward or slow-motion effects, it is best to have stable video footage with consistent lighting and a static background. There are also the options of Reverse Speed that can play the clip backward, as in flash-back. The Ripple edit feature allows you to cut short a long clip seamlessly.
Jump Cut: The Jump Cut is about snipping unwanted areas in the clip. It may sound like the Ripple edit mentioned above, but the ripple edit is more functional for cutting short a continuous video so that the viewer won’t realize the snip. For the Jump Cut, it doesn’t have to be a constant clip. You can get to the next frame or scene with an abracadabra move.
To use Jump Cut, place the cursor over the starting of the clip that you want to cut, and right-click on it and select “Split” (the “scissors” feature on the toolbar does the same thing). To make this look neat, preview the portion of the clip once again and delete the cuts between two clips with the same right-click.
Step 4: Understanding Transitions on Filmora
Transitions make your video more interactive and help you segregate the video from frame-to-frame with effects like dissolve, fade, flash, etc. there are numerous transition options available within the Filmora suit.
The best way to do this drag and drop the clips on the timeline is to trim parts of the clip to shorten it. Once you have all the clips in place, go to the “Transitions” options at the top toolbar to apply it on the end or start of each clip.
Step 5: Audio, Playback & Sound Edits
There are plenty of options that you can remove background noise, add voiceover, add music, and detach audio from video. Refer to the Audios section from your toolbar.
Step 6: Save to Drive/ Emport/ Publish
Once you are satisfied with your content, then go to Export. Choose the format of the video, MOV, MP4, MPG, etc. and whether you wish to publish directly or save to drive.
Tips to Make Your Cooking Videos Stand Out
- Lighting is your best friend. Invest in some quality spotlights or use the best of daylight.
- Mind your video duration. Short and Simple videos get the most views, but your content should not look incomplete. It is not a fact that long and elaborate videos do not get a place on the table; it is all about the relevance of your content. So don’t stop till you get enough.
- If you appear in the video, keep yourself always look good.
- Keep your video titles relevant and prominent, so that people looking for it can readily find it.
- Have a scrumptious custom thumbnail.
How to Promote Your Cooking Channel on YouTube
- Create an inventory before publishing videos. YouTube vlogging is valued for consistency. If you have a list of 10, 15, 20 videos, then you can have enough time in hand to film your next videos.
- Have a consistent style to create brand recognition. Do you think branding is not for Vlogs? Well, I suppose you might be wrong. Branding is for anyone who uses it.
- Share the link of your YouTube videos on other platforms like Twitter and Facebook.
- Encourage your viewers to comment on the video.
- Explore the different YouTube SEO strategies and use the accurate keywords in your video descriptions with hashtags.
With prior planning and practicing, you are bent on developing more confident moves and camera angles. Once you have that, follow this step by step guide to gain speed and prowess and also enjoy the whole adventure.
Richard Bennett
Richard Bennett is a writer and a lover of all things video.
Follow @Richard Bennett
Also read:
- 2024 Approved Breaking Down TSeries' Income Strategy on YouTube Platform
- [Updated] Audio Artists' Almanac Your Guide to Video Submission
- Top-Rated Apps for Capturing & Saving Videos Online
- [New] Digital Film Composer
- In 2024, Break Through the Crowd Key YouTube SEO Strategies to Rank High
- 2024 Approved Conquering Cross-Platform Content Sharing YouTubes & FBs
- In 2024, Broadcast Your Music MP3 Conversion and Upload on YouTube
- 2024 Approved How to Download Part of a YouTube Videos?
- [Updated] Ethical Practices for Accumulating Over A Million Video Engagements
- Crucial Info Every ASMR Viewer Should Absorb for 2024
- YouTube Guru Setup Opt for Studio or Beta Option
- [Updated] Elevating the Chilly Selecting Five Warm Video Backgrounds
- Experience the Power of Visuals Discover All 50 Banners in Our Digital Collection
- [Updated] Conquering the Digital Landscape Leveraging Multi-Platform Streaming
- [New] Cutting-Edge Editing Techniques YouTube & Comparable Tools
- Audience Engagement and Its Impact on YouTube Performance
- Essential Steps to Create YouTube Beginnings & Ends on a Budget
- In 2024, Overcoming Fixed Color Voids in Recording Software
- [Updated] Masterful FB Watching Essential Top 10 Players
- 2024 Approved FB Link Mastery 8 Powerful FREE Extractor Tools
- [New] 2024 Approved Guardians of the Screen - The Best Webcam Cover Options
- Top 15 Augmented Reality Games Like Pokémon GO To Play On Samsung Galaxy A25 5G | Dr.fone
- In 2024, The Key Elements of a High-Impact TikTok Promotion
- Process of Screen Sharing Itel S23 to PC- Detailed Steps | Dr.fone
- Close-Up Communication The Art of Zoom on Teams for 2024
- In 2024, 8 Frame Rate Video Converters You Must Try
- 2024 Approved Must-Try TikTok Video Ideas Drawing From Anime Worlds
- [Updated] VisuallyVivid Adjust Your Content for Instagram Success
- [Updated] In 2024, Instantaneous Identification in the Social Media Jungle
- Title: "Compiling Leading Short-Form Video Editors IOS/Android Edition for 2024"
- Author: Kevin
- Created at : 2024-05-25 14:50:36
- Updated at : 2024-05-26 14:50:36
- Link: https://youtube-videos.techidaily.com/compiling-leading-short-form-video-editors-iosandroid-edition-for-2024/
- License: This work is licensed under CC BY-NC-SA 4.0.
