
:max_bytes(150000):strip_icc()/004-how-to-see-everyone-on-google-meet-5088410-3eeb6cb239b84b20a4eb9c000cf45dd7.jpg)
Cohesive Labeling Approach for YTB, Ins & Others for 2024
Cohesive Labeling Approach for YTB, Ins & Others
Versatile Video Editor - Wondershare Filmora
An easy yet powerful editor
Numerous effects to choose from
Detailed tutorials provided by the official channel
The vertical video went to a mainstream media style. Nowadays, it’s common for online video, especially on social apps. Mobile video has become the most common way to watch online videos. It makes sense then that vertical is the preferred familiarization for videos. Users don’t want to twist their phones to watch a 30-second ad. Knowing YouTube shorts vertical size is important as well as Facebook vertical video specs.
Social juggernauts like Facebook and YouTube have adopted vertical video size or formats in current years. The newer social apps, like Snapchat and TikTok, use vertical video completely. While most platforms now prefer vertical video, they each have different patterns. Even Instagram vertical video dimensions premiere is different.
Users tinkering in video marketing know it’s essential to stay updated on social media video sizes across all platforms. But, we also know that it is time-consuming to dig through each technical specification of each social app. For that purpose, we have covered all network video sizes for each platform. So, browse the table of contents below and find the video dimensions, aspect ratios, and file sizes you need.
In this article
01 [What Vertical Video Size Do We Usually Use?](#Part 1)
02 [Vertical Video Dimension for Different Social Apps](#Part 2)
03 [Tips: How to Adjust Vertical Videos Size](#Part 3)
Part 1 What Vertical Video Size Do We Usually Use?
Videos come in different sizes. However, one principle is standard in creating them, the vertical video aspect ratio (width to height). This refers to how you compare and create the video height to video ratio (how you intend to record and produce your video).
Ideally, it is what you and viewers will see while watching your video. To create a perfect video, any video creator should decide on the relationship between the video height and width.
When creating YouTube vertical video dimensions, the width is usually longer than the height. Most television videos have a standard ratio of 4:3 and 16:9. However, social media videos are created using a 1:1 and 9:16 ratio.

A smartphone can shoot vertical videos perfectly, but some media players like cameras require editing and adjusting the sizes to get the correct aspect ratio. Experts won’t have difficulties adjusting horizontally shot videos, but an amateur will. Fortunately, you can avoid taking unprofessional shoots by focusing on the frame’s center to capture your subject wholly without clipping important aspects. While editing Facebook vertical video dimensions and other social apps, the results could vary depending on the editing software. But you can rotate the video within the software to get the correct dimensions lest you get ugly videos full of black backgrounds filling the frame.
Most cameras and video recorders have inbuilt settings that switch to aspect ratio when you start recording. And the good thing is that you can adjust the settings to your desired dimensions in the settings section. If you are shooting a vertical video without a preset aspect ratio, then:
- Shoot gently without switching your camera horizontally, especially if you are capturing a narrow view.
- Avoid fast spans as it appears intense on the camera that could result in blurry animations.
- Focus on what you are capturing, and if need be, zoom in to capture every essential detail.
The importance of applying aspect ratio in videos is to ensure your images and videos have excellent resolution. This way, you have a chance to present (market) your idea professionally.
Part 2 Vertical Video Dimension for Different Social Apps
Here is a guide on how to shoot vertical dimensions for various social apps –
1. YouTube Vertical Video Dimension Guide
It is common for viewers to switch to YouTube and watch videos, and this is why you need the work on the perfect YouTube vertical video size. Initially, you could display YouTube videos in different dimensions, but this is no longer the case since the app’s dynamic innovation to view animations in preferred sizes.

Usually, YouTube videos are recorded at a standard aspect ratio of 16: 9. It means that you cannot customize the dimensions as this is this ratio is the default.
Though the 16:9 dimensions are standard, you can also shoot your videos using different ratios like 1:1 (square), 4:3, or 9:16 (vertically). In this case, your video will fit different YouTube videos on each device but will display white or grey padding on the frames by default.
Manually adding padding to your videos reduces the ability to adjust them to different ratios on various devices. If you are yet to switch to YouTube vertical video dimensions, you are missing to increase brand awareness.
2. Facebook Vertical Video Dimension Guide
Facebook vertical video specs have mainly been using the 16:9 ratio. And since the app attracts billions of global users, it’s high time to optimize your snapshots and try posting in different formats.

For your next FB vertical video size for feed videos, think of square snapshots (1:1), 2:3, 4:5, or 16:9. If you love creating Facebook stories, you can stick to the 9:16 ratio. And for Facebook live videos, stick with the Facebook video vertical size, 16:9 dimensions. Note that most Facebook video posts will automatically have a standard measurement of 16:9.
3. Instagram Vertical Video Dimensions Guide
Since the inception of Instagram vertical video dimensions premiere, the ratio has always been 1:1. This dimension makes it optimal for phones and small-sized screens. Here is the ultimate guide for your new Instagram animations:
- 1:1 for square videos.
- 4:5 for portrait shots.
- 9:16 when shooting vertical animations.
If you are going live on Instagram, we recommend 9:16, while you can shoot in 1:1, 4:5, and 16:9 ratios for feed videos. For Instagram stories, we suggest 9:16, but you can always work around 1:1, 4:9, and 16:9.

4. Twitter Vertical Video Dimension Guide
Twitter is quite different when considering feed video dimensions; portrait and square. The former (portrait) is a favorite for ads and marketing videos display (increase brand visibility), whereas the latter is perfect for displaying videos on multiple devices.
Twitter videos can be perfect in the below dimensions:
- Promotional video ads 1:2 39 to 2.39:1
- Six-second short ads 1:2.39 – 2.39:1
- First video ads 1:2.39 – 2.39:1
- Personal portrait (vertical) videos 9:16
- Personal horizontal animations 1:2.39 – 2.39:1

5. WhatsApp Vertical Video Dimension Guide
Most people don’t know the importance of resizing WhatsApp videos. Sharing videos on your WhatsApp status is a marketing strategy, but you must resize your videos well. Most video WhatsApp vertical videos have 4:3 dimensions and a 1080 × 1920 pixels size.
Part 3 Tips: How to Adjust Vertical Videos Size
The smartphone has become the primary tool for taking photos or recording videos, but we hold our mobile phone in a different direction while shooting videos, which causes the wrong adjustment while uploading it. Fortunately, there are ways, and your video can fit any screen without any compromises. Bellow, we are going to tell you two methods to adjust vertical video size
Method 1: Filmora
Filmora allows users to rotate your video to any point they want. What’s more, you can zoom in or crop the undesired parts in the video with a snap. It also offers you preset aspect ratios like 16:9, 9:16; 4:5, 1:1, etc., to help you quickly find the perfect aspect ratio for YouTube, Instagram, and other social apps. Let’s see how to change video adjustment in Filmora.
How to crop aspect ratio at the starting interface:
In this method, you must upload the animation first. Follow these steps:
Step 1: Upload your video into the editing panel.
Step2: Scroll to the drop-down menu to see various dimensions (1:1. 4:3, 9:16, 16:9, and 21:9).
Step3: Select the desired ratio and apply.

Modifying aspect ratio in project settings:
This method allows you to preset the ratios before uploading your media. Most files are preset to a 4:3 ratio, but you can adjust as you wish. Note that uploading a video with other aspect ratios will automatically switch to the default one. However, you can change the ratio by clicking on the project settings tab.

Changing aspect ratio when editing:
You can crop your video after importing it to the Filmora panel using the crop and zoom tools.
Step 1: Right-click on the file in the panel.
Step 2: Select crop and zoom.
Step 3: Click on the desired ratio from the suggestions (16:9, 4:3, 1:1, and 9:16) and confirm the action by clicking OK.

You can also modify the aspect ratio manually, add filters, and blur the background to enhance resolution when editing.
Auto reframing:
Latest Filmora running versions like V10.5 have the auto-reframe feature that can help crop aspect ratio seamlessly. The good thing about this feature is that it detects any object and can remove it if need be. Plus, this video editor also comes with preset aspect ratios that conveniently suit different social apps.
You can auto reframe by:
Step 1: Import the video to the panel. Right-click on the file and select the auto-reframe icon.

Step 2: Choose the desired aspect ratio.

Step 3: Click the analyze icon and wait for the results in a preview window.
Step 4: Adjust the frame by dragging the box to balance the object or leave it if you love the results.

Step 5: When done, rename it and click the export feature to save your new file.

Step 6: Edit (add effects) as desired.
Modifying aspect ratio when exporting:
After saving your file, you can export it to your desired media display device and change the aspect ratio based on your platform settings, as discussed above.

Method 2: Final Cut Pro
Apple’s Final Cut Pro is a compelling software for video editing and compositing. The interface is designed similar with many other video editing programs such as Adobe Premiere and Combustion etc.
To prepare:
- Take vertical videos.
- Connect iPhone to an editing system.
- Enter a password on the iPhone.
- Started Final Cut Pro.
- Create a new library, named it “Vertical Video”.
Steps to adjust vertical video size with Final cut pro:
Step 1: To import the video clip, you want to edit, click on the File > Import Media. The connected iPhone screen appears in the top left corner. The circle icon shows that FCP is still collecting data from the phone and the pointing arrow allows to disconnect.
Step 2: When the iPhone is chosen in the sidebar, thumbnails appear at the bottom of the Media Import window. For example, you can see the four vertical video clips, choose one to edit.
Step 3: The iPhone compresses MP4 video. While editing a simple project, you don’t need to generate optimized media. However, optimizing media will save you time in the long run if you plan to add lots of effects.
Step 4: Now, generate a new project and apply the Automatic settings.
Step 5: Next, edit a vertical clip into the empty new project. Even if this isn’t the first clip you want the audience to see, it is essential because FCP uses this clip to configure the project settings.
Step 6: When that first video clip is edited into the timeline, this dialog arrives. Note that the frame size is already fixed by the size of the video you shot on the iPhone. Don’t change any settings. It allows FCP to automatically configure the project to match the specs of this clip. If you’ve done this correctly, your clip appears vertically in the Viewer.
Wondershare Filmora
Get started easily with Filmora’s powerful performance, intuitive interface, and countless effects!
Try It Free Try It Free Try It Free Learn More >

AI Portrait – The best feature of Wondershare Filmora for gameplay editing
The AI Portrait is a new add-on in Wondershare Filmora. It can easily remove video backgrounds without using a green screen or chroma key, allowing you to add borders, glitch effects, pixelated, noise, or segmentation video effects.

Conclusion
As you can tell, video dimensions significantly influence your media resolution and impact. Aspect ratio is the standard way to modify your media to fit YouTube, Instagram, Facebook, and other social apps. Changing dimensions is a DIY process; you can edit YouTube vertical video dimensions and other social apps like Facebook and Instagram through Filmora or Final Cut Pro.
The vertical video went to a mainstream media style. Nowadays, it’s common for online video, especially on social apps. Mobile video has become the most common way to watch online videos. It makes sense then that vertical is the preferred familiarization for videos. Users don’t want to twist their phones to watch a 30-second ad. Knowing YouTube shorts vertical size is important as well as Facebook vertical video specs.
Social juggernauts like Facebook and YouTube have adopted vertical video size or formats in current years. The newer social apps, like Snapchat and TikTok, use vertical video completely. While most platforms now prefer vertical video, they each have different patterns. Even Instagram vertical video dimensions premiere is different.
Users tinkering in video marketing know it’s essential to stay updated on social media video sizes across all platforms. But, we also know that it is time-consuming to dig through each technical specification of each social app. For that purpose, we have covered all network video sizes for each platform. So, browse the table of contents below and find the video dimensions, aspect ratios, and file sizes you need.
In this article
01 [What Vertical Video Size Do We Usually Use?](#Part 1)
02 [Vertical Video Dimension for Different Social Apps](#Part 2)
03 [Tips: How to Adjust Vertical Videos Size](#Part 3)
Part 1 What Vertical Video Size Do We Usually Use?
Videos come in different sizes. However, one principle is standard in creating them, the vertical video aspect ratio (width to height). This refers to how you compare and create the video height to video ratio (how you intend to record and produce your video).
Ideally, it is what you and viewers will see while watching your video. To create a perfect video, any video creator should decide on the relationship between the video height and width.
When creating YouTube vertical video dimensions, the width is usually longer than the height. Most television videos have a standard ratio of 4:3 and 16:9. However, social media videos are created using a 1:1 and 9:16 ratio.
A smartphone can shoot vertical videos perfectly, but some media players like cameras require editing and adjusting the sizes to get the correct aspect ratio. Experts won’t have difficulties adjusting horizontally shot videos, but an amateur will. Fortunately, you can avoid taking unprofessional shoots by focusing on the frame’s center to capture your subject wholly without clipping important aspects. While editing Facebook vertical video dimensions and other social apps, the results could vary depending on the editing software. But you can rotate the video within the software to get the correct dimensions lest you get ugly videos full of black backgrounds filling the frame.
Most cameras and video recorders have inbuilt settings that switch to aspect ratio when you start recording. And the good thing is that you can adjust the settings to your desired dimensions in the settings section. If you are shooting a vertical video without a preset aspect ratio, then:
- Shoot gently without switching your camera horizontally, especially if you are capturing a narrow view.
- Avoid fast spans as it appears intense on the camera that could result in blurry animations.
- Focus on what you are capturing, and if need be, zoom in to capture every essential detail.
The importance of applying aspect ratio in videos is to ensure your images and videos have excellent resolution. This way, you have a chance to present (market) your idea professionally.
Part 2 Vertical Video Dimension for Different Social Apps
Here is a guide on how to shoot vertical dimensions for various social apps –
1. YouTube Vertical Video Dimension Guide
It is common for viewers to switch to YouTube and watch videos, and this is why you need the work on the perfect YouTube vertical video size. Initially, you could display YouTube videos in different dimensions, but this is no longer the case since the app’s dynamic innovation to view animations in preferred sizes.
Usually, YouTube videos are recorded at a standard aspect ratio of 16: 9. It means that you cannot customize the dimensions as this is this ratio is the default.
Though the 16:9 dimensions are standard, you can also shoot your videos using different ratios like 1:1 (square), 4:3, or 9:16 (vertically). In this case, your video will fit different YouTube videos on each device but will display white or grey padding on the frames by default.
Manually adding padding to your videos reduces the ability to adjust them to different ratios on various devices. If you are yet to switch to YouTube vertical video dimensions, you are missing to increase brand awareness.
2. Facebook Vertical Video Dimension Guide
Facebook vertical video specs have mainly been using the 16:9 ratio. And since the app attracts billions of global users, it’s high time to optimize your snapshots and try posting in different formats.
For your next FB vertical video size for feed videos, think of square snapshots (1:1), 2:3, 4:5, or 16:9. If you love creating Facebook stories, you can stick to the 9:16 ratio. And for Facebook live videos, stick with the Facebook video vertical size, 16:9 dimensions. Note that most Facebook video posts will automatically have a standard measurement of 16:9.
3. Instagram Vertical Video Dimensions Guide
Since the inception of Instagram vertical video dimensions premiere, the ratio has always been 1:1. This dimension makes it optimal for phones and small-sized screens. Here is the ultimate guide for your new Instagram animations:
- 1:1 for square videos.
- 4:5 for portrait shots.
- 9:16 when shooting vertical animations.
If you are going live on Instagram, we recommend 9:16, while you can shoot in 1:1, 4:5, and 16:9 ratios for feed videos. For Instagram stories, we suggest 9:16, but you can always work around 1:1, 4:9, and 16:9.
4. Twitter Vertical Video Dimension Guide
Twitter is quite different when considering feed video dimensions; portrait and square. The former (portrait) is a favorite for ads and marketing videos display (increase brand visibility), whereas the latter is perfect for displaying videos on multiple devices.
Twitter videos can be perfect in the below dimensions:
- Promotional video ads 1:2 39 to 2.39:1
- Six-second short ads 1:2.39 – 2.39:1
- First video ads 1:2.39 – 2.39:1
- Personal portrait (vertical) videos 9:16
- Personal horizontal animations 1:2.39 – 2.39:1
5. WhatsApp Vertical Video Dimension Guide
Most people don’t know the importance of resizing WhatsApp videos. Sharing videos on your WhatsApp status is a marketing strategy, but you must resize your videos well. Most video WhatsApp vertical videos have 4:3 dimensions and a 1080 × 1920 pixels size.
Part 3 Tips: How to Adjust Vertical Videos Size
The smartphone has become the primary tool for taking photos or recording videos, but we hold our mobile phone in a different direction while shooting videos, which causes the wrong adjustment while uploading it. Fortunately, there are ways, and your video can fit any screen without any compromises. Bellow, we are going to tell you two methods to adjust vertical video size
Method 1: Filmora
Filmora allows users to rotate your video to any point they want. What’s more, you can zoom in or crop the undesired parts in the video with a snap. It also offers you preset aspect ratios like 16:9, 9:16; 4:5, 1:1, etc., to help you quickly find the perfect aspect ratio for YouTube, Instagram, and other social apps. Let’s see how to change video adjustment in Filmora.
How to crop aspect ratio at the starting interface:
In this method, you must upload the animation first. Follow these steps:
Step 1: Upload your video into the editing panel.
Step2: Scroll to the drop-down menu to see various dimensions (1:1. 4:3, 9:16, 16:9, and 21:9).
Step3: Select the desired ratio and apply.
Modifying aspect ratio in project settings:
This method allows you to preset the ratios before uploading your media. Most files are preset to a 4:3 ratio, but you can adjust as you wish. Note that uploading a video with other aspect ratios will automatically switch to the default one. However, you can change the ratio by clicking on the project settings tab.
Changing aspect ratio when editing:
You can crop your video after importing it to the Filmora panel using the crop and zoom tools.
Step 1: Right-click on the file in the panel.
Step 2: Select crop and zoom.
Step 3: Click on the desired ratio from the suggestions (16:9, 4:3, 1:1, and 9:16) and confirm the action by clicking OK.
You can also modify the aspect ratio manually, add filters, and blur the background to enhance resolution when editing.
Auto reframing:
Latest Filmora running versions like V10.5 have the auto-reframe feature that can help crop aspect ratio seamlessly. The good thing about this feature is that it detects any object and can remove it if need be. Plus, this video editor also comes with preset aspect ratios that conveniently suit different social apps.
You can auto reframe by:
Step 1: Import the video to the panel. Right-click on the file and select the auto-reframe icon.
Step 2: Choose the desired aspect ratio.
Step 3: Click the analyze icon and wait for the results in a preview window.
Step 4: Adjust the frame by dragging the box to balance the object or leave it if you love the results.
Step 5: When done, rename it and click the export feature to save your new file.
Step 6: Edit (add effects) as desired.
Modifying aspect ratio when exporting:
After saving your file, you can export it to your desired media display device and change the aspect ratio based on your platform settings, as discussed above.
Method 2: Final Cut Pro
Apple’s Final Cut Pro is a compelling software for video editing and compositing. The interface is designed similar with many other video editing programs such as Adobe Premiere and Combustion etc.
To prepare:
- Take vertical videos.
- Connect iPhone to an editing system.
- Enter a password on the iPhone.
- Started Final Cut Pro.
- Create a new library, named it “Vertical Video”.
Steps to adjust vertical video size with Final cut pro:
Step 1: To import the video clip, you want to edit, click on the File > Import Media. The connected iPhone screen appears in the top left corner. The circle icon shows that FCP is still collecting data from the phone and the pointing arrow allows to disconnect.
Step 2: When the iPhone is chosen in the sidebar, thumbnails appear at the bottom of the Media Import window. For example, you can see the four vertical video clips, choose one to edit.
Step 3: The iPhone compresses MP4 video. While editing a simple project, you don’t need to generate optimized media. However, optimizing media will save you time in the long run if you plan to add lots of effects.
Step 4: Now, generate a new project and apply the Automatic settings.
Step 5: Next, edit a vertical clip into the empty new project. Even if this isn’t the first clip you want the audience to see, it is essential because FCP uses this clip to configure the project settings.
Step 6: When that first video clip is edited into the timeline, this dialog arrives. Note that the frame size is already fixed by the size of the video you shot on the iPhone. Don’t change any settings. It allows FCP to automatically configure the project to match the specs of this clip. If you’ve done this correctly, your clip appears vertically in the Viewer.
Wondershare Filmora
Get started easily with Filmora’s powerful performance, intuitive interface, and countless effects!
Try It Free Try It Free Try It Free Learn More >
AI Portrait – The best feature of Wondershare Filmora for gameplay editing
The AI Portrait is a new add-on in Wondershare Filmora. It can easily remove video backgrounds without using a green screen or chroma key, allowing you to add borders, glitch effects, pixelated, noise, or segmentation video effects.
Conclusion
As you can tell, video dimensions significantly influence your media resolution and impact. Aspect ratio is the standard way to modify your media to fit YouTube, Instagram, Facebook, and other social apps. Changing dimensions is a DIY process; you can edit YouTube vertical video dimensions and other social apps like Facebook and Instagram through Filmora or Final Cut Pro.
Charting Your Course: Building Plays on YouTube
How to Create a Playlist on YouTube

Richard Bennett
Mar 27, 2024• Proven solutions
Want to watch the missed-out episodes of your favorite serial? As well know it irritates to find out every single episode on order? But why to worry when YouTube has a separate playlist on your famous tv-series. Want to watch new trending music of 2020? YouTube has a playlist for it. Missing comedy videos from the favorite show on TV? YouTube has a playlist on it. Need to know different ideas about marketing on improving your brand? Yes, you got my point. There is a playlist on YouTube for that as well.

Although it isn’t the latest one on the Internet, it is still the unbeatable application that brings everything in a single screen from trending tunes, entertaining videos, industry backgrounds, and the latest news to your notice that happens every second. Especially if you are an individual with a marketing background or a brand developer, YouTube playlists can do a lot from its side? Need to know what are its benefits and how to create a playlist on YouTube? You are in the right spot.
- Part 1: What is a YouTube Playlist?
- Part 2: YouTube Channel vs. YouTube Playlist
- Part 3: Benefits of Creating a playlist on YouTube
- Part 4: How to Make a YouTube Playlist?
- Part 5: Tips to Improve Your Video SEO
What is a YouTube Playlist?
Irritated from surfing over the Internet for videos related to your concept or topic you are searching for? Else are you a party-hard person who needs continuously playing of fantastic music to keeping the fun going? YouTube playlists are the better option: a collection of videos that keep playing in order, sequentially, and play one after another automatically unless you change it manually.
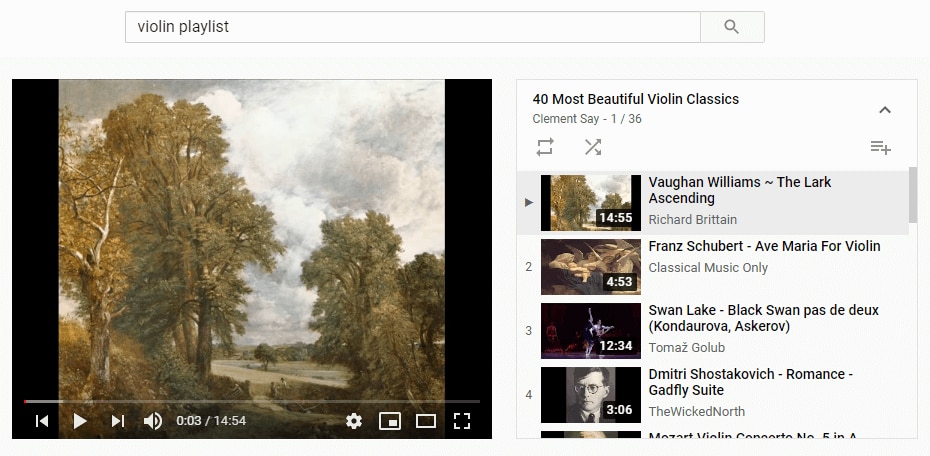
It is closely related to the music playlists like the ones we find in Spotify and Apple music. Different playlists on YouTube are available in all genres, like entertainment, fun, relaxation, thrilling, and educational niches. Do you have a monotonous routine at the office? Let’s play something crazy and fun-filled like the comedy series or bloopers? Need some workout ideas? Check out the compilation of different custom fitness workouts as a playlist on YouTube. Whatever you want, you can find everything in YouTube playlists.
It is a fantastic app that can do wonders that one could think. Besides being used for the fun-filled purposes, they are content curation tools that can be used by marketers as a platform to attract customers and engage with them with various product videos under a single roof called playlists.
If you are a tricky person who has a changing mindset and different mood-offs, you can create your playlists that combine all your favorite videos from varied niches.
Difference between a Channel and a Playlist on YouTube
There are times where one gets confused with the YouTube channels and playlists. While some say they are similar, the fact is both are different. A person with a specific name creates a channel, and it is the place where the person posts all the videos or uploads them for his/her subscribers to get likes and more audience.
But YouTube playlists are auto-generated contents that consist of videos from different channels but with the same content concept. For example, a PewDiePie channel will have his uploaded videos. Still, PewDiePie playlists will have all his videos and the ones similar to his stream but off the channel. Likewise, self-created playlists will have videos that you have saved to see them later or often.
What are the benefits of a playlist on YouTube?
There are various YouTube and video creators who have undervalued playlists’ importance, and hence the hidden benefits are often off-screen. So, we have listed the top 5 reasons why YouTube playlists are essential and how a YouTuber can benefit from playlists.
1. YouTube playlists help you organize videos in order
YouTube these days appears scattered with numerous information where some are important at the critical instances of time. You also have some playlists that are the effective ones grouped based on a common theme. Suppose your company focuses on selling musical equipment. In that case, you can make separate playlists for a guitar or pianos so that viewers can come across different equipment styles, available variants allowing them to navigate through various parts in your channel. Alongside this, you can tell your viewers what the YouTube channel or the organization is all about at first glance as the first impression is the best expression!
2. Increase the rank of your video
If your video gets added to a playlist, there are high chances for it to be in the YouTube watchlist even it is less popular but related to the ones that the audience prefers. In turn, this act raises your video’s rank as the “total watch time” is a vital factor that drives your video to the highly ranked video list.
3. Playlists account to discoverability and improve visibility on search engines
Apart from being enlisted as single videos, individual videos indexed in playlists get opportunities to appear on the search engines based on the keywords. Playlists are bread slices packed with jam as keywords providing likelihood to emerge on multiple times. But to catch the gain of this method, one has to enrich the video with an outstanding keyword, titles, or description and optimize the video with remarkable SEO techniques.
4. Get more views
When your video comes under a theme and is categorized, the YouTube algorithm places it over with the other related to each other. The next time, your video will appear on the right sidebar below the “related videos.” As the video plays automatically, one after the other, the number of views increases. “Amazing playlists can make viewers watch it longer!”
5. Playlists are best for video SEO
Such playlists can boost and help one to reach your YouTube channel. Especially when it comes to educators or artists, they provide value and save time. Playlists get ranked for keywords that help your audience in reaching you on YouTube.
How to Make a YouTube Playlist?
Surprised to know that a simple playlist has handy benefits that you weren’t aware of still now? Are you excited and eager to create your playlists on YouTube? Here is a step-by-step guide that will guide you on how to make a playlist on YouTube.
1. Open your channel page on YouTube
To start with, open your YouTube channel page and tap the “Customize Channel” button.
2. Create your YouTube playlist
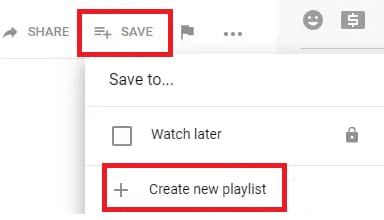
Now, find or select the video you wish to add to the playlist. To save it, click on the “Plus” icon. You can click on “Watch later” that will add the video to your already created playlist from the drop-down.
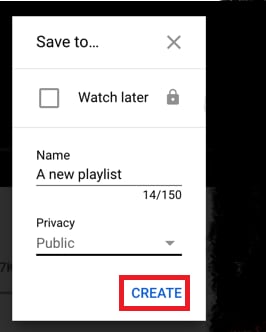
3. Give the playlist a name
Name your new YouTube playlist and make sure it fulfills the criteria of a maximum of 150 characters. Specify the privacy level and make it to the public so that anyone can view it. Once satisfied, tap the “Create” option.
4. Your YouTube playlist is now live
You have successfully made the playlist and added the video to find by clicking on the “Library” option.
Tips to Improve Your Video SEO
As said before, to improve your video playlist and bring it to rank, optimizing your playlists with SEO is mandatory.
1. Make use of appealing titles and depiction
While many viewers don’t prefer reading through the entire description, the title and the Metadata are the major factors that attract viewers at first glance. Hence, pay attention and spend time to build and craft an appealing title. Give importance to the thumbnail image and ensure that it is engaging.
2. Concentrate on keywords
Surf through the various playlists and find keywords used in popular videos related to your niche. Remember, keywords can be included in your titles and increase the chances of increasing the ranking of the video.
3. Prefer the optimal video hosting platform
Set a goal and choose a wise video hosting platform to gain traffic and generate new leads. Before deciding with the right one, consider making trails or find a review from the Internet.
Conclusion
So, now you know every nook and corner on the answers to how to make YouTube playlists and create them through a simple guide yourself. Besides using it for product marketing or brand deliverance, you can use it to make your YouTube channel a popular one. Yes, do you have a collection of videos to showcase the world? Upload them on YouTube as a playlist and optimize it with SEO tips discussed today. Maybe it is an ASMR video or a vlogging one. It can help in reaching your YouTube target audience for sure!
Richard Bennett
Richard Bennett is a writer and a lover of all things video.
Follow @Richard Bennett
Richard Bennett
Mar 27, 2024• Proven solutions
Want to watch the missed-out episodes of your favorite serial? As well know it irritates to find out every single episode on order? But why to worry when YouTube has a separate playlist on your famous tv-series. Want to watch new trending music of 2020? YouTube has a playlist for it. Missing comedy videos from the favorite show on TV? YouTube has a playlist on it. Need to know different ideas about marketing on improving your brand? Yes, you got my point. There is a playlist on YouTube for that as well.
Although it isn’t the latest one on the Internet, it is still the unbeatable application that brings everything in a single screen from trending tunes, entertaining videos, industry backgrounds, and the latest news to your notice that happens every second. Especially if you are an individual with a marketing background or a brand developer, YouTube playlists can do a lot from its side? Need to know what are its benefits and how to create a playlist on YouTube? You are in the right spot.
- Part 1: What is a YouTube Playlist?
- Part 2: YouTube Channel vs. YouTube Playlist
- Part 3: Benefits of Creating a playlist on YouTube
- Part 4: How to Make a YouTube Playlist?
- Part 5: Tips to Improve Your Video SEO
What is a YouTube Playlist?
Irritated from surfing over the Internet for videos related to your concept or topic you are searching for? Else are you a party-hard person who needs continuously playing of fantastic music to keeping the fun going? YouTube playlists are the better option: a collection of videos that keep playing in order, sequentially, and play one after another automatically unless you change it manually.
It is closely related to the music playlists like the ones we find in Spotify and Apple music. Different playlists on YouTube are available in all genres, like entertainment, fun, relaxation, thrilling, and educational niches. Do you have a monotonous routine at the office? Let’s play something crazy and fun-filled like the comedy series or bloopers? Need some workout ideas? Check out the compilation of different custom fitness workouts as a playlist on YouTube. Whatever you want, you can find everything in YouTube playlists.
It is a fantastic app that can do wonders that one could think. Besides being used for the fun-filled purposes, they are content curation tools that can be used by marketers as a platform to attract customers and engage with them with various product videos under a single roof called playlists.
If you are a tricky person who has a changing mindset and different mood-offs, you can create your playlists that combine all your favorite videos from varied niches.
Difference between a Channel and a Playlist on YouTube
There are times where one gets confused with the YouTube channels and playlists. While some say they are similar, the fact is both are different. A person with a specific name creates a channel, and it is the place where the person posts all the videos or uploads them for his/her subscribers to get likes and more audience.
But YouTube playlists are auto-generated contents that consist of videos from different channels but with the same content concept. For example, a PewDiePie channel will have his uploaded videos. Still, PewDiePie playlists will have all his videos and the ones similar to his stream but off the channel. Likewise, self-created playlists will have videos that you have saved to see them later or often.
What are the benefits of a playlist on YouTube?
There are various YouTube and video creators who have undervalued playlists’ importance, and hence the hidden benefits are often off-screen. So, we have listed the top 5 reasons why YouTube playlists are essential and how a YouTuber can benefit from playlists.
1. YouTube playlists help you organize videos in order
YouTube these days appears scattered with numerous information where some are important at the critical instances of time. You also have some playlists that are the effective ones grouped based on a common theme. Suppose your company focuses on selling musical equipment. In that case, you can make separate playlists for a guitar or pianos so that viewers can come across different equipment styles, available variants allowing them to navigate through various parts in your channel. Alongside this, you can tell your viewers what the YouTube channel or the organization is all about at first glance as the first impression is the best expression!
2. Increase the rank of your video
If your video gets added to a playlist, there are high chances for it to be in the YouTube watchlist even it is less popular but related to the ones that the audience prefers. In turn, this act raises your video’s rank as the “total watch time” is a vital factor that drives your video to the highly ranked video list.
3. Playlists account to discoverability and improve visibility on search engines
Apart from being enlisted as single videos, individual videos indexed in playlists get opportunities to appear on the search engines based on the keywords. Playlists are bread slices packed with jam as keywords providing likelihood to emerge on multiple times. But to catch the gain of this method, one has to enrich the video with an outstanding keyword, titles, or description and optimize the video with remarkable SEO techniques.
4. Get more views
When your video comes under a theme and is categorized, the YouTube algorithm places it over with the other related to each other. The next time, your video will appear on the right sidebar below the “related videos.” As the video plays automatically, one after the other, the number of views increases. “Amazing playlists can make viewers watch it longer!”
5. Playlists are best for video SEO
Such playlists can boost and help one to reach your YouTube channel. Especially when it comes to educators or artists, they provide value and save time. Playlists get ranked for keywords that help your audience in reaching you on YouTube.
How to Make a YouTube Playlist?
Surprised to know that a simple playlist has handy benefits that you weren’t aware of still now? Are you excited and eager to create your playlists on YouTube? Here is a step-by-step guide that will guide you on how to make a playlist on YouTube.
1. Open your channel page on YouTube
To start with, open your YouTube channel page and tap the “Customize Channel” button.
2. Create your YouTube playlist
Now, find or select the video you wish to add to the playlist. To save it, click on the “Plus” icon. You can click on “Watch later” that will add the video to your already created playlist from the drop-down.
3. Give the playlist a name
Name your new YouTube playlist and make sure it fulfills the criteria of a maximum of 150 characters. Specify the privacy level and make it to the public so that anyone can view it. Once satisfied, tap the “Create” option.
4. Your YouTube playlist is now live
You have successfully made the playlist and added the video to find by clicking on the “Library” option.
Tips to Improve Your Video SEO
As said before, to improve your video playlist and bring it to rank, optimizing your playlists with SEO is mandatory.
1. Make use of appealing titles and depiction
While many viewers don’t prefer reading through the entire description, the title and the Metadata are the major factors that attract viewers at first glance. Hence, pay attention and spend time to build and craft an appealing title. Give importance to the thumbnail image and ensure that it is engaging.
2. Concentrate on keywords
Surf through the various playlists and find keywords used in popular videos related to your niche. Remember, keywords can be included in your titles and increase the chances of increasing the ranking of the video.
3. Prefer the optimal video hosting platform
Set a goal and choose a wise video hosting platform to gain traffic and generate new leads. Before deciding with the right one, consider making trails or find a review from the Internet.
Conclusion
So, now you know every nook and corner on the answers to how to make YouTube playlists and create them through a simple guide yourself. Besides using it for product marketing or brand deliverance, you can use it to make your YouTube channel a popular one. Yes, do you have a collection of videos to showcase the world? Upload them on YouTube as a playlist and optimize it with SEO tips discussed today. Maybe it is an ASMR video or a vlogging one. It can help in reaching your YouTube target audience for sure!
Richard Bennett
Richard Bennett is a writer and a lover of all things video.
Follow @Richard Bennett
Also read:
- Step-by-Step Fixes for YouTube Short Failures
- ProEdit Wizardry Harmonious PC Video & Sound Symphony
- The Synergy Between YouTube and Creative Commons Licensinas
- In 2024, How to Buy 1 Million YouTube Views Safely From Trusted Providers
- The Ultimate Guide to Viewer Engagement and Loyalty 6 Proven Strategies for YouTube Success
- [Updated] Coordinated Labeling Processes in YTB, Ins, Fb Worlds
- Club Vibes Best DJ Template Video Selections for 2024
- The Video Venture A Vlogger's Journey to Judicious Gains
- In 2024, Culinary Crescendo High-Impact Food Network Monikers
- Internet Idolaters Top Ten YouTube Sensations
- 2024 Approved Alternative Cinema Choices for Every Fan
- Supercharge Your Videos with These Proven Keyword Analyst Tools
- [New] EditMelodiesPC Top Video & Music Pairing Software
- In 2024, A Stepwise Approach to Designing Powerful Edu-Vids on Social Media
- Essential Insights for Crafting YouTube Intros A+B Methods for 2024
- Understanding YouTube's Ad-Free Experience with a Plan
- Ultimate Recorder Options for Livestreaming on YouTube
- 2024 Approved Crafting Unique Thumbnails for YouTube Content
- 2024 Approved End-Screen Elegance - Free Guides to Upgrade Your Videos
- [New] Cutting-Edge PC Techniques for Stellar YouTube Video Production
- [Updated] Constructing YouTube Video Content That Resonates with Viewers
- Quick and Clean Video Extraction for All Screens
- From Barely There to Top Rated The Youtube Growth Arc
- Next-Gen Videostreaming Hubs Triumph Beyond Youtube
- [New] A Decade of YouTube Dominance Breakthrough Videos Hitting a Billion Views
- [Updated] A Guide to Understanding and Joining a YouTube Media Company
- 2024 Approved Crafting Compelling Thumbnails to Captivate YouTube Viewers and Encourage Clicks
- Views Velocity Harnessing Powerful Hashtags for Video Popularity
- Keep Your Videos Secure - YouTube-to-MP4 Downloading Safely
- Streamline Your Vlog's Sound with Effective Tips
- [New] Amplify Your Content Techniques for Successful Youtube & Twitch Multi-Streams
- Personalize Your Youtube Watch Experience with Alerts & Notes
- [New] Daily Dharma The Best Yoga Channels for Self-Growth
- Elevate Your Content Game on YouTube Top 11 Video SEO Insights for 2024
- In 2024, Designing Direct URLs for Automatic Content Subscription
- Mastering Multimedia Strategies for Gamers on Youtube
- How do I play MKV movies on Xiaomi Redmi Note 12 4G?
- In 2024, Endless Video Recording Program
- Innovative Approaches for Logging Online Discussions
- In 2024, How to Transfer Data from Itel P40 to BlackBerry | Dr.fone
- The Ultimate Guide to Unlocking Your iPhone 13 Pro on MetroPCS
- New In 2024, Get Best Subtitle Edit for Mac Alternatives
- Updated Here Is How You Can Do It Effectively, Either with Built-In Tools Provided by TikTok or with Additional Pieces of Reverser Tools to Reverse a TikTok Video
- Turning On/Off Picture-in-Picture for Mac/iOS/iPad
- Apply These Techniques to Improve How to Detect Fake GPS Location On Honor X50 | Dr.fone
- [Updated] Stealthy Sharing on Snapchat The Perfect Tutorial
- [New] 2024 Approved Which Recording Tool Wins? - A Bandicam Vs. Camtasia Comparison
- Top 10 Telegram Spy Tools On Apple iPhone SE (2022) for Parents | Dr.fone
- Finest Affordable Screen Recording Apps List
- [New] Craftsmanship Chronicles Sewing Skills Shared with Teens and Tweens for 2024
- How To Leave a Life360 Group On Poco M6 5G Without Anyone Knowing? | Dr.fone
- Updated Do You Use Premiere Pro and Want to Learn How to Change a Videos Frame Rate Using the Tool? Here Are the Steps that You Need to Follow
- [Updated] Beginner's Guide to Simple, Yet Effective Filming Gear
- New Advanced Audacity Editing Adjusting Pitch Without Audio Degradation
- [New] Tight-Knit Teams, Top Chat Platforms Which Rules the Game - Slack or Discord?
- In 2024, How to Transfer Contacts from Nubia Red Magic 9 Pro+ to iPhone XS/11 | Dr.fone
- New 10 Exceptional Online Tools for Crafting Epic Gaming Intros
- [Updated] The Yearbook of Viral Content on Twitter, 2023 Edition for 2024
- 2024 Approved Secrets Unveiled Complete Guide to Live TV Recording via Windows PCs
- Updated 2024 Approved 8 Frame Rate Video Converters for a Professional Finish
- Ultimate Showdown Top 10 Royale Warriors' Games
- [Updated] Compreenas Comprehensive Walkthrough for Creating a Unified Skype Chat Room Accessible by Users of Different Operating Systems
- [New] In 2024, Master Your TikTok Income Leading Money Calculators
- In 2024, How Can Nokia C12 ProMirror Share to PC? | Dr.fone
- Can’t view HEVC H.265 content on HTC
- Title: Cohesive Labeling Approach for YTB, Ins & Others for 2024
- Author: Kevin
- Created at : 2024-05-25 14:50:14
- Updated at : 2024-05-26 14:50:14
- Link: https://youtube-videos.techidaily.com/cohesive-labeling-approach-for-ytb-ins-and-others-for-2024/
- License: This work is licensed under CC BY-NC-SA 4.0.
