"Choosing the Best Camera for Filming Mirrorless or DSLR for 2024"
Choosing the Best Camera for Filming: Mirrorless or DSLR
Mirrorless vs. DSLR Cameras: Which is Better for Videos?

Richard Bennett
Oct 26, 2023• Proven solutions
If you’re looking to shoot your videos with interchangeable lenses, your camera set up will either have to have a mirrorless camera body or a DSLR camera body. In this post, I’ll be comparing the two camera body types for recording video.
- Part 1: What is a DSLR Camera?
- Part 2: What is a Mirrorless Camera?
- Part 3: Mirrorless vs. DSLR - a Complete Comparison
- Part 4: Mirrorless vs. DSLR - Which One is Better for Video?
What is a DSLR Camera?
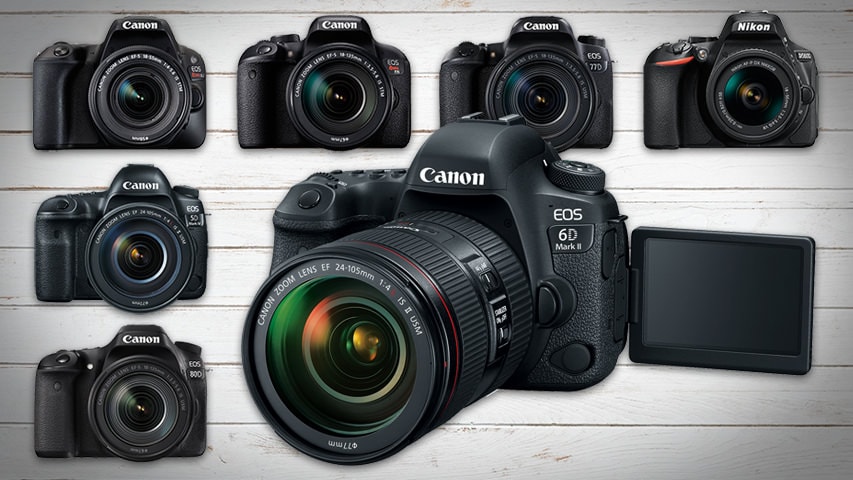
DSLR cameras are digital single-lens reflex cameras. Like 35mm film cameras of the past, DSLR cameras are built with an angled mirror inside its camera body. This mirror allows you to look into your camera’s optical viewfinder and see exactly what your camera sees.
The mirror inside a DSLR camera flips up out of the way when you open the shutter to allow light to reach the camera’s image sensor.
Check out our list of the 7 Best DSLR Cameras For Vlogging .
What is a Mirrorless Camera?
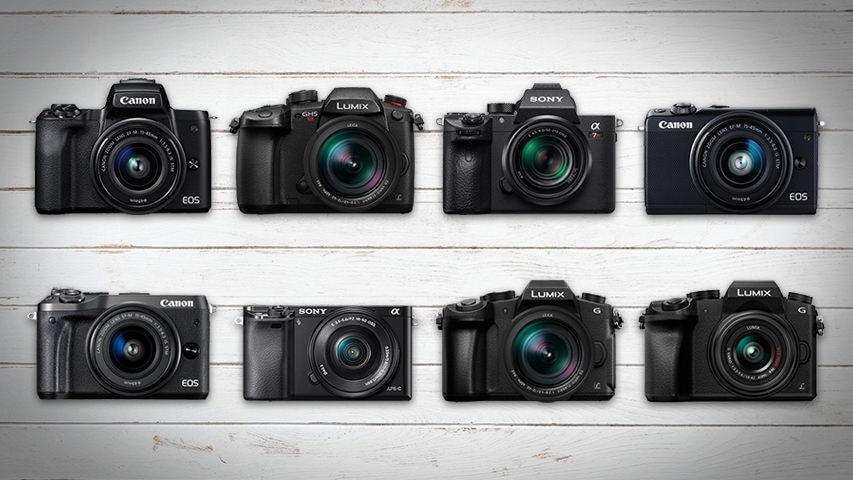
Mirrorless cameras are interchangeable lens cameras without a mirror inside the camera body. With nothing to reflect your image, you won’t find any optical viewfinder to look through to see exactly what your camera sees.
Light passes through the lens of a mirrorless camera and lands directly onto the camera’s sensor.
Check out our list of the 8 Best Mirrorless Cameras For Vlogging .
Mirrorless vs. DSLR - a Complete Comparison
Size and Weight
DSLR cameras are larger and heavier than mirrorless cameras because there are more parts that go into their camera bodies. DSLR cameras require enough space inside for an angled mirror to flip up out of the way.
If your video shooting style is more on-the-go, like that of a daily vlogger or travel vlogger, the smaller size and lighter weight of a mirrorless camera may be more suitable for you.
Previewing Images
When you’re using a DSLR camera, your optical viewfinder will show you exactly what your camera sees as opposed to a digital preview of what your image sensor picks up. No matter how bright or dark your scene actually is, through the optical viewfinder, you’ll be able to clearly see what your camera sees with the power of your eye.
Mirrorless cameras, on the other hand, display on your camera’s screen or electronic viewfinder a digital preview of what your camera is looking at. You will notice a lag, especially in low light, between actions that are taking place in front of the camera and the same actions being displayed in your live preview.
Lenses and Accessories
Having been around much longer, there are plenty more options for lenses and accessories when it comes to shooting with DSLR cameras. You can choose from all kinds of different quality levels and price ranges.
Video Resolution
4K video recording is more readily available in mirrorless cameras than DSLR cameras. At a much more affordable budget, you can get your hands on a 4K mirrorless camera. If you want to shoot 4K video on a DSLR camera, though, you will have to pay for some of the most expensive DSLR cameras on the market.
Image Stabilization
Up until quite recently, you needed to get the right lens with built-in optical image stabilization if you wanted to shoot stabilized photos and videos with an interchangeable lens camera. Image stabilization had not been readily available in the bodies of these cameras.
In recent years, however, mirrorless cameras have been much more active in their development of camera bodies equipped with shifting image sensors. Your shots can be even more stabilized when the optical image stabilization of your lens is combined with your camera’s in-body sensor-shift image stabilization.
Battery Life
When it comes to shooting video, DSLR cameras and mirrorless cameras consume about the same amount of power. It’s still safe to say, though, that DSLR cameras, for the most part, have better battery life than mirrorless cameras because their bigger batteries are packed with more power.
Mirrorless vs. DSLR - Which One is Better for Video?
In my opinion, when it comes to filming a video, mirrorless cameras are the way to go. In such a short time, mirrorless cameras have made huge leaps in their capabilities. It won’t be long before the ultimate vlogging camera comes out on the mirrorless market.
In the end, if you need to edit videos futhermore, try Filmora video editor . It’s a video editor which has significantly improved overall performance, making the product faster, and more powerful, and taking the user editing experience to a new level.
It is perfect for helping beginners, and intermediate users create stylish videos by providing an intuitive user interface and built-in effects.
![]()
Richard Bennett
Richard Bennett is a writer and a lover of all things video.
Follow @Richard Bennett
Richard Bennett
Oct 26, 2023• Proven solutions
If you’re looking to shoot your videos with interchangeable lenses, your camera set up will either have to have a mirrorless camera body or a DSLR camera body. In this post, I’ll be comparing the two camera body types for recording video.
- Part 1: What is a DSLR Camera?
- Part 2: What is a Mirrorless Camera?
- Part 3: Mirrorless vs. DSLR - a Complete Comparison
- Part 4: Mirrorless vs. DSLR - Which One is Better for Video?
What is a DSLR Camera?
DSLR cameras are digital single-lens reflex cameras. Like 35mm film cameras of the past, DSLR cameras are built with an angled mirror inside its camera body. This mirror allows you to look into your camera’s optical viewfinder and see exactly what your camera sees.
The mirror inside a DSLR camera flips up out of the way when you open the shutter to allow light to reach the camera’s image sensor.
Check out our list of the 7 Best DSLR Cameras For Vlogging .
What is a Mirrorless Camera?
Mirrorless cameras are interchangeable lens cameras without a mirror inside the camera body. With nothing to reflect your image, you won’t find any optical viewfinder to look through to see exactly what your camera sees.
Light passes through the lens of a mirrorless camera and lands directly onto the camera’s sensor.
Check out our list of the 8 Best Mirrorless Cameras For Vlogging .
Mirrorless vs. DSLR - a Complete Comparison
Size and Weight
DSLR cameras are larger and heavier than mirrorless cameras because there are more parts that go into their camera bodies. DSLR cameras require enough space inside for an angled mirror to flip up out of the way.
If your video shooting style is more on-the-go, like that of a daily vlogger or travel vlogger, the smaller size and lighter weight of a mirrorless camera may be more suitable for you.
Previewing Images
When you’re using a DSLR camera, your optical viewfinder will show you exactly what your camera sees as opposed to a digital preview of what your image sensor picks up. No matter how bright or dark your scene actually is, through the optical viewfinder, you’ll be able to clearly see what your camera sees with the power of your eye.
Mirrorless cameras, on the other hand, display on your camera’s screen or electronic viewfinder a digital preview of what your camera is looking at. You will notice a lag, especially in low light, between actions that are taking place in front of the camera and the same actions being displayed in your live preview.
Lenses and Accessories
Having been around much longer, there are plenty more options for lenses and accessories when it comes to shooting with DSLR cameras. You can choose from all kinds of different quality levels and price ranges.
Video Resolution
4K video recording is more readily available in mirrorless cameras than DSLR cameras. At a much more affordable budget, you can get your hands on a 4K mirrorless camera. If you want to shoot 4K video on a DSLR camera, though, you will have to pay for some of the most expensive DSLR cameras on the market.
Image Stabilization
Up until quite recently, you needed to get the right lens with built-in optical image stabilization if you wanted to shoot stabilized photos and videos with an interchangeable lens camera. Image stabilization had not been readily available in the bodies of these cameras.
In recent years, however, mirrorless cameras have been much more active in their development of camera bodies equipped with shifting image sensors. Your shots can be even more stabilized when the optical image stabilization of your lens is combined with your camera’s in-body sensor-shift image stabilization.
Battery Life
When it comes to shooting video, DSLR cameras and mirrorless cameras consume about the same amount of power. It’s still safe to say, though, that DSLR cameras, for the most part, have better battery life than mirrorless cameras because their bigger batteries are packed with more power.
Mirrorless vs. DSLR - Which One is Better for Video?
In my opinion, when it comes to filming a video, mirrorless cameras are the way to go. In such a short time, mirrorless cameras have made huge leaps in their capabilities. It won’t be long before the ultimate vlogging camera comes out on the mirrorless market.
In the end, if you need to edit videos futhermore, try Filmora video editor . It’s a video editor which has significantly improved overall performance, making the product faster, and more powerful, and taking the user editing experience to a new level.
It is perfect for helping beginners, and intermediate users create stylish videos by providing an intuitive user interface and built-in effects.
![]()
Richard Bennett
Richard Bennett is a writer and a lover of all things video.
Follow @Richard Bennett
Step-by-Step Guide to Unmicrophonic Audio Recording
How to Record Good Audio Without a Microphone?
Richard Bennett
Oct 26, 2023• Proven solutions
Audio quality is more important than video quality on YouTube. You’ve probably heard that before – viewers might forgive sub-par video quality if they’re interested in what you’re saying, but if it’s hard to understand what you’re saying they’ll click away.
Getting an external mic (even a $10 one-off Amazon ) is one of the best ways to improve your videos. That said, maybe your budget is $0. Or, maybe you just don’t happen to have a mic now and don’t want to wait to make videos. It could even be that you just don’t want to bother with an external mic.
Luckily, there are a lot of easy, free, things you can do to protect the quality of your audio recording even if you’re not using an external mic. Here are a few tips:
- 1. Keep Your Camera Close
- 2. Shoot Somewhere Quiet
- 3. Pick a Good Room
- 4. Protect your Built-In Mic from Wind
- 5. Use a Free Audio App
- 6. Do a Sound Check
1. Keep Your Camera Close (like, really close)
The biggest problem with the mic built into any camera or phone is just that, since it’s with the camera, it’s usually too far away from you. Built-in mics can record decent audio up close, but usually, your camera will be set up farther away from you than an external mic would be.
For example, your camera’s mic might be just as good as a clip-on LAV, but that LAV is right by your mouth and the camera is a couple of big steps away.
Moving your camera/smartphone physically closer to you will make it hard to include anything besides your head and shoulders in your shot, but it will get you significantly better audio.
2.Shoot Somewhere Quiet
The best way to limit the amount of background noise you pick up in your sound recording is to shoot somewhere where there’s no background noise. That probably seems really basic, but it’s something a lot of people just don’t do. It’s easy to default to recording in your home office, even though it’s right next to the kitchen where your family is bustling around, or in your bedroom even though there’s a busy street right outside your window.
Sometimes the best thing you can do for your audio is simply to scout out a quiet room in your house where the sound recording conditions are better. Speaking of recording conditions…
3. Pick a Good Room
There’s more that goes into picking a good room than how quiet it is. If you try to record in a room that’s too big your voice might sound to distant, and if you try to record in a room that’s too small your audio will be too echo-y. You need a room that’s just right.
You should also pay attention to what’s in the room you’re recording in. Avoid hard, reflective, surfaces like appliances and mirrors which your voice will bounce off of. The same conditions that make you sound great when you sing in the shower will – like recording in a small space -make your voiceover unpleasantly echo-y.
Look for a room that has a lot of soft things in it, like beds and sofas.
4. Protect your Built-In Mic from Wind
If you shoot outside, then the wind passing over your built-in mic will do terrible things to your audio. You can do a lot to counter-act this problem by physically blocking the wind.
There are a few ways to do this. If you’re doing hand-held shots you can partially cover your camera or phone’s mic with your finger. You don’t want to completely cover it/press down or your audio will be muffled. What you’re trying to do is create a barrier blocking out the wind.
On movie sets, they block out wind by covering the microphones with big fuzzy things called ‘dead cats’. You can also block out wind noise by attaching something fuzzy to your microphone. If your camera’s built-in mic is on front of it then you just need something big and fluffy you can loop around the lens. You can use a piece of a boa, a fuzzy novelty scrunchie – you can even murder a fuzzy stuffed animal! Do you have an old coat with a fuzz around the hood? That fuzz would do nicely.
The pompom used in this video cost $2, but you might already have something that would work!
If your built-in mic is on top of your camera you can get something called a ‘micromuff’. A micromuff is essentially a circular or rectangular piece of velcro with long strands of fluff on top. It’s open in the middle so it doesn’t actually cover your mic, but the surrounding fuzz blocks out the wind.

You use the adhesive backing to attach the base velcro to your camera. The other side of the velcro has your fluff attached to the back.
The only thing about a micromuff is that it costs about $30, and if you’re going to spend $30 on audio equipment then you could just buy yourself an inexpensive LAV mic. I only bring up the micromuff because it’s a very simple design you can probably DIY – you just need velcro with adhesive backing and any of the fluff-sources we just discussed.
5. Use a Free Audio App
If you’re recording on a smartphone, you can download a free app that will let you make adjustments to your audio as you record it. With the right app, you can adjust your gain (volume is how you control ‘output’ audio, and gain is for ‘input’ audio. By turning up your gain, you can make your mic more sensitive), tempo, and more. A lot of the time, your audio recording app will also let you edit your audio afterward.
Even if you’re not recording video from your smartphone, it might be a good idea to use your phone as your mic and record a separate audio file. You’ll be able to use an app to fine-tune your recording, and you can set your phone up closer to you the way you would an external mic while keeping your camera back a bit farther.
Free audio apps: Hi-Q MP3 Voice Recorder (Android), RecForge II (Android), Smart Voice Recorder (Android), Audio Memos (iOS), and Recorder Plus (iOS).
6. Do a Sound Check
Once you think you’ve got good audio set up – test it! You don’t want to do a whole video and find out when you play it back that your audio doesn’t sound good.
Do you have any of your own audio tips to pass on? Leave them in the comments!
This topic was suggested by RS Beauty over in the forums. Thanks for the idea!
Polish Your YouTube Videos with Filmora
As one of the most widely used video editing software in YouTube video editing, Filmora allows you to record voiceover and edit the recorded audio with mixer, equalizer and provides lots of templates and effects with an intuitive interface, which saves much time. Download the free trial version and get started now.


Richard Bennett
Richard Bennett is a writer and a lover of all things video.
Follow @Richard Bennett
Richard Bennett
Oct 26, 2023• Proven solutions
Audio quality is more important than video quality on YouTube. You’ve probably heard that before – viewers might forgive sub-par video quality if they’re interested in what you’re saying, but if it’s hard to understand what you’re saying they’ll click away.
Getting an external mic (even a $10 one-off Amazon ) is one of the best ways to improve your videos. That said, maybe your budget is $0. Or, maybe you just don’t happen to have a mic now and don’t want to wait to make videos. It could even be that you just don’t want to bother with an external mic.
Luckily, there are a lot of easy, free, things you can do to protect the quality of your audio recording even if you’re not using an external mic. Here are a few tips:
- 1. Keep Your Camera Close
- 2. Shoot Somewhere Quiet
- 3. Pick a Good Room
- 4. Protect your Built-In Mic from Wind
- 5. Use a Free Audio App
- 6. Do a Sound Check
1. Keep Your Camera Close (like, really close)
The biggest problem with the mic built into any camera or phone is just that, since it’s with the camera, it’s usually too far away from you. Built-in mics can record decent audio up close, but usually, your camera will be set up farther away from you than an external mic would be.
For example, your camera’s mic might be just as good as a clip-on LAV, but that LAV is right by your mouth and the camera is a couple of big steps away.
Moving your camera/smartphone physically closer to you will make it hard to include anything besides your head and shoulders in your shot, but it will get you significantly better audio.
2.Shoot Somewhere Quiet
The best way to limit the amount of background noise you pick up in your sound recording is to shoot somewhere where there’s no background noise. That probably seems really basic, but it’s something a lot of people just don’t do. It’s easy to default to recording in your home office, even though it’s right next to the kitchen where your family is bustling around, or in your bedroom even though there’s a busy street right outside your window.
Sometimes the best thing you can do for your audio is simply to scout out a quiet room in your house where the sound recording conditions are better. Speaking of recording conditions…
3. Pick a Good Room
There’s more that goes into picking a good room than how quiet it is. If you try to record in a room that’s too big your voice might sound to distant, and if you try to record in a room that’s too small your audio will be too echo-y. You need a room that’s just right.
You should also pay attention to what’s in the room you’re recording in. Avoid hard, reflective, surfaces like appliances and mirrors which your voice will bounce off of. The same conditions that make you sound great when you sing in the shower will – like recording in a small space -make your voiceover unpleasantly echo-y.
Look for a room that has a lot of soft things in it, like beds and sofas.
4. Protect your Built-In Mic from Wind
If you shoot outside, then the wind passing over your built-in mic will do terrible things to your audio. You can do a lot to counter-act this problem by physically blocking the wind.
There are a few ways to do this. If you’re doing hand-held shots you can partially cover your camera or phone’s mic with your finger. You don’t want to completely cover it/press down or your audio will be muffled. What you’re trying to do is create a barrier blocking out the wind.
On movie sets, they block out wind by covering the microphones with big fuzzy things called ‘dead cats’. You can also block out wind noise by attaching something fuzzy to your microphone. If your camera’s built-in mic is on front of it then you just need something big and fluffy you can loop around the lens. You can use a piece of a boa, a fuzzy novelty scrunchie – you can even murder a fuzzy stuffed animal! Do you have an old coat with a fuzz around the hood? That fuzz would do nicely.
The pompom used in this video cost $2, but you might already have something that would work!
If your built-in mic is on top of your camera you can get something called a ‘micromuff’. A micromuff is essentially a circular or rectangular piece of velcro with long strands of fluff on top. It’s open in the middle so it doesn’t actually cover your mic, but the surrounding fuzz blocks out the wind.
You use the adhesive backing to attach the base velcro to your camera. The other side of the velcro has your fluff attached to the back.
The only thing about a micromuff is that it costs about $30, and if you’re going to spend $30 on audio equipment then you could just buy yourself an inexpensive LAV mic. I only bring up the micromuff because it’s a very simple design you can probably DIY – you just need velcro with adhesive backing and any of the fluff-sources we just discussed.
5. Use a Free Audio App
If you’re recording on a smartphone, you can download a free app that will let you make adjustments to your audio as you record it. With the right app, you can adjust your gain (volume is how you control ‘output’ audio, and gain is for ‘input’ audio. By turning up your gain, you can make your mic more sensitive), tempo, and more. A lot of the time, your audio recording app will also let you edit your audio afterward.
Even if you’re not recording video from your smartphone, it might be a good idea to use your phone as your mic and record a separate audio file. You’ll be able to use an app to fine-tune your recording, and you can set your phone up closer to you the way you would an external mic while keeping your camera back a bit farther.
Free audio apps: Hi-Q MP3 Voice Recorder (Android), RecForge II (Android), Smart Voice Recorder (Android), Audio Memos (iOS), and Recorder Plus (iOS).
6. Do a Sound Check
Once you think you’ve got good audio set up – test it! You don’t want to do a whole video and find out when you play it back that your audio doesn’t sound good.
Do you have any of your own audio tips to pass on? Leave them in the comments!
This topic was suggested by RS Beauty over in the forums. Thanks for the idea!
Polish Your YouTube Videos with Filmora
As one of the most widely used video editing software in YouTube video editing, Filmora allows you to record voiceover and edit the recorded audio with mixer, equalizer and provides lots of templates and effects with an intuitive interface, which saves much time. Download the free trial version and get started now.
Richard Bennett
Richard Bennett is a writer and a lover of all things video.
Follow @Richard Bennett
Also read:
- [New] 2024 Approved Crimson Classic Codec
- [Updated] A Deeper Dive Into YouTube SEO and Keywords
- [Updated] In 2024, How to Elevate Your Social Influence The Six-Step Guide to Instagram Verified Status
- [Updated] In 2024, Unlocking YouTube Live Potential A Step-by-Step Guide
- 2024 Approved Become a KineMaster Meme Wizard
- 2024 Approved Lightning-Fast Windowed Image Viewer
- An Easy-to-Follow Guide to Applying CC License Types
- Dive Deep Into Designing Dynamic YouTube Live Thumbnails for 2024
- Harmonizing Hit Hits Building the Perfect YouTube Soundtrack
- Master the Art of Crypto Preservation: Top Tips by YL Computing's Specialists | YL Software
- Setting Up PS5 Friends' Access
- Title: Choosing the Best Camera for Filming Mirrorless or DSLR for 2024
- Author: Kevin
- Created at : 2025-02-04 00:13:36
- Updated at : 2025-02-10 20:12:34
- Link: https://youtube-videos.techidaily.com/choosing-the-best-camera-for-filming-mirrorless-or-dslr-for-2024/
- License: This work is licensed under CC BY-NC-SA 4.0.