
:max_bytes(150000):strip_icc()/how-to-send-a-spotify-playlist-5201669-dc4feee2c4884280949cdb9c39614796.jpg)
"Channel Your Creativity Convert YouTube Clips Into Dynamic Gifs for 2024"
Channel Your Creativity: Convert YouTube Clips Into Dynamic Gifs
How to Convert YouTube Videos to GIFs

Shanoon Cox
Mar 27, 2024• Proven solutions
A GIF adds an extra element to any conversation and makes the reader feel connected to the post. Using GIF can turn useful if done rightly. It narrates a story in a single animated image for social media conversation. In this article, we will brief you about how to convert YouTube to gif, various GIF converters, their uses, and the pros and cons of each converter.
Let’s get started!
How to Convert a YouTube Video into GIFs?
1. YouTube to GIF Directly
Here is a quick way to convert the YouTube video to GIFs without typing a YouTube to GIF website.
Gif.com is a free and easy-to-use video editor available with multiple effects. This converter was created keeping in mind how people spend hours and money on paid platforms.
Follow the below steps to convert a YouTube video into gifs.
- In the YouTube video page, add gif before youtube.com. For example, I want to convert the YouTube video https://www.youtube.com/watch?v=40fuGLmwHwk to GIFs, here is how it looks like after adding gif at the beginning: https://www.gifyoutube.com/watch?v=40fuGLmwHwk . Press the enter button on your keyboard and you will enter the gifs.com directly.

- In gifs.com, you can play and pause the YouTube video and drag the bar to select a desired moment for gif. Press the “Create Gif” button on the top right side to convert the specific part of the YouTube video to gif.
- You will then be directed to the result page to see your GIF created using the YouTube video, and you can change the GIF title and the tag.
- Lastly, you need to copy the link and share it!
Pros of converting YouTube to GIFs with Gifs.com:
- The interface is easy to use and it provides lots of tools to adjust.
- Simple functionality.
Cons:
- The watermark on your created GIF can be removed only after purchasing the premium version.
- GIFs can be downloaded only by registered users.
2. FreeGifMaker.me
FreeGifMaker is one simple online tool that allows the creation of animated Gifs for free. A minimum of two pictures has to be uploaded out of ten. It takes few seconds and is super easy to make a GIF from a YouTube video. You can use FreeGifMaker.me in some easy steps.
- Open the website http://freegifmaker.me/youtube-to-gif/ on your desktop.
- Go to YouTube and copy the video URL you want to create a GIF of and paste it on the website mentioned above.
- Then click “Load YouTube Video” below the URL and wait for a few seconds while the tool checks the video source.
- Once the YouTube video is loaded, enter the gif duration, start time, and click on the “Make a GIF button.” It will redirect you to the result page.
- Pros:
- Conversion size is unlimited**.**
- There is no usage of ads.
- Easy to make Gifs.
- Cons:
- The upload speed is slow.
- The converter gives limited options for editing.
3. Wondershare Online UniConverter
Online UniConverter converts video into a high-quality animated GIF and allows editing. It is a simple converter with unique features.
If you want to convert your YouTube video into a GIF, follow the steps.
- You need to upload your video through the “Choose Files” option. You can also copy the link from YouTube.
- Wait for some time once you upload the file; you can then set your start time, end time, frame rate according to your needs.
- Lastly, click on “Create GIF” and download your GIF. You can also save it through the dropdown option available besides “Download.”
- Pros:
- Easy to handle.
- A wide range of customization tools is available.
- Zero ads.
- Cons:
- Upload speed is slow.
- Conversion size is limited.
4. GifRun
It is a video maker that started in 2013, and GifRun converts videos from YouTube, Facebook, and other sources to high-quality GIFs. You can create Gifs free of cost from GifRun.
Here is how you can use Gifrun.
- Open the website and paste the URL you want to convert into Gif. Later, press “Get Video” option below the URL box.
- In this step, you can adjust the duration, start time, add text, and also pause and preview the video. Once you’re done altering the video, click “Create GIF.”
- Lastly, click on the “Download” button beside the add text button, or share the link directly.
- Pros:
- Fast conversion and download.
- There is no upload limit.
- The video preview feature is available.
- Cons:
- UI is ad-infested.
- Supports YouTube videos only.
5. Makeagif
This GIF converter creates high-quality GIFs in no time. You need to paste the URL in Makeagif and nothing much. It can make GIFs from Instagram, Facebook, Twitter, and other platforms easily.
The only issue is that it supports one type of conversion with a maximum limit of 25MB.
Here is how you can make your favorite GIF in few steps.
- Open makeagif.com and paste the YouTube URL in the box available.
- Once you paste the URL, the website will automatically take you to the edit page to edit GIF length, start time, speed, and add caption and stickers. The next step is to select the category to which the video belongs available on the left side of the screen.
- After editing, click on “Continue to publishing” then “Create GIF” at the lower right corner of the screen. Voila! Your GIF is ready to use.
- Pros:
- The UI is user-friendly.
- Ads are minimal
- Various GIF conversions are supported.
- Cons:
- The conversion size is small.
- Batch conversions are not available.
6. ImgFlip
It is a creative GIF website supporting various videos from other websites such as Vimeo and YouTube. ImgFlip has innovative customization tools for cropping, reshaping, adding text and, a lot more, but you just need to be aware of the ads.
Want to know how to create GIF? Go through these simple steps.
- You can make GIFs both from Video and Images. To make GIF from a video, paste the YouTube URL in the box at the top, upload the tape from your device’s file.
- After pasting the URL, you will be given lots of customization options. Choose the effect of your choice for your GIF.
- Lastly, click on “Generate GIF” available on the right side of the screen. You can now share the GIF via your device or download it.
- Pros:
- Plenty of customization options.
- Fast conversion.
- Easy to upload and use.
- Cons:
- Ads pop up frequently.
- Offline conversion is unavailable.
7. GIPHY
It is a free GIF converter that helps you download free YouTube GIFs. You can also make GIFs from your photos, videos available on your device along with video URLs and images. The only problem is, to use Giphy you first have to log in to the app.
Follow the below steps to create a GIF from YouTube videos with Giphy:
- Open Giphy on your device and click on “Create” on the top right-side of your screen.
- Paste the URL in the space given below. A pop-up will tell you to log in. Log in to the website to continue.
- The video you choose should be less than 15 seconds and under 100MB. You will be given editing options from which you can select the start time and duration of your GIF along with Captions and Tags.
- In the end, press the “Create GIF” button to make the GIF. When it’s done, you will be redirected to the GIF page. You can then share your GIF on any social media site.
- Pros:
- Ads are absent
- Uploading is fast
- Wide range of free GIFs available
- Cons:
- Not perfect for green hands
8. Imgur
It is one of the best apps that offers tons of images, memes, and GIFs. You can make GIFs of less than 60 seconds with high quality, which you can share anywhere.
Here are three easy steps to make GIFs
- Visit the page “imgur.com/vidgif” and paste your YouTube URL there.
- Set a start time by clicking or dragging on the timeline. The total runtime is also adjustable, with 60 seconds as the maximum time for GIFs.
- Lastly, press on “Create GIF” to see the magic. The GIF is converted from the YouTube video.
- Pros:
- The users can share the post of their choice
- Users can save posts.
- Great collection of short GIFs and videos.
- Cons:
- During loading, the screen flashes.
9 VEED.IO
Veed is a simple YouTube video converter that makes your work super easy. It converts YouTube videos into GIFs with various editing options like crop, trim, text ads, and many more.
Check out how to use VEED in 3 steps.
- Start by pasting the URL of your YouTube video into VEED, Your video will be ready to convert into GIF.
- Now you are all set to edit your video. You have the option to crop and trim the video. You can also include different font styles, colors, and sizes of your choice.
- Lastly, download the GIF you made in VEED.
- Pros:
- Downloading the software is not mandatory.
- UI is simple and easy to navigate.
- The subtitle option is present.
- Cons:
- It takes a lot of time to upload video.
- Many basic tools.
10. Kapwing
Kapwing is a helpful video converter that can easily turn any video into GIFs with a click. It can also convert different files such as 3GP, GIF, WEBM.
To create beautiful GIFs with this video editor, follow these easy steps.
- Open Kapwing video editor and upload your video from YouTube.
- Choose the “Export dropdown” option and choose the format you wish to convert.
You can also preview the GIF and customize it as per your choice.
- In the final step, export the video by clicking the “Export Video” button. Save and download the newly created GIF and share it anywhere with your friends.
- Pros:
- Great editing tools.
- Easy to use.
- Cons:
- Available only on the website.
- Too many tools for the same purpose.
Final Thoughts
With the increased use of GIFs on social media, you can now easily convert your favorite YouTube videos into GIFs on your own. All you have to do is simply choose the tools mentioned above and share it with your friends.
Shanoon Cox
Shanoon Cox is a writer and a lover of all things video.
Follow @Shanoon Cox
Shanoon Cox
Mar 27, 2024• Proven solutions
A GIF adds an extra element to any conversation and makes the reader feel connected to the post. Using GIF can turn useful if done rightly. It narrates a story in a single animated image for social media conversation. In this article, we will brief you about how to convert YouTube to gif, various GIF converters, their uses, and the pros and cons of each converter.
Let’s get started!
How to Convert a YouTube Video into GIFs?
1. YouTube to GIF Directly
Here is a quick way to convert the YouTube video to GIFs without typing a YouTube to GIF website.
Gif.com is a free and easy-to-use video editor available with multiple effects. This converter was created keeping in mind how people spend hours and money on paid platforms.
Follow the below steps to convert a YouTube video into gifs.
- In the YouTube video page, add gif before youtube.com. For example, I want to convert the YouTube video https://www.youtube.com/watch?v=40fuGLmwHwk to GIFs, here is how it looks like after adding gif at the beginning: https://www.gifyoutube.com/watch?v=40fuGLmwHwk . Press the enter button on your keyboard and you will enter the gifs.com directly.
- In gifs.com, you can play and pause the YouTube video and drag the bar to select a desired moment for gif. Press the “Create Gif” button on the top right side to convert the specific part of the YouTube video to gif.
- You will then be directed to the result page to see your GIF created using the YouTube video, and you can change the GIF title and the tag.
- Lastly, you need to copy the link and share it!
Pros of converting YouTube to GIFs with Gifs.com:
- The interface is easy to use and it provides lots of tools to adjust.
- Simple functionality.
Cons:
- The watermark on your created GIF can be removed only after purchasing the premium version.
- GIFs can be downloaded only by registered users.
2. FreeGifMaker.me
FreeGifMaker is one simple online tool that allows the creation of animated Gifs for free. A minimum of two pictures has to be uploaded out of ten. It takes few seconds and is super easy to make a GIF from a YouTube video. You can use FreeGifMaker.me in some easy steps.
- Open the website http://freegifmaker.me/youtube-to-gif/ on your desktop.
- Go to YouTube and copy the video URL you want to create a GIF of and paste it on the website mentioned above.
- Then click “Load YouTube Video” below the URL and wait for a few seconds while the tool checks the video source.
- Once the YouTube video is loaded, enter the gif duration, start time, and click on the “Make a GIF button.” It will redirect you to the result page.
- Pros:
- Conversion size is unlimited**.**
- There is no usage of ads.
- Easy to make Gifs.
- Cons:
- The upload speed is slow.
- The converter gives limited options for editing.
3. Wondershare Online UniConverter
Online UniConverter converts video into a high-quality animated GIF and allows editing. It is a simple converter with unique features.
If you want to convert your YouTube video into a GIF, follow the steps.
- You need to upload your video through the “Choose Files” option. You can also copy the link from YouTube.
- Wait for some time once you upload the file; you can then set your start time, end time, frame rate according to your needs.
- Lastly, click on “Create GIF” and download your GIF. You can also save it through the dropdown option available besides “Download.”
- Pros:
- Easy to handle.
- A wide range of customization tools is available.
- Zero ads.
- Cons:
- Upload speed is slow.
- Conversion size is limited.
4. GifRun
It is a video maker that started in 2013, and GifRun converts videos from YouTube, Facebook, and other sources to high-quality GIFs. You can create Gifs free of cost from GifRun.
Here is how you can use Gifrun.
- Open the website and paste the URL you want to convert into Gif. Later, press “Get Video” option below the URL box.
- In this step, you can adjust the duration, start time, add text, and also pause and preview the video. Once you’re done altering the video, click “Create GIF.”
- Lastly, click on the “Download” button beside the add text button, or share the link directly.
- Pros:
- Fast conversion and download.
- There is no upload limit.
- The video preview feature is available.
- Cons:
- UI is ad-infested.
- Supports YouTube videos only.
5. Makeagif
This GIF converter creates high-quality GIFs in no time. You need to paste the URL in Makeagif and nothing much. It can make GIFs from Instagram, Facebook, Twitter, and other platforms easily.
The only issue is that it supports one type of conversion with a maximum limit of 25MB.
Here is how you can make your favorite GIF in few steps.
- Open makeagif.com and paste the YouTube URL in the box available.
- Once you paste the URL, the website will automatically take you to the edit page to edit GIF length, start time, speed, and add caption and stickers. The next step is to select the category to which the video belongs available on the left side of the screen.
- After editing, click on “Continue to publishing” then “Create GIF” at the lower right corner of the screen. Voila! Your GIF is ready to use.
- Pros:
- The UI is user-friendly.
- Ads are minimal
- Various GIF conversions are supported.
- Cons:
- The conversion size is small.
- Batch conversions are not available.
6. ImgFlip
It is a creative GIF website supporting various videos from other websites such as Vimeo and YouTube. ImgFlip has innovative customization tools for cropping, reshaping, adding text and, a lot more, but you just need to be aware of the ads.
Want to know how to create GIF? Go through these simple steps.
- You can make GIFs both from Video and Images. To make GIF from a video, paste the YouTube URL in the box at the top, upload the tape from your device’s file.
- After pasting the URL, you will be given lots of customization options. Choose the effect of your choice for your GIF.
- Lastly, click on “Generate GIF” available on the right side of the screen. You can now share the GIF via your device or download it.
- Pros:
- Plenty of customization options.
- Fast conversion.
- Easy to upload and use.
- Cons:
- Ads pop up frequently.
- Offline conversion is unavailable.
7. GIPHY
It is a free GIF converter that helps you download free YouTube GIFs. You can also make GIFs from your photos, videos available on your device along with video URLs and images. The only problem is, to use Giphy you first have to log in to the app.
Follow the below steps to create a GIF from YouTube videos with Giphy:
- Open Giphy on your device and click on “Create” on the top right-side of your screen.
- Paste the URL in the space given below. A pop-up will tell you to log in. Log in to the website to continue.
- The video you choose should be less than 15 seconds and under 100MB. You will be given editing options from which you can select the start time and duration of your GIF along with Captions and Tags.
- In the end, press the “Create GIF” button to make the GIF. When it’s done, you will be redirected to the GIF page. You can then share your GIF on any social media site.
- Pros:
- Ads are absent
- Uploading is fast
- Wide range of free GIFs available
- Cons:
- Not perfect for green hands
8. Imgur
It is one of the best apps that offers tons of images, memes, and GIFs. You can make GIFs of less than 60 seconds with high quality, which you can share anywhere.
Here are three easy steps to make GIFs
- Visit the page “imgur.com/vidgif” and paste your YouTube URL there.
- Set a start time by clicking or dragging on the timeline. The total runtime is also adjustable, with 60 seconds as the maximum time for GIFs.
- Lastly, press on “Create GIF” to see the magic. The GIF is converted from the YouTube video.
- Pros:
- The users can share the post of their choice
- Users can save posts.
- Great collection of short GIFs and videos.
- Cons:
- During loading, the screen flashes.
9 VEED.IO
Veed is a simple YouTube video converter that makes your work super easy. It converts YouTube videos into GIFs with various editing options like crop, trim, text ads, and many more.
Check out how to use VEED in 3 steps.
- Start by pasting the URL of your YouTube video into VEED, Your video will be ready to convert into GIF.
- Now you are all set to edit your video. You have the option to crop and trim the video. You can also include different font styles, colors, and sizes of your choice.
- Lastly, download the GIF you made in VEED.
- Pros:
- Downloading the software is not mandatory.
- UI is simple and easy to navigate.
- The subtitle option is present.
- Cons:
- It takes a lot of time to upload video.
- Many basic tools.
10. Kapwing
Kapwing is a helpful video converter that can easily turn any video into GIFs with a click. It can also convert different files such as 3GP, GIF, WEBM.
To create beautiful GIFs with this video editor, follow these easy steps.
- Open Kapwing video editor and upload your video from YouTube.
- Choose the “Export dropdown” option and choose the format you wish to convert.
You can also preview the GIF and customize it as per your choice.
- In the final step, export the video by clicking the “Export Video” button. Save and download the newly created GIF and share it anywhere with your friends.
- Pros:
- Great editing tools.
- Easy to use.
- Cons:
- Available only on the website.
- Too many tools for the same purpose.
Final Thoughts
With the increased use of GIFs on social media, you can now easily convert your favorite YouTube videos into GIFs on your own. All you have to do is simply choose the tools mentioned above and share it with your friends.
Shanoon Cox
Shanoon Cox is a writer and a lover of all things video.
Follow @Shanoon Cox
Resolved: Disappearing YouTube Bite Sizes
How to Fix the YouTube Shorts Not Showing Up Issue?

Liza Brown
Oct 26, 2023• Proven solutions
Well, a YouTube Shorts is said to be YouTube’s short-form answer to TikTok. You can quickly scroll via algorithmically-driven feed, discover other similar short videos, and subscribe to your favorite creators.
Here, creators can record, share, and edit short-form video content that’s 60 seconds or less and vertically oriented. And, unlike Instagram stories, YouTube Shorts won’t disappear but will remain on your channel. So, that’s the brief intro of YouTube Shorts which we think everyone is aware of after YouTube has announced its YouTube Shorts availability globally.
However, certain factors are still there, raising the issue or concern of YouTube Shorts not showing. Thus, if you can’t find the YouTube Shorts option or videos, or YouTube Shorts disappeared, find a solution in this post.
Part 1: Why Do YouTube Shorts Not Showing Up?
There could be multiple reasons why YouTube Shorts not showing on your phone, the channel’s home page etc.
Besides, many scenarios arise with this issue, namely the YouTube Shorts option not showing up, the YouTube Shorts button missing, and YouTube Shorts videos not showing correctly.
And, there are valid reasons as well as to why these situations are happening to you. So, let’s discuss each of them separately in brief, along with the solutions in the next section.
- YouTube Shorts are not showing on the channel’s homepage
The standard and the most common reason why YouTube Shorts are not showing on the channel’s homepage is that you have not updated the YouTube app.
- YouTube Shorts option not showing up
This may be happening either because you’ve not updated the app or your internet connection is pretty slow to show you the option. There could be another reason as you may not have cleared the YouTube mobile app’s cache and data.
- YouTube Shorts button missing
Again, you may not have updated the YouTube app, or your internet connection is slow is the most common reason here. Moreover, the button of YouTube Shorts stays hidden behind the +icon.
- YouTube Shorts videos not showing correctly
The most valid reason for YouTube Shorts not showing correctly or YouTube Shorts disappearing is that you have a poor internet connection. Plus, we’ve discussed proper steps below if you’ve missed something while uploading the YouTube Shorts triggering this scenario.
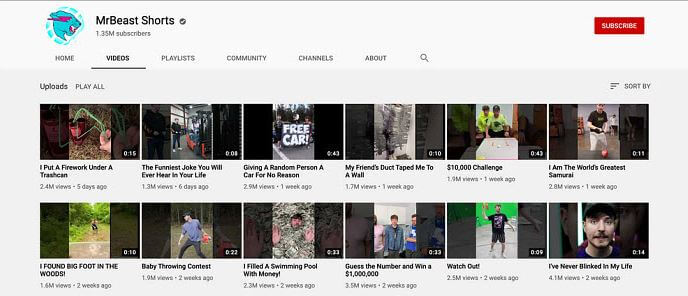
Before we move on to fixing YouTube Shorts not showing the issue, here’s a quick note on which videos qualify as YouTube Shorts. Shorts are different from YouTube stories. Unlike YouTube stories, it gets displayed in your regular channel feed along with your other YouTube videos.
And, you must note that a YouTube Shorts video consists of two criteria as follows.
- The video has to be vertical (portrait-style)
- The video must be 60 seconds or less
Part 2: How to Fix YouTube Shorts Not Showing Up?
Here’s the section covering fixes on YouTube Shorts not showing. Please give it a read and resolve your issue happily!
Fix 1: Update the YouTube App
As we’ve already discussed above, check if your YouTube mobile app has the latest version. The newest version of the YouTube mobile app (Version: 16.17.36) has a dedicated Shorts button at the bottom. And, it replaces the Trending button from the YouTube app.
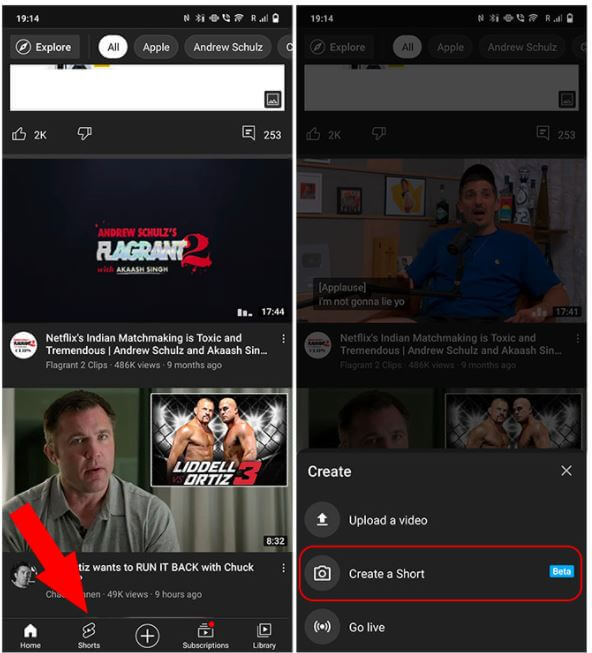
Moreover, the option to upload Shorts is now hidden behind the + icon. Tap on the + icon and hit the Create a Short option.
Fix 2: Check If Shorts Is Available in Your Country
Now, YouTube Shorts is available globally, but there was a phase when YouTube Shorts was a beta feature. It was only available in India and the US, which could be why you could not view Shorts in the YouTube app.
Fix 3: YouTube Shorts Is Mobile-only
As of now, YouTube Shorts is only available on a smartphone because it’s still in beta version. However, you can create Shorts via smartphone and the camera option in YouTube mobile app. Hence, there’s no point in searching for Shorts on your computer.
You can upload Shorts videos from your laptop. The entire process is similar to uploading a regular video. However, you have to mention #Shorts in the title and description to differentiate it as a Shorts video.
Common Fixes to YouTube Shorts Not Working
- Update the YouTube App to the latest version.
- Clear the YouTube mobile app’s data and cache.
- Check if your internet is connected or your internet connection is strong.
- Restart your smartphone and try again.
- The YouTube server can be down, busy, or under maintenance. Wait for a while and try again.
The fixes above are also applicable if the YouTube Shorts are not showing on iPhone as well.
Or, you can try the VPN solution before contacting the YouTube team.
If Videos Are Not Visible under YouTube Shorts
Solution 1: Ensure that you’ve added #shorts in the title and description. Those who have YouTube Shorts, they can make shorts videos via the Shorts camera. Those who can’t access this camera can also upload their current vertical videos that are less than 60 seconds after adding the hashtag #Shorts in the title or description.
All in all, you must include #shorts to let the YouTube algorithm figure out the video is created for Shorts, and the issue of YouTube Shorts not showing up will also be resolved.
Solution 2: Sometimes, you may not find YouTube Shorts videos if they’re precisely 60 seconds in duration because YouTube sometimes adds 1-2 seconds to a Shorts video for some reason. So, be alert here and ensure your Shorts video is around 58 seconds or less.
Solution 3: If your YouTube Shorts is not getting views, you need to wait more here because it takes a while for YouTube to index a Shorts video and suggest them to people. So, it’s the task of the algorithm that varies from person to person. Some Shorts videos take several days while others take weeks.
If YouTube Shorts Videos Are Not Showing up Correctly
Once uploaded, the YouTube Shorts will be displayed in a vertical thumbnail on YouTube and other regular content already there in your account. Or, it’s your choice to create a new channel for the YouTube shorts videos. If the YouTube shorts not showing correctly, you can try as follows:
Step 1. Go to your channel and select the “customize channel” option.
Step 2. Hop on to the Featured section, and choose the add section.
Step 3. You’ll see shorts videos under the “videos” section. Click that, and the videos you have which are tagged in with #shorts in the title or description will automatically display here.
Bonus Tip: How to Easily Create Vertical Videos for YouTube Shorts on PC
The YouTube Shorts app is pretty convenient to use nowadays. However, it doesn’t allow you to fine-edit the videos if you’ve explored the app or specifically when you want your videos to look more professional. The app doesn’t even have many filtering options, such as Effects, Elements, etc., to make your videos more interactive.
With that said, you can always use an efficient third-party program like Wondershare Filmora to create professional-looking YouTube Shorts videos to engage your viewers highly. Even no famous YouTuber uploads their videos directly from the app without using any third-party tool.
We recommend Wondershare Filmora because it is a production and post-production app available for Windows and Mac computers. It gives tough competition to some globally renowned tools like Final Cut Pro X, Adobe Premiere Pro, etc., because of its simplicity. Furthermore, Filmora has its inbuilt screen, voice recording features, and webcam that can be useful to create game walkthroughs, interactive videos, and voiceovers as needed.


Moreover, a YouTube Shorts video can be made through Wondershare Filmora using the below-mentioned guide.
Note: We are assuming that you have already recorded a vertical video using your smartphone and that it has been transferred to your PC.
So, the signature feature to create YouTube Shorts videos on Wondershare Filmora is Auto Reframe.
Powered by AI technology, Auto Reframe automatically identifies the focal point of your video and crops it while always maintaining it within the frame. This way, the main object or action in your video never goes out of vision.
You can choose an aspect ratio that best fits YouTube Shorts which is 9:16.
How to Use Auto Reframe in Filmora?
Step 1. Open Filmora and Select Auto Reframe
You can choose among three ways to open the Auto Reframe feature in Filmora.
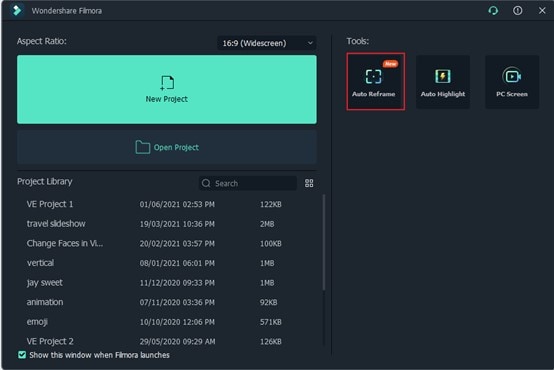
* **Way 1:** Once you open Filmora, the main interface will display the **Auto Reframe** tab on the right-hand panel. Click it to open directly
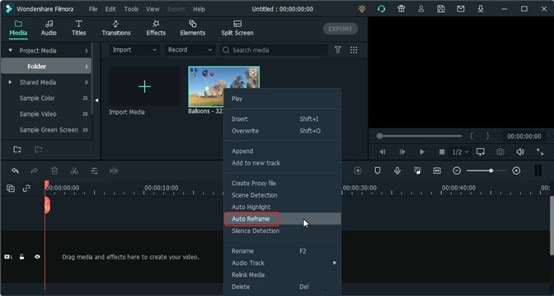
- Way 2: Import media as File > Import Media Files and select the file. After you import the media, right-click and choose the Auto Reframe.
- Way 3: Lastly, you can choose the Tools option on the top menu bar and hit the Auto Reframe.

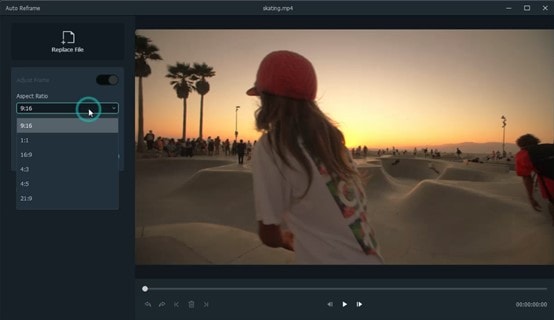
Step 2. Adjust the Aspect Ratio and Motion Speed
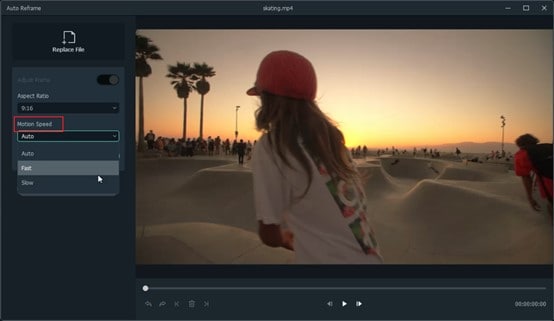
A separate dialog box will display once you have selected the Auto Reframe option. Now, click on Import Media and choose a single video to import. You can change the imported video by hitting the Replace File at the top menu.
There are multiple aspect ratio templates available such as square (1:1), vertical (9:16), standard (4:3), widescreen (16:9), and cinema (21:9). As you are making YouTube Shorts, so you need to select 9:16.
You can adjust the speed of your video in multiple options: keep it at Auto or make it Slow or Fast as per your requirements.
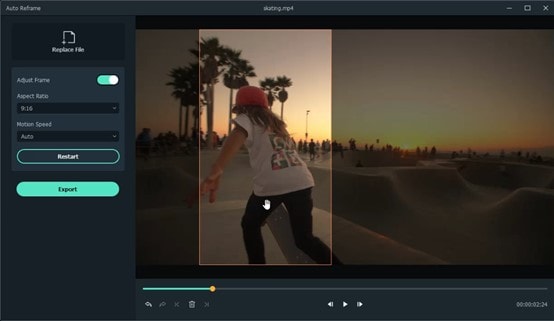
Step 3. Analyze, and Auto Reframe the Video
Once you finish the above adjustments, hit the Analysis tab. Filmora will take a few seconds to finish analyzing your video project.
Then the video will be automatically and quickly reframed to your specified speed and aspect ratio. You can modify these aspect ratios and speed options by hitting the Restart option as well.
Step 4. Preview the Reframed Video and Check
Lastly, you can preview your final video. If the video needs more work, you can also play and pause it at the point you want to adjust the frame. You can use Next Edit Point, Undo, Redo, and Previous Edit Point at the bottom panel.
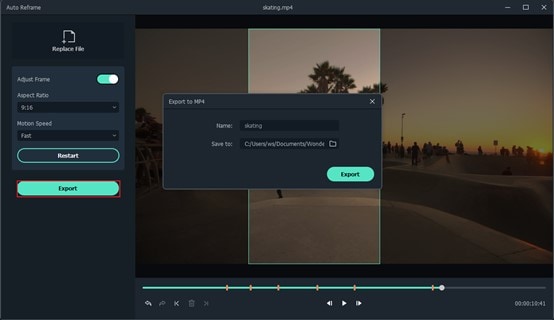
Step 5. Export the Reframed Video
Finally, after all the final adjustments, you can hit the Export tab, name your file and choose the destination folder.
Part 3: FAQs about YouTube Shorts
1. Where to download the YouTube Shorts app?
The YouTube Shorts app is currently available in the YouTube app that your iOS or Android smartphone has. To access it, sign in to your Google account, tap the + button at the bottom, and select the Create a Short option in the popup box that shows off.
2. What’s the YouTube Shorts video duration?
A YouTube Shorts video can be of only up to 60 seconds.
3. Can I Upload Shorts Video on Computer?
Yes. You can upload a Short video by following the traditional method.
- Click the Create camera icon on your PC.
- Click on Upload Videos.
- Locate the file on the PC you want to upload, and you are all done.
However, the option best works in smartphones, and still, if you are uploading through a laptop or PC, make sure to add #shorts in the title or description of the uploaded video.
4. What’s the YouTube Shorts size limitation?
YouTube hasn’t provided any information related to this as of now. However, you can rest assured that a 60 seconds long video file wouldn’t be too large for YouTube to handle.
5. How many subs do you need to access Shorts?
YouTube Shorts is available for everyone no matter how many subscribers the YouTube channel has.
6. Can you make money on Shorts?
Short-form video creators do not share revenue from advertisements played in the Shorts player right now. Instead, start the YouTube Shorts Fund, a $100M fund for creators that helps build the future of short-form video on YouTube.
Conclusion
Hopefully, you have resolved the concern of YouTube Shorts not showing. You can access your total dose of entertainment by getting the YouTube Shorts through our editing tips mentioned in the last section.
However, we’ve mainly defined the editing part of Wondershare Filmora except creating YouTube Shorts through its Auto Reframe feature. But, as you go through Filmora, you will find that editing is not a cumbersome task to follow over this platform. It’s the easiest!
Liza Brown
Liza Brown is a writer and a lover of all things video.
Follow @Liza Brown
Liza Brown
Oct 26, 2023• Proven solutions
Well, a YouTube Shorts is said to be YouTube’s short-form answer to TikTok. You can quickly scroll via algorithmically-driven feed, discover other similar short videos, and subscribe to your favorite creators.
Here, creators can record, share, and edit short-form video content that’s 60 seconds or less and vertically oriented. And, unlike Instagram stories, YouTube Shorts won’t disappear but will remain on your channel. So, that’s the brief intro of YouTube Shorts which we think everyone is aware of after YouTube has announced its YouTube Shorts availability globally.
However, certain factors are still there, raising the issue or concern of YouTube Shorts not showing. Thus, if you can’t find the YouTube Shorts option or videos, or YouTube Shorts disappeared, find a solution in this post.
Part 1: Why Do YouTube Shorts Not Showing Up?
There could be multiple reasons why YouTube Shorts not showing on your phone, the channel’s home page etc.
Besides, many scenarios arise with this issue, namely the YouTube Shorts option not showing up, the YouTube Shorts button missing, and YouTube Shorts videos not showing correctly.
And, there are valid reasons as well as to why these situations are happening to you. So, let’s discuss each of them separately in brief, along with the solutions in the next section.
- YouTube Shorts are not showing on the channel’s homepage
The standard and the most common reason why YouTube Shorts are not showing on the channel’s homepage is that you have not updated the YouTube app.
- YouTube Shorts option not showing up
This may be happening either because you’ve not updated the app or your internet connection is pretty slow to show you the option. There could be another reason as you may not have cleared the YouTube mobile app’s cache and data.
- YouTube Shorts button missing
Again, you may not have updated the YouTube app, or your internet connection is slow is the most common reason here. Moreover, the button of YouTube Shorts stays hidden behind the +icon.
- YouTube Shorts videos not showing correctly
The most valid reason for YouTube Shorts not showing correctly or YouTube Shorts disappearing is that you have a poor internet connection. Plus, we’ve discussed proper steps below if you’ve missed something while uploading the YouTube Shorts triggering this scenario.
Before we move on to fixing YouTube Shorts not showing the issue, here’s a quick note on which videos qualify as YouTube Shorts. Shorts are different from YouTube stories. Unlike YouTube stories, it gets displayed in your regular channel feed along with your other YouTube videos.
And, you must note that a YouTube Shorts video consists of two criteria as follows.
- The video has to be vertical (portrait-style)
- The video must be 60 seconds or less
Part 2: How to Fix YouTube Shorts Not Showing Up?
Here’s the section covering fixes on YouTube Shorts not showing. Please give it a read and resolve your issue happily!
Fix 1: Update the YouTube App
As we’ve already discussed above, check if your YouTube mobile app has the latest version. The newest version of the YouTube mobile app (Version: 16.17.36) has a dedicated Shorts button at the bottom. And, it replaces the Trending button from the YouTube app.
Moreover, the option to upload Shorts is now hidden behind the + icon. Tap on the + icon and hit the Create a Short option.
Fix 2: Check If Shorts Is Available in Your Country
Now, YouTube Shorts is available globally, but there was a phase when YouTube Shorts was a beta feature. It was only available in India and the US, which could be why you could not view Shorts in the YouTube app.
Fix 3: YouTube Shorts Is Mobile-only
As of now, YouTube Shorts is only available on a smartphone because it’s still in beta version. However, you can create Shorts via smartphone and the camera option in YouTube mobile app. Hence, there’s no point in searching for Shorts on your computer.
You can upload Shorts videos from your laptop. The entire process is similar to uploading a regular video. However, you have to mention #Shorts in the title and description to differentiate it as a Shorts video.
Common Fixes to YouTube Shorts Not Working
- Update the YouTube App to the latest version.
- Clear the YouTube mobile app’s data and cache.
- Check if your internet is connected or your internet connection is strong.
- Restart your smartphone and try again.
- The YouTube server can be down, busy, or under maintenance. Wait for a while and try again.
The fixes above are also applicable if the YouTube Shorts are not showing on iPhone as well.
Or, you can try the VPN solution before contacting the YouTube team.
If Videos Are Not Visible under YouTube Shorts
Solution 1: Ensure that you’ve added #shorts in the title and description. Those who have YouTube Shorts, they can make shorts videos via the Shorts camera. Those who can’t access this camera can also upload their current vertical videos that are less than 60 seconds after adding the hashtag #Shorts in the title or description.
All in all, you must include #shorts to let the YouTube algorithm figure out the video is created for Shorts, and the issue of YouTube Shorts not showing up will also be resolved.
Solution 2: Sometimes, you may not find YouTube Shorts videos if they’re precisely 60 seconds in duration because YouTube sometimes adds 1-2 seconds to a Shorts video for some reason. So, be alert here and ensure your Shorts video is around 58 seconds or less.
Solution 3: If your YouTube Shorts is not getting views, you need to wait more here because it takes a while for YouTube to index a Shorts video and suggest them to people. So, it’s the task of the algorithm that varies from person to person. Some Shorts videos take several days while others take weeks.
If YouTube Shorts Videos Are Not Showing up Correctly
Once uploaded, the YouTube Shorts will be displayed in a vertical thumbnail on YouTube and other regular content already there in your account. Or, it’s your choice to create a new channel for the YouTube shorts videos. If the YouTube shorts not showing correctly, you can try as follows:
Step 1. Go to your channel and select the “customize channel” option.
Step 2. Hop on to the Featured section, and choose the add section.
Step 3. You’ll see shorts videos under the “videos” section. Click that, and the videos you have which are tagged in with #shorts in the title or description will automatically display here.
Bonus Tip: How to Easily Create Vertical Videos for YouTube Shorts on PC
The YouTube Shorts app is pretty convenient to use nowadays. However, it doesn’t allow you to fine-edit the videos if you’ve explored the app or specifically when you want your videos to look more professional. The app doesn’t even have many filtering options, such as Effects, Elements, etc., to make your videos more interactive.
With that said, you can always use an efficient third-party program like Wondershare Filmora to create professional-looking YouTube Shorts videos to engage your viewers highly. Even no famous YouTuber uploads their videos directly from the app without using any third-party tool.
We recommend Wondershare Filmora because it is a production and post-production app available for Windows and Mac computers. It gives tough competition to some globally renowned tools like Final Cut Pro X, Adobe Premiere Pro, etc., because of its simplicity. Furthermore, Filmora has its inbuilt screen, voice recording features, and webcam that can be useful to create game walkthroughs, interactive videos, and voiceovers as needed.
Moreover, a YouTube Shorts video can be made through Wondershare Filmora using the below-mentioned guide.
Note: We are assuming that you have already recorded a vertical video using your smartphone and that it has been transferred to your PC.
So, the signature feature to create YouTube Shorts videos on Wondershare Filmora is Auto Reframe.
Powered by AI technology, Auto Reframe automatically identifies the focal point of your video and crops it while always maintaining it within the frame. This way, the main object or action in your video never goes out of vision.
You can choose an aspect ratio that best fits YouTube Shorts which is 9:16.
How to Use Auto Reframe in Filmora?
Step 1. Open Filmora and Select Auto Reframe
You can choose among three ways to open the Auto Reframe feature in Filmora.
* **Way 1:** Once you open Filmora, the main interface will display the **Auto Reframe** tab on the right-hand panel. Click it to open directly
- Way 2: Import media as File > Import Media Files and select the file. After you import the media, right-click and choose the Auto Reframe.
- Way 3: Lastly, you can choose the Tools option on the top menu bar and hit the Auto Reframe.
Step 2. Adjust the Aspect Ratio and Motion Speed
A separate dialog box will display once you have selected the Auto Reframe option. Now, click on Import Media and choose a single video to import. You can change the imported video by hitting the Replace File at the top menu.
There are multiple aspect ratio templates available such as square (1:1), vertical (9:16), standard (4:3), widescreen (16:9), and cinema (21:9). As you are making YouTube Shorts, so you need to select 9:16.
You can adjust the speed of your video in multiple options: keep it at Auto or make it Slow or Fast as per your requirements.
Step 3. Analyze, and Auto Reframe the Video
Once you finish the above adjustments, hit the Analysis tab. Filmora will take a few seconds to finish analyzing your video project.
Then the video will be automatically and quickly reframed to your specified speed and aspect ratio. You can modify these aspect ratios and speed options by hitting the Restart option as well.
Step 4. Preview the Reframed Video and Check
Lastly, you can preview your final video. If the video needs more work, you can also play and pause it at the point you want to adjust the frame. You can use Next Edit Point, Undo, Redo, and Previous Edit Point at the bottom panel.
Step 5. Export the Reframed Video
Finally, after all the final adjustments, you can hit the Export tab, name your file and choose the destination folder.
Part 3: FAQs about YouTube Shorts
1. Where to download the YouTube Shorts app?
The YouTube Shorts app is currently available in the YouTube app that your iOS or Android smartphone has. To access it, sign in to your Google account, tap the + button at the bottom, and select the Create a Short option in the popup box that shows off.
2. What’s the YouTube Shorts video duration?
A YouTube Shorts video can be of only up to 60 seconds.
3. Can I Upload Shorts Video on Computer?
Yes. You can upload a Short video by following the traditional method.
- Click the Create camera icon on your PC.
- Click on Upload Videos.
- Locate the file on the PC you want to upload, and you are all done.
However, the option best works in smartphones, and still, if you are uploading through a laptop or PC, make sure to add #shorts in the title or description of the uploaded video.
4. What’s the YouTube Shorts size limitation?
YouTube hasn’t provided any information related to this as of now. However, you can rest assured that a 60 seconds long video file wouldn’t be too large for YouTube to handle.
5. How many subs do you need to access Shorts?
YouTube Shorts is available for everyone no matter how many subscribers the YouTube channel has.
6. Can you make money on Shorts?
Short-form video creators do not share revenue from advertisements played in the Shorts player right now. Instead, start the YouTube Shorts Fund, a $100M fund for creators that helps build the future of short-form video on YouTube.
Conclusion
Hopefully, you have resolved the concern of YouTube Shorts not showing. You can access your total dose of entertainment by getting the YouTube Shorts through our editing tips mentioned in the last section.
However, we’ve mainly defined the editing part of Wondershare Filmora except creating YouTube Shorts through its Auto Reframe feature. But, as you go through Filmora, you will find that editing is not a cumbersome task to follow over this platform. It’s the easiest!
Liza Brown
Liza Brown is a writer and a lover of all things video.
Follow @Liza Brown
Also read:
- Ensuring Correct Ad Revenue A Comprehensive Guide to YT Channel Earnings
- Access a World of Content Anywhere, Anyplace with the Leading 6 Best and Cost-Free Tools to Download YouTubes' Short Videos
- [New] Capture YouTube in Full - Free Screencast Tutorials You Need Right Now
- Elevate Video Playback Embrace the Power of AV1 in YouTube
- 2024 Approved Essentials of YouTube Mastery Free Online Course Series
- In 2024, Decoding the Revised YouTube Earnings Criteria
- In 2024, Emulate Video Success Gaining YouTube Confidence Skills
- Chuckling Chords & Clever Cuts 10 Parody Classics
- Explore 10 YouTube Creators Accelerating Their Popularity
- 1K+ Followers in a Flash The YouTube Ultimate Playbook
- YT Buzz Top Music Video Responses & Why They Roar
- [Updated] A Filmmaker's Approach to YouTube Splitscreen Videos
- Turn Video to Sound YouTube to MP3 with AppleOS
- Enhance Smarts with These Premier 15 Science YTs
- Strategies for Creating Highly Engaging Video Titles
- 2024 Approved Achieving Excellence in Work and Online Content
- In 2024, Comparing the Costs and Advantages of Various YouTube Plans
- In 2024, Bridging the Gap YouTube Editing Mastered in iMovie Workflows
- Elevate Your Filming Flair with Free Green Screen Insights From 4 YouTube Authorities for 2024
- In 2024, Creative Command Center Studio for YouTubers
- [New] Boost Your Video's Popularity on YouTube
- A Comprehensive Look at Editing and Uploading Virtual Reality Videos to YouTube
- Maximize Your YouTube Income with Effective Mobile Device Strategies
- [New] Bringing Your Video Games to Life Customizable Channel Headers
- Cutting-Edge Techniques in YouTube Ad Design
- Mastering Mobile Easy Steps for Launching Personal/Business YouTube Channels
- 2024 Approved Smooth Path From Instagram Visuals to Mp3 Sound
- New 2024 Approved PowerDirector Alternatives for Mobile Top-Rated Video Editors
- [New] The Comprehensible Guide to WinCams' Bests
- In 2024, Step-by-Step Laptop ScreenRecord Guide
- [Updated] In 2024, Designer's Guide Crafting an Individualistic Keyword for TikTok
- Full Guide on Mirroring Your Xiaomi Redmi Note 13 Pro 5G to Your PC/Mac | Dr.fone
- [Updated] Brain Benders Await at the Best Room Sanctuaries for 2024
- 2024 Approved Elite HD Video Capture Software Listings
- Effective Guide to Cast Apple iPhone XS to MacBook without Hindrance | Dr.fone
- [New] Accelerate Creativity Pro-Level LunaPic Techniques Unveiled
- Different Methods To Unlock Your Apple iPhone 14 Pro Max
- 2024 Approved How to Make Animated Videos for Business – an Ultimate Guide
- Mastering Audio Balance Achieving Consistent Volume Levels with VLC Media Player
- Laying the Foundation of Zoom Room Use for 2024
- CatchEmAll Celebrate National Pokémon Day with Virtual Location On Motorola Moto G73 5G | Dr.fone
- Top 16 Best Free Movie Makers Easy to Use for 2024
- Paint Picture Humor
- [New] The Essential Guide Crafting a Standout Discord Profile with Custom Emojis for 2024
- [Updated] Demystifying Instagram's Videography Restrictions for 2024
- Title: "Channel Your Creativity Convert YouTube Clips Into Dynamic Gifs for 2024"
- Author: Kevin
- Created at : 2024-05-25 14:48:40
- Updated at : 2024-05-26 14:48:40
- Link: https://youtube-videos.techidaily.com/channel-your-creativity-convert-youtube-clips-into-dynamic-gifs-for-2024/
- License: This work is licensed under CC BY-NC-SA 4.0.
