
:max_bytes(150000):strip_icc()/markus-winkler-IrRbSND5EUc-unsplash-9edfd76b5a84442885dd247c033445a4.jpg)
Channel Trailers that Convert Viewers Into Customers
Channel Trailers that Convert Viewers Into Customers
How to Create a YouTube Channel Trailer to Increase Revenue

Richard Bennett
Mar 27, 2024• Proven solutions
Many YouTube content creators assume that no one checks out their channel trailer . Some may not even know about the concept of a trailer, while others are not sure how to create one. We will explain the concept of a YouTube channel trailer, how to make a great trailer, and how to get more subscribers and views through a quality trailer on your YouTube channel.
- Part1: What is a YouTube Channel Trailer
- Part2: How to Add YouTube Trailer to Channel
- Part3: Best YouTube Trailer Maker
- Part4: 5 Tips for Creating a Great Trailer
Part 1: What is a YouTube Channel Trailer?
Think of a channel trailer as an introduction to a movie or television show. You can choose to show the trailer to anyone who is not subscribe to your channel, when they land on your channel page.
The objective of a trailer is to hook the audience, promote your personality and content, and convince them it will be worth their time to check out some of your videos. And you must do all these things within 30 to 45 seconds !
Most content creators can benefit from creating a channel trailer. Unless you are a famous personality through a sports/acting/television/singing career, people who land on your channel may have no idea who you are. A proper trailer gives them an introduction to your personality and content.
Part 2: How to Add YouTube Trailer to Channel
After you know how to create a YouTube trail, why not add your new created trailer to YouTube channel right now. Here is the right steps.
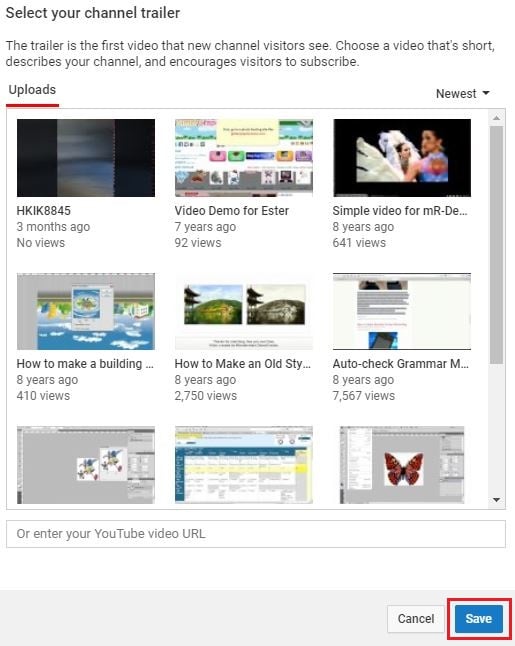
Step 1: Go to channel
Log in your YouTube account. Then click your users icon to find My channel. At the top right corner, click CUSTOMIZE CHANNEL and then choose For new visitors.
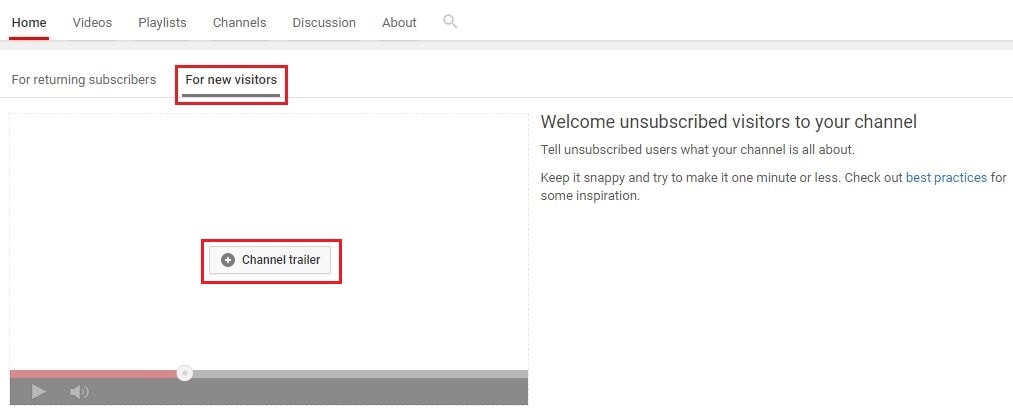
Step 2: Add trailer to YouTube
After clicking plus icon in the middle to add your amazing trailer, a playlist window will appear. Now select the trailer you want to use. Click Save. Then you will see a trailer is added. You can also change trailer or remove trailer.
Part 3: Best Channel YouTube Trailer Maker
1. Wondershare Filmora
Searching for a free and powerful video editing tool that you can use on both Windows and Mac computers? Wondershare Filmora may be the ideal program for you. It is very easy to use, even for beginners who do not have that much editing experience.
Features:
- It is free and very easy to add captions to the trailer video.
- There are many interesting options for adding video effects within the program.
- It features a modern interface that is intuitive and easy to operate. All the important controls and settings are easily accessible through the menus and submenus.
- The program operates smoothly, even on older machines.


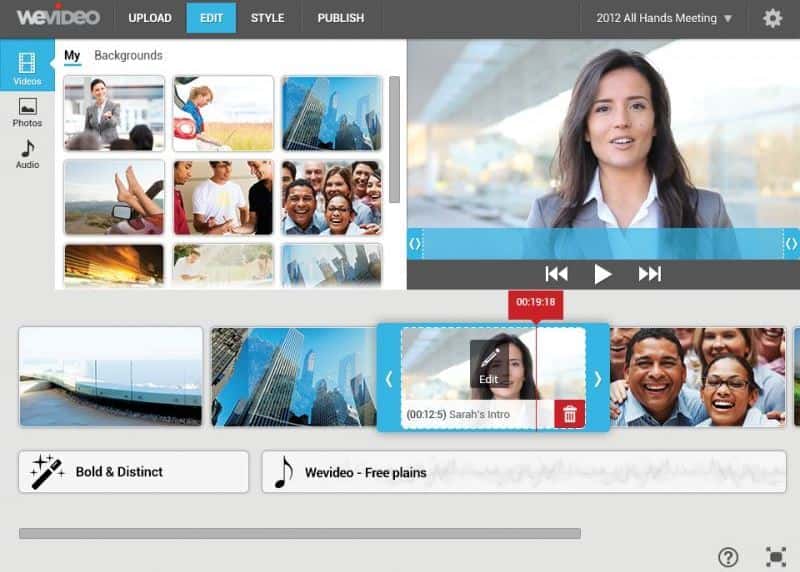
2. WeVideo
Hoping to edit content while you are on the go? By using a less powerful laptop, library computer or a friend’s device, you could edit your trailer within a couple hours. WeVideo is an online video editor that makes it so easy to edit videos in up to 4K resolution.
Features:
- The program is fast and very easy to use. It does not even require any downloads.
- As it is an online program, there are no compatibility issues with Windows, Mac or even Chromebook devices.
- It is possible to mix and match up to 600 different formats for graphics, audio, video and other effects.
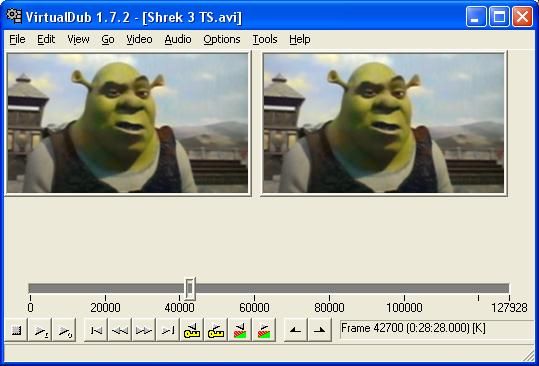
3. Virtual Dub
If you are seeking something that is open source and free, you may be interested in Virtual Dub. It is a completely free and open source program that you can use for quick capturing, encoding and editing video.
While it is not going to give you the same power and options as some of the other editors, it is a very simple tool that can be effective for specific use cases. If you are just hoping to record, encode and quickly put together a 30 second YouTube trailer, it is the ideal program.
Features:
- Offers the ability to capture videos on Windows, Mac and Linux computers.
- Works best with AVI files, but it is possible to use other video formats such as MKV and MP4 as well.
- It is possible to create video using a series of image files - or merge image files into existing video content.
Part 4: 5 Tips for Creating a Great Trailer
1. Let Viewers Know What is Coming
People appreciate routine. You can mention how many times a week you create content and the days when you publish. You can also have a brief overview of the type of videos you make, which will tell a new viewer what to expect if they subscribe to your channel!
2. Keep It Short
YouTube trailers that are more than a minute long will not succeed. People have a very short attention span. They want to be hooked immediately. 30 to 45 seconds is the sweet spot, with 30 seconds preferable! It may sound overwhelming to condense everything about your channel into 30 seconds, but that is where a great video script can help! However, sometimes both short videos and long videos work.
3. Use Some Fun Annotations
YouTube is great for having unique and helpful graphics on the screen while your video is playing. Having some fun and useful annotations, such as the days you make videos or a subscribe icon, during the intro video can be very helpful to new viewers. They also help to boost viewer engagement with your content!

4. Assume You Have New Viewers
Do not create a YouTube channel trailer with inside jokes or comments. This trailer is for people who know nothing about you or your channel. You are trying to hook them into your content, not provide a few laughs to existing subscribers.
5. Update Your Trailer Regularly
As a content creator, you may find that your brand changes every six months to a year. Maybe you change up your look, type of content, frequency of uploads or other parts of the channel. Ensure you are updating your trailer each time you make significant changes to your channel!
Conclusion
Creating a channel trailer for your YouTube page is a wonderful way to introduce a new audience to your content. They learn about you and the topics that you are passionate about. It convinces them to watch one of your videos and subscribe to your channel. And by using one of the YouTube Trailer Maker software options above, you will be creating quality trailers for your channel in no time!
Richard Bennett
Richard Bennett is a writer and a lover of all things video.
Follow @Richard Bennett
Richard Bennett
Mar 27, 2024• Proven solutions
Many YouTube content creators assume that no one checks out their channel trailer . Some may not even know about the concept of a trailer, while others are not sure how to create one. We will explain the concept of a YouTube channel trailer, how to make a great trailer, and how to get more subscribers and views through a quality trailer on your YouTube channel.
- Part1: What is a YouTube Channel Trailer
- Part2: How to Add YouTube Trailer to Channel
- Part3: Best YouTube Trailer Maker
- Part4: 5 Tips for Creating a Great Trailer
Part 1: What is a YouTube Channel Trailer?
Think of a channel trailer as an introduction to a movie or television show. You can choose to show the trailer to anyone who is not subscribe to your channel, when they land on your channel page.
The objective of a trailer is to hook the audience, promote your personality and content, and convince them it will be worth their time to check out some of your videos. And you must do all these things within 30 to 45 seconds !
Most content creators can benefit from creating a channel trailer. Unless you are a famous personality through a sports/acting/television/singing career, people who land on your channel may have no idea who you are. A proper trailer gives them an introduction to your personality and content.
Part 2: How to Add YouTube Trailer to Channel
After you know how to create a YouTube trail, why not add your new created trailer to YouTube channel right now. Here is the right steps.
Step 1: Go to channel
Log in your YouTube account. Then click your users icon to find My channel. At the top right corner, click CUSTOMIZE CHANNEL and then choose For new visitors.
Step 2: Add trailer to YouTube
After clicking plus icon in the middle to add your amazing trailer, a playlist window will appear. Now select the trailer you want to use. Click Save. Then you will see a trailer is added. You can also change trailer or remove trailer.
Part 3: Best Channel YouTube Trailer Maker
1. Wondershare Filmora
Searching for a free and powerful video editing tool that you can use on both Windows and Mac computers? Wondershare Filmora may be the ideal program for you. It is very easy to use, even for beginners who do not have that much editing experience.
Features:
- It is free and very easy to add captions to the trailer video.
- There are many interesting options for adding video effects within the program.
- It features a modern interface that is intuitive and easy to operate. All the important controls and settings are easily accessible through the menus and submenus.
- The program operates smoothly, even on older machines.
2. WeVideo
Hoping to edit content while you are on the go? By using a less powerful laptop, library computer or a friend’s device, you could edit your trailer within a couple hours. WeVideo is an online video editor that makes it so easy to edit videos in up to 4K resolution.
Features:
- The program is fast and very easy to use. It does not even require any downloads.
- As it is an online program, there are no compatibility issues with Windows, Mac or even Chromebook devices.
- It is possible to mix and match up to 600 different formats for graphics, audio, video and other effects.
3. Virtual Dub
If you are seeking something that is open source and free, you may be interested in Virtual Dub. It is a completely free and open source program that you can use for quick capturing, encoding and editing video.
While it is not going to give you the same power and options as some of the other editors, it is a very simple tool that can be effective for specific use cases. If you are just hoping to record, encode and quickly put together a 30 second YouTube trailer, it is the ideal program.
Features:
- Offers the ability to capture videos on Windows, Mac and Linux computers.
- Works best with AVI files, but it is possible to use other video formats such as MKV and MP4 as well.
- It is possible to create video using a series of image files - or merge image files into existing video content.
Part 4: 5 Tips for Creating a Great Trailer
1. Let Viewers Know What is Coming
People appreciate routine. You can mention how many times a week you create content and the days when you publish. You can also have a brief overview of the type of videos you make, which will tell a new viewer what to expect if they subscribe to your channel!
2. Keep It Short
YouTube trailers that are more than a minute long will not succeed. People have a very short attention span. They want to be hooked immediately. 30 to 45 seconds is the sweet spot, with 30 seconds preferable! It may sound overwhelming to condense everything about your channel into 30 seconds, but that is where a great video script can help! However, sometimes both short videos and long videos work.
3. Use Some Fun Annotations
YouTube is great for having unique and helpful graphics on the screen while your video is playing. Having some fun and useful annotations, such as the days you make videos or a subscribe icon, during the intro video can be very helpful to new viewers. They also help to boost viewer engagement with your content!
4. Assume You Have New Viewers
Do not create a YouTube channel trailer with inside jokes or comments. This trailer is for people who know nothing about you or your channel. You are trying to hook them into your content, not provide a few laughs to existing subscribers.
5. Update Your Trailer Regularly
As a content creator, you may find that your brand changes every six months to a year. Maybe you change up your look, type of content, frequency of uploads or other parts of the channel. Ensure you are updating your trailer each time you make significant changes to your channel!
Conclusion
Creating a channel trailer for your YouTube page is a wonderful way to introduce a new audience to your content. They learn about you and the topics that you are passionate about. It convinces them to watch one of your videos and subscribe to your channel. And by using one of the YouTube Trailer Maker software options above, you will be creating quality trailers for your channel in no time!
Richard Bennett
Richard Bennett is a writer and a lover of all things video.
Follow @Richard Bennett
The Ultimate Guide to Free, Accurate YouTube Transcript Creation
How to Transcribe a YouTube Video for FREE
Richard Bennett
Mar 27, 2024• Proven solutions
If you want to transcribe your videos to make the dialogs and speeches available in text format, you can use YouTube Transcribe feature that the streaming site offers for free. In this article, I’ll share with you a couple of methods to transcribe a YouTube video for free.
- Part 1: Transcribe YouTube Video Automatically for Free [2 Ways]
- Part 2: Transcribe YouTube Video to Text Online with Third-Party Service
- Part 3: Benefits of Transcribing YouTube Videos
- Part 4: YouTube Video Transcription FAQs
Part 1: How to Transcribe YouTube Video Automatically for Free [2 Ways]
Besides the basic video editing features on the YouTube platform, you can now quickly transcribe YouTube videos to the text as well. The good thing is, you can either use the automatic transcription feature that YouTube offers, or upload it manually while adjusting the timing as you go further.
Below are the two methods to transcribe your YouTube videos for free:
Method 1: Use the Automated Transcription Service on YouTube
As the name suggests, YouTube automatic transcription service works automatically. This means you don’t even have to click the ‘Transcribe’ button anymore to transcribe a YouTube video, and the website takes care of it on its own. All you need to do is, choose English as the language of the video when setting up subtitles. You can follow the instructions given below to do so:
Step 1 Upload a Video
Sign in to your YouTube account, click your profile picture from the top-right corner, and click YouTube Studio from the menu. Next, click CREATE from the upper-right corner, click Upload videos from the menu, and drag and drop a video from your computer to the Upload videos box that appears next.

Step 2 Select Transcription Language
On the Details page of the next box that appears, scroll down and click MORE OPTIONS, and select English in the Video language drop-down list under the Language, subtitles, and closed captions (CC) section.

Step 3 Publish the Video
Follow the on-screen instructions from this point to publish the video, and wait while YouTube automatically transcribes and adds the close captions to it.
Note: Depending on the duration of the clip, the time YouTube would take to transcribe may vary.
After YouTube has transcribed the video, you can download the transcription file in your preferred format. The instructions are given below explain how you can do so:
- Get to the Subtitles Window
While on the YouTube Studio page, click Subtitles from the left pane to go to the Channel subtitles page. And then click the video you want to modify.
- Get to Classic Studio
In the video subtitle page of the target video, hover mouse on the Published Automatic status under the Subtitles column, click the Options icon (with three vertical dots) that appears, and click Edit on Classic Studio.

- Download Transcription File
Click and open the Actions drop-down list from the top-left corner of the left pane, click your preferred transcription format including .vtt, .srt and .sbv from the list, and save the file on your local hard disk.

Method 2: Get YouTube Transcription when Watching
In addition, if you are watching any other video, you can make YouTube transcribe that for you as well. You can follow the instructions given below to get the YouTube video to text transcription:
Step 1: Play the Video
Go to the video on YouTube and start playing it. Make sure NOT to get to full-screen mode as doing so would hide the option to transcribe the clip.
Step 2: Enable Transcription
Click the More icon (with three horizontal dots) from under the bottom-right corner of the video player, and click Open transcript to see the video transcription in the Transcript pane that appears in the right.
Step 3: Manage Timestamps
Click the Options icon (with three vertical dots) from the top-right corner of the Transcript pane, and click Toggle timestamp to enable or disable the timestamps in the video transcription.
Limitations of Using YouTube Transcribe
Although YouTube’s automatic transcription is a decent feature that saves you a lot of time, since Google uses machine learning algorithms to convert the speech to text, the level of accuracy may vary depending on the accent of the speaker, and the clarity of the audio the video has. Also, even sometime you may not be satisfied with the end-results.
Alternatively, you can use Kapwing to transcribe a YouTube video and download the transcription file with the below step-by-step instructions:
Step 1: Add YouTube Video
Copy the URL of YouTube video you want to transcribe, go to https://www.kapwing.com/subtitles , paste the URL in the Paste a URL field, wait while Kapwing fetches the content of the video, and opens the Add subtitles to Video page.
Step 2: Transcribe the Video
Click Auto-generate from the right window, and follow the on-screen instructions to transcribe YouTube video to text.

Step 3: Download the Transcription File
Click Download SRT from the left pane, and follow the instructions from there to download the transcription file in *.srt format.

Pros
- Kapwing is free to use
- The auto-transcription process is quick and less tedious
- Kapwing also allows manual transcription and uploading of an existing *.srt file
Cons
- The auto-transcribed text might lack accuracy as the task is done by the speech-to-text tools that work in the background
You can follow the step-by-step instructions to transcribe a YouTube video and download the transcription file using Kapwing:
Step 1: Add YouTube Video
Copy the URL of YouTube video you want to transcribe, go to https://www.kapwing.com/subtitles , paste the URL in the Paste a URL field, wait while Kapwing fetches the content of the video, and opens the Add subtitles to Video page.
Step 2: Transcribe the Video
Click Auto-generate from the right window, and follow the on-screen instructions to transcribe YouTube video to text.
Step 3: Download the Transcription File
Click Download SRT from the left pane, and follow the instructions from there to download the transcription file in *.srt format.
Pros
- Kapwing is free to use
- The auto-transcription process is quick and less tedious
- Kapwing also allows manual transcription and uploading of an existing *.srt file
Cons
- The auto-transcribed text might lack accuracy as the task is done by the speech-to-text tools that work in the background
Part 3: Benefits of Transcribing YouTube Videos
You may need video transcriptions for several reasons, such as analyzing the summary of the entire speech in the video, extracting a single phrase or quote that was spoken in the clip, or making the video helpful even for those suffering from hearing impairment. When you transcribe a YouTube video, the transcript can be useful in many ways. Some of the most common benefits of transcribing a video include:
- Search Engine Optimization
When you add subtitles, the text can appear in Google search results when someone types a similar phrase in the search box. This helps get more views to your videos, thus giving your channel popularity, and you, monetary gains in the long run.
- Accent
If the speaker in the video is from a different region and is using an accent that you are not much comfortable with, you can turn on the subtitles and read the dialogs along with the video.
- Repurposing on Blogs
If you own a blog that you have embedded your video to, the transcription could be used to add text to it so the target audience can get a fair idea of what the video is all about. This is useful because many people prefer reading over watching.
YouTube Video Transcription FAQs
1. How to Transcribe YouTube Video to Text
Usually the transcription files have *.srt extension that are globally accepted and supported by almost all media players. However, there might be instances when you want to have the subtitles in plain text.
That said, to convert an SRT file to TXT, you can:
- Right-click the SRT file
- Go to Rename
- Replace srt with txt and press Enter
- Click OK on the confirmation box that appears next to convert SRT to TXT
After this, you can simply double-click the file, and read and modify the transcribed content as needed.
2. How to Edit and Upload Edited Transcript to YouTube
If you made any modifications to the transcript that was automatically generated by YouTube or any other third-party transcription tool, you can follow the steps given below to upload the new file to the YouTube video:
- Go to YouTube Studio and then to the Channel subtitles page as explained earlier
- Expand the Languages column of the target video
- Click the Options icon that appears under the Subtitles column when you hover mouse on to it
- Click Edit on Classic Studio
- On the next page, click Edit from the top-right corner

- Click to open the Actions drop-down list from the upper-left corner
- Click Upload a file
- Follow the on-screen instructions from there to upload the modified transcription file
- Click Save Changes from the top-right corner of the page when done
Conclusion
If you are looking for a quick and easy way of adding subtitles to your videos, letting YouTube transcribe for you could be a good approach. However, because these auto-generated transcriptions are created by machine learning algorithms, their accuracy cannot be counted on. Therefore, the best way to get the job done accurately is, let YouTube auto-transcribe your video, download the transcription file, make the necessary changes to it, and then upload the file back to the video.
Richard Bennett
Richard Bennett is a writer and a lover of all things video.
Follow @Richard Bennett
Richard Bennett
Mar 27, 2024• Proven solutions
If you want to transcribe your videos to make the dialogs and speeches available in text format, you can use YouTube Transcribe feature that the streaming site offers for free. In this article, I’ll share with you a couple of methods to transcribe a YouTube video for free.
- Part 1: Transcribe YouTube Video Automatically for Free [2 Ways]
- Part 2: Transcribe YouTube Video to Text Online with Third-Party Service
- Part 3: Benefits of Transcribing YouTube Videos
- Part 4: YouTube Video Transcription FAQs
Part 1: How to Transcribe YouTube Video Automatically for Free [2 Ways]
Besides the basic video editing features on the YouTube platform, you can now quickly transcribe YouTube videos to the text as well. The good thing is, you can either use the automatic transcription feature that YouTube offers, or upload it manually while adjusting the timing as you go further.
Below are the two methods to transcribe your YouTube videos for free:
Method 1: Use the Automated Transcription Service on YouTube
As the name suggests, YouTube automatic transcription service works automatically. This means you don’t even have to click the ‘Transcribe’ button anymore to transcribe a YouTube video, and the website takes care of it on its own. All you need to do is, choose English as the language of the video when setting up subtitles. You can follow the instructions given below to do so:
Step 1 Upload a Video
Sign in to your YouTube account, click your profile picture from the top-right corner, and click YouTube Studio from the menu. Next, click CREATE from the upper-right corner, click Upload videos from the menu, and drag and drop a video from your computer to the Upload videos box that appears next.
Step 2 Select Transcription Language
On the Details page of the next box that appears, scroll down and click MORE OPTIONS, and select English in the Video language drop-down list under the Language, subtitles, and closed captions (CC) section.
Step 3 Publish the Video
Follow the on-screen instructions from this point to publish the video, and wait while YouTube automatically transcribes and adds the close captions to it.
Note: Depending on the duration of the clip, the time YouTube would take to transcribe may vary.
After YouTube has transcribed the video, you can download the transcription file in your preferred format. The instructions are given below explain how you can do so:
- Get to the Subtitles Window
While on the YouTube Studio page, click Subtitles from the left pane to go to the Channel subtitles page. And then click the video you want to modify.
- Get to Classic Studio
In the video subtitle page of the target video, hover mouse on the Published Automatic status under the Subtitles column, click the Options icon (with three vertical dots) that appears, and click Edit on Classic Studio.
- Download Transcription File
Click and open the Actions drop-down list from the top-left corner of the left pane, click your preferred transcription format including .vtt, .srt and .sbv from the list, and save the file on your local hard disk.
Method 2: Get YouTube Transcription when Watching
In addition, if you are watching any other video, you can make YouTube transcribe that for you as well. You can follow the instructions given below to get the YouTube video to text transcription:
Step 1: Play the Video
Go to the video on YouTube and start playing it. Make sure NOT to get to full-screen mode as doing so would hide the option to transcribe the clip.
Step 2: Enable Transcription
Click the More icon (with three horizontal dots) from under the bottom-right corner of the video player, and click Open transcript to see the video transcription in the Transcript pane that appears in the right.
Step 3: Manage Timestamps
Click the Options icon (with three vertical dots) from the top-right corner of the Transcript pane, and click Toggle timestamp to enable or disable the timestamps in the video transcription.
Limitations of Using YouTube Transcribe
Although YouTube’s automatic transcription is a decent feature that saves you a lot of time, since Google uses machine learning algorithms to convert the speech to text, the level of accuracy may vary depending on the accent of the speaker, and the clarity of the audio the video has. Also, even sometime you may not be satisfied with the end-results.
Alternatively, you can use Kapwing to transcribe a YouTube video and download the transcription file with the below step-by-step instructions:
Step 1: Add YouTube Video
Copy the URL of YouTube video you want to transcribe, go to https://www.kapwing.com/subtitles , paste the URL in the Paste a URL field, wait while Kapwing fetches the content of the video, and opens the Add subtitles to Video page.
Step 2: Transcribe the Video
Click Auto-generate from the right window, and follow the on-screen instructions to transcribe YouTube video to text.
Step 3: Download the Transcription File
Click Download SRT from the left pane, and follow the instructions from there to download the transcription file in *.srt format.
Pros
- Kapwing is free to use
- The auto-transcription process is quick and less tedious
- Kapwing also allows manual transcription and uploading of an existing *.srt file
Cons
- The auto-transcribed text might lack accuracy as the task is done by the speech-to-text tools that work in the background
You can follow the step-by-step instructions to transcribe a YouTube video and download the transcription file using Kapwing:
Step 1: Add YouTube Video
Copy the URL of YouTube video you want to transcribe, go to https://www.kapwing.com/subtitles , paste the URL in the Paste a URL field, wait while Kapwing fetches the content of the video, and opens the Add subtitles to Video page.
Step 2: Transcribe the Video
Click Auto-generate from the right window, and follow the on-screen instructions to transcribe YouTube video to text.
Step 3: Download the Transcription File
Click Download SRT from the left pane, and follow the instructions from there to download the transcription file in *.srt format.
Pros
- Kapwing is free to use
- The auto-transcription process is quick and less tedious
- Kapwing also allows manual transcription and uploading of an existing *.srt file
Cons
- The auto-transcribed text might lack accuracy as the task is done by the speech-to-text tools that work in the background
Part 3: Benefits of Transcribing YouTube Videos
You may need video transcriptions for several reasons, such as analyzing the summary of the entire speech in the video, extracting a single phrase or quote that was spoken in the clip, or making the video helpful even for those suffering from hearing impairment. When you transcribe a YouTube video, the transcript can be useful in many ways. Some of the most common benefits of transcribing a video include:
- Search Engine Optimization
When you add subtitles, the text can appear in Google search results when someone types a similar phrase in the search box. This helps get more views to your videos, thus giving your channel popularity, and you, monetary gains in the long run.
- Accent
If the speaker in the video is from a different region and is using an accent that you are not much comfortable with, you can turn on the subtitles and read the dialogs along with the video.
- Repurposing on Blogs
If you own a blog that you have embedded your video to, the transcription could be used to add text to it so the target audience can get a fair idea of what the video is all about. This is useful because many people prefer reading over watching.
YouTube Video Transcription FAQs
1. How to Transcribe YouTube Video to Text
Usually the transcription files have *.srt extension that are globally accepted and supported by almost all media players. However, there might be instances when you want to have the subtitles in plain text.
That said, to convert an SRT file to TXT, you can:
- Right-click the SRT file
- Go to Rename
- Replace srt with txt and press Enter
- Click OK on the confirmation box that appears next to convert SRT to TXT
After this, you can simply double-click the file, and read and modify the transcribed content as needed.
2. How to Edit and Upload Edited Transcript to YouTube
If you made any modifications to the transcript that was automatically generated by YouTube or any other third-party transcription tool, you can follow the steps given below to upload the new file to the YouTube video:
- Go to YouTube Studio and then to the Channel subtitles page as explained earlier
- Expand the Languages column of the target video
- Click the Options icon that appears under the Subtitles column when you hover mouse on to it
- Click Edit on Classic Studio
- On the next page, click Edit from the top-right corner
- Click to open the Actions drop-down list from the upper-left corner
- Click Upload a file
- Follow the on-screen instructions from there to upload the modified transcription file
- Click Save Changes from the top-right corner of the page when done
Conclusion
If you are looking for a quick and easy way of adding subtitles to your videos, letting YouTube transcribe for you could be a good approach. However, because these auto-generated transcriptions are created by machine learning algorithms, their accuracy cannot be counted on. Therefore, the best way to get the job done accurately is, let YouTube auto-transcribe your video, download the transcription file, make the necessary changes to it, and then upload the file back to the video.
Richard Bennett
Richard Bennett is a writer and a lover of all things video.
Follow @Richard Bennett
Also read:
- Cutting-Edge PC Editing Techniques Enhancing Your YouTube Presence
- Discovering the Timeline for YouTube Earnings
- Skyrocket to Success Mastering SEO for YouTubers and Beyond
- In 2024, 10 Leading Biz YouTube Sites Why They Rule
- Monetizing Mastery A Triple Step Approach to Understanding YouTube Revenue
- In 2024, Enjoy Premium Video Artwork - Download at No Cost Today
- 2024 Approved Enhancing Video Content IPhone/iPad Screen Capture Basics
- 2024 Approved Estimated Video Monetization Totals
- Leveraging #Hashtags for a Huge Impact on Your YouTube Views
- Accessing Global Hitters The #1-#6 Short Video Downloaders for 2024
- In 2024, Beat Buzzers Up-and-Coming Background Scores For YT Shorts
- Cultivating Patience with YouTube Disapproval for 2024
- 2024 Approved Budget-Friendly Webinar Strategies for YouTube
- [New] Achieving Affiliate Success with Online Videos
- Unveiling the Secrets to Effortless YouTube Sharing on FB Groups
- In 2024, Creating User-Friendly YouTube Subscribe Icons
- 1K+ Followers in a Flash The YouTube Ultimate Playbook
- Professional Guide to Moving Videos From YouTube to Dailymotion
- In 2024, Earnings Explosion Boosting Your YouTube Channel's Income via Mobile
- [Updated] Adjust Cutting Room Time for YouTube
- In 2024, Backwards Viewing A New Lens for Analyzing YouTube Content
- Infinite Inspiration Cost-Free YouTube Theming
- [New] Chrome to iPhone A Guide to Stripping YouTube Ads
- In 2024, Crafting Compelling Thumbnails to Captivate YouTube Viewers and Encourage Clicks
- New Techniques for Audio-Free Editing of Filmed Material
- In 2024, Finding the Ideal AIFF Converter A Beginners Guide to Conversion Success
- Is Active the Premier Choice for Tech Enthusiasts?
- In 2024, Cinema Kings & Queens IPhone's Leading 8 FREE+Paid Watching Options
- [New] In 2024, Streamlining Videographs for Instagram via Mac
- New 2024 Approved Unleash Your Creativity Top Video Animation Apps for Android, iOS, and iPadOS
- [New] 2024 Approved Unveil the Potential of Zoom Filters for Excellence
- In 2024, How to Transfer Data from Nokia C12 Pro to Any iOS Devices | Dr.fone
- In 2024, Transform Your Day with These 15 TikTok Innovators
- In 2024, 5 Ways to Track Oppo A2 without App | Dr.fone
- In 2024, Ultimate Guide to Catch the Regional-Located Pokemon For Honor X8b | Dr.fone
- How to get the dragon scale and evolution-enabled pokemon On Lava Blaze 2 5G? | Dr.fone
- Top 7 Skype Hacker to Hack Any Skype Account On your OnePlus Nord N30 SE | Dr.fone
- Ultimate Guide on Sony Xperia 1 V FRP Bypass
- Updated The Pros and Cons of Final Cut Pro vs Final Cut Express
- In 2024, How to Fix when Apple Account Locked From iPhone 8?
- [New] The Ultimate Guide to Collaborative Chats in Skype (Windows, Mac)
- Unveiling 15 Superior Action Camera Replacements to GoPro
- Title: Channel Trailers that Convert Viewers Into Customers
- Author: Kevin
- Created at : 2024-05-25 14:48:33
- Updated at : 2024-05-26 14:48:33
- Link: https://youtube-videos.techidaily.com/channel-trailers-that-convert-viewers-into-customers/
- License: This work is licensed under CC BY-NC-SA 4.0.
