
:max_bytes(150000):strip_icc()/streamfreesportsonline-5b1994178023b900364a81e5.jpg)
"Budget-Friendly Sponsorship Blueprint for YouTube Enthusiasts"
Budget-Friendly Sponsorship Blueprint for YouTube Enthusiasts
How to Get YouTube Sponsorship for Small Channels (Easy)

Richard Bennett
Mar 27, 2024• Proven solutions
Are you looking for YouTube sponsorship? Getting YouTube sponsorship for small channels might seem to be a very difficult goal. Whenever the word sponsors strikes your mind, you think of the big and expensive commercials.
However, if you lower your expectation from the big commercial companies, there are several other companies in the market that can help you with the YouTube sponsorship.
In this article, you will learn how to get YouTube sponsorship and make money out of it.
- Part1: Before You Start Applying For Sponsorship
- Part2: How To Get A Sponsor For Youtube Channel
- Part3: Types of Sponsorship
Part 1: Before You Start Applying For Sponsorship
1. Read YouTube Rules
As you are a small channel, you must be very cautious about the YouTube rules. Never put up any abusive content on your channel that degrades the value of YouTube. Ensure that your channel’s content fits the directions and guidelines of YouTube.
The supporters of YouTube sponsorship for small channels would never wish to get associated with channels that might be erased due to the strategy infringement of YouTube. So, be careful before uploading your content.
2. Quality Content Is Important
The content you offer through your channel must offer valuable content. Not just that, you must have a library of valuable content so that the potential sponsors can browse through several materials in your channel. Uploading once in a blue moon or just a few contents in the beginning and expecting YouTube sponsorships to pour in is not the way out to acquire supporters.

3. Leave Your Business Email
Always add a business email ID to your channel, which shows that you would love to receive business inquiries. This is the ID where you will receive notifications for friend requests, video comments, and even the battering messages once you have a large fan following.

4. Try to Make Your Video Eye-catching
A high-quality video will also attract sponsors. Don’t just put your footage together and upload it to YouTube, add some transitions, elements, and effects to make it more entertaining and attractive. Yet not everyone is able to edit videos perfectly, that’s why we would like to recommend Filmora for you.
Filmora is a video editing software for people of different levels. For beginners, the Instant Mode, Template Mode saves you from the trouble of finding the proper transitions or elements. For experienced, the Green Screen, Split Screen, Speed Ramping, and more allow you to add more effects to your video.
Check the below videos to find out the features of Filmora and download it to get started with video editing.


Part 2: How To Get A Sponsor For Youtube Channel
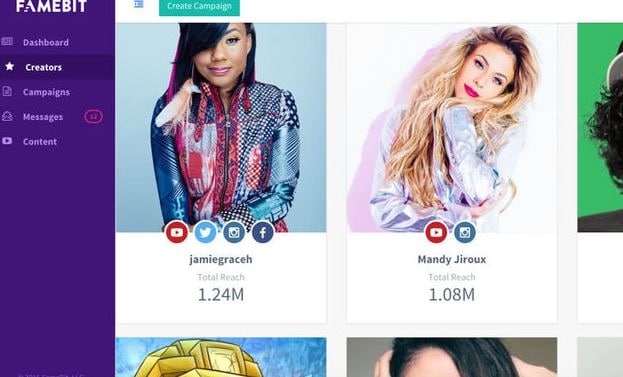
1. Use YouTube Sponsorship Platform – Famebit
If you are searching for YouTube sponsorship for small channels, Famebit is a trusted platform that can be considered. It is an interface for the advertisers and the video creators who require sponsorship for their content.
Utilizing Famebit can be beneficial in acquiring more than the average amount of cash as it is added by Google. If you have 5000 endorsers for your channel, you can very well utilize Famebit to obtain YouTube sponsorship for small channels.
You can explore various items like contraptions, innovations, designs, and more when you get to their commercial center by making a free record. Famebit charges 10% of the sponsored amount and the installment is made by check or PayPal.
2. Reach Out Directly
Reaching out to the people directly is one of the tried and tested ways to acquire YouTube sponsorship for small channels. Research and try to find 50 to 100 companies that would be interested in your channel.
It will not be much difficult to search for that one person within this list whom you can connect with directly. Once you have the company’s list and detailed contact information of those companies, send a mail inviting them to check your channel and show your interest to partner with them.
It is essential to make yourself stand out in the colossal crowd. Ensure your channel is unique and somewhat different from the rest because the contacted companies keep receiving partnering submissions from several other content creators too.
One important thing is not to send out the same old letter to all 50 companies and keep hoping to receive a positive response from at least one. Try to focus on your channel’s USP and highlight the same in your letter to the companies while trying to contact the companies for YouTube Sponsorship.

3. Remember To Attend Exhibition
The trade shows and exhibitions are a great way to search for YouTube sponsorship for small channels. The exhibitions that focus on new media give a huge platform for you to find a sponsor when you participate in it.
Such events offer tricks and tips, helps you to talk to other content creators, and also lets you connect with the brand managers who can offer your channel with YouTube sponsorship.

Part 3: Types of Sponsorship
1. Product Sponsorships
When you are searching for sponsorship for a particular product, ensure that it is relevant to your channel. Never approach the sponsors without ensuring the same as you might put off your viewers and your sponsors will not achieve their expected results. You might lose both your sponsors and audiences in such a case.
When you try to get YouTube sponsorship for small channels, it is quite difficult as the promotion of the product becomes limited to whatever small following they have. Product reviews and tutorials are the best ways to obtain product sponsorships.
2. Paid Sponsorship
Among all sponsorships, paid sponsorship is the most challenging one. Usually, when you review the products of the affiliate links in your videos, you earn revenues, but, in the paid sponsorship you earn by advertising product and company links on your channel.
When you add the company’s products to your videos, you earn money. It appears at the beginning and at the end of your videos after it is played on your YouTube channel.
3. Affiliate Sponsorship
It is the easiest of all sponsorships but also the least revenue-generating one too. Affiliate sponsorship works by sharing affiliate codes and links. It is used by your audiences to obtain discounts or offer you a reward.
There are two types in which affiliate sponsorship works. One is the discounting option where the code is shared and the viewers use these codes to get discounts anywhere between 5-15% in shopping products from that same site. Another option is to use the affiliate code to integrate it into an URL that offers profits to a content creator in form of traffic.
Conclusion
Not just the popular channels, the newbies can also earn YouTube sponsorship when they know the way outs. Follow the above tricks to get the youtube sponsorship for small channels without much effort. If your content is unique and your process to reach the sponsors is right, you can definitely make money through this medium. If you want to edit a YouTube video, Filmora can help you with its powerful features.
Richard Bennett
Richard Bennett is a writer and a lover of all things video.
Follow @Richard Bennett
Richard Bennett
Mar 27, 2024• Proven solutions
Are you looking for YouTube sponsorship? Getting YouTube sponsorship for small channels might seem to be a very difficult goal. Whenever the word sponsors strikes your mind, you think of the big and expensive commercials.
However, if you lower your expectation from the big commercial companies, there are several other companies in the market that can help you with the YouTube sponsorship.
In this article, you will learn how to get YouTube sponsorship and make money out of it.
- Part1: Before You Start Applying For Sponsorship
- Part2: How To Get A Sponsor For Youtube Channel
- Part3: Types of Sponsorship
Part 1: Before You Start Applying For Sponsorship
1. Read YouTube Rules
As you are a small channel, you must be very cautious about the YouTube rules. Never put up any abusive content on your channel that degrades the value of YouTube. Ensure that your channel’s content fits the directions and guidelines of YouTube.
The supporters of YouTube sponsorship for small channels would never wish to get associated with channels that might be erased due to the strategy infringement of YouTube. So, be careful before uploading your content.
2. Quality Content Is Important
The content you offer through your channel must offer valuable content. Not just that, you must have a library of valuable content so that the potential sponsors can browse through several materials in your channel. Uploading once in a blue moon or just a few contents in the beginning and expecting YouTube sponsorships to pour in is not the way out to acquire supporters.
3. Leave Your Business Email
Always add a business email ID to your channel, which shows that you would love to receive business inquiries. This is the ID where you will receive notifications for friend requests, video comments, and even the battering messages once you have a large fan following.
4. Try to Make Your Video Eye-catching
A high-quality video will also attract sponsors. Don’t just put your footage together and upload it to YouTube, add some transitions, elements, and effects to make it more entertaining and attractive. Yet not everyone is able to edit videos perfectly, that’s why we would like to recommend Filmora for you.
Filmora is a video editing software for people of different levels. For beginners, the Instant Mode, Template Mode saves you from the trouble of finding the proper transitions or elements. For experienced, the Green Screen, Split Screen, Speed Ramping, and more allow you to add more effects to your video.
Check the below videos to find out the features of Filmora and download it to get started with video editing.
Part 2: How To Get A Sponsor For Youtube Channel
1. Use YouTube Sponsorship Platform – Famebit
If you are searching for YouTube sponsorship for small channels, Famebit is a trusted platform that can be considered. It is an interface for the advertisers and the video creators who require sponsorship for their content.
Utilizing Famebit can be beneficial in acquiring more than the average amount of cash as it is added by Google. If you have 5000 endorsers for your channel, you can very well utilize Famebit to obtain YouTube sponsorship for small channels.
You can explore various items like contraptions, innovations, designs, and more when you get to their commercial center by making a free record. Famebit charges 10% of the sponsored amount and the installment is made by check or PayPal.
2. Reach Out Directly
Reaching out to the people directly is one of the tried and tested ways to acquire YouTube sponsorship for small channels. Research and try to find 50 to 100 companies that would be interested in your channel.
It will not be much difficult to search for that one person within this list whom you can connect with directly. Once you have the company’s list and detailed contact information of those companies, send a mail inviting them to check your channel and show your interest to partner with them.
It is essential to make yourself stand out in the colossal crowd. Ensure your channel is unique and somewhat different from the rest because the contacted companies keep receiving partnering submissions from several other content creators too.
One important thing is not to send out the same old letter to all 50 companies and keep hoping to receive a positive response from at least one. Try to focus on your channel’s USP and highlight the same in your letter to the companies while trying to contact the companies for YouTube Sponsorship.
3. Remember To Attend Exhibition
The trade shows and exhibitions are a great way to search for YouTube sponsorship for small channels. The exhibitions that focus on new media give a huge platform for you to find a sponsor when you participate in it.
Such events offer tricks and tips, helps you to talk to other content creators, and also lets you connect with the brand managers who can offer your channel with YouTube sponsorship.
Part 3: Types of Sponsorship
1. Product Sponsorships
When you are searching for sponsorship for a particular product, ensure that it is relevant to your channel. Never approach the sponsors without ensuring the same as you might put off your viewers and your sponsors will not achieve their expected results. You might lose both your sponsors and audiences in such a case.
When you try to get YouTube sponsorship for small channels, it is quite difficult as the promotion of the product becomes limited to whatever small following they have. Product reviews and tutorials are the best ways to obtain product sponsorships.
2. Paid Sponsorship
Among all sponsorships, paid sponsorship is the most challenging one. Usually, when you review the products of the affiliate links in your videos, you earn revenues, but, in the paid sponsorship you earn by advertising product and company links on your channel.
When you add the company’s products to your videos, you earn money. It appears at the beginning and at the end of your videos after it is played on your YouTube channel.
3. Affiliate Sponsorship
It is the easiest of all sponsorships but also the least revenue-generating one too. Affiliate sponsorship works by sharing affiliate codes and links. It is used by your audiences to obtain discounts or offer you a reward.
There are two types in which affiliate sponsorship works. One is the discounting option where the code is shared and the viewers use these codes to get discounts anywhere between 5-15% in shopping products from that same site. Another option is to use the affiliate code to integrate it into an URL that offers profits to a content creator in form of traffic.
Conclusion
Not just the popular channels, the newbies can also earn YouTube sponsorship when they know the way outs. Follow the above tricks to get the youtube sponsorship for small channels without much effort. If your content is unique and your process to reach the sponsors is right, you can definitely make money through this medium. If you want to edit a YouTube video, Filmora can help you with its powerful features.
Richard Bennett
Richard Bennett is a writer and a lover of all things video.
Follow @Richard Bennett
The Ultimate Editor’s Guide: Best for YouTube Content
The Best Video Editors for YouTube
Richard Bennett
Oct 26, 2023• Proven solutions
Check out our most updated post on this topic: Top 10 Video Editors for YouTube in 2018.
Part 1: Filmora

Filmora ’s intuitive interface was designed to make video editing a fast and simple process. The less effort you have to put into the technical side of editing, the more energy you can devote to being creative.
In the main screen of Filmora, you are never more than a couple clicks away from any basic, advanced, or creative feature you want to use. The built-in music library, a wide selection of text and title options, filters, overlays, animated elements, and split-screen options can all be accessed from a clearly labeled toolbar above the timeline.
Besides fun things like filters, Filmora also has powerful tools like advanced color grading and an audio equalizer. Either of these features can be accessed in two clicks from the main editing screen. With your audio or video clip selected, simply click the editing icon and then either Advanced (for expanded color editing options) or Customize (for the audio equalizer).
Even features like picture-in-picture (PIP) and green screen are easy to use in Filmora. The PIP tracks are right under the main video track in your timeline. Although there is only one when you start a project, you can have up to ten. These PIP tracks can be used to layer photos and videos over top of each other. One of the most popular uses for the PIP track is facecam videos. After you drag your facecam footage into the PIP track, you can easily shrink it and move it to the corner of your main video.
The green screen has its own designated icon on the main toolbar. Simply select a clip or image in one of your PIP tracks and click it to access the feature.
Filmora is always adding new features to make editing even easier for online video creators. A few of the other tools included in Filmora are speed control, text customization, tilt-shift, ripple delete, and an audio mixer.
Part 2: Video Editing Software Comparisons
Here is a ‘top 4’ list of other popular video editors. The list will discuss their best features and how they measure up to Filmora.
Section 1: PC Video Editors
Here are two of the most popular editing programs for Windows computers:
Windows Movie Maker

Image source: intowindows
PC users can download Windows Movie Maker for free, which has made it a popular choice among video creators that are just starting out. Movie Maker has different timeline tracks for things like videos and music, and it is very easy to trim or cut up all of your media clips. The ability to sharpen some of your blurrier images, speed control, and a simple title generator, and some basic transitions are some of the program’s more noteworthy features.
Movie Maker does not come close to matching Filmora’s range of features, but it is easy to use. It could be a good option for video creators who have no room in their budget for paid software. Videos made in Movie Maker will be simple, but that is all some people need.
Vegas Movie Studio
Vegas Movie Studio, which used to be Sony Vegas, is a big step up from Movie Maker. While editing your clips, you can adjust their brightness, contrast, and color balance. On the audio side of things, Vegas has a great audio restoration tool you can use to get rid of unwanted background noises.
Although it does not have filters, overlays, and animated elements like Filmora, Vegas does have some very modern-looking titles and transition effects.
The biggest advantage that Filmora has over Vegas is that it is a lot easier to use. Vegas has some great features, but accessing and using them is not something you can just jump into doing. Filmora is so intuitive that most users can just open it up and start applying effects.
Vegas is very reasonably priced at $49.95 USD, but it is only $10 more for the ease and effect variety of Filmora.
Section 2: Mac Video Editors
Here are two of the most popular video editors for the Mac OS:
iMovie
iMovie comes free with Mac computers, and it is a huge step up from Windows Movie Maker. It has some really nice audio editing tools, like an equalizer and the ability to set fade in and fade out times (which Filmora also has). When you are editing video clips, iMovie provides you with a stabilization tool, speed controls, and even some filters and overlays. There are text and title options available as well, although they are very basic.
The main difference between Filmora and iMovie is variety. Filmora has a huge range of titles in different styles; iMovie has everyday fonts with all the traditional credit/title animations. iMovie has close to the same amount of features as Filmora, but there is always less variety in those features, and they tend to feel dated.
The main difference between iMovie and every other editor on this list is the layout. The timeline is located in the top left portion of the screen, not stretched across the bottom, and the clips/sounds do not sit in different tracks. The iMovie interface is not actually very complicated, but it will be an adjustment for anybody used to a more traditional editing experience.
Final Cut Pro X
Final Cut Pro is Apple’s attempt at a professional-grade editing program. It is much more advanced than iMovie and offers 64-bit architecture and background rendering. Background rendering means that your imported clips are prepared for playback before you actually move them into your timeline, making the editing process a lot faster.
Final Cut Pro also boasts a huge selection of editing tools.
Like iMovie, Final Cut Pro does not use a traditional timeline. This will make it easier to learn for users upgrading from iMovie, but potentially more difficult for users coming from any other program. Final Cut Pro would be competition for Adobe Premiere if it were available on anything except the latest Mac OS.
Final Cut Pro X costs $300, making it a significant investment.
Section 3: Online Video Editors
WeVideo
WeVideo is a fairly simple cloud-based video editor. Its most useful feature is that it gives your team the ability to edit collaboratively. Multiple editors can upload footage and create their own edits of the project.
WeVideo has all of the most basic editing features – the abilities to trim clips, add transitions, and give your project a soundtrack. Other than the potential for collaboration, though, it has nothing that free programs like iMovie, and even Windows Movie Maker, do not have.
There are a few different pricing options for WeVideo. You can use it for free, but your storage space and the number of features you have access to will be very limited. Your videos will also be watermarked. Also, both the free and $19 packages limit your video resolution to 720p. You will need to pay at least $39 for 1080p, and it will cost you $69 to get rid of all the storage limits.
If you are going to pay $69 for video editing software, you are much better off using Filmora.
Section 4: The Pro-Choice
Adobe Premiere
Adobe Premiere is a professional editing software. In terms of functionality, it has every program on this list, including Filmora, beat. It has very powerful video and audio editing tools, and the program can be customized to suit the needs of particular projects.
Because it is designed for professionals and veteran editors, Premiere is far from a simple program. If you have not edited a video before, or are used to a simpler program, it will take you a long time to become good at using Premiere (it might be a good idea to find an online course).
It does have a few features designed to save time, such as an automatic audio syncing tool and the ability to apply changes you have made to one clip across multiple other clips. The Premiere is probably the best program for professional video editors, but Filmora’s ease of use gives it an edge with amateur video creators.
Conclusion
Filmora is the best video editing software for YouTubers and other online video creators. Windows Movie Maker and iMovie are decent basic programs for creators on a budget, and Premiere is an excellent program for professionals, but if your goal is to create awesome videos for YouTube, then Filmora is the best tool for the job.
If you want to find a video editing solution that empowers your imagination and creativity yet takes less effort, please try this robust and user-friendly video editing software Wondershare Filmora. It provides special effects, stock photo & video, sound library, etc., which will definitely enhance your productivity and helps to make money by making videos much accessible.
Richard Bennett
Richard Bennett is a writer and a lover of all things video.
Follow @Richard Bennett
Richard Bennett
Oct 26, 2023• Proven solutions
Check out our most updated post on this topic: Top 10 Video Editors for YouTube in 2018.
Part 1: Filmora
Filmora ’s intuitive interface was designed to make video editing a fast and simple process. The less effort you have to put into the technical side of editing, the more energy you can devote to being creative.
In the main screen of Filmora, you are never more than a couple clicks away from any basic, advanced, or creative feature you want to use. The built-in music library, a wide selection of text and title options, filters, overlays, animated elements, and split-screen options can all be accessed from a clearly labeled toolbar above the timeline.
Besides fun things like filters, Filmora also has powerful tools like advanced color grading and an audio equalizer. Either of these features can be accessed in two clicks from the main editing screen. With your audio or video clip selected, simply click the editing icon and then either Advanced (for expanded color editing options) or Customize (for the audio equalizer).
Even features like picture-in-picture (PIP) and green screen are easy to use in Filmora. The PIP tracks are right under the main video track in your timeline. Although there is only one when you start a project, you can have up to ten. These PIP tracks can be used to layer photos and videos over top of each other. One of the most popular uses for the PIP track is facecam videos. After you drag your facecam footage into the PIP track, you can easily shrink it and move it to the corner of your main video.
The green screen has its own designated icon on the main toolbar. Simply select a clip or image in one of your PIP tracks and click it to access the feature.
Filmora is always adding new features to make editing even easier for online video creators. A few of the other tools included in Filmora are speed control, text customization, tilt-shift, ripple delete, and an audio mixer.
Part 2: Video Editing Software Comparisons
Here is a ‘top 4’ list of other popular video editors. The list will discuss their best features and how they measure up to Filmora.
Section 1: PC Video Editors
Here are two of the most popular editing programs for Windows computers:
Windows Movie Maker
Image source: intowindows
PC users can download Windows Movie Maker for free, which has made it a popular choice among video creators that are just starting out. Movie Maker has different timeline tracks for things like videos and music, and it is very easy to trim or cut up all of your media clips. The ability to sharpen some of your blurrier images, speed control, and a simple title generator, and some basic transitions are some of the program’s more noteworthy features.
Movie Maker does not come close to matching Filmora’s range of features, but it is easy to use. It could be a good option for video creators who have no room in their budget for paid software. Videos made in Movie Maker will be simple, but that is all some people need.
Vegas Movie Studio
Vegas Movie Studio, which used to be Sony Vegas, is a big step up from Movie Maker. While editing your clips, you can adjust their brightness, contrast, and color balance. On the audio side of things, Vegas has a great audio restoration tool you can use to get rid of unwanted background noises.
Although it does not have filters, overlays, and animated elements like Filmora, Vegas does have some very modern-looking titles and transition effects.
The biggest advantage that Filmora has over Vegas is that it is a lot easier to use. Vegas has some great features, but accessing and using them is not something you can just jump into doing. Filmora is so intuitive that most users can just open it up and start applying effects.
Vegas is very reasonably priced at $49.95 USD, but it is only $10 more for the ease and effect variety of Filmora.
Section 2: Mac Video Editors
Here are two of the most popular video editors for the Mac OS:
iMovie
iMovie comes free with Mac computers, and it is a huge step up from Windows Movie Maker. It has some really nice audio editing tools, like an equalizer and the ability to set fade in and fade out times (which Filmora also has). When you are editing video clips, iMovie provides you with a stabilization tool, speed controls, and even some filters and overlays. There are text and title options available as well, although they are very basic.
The main difference between Filmora and iMovie is variety. Filmora has a huge range of titles in different styles; iMovie has everyday fonts with all the traditional credit/title animations. iMovie has close to the same amount of features as Filmora, but there is always less variety in those features, and they tend to feel dated.
The main difference between iMovie and every other editor on this list is the layout. The timeline is located in the top left portion of the screen, not stretched across the bottom, and the clips/sounds do not sit in different tracks. The iMovie interface is not actually very complicated, but it will be an adjustment for anybody used to a more traditional editing experience.
Final Cut Pro X
Final Cut Pro is Apple’s attempt at a professional-grade editing program. It is much more advanced than iMovie and offers 64-bit architecture and background rendering. Background rendering means that your imported clips are prepared for playback before you actually move them into your timeline, making the editing process a lot faster.
Final Cut Pro also boasts a huge selection of editing tools.
Like iMovie, Final Cut Pro does not use a traditional timeline. This will make it easier to learn for users upgrading from iMovie, but potentially more difficult for users coming from any other program. Final Cut Pro would be competition for Adobe Premiere if it were available on anything except the latest Mac OS.
Final Cut Pro X costs $300, making it a significant investment.
Section 3: Online Video Editors
WeVideo
WeVideo is a fairly simple cloud-based video editor. Its most useful feature is that it gives your team the ability to edit collaboratively. Multiple editors can upload footage and create their own edits of the project.
WeVideo has all of the most basic editing features – the abilities to trim clips, add transitions, and give your project a soundtrack. Other than the potential for collaboration, though, it has nothing that free programs like iMovie, and even Windows Movie Maker, do not have.
There are a few different pricing options for WeVideo. You can use it for free, but your storage space and the number of features you have access to will be very limited. Your videos will also be watermarked. Also, both the free and $19 packages limit your video resolution to 720p. You will need to pay at least $39 for 1080p, and it will cost you $69 to get rid of all the storage limits.
If you are going to pay $69 for video editing software, you are much better off using Filmora.
Section 4: The Pro-Choice
Adobe Premiere
Adobe Premiere is a professional editing software. In terms of functionality, it has every program on this list, including Filmora, beat. It has very powerful video and audio editing tools, and the program can be customized to suit the needs of particular projects.
Because it is designed for professionals and veteran editors, Premiere is far from a simple program. If you have not edited a video before, or are used to a simpler program, it will take you a long time to become good at using Premiere (it might be a good idea to find an online course).
It does have a few features designed to save time, such as an automatic audio syncing tool and the ability to apply changes you have made to one clip across multiple other clips. The Premiere is probably the best program for professional video editors, but Filmora’s ease of use gives it an edge with amateur video creators.
Conclusion
Filmora is the best video editing software for YouTubers and other online video creators. Windows Movie Maker and iMovie are decent basic programs for creators on a budget, and Premiere is an excellent program for professionals, but if your goal is to create awesome videos for YouTube, then Filmora is the best tool for the job.
If you want to find a video editing solution that empowers your imagination and creativity yet takes less effort, please try this robust and user-friendly video editing software Wondershare Filmora. It provides special effects, stock photo & video, sound library, etc., which will definitely enhance your productivity and helps to make money by making videos much accessible.
Richard Bennett
Richard Bennett is a writer and a lover of all things video.
Follow @Richard Bennett
Also read:
- Win & Mac MP3 Converter Unlock Your Music From YouTube
- Growth Hacking for YouTube Stars Maximizing Fans
- In 2024, Boost Your Video Impact Expert Tips on Using WM Maker
- Pursuing Well-Being Top 10 Yoga Channel Recommendations
- [Updated] Break Through the Crowd - Your Guide to Choosing Free Intro Masters
- [New] Achieve Seamless Video Playback by Removing Bars in YouTube
- [Updated] Digital Dominance Who Has the Largest Fanbase?
- Elevate Everyday - YouTube's Finest Yoga Influencers for 2024
- Channel Identity Made Simple with These Top 11 Zero-Cost Tools
- Dissecting Top-Viewed Video Dynamics on YouTube
- [New] Everyone's Guide to YouTube Success 10 Straightforward Video Tips
- Strategies to Purge YouTube's Video Buffer List
- 2024 Approved Aspect Ratios Decoded YouTube Edition – A Quick Reference Guide
- [New] Dive Deep Into Duality Mastering Multi-Video Watching on YouTube
- How To Make Your Videos a YouTube Hit Top Tips and Strategies
- In 2024, Direct Transfer Solution YouTube Content on Dailymotion Now
- [New] Discovering the Speedy Scaling Channels Among YouTube Titans
- 2024 Approved Double Your Watch Time on YouTube with These Tips
- How to Quickly And Easily Share A YouTube Playlist
- Insightful Interviews - Top 15 Recruitment Dialogues
- [Updated] Boost or Dial Down YouTube Audio with Devices
- Mastery in Managing Online Discussions on YouTube
- 2024 Approved Comedy Canvas Painting Laughter with Top 10 Video Concepts
- [Updated] Comprehensive Assessment of Digital Entertainers
- Elevating Your YouTube Shorts Presence with Impactful Strategies for 2024
- In 2024, Best 5 YouTube Tag Generators & Tips to Tag Videos Properly
- Efficient Guide Image Conversion to Professional YouTube Thumbnails
- Earth’s Premier Online Income Tycoon
- [Updated] Digital Wealth Creation Through Video Networking
- [New] Channel Growth Strategy Going with Studio or Beta Progression
- 2024 Approved Best Recording Equipment For Creating YouTube Masterpieces
- Quick Musical Notes Understanding YouTube Shorts
- 5 Winter YouTube Background Ideas to Warm Up Your Videos
- [New] Earn Extra Bucks Maximizing YouTube's Mobile Revenue Opportunities
- Cooking Crusaders YouTube Stars Serving Up Deliciousness for 2024
- A Visual Voyage Through Youtube's 2017 Data Deluge for 2024
- 2024 Approved Capturing Youtube Icons Browser Extension, Command Line & Software Trio
- Mastery of Live Sharing YouTube Edition
- In 2024, Dynamic Duo Display YouTube’s Way of Creative Splitting
- In 2024, Audience Wave Top Hash Tags to Swell Youtube Views
- Tailored Audio Gear Choosing Mics for Diverse Video Platforms
- [Updated] Audience Appreciation Assessment Self and Seekers Vs. Rival Repertoires
- Updated Ultimate Windows Sound Experience Designer
- Updated 2024 Approved The Rise of Non-FaceTime Video Chats Androids Most Trusted Options
- Complete Tutorial to Use VPNa to Fake GPS Location On Lava Agni 2 5G | Dr.fone
- New Elevate Your TikTok Game with Catchy Captions! Explore the Trendiest 2024 TikTok Captions for Every Occasion and Style. Up Your TikTok Content with Style
- In 2024, Detailed guide of ispoofer for pogo installation On Apple iPhone 14 Plus | Dr.fone
- In 2024, Illuminating Imagery Mastering Three Key Insta Hits
- Snapshots of Success Recording Your Switch Gaming for 2024
- New In 2024, Planning and Storyboarding Is the Most Important Part of Creating a Music Video. Here Are some Easy Tips for Planning and Storyboarding a Music Video in Filmora
- [New] Installation Instructions for Snapchat on a Mac for 2024
- [Updated] 2024 Approved Expedite Your TikTok Browsing Journey
- How to Turn Off Google Location to Stop Tracking You on Nokia G22 | Dr.fone
- In 2024, How to Transfer Contacts from Samsung Galaxy A14 4G To Phone | Dr.fone
- [New] Explore the Limitless Potential of FB VR Upload Tips
- 2024 Approved Transition Like a Pro 3 Expert Techniques in Final Cut Pro
- Ultimate Guide to Catch the Regional-Located Pokemon For Honor 100 | Dr.fone
- [New] 2024 Approved Top-Notch Grid Crafting Made Simple Our Expertly Selected 10 Tools
- Title: "Budget-Friendly Sponsorship Blueprint for YouTube Enthusiasts"
- Author: Kevin
- Created at : 2024-05-25 14:46:21
- Updated at : 2024-05-26 14:46:21
- Link: https://youtube-videos.techidaily.com/budget-friendly-sponsorship-blueprint-for-youtube-enthusiasts/
- License: This work is licensed under CC BY-NC-SA 4.0.
