
:max_bytes(150000):strip_icc()/005_casting-from-your-firefox-browser-4588162-90d13104cdbe4059aa19279e5f97fa55-064eb475c65f4139bfcb92f1af9d4969.jpg)
"Breaking the Monotony Innovative YT Playlist Shuffling"
Breaking the Monotony: Innovative YT Playlist Shuffling
We often create playlists on YouTube for different moods, genres, and occasions, but you may want to change the order of the videos or songs in your list. This is where the shuffling feature can help you.
Shuffling your YouTube playlist is an excellent way to mix things up and play various videos or songs from different channels without manually selecting each one.
But if you don’t know how to use the “Shuffle” feature, we’ll show you how to shuffle YouTube playlists on PCs, phones, and TVs. So, keep reading to start randomizing your YouTube playlist to mix up your music or video collection!
How To Shuffle YouTube Playlist On PCs/Phones/TVs?
Whether it’s a mix of our favorite songs, a set of dance videos to help get us through our workout, or a compilation of cat videos that never fail to make us smile, we all have that one go-to playlist we want to listen to over and over again.
But sometimes, even our favorite playlist can feel a little stale. That’s when it’s time to shuffle things up and give the playlist a fresh new feel.
To help you with this, we’ve provided step-by-step tutorials to help you shuffle Youtube playlists on your computer, phone, or Smart TV without having much trouble.
Part 1. How to Shuffle YouTube Playlist on PC?
Here is the step-by-step guide that can help you quickly shuffle your YouTube playlist on your PC, whether it’s before playback while watching, or from the Library:
How To Shuffle the Playlist Before Playlist Playback
The following is a quick rundown of the steps you need to take to shuffle the playlist before playback:
Step 1: First, open a browser on your PC to visit the YouTubewebsite and log in to your account using your credentials.
Step 2: Now, click the “Menu” (hamburger) icon on the top left of the YouTube home page and select your playlist from the menu.

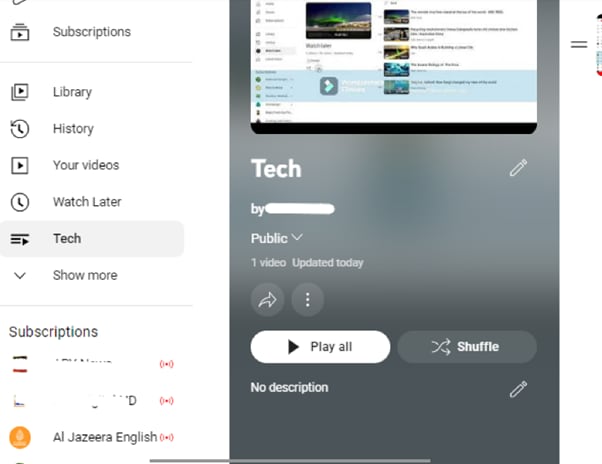
Step 3: On the next page, click the “Shuffle” button next to the “Play All” option in the playlist details section to randomize your YouTube playlist.
That’s about it! Your videos/songs will now play in random order.
How To Shuffle The Playlist While Listening
To learn how to shuffle a YouTube playlist while listening to your favorite songs, do the following steps in sequence:
Step 1: Launch your preferred browser on your PC and head to the “YouTube” homepage.
Step 2: Now, use the search icon to find your favorite song’s playlist or choose from the left “Menu” panel, and click “Play All” to listen to the music.
Step 3: When you start playing, you’ll find your playlist next to the video player. Click the crisscrossed arrows “Shuffle” icon below the playlist title, and the songs will start playing randomly instead of in proper order.

How To Shuffle The Playlist In the Library
If you want to randomize your YouTube playlist in the library section, follow these step-by-step instructions:
Step 1: In the first step, head to the YouTube website using your preferred browser on the PC and sign in to your account.
Step 2: Click the “Library” option from the left side panel on the YouTube homepage and scroll down to the “Playlists” section.
Step 3: In the next step, find your playlist and click the “View Full Playlist” option below. This will take you to the playlist page.
Step 4: Finally, on the playlist page, click the “Shuffle” option next to “Play All” in the details section. Now, when you start watching the videos in the playlist, they will play randomly.
Part 2. How To Shuffle YouTube Playlist On Handy?
It is possible to shuffle your YouTube playlist on your handy (iPhone or Android) with the following workarounds.
How To Shuffle The Playlist Before Playlist Playback/From Library
The following steps will help you shuffle your favorite playlists before playlist playback or from the Library:
Step 1: If the YouTube app is not installed on your phone, head to the “App Store “ or “GooglePlay Store “ and install the app.
Step 2: Now, launch the YouTube app on your handy and tap the “Library” option at the bottom right corner of the app’s home screen.
Step 3: Now, scroll down to the “Playlist” section and tap the playlist you want to shuffle. On the playlist screen, tap “Shuffle” next to the “Play All” option, and that’s it!

You can now enjoy your favorite videos and songs in a new order.
How To Shuffle The Playlist While Listening
To change the order of your favorite songs in the YouTube playlist while listening to it on your mobile device, do the following steps:
Step 1: First, open the “YouTube” app on your device and log into your account if you are not signed in already.
Step 2: On the app’s home screen, tap the “Search” bar, type the playlist name, and tap to open it to start listening to your favorite songs.
Step 3: You will find the playlist available under the video player. Simply tap the crisscrossed arrows “Shuffle” icon below the playlist’s title.

That’s all to it! Now you can enjoy your YouTube playlist in totally random order.
Part 3. How To Shuffle YouTube Playlist on TV?
The YouTube app is also available on smart TVs, which many people find to be a more enjoyable experience than watching YouTube videos on a small screen.
However, unfortunately, there is no way to shuffle a YouTube playlist on a Smart TV. This is a feature that is currently only available on the YouTube website and apps.
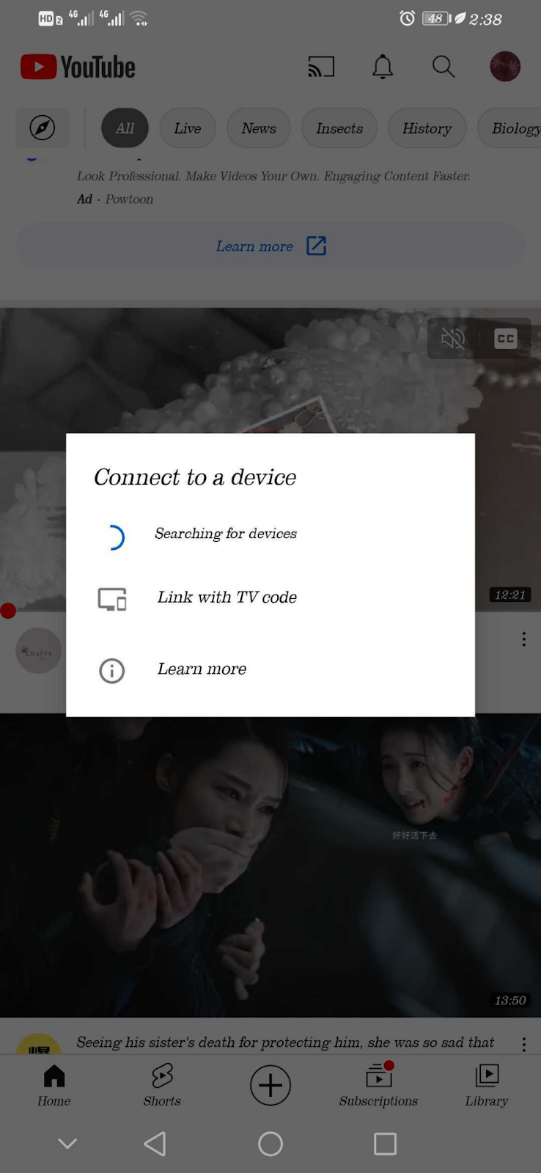
But if your Smart TV comes with a built-in Chromecast option, you can screen mirror the YouTube app on your TV and shuffle the playlist to your liking in the following way:
Step 1: In the first step, make sure your Smart TV and mobile device are connected to the same internet connection.
Step 2: In the next step, launch the YouTube app on your device, and access your playlist under the “Library” tab. Tap the “Shuffle” icon in the playlist details section and play your playlist
Step 3: In the final step, tap the “Cast” icon at the top-right of the screen and select your TV from the list to cast to.
Now you can enjoy randomly listen to your favorite songs on a more prominent display without getting bored.
Note:
You can also use other streaming devices like Firestick or Apple Airplay to cast YouTube on your Smart TV.
A Bouns Tip: How To Make a Music Video by Yourself?
We hope you have found appropriate solutions to shuffle your YouTube Playlist. Besides, supposing you are a music and YouTube lover, do you want to create videos with your favourite music? If yes, you can watch the video we have prepared for you. In this video, you will learn how to easily use a user-friendly video editor, Filmora, to make music videos!
In this comprehensive guide, we’ve provided a detailed step-by-step guide to show you how to shuffle YouTube playlists on your computer, mobile device, or Smart TV.
Hopefully, you’ve found this article informative and can now enjoy watching or listening to your favorite video/song in a random order in your YouTube playlist.
We often create playlists on YouTube for different moods, genres, and occasions, but you may want to change the order of the videos or songs in your list. This is where the shuffling feature can help you.
Shuffling your YouTube playlist is an excellent way to mix things up and play various videos or songs from different channels without manually selecting each one.
But if you don’t know how to use the “Shuffle” feature, we’ll show you how to shuffle YouTube playlists on PCs, phones, and TVs. So, keep reading to start randomizing your YouTube playlist to mix up your music or video collection!
How To Shuffle YouTube Playlist On PCs/Phones/TVs?
Whether it’s a mix of our favorite songs, a set of dance videos to help get us through our workout, or a compilation of cat videos that never fail to make us smile, we all have that one go-to playlist we want to listen to over and over again.
But sometimes, even our favorite playlist can feel a little stale. That’s when it’s time to shuffle things up and give the playlist a fresh new feel.
To help you with this, we’ve provided step-by-step tutorials to help you shuffle Youtube playlists on your computer, phone, or Smart TV without having much trouble.
Part 1. How to Shuffle YouTube Playlist on PC?
Here is the step-by-step guide that can help you quickly shuffle your YouTube playlist on your PC, whether it’s before playback while watching, or from the Library:
How To Shuffle the Playlist Before Playlist Playback
The following is a quick rundown of the steps you need to take to shuffle the playlist before playback:
Step 1: First, open a browser on your PC to visit the YouTubewebsite and log in to your account using your credentials.
Step 2: Now, click the “Menu” (hamburger) icon on the top left of the YouTube home page and select your playlist from the menu.
Step 3: On the next page, click the “Shuffle” button next to the “Play All” option in the playlist details section to randomize your YouTube playlist.
That’s about it! Your videos/songs will now play in random order.
How To Shuffle The Playlist While Listening
To learn how to shuffle a YouTube playlist while listening to your favorite songs, do the following steps in sequence:
Step 1: Launch your preferred browser on your PC and head to the “YouTube” homepage.
Step 2: Now, use the search icon to find your favorite song’s playlist or choose from the left “Menu” panel, and click “Play All” to listen to the music.
Step 3: When you start playing, you’ll find your playlist next to the video player. Click the crisscrossed arrows “Shuffle” icon below the playlist title, and the songs will start playing randomly instead of in proper order.
How To Shuffle The Playlist In the Library
If you want to randomize your YouTube playlist in the library section, follow these step-by-step instructions:
Step 1: In the first step, head to the YouTube website using your preferred browser on the PC and sign in to your account.
Step 2: Click the “Library” option from the left side panel on the YouTube homepage and scroll down to the “Playlists” section.
Step 3: In the next step, find your playlist and click the “View Full Playlist” option below. This will take you to the playlist page.
Step 4: Finally, on the playlist page, click the “Shuffle” option next to “Play All” in the details section. Now, when you start watching the videos in the playlist, they will play randomly.
Part 2. How To Shuffle YouTube Playlist On Handy?
It is possible to shuffle your YouTube playlist on your handy (iPhone or Android) with the following workarounds.
How To Shuffle The Playlist Before Playlist Playback/From Library
The following steps will help you shuffle your favorite playlists before playlist playback or from the Library:
Step 1: If the YouTube app is not installed on your phone, head to the “App Store “ or “GooglePlay Store “ and install the app.
Step 2: Now, launch the YouTube app on your handy and tap the “Library” option at the bottom right corner of the app’s home screen.
Step 3: Now, scroll down to the “Playlist” section and tap the playlist you want to shuffle. On the playlist screen, tap “Shuffle” next to the “Play All” option, and that’s it!
You can now enjoy your favorite videos and songs in a new order.
How To Shuffle The Playlist While Listening
To change the order of your favorite songs in the YouTube playlist while listening to it on your mobile device, do the following steps:
Step 1: First, open the “YouTube” app on your device and log into your account if you are not signed in already.
Step 2: On the app’s home screen, tap the “Search” bar, type the playlist name, and tap to open it to start listening to your favorite songs.
Step 3: You will find the playlist available under the video player. Simply tap the crisscrossed arrows “Shuffle” icon below the playlist’s title.
That’s all to it! Now you can enjoy your YouTube playlist in totally random order.
Part 3. How To Shuffle YouTube Playlist on TV?
The YouTube app is also available on smart TVs, which many people find to be a more enjoyable experience than watching YouTube videos on a small screen.
However, unfortunately, there is no way to shuffle a YouTube playlist on a Smart TV. This is a feature that is currently only available on the YouTube website and apps.
But if your Smart TV comes with a built-in Chromecast option, you can screen mirror the YouTube app on your TV and shuffle the playlist to your liking in the following way:
Step 1: In the first step, make sure your Smart TV and mobile device are connected to the same internet connection.
Step 2: In the next step, launch the YouTube app on your device, and access your playlist under the “Library” tab. Tap the “Shuffle” icon in the playlist details section and play your playlist
Step 3: In the final step, tap the “Cast” icon at the top-right of the screen and select your TV from the list to cast to.
Now you can enjoy randomly listen to your favorite songs on a more prominent display without getting bored.
Note:
You can also use other streaming devices like Firestick or Apple Airplay to cast YouTube on your Smart TV.
A Bouns Tip: How To Make a Music Video by Yourself?
We hope you have found appropriate solutions to shuffle your YouTube Playlist. Besides, supposing you are a music and YouTube lover, do you want to create videos with your favourite music? If yes, you can watch the video we have prepared for you. In this video, you will learn how to easily use a user-friendly video editor, Filmora, to make music videos!
In this comprehensive guide, we’ve provided a detailed step-by-step guide to show you how to shuffle YouTube playlists on your computer, mobile device, or Smart TV.
Hopefully, you’ve found this article informative and can now enjoy watching or listening to your favorite video/song in a random order in your YouTube playlist.
Boost Engagement Through Anime-Style Subscribe Buttons (Filmora Tutorial)
How to Make Your YouTube Animated Subscribe Button Easily With Filmora

Richard Bennett
Mar 27, 2024• Proven solutions
The main goal of every content creator is to increase its audience to expand its reach and views. To do so, it’s essential to provide something unique and different to the viewer. Without providing them the content they are looking for, it is impossible to grow your channel and reach. Once your content is ready and you are getting many views, it is essential to make these potential viewers your permanent viewers. The animated subscribe button will help you achieve this goal. While your viewers are watching your videos, you must remind them about subscribing to your channel for receiving such incredible content in the future. Subscribe animation plays a vital role in converting your viewers into subscribers.
There are so many platforms on the internet from where you can get Youtube subscribe button animation free, and you can also purchase these subscribe png gifs. But creating your own animated subscribe button can make you stand out from the crowd and make your videos unique and exclusive. Because it enables you to design it the way you want according to your brand, so, let’s create your own subscribe animation using Wondershare Filmora .
Step-By-Step guide
Step 1: To get started,open Filmora X. On your upper left corner, click on the “Sample Colors,” select the Green color and drag it to Video Track into the timeline. We are using a Green background to easily remove it using the green screen feature in Filmora to use it in our future projects after exporting it, without creating it again. Adjust the duration of this track according to your requirement. In my case, I am trying to make an animated subscribe button of 5 seconds.
Step 2: Lock this track by clicking on the lock icon to work on subscribe animation without disturbing the background easily.
Step 3: Now it’s time to design the subscribe png gif. Go to the Sample colors again and drag the red color into the time above the green background.
Step 4: Double click on the red color in the timeline and adjust its size. Make it look like a subscribe button that is a rectangle and place it at the bottom center of the background. You can put it anywhere you want it to appear in your future videos.
Step 5: Now, let’s add Subscribe text into the button. Go to the Title and select any style that you like. “Basic 6” will work perfectly fine for this purpose. Drag and drop it into the timeline above all tracks.
Step 6: Double click on the Title on the timeline and edit it with “Subscribe” and place it under the red rectangle and click OK.
Step 7: We have put a cursor that can click on the animated subscribe button. You can use Google Search to find a transparent cursor. Make sure to save it in png format. Download it and import it into Filmora.
Step 8: Drag and drop the cursor into the timeline and place it above all the other three tracks to make it prominent. Adjust the size of the cursor place it on the Subscribe button where you want it to appear.
Step 9: Now, it’s time to animate the design using keyframes. First of all, let’s animate the red rectangle. Double click on the red color on the timeline. Go to the ‘Animation’ tab and then click ‘Customize.’ Move to the 1 second in the timeline and click ‘Add.’
Step 10: Now go back to the beginning in the timeline and adjust the scale to 0%. It will make the rectangle pop up when you play the clip.
Step 11: Text needs to be animated as well to match it with the rectangle. Double click on the text in the timeline and click ‘ADVANCED.’
Step 12: In this Advance text editor, go to the ‘Animation’ tab and select any animation that you like. On the timeline under the preview screen, adjusts the dark areas according to the time you set on the rectangle, which was 1 second. We want the text to appear on the screen in 1 second, like the rectangle. Also, adjust the ending time when you want the text to disappear again. We have set it on 4 seconds. Which means it will start to fade after 4 seconds.
Step 13: Now, to animate the mouse cursor, we will use the same process we used for a rectangle that is key framing. Double click on the cursor track on the timeline and move the time on your timeline to a point when you want the cursor to appear. Now add a key frame by clicking ‘Add’.
Step 14: Now jump back to a point in your timeline, when the cursor will start appearing from outside the screen. Move the cursor outside the screen from where you want it to start moving toward the subscribe animation.
Step 15: To animate the click of the cursor, move ahead a little bit into your timeline and scale down the cursor to around 70%. Move it a little further and scale it up to 100%.
Step 16: You can add the sound of mouse click to make it more realistic. You can find this sound anywhere on the internet. Download it and import it into Filmora. Now place it into the timeline where it can match the movement of the cursor.
Step 17: Now it’s time to make this subscribe animation button disappear. Move forward into the time to the end, at around 4 seconds. Double click on the red button in the timeline and add a key frame at its actual scale.
Step 18: After that, move further in the timeline to the end and make its scale 0. It will make it disappear.
Step 19: Do the same with the cursor. Double click on the cursor in the time and add a key frame at its actual position.
Step 20: Move ahead when you want it to disappear. Move the cursor out of the screen and click ‘OK’.
Step 21: Your Subscribe png gif is ready to be exported and used in your videos. Click on export and choose from various formats and options to choose from while exporting it.
You may also like: How to Get People to Subscribe Channel
Conclusion:Your own Animated Subscribe Button is ready to be used in your future videos and projects. This is a ready-to-use subscribe button that can be easily used using the green screen effect in Filmora. Just import the clip, remove the green screen, and you are good to go. You can also customize this Subscribe Animation using your channel and more. Keep experimenting with new things using Filmora.


Richard Bennett
Richard Bennett is a writer and a lover of all things video.
Follow @Richard Bennett
Richard Bennett
Mar 27, 2024• Proven solutions
The main goal of every content creator is to increase its audience to expand its reach and views. To do so, it’s essential to provide something unique and different to the viewer. Without providing them the content they are looking for, it is impossible to grow your channel and reach. Once your content is ready and you are getting many views, it is essential to make these potential viewers your permanent viewers. The animated subscribe button will help you achieve this goal. While your viewers are watching your videos, you must remind them about subscribing to your channel for receiving such incredible content in the future. Subscribe animation plays a vital role in converting your viewers into subscribers.
There are so many platforms on the internet from where you can get Youtube subscribe button animation free, and you can also purchase these subscribe png gifs. But creating your own animated subscribe button can make you stand out from the crowd and make your videos unique and exclusive. Because it enables you to design it the way you want according to your brand, so, let’s create your own subscribe animation using Wondershare Filmora .
Step-By-Step guide
Step 1: To get started,open Filmora X. On your upper left corner, click on the “Sample Colors,” select the Green color and drag it to Video Track into the timeline. We are using a Green background to easily remove it using the green screen feature in Filmora to use it in our future projects after exporting it, without creating it again. Adjust the duration of this track according to your requirement. In my case, I am trying to make an animated subscribe button of 5 seconds.
Step 2: Lock this track by clicking on the lock icon to work on subscribe animation without disturbing the background easily.
Step 3: Now it’s time to design the subscribe png gif. Go to the Sample colors again and drag the red color into the time above the green background.
Step 4: Double click on the red color in the timeline and adjust its size. Make it look like a subscribe button that is a rectangle and place it at the bottom center of the background. You can put it anywhere you want it to appear in your future videos.
Step 5: Now, let’s add Subscribe text into the button. Go to the Title and select any style that you like. “Basic 6” will work perfectly fine for this purpose. Drag and drop it into the timeline above all tracks.
Step 6: Double click on the Title on the timeline and edit it with “Subscribe” and place it under the red rectangle and click OK.
Step 7: We have put a cursor that can click on the animated subscribe button. You can use Google Search to find a transparent cursor. Make sure to save it in png format. Download it and import it into Filmora.
Step 8: Drag and drop the cursor into the timeline and place it above all the other three tracks to make it prominent. Adjust the size of the cursor place it on the Subscribe button where you want it to appear.
Step 9: Now, it’s time to animate the design using keyframes. First of all, let’s animate the red rectangle. Double click on the red color on the timeline. Go to the ‘Animation’ tab and then click ‘Customize.’ Move to the 1 second in the timeline and click ‘Add.’
Step 10: Now go back to the beginning in the timeline and adjust the scale to 0%. It will make the rectangle pop up when you play the clip.
Step 11: Text needs to be animated as well to match it with the rectangle. Double click on the text in the timeline and click ‘ADVANCED.’
Step 12: In this Advance text editor, go to the ‘Animation’ tab and select any animation that you like. On the timeline under the preview screen, adjusts the dark areas according to the time you set on the rectangle, which was 1 second. We want the text to appear on the screen in 1 second, like the rectangle. Also, adjust the ending time when you want the text to disappear again. We have set it on 4 seconds. Which means it will start to fade after 4 seconds.
Step 13: Now, to animate the mouse cursor, we will use the same process we used for a rectangle that is key framing. Double click on the cursor track on the timeline and move the time on your timeline to a point when you want the cursor to appear. Now add a key frame by clicking ‘Add’.
Step 14: Now jump back to a point in your timeline, when the cursor will start appearing from outside the screen. Move the cursor outside the screen from where you want it to start moving toward the subscribe animation.
Step 15: To animate the click of the cursor, move ahead a little bit into your timeline and scale down the cursor to around 70%. Move it a little further and scale it up to 100%.
Step 16: You can add the sound of mouse click to make it more realistic. You can find this sound anywhere on the internet. Download it and import it into Filmora. Now place it into the timeline where it can match the movement of the cursor.
Step 17: Now it’s time to make this subscribe animation button disappear. Move forward into the time to the end, at around 4 seconds. Double click on the red button in the timeline and add a key frame at its actual scale.
Step 18: After that, move further in the timeline to the end and make its scale 0. It will make it disappear.
Step 19: Do the same with the cursor. Double click on the cursor in the time and add a key frame at its actual position.
Step 20: Move ahead when you want it to disappear. Move the cursor out of the screen and click ‘OK’.
Step 21: Your Subscribe png gif is ready to be exported and used in your videos. Click on export and choose from various formats and options to choose from while exporting it.
You may also like: How to Get People to Subscribe Channel
Conclusion:Your own Animated Subscribe Button is ready to be used in your future videos and projects. This is a ready-to-use subscribe button that can be easily used using the green screen effect in Filmora. Just import the clip, remove the green screen, and you are good to go. You can also customize this Subscribe Animation using your channel and more. Keep experimenting with new things using Filmora.
Richard Bennett
Richard Bennett is a writer and a lover of all things video.
Follow @Richard Bennett
Also read:
- Counteracting Bot Influence for Higher Traffic for 2024
- Top 5 Spotify Playlist Converters for Creating YouTube Content
- In 2024, Anime for Every Moment The Ultimate List of YouTube Sources
- Cut, Color & Compile A Deep Dive Into YouTube Studio Video Editing
- The Soundscapes of Success Building YouTube Playlists with Precision
- 2024 Approved 10 Masterpieces in Job Market Insight
- Sustaining YouTube CC Status to Boost Engagement
- [New] Audience Engagement Where to Captivate Viewers
- Diving Into YouTube Creation & Making It Monetary
- Is It Illegal to Archive Your YouTube Watch History?
- Navigating Video Landscape Vimeo and YouTube Distinguished
- [New] Elevate Your Vids Top YouTube SEO Gadgets
- [New] Breaking the Cycle of Zero Video Views on YouTube
- 2024 Approved Best Practices for YouTube Thumbnail Dimensions
- A Quick Dive Into Video Ratios The Aspect Ratio Essentials for YouTubers
- [Updated] Dial Back Your Playlist Quick Steps to Reverse Order
- In 2024, Creating User-Friendly YouTube Subscribe Icons
- Spectacular Swaps YouTube Editors' Tricks
- Procuring Legal Melodies A YouTube Creator's Guide
- [New] Club Craft How to Download Best DJ Vids
- 2024 Approved Dive Into the World of Youtuber Shorts
- [Updated] Elevate Video Engagement Top 7 Free Thumbnail Design Tools
- In 2024, Chart-Topping Tunes Compiling an Impressive YouTube Playlist
- 2024 Approved Customize Your Video's Appeal YouTube Thumbnail Tips & Tricks
- [Updated] Achieve 10 Free Tools for Thumbnail Extraction
- In 2024, Elevate Your Content with Professional End Screen Templates
- [New] 5-Star Channel Cutting Long URLs Down for YouTube Videos
- [Updated] A Compreranstive Approach to High-Fidelity Recording, No Mic Necessary
- [New] Clearing Up Confusion Addressing YouTube Short Concerns
- 2024 Approved Endless Entertainment Escapade Top-Tier Free Films on YouTube
- Everyone's Guide to YouTube Success 10 Straightforward Video Tips for 2024
- [Updated] Create Memorable Videos with the Right Thumbnail Font
- Direction and Intensity in Video Lighting for 2024
- [Updated] Choosing Prime Audio Editors for YouTube Creators
- In 2024, Discover World Wonders with These Top 10 Videos
- Elevate Your Mobile Shoot - Ranking the Best 9 CamGear Innovations
- Access Royalty-Free Beats for Your Vlog & More for 2024
- The Ultimate GIF Making Software Showdown
- In 2024, Blueprint Strategies for Authentic Life Enrichment Videos
- Crafting a Simplified YouTube Auto-Subscribe URL for 2024
- Jumpstart Success with Top 30 YouTube Intra Designers' Insights
- In 2024, Deciphering the Art of Personalized Playlist Curation for YouTube
- Ban-Free Omegle Tactics to Restore Profile Access for 2024
- In 2024, How to Transfer/Sync Notes from Apple iPhone 6 Plus to iPad | Dr.fone
- In 2024, 3 Ways for Android Pokemon Go Spoofing On Realme C53 | Dr.fone
- [New] Into Every Detailed Detail Expert Strategies to Record Immersive Sims 4 Adventures for 2024
- [New] 2024 Approved Elevate Engagement The Hottest TikTok Hashtags for Now
- In 2024, Chromatic Choices Discover the Best 5 Screens Today
- In 2024, Tips for Integrating Emojis Into Discord User Statuses
- In 2024, Elevate Video Conferencing Skills Google Meet Aesthetics Guide
- Why Vimeo Slideshow Maker Become More and More Popular for 2024
- Easy Guide to Infinix Hot 30i FRP Bypass With Best Methods
- In 2024, Best Ways on How to Unlock/Bypass/Swipe/Remove Vivo S17t Fingerprint Lock
- Updated In 2024, Unbiased Reviews Finding the Perfect YouTube to MP3 Converter
- In 2024, How to Mirror Tecno Spark 10 4G to Mac? | Dr.fone
- In 2024, How to Transfer Data from OnePlus Ace 3 to Any iOS Devices | Dr.fone
- Maximizing Team Output 8 Excellent Facebook Planners Revealed
- iCloud Separation How To Disconnect iPhone 15 Pro and iPad
- 9 Solutions to Fix Process System Isnt Responding Error on OnePlus 12 | Dr.fone
- How Can Samsung Galaxy F54 5GMirror Share to PC? | Dr.fone
- DIY iPhone Image Composition Techniques
- How to Fix Unfortunately, Contacts Has Stopped Error on Oppo Reno 10 Pro+ 5G | Dr.fone
- How to Hard Reset Realme Narzo 60 5G Without Password | Dr.fone
- Bring Back the Faded Step-by-Step on Transforming Prints to Pixels for 2024
- Title: "Breaking the Monotony Innovative YT Playlist Shuffling"
- Author: Kevin
- Created at : 2024-05-25 14:45:37
- Updated at : 2024-05-26 14:45:37
- Link: https://youtube-videos.techidaily.com/breaking-the-monotony-innovative-yt-playlist-shuffling/
- License: This work is licensed under CC BY-NC-SA 4.0.
