
:max_bytes(150000):strip_icc()/Streaming_GettyImages-1317927924_grinvalds_CROPPED-71ab52546b8b477ca2c0788bc26d150f.jpg)
"Boosting Exposure Posting YouTube Content on Facebook Effectively for 2024"
Boosting Exposure: Posting YouTube Content on Facebook Effectively
Create High-Quality Video - Wondershare Filmora
An easy and powerful YouTube video editor
Numerous video and audio effects to choose from
Detailed tutorials provided by the official channel
YouTube reports that Facebook is the most utilized platform fans use to watch online content. More so, up to 40% of those who watch the content do share links with their friends online – this then makes it quick to promote YouTube content on Facebook. Simply by making your new YouTube content visible on your Facebook page, and you’ll be certain that thousands of viewers will have a glimpse of it. You must already be scratching your head for ways on how to post a YouTube video on a Facebook page. Well, we bring you several ways to go through that and make your YouTube content accessible on Facebook.
In this article
01 How to Post YouTube video on Facebook?
02 Extra Tip: Facebook Video Tips for more Views and Shares
03 Frequently Asked Question about Facebook video
How to Post YouTube video on Facebook?
Since Facebook is easily accessible, many users have more access to it than other social media platforms. More so, the page allows you to communicate with your audience via photos, videos, graphics, text, among many other multimedia contents. You don’t even need any programming skills to operate it. Here are ways to post YouTube content to Facebook.
How to share a YouTube video on Facebook using a computer
If you have a stationary point of work, i.e., a computer, it is possible to share your YouTube video through it.
Step 1. First, visit the YouTube site at https://www.youtube.com . It can launch from any web browser.
Step 2. Choose from among your videos on YouTube the one you wish to share on Facebook.
Step 3. Then find the “Share” icon located directly under the video you want to share. Click on the video and hit the “Share” button below the video.
Step 4. Choose “Facebook” from the sharing options that pop up.
Step 5. Next, sign in to “Facebook” on your desktop. Then select the destination point you want your video to land in by using the drop-down menu at the top of your desktop screen. Select the “Share to News Feed” or perhaps the share to “Story.”
Step 6. Finally, click the “Post to Facebook” tab to share your YouTube content with Facebook.
How to share a YouTube video on Facebook using a mobile device
Are you on the go and want your Facebook fans to know what content you have on your YouTube channel? Here are the simple steps on how to post a YouTube video on Facebook right from the palm of your hands – a mobile device.
Step 1. Use any browser on your mobile device to launch the YouTube app from the official website.
Step 2. Peruse through your YouTube videos and choose the one you wish to share on Facebook.
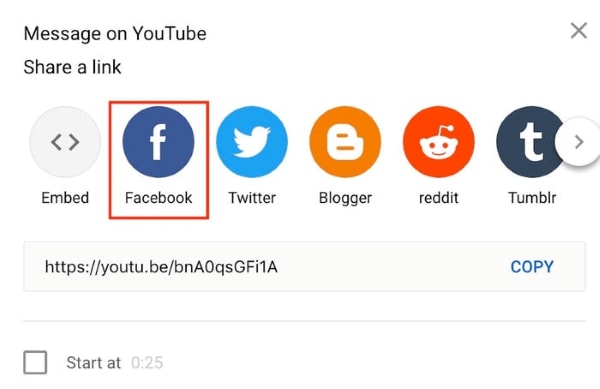
Step 3. Check below the video and click on the “Share” icon.
Step 4. Search through the app’s options and choose Facebook. Also, ensure that the “Facebook” app is installed on your mobile device to make your videos sharable.
Step 5. Click on the “Next” option in the upper right-hand corner of your mobile screen. It will enable video sharing.
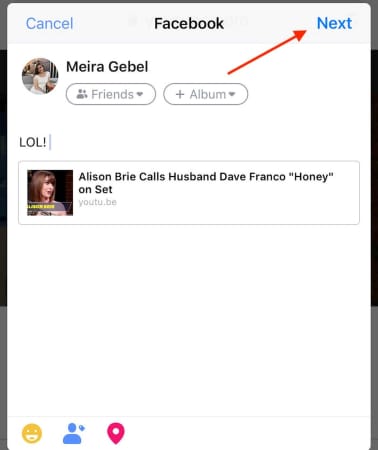
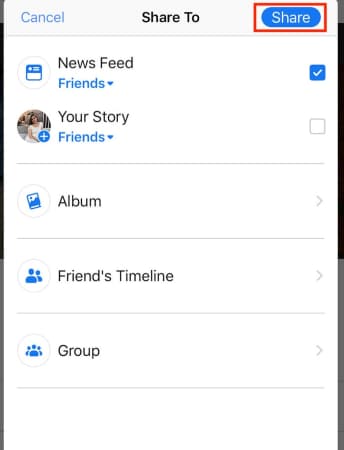
Step 6. Then choose the YouTube video’s post destination to your Facebook. It could be shared on your timeline, story, or a Facebook group’s page.
Step 7. Finally, click on the “Share” tab to make your video viewable on Facebook.
How to post a YouTube video on Facebook
Easily post your YouTube video on Facebook and let viewers access them directly from your Facebook feed. By this, your fans don’t have to click on other tabs but will access the videos directly.
Step 1. Copy the YouTube video’s link
First, go to your YouTube channel and copy the video link that you want to post to Facebook. You can as well copy the embed code.
Step 2. Embed the video link you copied
This link should be embedded into a Facebook post. Do this by first logging into your Facebook account. Then go to the top of your “Facebook News Feed” and click the “What’s on your mind” box.
Step 3. Paste your link
Right-click on the “What’s on your mind” box, then select the “Paste” option.
Step 4. Preview video
Facebook will let you preview the video you just posted. Check whether you have pasted the right video before you post it.
Step 5. Post your video
Now, scroll down and click on the “Post” tab. You can also add a message to your post. Just place a cursor after the video URL and hit the “Enter” key on your keyboard. Finally, scroll down and hit the “Post” tab to make your video public on Facebook.
Extra Tip: Facebook Video Tips for more Views and Shares
You have to play your cards well when it comes to posting and sharing your videos on Facebook. These tips are all you need.
- Catch viewer’s attention within the shortest time possible
Here, your main aim is to convince your viewers. So, don’t let them spend so much time before you catch their attention. You can bring up a point about some latest news or adventures that let your viewers connect immediately.
- Add captions to the video
It is not necessarily possible that viewers will watch your videos with the sound on. Some like it when it’s silent and might disable the sound auto-play. Add some captions so that viewers will understand your video, even on silent mode.
- Emphasize on one key-point
Focus on one key point so that your viewers are not swayed away. Your video is highly sharable if it is easy to understand.
- Add a Call To Action
Including a call-to-action will encourage your viewers to subscribe to your channel. Ensure you include it at the end of your video to tell viewers what to do next. You could also include a link to your blog post to let your viewers read and find more content from your other channels.
- Facebook ads can make a great difference
Facebook is a great place for running ads that reach a wider audience. Adverts are great ways to target a specific audience. They explain your products and services more straightforwardly.
- Embed your videos on blog posts
Numerous people get to access guest posts and blog posts. You can embed your Facebook videos on such posts to reach more people. Just get the embed code from your video, then copy and paste it to a guest or blog post.
Frequently Asked Question about Facebook video
Both viewers and content creators have a few concerns about YouTube and Facebook videos. Here are some frequently asked questions that will be of benefit to you.
1) Is it legal to share YouTube videos?
YouTube is just one platform where content creators showcase their productions. Yes, it is legal to share your content on other forums like Facebook, Twitter, Instagram, etc.
2) What is the best time to post to your Facebook page?
The best time to post on a Facebook page depends on your time zone. Generally, viewers access Facebook late in the evening and early in the night. Perhaps they are off work and now want to relax by checking the day’s updates.
3) What are Facebook business accounts and personal accounts?
Facebook business accounts are designed for users who want to use Facebook to administer their pages and advert campaigns. This account cannot be found in searching or receiving friend request apps. Nonetheless, personal accounts are used at basic and casual levels. You can search for friends and send requests. Personal accounts are also easy to manage.
4) Can I mobilize people to share my posted content on Facebook?
Yes, it is possible to let others share what you have posted. Just ensure they know your intention by constant reminders. Some popular ways that are proven to be effective include the use of “Call to Action,” using an image or video with your Facebook status update and offering some incentive to your fans for sharing.
5) Does the quality of my YouTube content drop when I share it with Facebook?
Of course not! What you pull from your YouTube channel is the kind of video that will be watched from Facebook. The quality cannot deteriorate. However, it is good to ensure you compose quality videos on YouTube before sharing them. Several video editing apps like Filmora can help you compose quality videos with high resolution.
Conclusion
● Facebook is a great platform that is accessed by a wide audience. More so, you can share your content from other platforms easily. The article has covered how to share YouTube videos on Facebook and hook your audience. You can use your computer or share directly from your mobile device in simple steps. It is also better to play some tricks on your effort to reach a wider audience. These include a CTA, embedding your Facebook videos to blogs posts, among other options.
YouTube reports that Facebook is the most utilized platform fans use to watch online content. More so, up to 40% of those who watch the content do share links with their friends online – this then makes it quick to promote YouTube content on Facebook. Simply by making your new YouTube content visible on your Facebook page, and you’ll be certain that thousands of viewers will have a glimpse of it. You must already be scratching your head for ways on how to post a YouTube video on a Facebook page. Well, we bring you several ways to go through that and make your YouTube content accessible on Facebook.
In this article
01 How to Post YouTube video on Facebook?
02 Extra Tip: Facebook Video Tips for more Views and Shares
03 Frequently Asked Question about Facebook video
How to Post YouTube video on Facebook?
Since Facebook is easily accessible, many users have more access to it than other social media platforms. More so, the page allows you to communicate with your audience via photos, videos, graphics, text, among many other multimedia contents. You don’t even need any programming skills to operate it. Here are ways to post YouTube content to Facebook.
How to share a YouTube video on Facebook using a computer
If you have a stationary point of work, i.e., a computer, it is possible to share your YouTube video through it.
Step 1. First, visit the YouTube site at https://www.youtube.com . It can launch from any web browser.
Step 2. Choose from among your videos on YouTube the one you wish to share on Facebook.
Step 3. Then find the “Share” icon located directly under the video you want to share. Click on the video and hit the “Share” button below the video.
Step 4. Choose “Facebook” from the sharing options that pop up.
Step 5. Next, sign in to “Facebook” on your desktop. Then select the destination point you want your video to land in by using the drop-down menu at the top of your desktop screen. Select the “Share to News Feed” or perhaps the share to “Story.”
Step 6. Finally, click the “Post to Facebook” tab to share your YouTube content with Facebook.
How to share a YouTube video on Facebook using a mobile device
Are you on the go and want your Facebook fans to know what content you have on your YouTube channel? Here are the simple steps on how to post a YouTube video on Facebook right from the palm of your hands – a mobile device.
Step 1. Use any browser on your mobile device to launch the YouTube app from the official website.
Step 2. Peruse through your YouTube videos and choose the one you wish to share on Facebook.
Step 3. Check below the video and click on the “Share” icon.
Step 4. Search through the app’s options and choose Facebook. Also, ensure that the “Facebook” app is installed on your mobile device to make your videos sharable.
Step 5. Click on the “Next” option in the upper right-hand corner of your mobile screen. It will enable video sharing.
Step 6. Then choose the YouTube video’s post destination to your Facebook. It could be shared on your timeline, story, or a Facebook group’s page.
Step 7. Finally, click on the “Share” tab to make your video viewable on Facebook.
How to post a YouTube video on Facebook
Easily post your YouTube video on Facebook and let viewers access them directly from your Facebook feed. By this, your fans don’t have to click on other tabs but will access the videos directly.
Step 1. Copy the YouTube video’s link
First, go to your YouTube channel and copy the video link that you want to post to Facebook. You can as well copy the embed code.
Step 2. Embed the video link you copied
This link should be embedded into a Facebook post. Do this by first logging into your Facebook account. Then go to the top of your “Facebook News Feed” and click the “What’s on your mind” box.
Step 3. Paste your link
Right-click on the “What’s on your mind” box, then select the “Paste” option.
Step 4. Preview video
Facebook will let you preview the video you just posted. Check whether you have pasted the right video before you post it.
Step 5. Post your video
Now, scroll down and click on the “Post” tab. You can also add a message to your post. Just place a cursor after the video URL and hit the “Enter” key on your keyboard. Finally, scroll down and hit the “Post” tab to make your video public on Facebook.
Extra Tip: Facebook Video Tips for more Views and Shares
You have to play your cards well when it comes to posting and sharing your videos on Facebook. These tips are all you need.
- Catch viewer’s attention within the shortest time possible
Here, your main aim is to convince your viewers. So, don’t let them spend so much time before you catch their attention. You can bring up a point about some latest news or adventures that let your viewers connect immediately.
- Add captions to the video
It is not necessarily possible that viewers will watch your videos with the sound on. Some like it when it’s silent and might disable the sound auto-play. Add some captions so that viewers will understand your video, even on silent mode.
- Emphasize on one key-point
Focus on one key point so that your viewers are not swayed away. Your video is highly sharable if it is easy to understand.
- Add a Call To Action
Including a call-to-action will encourage your viewers to subscribe to your channel. Ensure you include it at the end of your video to tell viewers what to do next. You could also include a link to your blog post to let your viewers read and find more content from your other channels.
- Facebook ads can make a great difference
Facebook is a great place for running ads that reach a wider audience. Adverts are great ways to target a specific audience. They explain your products and services more straightforwardly.
- Embed your videos on blog posts
Numerous people get to access guest posts and blog posts. You can embed your Facebook videos on such posts to reach more people. Just get the embed code from your video, then copy and paste it to a guest or blog post.
Frequently Asked Question about Facebook video
Both viewers and content creators have a few concerns about YouTube and Facebook videos. Here are some frequently asked questions that will be of benefit to you.
1) Is it legal to share YouTube videos?
YouTube is just one platform where content creators showcase their productions. Yes, it is legal to share your content on other forums like Facebook, Twitter, Instagram, etc.
2) What is the best time to post to your Facebook page?
The best time to post on a Facebook page depends on your time zone. Generally, viewers access Facebook late in the evening and early in the night. Perhaps they are off work and now want to relax by checking the day’s updates.
3) What are Facebook business accounts and personal accounts?
Facebook business accounts are designed for users who want to use Facebook to administer their pages and advert campaigns. This account cannot be found in searching or receiving friend request apps. Nonetheless, personal accounts are used at basic and casual levels. You can search for friends and send requests. Personal accounts are also easy to manage.
4) Can I mobilize people to share my posted content on Facebook?
Yes, it is possible to let others share what you have posted. Just ensure they know your intention by constant reminders. Some popular ways that are proven to be effective include the use of “Call to Action,” using an image or video with your Facebook status update and offering some incentive to your fans for sharing.
5) Does the quality of my YouTube content drop when I share it with Facebook?
Of course not! What you pull from your YouTube channel is the kind of video that will be watched from Facebook. The quality cannot deteriorate. However, it is good to ensure you compose quality videos on YouTube before sharing them. Several video editing apps like Filmora can help you compose quality videos with high resolution.
Conclusion
● Facebook is a great platform that is accessed by a wide audience. More so, you can share your content from other platforms easily. The article has covered how to share YouTube videos on Facebook and hook your audience. You can use your computer or share directly from your mobile device in simple steps. It is also better to play some tricks on your effort to reach a wider audience. These include a CTA, embedding your Facebook videos to blogs posts, among other options.
Essential Guide: 9 Cost-Free Editing Tools for Creatives
9 Best Free and Easy Editing Apps You Should Know

Richard Bennett
Dec 14, 2023• Proven solutions
Have you ever made a video 100% on your phone using a mobile video editing app?
If you’ve just started off on YouTube, there’s a good chance your main camera is the one in your phone. Actually, there’s a good chance of that even if you’ve been making YouTube videos for a while now.
Since you’re shooting videos on your phone, why shouldn’t you edit them there too? Here are 9 free video editing apps you can use for YouTube.
Note: This is not a ranked list. The apps will appear in alphabetical order.
- Adobe Premiere Clip (Android or iOS)
- Cameo (iOS)
- Clips (iOS)
- Filmora (Android or iOS)
- Funimate (Android or iOS)
- iMovie (iOS)
- Movie Maker Filmmaker by Alive (Android or iOS)
- PowerDirector (Android)
- Vlogit (Android or iOS)
Adobe Premiere Clip (Android or iOS )

Key Points:
- Automatic using clips. Times them to music
- Guides you with pop-up tips
- No text/title overlays
- Exports directly to YouTube
Adobe Premiere Pro is a professional-grade desktop editor, and Adobe Premiere Clip lives up to the quality standards set by its big-brother software. It is missing some features you might want for YouTube videos, like title effects, but it does have some bells and whistles. There’s a good selection of filters.

Making changes to your picture, like adjusting the exposure or the prevalence of highlights or shadows, is just a matter of sliding bars. The tools for splitting and duplicating clips are easy to find too. You just toggle between the two icons right above your video – the one that looks like a shutter and the one that looks like adjustment bars – to switch between the picture tools and the other tools.

You cannot add what you might normally think of as a title effect in Adobe Premiere Clip, so it’ll be hard to fully complete your video. You can add text cards to put in-between your video clips, but you can’t overlay the title on top of a clip.
You can share your video directly to YouTube when you export.
Cameo (iOS)

Key Points:
- Easy-to-apply themes
- Customizable titles
- Limited features
- Exports to 4K (if your clips are 4K)
Vimeo is a video sharing site with more of a ‘filmmaker’ focus than YouTube, so it isn’t a surprise that their mobile editing app Cameo can export high-quality 4K videos.
Like some of the other apps on this list, Cameo does not have a huge variety of functions. You can reorder your clips, trim them, add titles, and apply themes (essentially filter and title combos).
There are three icons on the main interface: Scissors, a Music Note, and Filters.
The Scissors will take you to the trimming screen, where you can make your clip shorter or longer.

You can also add a title in the trimming screen, but you will not be able to change the font style or color until you are in the Filter screen.
In the Filter screen (tap the overlapping filters icon on the main interface) you will be able to adjust the color of your text by tapping on the circle with the A in it. Tapping where it says ‘Font’ will change your font style.

You can also tap on Themes and choose a premade style.

Here’s what ‘Crush’ looks like applied:

My font was changed, and there’s also a filter now. In order to apply a filter, you must start with a theme.
Clips (iOS)

Key Points:
- Great selection of stickers
- Lacks some basic tools
- Simple interface
Clips is an intuitive app with a lot of options for decorating your videos. It is lacking in some of the more basic editings features you might expect (i.e. you cannot split clips or do any color correction), but it has a lot of fun features like stickers and emojis that could make up for that depending on your needs.

There are also more traditional effects, like filters and titles. There are a wide range of title options in styles that are popular on YouTube, and a fairly standard filter selection.

While you cannot split clips in this app, but trimming and reordering them is easy. For trimming, you just select the clip and then Trim to open a screen where you can drag the start and end points of the clip.
To rearrange your clips, just tap the clip you want to move and hold down. You’ll be able to drag it to a new location.
It’d be hard to rely on Clips exclusively as your YouTube video editor, but it’s well suited for Instagram or for making quick ‘on-the-go’ videos.
Filmora (Android or iOS)

Key Points:
- Export directly to YouTube
- 16:9 or 1:1 for Instagram
- Includes effects like transitions, filters, and overlays
- End-roll logo
You can make a complete video easily just by tapping and dragging in Filmora, and there are even effects like filters, transitions, and overlays you can add to make your video more polished.
After importing your media into Filmora (you can import videos and photos saved on your phone, or media which has been uploaded to a social media account like Facebook or Instagram) you can change the order of your clips by tapping one, pressing down for a moment, and then dragging your clips where you want them.
Trimming a clip is as simple as tapping on it and then Duration. You’ll get this screen where you can adjust the length easily by dragging the markers to beginning or endpoints.

Cropping and zooming are simple too.

Filmora comes with pre-made themes you can apply which include titles, filters, and other effects. These might not be ideal if you already have branding you like to use for YouTube, but in some situations, they can make video creation a lot faster.

Filmora comes loaded with music, or you can even import your own music from your phone.
Once you’re done, tap ‘save’ in the top right corner of your screen to export your video. From the save screen, you’ll be able to export your video directly to YouTube.

One potential drawback is that Filmora will add its own logo to the end of your exported video. This logo will not distract from your video content since it is added at the end and never overlaps any of your clips, but it still might not be ideal for all creators.
Funimate (Android or iOS )

Key Points:
- Easily add text and shapes
- Rainbow doodling
- Shake effects
- Small ‘Funimate’ watermark in videos from the free version
Funimate is lives up to the ‘fun’ promise in its name. It’s designed mostly for music videos/Musical.ly and while it is missing a lot of more typical editing options, there are a few free tools in Funimate that other apps just don’t have.
For example, there are shake and distortion effects available through Funimate that you usually only find in desktop software.
You can also draw rainbow designs on your video with your finger – no other app on this list can do that.
The text tool in Funimate is easy to use, and there are cool looking glow effects you can apply in the color selection screen. Those options are also available when you’re adding shapes, likes stars and sparkles.
Funimate is not built for typical editing, which is both its strength and its weakness. Trimming your clips is its own stage which you must complete before you start adding effects, and you cannot split clips or add multiple clips.
The free version of Funimate does add a small watermark to your videos in the bottom-right corner, but it is subtle enough that I almost missed it completely while reviewing the app.
iMovie (iOS)

Key Points:
- Trailer templates
- Themes
- Limited tools and resources
iMovie’s mobile app is designed for ease and includes things like ‘trailer templates’ and themes that allow you to make a video quickly and with minimal effort.
This streamlined app is limited in its features. Other apps on this list have left out color correction tools or clip splitting tools and instead loaded up on decorative features like stickers, emojis, and overlays. iMovie has left out these tools and does not have an abundance of decorative features either.
There are filters, themes, and titles, however.
The titles are simple but polished, and you’ll find all the standard types of filters.
The themes include a variety of graphics and are applied to your entire video, not individual clips. You can also apply one filter to your entire video.
iMovie also includes a decent selection of transitions, which you can apply easily by tapping the area between two clips.
Movie Maker Filmmaker by Alive (Android or iOS )

Key Points:
- Good title tool
- Stickers
- Change clip duration
- 16:9 or 1:1
Movie Maker Filmmaker (the app will be labeled ‘Alive’ in on your phone) has a lot of features that will help you put together a fun YouTube video. There’s a great selection of stickers, filters, and overlays and they’re all easy to apply. You just click on what you want and resize/reposition it in the player.

This app is missing a lot of basic editing features, however. You cannot adjust things like brightness or saturation. This won’t be a problem if you’re happy with your clips as-is, but it’s a bit odd to not have those options.
There is a text tool and while it is fairly basic, it is also flexible. There is a good selection of fonts to choose from, and you can also choose whether or not you want a colored background, and if your text should have a shadow.
Once you’ve decided on the look of your text you can drag it, resize it, and tilt it however you want in the preview screen.
A slightly odd feature of this app is that it doesn’t save your video to your phone or export it directly to YouTube. Instead, it saves it – and shares it – within the app and gives you the option of sharing it with YouTube after.
Power Director (Android)

Key Points:
- A timeline like desktop software
- All the basic editing features
- Lots of transitions
- Videos from the free version will be watermarked
The first thing you’ll notice when you open up Power Director is that the interface looks a lot like the interface of a lot of desktop editors with a very classic timeline. This familiarity could make it easy to jump into if you’re used to editing on your laptop.
However, Power Director is a bit less intuitive than most of the other apps on this list. I wouldn’t go so far as to say it’s difficult to use – it isn’t, it’s much easier than a lot of desktop software – but among mobile apps designed for streamlined efficiency it does stand out as being a bit harder to dive into.
That is partly because there’s a lot you can do with it. It has the tools you would expect in an editor. You can split and trim clips, and you have all the standard color tools including some that most mobile apps leave out.
A lot of apps have Brightness, Contrast, and Saturation, but PowerDirector also has Color Temperature and Tint.
In addition to editing tools, PowerDirector has bells and whistles like filters –
- and a ton of great transitions.
One drawback of PowerDirector is that the free version will watermark your videos. This watermark is not intrusive, but it isn’t as subtle as the Funimate one either.
You can export videos from PowerDirector directly to YouTube.
Vlogit (Android or iOS )

Key Points:
- Easy thumbnail maker
- Export directly to YouTube
- Animated stickers
Vlogit is also an app from the creators of the Filmora Video Editor. It isn’t quite as intuitive as Filmora, but the major benefit of Vlogit for YouTube creators is that it was designed with you in mind. It has features like animated stickers, emojis, and a thumbnail maker which were included specifically because YouTubers and vloggers need them.
All the usual adjustments you might want to make, like saturation or sharpness, are easy in Vlogit. So are adjustments to the length or crop of clips.
After you save your video you’ll have the option of creating a thumbnail using a screenshot from your video. You can add a colored border, text, emojis, and more!
Once you’re done, you can export directly to YouTube. Like Filmora, Vlogit does have a post-video logo roll.
Have you ever used a free mobile app to edit one of your YouTube videos? What did you use, and were you happy with the results?
Richard Bennett
Richard Bennett is a writer and a lover of all things video.
Follow @Richard Bennett
Richard Bennett
Dec 14, 2023• Proven solutions
Have you ever made a video 100% on your phone using a mobile video editing app?
If you’ve just started off on YouTube, there’s a good chance your main camera is the one in your phone. Actually, there’s a good chance of that even if you’ve been making YouTube videos for a while now.
Since you’re shooting videos on your phone, why shouldn’t you edit them there too? Here are 9 free video editing apps you can use for YouTube.
Note: This is not a ranked list. The apps will appear in alphabetical order.
- Adobe Premiere Clip (Android or iOS)
- Cameo (iOS)
- Clips (iOS)
- Filmora (Android or iOS)
- Funimate (Android or iOS)
- iMovie (iOS)
- Movie Maker Filmmaker by Alive (Android or iOS)
- PowerDirector (Android)
- Vlogit (Android or iOS)
Adobe Premiere Clip (Android or iOS )
Key Points:
- Automatic using clips. Times them to music
- Guides you with pop-up tips
- No text/title overlays
- Exports directly to YouTube
Adobe Premiere Pro is a professional-grade desktop editor, and Adobe Premiere Clip lives up to the quality standards set by its big-brother software. It is missing some features you might want for YouTube videos, like title effects, but it does have some bells and whistles. There’s a good selection of filters.
Making changes to your picture, like adjusting the exposure or the prevalence of highlights or shadows, is just a matter of sliding bars. The tools for splitting and duplicating clips are easy to find too. You just toggle between the two icons right above your video – the one that looks like a shutter and the one that looks like adjustment bars – to switch between the picture tools and the other tools.
You cannot add what you might normally think of as a title effect in Adobe Premiere Clip, so it’ll be hard to fully complete your video. You can add text cards to put in-between your video clips, but you can’t overlay the title on top of a clip.
You can share your video directly to YouTube when you export.
Cameo (iOS)
Key Points:
- Easy-to-apply themes
- Customizable titles
- Limited features
- Exports to 4K (if your clips are 4K)
Vimeo is a video sharing site with more of a ‘filmmaker’ focus than YouTube, so it isn’t a surprise that their mobile editing app Cameo can export high-quality 4K videos.
Like some of the other apps on this list, Cameo does not have a huge variety of functions. You can reorder your clips, trim them, add titles, and apply themes (essentially filter and title combos).
There are three icons on the main interface: Scissors, a Music Note, and Filters.
The Scissors will take you to the trimming screen, where you can make your clip shorter or longer.
You can also add a title in the trimming screen, but you will not be able to change the font style or color until you are in the Filter screen.
In the Filter screen (tap the overlapping filters icon on the main interface) you will be able to adjust the color of your text by tapping on the circle with the A in it. Tapping where it says ‘Font’ will change your font style.
You can also tap on Themes and choose a premade style.
Here’s what ‘Crush’ looks like applied:
My font was changed, and there’s also a filter now. In order to apply a filter, you must start with a theme.
Clips (iOS)
Key Points:
- Great selection of stickers
- Lacks some basic tools
- Simple interface
Clips is an intuitive app with a lot of options for decorating your videos. It is lacking in some of the more basic editings features you might expect (i.e. you cannot split clips or do any color correction), but it has a lot of fun features like stickers and emojis that could make up for that depending on your needs.
There are also more traditional effects, like filters and titles. There are a wide range of title options in styles that are popular on YouTube, and a fairly standard filter selection.
While you cannot split clips in this app, but trimming and reordering them is easy. For trimming, you just select the clip and then Trim to open a screen where you can drag the start and end points of the clip.
To rearrange your clips, just tap the clip you want to move and hold down. You’ll be able to drag it to a new location.
It’d be hard to rely on Clips exclusively as your YouTube video editor, but it’s well suited for Instagram or for making quick ‘on-the-go’ videos.
Filmora (Android or iOS)
Key Points:
- Export directly to YouTube
- 16:9 or 1:1 for Instagram
- Includes effects like transitions, filters, and overlays
- End-roll logo
You can make a complete video easily just by tapping and dragging in Filmora, and there are even effects like filters, transitions, and overlays you can add to make your video more polished.
After importing your media into Filmora (you can import videos and photos saved on your phone, or media which has been uploaded to a social media account like Facebook or Instagram) you can change the order of your clips by tapping one, pressing down for a moment, and then dragging your clips where you want them.
Trimming a clip is as simple as tapping on it and then Duration. You’ll get this screen where you can adjust the length easily by dragging the markers to beginning or endpoints.
Cropping and zooming are simple too.
Filmora comes with pre-made themes you can apply which include titles, filters, and other effects. These might not be ideal if you already have branding you like to use for YouTube, but in some situations, they can make video creation a lot faster.
Filmora comes loaded with music, or you can even import your own music from your phone.
Once you’re done, tap ‘save’ in the top right corner of your screen to export your video. From the save screen, you’ll be able to export your video directly to YouTube.
One potential drawback is that Filmora will add its own logo to the end of your exported video. This logo will not distract from your video content since it is added at the end and never overlaps any of your clips, but it still might not be ideal for all creators.
Funimate (Android or iOS )
Key Points:
- Easily add text and shapes
- Rainbow doodling
- Shake effects
- Small ‘Funimate’ watermark in videos from the free version
Funimate is lives up to the ‘fun’ promise in its name. It’s designed mostly for music videos/Musical.ly and while it is missing a lot of more typical editing options, there are a few free tools in Funimate that other apps just don’t have.
For example, there are shake and distortion effects available through Funimate that you usually only find in desktop software.
You can also draw rainbow designs on your video with your finger – no other app on this list can do that.
The text tool in Funimate is easy to use, and there are cool looking glow effects you can apply in the color selection screen. Those options are also available when you’re adding shapes, likes stars and sparkles.
Funimate is not built for typical editing, which is both its strength and its weakness. Trimming your clips is its own stage which you must complete before you start adding effects, and you cannot split clips or add multiple clips.
The free version of Funimate does add a small watermark to your videos in the bottom-right corner, but it is subtle enough that I almost missed it completely while reviewing the app.
iMovie (iOS)
Key Points:
- Trailer templates
- Themes
- Limited tools and resources
iMovie’s mobile app is designed for ease and includes things like ‘trailer templates’ and themes that allow you to make a video quickly and with minimal effort.
This streamlined app is limited in its features. Other apps on this list have left out color correction tools or clip splitting tools and instead loaded up on decorative features like stickers, emojis, and overlays. iMovie has left out these tools and does not have an abundance of decorative features either.
There are filters, themes, and titles, however.
The titles are simple but polished, and you’ll find all the standard types of filters.
The themes include a variety of graphics and are applied to your entire video, not individual clips. You can also apply one filter to your entire video.
iMovie also includes a decent selection of transitions, which you can apply easily by tapping the area between two clips.
Movie Maker Filmmaker by Alive (Android or iOS )
Key Points:
- Good title tool
- Stickers
- Change clip duration
- 16:9 or 1:1
Movie Maker Filmmaker (the app will be labeled ‘Alive’ in on your phone) has a lot of features that will help you put together a fun YouTube video. There’s a great selection of stickers, filters, and overlays and they’re all easy to apply. You just click on what you want and resize/reposition it in the player.
This app is missing a lot of basic editing features, however. You cannot adjust things like brightness or saturation. This won’t be a problem if you’re happy with your clips as-is, but it’s a bit odd to not have those options.
There is a text tool and while it is fairly basic, it is also flexible. There is a good selection of fonts to choose from, and you can also choose whether or not you want a colored background, and if your text should have a shadow.
Once you’ve decided on the look of your text you can drag it, resize it, and tilt it however you want in the preview screen.
A slightly odd feature of this app is that it doesn’t save your video to your phone or export it directly to YouTube. Instead, it saves it – and shares it – within the app and gives you the option of sharing it with YouTube after.
Power Director (Android)
Key Points:
- A timeline like desktop software
- All the basic editing features
- Lots of transitions
- Videos from the free version will be watermarked
The first thing you’ll notice when you open up Power Director is that the interface looks a lot like the interface of a lot of desktop editors with a very classic timeline. This familiarity could make it easy to jump into if you’re used to editing on your laptop.
However, Power Director is a bit less intuitive than most of the other apps on this list. I wouldn’t go so far as to say it’s difficult to use – it isn’t, it’s much easier than a lot of desktop software – but among mobile apps designed for streamlined efficiency it does stand out as being a bit harder to dive into.
That is partly because there’s a lot you can do with it. It has the tools you would expect in an editor. You can split and trim clips, and you have all the standard color tools including some that most mobile apps leave out.
A lot of apps have Brightness, Contrast, and Saturation, but PowerDirector also has Color Temperature and Tint.
In addition to editing tools, PowerDirector has bells and whistles like filters –
- and a ton of great transitions.
One drawback of PowerDirector is that the free version will watermark your videos. This watermark is not intrusive, but it isn’t as subtle as the Funimate one either.
You can export videos from PowerDirector directly to YouTube.
Vlogit (Android or iOS )
Key Points:
- Easy thumbnail maker
- Export directly to YouTube
- Animated stickers
Vlogit is also an app from the creators of the Filmora Video Editor. It isn’t quite as intuitive as Filmora, but the major benefit of Vlogit for YouTube creators is that it was designed with you in mind. It has features like animated stickers, emojis, and a thumbnail maker which were included specifically because YouTubers and vloggers need them.
All the usual adjustments you might want to make, like saturation or sharpness, are easy in Vlogit. So are adjustments to the length or crop of clips.
After you save your video you’ll have the option of creating a thumbnail using a screenshot from your video. You can add a colored border, text, emojis, and more!
Once you’re done, you can export directly to YouTube. Like Filmora, Vlogit does have a post-video logo roll.
Have you ever used a free mobile app to edit one of your YouTube videos? What did you use, and were you happy with the results?
Richard Bennett
Richard Bennett is a writer and a lover of all things video.
Follow @Richard Bennett
Also read:
- [New] Discover Essential YouTube Music Channels
- Convert Audio Online MP3 to YouTube Live Upload Guide for 2024
- Copyright Concerns with Recording YouTube Content for 2024
- Cutting-Edge Methods to Reduce YouTube Video Size for 2024
- Crafting a Digital Identity Simple Steps to Create Business/Personal YouTube Channels on Smartphones
- 2024 Approved Charting Your Course From Creator to Major Label
- [New] Dynamic Techniques for YouTube Promotional Videos
- [New] Best Screen Grabber Gadgets for YouTube Channels
- Unlocking Video View Growth Top 10 Reasons Behind Zero Views
- Enhancing Video Signals with YouTube Cards for 2024
- Professional Strategies for Embedding Timestamps on Your Channel
- Creating Costless Webinars on YouTube A Handbook
- [Updated] Engaging Scriptwriting Techniques for Higher Video Rankings
- [New] 10 Quick Setup Ideas for Successful YouTube Business Ventures
- Laugh Loophole Ideas for 7 Hilarious YouTube Showcases
- Creating Viral Haul Videos A Comprehensible Guide
- Launching a Lucrative Channel YouTube's Most Accessible Biz Setups
- [Updated] Bringing Bygone Era Filmmaking to Life Today
- In 2024, Demystifying YouTube Premium Membership Benefits
- [Updated] Creating Content with Purpose Balancing Job & YouTube
- No Cash Needed? Try These Free YouTube Subtitle Tools
- Billion-Views Video Hall YouTube's Top Ever Watches
- Superb Phone Video & Photo Capturing with Best Apps List
- 2024 Approved Efficacy of Monetized YouTube Engagement for Content Creators?
- Spectacular Spellbinding YouTube Magic Edition of the Year
- [Updated] Decoding YouTube's Mystery A Sequential Exploration Guide
- Script to Screen Your Guide to YouTube Storytelling
- Digital Dazzle Fine-Tuning Video Chrominance for Beauty for 2024
- [New] Behind the Scenes Unveiling the Best 9 Camera Additions for Mobile Films
- [Updated] Design Strategies for Top-Tier Valorant Thumbnails on Social Media
- Unlock Free YouTube Intro/End Customization
- [New] Evaluating Earnings From One Million YouTube Watches
- Elevating Your Content Strategy YouTube Keywords Explained for 2024
- Charting a Path to YouTube Wealth CPM Analysis for 2024
- Elevate Your Social Media Game Discover the Best 5 YouTube Promotion Strategies
- How To Update or Downgrade iPhone 15 Plus Without Losing Data? | Dr.fone
- How To Fix Apple ID Verification Code Not Working On Apple iPhone 8 Plus
- [Updated] Spark Social Media Flames Facebook Success Hacks
- An Insider’s Look at Toolwiz's Photo Editing Features for 2024
- [Updated] Swipe, Tap, Save The Ultimate Guide for IGTV Videos on Devices
- Recommended Best Applications for Mirroring Your Honor Magic 5 Lite Screen | Dr.fone
- [New] Perfected Presence The Art of Blurring Conference Backdrops for 2024
- Pokémon Go Cooldown Chart On Nokia G22 | Dr.fone
- Updated 2024 Approved Waveform Generation Made Easy 10 Online Tools to Explore
- Elevate Note-Taking to New Heights with Mematic
- [Updated] In 2024, Finding the Ultimate Cam Choice Post-ManyCam
- 3 Effective Ways to Bypass Activation Lock from iPhone 7 Plus
- The Best 11 First-Timer Kids' Cameras for Rainy Day Vlogging
- [Updated] In 2024, How to Change TikTok Video Background?
- [New] In 2024, Visual Narratives Instagram Carousel
- [Updated] Expert Tips to Correct Video Transmission Problem on Mobile Messengers for 2024
- New Transform Your Tunes Free Online Tool to Dial Back MP3 Volume, Ideal for Karaoke Enthusiasts. For 2024
- In 2024, Complete Tutorial to Use GPS Joystick to Fake GPS Location On Honor Magic 5 Pro | Dr.fone
- Photography Fundamentals Tips & Apps for Android
- [New] Masterful Moment Preservation - A Gif Collector's Dream Toolkit for 2024
- In 2024, How to Use Google Assistant on Your Lock Screen Of Infinix Smart 7 HD Phone
- [Updated] In 2024, Top 8 Instagram Story Filters
- Unlocking Apple iPhone 7 Plus Lock Screen 3 Foolproof Methods that Actually Work
- In 2024, How to Unlock iCloud Activation Lock and iCloud Account On Apple iPhone 6s?
- In 2024, How to Make a Slideshow with Music
- In 2024, Easy Guide to Samsung Galaxy A15 4G FRP Bypass With Best Methods
- [Updated] Streamlining TV Downloads A Step-by-Step Recording Approach
- Title: "Boosting Exposure Posting YouTube Content on Facebook Effectively for 2024"
- Author: Kevin
- Created at : 2024-05-25 14:44:35
- Updated at : 2024-05-26 14:44:35
- Link: https://youtube-videos.techidaily.com/boosting-exposure-posting-youtube-content-on-facebook-effectively-for-2024/
- License: This work is licensed under CC BY-NC-SA 4.0.
