
:max_bytes(150000):strip_icc()/GettyImages-1166819311-aec86039d8d8469bbb3e155aed81c924.jpg)
"Boosting Clickthrough Rates with Attention-Grabbing YouTube Thumbnails"
Boosting Clickthrough Rates with Attention-Grabbing YouTube Thumbnails
Best YouTube Thumbnail Size: How to Make a Thumbnail for YouTube in 2024

Benjamin Arango
Mar 27, 2024• Proven solutions
You must have heard the phrase, Never judge a book by its cover. But actually, we do judge everything by its cover. The same is the case with Youtube videos. No matter how good the content of your video is if you are unable to convey that with the thumbnail of your video, it will not bring any good to your channel. If you are looking forward to growing your channel and attracting more viewers, then having an appealing and eye-catching thumbnail is one of the most important factors. There are several things to be considered while creating a custom thumbnail if you want to make your videos look stunning and engaging. By following all these points, you can increase the chances of your channel’s growth.
In this article, we have 5 chapters for you:
- Best YouTube Thumbnail Size
- How Important is a Custom Thumbnail?
- Best Practices From Experiences
- How to Make a Fortnite Thumbnail
- How to Add a Custom Thumbnail to Your Video
Best YouTube Thumbnail Size
Being a content creator, you never know which device is being used by the viewer to watch your videos. It can be a smartphone, laptop, pc, or smart TV. It is very important to keep all these devices in mind while choosing a Youtube thumbnail size. For the best possible results, consider the following points while making a thumbnail for your Youtube videos.
- To cover all the devices perfectly, set the thumbnail resolution to 1280x720
- Save the thumbnail in JPG, GIF, or PNG format
- Try not to cross the 2MB limit
- Make sure to use a 16:9 aspect ratio for perfect results throughout the devices

How Important is a Custom Thumbnail?
Custom Thumbnail is a tool through which the viewers can understand everything about a video. It tells the viewers what to expect from a video, what not to expect, and what the video is all about. no matter if you create amazing content, if the thumbnail is not good enough to covey that to the viewers, all your hard work will be of no use and will not bring any good to your channel and its growth. According to Google ,90% of best-performing videos have custom thumbnails. It shows the importance of custom thumbnails.

Best Practice From Experiences
Now, since we know the importance of having a custom thumbnail, it is important to know how to make a thumbnail for Youtube look perfect, appealing, and eye-catching at the same time. There are some points to be considered while creating a thumbnail for Youtube. We will provide you with the best practices that we have learned throughout our journey of using Youtube and growing it from zero.
7 best practices can help you make your Youtube thumbnail stand out from the crowd and make its way out.
In a world full of machines and computers, people love to listen and interact with people instead of computer-generated voices and a voice without a face. Showing your face on a Youtube thumbnail makes it more appealing to users to click and listen to the person who is being shown in the thumbnail. Humans are more inclined towards faces. When there is a human element in a video, it increases its effectiveness. Check out the pics below, which one are you most likely to click through?

With your face, it is necessary to put some text on your Youtube thumbnail to let viewers know what this video is all about without clicking or watching it. Don’t use fancy fonts on Youtube thumbnail. It makes it hard for the viewers to read and understand what to expect in the video, especially for those watching YouTube on their 5 inches screen smartphone, ultimately decreasing the chances of your video being clicked and watched. I personally recommend you to use give these fonts a go while making YouTube thumbnail.

If you have ever noticed, Youtube thumbnails are very small in size, making it hard for viewers to notice any small elements. According to YouTube , more than 70% of Youtube watch time comes from mobile devices. While adding text in a thumbnail, instead of using sentences, make sure to use only words and make them large in size that can easily be noticed on small screens. Summurise your video in no more than 5 words.


When we navigate to a Youtube thumbnail and place the cursor on it, it shows us two icons, “Watch Later” and “Add to Queue,” located on its right size. Come on, you don’t want your beautiful thumbnail that cost you a few hours be covered. To avoid these icons from hiding your important stuff of thumbnail, make sure to put everything on the right side of your thumbnail.

Try to make all your thumbnails follow the same style. Following the same style for all your Youtube thumbnails will make your channel look unique and all your videos identical. It will be easy for viewers to identify your videos when they see them. It gives your channel a touch of its unique brand.

To make your Youtube thumbnail more appealing to the viewers, add circles and arrows to grab viewers’ attention to something very important in the video. It will increase the curiosity in the viewers and make them click your videos to learn more.

This whole process seems to be very hectic and time taking, but do you know, you can do everything on just one software? There is no need to edit a video in a different software then make a thumbnail in another software. With Filmora X, you can perform all these tasks on a single platform with so many amazing features. Whether you want to remove the background of your image or add attractive titles to it, Filmora X has got you covered.
It is one of the old tricks that so many people on Youtube use. It undoubtedly brings you clicks and more views, but once the viewer realizes that you have used irrelevant pictures or texts to attract them**. I**n reality, your video doesn’t contain any information related to it, you are going to lose their trust. They are never going to click on your videos again. Even if you don’t use such a trick anymore. Try to avoid such activities. Avoiding such activities can make your channel grow in the long term. Only use the text and images that are relevant to your content and stick to that.
Do you know that Youtube can show a 3-second preview of your video when someone hovers the cursor over it? It is one of the best ways to show the viewers the content of your video even when they don’t click on your video. These three seconds will help them decide whether to click on your video or not. This preview is selected by the system from the first half of your video according to its relevance and similarity with the topic. That’s why it is very important to add related information in the first half of the video, otherwise, Youtube will choose it randomly. If the preview is not selected for two days, it means your video is not eligible for it.

How to Make a Fortnite Thumbnail Super Fast and Free?
Many of you might be interested in how to make a fortnite thumbnail, so here it is. To make a Fortnite thumbnail for free, we are going to use Filmora X. Filmora X contains all kinds of features and elements that are required for a perfect and eye-catching thumbnail. To get started, make sure to download and install the latest version of Filmora X.
- Before we start making Fortnite Thumbnails, we have to take a screenshot of the gameplay. Open Fortnite and go to the Career tab. Here you will find Replays.

- It contains all your recent gameplays. We can use it to take a screenshot. If you are using a console, you will find 10 recent gameplays here. But if you are a PC user, you can find the last 100 gameplays. Select the gameplay you want to take a screenshot from.

- For our preferred angle, choose “Drone Free Camera” mode from the bottom right corner of the screen. It will allow us to use our preferred angle without any restriction. Choose an angle and take a screenshot.

- Open Filmora X, make sure to select the 16:9 screen ratio. Import the screenshot that you have taken from Fortnite.

- Place it into the timeline to start working on it.

- Now to separate the character from the background, go to the Effects. Under effects, you can find a tab named AI Portraits. Click on AI Portrait. Now drag the Human Segmentation and drop it on the screenshot in the timeline.

- It will ask you to purchase it. But there is no need to do that. Just hit Try It.

- This effect will remove the background of your screenshot.

- Now you can add a background of your choice. You can upload an image or choose a simple color from Filmora’s Media tab and drag it below the screenshot in the timeline.

- To add text to the screenshot, go to Titles. Here you can find a wide range of different and unique titles to choose from for your Fortnite Thumbnail. Choose any of the titles and place them accordingly.

- To make it more attractive, we can add icons and other elements from Filmora’s Element tab. You can also download the stickers from the internet and use them.

- After completing the thumbnail, click on the Snapshot icon located below the preview tab of Filmora. Or press “CTRL+ALT+S”. It will save a screenshot into the media panel of Filmora.

- Right-click on the screenshot and navigate to “Reveal in Explorer”. It will open the folder that contains all the screenshots taken from Filmora. Now you can use it as a Fortnite Thumbnail.

How to Add a Custom YouTube Thumbnail to Your Video in YouTube
Once you have successfully created a custom thumbnail, you can use it in your videos on Youtube.
- Open Youtube Studio and upload your video. While uploading the video, you can see a section named “Thumbnail”. Under this section, click on “Upload Thumbnail”.

- Select the thumbnail that you have made. Just like the one Fortnite thumbnail that we have created using Filmora X.

- The thumbnail will be uploaded and attached to the video. Now you can process all the settings and publish the video.

Conclusion
Thumbnail is the first thing that helps the viewer decide whether to click on a video or ignore it. Which increases the importance of having a well-structured and attractive thumbnail. By following the above guide, you can make an astonishing and clickable thumbnail in no time. For better and quick results, we recommend you using Filmora X. It allows you to perform all the tasks from video editing to thumbnail creation on a single platform.


Benjamin Arango
Benjamin Arango is a writer and a lover of all things video.
Follow @Benjamin Arango
Benjamin Arango
Mar 27, 2024• Proven solutions
You must have heard the phrase, Never judge a book by its cover. But actually, we do judge everything by its cover. The same is the case with Youtube videos. No matter how good the content of your video is if you are unable to convey that with the thumbnail of your video, it will not bring any good to your channel. If you are looking forward to growing your channel and attracting more viewers, then having an appealing and eye-catching thumbnail is one of the most important factors. There are several things to be considered while creating a custom thumbnail if you want to make your videos look stunning and engaging. By following all these points, you can increase the chances of your channel’s growth.
In this article, we have 5 chapters for you:
- Best YouTube Thumbnail Size
- How Important is a Custom Thumbnail?
- Best Practices From Experiences
- How to Make a Fortnite Thumbnail
- How to Add a Custom Thumbnail to Your Video
Best YouTube Thumbnail Size
Being a content creator, you never know which device is being used by the viewer to watch your videos. It can be a smartphone, laptop, pc, or smart TV. It is very important to keep all these devices in mind while choosing a Youtube thumbnail size. For the best possible results, consider the following points while making a thumbnail for your Youtube videos.
- To cover all the devices perfectly, set the thumbnail resolution to 1280x720
- Save the thumbnail in JPG, GIF, or PNG format
- Try not to cross the 2MB limit
- Make sure to use a 16:9 aspect ratio for perfect results throughout the devices
How Important is a Custom Thumbnail?
Custom Thumbnail is a tool through which the viewers can understand everything about a video. It tells the viewers what to expect from a video, what not to expect, and what the video is all about. no matter if you create amazing content, if the thumbnail is not good enough to covey that to the viewers, all your hard work will be of no use and will not bring any good to your channel and its growth. According to Google ,90% of best-performing videos have custom thumbnails. It shows the importance of custom thumbnails.
Best Practice From Experiences
Now, since we know the importance of having a custom thumbnail, it is important to know how to make a thumbnail for Youtube look perfect, appealing, and eye-catching at the same time. There are some points to be considered while creating a thumbnail for Youtube. We will provide you with the best practices that we have learned throughout our journey of using Youtube and growing it from zero.
7 best practices can help you make your Youtube thumbnail stand out from the crowd and make its way out.
In a world full of machines and computers, people love to listen and interact with people instead of computer-generated voices and a voice without a face. Showing your face on a Youtube thumbnail makes it more appealing to users to click and listen to the person who is being shown in the thumbnail. Humans are more inclined towards faces. When there is a human element in a video, it increases its effectiveness. Check out the pics below, which one are you most likely to click through?
With your face, it is necessary to put some text on your Youtube thumbnail to let viewers know what this video is all about without clicking or watching it. Don’t use fancy fonts on Youtube thumbnail. It makes it hard for the viewers to read and understand what to expect in the video, especially for those watching YouTube on their 5 inches screen smartphone, ultimately decreasing the chances of your video being clicked and watched. I personally recommend you to use give these fonts a go while making YouTube thumbnail.
If you have ever noticed, Youtube thumbnails are very small in size, making it hard for viewers to notice any small elements. According to YouTube , more than 70% of Youtube watch time comes from mobile devices. While adding text in a thumbnail, instead of using sentences, make sure to use only words and make them large in size that can easily be noticed on small screens. Summurise your video in no more than 5 words.
When we navigate to a Youtube thumbnail and place the cursor on it, it shows us two icons, “Watch Later” and “Add to Queue,” located on its right size. Come on, you don’t want your beautiful thumbnail that cost you a few hours be covered. To avoid these icons from hiding your important stuff of thumbnail, make sure to put everything on the right side of your thumbnail.
Try to make all your thumbnails follow the same style. Following the same style for all your Youtube thumbnails will make your channel look unique and all your videos identical. It will be easy for viewers to identify your videos when they see them. It gives your channel a touch of its unique brand.
To make your Youtube thumbnail more appealing to the viewers, add circles and arrows to grab viewers’ attention to something very important in the video. It will increase the curiosity in the viewers and make them click your videos to learn more.
This whole process seems to be very hectic and time taking, but do you know, you can do everything on just one software? There is no need to edit a video in a different software then make a thumbnail in another software. With Filmora X, you can perform all these tasks on a single platform with so many amazing features. Whether you want to remove the background of your image or add attractive titles to it, Filmora X has got you covered.
It is one of the old tricks that so many people on Youtube use. It undoubtedly brings you clicks and more views, but once the viewer realizes that you have used irrelevant pictures or texts to attract them**. I**n reality, your video doesn’t contain any information related to it, you are going to lose their trust. They are never going to click on your videos again. Even if you don’t use such a trick anymore. Try to avoid such activities. Avoiding such activities can make your channel grow in the long term. Only use the text and images that are relevant to your content and stick to that.
Do you know that Youtube can show a 3-second preview of your video when someone hovers the cursor over it? It is one of the best ways to show the viewers the content of your video even when they don’t click on your video. These three seconds will help them decide whether to click on your video or not. This preview is selected by the system from the first half of your video according to its relevance and similarity with the topic. That’s why it is very important to add related information in the first half of the video, otherwise, Youtube will choose it randomly. If the preview is not selected for two days, it means your video is not eligible for it.
How to Make a Fortnite Thumbnail Super Fast and Free?
Many of you might be interested in how to make a fortnite thumbnail, so here it is. To make a Fortnite thumbnail for free, we are going to use Filmora X. Filmora X contains all kinds of features and elements that are required for a perfect and eye-catching thumbnail. To get started, make sure to download and install the latest version of Filmora X.
- Before we start making Fortnite Thumbnails, we have to take a screenshot of the gameplay. Open Fortnite and go to the Career tab. Here you will find Replays.
- It contains all your recent gameplays. We can use it to take a screenshot. If you are using a console, you will find 10 recent gameplays here. But if you are a PC user, you can find the last 100 gameplays. Select the gameplay you want to take a screenshot from.
- For our preferred angle, choose “Drone Free Camera” mode from the bottom right corner of the screen. It will allow us to use our preferred angle without any restriction. Choose an angle and take a screenshot.
- Open Filmora X, make sure to select the 16:9 screen ratio. Import the screenshot that you have taken from Fortnite.
- Place it into the timeline to start working on it.
- Now to separate the character from the background, go to the Effects. Under effects, you can find a tab named AI Portraits. Click on AI Portrait. Now drag the Human Segmentation and drop it on the screenshot in the timeline.
- It will ask you to purchase it. But there is no need to do that. Just hit Try It.
- This effect will remove the background of your screenshot.
- Now you can add a background of your choice. You can upload an image or choose a simple color from Filmora’s Media tab and drag it below the screenshot in the timeline.
- To add text to the screenshot, go to Titles. Here you can find a wide range of different and unique titles to choose from for your Fortnite Thumbnail. Choose any of the titles and place them accordingly.
- To make it more attractive, we can add icons and other elements from Filmora’s Element tab. You can also download the stickers from the internet and use them.
- After completing the thumbnail, click on the Snapshot icon located below the preview tab of Filmora. Or press “CTRL+ALT+S”. It will save a screenshot into the media panel of Filmora.
- Right-click on the screenshot and navigate to “Reveal in Explorer”. It will open the folder that contains all the screenshots taken from Filmora. Now you can use it as a Fortnite Thumbnail.
How to Add a Custom YouTube Thumbnail to Your Video in YouTube
Once you have successfully created a custom thumbnail, you can use it in your videos on Youtube.
- Open Youtube Studio and upload your video. While uploading the video, you can see a section named “Thumbnail”. Under this section, click on “Upload Thumbnail”.
- Select the thumbnail that you have made. Just like the one Fortnite thumbnail that we have created using Filmora X.
- The thumbnail will be uploaded and attached to the video. Now you can process all the settings and publish the video.
Conclusion
Thumbnail is the first thing that helps the viewer decide whether to click on a video or ignore it. Which increases the importance of having a well-structured and attractive thumbnail. By following the above guide, you can make an astonishing and clickable thumbnail in no time. For better and quick results, we recommend you using Filmora X. It allows you to perform all the tasks from video editing to thumbnail creation on a single platform.
Benjamin Arango
Benjamin Arango is a writer and a lover of all things video.
Follow @Benjamin Arango
YouTube Shorts Tutorial: Crafting Compact, Engaging Videos
YouTube Shorts Ultimate Guide in 2024

Richard Bennett
Mar 27, 2024• Proven solutions
Since smartphones are cheap and easily available in the market today, and there is also a huge range of contents to view online, a majority of users prefer watching videos that are both short enough to convey the message within a few seconds, and can be seen on your phone’s screen with decent picture quality. Considering this, Google lately came up with a Tik Tok-style app calledYouTube shorts that can be accessed right from your Android or iPhone as long as you are using the YouTube app, and are signed in to your Google account.
That said, in the following sections you will learn everything about the YouTube Shorts app, and how it could help you gain more viewers for your YouTube channel.
- Part 1: What Is YouTube Shorts?
- Part 2: How to Make and Upload a YouTube Shorts Video with Shorts App?
- Part 3: Creating Vertical YouTube Shorts Video in Filmora [Step by Step Tutorial]
Part 1: What Is YouTube Shorts?
A short and quick answer to the question is, YouTube Shorts is a Tik Tok competitor developed by Google and can be accessed via the YouTube app on an Android or iOS device. In order to use the YouTube Shorts app, all you need to do is, sign in to your YouTube account on the YouTube app, and you are good to go.
1. YouTube Shorts Release History
At the time of this writing, YouTube Shorts is still in the Beta phase, and there is a lot more that the developers at Google have yet to explore and discover. However, for now, the fully functional variant of the program is available only for users in India on Android and iOS platforms.
2. YouTube Shorts Target Audience
A majority of people who can be called the target audience for YouTube Shorts are the artists and creators looking forward to getting noticed. Some of them could also be among those who wish to become an influencer, or get their YouTube channel more subscribers to be able to become eligible for YouTube Partnership Program.
And of course, the viewers and subscribers cannot be left alone when talking about the target audiences of YouTube Shorts as without them, there’s no point in creating short videos in the first place.
The type of contents that the viewers expect to see as YouTube Shorts could include:
- Entertainment – While movies are of longer duration, roasting the characters in it, or explaining some other stuff to the subscribers could be one of the things that could keep the viewers engaged
- Gaming – Some extraordinary gaming tips, tricks, and skills can be demonstrated in a short video
- How-To – A couple of brief how-to illustrations can yet be another attraction for DIY-loving viewers
- Science and Technology – A short introduction of upcoming gadgets or applications along with their usability can be explained within the timeframe of 60 seconds as well
In addition to the above, a few other categories could be People and Places, Music, Domestic and Wild Animals, Education, etc.
3. YouTube Shorts Content Requirements
While creating YouTube Shorts, there are certain guidelines that must be followed. These points include:
- YouTube Shorts videos must not be more than 60 seconds long
- The videos must be vertically shot, and must not be in the landscape orientation
- You can have multiple short videos clubbed together. However, the total length of the final video must not exceed 60 seconds in duration
- While posting YouTube Shorts videos, the title or the description must contain ‘#shorts’ in it
Certain things that you must keep in mind while creating YouTube Shorts include:
- YouTube Shorts cannot be monetized. However, they can serve as a good medium to attract and redirect the audiences to your main YouTube channel which may contain several videos that are eligible for monetization.
- The number of views and the total playtime of the YouTube Shorts videos DO affect your YouTube channel statistics
4. Where People Can Find YouTube Shorts
As mentioned earlier, YouTube Shorts can be accessed by launching the YouTube app on your Android or iOS device. You can use YouTube Shorts by clicking the + (Add) icon present at the bottom. Once the YouTube Shorts app is initialized, you can easily create and publish short videos by following the simple on-screen instructions.
Part 2: How to Make and Upload a YouTube Shorts Video with Shorts App?
You can follow the instructions given below to make and upload a YouTube Shorts video using the YouTube Shorts app:
Step 1: Record a Video with YouTube Shorts

Launch the YouTube app on your Android or iOS smart device (Samsung Galaxy Note 10+ is used here for demonstration), make sure that you are signed in to your Google account, tap the + (Add) button present at the bottom of the screen, tap Create a Short on the popup box that appears next, tap the Record button on the next window to start the recording. Once you are done, tap the Stop button to stop the recording.
Step 2: Edit the Video
Tap Music from the bottom of the screen to add background music to the video. The music that you can use in your short videos must be either created by you, or you should have permission to use them. However, the audio files that the Music library contains is made available by Google, is royalty-free, and can be used throughout the platform.

Likewise, you can tap Text to add captions as well. As for the text type, the app offers various formatting options such as alignment (left, center, and right), text highlighter, font changer, and even color selector. Further, the Speed and Timer icons at the top-right area allow you to manage the playback speed anywhere between 0.3x to 3x, and automatically stop the recording after the set time limit respectively. Once everything is set up, tap NEXT from the top-right corner to proceed to the next step.
Step 3: Pick Target Audience Type
On the Add details window, tap Select audience, and on the Select audience window, tap to select the appropriate radio button to define whether the video is suitable for kids. Tap the Back button once the target audience is selected.

Step 4: Add Details and Upload the Video
Enter a title for the video in the Title field. Make sure to include #shorts to help YouTube understand that you are preparing a YouTube Shorts video. Next, tap UPLOAD from the upper-right corner of the screen to submit the video for review. Once YouTube reviews the recording and finds it appropriate, it will be published on the portal, and will be visible throughout and even under the Shorts category of the main page.

Part 3: How to Create a Vertical YouTube Shorts Video in Filmora?
The YouTube Shorts app is pretty convenient to access and use alright. However, it doesn’t allow you to fine edit the videos. The app doesn’t even have many filtering options such as Effects, Elements, etc. to make your videos more engaging.
With that said, you can always use an efficient third-party program like Wondershare Filmora to create professionally-looking YouTube Shorts videos to attract your viewers.
When talking about Wondershare Filmora, it is a production and post-production app available for both Windows and Mac computers, and gives tough competition to some of the globally accepted similar programs like Adobe Premiere Pro, Final Cut Pro X, etc. Furthermore, Filmora has its own built-in screen, webcam, and voice recording features that can be used to prepare interactive videos, game walkthroughs, and voiceovers as needed.
For Win 7 or later (64-bit)
 Secure Download
For macOS 10.12 or later
Secure Download
The following step-by-step guide teaches you how to use Wondershare Filmora to create a vertical YouTube Shorts video:
Note: Before proceeding to the instructions, make sure that you have already recorded a vertical video using your cellphone, and that it has been transferred to your PC.
Step 1: Add the Video to Timeline
Launch Wondershare Filmora on your Windows or Mac PC (a Windows 10 computer is used here for demonstration), go to File > New Project, and click 9:16 (Portrait). Click anywhere inside the Media box, and select and import the source vertical video from your PC to Filmora.
Next, hover the mouse over the clip in the Media box, click the + button that appears at the bottom-right corner of the thumbnail, and in the resolution confirmation box that comes up next, click the button under the Match to Media section to add the video in the correct orientation to the Timeline at the bottom.
Step 2: Edit the Video
Select the clip in the Timeline, and use the Split, Crop, Speed, etc. buttons above the Timeline itself to remove the unwanted portions from the clip, manage its playback speed, and do other fine-tuning tasks.

You can even click the Edit button, and use the available editing features like Motion Tracking and Stabilization to add text or objects to a moving body in the video and stabilize the clip if the camera shook during the recording session respectively. Click OK to save the changes when done.

Note: To be able to remain compliant with the YouTube Shorts policies, make sure that the video length is no longer than 60 seconds.
Step 3: Beautify the Video

Click Titles from the standard toolbox at the top, choose your preferred text category from the list in the left, hover the mouse over a decent preset in the right window, and click the + button at the bottom-right corner of the thumbnail to add the preset on top of the media track in the Timeline. Next, you can double-click the preset track in the Timeline to modify the text and make granular modifications to it as needed. Click OK to save the changes.
Similarly, you can select the Effects and Elements tools to add effects and elements to the video as needed. To add background music, you can go to the Audio tool, and pick your preferred preset from the available options. A custom music can be added by going to the Media tool, and importing an audio file from your PC using the method explained in Step 1.

After this, optionally, you can go to Split Screen from the standard toolbar at the top, and use your preferred Split Screen preset to club multiple video clips into one screen. In Filmora, you can add as many as 6 screens in a video.
For Win 7 or later (64-bit)
Secure Download
For macOS 10.12 or later
Secure Download
Step 4: Render the Final Output
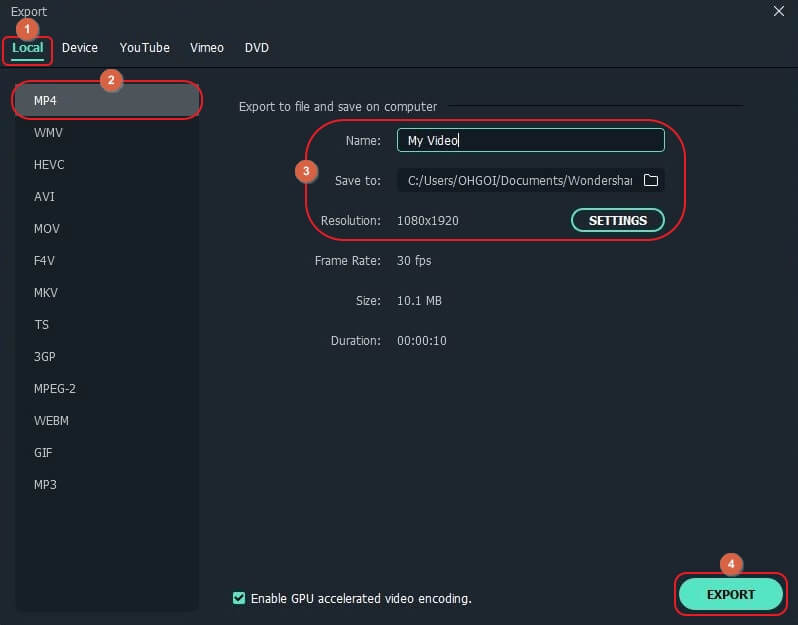
Once everything is set up, click EXPORT from the top of the window, go to the Local tab on the Export window, select MP4 from the formats list in the left, give a name and configure other settings from the available options in the right, and click EXPORT from the bottom-right corner to create a YouTube Shorts video. Once the clip is generated, you can upload the video to YouTube using #Shorts in the title or description to publish the video under the YouTube Shorts section.
FAQs About YouTube Shorts
- Where to download the YouTube Shorts app?
The YouTube Shorts app is already present in the YouTube app that your Android or iOS smartphone has. All you need to do to access it is, sign in to your Google account, tap the + button at the bottom, and tap Create a Short in the popup box that comes up.
- What if YouTube Shorts is not showing on my YouTube app?
Make sure that your YouTube app is updated to its latest version. If the app is already updated, and YouTube Shorts is still unavailable, the chances are that Google hasn’t rolled the app in your region. Since YouTube Shorts is still in its Beta phase, only the region of India can use all the functions of the app at the time of this writing. In such a case, you are suggested to wait until the YouTube Shorts app is made available for your location.
- What’s the YouTube Shorts video duration?
A YouTube Shorts video can be of only up to 60 seconds.
- What’s the YouTube Shorts size limitation?
YouTube hasn’t provided any information related to this as of now. However, you can rest assure that a 60 seconds long video file wouldn’t be too large for YouTube to handle.
- How many subs do you need to access Shorts?
YouTube Shorts is available for everyone regardless of the number of subscribers the channel has.
- Can you make money on Shorts?
Unfortunately, NO. Although you cannot monetize the recordings published as YouTube Shorts, they can be a good source to drive subscribers to your main YouTube channel that may have the videos that can be monetized.
Richard Bennett
Richard Bennett is a writer and a lover of all things video.
Follow @Richard Bennett
Richard Bennett
Mar 27, 2024• Proven solutions
Since smartphones are cheap and easily available in the market today, and there is also a huge range of contents to view online, a majority of users prefer watching videos that are both short enough to convey the message within a few seconds, and can be seen on your phone’s screen with decent picture quality. Considering this, Google lately came up with a Tik Tok-style app calledYouTube shorts that can be accessed right from your Android or iPhone as long as you are using the YouTube app, and are signed in to your Google account.
That said, in the following sections you will learn everything about the YouTube Shorts app, and how it could help you gain more viewers for your YouTube channel.
- Part 1: What Is YouTube Shorts?
- Part 2: How to Make and Upload a YouTube Shorts Video with Shorts App?
- Part 3: Creating Vertical YouTube Shorts Video in Filmora [Step by Step Tutorial]
Part 1: What Is YouTube Shorts?
A short and quick answer to the question is, YouTube Shorts is a Tik Tok competitor developed by Google and can be accessed via the YouTube app on an Android or iOS device. In order to use the YouTube Shorts app, all you need to do is, sign in to your YouTube account on the YouTube app, and you are good to go.
1. YouTube Shorts Release History
At the time of this writing, YouTube Shorts is still in the Beta phase, and there is a lot more that the developers at Google have yet to explore and discover. However, for now, the fully functional variant of the program is available only for users in India on Android and iOS platforms.
2. YouTube Shorts Target Audience
A majority of people who can be called the target audience for YouTube Shorts are the artists and creators looking forward to getting noticed. Some of them could also be among those who wish to become an influencer, or get their YouTube channel more subscribers to be able to become eligible for YouTube Partnership Program.
And of course, the viewers and subscribers cannot be left alone when talking about the target audiences of YouTube Shorts as without them, there’s no point in creating short videos in the first place.
The type of contents that the viewers expect to see as YouTube Shorts could include:
- Entertainment – While movies are of longer duration, roasting the characters in it, or explaining some other stuff to the subscribers could be one of the things that could keep the viewers engaged
- Gaming – Some extraordinary gaming tips, tricks, and skills can be demonstrated in a short video
- How-To – A couple of brief how-to illustrations can yet be another attraction for DIY-loving viewers
- Science and Technology – A short introduction of upcoming gadgets or applications along with their usability can be explained within the timeframe of 60 seconds as well
In addition to the above, a few other categories could be People and Places, Music, Domestic and Wild Animals, Education, etc.
3. YouTube Shorts Content Requirements
While creating YouTube Shorts, there are certain guidelines that must be followed. These points include:
- YouTube Shorts videos must not be more than 60 seconds long
- The videos must be vertically shot, and must not be in the landscape orientation
- You can have multiple short videos clubbed together. However, the total length of the final video must not exceed 60 seconds in duration
- While posting YouTube Shorts videos, the title or the description must contain ‘#shorts’ in it
Certain things that you must keep in mind while creating YouTube Shorts include:
- YouTube Shorts cannot be monetized. However, they can serve as a good medium to attract and redirect the audiences to your main YouTube channel which may contain several videos that are eligible for monetization.
- The number of views and the total playtime of the YouTube Shorts videos DO affect your YouTube channel statistics
4. Where People Can Find YouTube Shorts
As mentioned earlier, YouTube Shorts can be accessed by launching the YouTube app on your Android or iOS device. You can use YouTube Shorts by clicking the + (Add) icon present at the bottom. Once the YouTube Shorts app is initialized, you can easily create and publish short videos by following the simple on-screen instructions.
Part 2: How to Make and Upload a YouTube Shorts Video with Shorts App?
You can follow the instructions given below to make and upload a YouTube Shorts video using the YouTube Shorts app:
Step 1: Record a Video with YouTube Shorts
Launch the YouTube app on your Android or iOS smart device (Samsung Galaxy Note 10+ is used here for demonstration), make sure that you are signed in to your Google account, tap the + (Add) button present at the bottom of the screen, tap Create a Short on the popup box that appears next, tap the Record button on the next window to start the recording. Once you are done, tap the Stop button to stop the recording.
Step 2: Edit the Video
Tap Music from the bottom of the screen to add background music to the video. The music that you can use in your short videos must be either created by you, or you should have permission to use them. However, the audio files that the Music library contains is made available by Google, is royalty-free, and can be used throughout the platform.
Likewise, you can tap Text to add captions as well. As for the text type, the app offers various formatting options such as alignment (left, center, and right), text highlighter, font changer, and even color selector. Further, the Speed and Timer icons at the top-right area allow you to manage the playback speed anywhere between 0.3x to 3x, and automatically stop the recording after the set time limit respectively. Once everything is set up, tap NEXT from the top-right corner to proceed to the next step.
Step 3: Pick Target Audience Type
On the Add details window, tap Select audience, and on the Select audience window, tap to select the appropriate radio button to define whether the video is suitable for kids. Tap the Back button once the target audience is selected.
Step 4: Add Details and Upload the Video
Enter a title for the video in the Title field. Make sure to include #shorts to help YouTube understand that you are preparing a YouTube Shorts video. Next, tap UPLOAD from the upper-right corner of the screen to submit the video for review. Once YouTube reviews the recording and finds it appropriate, it will be published on the portal, and will be visible throughout and even under the Shorts category of the main page.
Part 3: How to Create a Vertical YouTube Shorts Video in Filmora?
The YouTube Shorts app is pretty convenient to access and use alright. However, it doesn’t allow you to fine edit the videos. The app doesn’t even have many filtering options such as Effects, Elements, etc. to make your videos more engaging.
With that said, you can always use an efficient third-party program like Wondershare Filmora to create professionally-looking YouTube Shorts videos to attract your viewers.
When talking about Wondershare Filmora, it is a production and post-production app available for both Windows and Mac computers, and gives tough competition to some of the globally accepted similar programs like Adobe Premiere Pro, Final Cut Pro X, etc. Furthermore, Filmora has its own built-in screen, webcam, and voice recording features that can be used to prepare interactive videos, game walkthroughs, and voiceovers as needed.
For Win 7 or later (64-bit)
Secure Download
For macOS 10.12 or later
Secure Download
The following step-by-step guide teaches you how to use Wondershare Filmora to create a vertical YouTube Shorts video:
Note: Before proceeding to the instructions, make sure that you have already recorded a vertical video using your cellphone, and that it has been transferred to your PC.
Step 1: Add the Video to Timeline
Launch Wondershare Filmora on your Windows or Mac PC (a Windows 10 computer is used here for demonstration), go to File > New Project, and click 9:16 (Portrait). Click anywhere inside the Media box, and select and import the source vertical video from your PC to Filmora.
Next, hover the mouse over the clip in the Media box, click the + button that appears at the bottom-right corner of the thumbnail, and in the resolution confirmation box that comes up next, click the button under the Match to Media section to add the video in the correct orientation to the Timeline at the bottom.
Step 2: Edit the Video
Select the clip in the Timeline, and use the Split, Crop, Speed, etc. buttons above the Timeline itself to remove the unwanted portions from the clip, manage its playback speed, and do other fine-tuning tasks.
You can even click the Edit button, and use the available editing features like Motion Tracking and Stabilization to add text or objects to a moving body in the video and stabilize the clip if the camera shook during the recording session respectively. Click OK to save the changes when done.
Note: To be able to remain compliant with the YouTube Shorts policies, make sure that the video length is no longer than 60 seconds.
Step 3: Beautify the Video
Click Titles from the standard toolbox at the top, choose your preferred text category from the list in the left, hover the mouse over a decent preset in the right window, and click the + button at the bottom-right corner of the thumbnail to add the preset on top of the media track in the Timeline. Next, you can double-click the preset track in the Timeline to modify the text and make granular modifications to it as needed. Click OK to save the changes.
Similarly, you can select the Effects and Elements tools to add effects and elements to the video as needed. To add background music, you can go to the Audio tool, and pick your preferred preset from the available options. A custom music can be added by going to the Media tool, and importing an audio file from your PC using the method explained in Step 1.
After this, optionally, you can go to Split Screen from the standard toolbar at the top, and use your preferred Split Screen preset to club multiple video clips into one screen. In Filmora, you can add as many as 6 screens in a video.
For Win 7 or later (64-bit)
Secure Download
For macOS 10.12 or later
Secure Download
Step 4: Render the Final Output
Once everything is set up, click EXPORT from the top of the window, go to the Local tab on the Export window, select MP4 from the formats list in the left, give a name and configure other settings from the available options in the right, and click EXPORT from the bottom-right corner to create a YouTube Shorts video. Once the clip is generated, you can upload the video to YouTube using #Shorts in the title or description to publish the video under the YouTube Shorts section.
FAQs About YouTube Shorts
- Where to download the YouTube Shorts app?
The YouTube Shorts app is already present in the YouTube app that your Android or iOS smartphone has. All you need to do to access it is, sign in to your Google account, tap the + button at the bottom, and tap Create a Short in the popup box that comes up.
- What if YouTube Shorts is not showing on my YouTube app?
Make sure that your YouTube app is updated to its latest version. If the app is already updated, and YouTube Shorts is still unavailable, the chances are that Google hasn’t rolled the app in your region. Since YouTube Shorts is still in its Beta phase, only the region of India can use all the functions of the app at the time of this writing. In such a case, you are suggested to wait until the YouTube Shorts app is made available for your location.
- What’s the YouTube Shorts video duration?
A YouTube Shorts video can be of only up to 60 seconds.
- What’s the YouTube Shorts size limitation?
YouTube hasn’t provided any information related to this as of now. However, you can rest assure that a 60 seconds long video file wouldn’t be too large for YouTube to handle.
- How many subs do you need to access Shorts?
YouTube Shorts is available for everyone regardless of the number of subscribers the channel has.
- Can you make money on Shorts?
Unfortunately, NO. Although you cannot monetize the recordings published as YouTube Shorts, they can be a good source to drive subscribers to your main YouTube channel that may have the videos that can be monetized.
Richard Bennett
Richard Bennett is a writer and a lover of all things video.
Follow @Richard Bennett
Also read:
- Unleashing Potential Strategic Hashtags for Video Success
- Enhance Youtubes' Conversations with Emojis
- Unveiling Effective Techniques for YouTube Video Thumbnail Designs
- Optimize Your Online Presence YouTube to Dailymotion Video Migration
- [New] Content Composer Arena
- [Updated] Elevate Your YouTube Content SEO Methods Revealed
- In 2024, Achieve the Perfect Look YouTube's Guide to Video Aspect Ratios
- [New] Best of Breed Top-Rated Youtuber's Streaming Arsenal
- Discover These 10 Quickly Rising YouTube Inspirations
- Unveiling Subscriber Lists A YouTube Guide
- In 2024, A Beginner's Roadmap to Professional Sports Edits
- 2024 Approved Cutting-Edge Editing with YouTube's Studio Editor
- [Updated] Charting Success Navigating YouTube Statistics with Social Blade
- YouTube's Iconic Milestone Markers for Viewership
- Earth's Richest Digital Content Wizard for 2024
- [New] Cutting Edge Video Techniques Turning YouTube Shorts Into MP4
- Elevating User Experience with Personalized YouTube Card Implementation for 2024
- In 2024, Astonishing Visuals on Thumbnails
- Top 5 Multimedia Sensation Apps IPhone/Android Showdown
- [New] Decoding the Best of Beauty YouTube's Elite Artists Showcased
- Cognitive Conclaves Educational YT Powerhouses for 2024
- [New] Dissecting Revenue Allocation for Shortform Content Makers
- Ultimate Crew for Photographic Rhythm Films
- Boosting Revenue with YouTube Short Videos – A Complete Plan
- 2024 Approved Decoding the Mystery of YouTube Shorts
- [Updated] Bridging YouTube and iMovie with Seamless Audio Transfer
- Spotlight on 10 High-Speed Growth Titles to Inspire You
- 2024 Approved Enhance Video Reach Strategic Insights Into YouTube's Tag System
- In 2024, A Complete Guide To OEM Unlocking on Vivo Y78t
- In 2024, Does Airplane Mode Turn off GPS Location On Infinix Note 30 Pro? | Dr.fone
- The Meme Titans Reddit & Twitter's Biggest Sensations for 2024
- New Unveiling the Ultimate Selection of Background Noise Reduction Software for 2024
- How to Fix Error 495 While Download/Updating Android Apps On Tecno Pova 5 Pro | Dr.fone
- In 2024, How to Bypass iCloud Lock on iPhone 14 Plus
- [New] Cutting-Edge Capture 8 Latency-Free Tools for 2024
- Top Picks 8 Economical Video Conferencing Tools Compatible with Mac & PC
- Step-by-Step Guide to Hulu Screen Capture for Various Operating Systems for 2024
- Leveraging Your Roku Setup for Exclusive FB Live Content for 2024
- Updated Insightful Suggestions Unlocking Your Potential with Voxels Voice Modification in Discord for 2024
- AVCHD on Xiaomi -convert MTS for Xiaomi
- Downloading SamFw FRP Tool 3.0 for Samsung Galaxy M14 5G
- Title: "Boosting Clickthrough Rates with Attention-Grabbing YouTube Thumbnails"
- Author: Kevin
- Created at : 2024-05-25 14:44:30
- Updated at : 2024-05-26 14:44:30
- Link: https://youtube-videos.techidaily.com/boosting-clickthrough-rates-with-attention-grabbing-youtube-thumbnails/
- License: This work is licensed under CC BY-NC-SA 4.0.
