
:max_bytes(150000):strip_icc()/buffer-social-media-scheduling-3486540-74d00c122f704b87a889ee53de7a7eec.png)
"Boost Your Search Rankings Expert Reviews on 7 Cost-Effective Video Tags Extractors"
Boost Your Search Rankings: Expert Reviews on 7 Cost-Effective Video Tags Extractors
7 Best Online YouTube Tag Extractors

Richard Bennett
Mar 27, 2024• Proven solutions
Producing entertaining and captivating visual content for your YouTube channel is not enough to reach the audience you’re targeting. Tagging your videos appropriately is more important than it may seem at first, as it increases the visibility of your content and helps you reach your ideal viewer.
Knowing which tags to use for your next video can be difficult, especially if you want your video to reach a niche audience. Online tag extractors enable you to see all tags that are added to a YouTube video. This may give you an idea which tags you can use to make your content more visible. We’ve selected some of the best online YouTube tag extractors that will make the tagging process faster and easier.
The Best Online YouTube Tag Extractors You Should Try
Ideally, each video you upload to YouTube should appear on the first page of search results, but a vast amount of content that is being uploaded to this platform every minute makes this task very difficult. Online YouTube Tag Extractors we featured in this article enable you to improve the ranking of your videos by allowing you to see tags of the highest-ranked videos on YouTube. Here’s what the best online YouTube tag extractors have to offer.
1. Online-Free-Tools
Price: Free

This platform provides a broad spectrum of online tools that can be used to generate QR Codes, analyze HTTP headers, or test different PHP functions. Its tag extractor tool is remarkably easy to use since you just have to paste the URL of the YouTube video from which you would like to extract tags, confirm that you are not a robot, and click on the Find the Tags button.
The platform then displays all the tags it found in the Results section, and it also offers the option to copy them for YouTube. The best part is that you don’t have to create an account on the Online-Free-Tools platform if you want to use this tool.
2. YouTube Video Tags Extractor Online Tool
TagsYouTube is equipped with a number of video optimization tools that ultimately help you improve the performance of your content. Tag Finder, Video Description Generator, or Hashtags Generator are among the tools this platform offers.
In order to access the video extractor tool, you have to click on the More Tools menu and then choose the Extract or View Video Tags option. Afterward, you should add the video’s URL and click on the Extract Tag button. Besides showing the tags the video already contains, the platform also generates tag suggestions for a particular video. In addition, you can copy up to 500 tags and add them to a video you’re uploading to your YouTube channel.
3. YouTube Tag Generator
Price: Free
YouTube Tag Generator platform lets you extract tags from individual videos or entire channels in just a few easy steps. Simply insert the URL into the appropriate box and click on the Search icon. All tags a video contains are going to be displayed in the Tags From This Video section.
The Tag Editor option enables you to remove the tags you don’t want to include in your video. You can also click on the Copy All button if you want to add all the tags that are displayed in the Tag editor to your video. Optionally, you can click on the Copy Selected button if you only want to copy the tags you selected.
4. YTube Tool
Price: Free

This simple but effective online tool, lets you generate thumbnails, as well as video titles and descriptions. It also enables you to extract tags from a YouTube video in just three simple steps. You just have to add the URL into the YouTube Video URL box and click on the Find Tags button.
The platform will then show you a prompt that asks you to confirm that you are not a robot and display all tags it detected in the Results section. In the Tags List in a Text Area Section, you can edit the tags, and remove those you don’t want to include in the video you would like to upload to your YouTube channel. All other tags can be copied or downloaded to your computer.
5. Y2TAG
Price: Free
YouTubers in need of a free and easy to use tag extractor should consider using the Y2TAG platform. Besides extracting tags from videos and channels, you can also search for tag suggestions using the platform’s Tags Generator tool or analyze tags for a particular keyword.
Extracting tags from a video with Y2TAG is easy because you can just click on the Find button after you’ve pasted the video’s URL into the box at the top of the screen. The platform will then display all detected keywords in the Tags From this Video section. The Tag Editor that is located at the bottom of the page lets you keep only the tags that fit your demands and copy them to your YouTube channel.
6. MyFreeOnlineTools
Price: Free

A Keyword Density Checker, a Color Converter, or Code Compressor are just a few among countless tools you can use for free on the MyFreeOnlineTools platform. What’s more, you don’t even have to create an account on this platform in order to extract keywords and tags from YouTube videos.
Once you open this tool, you’ll have to paste the video’s URL to the designated box and hit the Click Extract Data button. YouTube video’s tags, title, and description will pop up on the screen in just a few moments. However, you won’t be able to edit or copy them, as the platform merely shows the data the video contains.
7. BackLinkValidator
Price: Free, pricing options start $0.65 per month

BackLinkValidator can help you discover tags through keywords, key phrases, and it can also provide you with tag suggestions for your video based on the tags the highest-ranking videos on YouTube are using.
The Extract tags from specific YouTube videos and channels option generates a list of tags for a video it analyzes. Moreover, this tool also collects all keywords in the video’s description. BackLinkValidator lets you extract tags and keywords from up to five URLs simultaneously, which speeds up the tagging process significantly. The Pro version of the platform grants you access to a wider set of options that can be useful if you upload videos to YouTube regularly.
Frequently Asked Questions About Online YouTube Tag Extractor
#1. Can I Extract YouTube Tags Without Desktop Software?
You don’t need a desktop-based software to extract tags from a YouTube video, because online tag extractors can generate a list of video’s tags within seconds.
#2. How to Change YouTube Video Tags?
Make sure that you are logged in to YouTube Studio, and click on the Video Manager option that is located in the menu on the left side of the screen. The Info and Settings page contains the Basic Info section where you can remove existing tags and replace them with new ones.
Conclusion
It is almost impossible to overestimate the importance of tags for the number of views and likes your YouTube videos are getting. Luckily, online YouTube tag extractors grant you the insight into the tags other video content producers on the platform are using.
If you are a YouTuber who want to create videos with templates and effects without much efforts, you should try an effective video editing software for YouTube like Wondershare Filmora .


Richard Bennett
Richard Bennett is a writer and a lover of all things video.
Follow @Richard Bennett
Richard Bennett
Mar 27, 2024• Proven solutions
Producing entertaining and captivating visual content for your YouTube channel is not enough to reach the audience you’re targeting. Tagging your videos appropriately is more important than it may seem at first, as it increases the visibility of your content and helps you reach your ideal viewer.
Knowing which tags to use for your next video can be difficult, especially if you want your video to reach a niche audience. Online tag extractors enable you to see all tags that are added to a YouTube video. This may give you an idea which tags you can use to make your content more visible. We’ve selected some of the best online YouTube tag extractors that will make the tagging process faster and easier.
The Best Online YouTube Tag Extractors You Should Try
Ideally, each video you upload to YouTube should appear on the first page of search results, but a vast amount of content that is being uploaded to this platform every minute makes this task very difficult. Online YouTube Tag Extractors we featured in this article enable you to improve the ranking of your videos by allowing you to see tags of the highest-ranked videos on YouTube. Here’s what the best online YouTube tag extractors have to offer.
1. Online-Free-Tools
Price: Free
This platform provides a broad spectrum of online tools that can be used to generate QR Codes, analyze HTTP headers, or test different PHP functions. Its tag extractor tool is remarkably easy to use since you just have to paste the URL of the YouTube video from which you would like to extract tags, confirm that you are not a robot, and click on the Find the Tags button.
The platform then displays all the tags it found in the Results section, and it also offers the option to copy them for YouTube. The best part is that you don’t have to create an account on the Online-Free-Tools platform if you want to use this tool.
2. YouTube Video Tags Extractor Online Tool
TagsYouTube is equipped with a number of video optimization tools that ultimately help you improve the performance of your content. Tag Finder, Video Description Generator, or Hashtags Generator are among the tools this platform offers.
In order to access the video extractor tool, you have to click on the More Tools menu and then choose the Extract or View Video Tags option. Afterward, you should add the video’s URL and click on the Extract Tag button. Besides showing the tags the video already contains, the platform also generates tag suggestions for a particular video. In addition, you can copy up to 500 tags and add them to a video you’re uploading to your YouTube channel.
3. YouTube Tag Generator
Price: Free
YouTube Tag Generator platform lets you extract tags from individual videos or entire channels in just a few easy steps. Simply insert the URL into the appropriate box and click on the Search icon. All tags a video contains are going to be displayed in the Tags From This Video section.
The Tag Editor option enables you to remove the tags you don’t want to include in your video. You can also click on the Copy All button if you want to add all the tags that are displayed in the Tag editor to your video. Optionally, you can click on the Copy Selected button if you only want to copy the tags you selected.
4. YTube Tool
Price: Free
This simple but effective online tool, lets you generate thumbnails, as well as video titles and descriptions. It also enables you to extract tags from a YouTube video in just three simple steps. You just have to add the URL into the YouTube Video URL box and click on the Find Tags button.
The platform will then show you a prompt that asks you to confirm that you are not a robot and display all tags it detected in the Results section. In the Tags List in a Text Area Section, you can edit the tags, and remove those you don’t want to include in the video you would like to upload to your YouTube channel. All other tags can be copied or downloaded to your computer.
5. Y2TAG
Price: Free
YouTubers in need of a free and easy to use tag extractor should consider using the Y2TAG platform. Besides extracting tags from videos and channels, you can also search for tag suggestions using the platform’s Tags Generator tool or analyze tags for a particular keyword.
Extracting tags from a video with Y2TAG is easy because you can just click on the Find button after you’ve pasted the video’s URL into the box at the top of the screen. The platform will then display all detected keywords in the Tags From this Video section. The Tag Editor that is located at the bottom of the page lets you keep only the tags that fit your demands and copy them to your YouTube channel.
6. MyFreeOnlineTools
Price: Free
A Keyword Density Checker, a Color Converter, or Code Compressor are just a few among countless tools you can use for free on the MyFreeOnlineTools platform. What’s more, you don’t even have to create an account on this platform in order to extract keywords and tags from YouTube videos.
Once you open this tool, you’ll have to paste the video’s URL to the designated box and hit the Click Extract Data button. YouTube video’s tags, title, and description will pop up on the screen in just a few moments. However, you won’t be able to edit or copy them, as the platform merely shows the data the video contains.
7. BackLinkValidator
Price: Free, pricing options start $0.65 per month
BackLinkValidator can help you discover tags through keywords, key phrases, and it can also provide you with tag suggestions for your video based on the tags the highest-ranking videos on YouTube are using.
The Extract tags from specific YouTube videos and channels option generates a list of tags for a video it analyzes. Moreover, this tool also collects all keywords in the video’s description. BackLinkValidator lets you extract tags and keywords from up to five URLs simultaneously, which speeds up the tagging process significantly. The Pro version of the platform grants you access to a wider set of options that can be useful if you upload videos to YouTube regularly.
Frequently Asked Questions About Online YouTube Tag Extractor
#1. Can I Extract YouTube Tags Without Desktop Software?
You don’t need a desktop-based software to extract tags from a YouTube video, because online tag extractors can generate a list of video’s tags within seconds.
#2. How to Change YouTube Video Tags?
Make sure that you are logged in to YouTube Studio, and click on the Video Manager option that is located in the menu on the left side of the screen. The Info and Settings page contains the Basic Info section where you can remove existing tags and replace them with new ones.
Conclusion
It is almost impossible to overestimate the importance of tags for the number of views and likes your YouTube videos are getting. Luckily, online YouTube tag extractors grant you the insight into the tags other video content producers on the platform are using.
If you are a YouTuber who want to create videos with templates and effects without much efforts, you should try an effective video editing software for YouTube like Wondershare Filmora .
Richard Bennett
Richard Bennett is a writer and a lover of all things video.
Follow @Richard Bennett
Superior Mics for Video Blogging Professionals
Best Microphone for YouTubers
Richard Bennett
Mar 27, 2024• Proven solutions
If you want your viewers to be glued to their screens then quality audio is just as important as quality video for your YouTube channel. People will watch your vlog because they want to hear what you are saying. It can be tempting to use the audio your camera records rather than buy a separate microphone. Unfortunately, the microphones built into most cameras will only record mediocre audio. In this case, we have researched and found out the following best microphones for YouTube videos based on its price and performance. Besides, we will also highlight the best microphones for different recording scenarios. Whether you’re making gaming videos or recording yourself singing, or filming inside or outside, you will get to know which one is best for your situation. Let’s check out now.
- Best Microphones for YouTube Videos
- Best Microphones for Different Types of YouTube Creators
- Tips for Recording YouTube Audio
- How to Sync your Audio in Filmora
Part 1: Best Microphones for YouTube Videos [Best for All]
Here are examples of some of the best external microphones for YouTube:
1. Blue Snowball USB Mic - $60
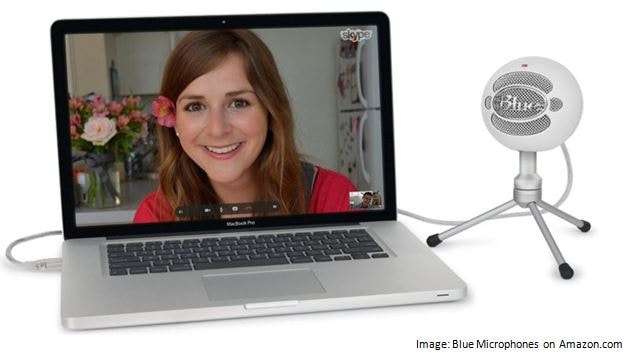
The Snowball is especially good for vlogging from your webcam because it is easy to hook up to your computer using a USB port. It will record your audio simultaneously while you are using your webcam. The biggest drawback of the Snowball is that it needs to be close to you while your record. This combined with its larger size means that it will probably need to be in your shot.
2. RØDE Video Shotgun Mic - $140
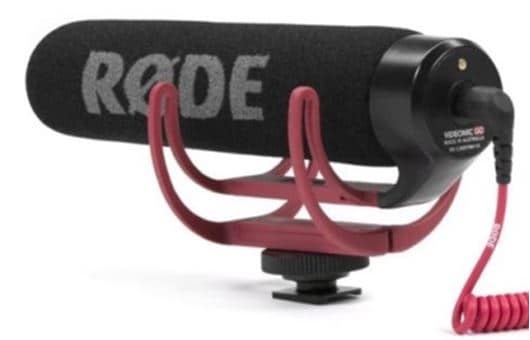
The Shotgun attaches to your DSLR camera and is great for capturing specific sounds, like dialogue, without a lot of background noise. To work well it needs to be pointing at the person who is speaking, and it should be fairly close to them as well. This means that the camera cannot be too far back from you while you vlog.
3. Audio-Technica AT875R Line + Gradient Condenser Microphone - $240
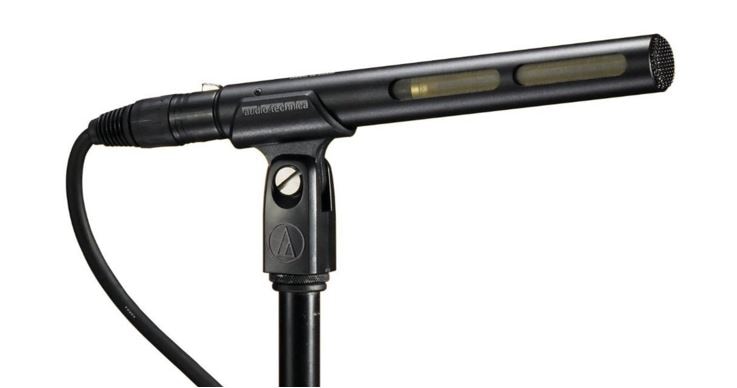
This microphone is similar to the ones you think of being mounted on boom poles on professional sets, and it can easily be mounted onto a pole and used the same way. This gradient condenser mic is good at picking up sound at a distance, and at only picking up sound coming from directly in front of it. If you are working alone then you can set this mic up on a stand so it is pointing at you, or if you have a friend to help you you can ask them to hold it on a boom pole.
4. Sony LAV Wireless Mic System - $600
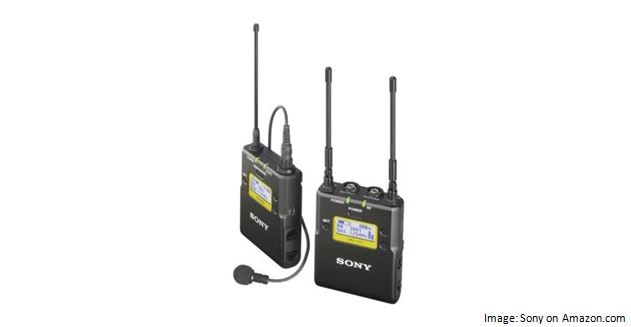
A LAV Mic, also called a lavalier or lapel mic, is a small microphone which can be clipped onto clothing. Wearing a LAV Mic while you vlog will allow you to move around freely and still capture great audio, rather than being stuck in range of a stationary mic. There are both wired and wireless options available in LAV Mics.
5. Roland R-05 WAVE/MP3 Recorder - $200
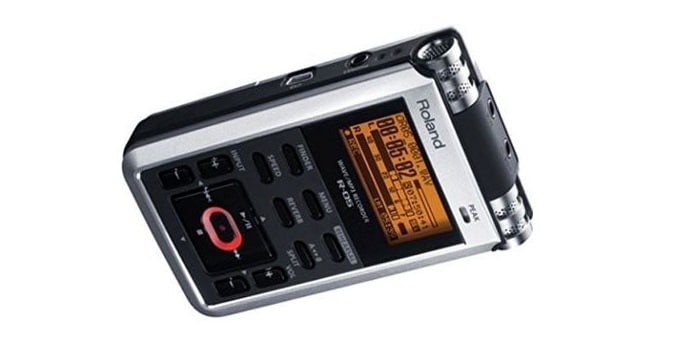
The R-05 is a pocket recorder that captures flawless audio. Its small size means you can hide it in your pocket and it will not show up in your video. Also, since it does not need to hook up to your camera or computer you will have freedom of movement.
Part 2: Best Microphones for All Types of YouTube Creators
If you have to invest in a new piece of equipment for your YouTube channel, consider upgrading your microphones. Your viewers can forgive your grainy video footage, poor lighting, and unsteady camera handling, but if your audio sounds like you’re speaking across the road on a busy highway, all your hard work will be wasted, because nobody will want to watch it.
But the thing about microphones is that they are not all created equal. Depending on the type of videos you’re filming and the environment where you’re recording, the capabilities of the microphone will differ.
1. Best Microphone for Live Streamers and Gamers
Blue Yeti USB - $150
As a live streamer, gamer, or vlogger such as beauty or lifestyle, you’ll want a balance of easy setup and high-quality audio. The Blue Yeti USB delivers on that.
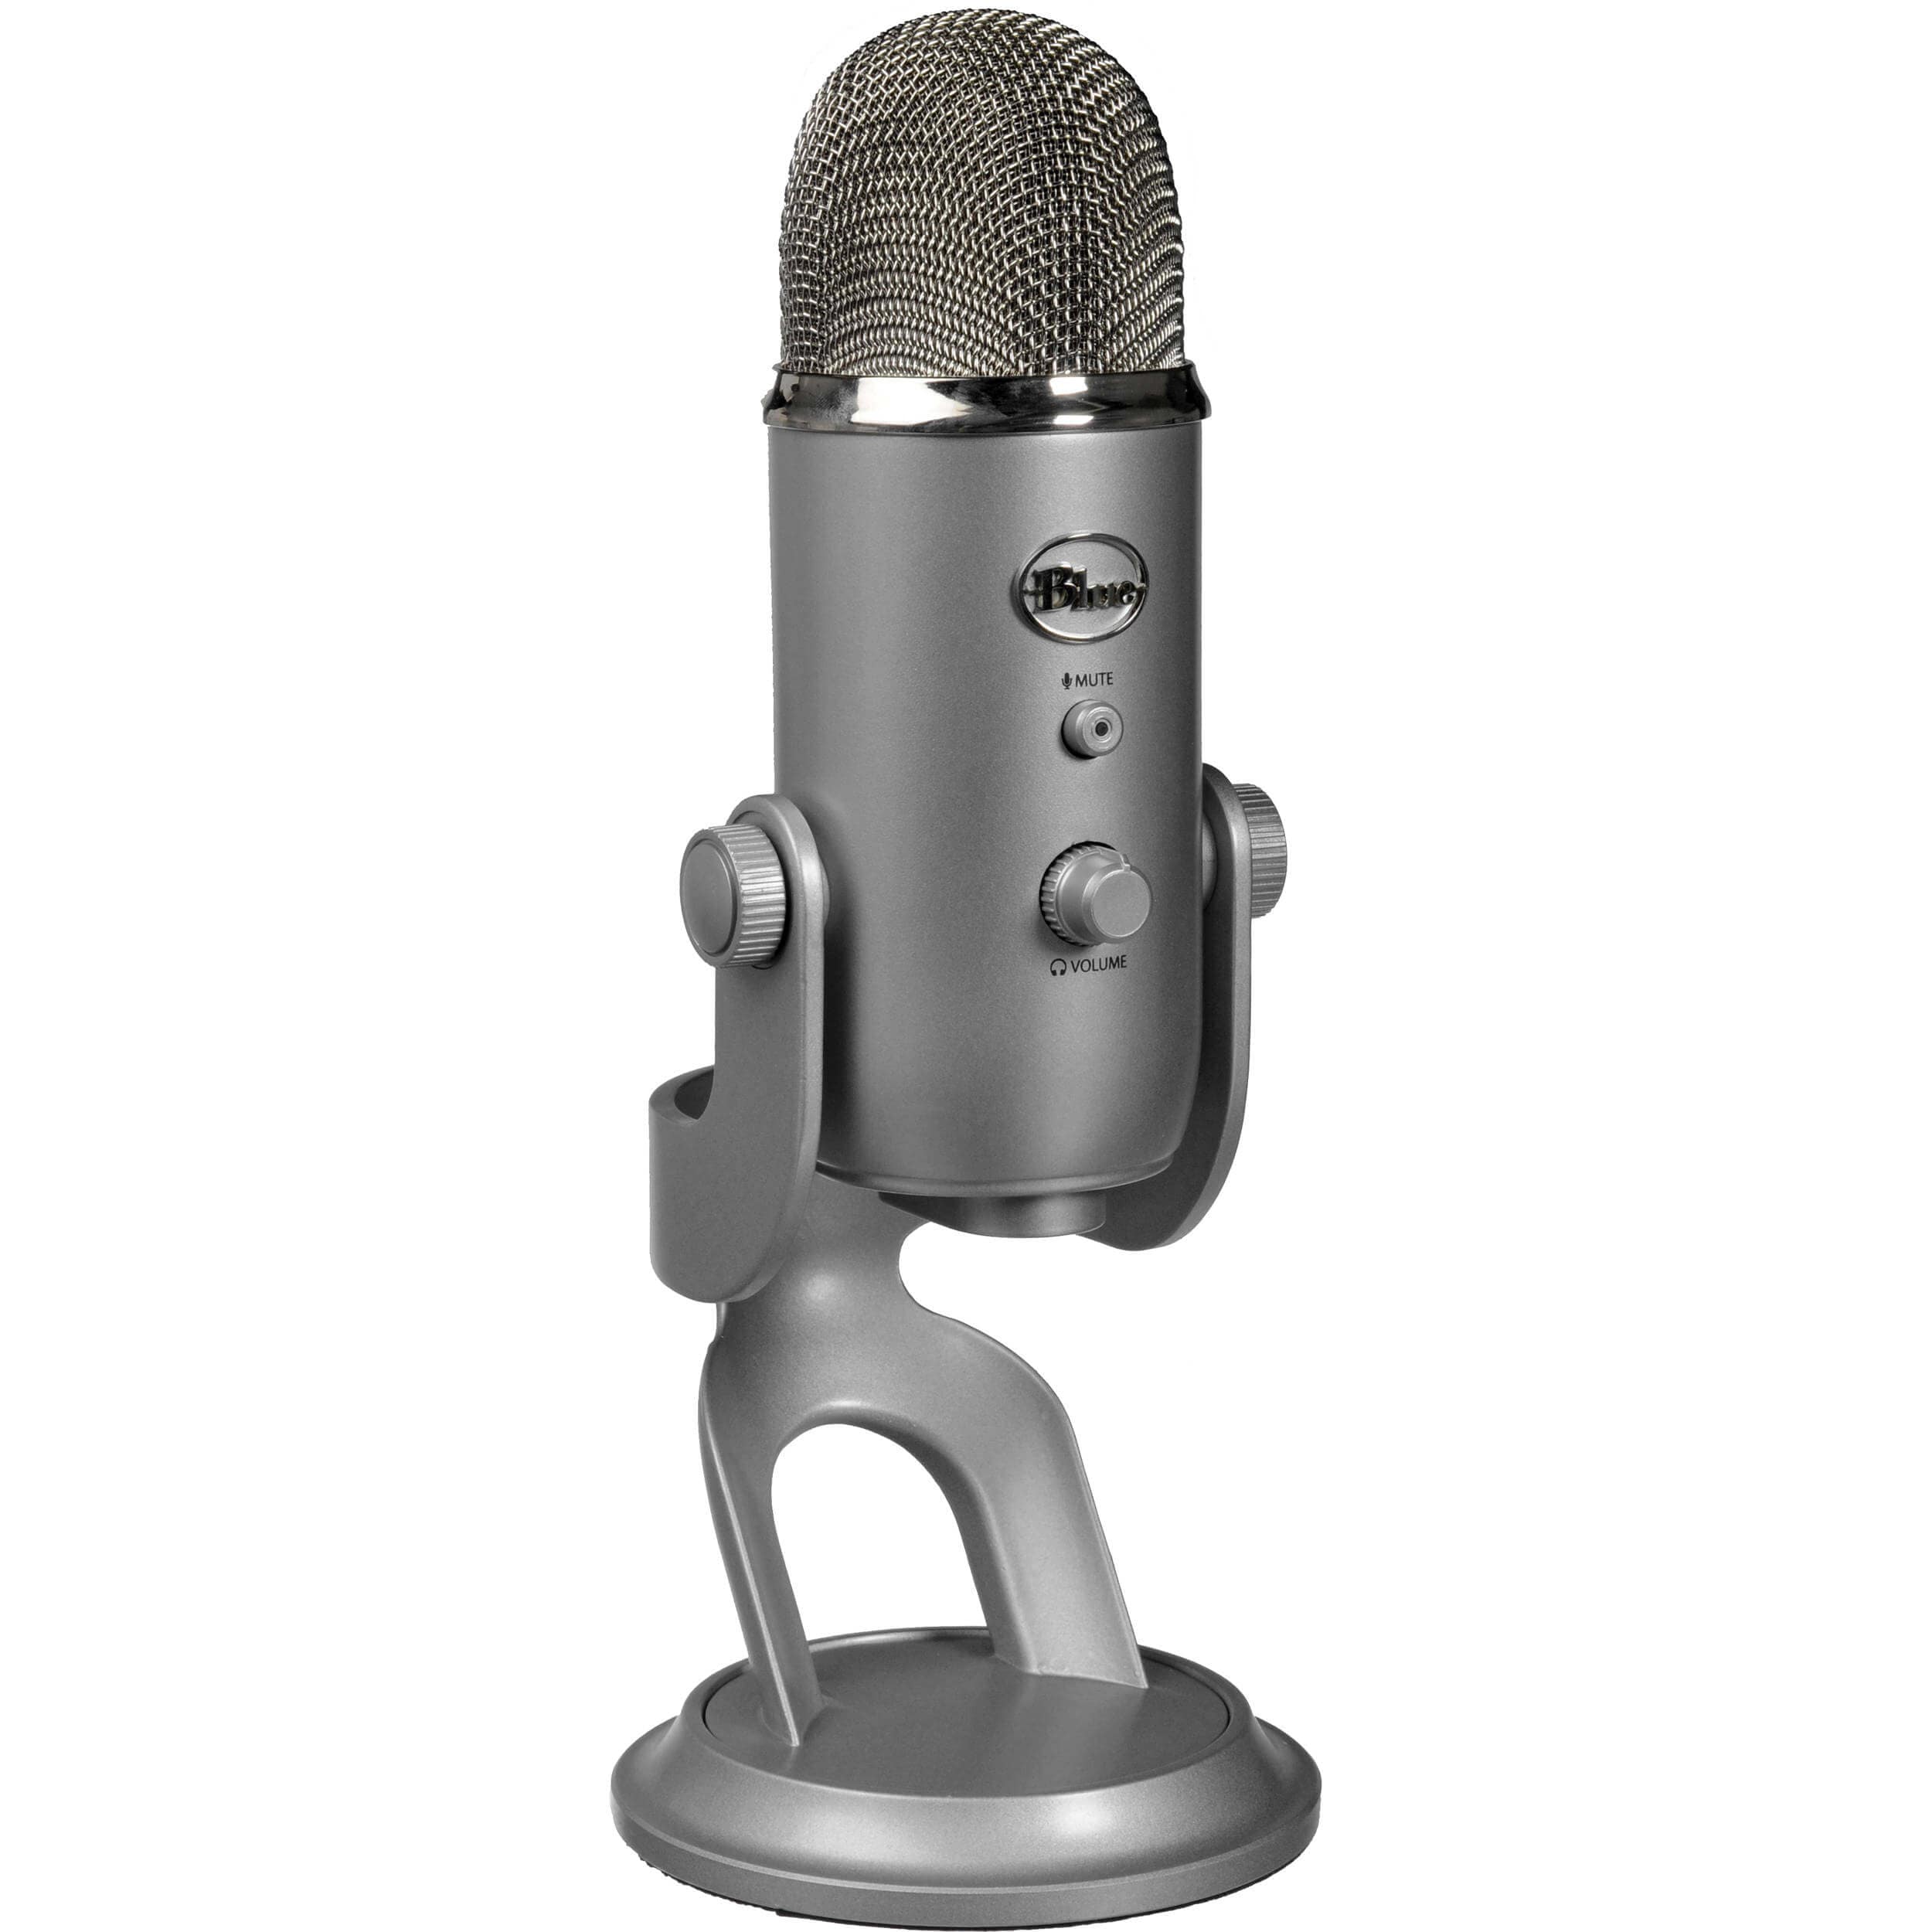
It’s the closest budget microphone to a professional studio mic on the market, and it feels that way when you hold its solid metal frame for the first time. Connecting directly to your computer via USB, the Blue Yeti comes with a 6-feet long USB cable. Out of the box, it sits upon a sturdy stand, which can be removed and the mic can be threaded a shock mount.
The Blue Yeti can pick up audio in four different polar patterns: cardioid, bidirectional, omnidirectional, and stereo. This makes it incredibly versatile, but if you are streaming, I recommend keeping it on cardioid.
Tip: In cardioid mode, speak into the front of the mic, not the top of it.
2. Best Microphones for Outdoor Locations
Rode VideoMic Pro Compact VMP Shotgun Microphone - $268
When you are filming outside, you are dealing with audio from all different directions: distant traffic, a gust of wind, the neighbor’s kids, etc.
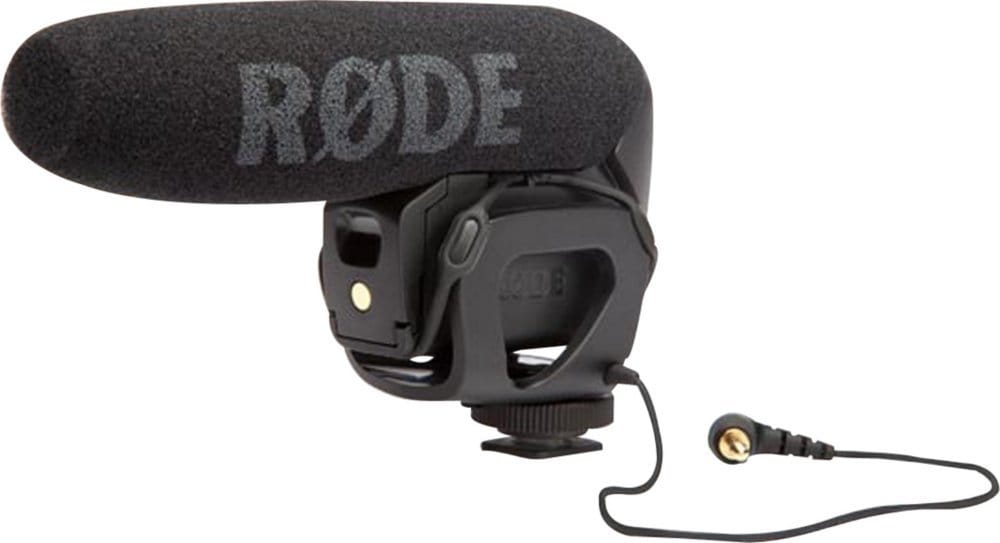
That’s why a shotgun mic is better than an omnidirectional one for outdoor situations. Shotgun microphones, such as the Rode VideoMic Pro, picks up audio only in the direction it’s pointing in. You can aim it at your subject and it will give you clear audio without a lot of background noises.
The Rode VideoMic Pro comes with a mount that attaches on top of your camera, if you are filming outdoors. So if you are holding the camera and vlogging, then the audio will be great. However, if you want to take advantage of the space, and set the camera further away, you should attach the mic on a boom or a stand to get the best audio.
Tip: With Rode VideoMic Pro, and any mic you use to shoot outdoors, always do a sound check to make sure the quality is up to standard. Ten seconds of your subject talking at the level they will be speaking in will be enough to judge the sound quality.
3. Best Microphone for Music (Vocals)
Audio-Technica AT2035 - $163
If you are a serious musician on YouTube, then you will need a serious microphone like the Audio-Technica AT2035. This microphone connects via an XLR cable and requires phantom power, so you will need to invest in an audio interface, if you don’t already have one.
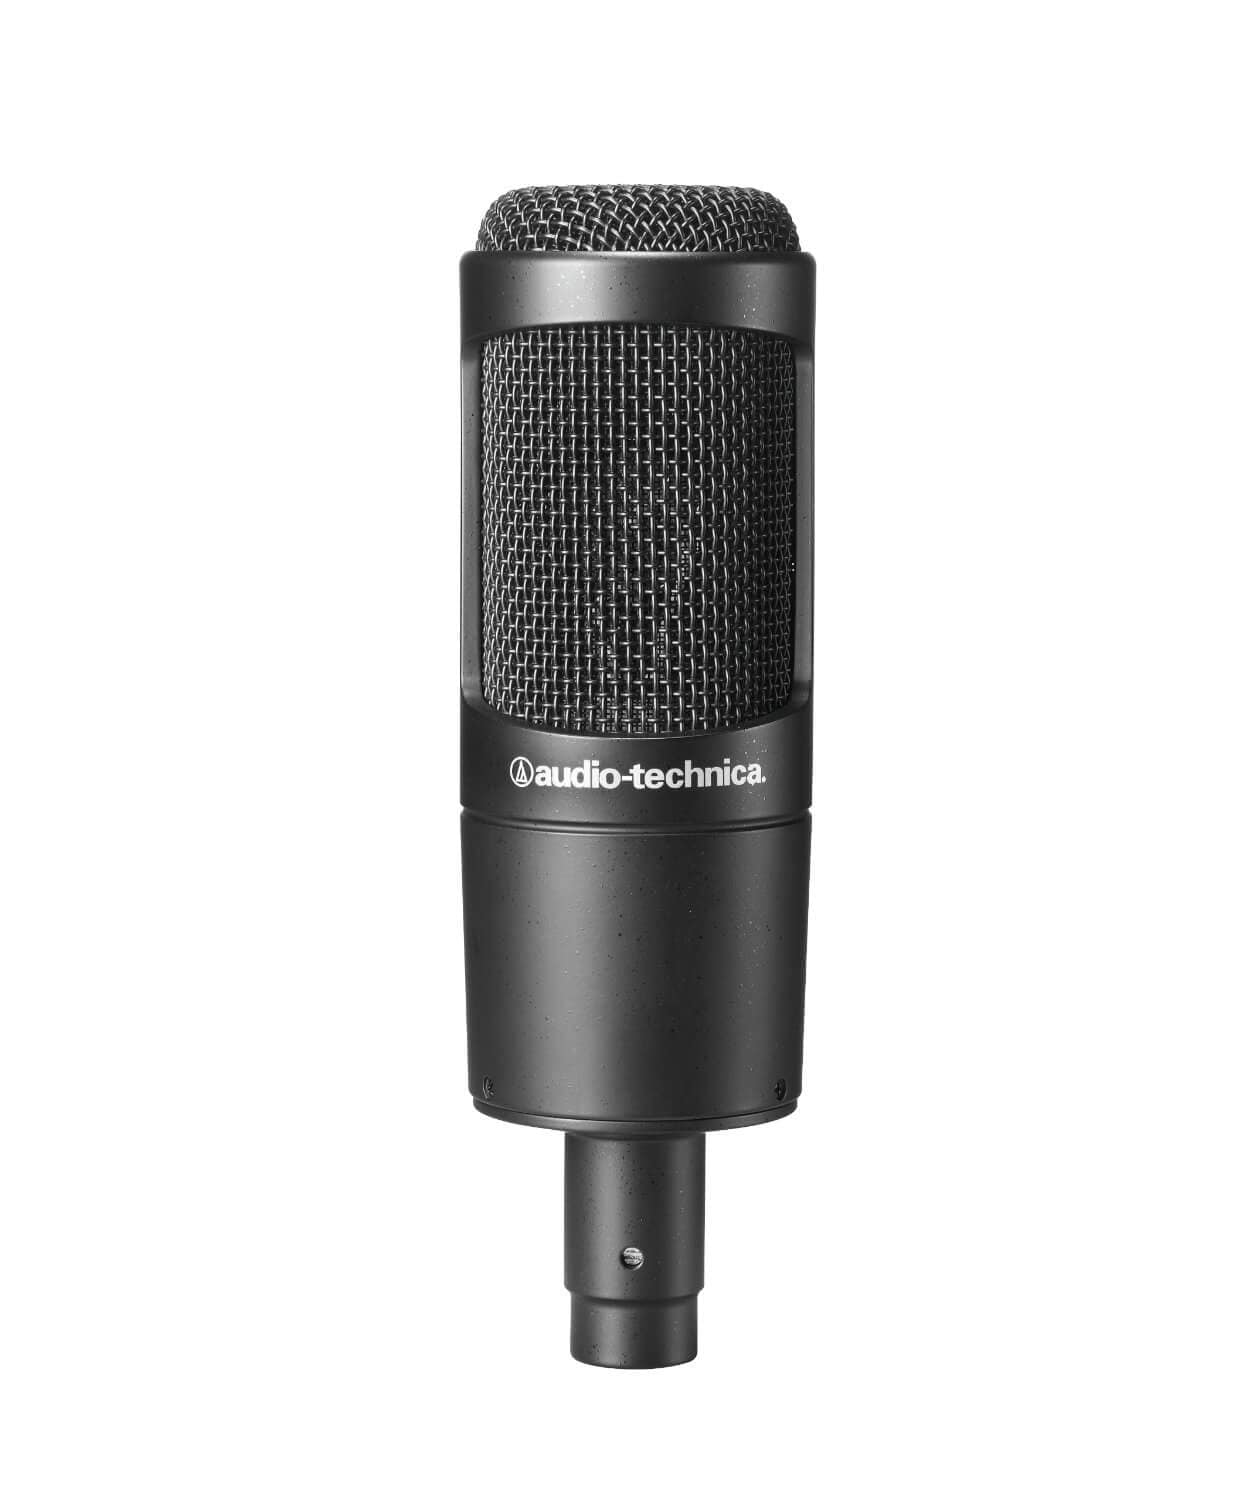
Nevertheless, this microphone does a fantastic job isolating the source of sound and eliminating background noise. Even if you’re recording in your bedroom, and not a professional studio, you’ll still get high quality vocals from this microphone.
Tip : Position yourself 8-12 inches away from the mic when singing. This allows your voice to sound more natural (too close and it’ll sound bassy) and it prevents the audio volume from fluctuating too dramatically as you move around or sing loudly one part and quietly at another.
4. Best Microphone for Voice Over
Rode NTK Tube Condenser Microphone - $529
The Rode NTK Tube is arguably one of the best microphone for its price. You can spend a thousand dollars and get a professional studio microphone, but you can’t do much better than the Rode NTK.
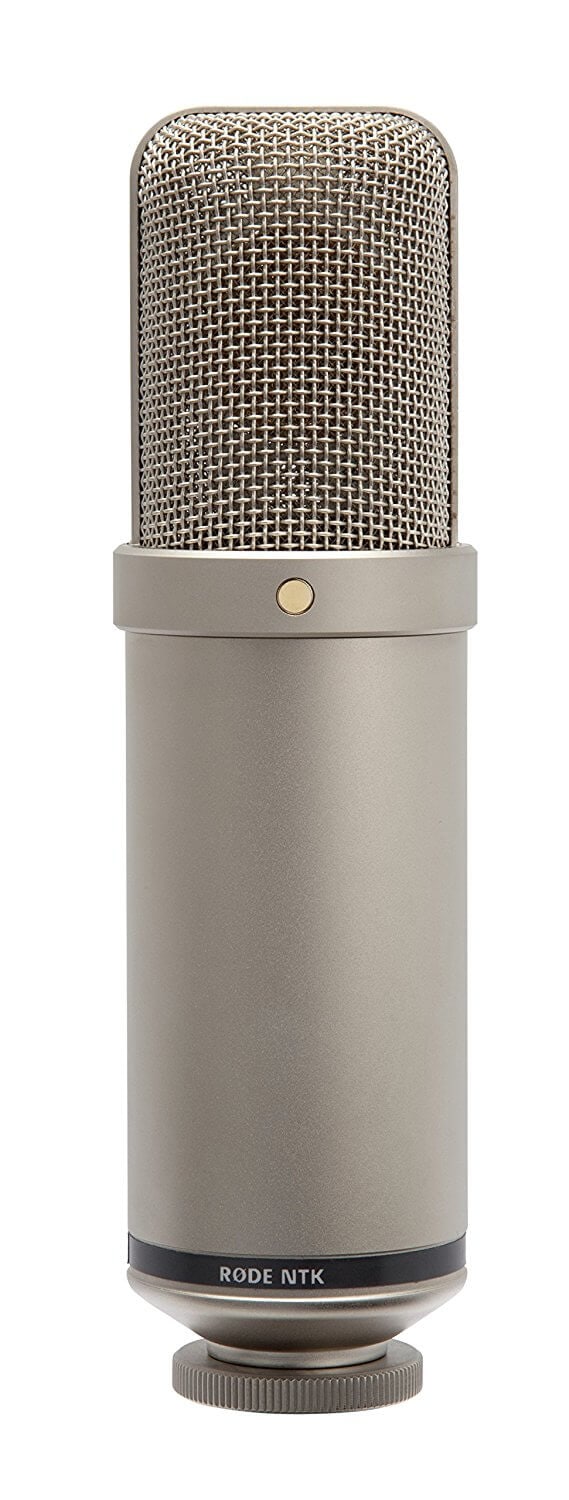
If you’re recording out of a studio environment, whether it’s a professional, semi-professional, or a closet with soft padded walls, the Rode NTK will give warmth and richness to every word you speak, while still offering crispness. Allow it to warm up for a few minutes before you start recording, and you’ll have awesome audio for your voice over.
This mic is great for YouTubers who are creating video essays, ADR, animated videos, or other videos that require top quality narrations.
Tip: Make sure you have a mic stand that you can raise to your standing height. Standing while recording voice over allows you diaphragm to open up, which will improve the quality of your voice.
5. Best Microphone for Big Echoey Space
Sennheiser MD 421 II Cardioid Dynamic Mic - $449
Commonly used to record isolated percussions or brass instruments, the Sennheiser MD 421 II is also wonderful if you need to record vocals in a large room. As a versatile dynamic mic, it doesn’t allow background noises or reverberations to bleed into the source vocal.
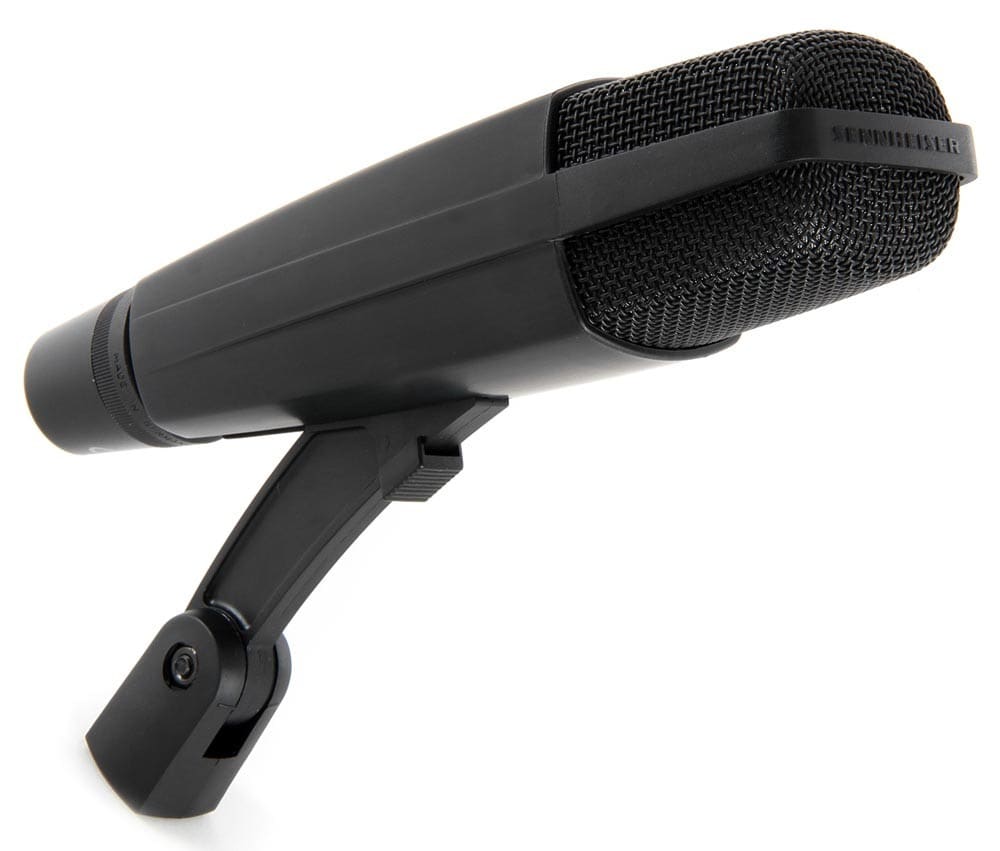
The Sennheiser MD 421 II has a rugged design as it’s built for live situations, such as concerts. This is a great microphone to have in your arsenal, should you end up recording in a large venue such as a conference or an arena.
If you are a YouTuber who makes a lot of video in warehouses, workshops, or rehearsal halls, then you should consider investing in a Sennheiser MD 421 II to get the most out of these acoustically complicated locations.
Tip : Sometimes audio in a loud, big environment can’t be saved by the best microphone. If that’s the case, film the source of the background noise. Get b-roll of people walking around, machinery operating, or whatever challenging sound you are dealing with in the large space. Cutting to these noise makers will give the audience a reference for the background noise, which helps conceal it.
6. Best Handheld Microphone for Interviews
Zoom ZH1 H1 Handy Portable Digital Recorder - $68.99
This unidirectional microphone delivers clear and crisp audio. Compact, portable, and lightweight, the Zoom ZH1 H1 is a terrific choice for YouTubers who are looking for a handheld option for a microphone.
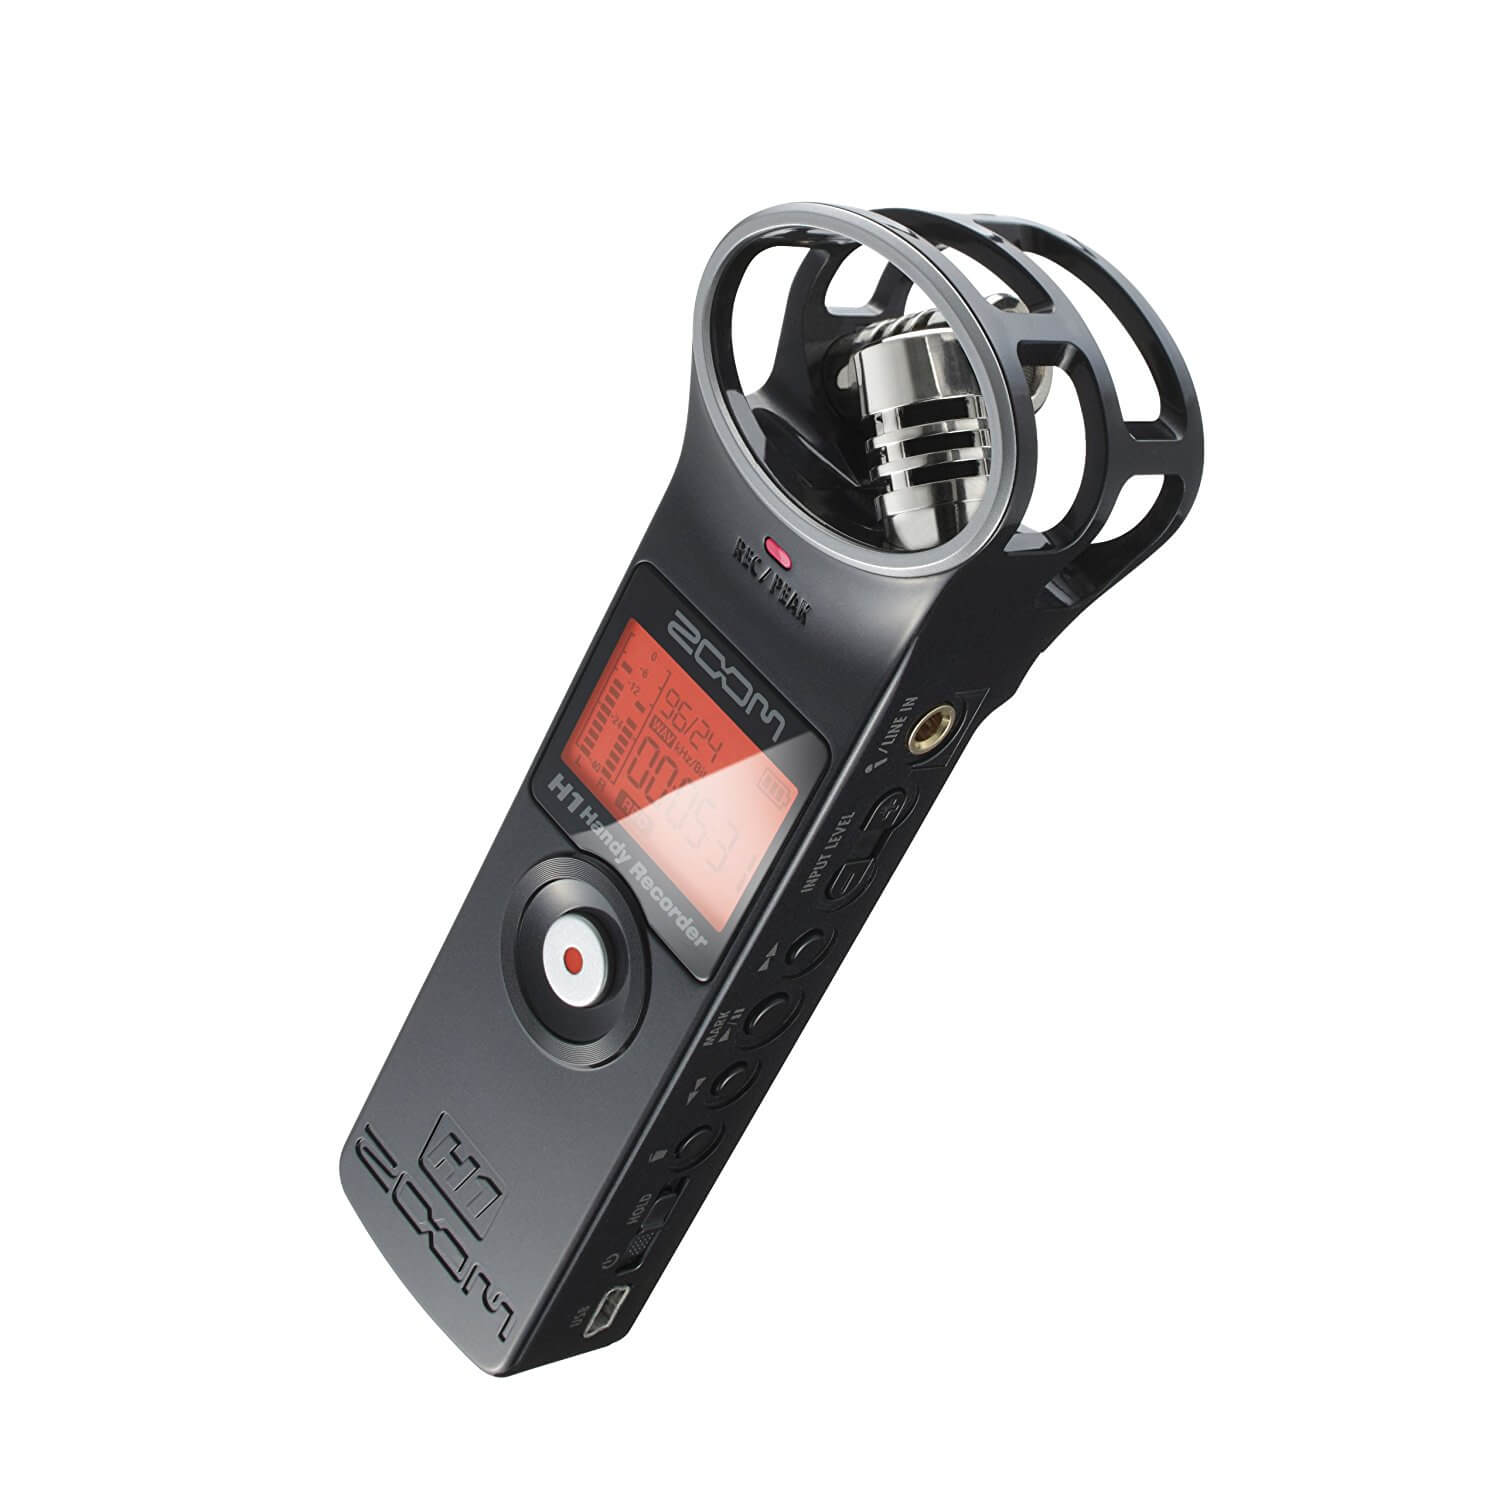
As a YouTuber, you may not have a crew to help you wrangle cable or a team member to help you monitor your audio levels, that is what makes Zoom ZH1 H1 a solid choice, as it is wireless and you can check the levels right in the palm of your hands as you record and even hear playback on the device.
The only thing that might slow you down, is that the audio will be captured directly onto the device, which means that you will need to sync up your audio to video afterward.
Tip : Before you start your interview, hit record on video and audio and then clap on camera, causing the audio to spike and giving you a video reference. This will give you a clear mark for syncing up, the sound of the clap and your hands coming together on camera.
7. Best Microphone for Action and Fitness
Rode VMPR VideoMic Pro R with Rycote Lyre Shockmount - $214.90
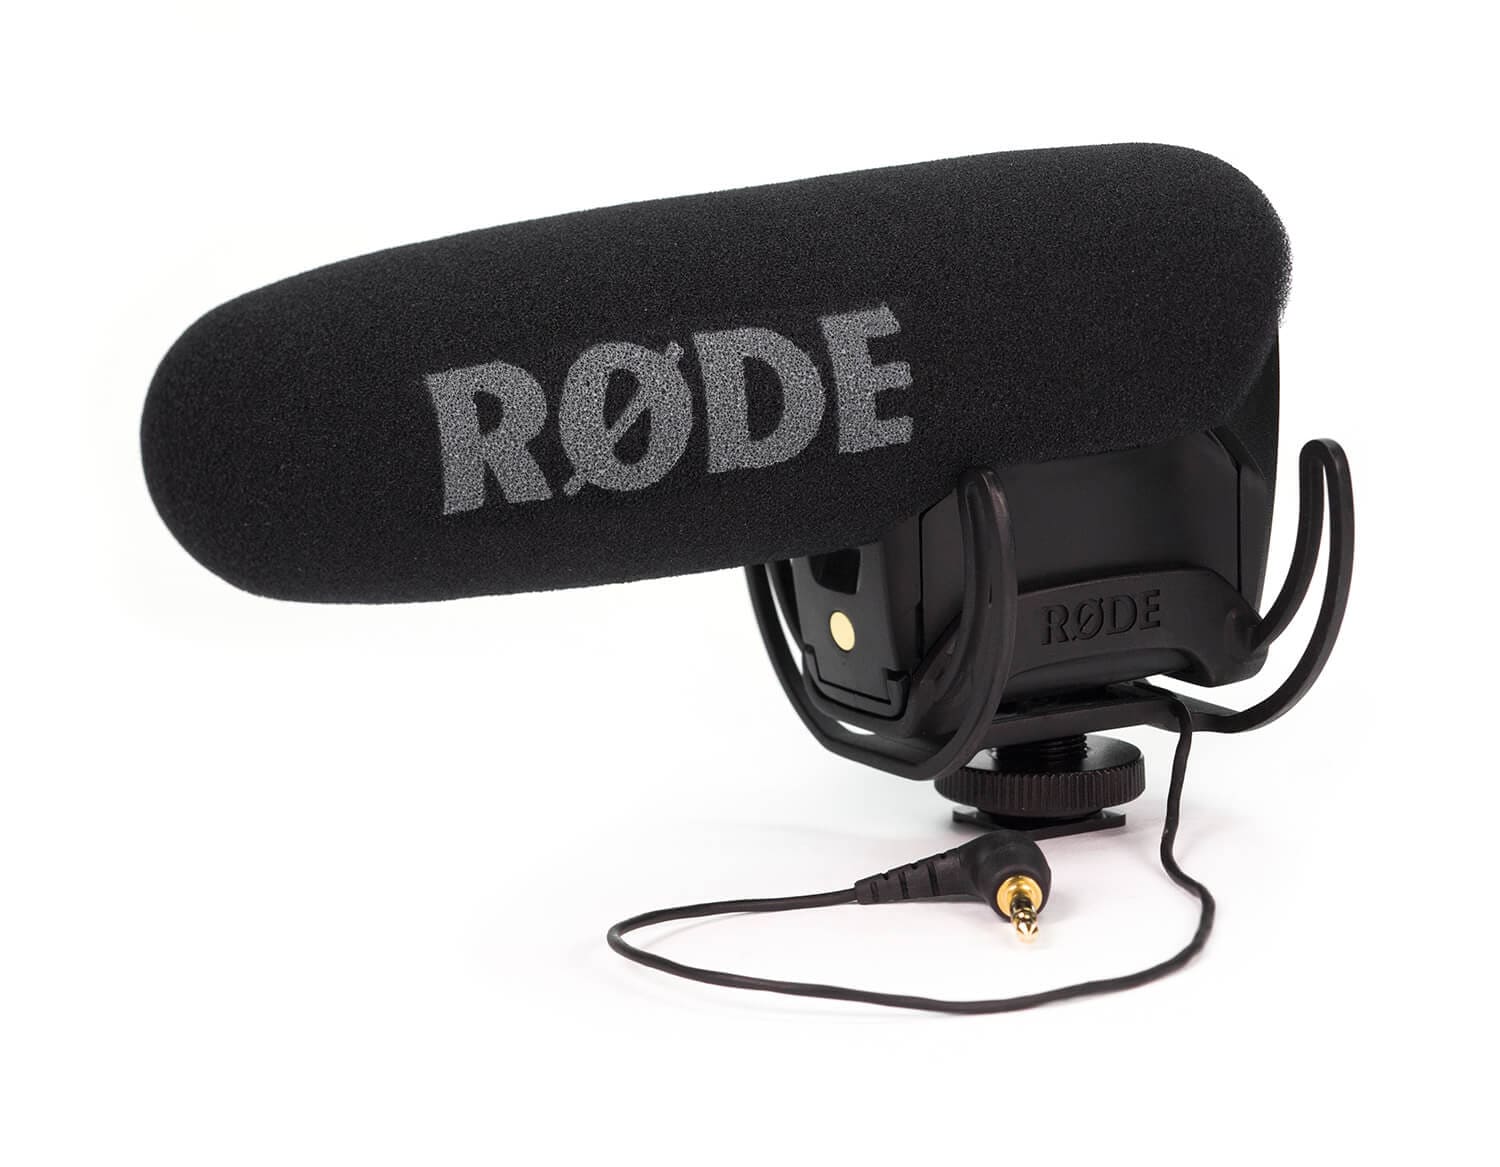
If you’re a YouTuber who films a lot of action shots or fitness videos, where you, your camera and your microphone are in motion, then I recommend the Rode VMPR VideoMic Pro R with Rycote Lyre Shockmount.
The Rode VMRP VideoMic Pro is a shotgun microphone that can focus on your subject in front of the camera with a low self-noise. This is excellent when you’re filming action shots, because you can always direct your mic at what you want to record knowing you won’t capture too much from other angles.
The Rycote Lyre shock mount eliminates any external audio that can be caused by movements to the microphone and camera. The shock mount is made of an elastic solution, so it’s incredibly durable.
Tip : For a greater range, the Rode VMRP Video Mic Pro can be mounted onto a boom pole, should the subject need to move around within the shot or if the camera needs to move away from the subject.
8. Best Waterproof Microphone
Sennheiser MKE 2 elements - Action Mic for the GoPro HERO4 - $200
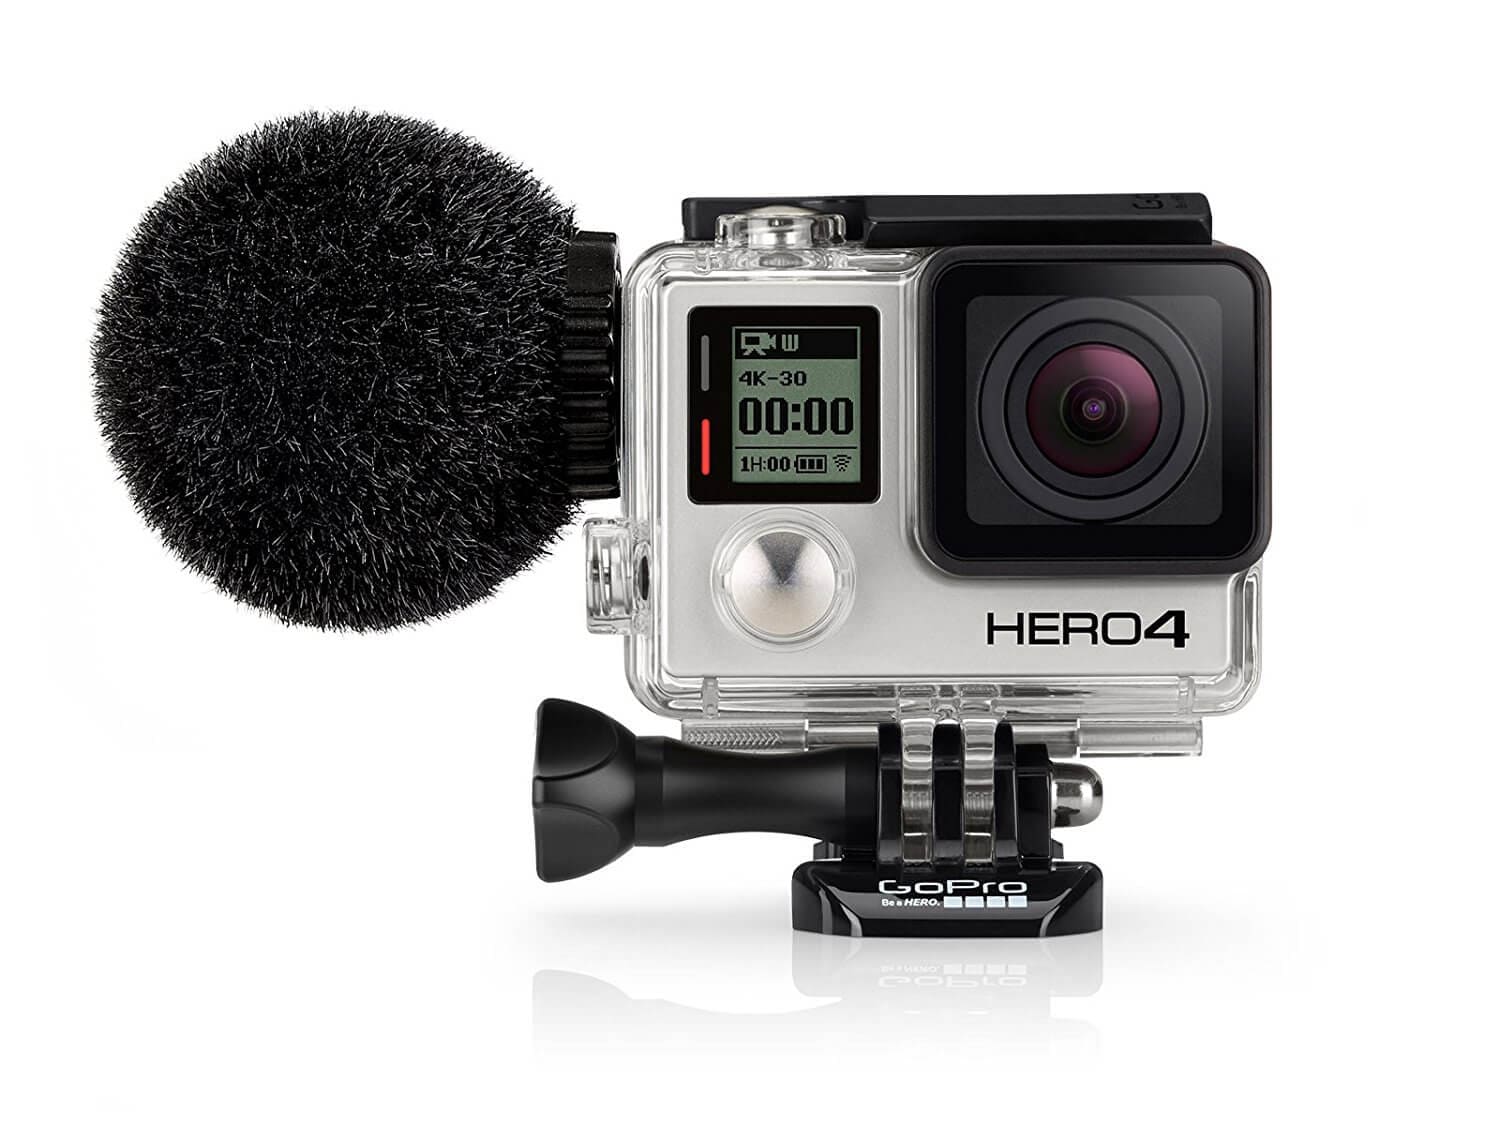
In or around water, nothing can ruin a day of shooting faster than getting your equipment wet. If you’re using GoPro Hero4 for shooting all your intense water shots, you would be familiar with the awful audio you capture when the camera is inside the waterproof casing.
Lucky for you, Sennheiser has developed a waterproof microphone, the MKE 2 elements. This little furry ball that connects to your GoPro Hero4 can withstand up to 1 meter of water. Because underwater sound is captured differently (via a hydrophone ), the Sennheiser MKE 2 elements can’t actually record audio underwater, however, it’ll be ready to keep recording quality audio once it resurfaces.
Tip: Double check to make sure that the mic cable is not blocking the seal of the waterproof case of the camera before launching it into the water.
Different situations call for different equipment. This is the true for tradespeople, golfers, and YouTubers. If you want to get the best audio, it’s more than simply buying the most expensive one, you’ll also need to find the microphone most suited for that situation.
I hope this post helped you improve your audio quality. If you are having challenges finding a good microphone for a particular scenario, let us know in the comments below!
Part 3: 10 Tips for Recording YouTube Audio [Video Tutorial]
After picking up the best microphone based on your need, you can record your audio now. But wait, here are 10 tips for using the microphones to record better audio for your YouTube video. In case that you are in a hurry, we have summarized the following tips for a quick look.
- Silence everything you don’t want your mic to record.
- Put your mobile phone in airplane mode.
- Minimize echo.
- Block wind from reaching your mic.
- Upgrade your mic.
- Adjust your levels.
- Start with a sound cue if you’re planning to do some syncing in post.
- Get close to the sound.
- ADR.
- Record Ambient Sound.
Download Mac Version ](https://tools.techidaily.com/wondershare/filmora/download/ )
Part 4: How to Sync your Audio in Filmora
Both the LAV Mics and the R-05 will create separate audio clips which you will need to sync up with your video when you are finished recording.
Note: when you start recording, clap two or three times. This will create distinct and visible audio spikes for you to look for when you sync the audio with video.
1. Import Video and Audio Files
Once you have finished recording and have opened up Filmora Video Editor , import your video and drag and drop it into your timeline. The audio recorded with the built in camera mic is already lined with your video clip and your audio and video will both automatically share the video track.
Now import the audio from your external microphone and drag and drop it to your audio track. The audio track is initially hidden, but it will appear when you pull an audio file into the timeline.
Download Mac Version ](https://tools.techidaily.com/wondershare/filmora/download/ )
2.Detach Default Audio from Video
Since you have recorded a separate audio file, you should detach the original audio recorded with the built-in camera mic from the video. To do this, just right click the video clip in the timeline and select Audio Detach from the drop down menu.

3.Align Spikes in Video Audio and Recorded Audio
Find the spikes that represent your clapping in both audio tracks. Then, adjust your external audio so its clapping patterns are in line with those in your camera’s audio track. You can magnify your timeline for a better control.
Once your external audio is synced to your camera’s audio it will also be synced to your video. You no longer need your camera’s audio and can delete it.
Watch the video below to check more features about Filmora.
Richard Bennett
Richard Bennett is a writer and a lover of all things video.
Follow @Richard Bennett
Richard Bennett
Mar 27, 2024• Proven solutions
If you want your viewers to be glued to their screens then quality audio is just as important as quality video for your YouTube channel. People will watch your vlog because they want to hear what you are saying. It can be tempting to use the audio your camera records rather than buy a separate microphone. Unfortunately, the microphones built into most cameras will only record mediocre audio. In this case, we have researched and found out the following best microphones for YouTube videos based on its price and performance. Besides, we will also highlight the best microphones for different recording scenarios. Whether you’re making gaming videos or recording yourself singing, or filming inside or outside, you will get to know which one is best for your situation. Let’s check out now.
- Best Microphones for YouTube Videos
- Best Microphones for Different Types of YouTube Creators
- Tips for Recording YouTube Audio
- How to Sync your Audio in Filmora
Part 1: Best Microphones for YouTube Videos [Best for All]
Here are examples of some of the best external microphones for YouTube:
1. Blue Snowball USB Mic - $60
The Snowball is especially good for vlogging from your webcam because it is easy to hook up to your computer using a USB port. It will record your audio simultaneously while you are using your webcam. The biggest drawback of the Snowball is that it needs to be close to you while your record. This combined with its larger size means that it will probably need to be in your shot.
2. RØDE Video Shotgun Mic - $140
The Shotgun attaches to your DSLR camera and is great for capturing specific sounds, like dialogue, without a lot of background noise. To work well it needs to be pointing at the person who is speaking, and it should be fairly close to them as well. This means that the camera cannot be too far back from you while you vlog.
3. Audio-Technica AT875R Line + Gradient Condenser Microphone - $240
This microphone is similar to the ones you think of being mounted on boom poles on professional sets, and it can easily be mounted onto a pole and used the same way. This gradient condenser mic is good at picking up sound at a distance, and at only picking up sound coming from directly in front of it. If you are working alone then you can set this mic up on a stand so it is pointing at you, or if you have a friend to help you you can ask them to hold it on a boom pole.
4. Sony LAV Wireless Mic System - $600
A LAV Mic, also called a lavalier or lapel mic, is a small microphone which can be clipped onto clothing. Wearing a LAV Mic while you vlog will allow you to move around freely and still capture great audio, rather than being stuck in range of a stationary mic. There are both wired and wireless options available in LAV Mics.
5. Roland R-05 WAVE/MP3 Recorder - $200
The R-05 is a pocket recorder that captures flawless audio. Its small size means you can hide it in your pocket and it will not show up in your video. Also, since it does not need to hook up to your camera or computer you will have freedom of movement.
Part 2: Best Microphones for All Types of YouTube Creators
If you have to invest in a new piece of equipment for your YouTube channel, consider upgrading your microphones. Your viewers can forgive your grainy video footage, poor lighting, and unsteady camera handling, but if your audio sounds like you’re speaking across the road on a busy highway, all your hard work will be wasted, because nobody will want to watch it.
But the thing about microphones is that they are not all created equal. Depending on the type of videos you’re filming and the environment where you’re recording, the capabilities of the microphone will differ.
1. Best Microphone for Live Streamers and Gamers
Blue Yeti USB - $150
As a live streamer, gamer, or vlogger such as beauty or lifestyle, you’ll want a balance of easy setup and high-quality audio. The Blue Yeti USB delivers on that.
It’s the closest budget microphone to a professional studio mic on the market, and it feels that way when you hold its solid metal frame for the first time. Connecting directly to your computer via USB, the Blue Yeti comes with a 6-feet long USB cable. Out of the box, it sits upon a sturdy stand, which can be removed and the mic can be threaded a shock mount.
The Blue Yeti can pick up audio in four different polar patterns: cardioid, bidirectional, omnidirectional, and stereo. This makes it incredibly versatile, but if you are streaming, I recommend keeping it on cardioid.
Tip: In cardioid mode, speak into the front of the mic, not the top of it.
2. Best Microphones for Outdoor Locations
Rode VideoMic Pro Compact VMP Shotgun Microphone - $268
When you are filming outside, you are dealing with audio from all different directions: distant traffic, a gust of wind, the neighbor’s kids, etc.
That’s why a shotgun mic is better than an omnidirectional one for outdoor situations. Shotgun microphones, such as the Rode VideoMic Pro, picks up audio only in the direction it’s pointing in. You can aim it at your subject and it will give you clear audio without a lot of background noises.
The Rode VideoMic Pro comes with a mount that attaches on top of your camera, if you are filming outdoors. So if you are holding the camera and vlogging, then the audio will be great. However, if you want to take advantage of the space, and set the camera further away, you should attach the mic on a boom or a stand to get the best audio.
Tip: With Rode VideoMic Pro, and any mic you use to shoot outdoors, always do a sound check to make sure the quality is up to standard. Ten seconds of your subject talking at the level they will be speaking in will be enough to judge the sound quality.
3. Best Microphone for Music (Vocals)
Audio-Technica AT2035 - $163
If you are a serious musician on YouTube, then you will need a serious microphone like the Audio-Technica AT2035. This microphone connects via an XLR cable and requires phantom power, so you will need to invest in an audio interface, if you don’t already have one.
Nevertheless, this microphone does a fantastic job isolating the source of sound and eliminating background noise. Even if you’re recording in your bedroom, and not a professional studio, you’ll still get high quality vocals from this microphone.
Tip : Position yourself 8-12 inches away from the mic when singing. This allows your voice to sound more natural (too close and it’ll sound bassy) and it prevents the audio volume from fluctuating too dramatically as you move around or sing loudly one part and quietly at another.
4. Best Microphone for Voice Over
Rode NTK Tube Condenser Microphone - $529
The Rode NTK Tube is arguably one of the best microphone for its price. You can spend a thousand dollars and get a professional studio microphone, but you can’t do much better than the Rode NTK.
If you’re recording out of a studio environment, whether it’s a professional, semi-professional, or a closet with soft padded walls, the Rode NTK will give warmth and richness to every word you speak, while still offering crispness. Allow it to warm up for a few minutes before you start recording, and you’ll have awesome audio for your voice over.
This mic is great for YouTubers who are creating video essays, ADR, animated videos, or other videos that require top quality narrations.
Tip: Make sure you have a mic stand that you can raise to your standing height. Standing while recording voice over allows you diaphragm to open up, which will improve the quality of your voice.
5. Best Microphone for Big Echoey Space
Sennheiser MD 421 II Cardioid Dynamic Mic - $449
Commonly used to record isolated percussions or brass instruments, the Sennheiser MD 421 II is also wonderful if you need to record vocals in a large room. As a versatile dynamic mic, it doesn’t allow background noises or reverberations to bleed into the source vocal.
The Sennheiser MD 421 II has a rugged design as it’s built for live situations, such as concerts. This is a great microphone to have in your arsenal, should you end up recording in a large venue such as a conference or an arena.
If you are a YouTuber who makes a lot of video in warehouses, workshops, or rehearsal halls, then you should consider investing in a Sennheiser MD 421 II to get the most out of these acoustically complicated locations.
Tip : Sometimes audio in a loud, big environment can’t be saved by the best microphone. If that’s the case, film the source of the background noise. Get b-roll of people walking around, machinery operating, or whatever challenging sound you are dealing with in the large space. Cutting to these noise makers will give the audience a reference for the background noise, which helps conceal it.
6. Best Handheld Microphone for Interviews
Zoom ZH1 H1 Handy Portable Digital Recorder - $68.99
This unidirectional microphone delivers clear and crisp audio. Compact, portable, and lightweight, the Zoom ZH1 H1 is a terrific choice for YouTubers who are looking for a handheld option for a microphone.
As a YouTuber, you may not have a crew to help you wrangle cable or a team member to help you monitor your audio levels, that is what makes Zoom ZH1 H1 a solid choice, as it is wireless and you can check the levels right in the palm of your hands as you record and even hear playback on the device.
The only thing that might slow you down, is that the audio will be captured directly onto the device, which means that you will need to sync up your audio to video afterward.
Tip : Before you start your interview, hit record on video and audio and then clap on camera, causing the audio to spike and giving you a video reference. This will give you a clear mark for syncing up, the sound of the clap and your hands coming together on camera.
7. Best Microphone for Action and Fitness
Rode VMPR VideoMic Pro R with Rycote Lyre Shockmount - $214.90
If you’re a YouTuber who films a lot of action shots or fitness videos, where you, your camera and your microphone are in motion, then I recommend the Rode VMPR VideoMic Pro R with Rycote Lyre Shockmount.
The Rode VMRP VideoMic Pro is a shotgun microphone that can focus on your subject in front of the camera with a low self-noise. This is excellent when you’re filming action shots, because you can always direct your mic at what you want to record knowing you won’t capture too much from other angles.
The Rycote Lyre shock mount eliminates any external audio that can be caused by movements to the microphone and camera. The shock mount is made of an elastic solution, so it’s incredibly durable.
Tip : For a greater range, the Rode VMRP Video Mic Pro can be mounted onto a boom pole, should the subject need to move around within the shot or if the camera needs to move away from the subject.
8. Best Waterproof Microphone
Sennheiser MKE 2 elements - Action Mic for the GoPro HERO4 - $200
In or around water, nothing can ruin a day of shooting faster than getting your equipment wet. If you’re using GoPro Hero4 for shooting all your intense water shots, you would be familiar with the awful audio you capture when the camera is inside the waterproof casing.
Lucky for you, Sennheiser has developed a waterproof microphone, the MKE 2 elements. This little furry ball that connects to your GoPro Hero4 can withstand up to 1 meter of water. Because underwater sound is captured differently (via a hydrophone ), the Sennheiser MKE 2 elements can’t actually record audio underwater, however, it’ll be ready to keep recording quality audio once it resurfaces.
Tip: Double check to make sure that the mic cable is not blocking the seal of the waterproof case of the camera before launching it into the water.
Different situations call for different equipment. This is the true for tradespeople, golfers, and YouTubers. If you want to get the best audio, it’s more than simply buying the most expensive one, you’ll also need to find the microphone most suited for that situation.
I hope this post helped you improve your audio quality. If you are having challenges finding a good microphone for a particular scenario, let us know in the comments below!
Part 3: 10 Tips for Recording YouTube Audio [Video Tutorial]
After picking up the best microphone based on your need, you can record your audio now. But wait, here are 10 tips for using the microphones to record better audio for your YouTube video. In case that you are in a hurry, we have summarized the following tips for a quick look.
- Silence everything you don’t want your mic to record.
- Put your mobile phone in airplane mode.
- Minimize echo.
- Block wind from reaching your mic.
- Upgrade your mic.
- Adjust your levels.
- Start with a sound cue if you’re planning to do some syncing in post.
- Get close to the sound.
- ADR.
- Record Ambient Sound.
Download Mac Version ](https://tools.techidaily.com/wondershare/filmora/download/ )
Part 4: How to Sync your Audio in Filmora
Both the LAV Mics and the R-05 will create separate audio clips which you will need to sync up with your video when you are finished recording.
Note: when you start recording, clap two or three times. This will create distinct and visible audio spikes for you to look for when you sync the audio with video.
1. Import Video and Audio Files
Once you have finished recording and have opened up Filmora Video Editor , import your video and drag and drop it into your timeline. The audio recorded with the built in camera mic is already lined with your video clip and your audio and video will both automatically share the video track.
Now import the audio from your external microphone and drag and drop it to your audio track. The audio track is initially hidden, but it will appear when you pull an audio file into the timeline.
Download Mac Version ](https://tools.techidaily.com/wondershare/filmora/download/ )
2.Detach Default Audio from Video
Since you have recorded a separate audio file, you should detach the original audio recorded with the built-in camera mic from the video. To do this, just right click the video clip in the timeline and select Audio Detach from the drop down menu.
3.Align Spikes in Video Audio and Recorded Audio
Find the spikes that represent your clapping in both audio tracks. Then, adjust your external audio so its clapping patterns are in line with those in your camera’s audio track. You can magnify your timeline for a better control.
Once your external audio is synced to your camera’s audio it will also be synced to your video. You no longer need your camera’s audio and can delete it.
Watch the video below to check more features about Filmora.
Richard Bennett
Richard Bennett is a writer and a lover of all things video.
Follow @Richard Bennett
Also read:
- Troubleshoot and Eliminate Green Screen Issues on Mac
- Perfect Sound Placement Adding Music Seamlessly to YouTube Videos
- [Updated] Banishing Blackout Blues From YouTube Videos
- 2024 Approved Enchantments of the Video Edging Wizardry
- Double the Joy Master Looping of YouTube Media on Televisions for 2024
- Crafting Engaging, Extended Videos A YouTube Expert's Guide for 2024
- [Updated] Beyond YouTube Ranking Your Top Picks for Streaming Video Content
- 2024 Approved Enhancing Visibility Popularize Your YouTube Short Videos
- Channel Success Strategy Standard Studio or Beta Edge
- Pro Stock Market Strategies in YT Reviews
- In 2024, 9 Essential Apps for Pulling YouTube Videos (Android)
- Strategic Income From Online Gameplay
- Must-Watch YouTube News Feeds
- [New] Elevate Your Content Strategies to Climb YouTube Ranks
- In 2024, Assessing the Value of 4-Second Rapid Subscriptions on Youtube
- Decoding YouTube's Best Video Editing Practices
- [New] Demystifying YouTube SEO Terminology and Tactics
- [Updated] Bridging the Gap Between Classic and Contemporary Videos
- Discovering the Timeline for YouTube Earnings
- [New] Dive Into a Stream of 9 Full-Length Festive Flicks - No Charge
- [Updated] Elevating Business & Personal Visibility with YouTube, Mobile Edition
- The Fundamentals of Earnings on YouTube
- Channel Personality Complimentary YouTube Graphics for 2024
- Navigating 4K Video Submission YouTube Best Practices Unveiled
- 2024 Approved Crafting a Content Schedule The Path to Gaining Traction on YouTube
- Simple and Effective Ways to Change Your Country on YouTube App Of your Oppo Find N3 Flip | Dr.fone
- New Advanced Audio Engineers Pioneering Speech Generation Technology
- In 2024, Unlocking User Preferences with Instagram's Real-Time Feedback
- In 2024, How to Launch Your First Session with VRecorder
- In 2024, A Step-by-Step Guide on Using ADB and Fastboot to Remove FRP Lock from your Motorola Moto G04
- In 2024, How to Transfer Apps from Honor X50 to Another | Dr.fone
- [Updated] 2024 Approved How to Capture and Stream in Stunning HD (FB)
- In 2024, How To Remove or Bypass Knox Enrollment Service On ZTE Blade A73 5G
- How to Transfer Data from Sony Xperia 5 V to BlackBerry | Dr.fone
- In 2024, Unlocking Video Content Secure Facebook Live Recordings
- Dubbing Videos With Voiceovers | Using Wondershare Filmora
- [New] In 2024, The Guide to Capturing Web Radio Frequencies Flawlessly
- Streamlining Media Transfer Sending Tweets' Videos via WhatsApp
- What Does Enter PUK Code Mean And Why Did The Sim Get PUK Blocked On Samsung Galaxy M34 5G Device
- [New] In 2024, Dissecting Content Creation Tools in Triller and TikTok (Max 156 Chars)
- [New] In 2024, Navigating the Process of Embedding Vimeo Media in PPTs
- Title: "Boost Your Search Rankings Expert Reviews on 7 Cost-Effective Video Tags Extractors"
- Author: Kevin
- Created at : 2024-05-25 14:44:15
- Updated at : 2024-05-26 14:44:15
- Link: https://youtube-videos.techidaily.com/boost-your-search-rankings-expert-reviews-on-7-cost-effective-video-tags-extractors/
- License: This work is licensed under CC BY-NC-SA 4.0.
