
:max_bytes(150000):strip_icc()/Screenshot2024-01-23at9.04.03AM-b6e5cf95e42a478b985b43d406c4a52e.png)
"Boost Eco-Ad Impact Combining Greener Gear & Subscriptions for 2024"
Boost Eco-Ad Impact: Combining Greener Gear & Subscriptions
Create High-Quality Video - Wondershare Filmora
An easy and powerful YouTube video editor
Numerous video and audio effects to choose from
Detailed tutorials provided by the official channel
Advances in filmmaking have brought many concepts into reality. And the green screen is one common practice. Green screen technology is a technique where you use two images or video streams to composite them together. You can use any background images, either foreground or behind the actors. For YouTube, you can use green screen subscribe to facilitate video Call To Action. A green screen easily produces impossible scenes and expands filming ideas. Everything done at the Studio is also the best way to protect actors from hazardous environments.
More so, the best trick is to allow actors to appear together on the screen even when the scenes were captured separately. And did you know that subscribe green screen makes it easy to add YouTube Call To Action and direct viewers on what to do?

Methods to add a subscribe button to your video
Viewers are not likely to subscribe to any channel if they are not guided. One best method is to engage a subscribe button to your video and draw the attention of as many as possible.
1 Use Subscribe Green Screen
Put your green screen to work by subscribing to it. Follow these steps to produce eye-catching videos, with a call to action closing point.
Step 1. Set screen
You need to create a background at the Studio – and that’s the green screen. Keenly hand it on a frame before you start filming. Also, note that no wrinkles or fold-ups are visible.

Step 2. Adjust lighting
Lighting is important to facilitate high-resolution video output quality. Put appropriate lighting settings to avoid directional shadows and get the best results.
Step 3. Set up the subject
Give ample space between the subject and the green screen for an effective outcome. If they are too close, there will be a reflection of the green screen on the subject. It isn’t professional as it will be hard when it comes to matching to a different background.

Step 4. Start filming
Begin to film your video and ensure you take various shots for comparison. It is good to film at different angles to see what works best.
Step 5. Polish the rough cut
Tune all the footage to perfect video clips. It will save your efforts when keying out green screen footage. Remove the unwanted parts by trimming. You can also do other edits like merge and split where necessary.
Step 6. Key out the footage and edit the green screen
Your footage is now ready, and you are now free to edit the green screen. It is better to engage reliable editing software to remove the green traces in the shot.
Step 7. Paste the new background
Any background concept can now fit in. Add your desired background video or image in a new layer below the subject. You can continue to make other necessary adjustments like sharpness and hue for reality.
Step 8. Add Call To Action
Finally, tell your viewers to subscribe to your YouTube channel while watching the video. You can also introduce your other channels that aren’t yet known or those that have not reached 1,000 subscribers.
2 Using YouTube Studio
You can also enable the green screen to subscribe via the YouTube Studio. It is a YouTube application that provides you with the tools you need to create a successful YouTube channel. You can manage your videos, respond to comments and even add adverts to your content for pay. Here are the steps to add subscribe button.
Step 1. First, go directly to “studio.youtube.com” or click on your profile picture on the YouTube page to launch YT Studio.

Step 2. Click on the “Menu” option and choose the “Settings”> “Channel” option.

Step 3. Then select the “Choose” image and select which subscribe button image you wish to use as your branding watermark. You can easily get one on the Google images section.
Step 4. Next, choose the display time for the branding watermark. It could be a custom start time if you want the branding watermark to start showing at a specific time. You can also choose “End or video” for it to appear at the last 10 to 15 seconds of your video. Likewise, the branding watermark can show throughout the video if you choose the “Entire video” option.
Step 5. Finally, save the changes. Voila! Viewers can subscribe to your channel easily, with a single click of a button.
3 Using Subscribe Effects
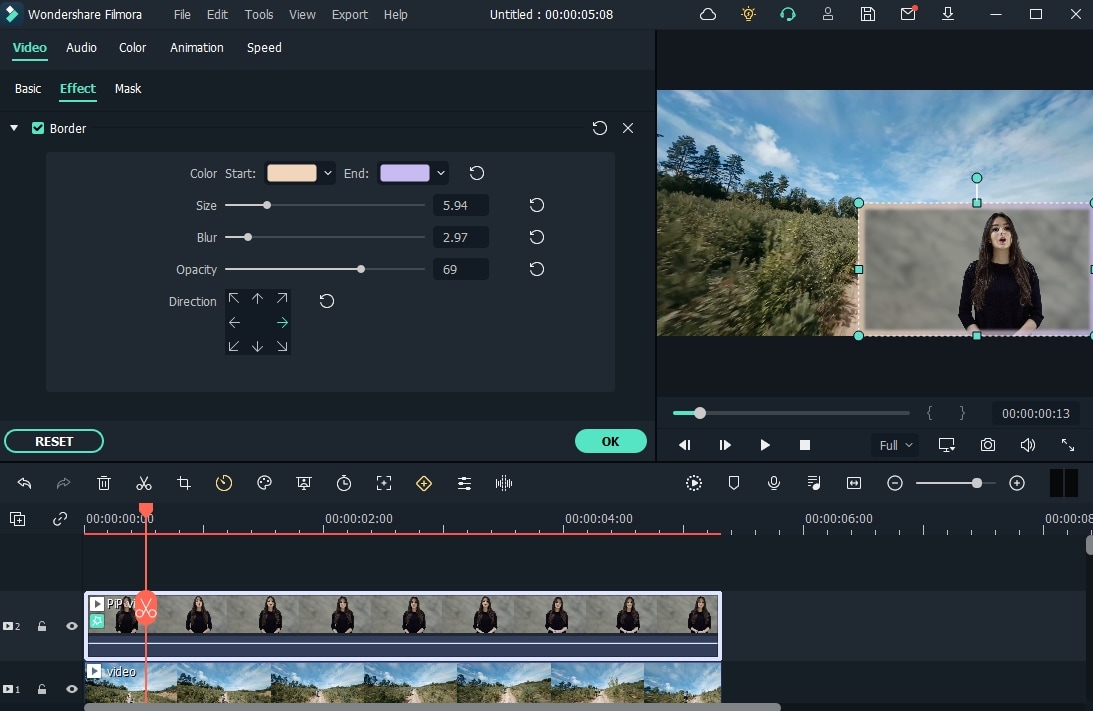
You can also use the subscribers’ effects to add a Call To Action. Remember, your main aim is to increase the audience to your channel. And in most cases, viewers forget to subscribe even though they love your video. Perhaps they don’t understand the importance it holds to your channel. You can do this using a reliable video editor software – Filmora.
Filmora is a sophisticated tool that is easy to use and export your videos to your computer and upload them to YouTube. It has over 300 effects for YouTubers and comprises exclusive overlays for any scene. Follow these steps to add the subscribe button with subscribe effects.
Key Features of Filmora
- Edit and export your videos at up to 4K resolution
- Supports GIF animation, which you can use for CTA
- It has an advanced text editor
- Easily remove background noise for a polished video sound
- It has an audio equalizer functionality for audio uniformity
- It has the video stabilization functionality
For Win 7 or later (64-bit)
For macOS 10.12 or later
Step 1. Launch Filmora
Open Filmora on your computer, then navigate to the upper left corner of the screen. Click on the “Sample Colors” and select the “Green color.” Next, drag it to video track into the timeline. Then adjust the duration of your video track to your preference.

Step 2. Design the subscribe GIF animation
Use a different color shade to design the subscribe GIF animation. Take “Red” in this case as it smartly blends with the green color that we choose earlier. Drag the red color above the green background.

Step 3. Adjust the red box
Make the added color red button look like a subscribe button. Then place it at any point you want it to appear in front of the background.
Step 4. Add the subscribe text
Write a text into the button. Filmora offers you various styles of text to choose from. You can select the text style you want to use, then drag and drop it into the timeline.

Step 5. Edit title with “Subscribe”
Edit your text with the word “Subscribe,” then place it under the red rectangle and hit the “OK” button.
Step 6. Animate the “Subscribe” button
Double click on the “Red” button. Just go to the “Animate” tab and click on the “Customize” option. Next, click on the “Add” button.

Step 7. Animate text as well
Go to the “Text” option in the timeline and click on “Advanced” text editor. Then go to the “Animation” tab and select the animation you wish to use. Here, you can adjust your text’s start and ending time when you want it to start fading.
Step 8. Export GIF
Your Subscribe GIF is now ready to be exported to your video. Hit the “Export” button and select which format to export it in.

Extra Tip: Ways to Include Calls to Action on videos
Know how to include CTA in your video marketing strategy to boost your subscribers.
- Include Annotations
Annotations are eye-catching and a quick reminder for viewers. You have a variety to choose from, like bubbles, shoutouts, etc. They are used to remind you to subscribe to the channel, view another video, or comment after watching it. - Edit CTAs in your video
It lets the viewer know what to do next before the video ends. The likely reminder is to subscribe to the channel. They could also be reminded to watch the next video or leave a comment. - YouTube Ad Overlays also work
However, ad overlay is for content creators with Google AdWords enabled on their YT channel. Adding an Ad Overlay will link you to any part of the web. Do you want to know the best part? No cost at all! You only need to pay for the views you buy during your video promotion.
Conclusion
● The best strategy to get viewers to subscribe to your YouTube channel is to engage a Call To Action. A bigger number of subscribers guarantees more watch time and the possible growth of your channel. Subscribe green screen even makes it perfect as far as video creation is concerned. You can get different video background ideas and make every scene look authentic. You can engage a third-party tool like Filmora. It will effortlessly add a green screen subscribe in a few steps. Likewise, you can add annotations and other text styles to enhance your look.
Advances in filmmaking have brought many concepts into reality. And the green screen is one common practice. Green screen technology is a technique where you use two images or video streams to composite them together. You can use any background images, either foreground or behind the actors. For YouTube, you can use green screen subscribe to facilitate video Call To Action. A green screen easily produces impossible scenes and expands filming ideas. Everything done at the Studio is also the best way to protect actors from hazardous environments.
More so, the best trick is to allow actors to appear together on the screen even when the scenes were captured separately. And did you know that subscribe green screen makes it easy to add YouTube Call To Action and direct viewers on what to do?
Methods to add a subscribe button to your video
Viewers are not likely to subscribe to any channel if they are not guided. One best method is to engage a subscribe button to your video and draw the attention of as many as possible.
1 Use Subscribe Green Screen
Put your green screen to work by subscribing to it. Follow these steps to produce eye-catching videos, with a call to action closing point.
Step 1. Set screen
You need to create a background at the Studio – and that’s the green screen. Keenly hand it on a frame before you start filming. Also, note that no wrinkles or fold-ups are visible.
Step 2. Adjust lighting
Lighting is important to facilitate high-resolution video output quality. Put appropriate lighting settings to avoid directional shadows and get the best results.
Step 3. Set up the subject
Give ample space between the subject and the green screen for an effective outcome. If they are too close, there will be a reflection of the green screen on the subject. It isn’t professional as it will be hard when it comes to matching to a different background.
Step 4. Start filming
Begin to film your video and ensure you take various shots for comparison. It is good to film at different angles to see what works best.
Step 5. Polish the rough cut
Tune all the footage to perfect video clips. It will save your efforts when keying out green screen footage. Remove the unwanted parts by trimming. You can also do other edits like merge and split where necessary.
Step 6. Key out the footage and edit the green screen
Your footage is now ready, and you are now free to edit the green screen. It is better to engage reliable editing software to remove the green traces in the shot.
Step 7. Paste the new background
Any background concept can now fit in. Add your desired background video or image in a new layer below the subject. You can continue to make other necessary adjustments like sharpness and hue for reality.
Step 8. Add Call To Action
Finally, tell your viewers to subscribe to your YouTube channel while watching the video. You can also introduce your other channels that aren’t yet known or those that have not reached 1,000 subscribers.
2 Using YouTube Studio
You can also enable the green screen to subscribe via the YouTube Studio. It is a YouTube application that provides you with the tools you need to create a successful YouTube channel. You can manage your videos, respond to comments and even add adverts to your content for pay. Here are the steps to add subscribe button.
Step 1. First, go directly to “studio.youtube.com” or click on your profile picture on the YouTube page to launch YT Studio.
Step 2. Click on the “Menu” option and choose the “Settings”> “Channel” option.
Step 3. Then select the “Choose” image and select which subscribe button image you wish to use as your branding watermark. You can easily get one on the Google images section.
Step 4. Next, choose the display time for the branding watermark. It could be a custom start time if you want the branding watermark to start showing at a specific time. You can also choose “End or video” for it to appear at the last 10 to 15 seconds of your video. Likewise, the branding watermark can show throughout the video if you choose the “Entire video” option.
Step 5. Finally, save the changes. Voila! Viewers can subscribe to your channel easily, with a single click of a button.
3 Using Subscribe Effects
You can also use the subscribers’ effects to add a Call To Action. Remember, your main aim is to increase the audience to your channel. And in most cases, viewers forget to subscribe even though they love your video. Perhaps they don’t understand the importance it holds to your channel. You can do this using a reliable video editor software – Filmora.
Filmora is a sophisticated tool that is easy to use and export your videos to your computer and upload them to YouTube. It has over 300 effects for YouTubers and comprises exclusive overlays for any scene. Follow these steps to add the subscribe button with subscribe effects.
Key Features of Filmora
- Edit and export your videos at up to 4K resolution
- Supports GIF animation, which you can use for CTA
- It has an advanced text editor
- Easily remove background noise for a polished video sound
- It has an audio equalizer functionality for audio uniformity
- It has the video stabilization functionality
For Win 7 or later (64-bit)
For macOS 10.12 or later
Step 1. Launch Filmora
Open Filmora on your computer, then navigate to the upper left corner of the screen. Click on the “Sample Colors” and select the “Green color.” Next, drag it to video track into the timeline. Then adjust the duration of your video track to your preference.
Step 2. Design the subscribe GIF animation
Use a different color shade to design the subscribe GIF animation. Take “Red” in this case as it smartly blends with the green color that we choose earlier. Drag the red color above the green background.
Step 3. Adjust the red box
Make the added color red button look like a subscribe button. Then place it at any point you want it to appear in front of the background.
Step 4. Add the subscribe text
Write a text into the button. Filmora offers you various styles of text to choose from. You can select the text style you want to use, then drag and drop it into the timeline.
Step 5. Edit title with “Subscribe”
Edit your text with the word “Subscribe,” then place it under the red rectangle and hit the “OK” button.
Step 6. Animate the “Subscribe” button
Double click on the “Red” button. Just go to the “Animate” tab and click on the “Customize” option. Next, click on the “Add” button.
Step 7. Animate text as well
Go to the “Text” option in the timeline and click on “Advanced” text editor. Then go to the “Animation” tab and select the animation you wish to use. Here, you can adjust your text’s start and ending time when you want it to start fading.
Step 8. Export GIF
Your Subscribe GIF is now ready to be exported to your video. Hit the “Export” button and select which format to export it in.
Extra Tip: Ways to Include Calls to Action on videos
Know how to include CTA in your video marketing strategy to boost your subscribers.
- Include Annotations
Annotations are eye-catching and a quick reminder for viewers. You have a variety to choose from, like bubbles, shoutouts, etc. They are used to remind you to subscribe to the channel, view another video, or comment after watching it. - Edit CTAs in your video
It lets the viewer know what to do next before the video ends. The likely reminder is to subscribe to the channel. They could also be reminded to watch the next video or leave a comment. - YouTube Ad Overlays also work
However, ad overlay is for content creators with Google AdWords enabled on their YT channel. Adding an Ad Overlay will link you to any part of the web. Do you want to know the best part? No cost at all! You only need to pay for the views you buy during your video promotion.
Conclusion
● The best strategy to get viewers to subscribe to your YouTube channel is to engage a Call To Action. A bigger number of subscribers guarantees more watch time and the possible growth of your channel. Subscribe green screen even makes it perfect as far as video creation is concerned. You can get different video background ideas and make every scene look authentic. You can engage a third-party tool like Filmora. It will effortlessly add a green screen subscribe in a few steps. Likewise, you can add annotations and other text styles to enhance your look.
Innovative Approaches to YouTube Video Marketing
While there are a lot of ways you could advertise your business online, YouTube video ads are quickly becoming the most popular advertising solution. This is because more and more people choose to watch videos than any other form of video.
But to make sure that you are putting your best foot forward when it comes to video ads, you need to invest in a YouTube ad creator that is easy to use and effective. Here, we will be looking at the best YouTube video creators that you can use.
Why Use YouTube Video Ads
Before we look at some of the tools you can use to create YouTube video ads, it is important to mention some of the reasons why you may want to choose YouTube ads over other solutions. YouTube ads when compared to PPC are relatively cheaper and you also choose how much you are willing to pay when a user clicks on the ads. This makes it unlikely that you could spend more than you intended to.
YouTube ads are also more targeted than any other form of advertising. You have a lot of options when choosing who you want to target including metrics such as demographics, topics, similar audiences, customer matches, life events, and more.
Since the ad is a video, it generates far more engagement than a text ad on any other platform. Even though it is an ad, the video is still a great way for your brand to connect with potential audiences.
Types of Video Ads for YouTube
The following are the different types of YouTube ads that you can create;
**Video Discovery
Video discover ads appear on the search page results and are usually composed of a thumbnail image and a few lines of text. They also have a very recognizable “Ad” in the box to let all users know that this is sponsored content.
**In-Stream Ads
In-stream video ads can be skippable or non-skippable. Skippable in-stream video ads will often play for a minimum of 5 seconds before allowing the user to skip to the video content. Non-skippable in-stream video ads do not have the “skip” button and the user has to watch the video to the end.
**Pre-roll Ads
A pre-roll ad is just an in-stream ad that is not skippable. It doesn’t give the user the option of skipping the app and they have to watch the entire ad before they can watch the video. The pre-roll video ad is usually 15 to 60 seconds long.
**Bumper Ads
Bumper ads are tiny non-skippable 6-second ads that will play right before the video content loads. They can be an ideal way to promote an event or a new brand. Since they are only 6 seconds long, they can be very easy to make.
Best YouTube Ad Creators
The following are the best YouTube ad creators that you can use to make your YouTube video ad;
Filmora
Best For: All Types of YouTube Video ads
Price: Free Trial Available with plans starting from $54.99 a year.
Rating: 4.8/5
Wondershare Filmora is one of the best video creation software in the market and therefore can be very useful when creating YouTube video ads of any kind. It has powerful features that can benefit both beginner and professional users, allowing users to create stunning videos of any length.
For Win 7 or later (64-bit)
For macOS 10.12 or later
It comes with a library of more than 300 templates, filters, overlays, and numerous other effects that you can use to create your video. You can even add audio and music to the video to make your ad stand out more.
Animoto
Best For: All Types of YouTube Video Ads
Price: A free plan is available with paid plans starting from $15 a month
User Rating: 4.3/5

Animoto is another great solution that you can use to create YouTube ads of all kinds and publish them directly on the video-sharing platform. It has a very simple drag-and-drop operation that can allow you to create your YouTube video ad in just a few minutes.
It offers you a lot of resources that you can use to create the video including a huge library of up to one million photos and video clips as well as licensed audio tracks that you can use freely. This is on top of the numerous effects that you can use to make your video ad stand out more.
Promo.com
Best For: All Types of YouTube Video Ads
Price: Free plan is available with paid plans starting at $39 a month
User Rating: 4.4/5

Promo.com is another great solution that you can use to create YouTube video ads to give your brand the upper hand. It simplifies the video creation process by providing you with pre-made templates that you can add elements to create the video. You also get a library of music, photos, and video clips that you can choose to add to the video.
It also allows you to publish the video directly on social media apps. Since it doesn’t limit the size of the video that you can create, it is also an ideal solution for creating other types of videos.
Biteable
Best For: All Types of YouTube Ads
Price: Free Plan is available with paid plans starting at $19 a month
User Rating: 4.3/5

Biteable is also a great choice when you want to create YouTube ad videos. It is a professional solution that gives you a lot of options when it comes to video creation with a rich resource of over 1.8 million photos, clips, and pre-made animations to choose from.
The videos that you create with Biteable are of very high resolution and you have unlimited exports so you can use the same video over and over again. It also doesn’t limit the size or length of the video that you can create making it an ideal solution to create all types of videos.
InVideo
Best For: All Types of YouTube Ads
Price: Free plan is available with paid plans from $10 a month
User Rating: 4.7/5

This is an online solution that is very easy to use and that creates stunning videos. The interface allows you to upload your images, video clips, and audio and then use one of the many templates to create the video. The templates are also customizable, giving you additional options to customize your video in many ways.
InVideo allows you to upload the video that you create directly to social media platforms. It also has a very large library of resources that you can use to create the video including more than 3000 professionally made templates and more than a million premium photos and videos to choose from.
Adobe Spark
Best For: All Types of YouTube Ad Videos
Price: Free Plan available with paid plans starting at $9.99 a month
User Rating: 4.5/5

If you are looking for a solution that will allow you to make unique and very high-quality video ads, then Adobe Spark is a great choice. It has a ton of resources that you can use to make your video ad stand out including multiple themes, layouts, storyboards, and unique fonts.
You also have access to thousands of free images to spice up your creation and exclusive templates that you will not find anywhere else. But like most Adobe software, it can be hard to get started with Adobe Spark, especially for beginner users.
Animaker
Best For: All Types of YouTube Ad videos
Price: It doesn’t offer a free plan. Paid plans start at $10 per month.
User Rating: 4.6/5

Animaker is a professional video editing tool that can create very high-quality and unique videos. It is also one of the only tools that you can use to add subtitles to a video. You get to choose from a lot of professionally made templates and choose from a large library of images and videos to add to your project.
It also allows you to add audio to the video in the form of voiceover or music. You can also use the live editing feature to make changes to a video that is already uploaded to YouTube.
Powtoon
Best For: Animated YouTube Ads
Price: It doesn’t offer a free plan. Paid plans start at $20 a month
User Rating: 4/5

Powtoon is a great solution when the YouTube ad video that you want to create is an animated video. It has numerous features designed to help you create the most interactive animated videos. You have a lot of resources to choose from including various animation styles, whiteboards, and infographics.
It also has a very large library of templates, videos, images, and audio to choose from. But Powtoon doesn’t offer a free plan and hence there is no way for you to test its function before purchasing it.
Magisto
Best For: All Types of YouTube Ads
Price: It doesn’t offer a free plan. Paid plans start at $34.99 a month
User Rating: 4.4/5

Magisto is an online video editing tool that you can use to create video ads very quickly. It is completely deployed on the cloud which means that you don’t have to download any software on your computer. The user interface is very easy to use, allowing users to create professional-quality videos in a matter of minutes.
If you are using it to create longer videos, you can edit the scenes of the video individually and add as many effects as are relevant to your project. It can also be used to create and edit videos on Android and iOS devices.
Creatopy
Best For: All Types of YouTube Ads
Price: A free plan is available. Paid plans start at $17 a month
User Rating: 4.3/5

Creatopy is a simple to use and highly effective video editor that can come in handy when creating YouTube video ads. It offers you the chance to create videos of any size, making it an ideal choice not just for video ads but all types of video ads.
You can upload your images and audio files to add to the video project, or you can choose from the built-in library. Then you can use one or more of the many effects to add the finishing touch.
Tips for Creating YouTube Ads
The following are just some tips to help you create effective and profitable YouTube Video ads;
- Choose the type of ad you would like to create wisely. Learn the different types of YouTube ads and select one based on your brand, advertising budget, and projected reach.
- Use the YouTube targeting options to give your ads the best chance at success. Ensure that you are choosing the right targets to avoid spending money on targets that will not engage with your ad.
- You may also want to use your videos in a remarketing campaign. Remarketing targets the same audience that you targeted before, increasing your chances of getting more engagement.
- When creating the ad, ensure that the content in the ad is compelling and feels natural. Even though the audience will be watching sponsored content it should feel just like any other video.
- You can also drive more engagement by adding interactive elements to the video. These can be calls-to-action, auto-end screens, and cards to showcase your products.
Related FAQs About YouTube Ads
**How do you create a YouTube Ad?
You can easily create a YouTube ad using one of the video editing tools that we have outlined above. Choose the type of YouTube video ad you want to create as it will inform the length of the video you will create.
**Is it Free to Make YouTube Ads?
It can be free. If you choose to use a free video editor, you can create a YouTube ad for free. But you should know that you will still have to pay for YouTube to serve the ad.
**What is a YouTube Ad Specialist?
A YouTube Ads Specialist is a professional who is responsible for creating a YouTube ads strategy and implementing the strategy by creating the YouTube video ads.
**Can I Put My Ads on YouTube?
Yes. YouTube allows you to run your ads and even choose the placement of the ads and target the audiences you want YouTube to serve the ads to.
YouTube video ads can be a great way to reach as many people as you can with your products and services. Now you have several options that you can use to create the ads.
For macOS 10.12 or later
It comes with a library of more than 300 templates, filters, overlays, and numerous other effects that you can use to create your video. You can even add audio and music to the video to make your ad stand out more.
Animoto
Best For: All Types of YouTube Video Ads
Price: A free plan is available with paid plans starting from $15 a month
User Rating: 4.3/5
Animoto is another great solution that you can use to create YouTube ads of all kinds and publish them directly on the video-sharing platform. It has a very simple drag-and-drop operation that can allow you to create your YouTube video ad in just a few minutes.
It offers you a lot of resources that you can use to create the video including a huge library of up to one million photos and video clips as well as licensed audio tracks that you can use freely. This is on top of the numerous effects that you can use to make your video ad stand out more.
Promo.com
Best For: All Types of YouTube Video Ads
Price: Free plan is available with paid plans starting at $39 a month
User Rating: 4.4/5
Promo.com is another great solution that you can use to create YouTube video ads to give your brand the upper hand. It simplifies the video creation process by providing you with pre-made templates that you can add elements to create the video. You also get a library of music, photos, and video clips that you can choose to add to the video.
It also allows you to publish the video directly on social media apps. Since it doesn’t limit the size of the video that you can create, it is also an ideal solution for creating other types of videos.
Biteable
Best For: All Types of YouTube Ads
Price: Free Plan is available with paid plans starting at $19 a month
User Rating: 4.3/5
Biteable is also a great choice when you want to create YouTube ad videos. It is a professional solution that gives you a lot of options when it comes to video creation with a rich resource of over 1.8 million photos, clips, and pre-made animations to choose from.
The videos that you create with Biteable are of very high resolution and you have unlimited exports so you can use the same video over and over again. It also doesn’t limit the size or length of the video that you can create making it an ideal solution to create all types of videos.
InVideo
Best For: All Types of YouTube Ads
Price: Free plan is available with paid plans from $10 a month
User Rating: 4.7/5
This is an online solution that is very easy to use and that creates stunning videos. The interface allows you to upload your images, video clips, and audio and then use one of the many templates to create the video. The templates are also customizable, giving you additional options to customize your video in many ways.
InVideo allows you to upload the video that you create directly to social media platforms. It also has a very large library of resources that you can use to create the video including more than 3000 professionally made templates and more than a million premium photos and videos to choose from.
Adobe Spark
Best For: All Types of YouTube Ad Videos
Price: Free Plan available with paid plans starting at $9.99 a month
User Rating: 4.5/5
If you are looking for a solution that will allow you to make unique and very high-quality video ads, then Adobe Spark is a great choice. It has a ton of resources that you can use to make your video ad stand out including multiple themes, layouts, storyboards, and unique fonts.
You also have access to thousands of free images to spice up your creation and exclusive templates that you will not find anywhere else. But like most Adobe software, it can be hard to get started with Adobe Spark, especially for beginner users.
Animaker
Best For: All Types of YouTube Ad videos
Price: It doesn’t offer a free plan. Paid plans start at $10 per month.
User Rating: 4.6/5
Animaker is a professional video editing tool that can create very high-quality and unique videos. It is also one of the only tools that you can use to add subtitles to a video. You get to choose from a lot of professionally made templates and choose from a large library of images and videos to add to your project.
It also allows you to add audio to the video in the form of voiceover or music. You can also use the live editing feature to make changes to a video that is already uploaded to YouTube.
Powtoon
Best For: Animated YouTube Ads
Price: It doesn’t offer a free plan. Paid plans start at $20 a month
User Rating: 4/5
Powtoon is a great solution when the YouTube ad video that you want to create is an animated video. It has numerous features designed to help you create the most interactive animated videos. You have a lot of resources to choose from including various animation styles, whiteboards, and infographics.
It also has a very large library of templates, videos, images, and audio to choose from. But Powtoon doesn’t offer a free plan and hence there is no way for you to test its function before purchasing it.
Magisto
Best For: All Types of YouTube Ads
Price: It doesn’t offer a free plan. Paid plans start at $34.99 a month
User Rating: 4.4/5
Magisto is an online video editing tool that you can use to create video ads very quickly. It is completely deployed on the cloud which means that you don’t have to download any software on your computer. The user interface is very easy to use, allowing users to create professional-quality videos in a matter of minutes.
If you are using it to create longer videos, you can edit the scenes of the video individually and add as many effects as are relevant to your project. It can also be used to create and edit videos on Android and iOS devices.
Creatopy
Best For: All Types of YouTube Ads
Price: A free plan is available. Paid plans start at $17 a month
User Rating: 4.3/5
Creatopy is a simple to use and highly effective video editor that can come in handy when creating YouTube video ads. It offers you the chance to create videos of any size, making it an ideal choice not just for video ads but all types of video ads.
You can upload your images and audio files to add to the video project, or you can choose from the built-in library. Then you can use one or more of the many effects to add the finishing touch.
Tips for Creating YouTube Ads
The following are just some tips to help you create effective and profitable YouTube Video ads;
- Choose the type of ad you would like to create wisely. Learn the different types of YouTube ads and select one based on your brand, advertising budget, and projected reach.
- Use the YouTube targeting options to give your ads the best chance at success. Ensure that you are choosing the right targets to avoid spending money on targets that will not engage with your ad.
- You may also want to use your videos in a remarketing campaign. Remarketing targets the same audience that you targeted before, increasing your chances of getting more engagement.
- When creating the ad, ensure that the content in the ad is compelling and feels natural. Even though the audience will be watching sponsored content it should feel just like any other video.
- You can also drive more engagement by adding interactive elements to the video. These can be calls-to-action, auto-end screens, and cards to showcase your products.
Related FAQs About YouTube Ads
**How do you create a YouTube Ad?
You can easily create a YouTube ad using one of the video editing tools that we have outlined above. Choose the type of YouTube video ad you want to create as it will inform the length of the video you will create.
**Is it Free to Make YouTube Ads?
It can be free. If you choose to use a free video editor, you can create a YouTube ad for free. But you should know that you will still have to pay for YouTube to serve the ad.
**What is a YouTube Ad Specialist?
A YouTube Ads Specialist is a professional who is responsible for creating a YouTube ads strategy and implementing the strategy by creating the YouTube video ads.
**Can I Put My Ads on YouTube?
Yes. YouTube allows you to run your ads and even choose the placement of the ads and target the audiences you want YouTube to serve the ads to.
YouTube video ads can be a great way to reach as many people as you can with your products and services. Now you have several options that you can use to create the ads.
Also read:
- [Updated] Beat Bazaar Curation of Superior DJ Video Samples for Download
- Channel Success Strategy Standard Studio or Beta Edge
- In 2024, A Complete Guide to YouTube's Live Image Lore
- [New] Cutting-Edge Editing Techniques YouTube & Comparable Tools
- Navigating the Numbers Game A Guide to YT Stardom
- 2024 Approved 10 Best Fitness Channels for Yogis
- 2024 Approved Comprehensive Strategies for Tracking YT Traffic and Gains
- Master Video Creation Understanding the Role of Camera Lenses in Vlogging
- Peeking Into Pixel Performance A Complete Guide to Measuring Views and Income on YouTube
- Leading Least Expensive Stock Images Online
- [Updated] Building a Strong Visual Narrative in YouTube Videos
- Distinguishing Between YouTube Policies and CC Clauses for 2024
- [Updated] Amplify Your Content Navigating the World of YouTube Backlinks
- In 2024, 15 Best YouTube Movies Channels for You to Kill Time
- [New] Audiovisual Harmony Merging Audio and Visual Elements on YouTube
- 2024 Approved Crafting Memorable Valorant Thumbnails A Practical Guide for YouTube Creators
- [New] Budget-Conscious Filmmaker's Essential Video Gear List
- In 2024, Crafting Visibility on YouTube The Ultimate Guide to Featured Channel Placement
- Elevate Video Popularity with Strategic #Hashtags
- [Updated] Crafting the Ideal Set of Keywords for Your Youtube Videos
- Unlock the Full Potential of Your YouTube Videos with These Tips
- Miniature Marketer's Guide to Video Promos (Infographic)
- Unlock YouTube Star Status Becoming a Self-Assured Vlogger
- [Updated] Best Free Tools for Converting YouTube Videos
- In 2024, Elevate Your Video Content with Desktop/Mobile Timestamps
- Beginner's Blueprint for Viral Video SEO
- Professional Strategies for Embedding Timestamps on Your Channel
- 2024 Approved Behind the Scenes How Ajey Monetizes Content
- [Updated] Essential Techniques for YouTube End Screen Designs
- [Updated] Event-Ready Top DJ Templates Download Guide
- Maximizing Reach Strategies From Seasoned TubeBuddy Experts
- Navigating Two Worlds A Practical Guide to Multistream on Youtube and Twitch
- Breaking Down YouTube Revenue per Million Views for 2024
- Best Practices in Digital Image Creation for YouTube for 2024
- Enhancing Your Video Impact A Compreranble Plan for YouTube Success
- In 2024, Captivating Content at Your Fingertips Download YouTube for iOS
- [New] Craft Professional Scenes - Access These Top 8 Free Green Screen Backdrops Sites
- Best 5 Non-YouTube Editing Tools for Vids
- [New] Cross-Platform Multistreaming for Enhanced Viewership
- Beyond YouTube Exploring 27 Other Video Platforms for 2024
- Mastering FreeFire The 30 Best Tag Strategies to Increase Views
- [New] Charting the Course Establishing a Powerful Gaming Channel
- In 2024, Cutting-Edge Method Quick Erasure of Youtube Comments
- Freeing Up YouTube Footage Borderless Exploration
- [New] Elevate Your YouTube Content SEO Methods Revealed
- [Updated] In 2024, Comprehensive Guide to FB Video Success
- [Updated] 2024 Approved Instagram's Social Filters Unfollow Guide
- [Updated] In 2024, Step-by-Step Guide to Flawless Zoom Screen Sharing
- How To Unlock Any Vivo Y100i Phone Password Using Emergency Call
- [Updated] In 2024, Critical Top 5 Socially Driven Animation Designs
- In 2024, Unlocking Made Easy The Best 10 Apps for Unlocking Your Nubia Z50 Ultra Device
- Bricked Your Honor Magic 5 Pro? Heres A Full Solution | Dr.fone
- In 2024, How to Track Samsung Galaxy F34 5G Location without Installing Software? | Dr.fone
- In 2024, Ultimate guide to get the meltan box pokemon go For Apple iPhone 13 Pro Max | Dr.fone
- Possible ways to recover deleted files from Oppo A2
- How Do You Get Sun Stone Evolutions in Pokémon For Xiaomi Redmi Note 13 Pro+ 5G? | Dr.fone
- Learn How To Lock Stolen Your iPhone 6s Plus Properly | Dr.fone
- [Updated] In 2024, Decoding the Mystery Insider Knowledge on Story Watchers
- [New] Economical Systems Optimized by Ideal OBS Settings
- [Updated] 2024 Approved Professional Guide to YouTube Screen Capturing
- Why Your WhatsApp Live Location is Not Updating and How to Fix on your Motorola Edge 40 Pro | Dr.fone
- The Formula for Success Podcast Length Strategy
- Hacks to do pokemon go trainer battles For Vivo S17e | Dr.fone
- In 2024, Comprehensive Manual Mastering Mobizen Recorders
- In 2024, A Complete Guide To OEM Unlocking on Samsung Galaxy F14 5G
- [New] 2024 Approved Perfecting Your Virtual Sessions with Best Screen Recorders (Free/Paid)
- How to Fake Snapchat Location on Nokia C110 | Dr.fone
- Aesthetic Background Tunes for YouTube Originals
- In 2024, Can I Bypass a Forgotten Phone Password Of Realme Narzo 60 5G?
- In 2024, Unveiling the Hidden Potential of Earnings on Vimeo Platforms
- Updated 2024 Approved Twitter Video Size Guide What You Need to Know
- Empower Collaborative Meetings The Best 10 Free Recorders in Review
- In 2024, The Ultimate Plan for Profit From Instagram Content
- How to Reset a Poco M6 Pro 5G Phone that is Locked?
- 2024 Approved Obsudio Screen Recorder Examination Top Contenders Revealed
- Title: "Boost Eco-Ad Impact Combining Greener Gear & Subscriptions for 2024"
- Author: Kevin
- Created at : 2024-05-25 14:43:56
- Updated at : 2024-05-26 14:43:56
- Link: https://youtube-videos.techidaily.com/boost-eco-ad-impact-combining-greener-gear-and-subscriptions-for-2024/
- License: This work is licensed under CC BY-NC-SA 4.0.
