
:max_bytes(150000):strip_icc():format(webp)/how-to-use-a-ps5-controller-on-your-pc-or-mac-5089439-b56739aa27bd48858200878a6b64f952.jpg)
Best Practices in YouTube Thumbnail Sizes and Ratios for 2024
Best Practices in YouTube Thumbnail Sizes and Ratios
Versatile Video Editor - Wondershare Filmora
YouTube serves as one of the best entertaining platforms worldwide. It is high time to work on the width and height of the YouTube thumbnail when you try to upload videos for your channels at the YouTube space. The thumbnail plays a vital role that appears as a cover page for your videos. The aspect ratio of this page should meet the guidelines of YouTube for a successful upload.
In this article, you will get valuable insights on the best size of YouTube thumbnail and the respective changes you can make on this factor to enhance visibility. Here, you will study the role of the YouTube thumbnail and the methods to edit its dimensions to ensure the proper reach of the expected audience globally. Research on the best formats of YouTube Thumbnails and design them accordingly to fit perfectly at the allotted space in the online platform.

In this article
01 [What are YouTube Thumbnails?](#Part 1)
02 [Width and Height of YouTube Thumbnail](#Part 2)
03 [How to Make a Thumbnail on YouTube](#Part 3)
04 [What happens if YouTube thumbnails are 1920x1080](#Part 4)
05 [YouTube thumbnail formats](#Part 5)
Part 1 What are YouTube Thumbnails?
The YouTube Thumbnail is the first image that appears in your video. When you create a video for your YouTube channel, it is essential to insert the thumbnail that describes the content of your video. Based on the thumbnail image, the viewers will get an idea about your uploaded video. This thumbnail plays a vital role in triggering the audience to make a click at your video. Design an attractive thumbnail with a meaningful message that inspires the audience quickly. It aids in increasing the subscribers for your channel. It helps you in the better reach of your audience.
While creating a thumbnail image, do not forget to use a reliable editor to make the picture impressive. Work on every detail on your thumbnail image and add possible effects on it for meaningful results. The YouTube Thumbnail reveals the idea about the video and acts as a deciding factor for the viewers whether to click it or not. This thumbnail image takes a greater part in the success of your video and helps in boosting your followers globally.

Part 2 Width and Height of YouTube Thumbnail
There are restricted guidelines while designing the YouTube Thumbnail. The width and height of the YouTube thumbnail are important while designing it using a sophisticated program. As per the instructions of YouTube thumbnail, the image sizes must be 1280*720 pixels and the minimum width is 640 pixels. The ideal aspect ratio is 16:9. Only if you meet these requirements, you can successfully upload the thumbnail in your videos and publish it in your YouTube channel flawlessly. Scale down the thumbnail images with incredible applications without compromising the quality factors. Edit the images accordingly without disturbing the resolution of the picture. Use efficient programs to edit the YouTube thumbnail images as per your needs.

Part 3 How to Make a Thumbnail on YouTube
To edit the YouTube Thumbnail images, the Filmora app serves the best. It is a prestigious product from Wondershare and offers a simple interface for the users to work efficiently on the media files. Many YouTubers prefer this program because of its attractive features and comfortable usage. With the help of this app, you can edit videos and images like a pro and bring a professional impact on the files. It helps you to unleash your imagination and work beyond limitations efficiently. Create impressive videos without limits and bring an astonishing impact on the media files using this program.
The stunning features of the Filmora application
- An excellent toolbox that provides the basic edits like trim, crop, resize and rotate on the images
- Add desired filter effects on the media to acquire impressive results.
- Change the background of your image using the Green Screen feature
- Insert titles and edit the motion elements based on the needs.
- Customize the colors on the images with the help of jaw-dropping color combinations provided by this awesome tool.
These are the remarkable functionalities of the Filmora app and you can discover a lot when you make a try on this tool. Every YouTuber adopts Filmora to edit the videos optimally to engage their subscribers without any compromises.
Wondershare Filmora
Get started easily with Filmora’s powerful performance, intuitive interface, and countless effects!
Try It Free Try It Free Try It Free Learn More about Filmora>

To edit the YouTube Thumbnail using the Filmora application
Step1 Install the app and import the image
Download the program from its official webpage according to your system OS and install it. Then, add the image into the app timeline by tapping the Import media option.

Step2 Resize the image
Drag and drop the uploaded image into the timeline and tap the ‘Export’ button. Here, you will find resizing attributes like Resolution and size. Tap the Settings option and edit these values according to YouTube Thumbnail and click the Export button again to save the edited file at the desired storage location.

Apart from resizing, you can crop, trim, rotate the images as per your needs using this app. It is a reliable platform that assists to create an impressive impact on the media files. You can edit the videos and reshape them based on the requirements in no time. The Filmora offers a complete solution for audio and video file edits and aids you in creating enlightening media files for your needs.
Part 4 What happens if YouTube thumbnails are 1920x1080
The thumbnail images get pixelated and appear unclear on your YouTube channel. The clarity of the image is affected by uploading image sizes that are not advised by the YouTube guidelines. The video thumbnails on YouTube are crucial to reaching the target audience. It is good to stick to the prescribed width and height of YouTube Thumbnails to avoid unnecessary issues. Due to the dimension mismatch, the pixel elements distort giving out unpleasant images on the screen. To be successful as a YouTuber, it is high time to follow the thumbnail image measurements to avoid the blurred images on your uploaded videos. The distorted thumbnail image reduces the click counts thereby affecting your reputation as a YouTuber.
Part 5 YouTube thumbnail formats
The YouTube thumbnail format are JPG, GIF or PNG. The compatible size limit is up to 2MB. The advised aspect ratio is 16:9. The thumbnail fits aptly with the provided space when you stick to this format without any excuses. For perfect results, you must abide by the YouTube thumbnail dimensions and upload it on time to engage your subscribers. You will face upload issues if you try to include videos in different file formats. It leads to compatibility problems. It is a wise practice to abide by the YouTube standards to avoid unnecessary problems. Before uploading your videos for the YouTube channel, check whether the file format, resolution and dimensions meet the values as per the recommendations. If you find any controversies, then immediately use a reliable app to edit the images according to your needs and directly upload them to the desired platform effortlessly.
Wondershare Filmora
Get started easily with Filmora’s powerful performance, intuitive interface, and countless effects!
Try It Free Try It Free Try It Free Learn More >
Conclusion
Thus, this article has valuable insights into the width and height of YouTube Thumbnails. If you are a newbie YouTuber, then this article will help you how to create an efficient YouTube Thumbnail for your videos and the role of thumbnail in attracting the audience for your channel. Use the Filmora app and edit the media files efficiently to abide by the guidelines of YouTube. Filmora acts as a powerful tool to meet your media files edit needs and aids in the flawless upload of YouTube videos without any issues. Choose Filmora and enjoy the essence of posting insightful videos at the YouTube platform impressing your subscribers around the globe precisely. Connect with this article to create an efficient YouTube Thumbnail for your requirements using the Filmora video editor program.
YouTube serves as one of the best entertaining platforms worldwide. It is high time to work on the width and height of the YouTube thumbnail when you try to upload videos for your channels at the YouTube space. The thumbnail plays a vital role that appears as a cover page for your videos. The aspect ratio of this page should meet the guidelines of YouTube for a successful upload.
In this article, you will get valuable insights on the best size of YouTube thumbnail and the respective changes you can make on this factor to enhance visibility. Here, you will study the role of the YouTube thumbnail and the methods to edit its dimensions to ensure the proper reach of the expected audience globally. Research on the best formats of YouTube Thumbnails and design them accordingly to fit perfectly at the allotted space in the online platform.
In this article
01 [What are YouTube Thumbnails?](#Part 1)
02 [Width and Height of YouTube Thumbnail](#Part 2)
03 [How to Make a Thumbnail on YouTube](#Part 3)
04 [What happens if YouTube thumbnails are 1920x1080](#Part 4)
05 [YouTube thumbnail formats](#Part 5)
Part 1 What are YouTube Thumbnails?
The YouTube Thumbnail is the first image that appears in your video. When you create a video for your YouTube channel, it is essential to insert the thumbnail that describes the content of your video. Based on the thumbnail image, the viewers will get an idea about your uploaded video. This thumbnail plays a vital role in triggering the audience to make a click at your video. Design an attractive thumbnail with a meaningful message that inspires the audience quickly. It aids in increasing the subscribers for your channel. It helps you in the better reach of your audience.
While creating a thumbnail image, do not forget to use a reliable editor to make the picture impressive. Work on every detail on your thumbnail image and add possible effects on it for meaningful results. The YouTube Thumbnail reveals the idea about the video and acts as a deciding factor for the viewers whether to click it or not. This thumbnail image takes a greater part in the success of your video and helps in boosting your followers globally.
Part 2 Width and Height of YouTube Thumbnail
There are restricted guidelines while designing the YouTube Thumbnail. The width and height of the YouTube thumbnail are important while designing it using a sophisticated program. As per the instructions of YouTube thumbnail, the image sizes must be 1280*720 pixels and the minimum width is 640 pixels. The ideal aspect ratio is 16:9. Only if you meet these requirements, you can successfully upload the thumbnail in your videos and publish it in your YouTube channel flawlessly. Scale down the thumbnail images with incredible applications without compromising the quality factors. Edit the images accordingly without disturbing the resolution of the picture. Use efficient programs to edit the YouTube thumbnail images as per your needs.
Part 3 How to Make a Thumbnail on YouTube
To edit the YouTube Thumbnail images, the Filmora app serves the best. It is a prestigious product from Wondershare and offers a simple interface for the users to work efficiently on the media files. Many YouTubers prefer this program because of its attractive features and comfortable usage. With the help of this app, you can edit videos and images like a pro and bring a professional impact on the files. It helps you to unleash your imagination and work beyond limitations efficiently. Create impressive videos without limits and bring an astonishing impact on the media files using this program.
The stunning features of the Filmora application
- An excellent toolbox that provides the basic edits like trim, crop, resize and rotate on the images
- Add desired filter effects on the media to acquire impressive results.
- Change the background of your image using the Green Screen feature
- Insert titles and edit the motion elements based on the needs.
- Customize the colors on the images with the help of jaw-dropping color combinations provided by this awesome tool.
These are the remarkable functionalities of the Filmora app and you can discover a lot when you make a try on this tool. Every YouTuber adopts Filmora to edit the videos optimally to engage their subscribers without any compromises.
Wondershare Filmora
Get started easily with Filmora’s powerful performance, intuitive interface, and countless effects!
Try It Free Try It Free Try It Free Learn More about Filmora>
To edit the YouTube Thumbnail using the Filmora application
Step1 Install the app and import the image
Download the program from its official webpage according to your system OS and install it. Then, add the image into the app timeline by tapping the Import media option.
Step2 Resize the image
Drag and drop the uploaded image into the timeline and tap the ‘Export’ button. Here, you will find resizing attributes like Resolution and size. Tap the Settings option and edit these values according to YouTube Thumbnail and click the Export button again to save the edited file at the desired storage location.
Apart from resizing, you can crop, trim, rotate the images as per your needs using this app. It is a reliable platform that assists to create an impressive impact on the media files. You can edit the videos and reshape them based on the requirements in no time. The Filmora offers a complete solution for audio and video file edits and aids you in creating enlightening media files for your needs.
Part 4 What happens if YouTube thumbnails are 1920x1080
The thumbnail images get pixelated and appear unclear on your YouTube channel. The clarity of the image is affected by uploading image sizes that are not advised by the YouTube guidelines. The video thumbnails on YouTube are crucial to reaching the target audience. It is good to stick to the prescribed width and height of YouTube Thumbnails to avoid unnecessary issues. Due to the dimension mismatch, the pixel elements distort giving out unpleasant images on the screen. To be successful as a YouTuber, it is high time to follow the thumbnail image measurements to avoid the blurred images on your uploaded videos. The distorted thumbnail image reduces the click counts thereby affecting your reputation as a YouTuber.
Part 5 YouTube thumbnail formats
The YouTube thumbnail format are JPG, GIF or PNG. The compatible size limit is up to 2MB. The advised aspect ratio is 16:9. The thumbnail fits aptly with the provided space when you stick to this format without any excuses. For perfect results, you must abide by the YouTube thumbnail dimensions and upload it on time to engage your subscribers. You will face upload issues if you try to include videos in different file formats. It leads to compatibility problems. It is a wise practice to abide by the YouTube standards to avoid unnecessary problems. Before uploading your videos for the YouTube channel, check whether the file format, resolution and dimensions meet the values as per the recommendations. If you find any controversies, then immediately use a reliable app to edit the images according to your needs and directly upload them to the desired platform effortlessly.
Wondershare Filmora
Get started easily with Filmora’s powerful performance, intuitive interface, and countless effects!
Try It Free Try It Free Try It Free Learn More >
Conclusion
Thus, this article has valuable insights into the width and height of YouTube Thumbnails. If you are a newbie YouTuber, then this article will help you how to create an efficient YouTube Thumbnail for your videos and the role of thumbnail in attracting the audience for your channel. Use the Filmora app and edit the media files efficiently to abide by the guidelines of YouTube. Filmora acts as a powerful tool to meet your media files edit needs and aids in the flawless upload of YouTube videos without any issues. Choose Filmora and enjoy the essence of posting insightful videos at the YouTube platform impressing your subscribers around the globe precisely. Connect with this article to create an efficient YouTube Thumbnail for your requirements using the Filmora video editor program.
Effortless Harmony: Creating Engaging and Organized YouTube Playlists
How to Make a Playlist on YouTube

Liza Brown
Mar 27, 2024• Proven solutions
Youtube is one of the largest video-sharing platforms used worldwide by different people and nations without any limitation or restriction of language, region, or interests. It contains billions of videos, and thousands of new videos are uploaded on Youtube daily. To make your channel or your brand stand out in this crowd, it is important to arrange your videos in the form of playlists. These playlists help you manage your videos and allow the viewers to find the required video easily and conveniently. In this article, we are going to show you how to make a playlist on Youtube.
Youtube playlists not only help in arranging the videos that you upload on Youtube. But you can also create a playlist of any video available on Youtube. Whether it is a song, recipe, movie, or something else, you add it into your playlist to arrange them according to your needs to access them easily when needed.
How to make a playlist on Youtube of your uploaded videos
If you are running a Youtube channel and upload videos very often, then it is important to arrange them so that the viewers can easily explore and find their relevant video in no time. The best way to do that is to make a separate playlist for each type of video you upload. To know how to make a playlist on Youtube, follow the below steps.
- Open Youtube. Click on your “Channel Icon” in the upper right corner, then click on “Your Channel”.
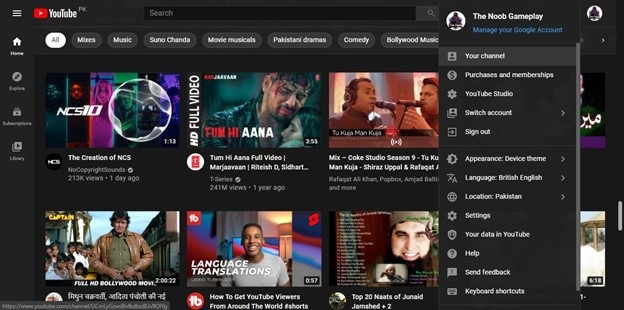
- Under Your Channel, click on the “Manage Videos” button. It will open the Youtube Studio of your Channel.

- In Youtube Studio, click on “Playlists” located on the left sidebar of the Studio.

- In this window, click on “New Playlist” located below your channel’s icon.
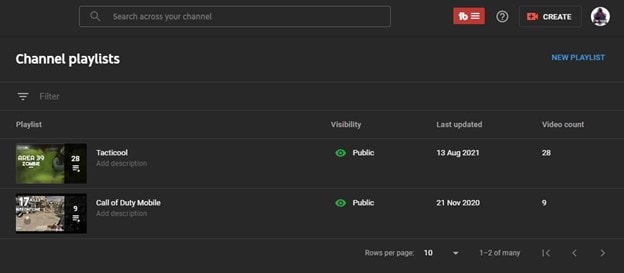
- Now it will ask you to enter “Playlist Title” and its “Visibility.” Name it accordingly and under Visibility, select an appropriate option according to your requirement and hit “Create.” Now your playlist is successfully created.

- Whenever you upload a new video on this channel, you can select the playlist you have created. While uploading the video, you can find a section named “Playlists” under the details tab.
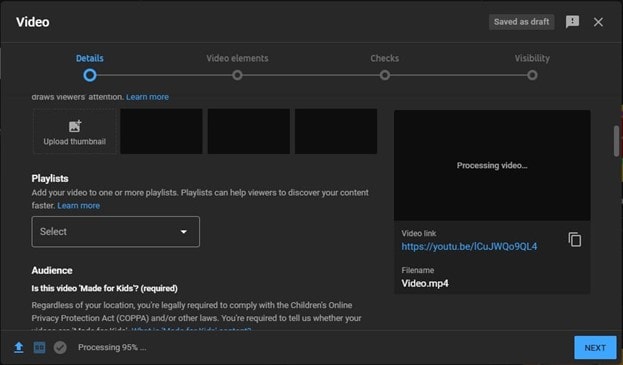
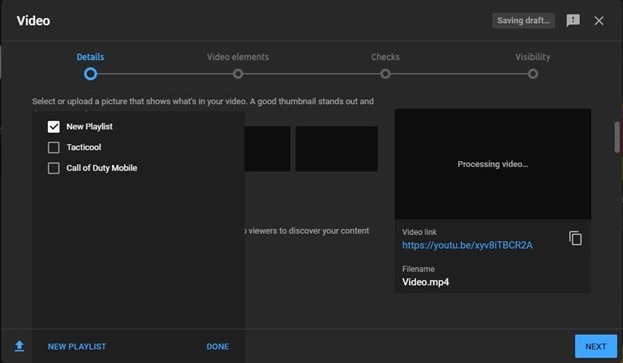
- Click on the drop-down menu to open select a playlist from the playlists that you have created. Select one and hit “Done.”
After uploading the video, it will be added to the playlist that you have selected. You can create as many playlists as you want. There is no restriction on that.
How to make a playlist on Youtube of others’ videos
Sometimes you like a video so much that you want to save it for future use or add it to your favorites. In such cases, creating a Youtube playlist is the best option. It will help you arrange the videos according to their type. To make a playlist on Youtube of others’ videos, follow the below steps.
- Open Youtube. Play a video that you want to save to a Playlist.
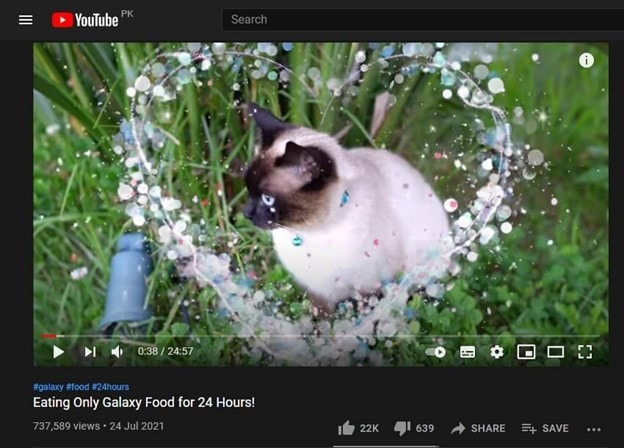
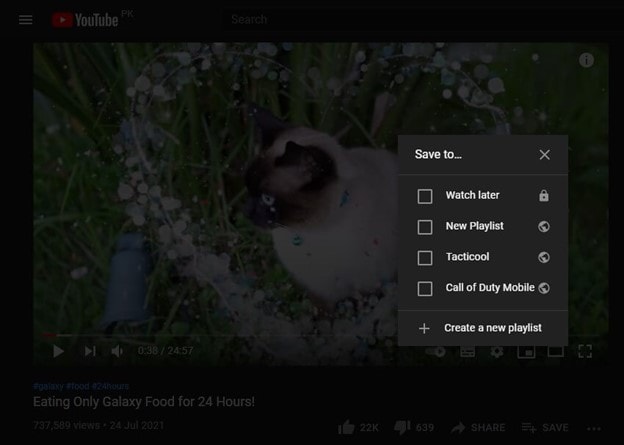
- Click on the “Save” on the right side below the video. It will open a new pop-up window that will ask you to select a playlist to add this video to it. But since you want to create a new playlist, click on the “Create a new Playlist.”
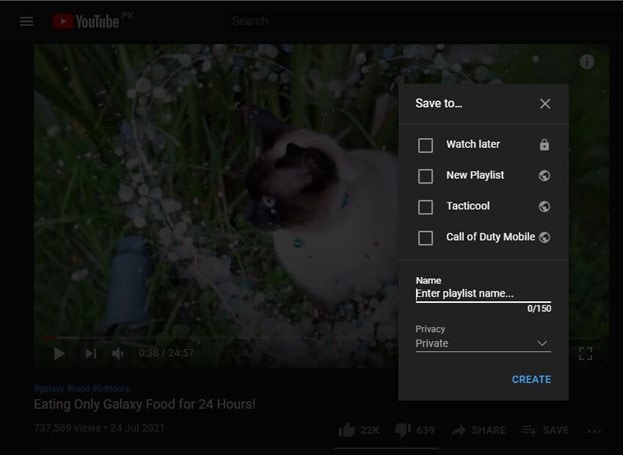
- It will ask you to enter the Name and select the privacy of the playlist. Name it and choose the privacy according to your preference and hit “Create.” Your video will be added to the new playlist.
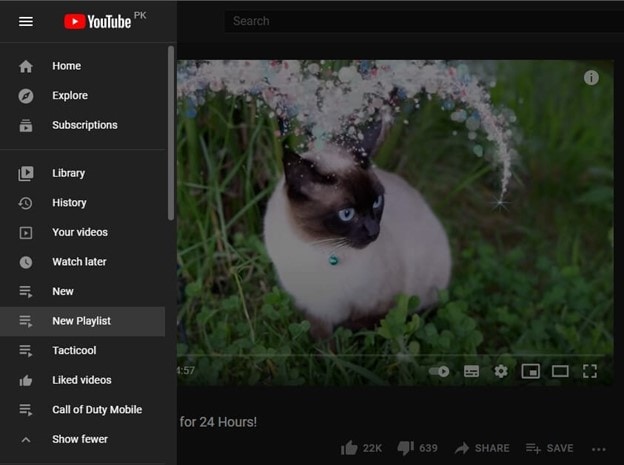
- You can easily access these playlists by clicking the three lines in the upper left corner of Youtube. Here you can find all the Playlists that you will create. Click on the playlist to access all the videos that are included in it.
Conclusion
Both of these processes of how to make a playlist on Youtube will help you whether you are a content creator or a simple Youtube user. With such a huge video database, it is difficult for users to keep their favorite videos to access them whenever they need them. Making a Youtube playlist can be very beneficial in such cases.


Liza Brown
Liza Brown is a writer and a lover of all things video.
Follow @Liza Brown
Liza Brown
Mar 27, 2024• Proven solutions
Youtube is one of the largest video-sharing platforms used worldwide by different people and nations without any limitation or restriction of language, region, or interests. It contains billions of videos, and thousands of new videos are uploaded on Youtube daily. To make your channel or your brand stand out in this crowd, it is important to arrange your videos in the form of playlists. These playlists help you manage your videos and allow the viewers to find the required video easily and conveniently. In this article, we are going to show you how to make a playlist on Youtube.
Youtube playlists not only help in arranging the videos that you upload on Youtube. But you can also create a playlist of any video available on Youtube. Whether it is a song, recipe, movie, or something else, you add it into your playlist to arrange them according to your needs to access them easily when needed.
How to make a playlist on Youtube of your uploaded videos
If you are running a Youtube channel and upload videos very often, then it is important to arrange them so that the viewers can easily explore and find their relevant video in no time. The best way to do that is to make a separate playlist for each type of video you upload. To know how to make a playlist on Youtube, follow the below steps.
- Open Youtube. Click on your “Channel Icon” in the upper right corner, then click on “Your Channel”.
- Under Your Channel, click on the “Manage Videos” button. It will open the Youtube Studio of your Channel.
- In Youtube Studio, click on “Playlists” located on the left sidebar of the Studio.
- In this window, click on “New Playlist” located below your channel’s icon.
- Now it will ask you to enter “Playlist Title” and its “Visibility.” Name it accordingly and under Visibility, select an appropriate option according to your requirement and hit “Create.” Now your playlist is successfully created.
- Whenever you upload a new video on this channel, you can select the playlist you have created. While uploading the video, you can find a section named “Playlists” under the details tab.
- Click on the drop-down menu to open select a playlist from the playlists that you have created. Select one and hit “Done.”
After uploading the video, it will be added to the playlist that you have selected. You can create as many playlists as you want. There is no restriction on that.
How to make a playlist on Youtube of others’ videos
Sometimes you like a video so much that you want to save it for future use or add it to your favorites. In such cases, creating a Youtube playlist is the best option. It will help you arrange the videos according to their type. To make a playlist on Youtube of others’ videos, follow the below steps.
- Open Youtube. Play a video that you want to save to a Playlist.
- Click on the “Save” on the right side below the video. It will open a new pop-up window that will ask you to select a playlist to add this video to it. But since you want to create a new playlist, click on the “Create a new Playlist.”
- It will ask you to enter the Name and select the privacy of the playlist. Name it and choose the privacy according to your preference and hit “Create.” Your video will be added to the new playlist.
- You can easily access these playlists by clicking the three lines in the upper left corner of Youtube. Here you can find all the Playlists that you will create. Click on the playlist to access all the videos that are included in it.
Conclusion
Both of these processes of how to make a playlist on Youtube will help you whether you are a content creator or a simple Youtube user. With such a huge video database, it is difficult for users to keep their favorite videos to access them whenever they need them. Making a Youtube playlist can be very beneficial in such cases.
Liza Brown
Liza Brown is a writer and a lover of all things video.
Follow @Liza Brown
Also read:
- Enjoy the Joy of Joint YouTube Video Experiences for 2024
- Enhance Youtubes' Conversations with Emojis
- [Updated] Diving Into Popularity Top 10 YouTube Creators by Views & Subs
- Miniature Mastery in the Social Sphere Who Wins with YouTube Shorts or TikToks?
- Concluding Your Channel on YouTube - Expert Guides & Templates
- 2024 Approved Enhancing YouTube Content with Text Overlays
- __Energy Savings Calculations__ While Not Directly Impacting Installation Cost, Understanding Potential Energy Savings Is Crucial for Long-Term ROI Analysis.
- Constructing Inquiry Curtain Closers
- Channel Up Your Wealth Profit From Effective Use of YouTube Shorts
- Mastering the Art of Aspect Ratios on YouTube Videos/Shorts/Ads
- The Beginner's Blueprint for Creating a Sports Chain on Mac
- Microtones and Monikers Shorts' Sound Roles
- Finding the Sweet Spot Optimal YouTube Video Upload Rates for Growth
- [New] Dispelling Darkness, Enhancing Youtube Views
- From Scripts to Screen Making YouTube Splits
- Flashing Feathersticks Short Film Characters' Music
- How to Add YouTube End Screen and Cards Effectively
- [Updated] Become a Viral Sensation Maximizing Your YouTube Reach
- Monetizing Mastery A Triple Step Approach to Understanding YouTube Revenue
- Best Student-Friendly History Vid Hubs (#1-10) for 2024
- [New] Comprehensive Guide to YouTube Content Moderation Rules
- Building Brand Voice via Micro-Business Videos for 2024
- [Updated] Amplify Watcher Count Simplified Tactics Exposed
- 2024 Approved A Treasure Trove of Premium YouTube Images From 6 Websites
- Streamlining Your Creative Process How to Link YouTube and TikTok Effortlessly
- In 2024, Discover YouTube's Frame Advantage - Five Free Tools
- How to Safely Capture Your Favorite YouTube Audio for Free
- Ditch YouTube on Your Phone Top 10 Free Video App Alternatives
- The Definitive User's Manual for YouTube TV
- In 2024, Conquer the Blackened Canvas of YouTube
- New Dont Start Without This Crucial Info About M4R Converters for 2024
- [Updated] In 2024, Pinnacle IOS Solutions The Best PS2 Game Emulators
- In 2024, Seamless Transfer of High Definition FB Media
- In 2024, How does the stardust trade cost In pokemon go On Honor 90 Lite? | Dr.fone
- Premium Collection Expert TikTok Downloader Tools for 2024
- [New] 2024 Approved Live Capture Success Explore 4 Effective Recording Strategies
- Navigating Skype Recordings on Windows & Mac - Free vs Paid Guide for 2024
- How to recover deleted photos from Android Gallery without backup on Redmi K70 Pro
- In 2024, Your Account Has Been Disabled in the App Store and iTunes From Apple iPhone 15 Pro Max?
- [Updated] Advanced Techniques in FBX Game Filming for 2024
- In 2024, Get Pro-Level Stability for Free Top Online Video Stabilizers
- Title: Best Practices in YouTube Thumbnail Sizes and Ratios for 2024
- Author: Kevin
- Created at : 2024-05-25 14:42:56
- Updated at : 2024-05-26 14:42:56
- Link: https://youtube-videos.techidaily.com/best-practices-in-youtube-thumbnail-sizes-and-ratios-for-2024/
- License: This work is licensed under CC BY-NC-SA 4.0.
