"Beauty Vlogs From Basics to Brilliance Launching a YouTube Channel"
Beauty Vlogs From Basics to Brilliance: Launching a YouTube Channel
How To Be A Beauty Guru on YouTube: Beauty Vlogger Set Up

Richard Bennett
Mar 27, 2024• Proven solutions
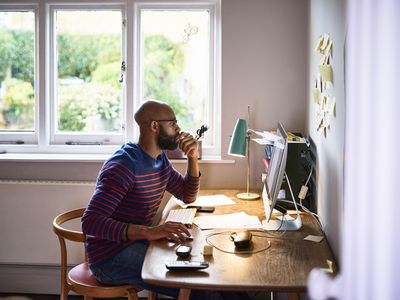
Beauty Vlogs are some of the most popular channels on YouTube. These vlogs are all about aesthetics, so it is important that the videos themselves are beautiful. When you are giving out tips on makeup or hair you want to use a setup that will make your results look their very best.
YouTube Beauty Vlogger Set Up
It’s easy to put together your own Beauty Vlog setup. There are four main elements; lighting, beauty supplies, backgrounds, and audio. Here are some tips on building your beauty guru set:
1. Light It Up

Beauty Vlogs need to have great lighting so that everyone can clearly see what you are doing and how amazing it looks. Make sure you have even light over your whole face by ‘front lighting’ your vlog. Front lighting means having a light source right in front of you.
Depending on your budget, you can either use a window as a front light or buy a diva ring light.
Using a Window: Face the window while you vlog and be careful that the camera’s shadow is not visible in your shot. Avoid using a window the sun is shining directly into. You want softer, more diffused, light for a beauty vlog.
Using a Ring Light: Mount your camera either inside the ring or right behind it on a tripod. Ring lights are powerful options for illuminating your entire face, and they are very popular with makeup vloggers.
Front lighting can make you appear flat against your background, so it is also a good idea to set up a backlight behind you to make you pop out. Setting up lights on either side of you can also help add dimension to your shot.
Check this tutorial to know more details:
2. Organize Your Makeup
Having to search for makeup or reach across to where you are storing your curling iron will kill your vlogging momentum. Creating a great look is the fun part of beauty vlogging, and probably the part you want to focus on. Not looking for your missing brush. The best way to set yourself up for a beauty vlog is at a desk or table where you can lay everything out neatly right in front of you.
3. Alter Your Background
Making your vlog look more professional can be as easy as dressing up your background. You do not want there to be a lot of clutter behind you, but you don’t want to shoot with your back to a plain beige wall either. One simple way to keep your background beautiful, but not distracting, is to use a backdrop. Just hang a sheet or other piece of fabric behind you. You can even use patterns and change your backdrop to match your makeup in different videos.
Another great way to disguise the room you are vlogging in, and make sure nothing behind you distracts your viewers, is to blur your background. You really stand out when your background is blurry and you are in perfect focus.
4. Be Audible
You have a lot to say, so make sure people can hear you. Most cameras do not have great microphones, so you will need to use an external mic. To see what kinds of options you have make sure to read and watch “Best Microphone for YouTube - Top 5 Mics for YouTube Videos ”.
If you do not have access to an external mic then you may be able to get by without one for a while using software. Make sure there is no background noise competing with your voice, and download a free audio editing program called Audacity from Audacityteam.org. Using Audacity you will be able to improve a mediocre audio recording from your camera and make it usable. This is a popular option among YouTube gamers who record both video and audio from their webcams, but there is no reason it should not be useful for beauty gurus too.
Richard Bennett
Richard Bennett is a writer and a lover of all things video.
Follow @Richard Bennett
Richard Bennett
Mar 27, 2024• Proven solutions
Beauty Vlogs are some of the most popular channels on YouTube. These vlogs are all about aesthetics, so it is important that the videos themselves are beautiful. When you are giving out tips on makeup or hair you want to use a setup that will make your results look their very best.
YouTube Beauty Vlogger Set Up
It’s easy to put together your own Beauty Vlog setup. There are four main elements; lighting, beauty supplies, backgrounds, and audio. Here are some tips on building your beauty guru set:
1. Light It Up
Beauty Vlogs need to have great lighting so that everyone can clearly see what you are doing and how amazing it looks. Make sure you have even light over your whole face by ‘front lighting’ your vlog. Front lighting means having a light source right in front of you.
Depending on your budget, you can either use a window as a front light or buy a diva ring light.
Using a Window: Face the window while you vlog and be careful that the camera’s shadow is not visible in your shot. Avoid using a window the sun is shining directly into. You want softer, more diffused, light for a beauty vlog.
Using a Ring Light: Mount your camera either inside the ring or right behind it on a tripod. Ring lights are powerful options for illuminating your entire face, and they are very popular with makeup vloggers.
Front lighting can make you appear flat against your background, so it is also a good idea to set up a backlight behind you to make you pop out. Setting up lights on either side of you can also help add dimension to your shot.
Check this tutorial to know more details:
2. Organize Your Makeup
Having to search for makeup or reach across to where you are storing your curling iron will kill your vlogging momentum. Creating a great look is the fun part of beauty vlogging, and probably the part you want to focus on. Not looking for your missing brush. The best way to set yourself up for a beauty vlog is at a desk or table where you can lay everything out neatly right in front of you.
3. Alter Your Background
Making your vlog look more professional can be as easy as dressing up your background. You do not want there to be a lot of clutter behind you, but you don’t want to shoot with your back to a plain beige wall either. One simple way to keep your background beautiful, but not distracting, is to use a backdrop. Just hang a sheet or other piece of fabric behind you. You can even use patterns and change your backdrop to match your makeup in different videos.
Another great way to disguise the room you are vlogging in, and make sure nothing behind you distracts your viewers, is to blur your background. You really stand out when your background is blurry and you are in perfect focus.
4. Be Audible
You have a lot to say, so make sure people can hear you. Most cameras do not have great microphones, so you will need to use an external mic. To see what kinds of options you have make sure to read and watch “Best Microphone for YouTube - Top 5 Mics for YouTube Videos ”.
If you do not have access to an external mic then you may be able to get by without one for a while using software. Make sure there is no background noise competing with your voice, and download a free audio editing program called Audacity from Audacityteam.org. Using Audacity you will be able to improve a mediocre audio recording from your camera and make it usable. This is a popular option among YouTube gamers who record both video and audio from their webcams, but there is no reason it should not be useful for beauty gurus too.
Richard Bennett
Richard Bennett is a writer and a lover of all things video.
Follow @Richard Bennett
The Ultimate Checklist for Confirming YT Account
How to Verify Your YouTube Account - a Simple Guide
Richard Bennett
Oct 26, 2023• Proven solutions
YouTube verify isn’t just for big channels, it’s for just about anyone serious about YouTube. The main benefits of verifying your channel are live streaming and the ability to publish longer videos. You must also verify your account to apply for monetization, although there are other qualifications for that as well.
How to verify your YouTube channel
To verify your YouTube channel, start by visiting this link: https://www.youtube.com/verify .
You’ll need to provide a phone number. A verification code will be either texted or sent via an automated voice call (your choice). Once you have the code, you just have to enter in the field YouTube provides.
How to post videos on YouTube longer than 15 minutes
The default settings on YouTube only allow creators to upload videos that are 15 minutes or shorter. To upload longer videos you will need to verify your YouTube account. Luckily this feature is easy to access.
From the YouTube upload page, you will see an option that says increase your limit at the bottom of the page. From there you will be redirected to the main YouTube verification page. In this area, you can follow the steps to verify your account, which will involve receiving a verification code via text message on your mobile phone or an automated voice call. Once you are verified you can upload videos that are up to 12 hours long or have a file size of up to 128 GB.
How to live stream on YouTube
Live streaming lets you reach out to your viewers an engage with them directly. With a verified YouTube account you can start the process of streaming directly from your channel page. Live streams will appear as recommended for your subscribers just like any other piece of the published content. After a live stream is finished content creators have the chance to publish the video that was captured during the live stream.
To live stream on YouTube you must have a verified channel and zero live stream restrictions for 90 days. An account may not be able to live stream within the first 24 hours of account creation.
To enable live streaming go to the creator studio, click on the live streaming tab, and enable the live stream. Live streams are also available through the YouTube mobile app from the ‘create a live stream’ button.
Customize YouTube Videos with Easy-to-Use Video Editor


Richard Bennett
Richard Bennett is a writer and a lover of all things video.
Follow @Richard Bennett
Richard Bennett
Oct 26, 2023• Proven solutions
YouTube verify isn’t just for big channels, it’s for just about anyone serious about YouTube. The main benefits of verifying your channel are live streaming and the ability to publish longer videos. You must also verify your account to apply for monetization, although there are other qualifications for that as well.
How to verify your YouTube channel
To verify your YouTube channel, start by visiting this link: https://www.youtube.com/verify .
You’ll need to provide a phone number. A verification code will be either texted or sent via an automated voice call (your choice). Once you have the code, you just have to enter in the field YouTube provides.
How to post videos on YouTube longer than 15 minutes
The default settings on YouTube only allow creators to upload videos that are 15 minutes or shorter. To upload longer videos you will need to verify your YouTube account. Luckily this feature is easy to access.
From the YouTube upload page, you will see an option that says increase your limit at the bottom of the page. From there you will be redirected to the main YouTube verification page. In this area, you can follow the steps to verify your account, which will involve receiving a verification code via text message on your mobile phone or an automated voice call. Once you are verified you can upload videos that are up to 12 hours long or have a file size of up to 128 GB.
How to live stream on YouTube
Live streaming lets you reach out to your viewers an engage with them directly. With a verified YouTube account you can start the process of streaming directly from your channel page. Live streams will appear as recommended for your subscribers just like any other piece of the published content. After a live stream is finished content creators have the chance to publish the video that was captured during the live stream.
To live stream on YouTube you must have a verified channel and zero live stream restrictions for 90 days. An account may not be able to live stream within the first 24 hours of account creation.
To enable live streaming go to the creator studio, click on the live streaming tab, and enable the live stream. Live streams are also available through the YouTube mobile app from the ‘create a live stream’ button.
Customize YouTube Videos with Easy-to-Use Video Editor
Richard Bennett
Richard Bennett is a writer and a lover of all things video.
Follow @Richard Bennett
Also read:
- [New] 7 Star-Rated Apps for Effortless YouTube LIVE Broadcast From iPhone and Android
- [New] Behind the Scenes IPhone Video Loops Unveiled for 2024
- [New] Dissecting Biggest FIFA Footage Trends in Graphs
- [Updated] 2024 Approved Compare & Contrast Best 6 HDMI Monitor Models in Detail
- [Updated] Closing with Panache Free YouTube's #1 Six
- 2024 Approved Discover 7 Unforgettable Marriage Videos on Vimeo
- Addressing Headphone & Speaker Non-Detection in WINDOWS OS
- Boost Video Appeal with These 20 Best Thumbnail Fonts
- Elevating Content Strategy Through YouTube Metrics for 2024
- Enhance Your DVD Watching Experience: Tips to Boost DVD Quality on HDTV and 4K TVs
- Exclusive Software Gamers' Streaming Companions
- Expert Conversion YouTube to Written Format
- How to Fix the Soft Bricked Vivo T2x 5G? | Dr.fone
- In 2024, 5 Ways to Move Contacts From Vivo S17t to iPhone (13/14/15) | Dr.fone
- In 2024, Elevating the Chilly Selecting Five Warm Video Backgrounds
- Madden NFL 19 Analysis: Outstanding Features Amidst Growing Familiarity
- Perfecting the Twitch-to-YouTube Content Transfer Process
- Top Rated HDMI Cables for Superior Connectivity : Expert Picks
- Top Teen-Focused Films Streaming on Netflix
- Title: Beauty Vlogs From Basics to Brilliance Launching a YouTube Channel
- Author: Kevin
- Created at : 2025-02-15 16:56:46
- Updated at : 2025-02-20 16:34:56
- Link: https://youtube-videos.techidaily.com/beauty-vlogs-from-basics-to-brilliance-launching-a-youtube-channel/
- License: This work is licensed under CC BY-NC-SA 4.0.