
:max_bytes(150000):strip_icc()/Google-TV-vs-YouTube-TV-459482eb01f54610952183b5233688fd.jpg)
"Animated Text That Jumps Master Class with Easy Steps for 2024"
Animated Text That Jumps: Master Class with Easy Steps
How to Create Animated Bouncing Text

Liza Brown
Mar 27, 2024• Proven solutions
Earlier, you learned how to have a bounce text effect in Adobe After Effects . However, because AE is a complex application and has a steep learning curve, this section explains the two alternative ways to get the same effect on your existing video footage.
Method 1: How to Create Bouncing Text in Filmora Video Editor?
When talking about Wondershare Filmora , the application is populated with several presets for texts and titles, animations, effects, filters, and much more.
These pre-built templates not only make your task easier, they also save your decent amount of time that you would spend while working with After Effects or any other similar app that requires you to build things from scratch.
You can follow the instructions given below to add animated bounce text to any of your video footages with Filmora:
Step 1: Add a Footage to Timeline
Launch Wondershare Filmora on your Windows or Mac PC. By default, the aspect ratio of the project is set to 16:9. Click anywhere inside the Media window at the upper-left section, and select and import footage you want to add bounce text to.
Step 2: Insert Text and Add Bounce Effect
Click Titles from the standard toolbar at the top, and click and drag your preferred title template from the Library to the timeline. In case you don’t want any specific animation or style on the title, you can use the default title.
In the timeline, double-click the title you just added, use the upper-left section to edit the text, go to the Animation tab from the left pane, scroll down the list, and double-click the Up Down 1 or Up Down 2 preset to apply the bounce effect to the credits. Click OK to save the changes and to get back to the main window.

Step 3: Add Shake Filters
Go to Effects from the standard toolbar, expand the Filters category from the left pane, and click Shake. From the Library window, click and drag your preferred shake filter to the timeline. Here, I will choose Mild.

You can customize the default effect by double-clicking the shake filter in the timeline, using the sliders in the upper-left area of the interface to make necessary adjustments, and then clicking OK to save the changes and to get back to the previous interface.

Step 4: Export the Final Output
Click EXPORT from the top of the interface, go to the Local tab in the Export box, choose your preferred output format from the list in the left, make required customizations from the right pane, and click EXPORT from the bottom-right corner to export the video.

Now, you can add the bouncing text video and the background video to the timeline, and then place the bouncing text video above the background video track.
Double click the text track, go to the Chroma Key effect, select the Color Picker tool, and click anywhere in the Preview window to get things right. Finally, export the entire project to your preferred output format as explained in Step 4.
As explained before, Wondeshare Filmora makes the entire process of creating and adding bounce text effect pretty simple. With all the pre-build templates, and the versatility of the options that can be used to customize those presets, you can come up with the effects that are usually obtained when you start generating them from the scratch.


Method 2: Generate Animated Bouncing Texts Online
If you don’t want any heavy and resource-intensive app on your PC merely for some special text effects, you can try any of the online solutions instead. The benefit of using any such web app is that all the processing is done on site’s server, and it is only a web browser and an Internet connection that you need to have at your side.
Some most trusted websites to generate bounce text are listed below:
1. ENGFTO
Website: https://engfto.com/index/create%5Fanimated%5Fbouncing%5Ftext/0-26

You can follow the instructions given below to use Engfto to generate bouncing text for your footages:
Step 1: Get to the Animated Bouncing Text Page
Launch your favorite web browser, and go to the link given above to get to the Engfto’s animated bouncing text page.
Step 2: Customize Text and Preferences
Modify the values in the fields under the SIZE AREA and TEXT sections to customize the text area, the text itself, its size, and font. Next, adjust the values in the fields under the EFFECT PARAMETERS section to get the required bounce effect. Also, use the fields under the BACKGROUND section to either change the background color, or pick a background image from your PC.
Step 3: Obtain the Animated Text
Click the SAVE GIF ANIMATION button from the lower section of the page to download the animated text to your PC.
2. Loading.io
The instructions given below explain how to use Loading.io to get animated bounce text effect for your footages:
Step 1: Get to the Loading.io Webpage
Launch your favorite web browser and go to https://loading.io/animation/text/ .
Step 2: Customize the Text and Choose Animation Effect

Use the options available on the webpage to type your text, and change its font, color, background, transparency level etc. Select Bounce (or any of its variants) from the Animation drop-down list, and adjust the speed using the Speed slider.
Step 3: Obtain the Text
Click your preferred option from next to the Download As section to download the animated text to your PC.
Note: Regardless of the web solution you choose to generate and obtain animated bounce text, you will still need a post-production tool to add the downloaded text to your footage.
Conclusion
Generating bounce text effect is much simpler when you use Wondershare Filmora or any of the online solutions as explained in Method 2. While the former gives you more flexibility when it comes to customizations, the latter doesn’t require any app to be installed on your PC. In addition, many times the web apps offer their services for free, and therefore they are preferred by the novice users who are not much into post-production processes.
Liza Brown
Liza Brown is a writer and a lover of all things video.
Follow @Liza Brown
Liza Brown
Mar 27, 2024• Proven solutions
Earlier, you learned how to have a bounce text effect in Adobe After Effects . However, because AE is a complex application and has a steep learning curve, this section explains the two alternative ways to get the same effect on your existing video footage.
Method 1: How to Create Bouncing Text in Filmora Video Editor?
When talking about Wondershare Filmora , the application is populated with several presets for texts and titles, animations, effects, filters, and much more.
These pre-built templates not only make your task easier, they also save your decent amount of time that you would spend while working with After Effects or any other similar app that requires you to build things from scratch.
You can follow the instructions given below to add animated bounce text to any of your video footages with Filmora:
Step 1: Add a Footage to Timeline
Launch Wondershare Filmora on your Windows or Mac PC. By default, the aspect ratio of the project is set to 16:9. Click anywhere inside the Media window at the upper-left section, and select and import footage you want to add bounce text to.
Step 2: Insert Text and Add Bounce Effect
Click Titles from the standard toolbar at the top, and click and drag your preferred title template from the Library to the timeline. In case you don’t want any specific animation or style on the title, you can use the default title.
In the timeline, double-click the title you just added, use the upper-left section to edit the text, go to the Animation tab from the left pane, scroll down the list, and double-click the Up Down 1 or Up Down 2 preset to apply the bounce effect to the credits. Click OK to save the changes and to get back to the main window.
Step 3: Add Shake Filters
Go to Effects from the standard toolbar, expand the Filters category from the left pane, and click Shake. From the Library window, click and drag your preferred shake filter to the timeline. Here, I will choose Mild.
You can customize the default effect by double-clicking the shake filter in the timeline, using the sliders in the upper-left area of the interface to make necessary adjustments, and then clicking OK to save the changes and to get back to the previous interface.
Step 4: Export the Final Output
Click EXPORT from the top of the interface, go to the Local tab in the Export box, choose your preferred output format from the list in the left, make required customizations from the right pane, and click EXPORT from the bottom-right corner to export the video.
Now, you can add the bouncing text video and the background video to the timeline, and then place the bouncing text video above the background video track.
Double click the text track, go to the Chroma Key effect, select the Color Picker tool, and click anywhere in the Preview window to get things right. Finally, export the entire project to your preferred output format as explained in Step 4.
As explained before, Wondeshare Filmora makes the entire process of creating and adding bounce text effect pretty simple. With all the pre-build templates, and the versatility of the options that can be used to customize those presets, you can come up with the effects that are usually obtained when you start generating them from the scratch.
Method 2: Generate Animated Bouncing Texts Online
If you don’t want any heavy and resource-intensive app on your PC merely for some special text effects, you can try any of the online solutions instead. The benefit of using any such web app is that all the processing is done on site’s server, and it is only a web browser and an Internet connection that you need to have at your side.
Some most trusted websites to generate bounce text are listed below:
1. ENGFTO
Website: https://engfto.com/index/create%5Fanimated%5Fbouncing%5Ftext/0-26
You can follow the instructions given below to use Engfto to generate bouncing text for your footages:
Step 1: Get to the Animated Bouncing Text Page
Launch your favorite web browser, and go to the link given above to get to the Engfto’s animated bouncing text page.
Step 2: Customize Text and Preferences
Modify the values in the fields under the SIZE AREA and TEXT sections to customize the text area, the text itself, its size, and font. Next, adjust the values in the fields under the EFFECT PARAMETERS section to get the required bounce effect. Also, use the fields under the BACKGROUND section to either change the background color, or pick a background image from your PC.
Step 3: Obtain the Animated Text
Click the SAVE GIF ANIMATION button from the lower section of the page to download the animated text to your PC.
2. Loading.io
The instructions given below explain how to use Loading.io to get animated bounce text effect for your footages:
Step 1: Get to the Loading.io Webpage
Launch your favorite web browser and go to https://loading.io/animation/text/ .
Step 2: Customize the Text and Choose Animation Effect
Use the options available on the webpage to type your text, and change its font, color, background, transparency level etc. Select Bounce (or any of its variants) from the Animation drop-down list, and adjust the speed using the Speed slider.
Step 3: Obtain the Text
Click your preferred option from next to the Download As section to download the animated text to your PC.
Note: Regardless of the web solution you choose to generate and obtain animated bounce text, you will still need a post-production tool to add the downloaded text to your footage.
Conclusion
Generating bounce text effect is much simpler when you use Wondershare Filmora or any of the online solutions as explained in Method 2. While the former gives you more flexibility when it comes to customizations, the latter doesn’t require any app to be installed on your PC. In addition, many times the web apps offer their services for free, and therefore they are preferred by the novice users who are not much into post-production processes.
Liza Brown
Liza Brown is a writer and a lover of all things video.
Follow @Liza Brown
Swift Strategies: Randomize Your Video Playlist Quickly
We often create playlists on YouTube for different moods, genres, and occasions, but you may want to change the order of the videos or songs in your list. This is where the shuffling feature can help you.
Shuffling your YouTube playlist is an excellent way to mix things up and play various videos or songs from different channels without manually selecting each one.
But if you don’t know how to use the “Shuffle” feature, we’ll show you how to shuffle YouTube playlists on PCs, phones, and TVs. So, keep reading to start randomizing your YouTube playlist to mix up your music or video collection!
How To Shuffle YouTube Playlist On PCs/Phones/TVs?
Whether it’s a mix of our favorite songs, a set of dance videos to help get us through our workout, or a compilation of cat videos that never fail to make us smile, we all have that one go-to playlist we want to listen to over and over again.
But sometimes, even our favorite playlist can feel a little stale. That’s when it’s time to shuffle things up and give the playlist a fresh new feel.
To help you with this, we’ve provided step-by-step tutorials to help you shuffle Youtube playlists on your computer, phone, or Smart TV without having much trouble.
Part 1. How to Shuffle YouTube Playlist on PC?
Here is the step-by-step guide that can help you quickly shuffle your YouTube playlist on your PC, whether it’s before playback while watching, or from the Library:
How To Shuffle the Playlist Before Playlist Playback
The following is a quick rundown of the steps you need to take to shuffle the playlist before playback:
Step 1: First, open a browser on your PC to visit the YouTubewebsite and log in to your account using your credentials.
Step 2: Now, click the “Menu” (hamburger) icon on the top left of the YouTube home page and select your playlist from the menu.

Step 3: On the next page, click the “Shuffle” button next to the “Play All” option in the playlist details section to randomize your YouTube playlist.
That’s about it! Your videos/songs will now play in random order.
How To Shuffle The Playlist While Listening
To learn how to shuffle a YouTube playlist while listening to your favorite songs, do the following steps in sequence:
Step 1: Launch your preferred browser on your PC and head to the “YouTube” homepage.
Step 2: Now, use the search icon to find your favorite song’s playlist or choose from the left “Menu” panel, and click “Play All” to listen to the music.
Step 3: When you start playing, you’ll find your playlist next to the video player. Click the crisscrossed arrows “Shuffle” icon below the playlist title, and the songs will start playing randomly instead of in proper order.

How To Shuffle The Playlist In the Library
If you want to randomize your YouTube playlist in the library section, follow these step-by-step instructions:
Step 1: In the first step, head to the YouTube website using your preferred browser on the PC and sign in to your account.
Step 2: Click the “Library” option from the left side panel on the YouTube homepage and scroll down to the “Playlists” section.
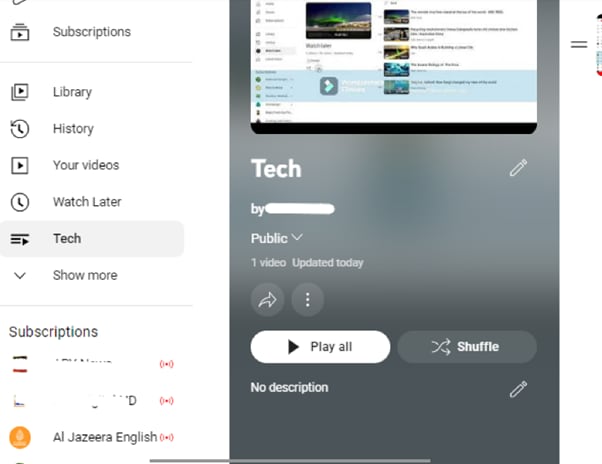
Step 3: In the next step, find your playlist and click the “View Full Playlist” option below. This will take you to the playlist page.
Step 4: Finally, on the playlist page, click the “Shuffle” option next to “Play All” in the details section. Now, when you start watching the videos in the playlist, they will play randomly.
Part 2. How To Shuffle YouTube Playlist On Handy?
It is possible to shuffle your YouTube playlist on your handy (iPhone or Android) with the following workarounds.
How To Shuffle The Playlist Before Playlist Playback/From Library
The following steps will help you shuffle your favorite playlists before playlist playback or from the Library:
Step 1: If the YouTube app is not installed on your phone, head to the “App Store “ or “GooglePlay Store “ and install the app.
Step 2: Now, launch the YouTube app on your handy and tap the “Library” option at the bottom right corner of the app’s home screen.
Step 3: Now, scroll down to the “Playlist” section and tap the playlist you want to shuffle. On the playlist screen, tap “Shuffle” next to the “Play All” option, and that’s it!

You can now enjoy your favorite videos and songs in a new order.
How To Shuffle The Playlist While Listening
To change the order of your favorite songs in the YouTube playlist while listening to it on your mobile device, do the following steps:
Step 1: First, open the “YouTube” app on your device and log into your account if you are not signed in already.
Step 2: On the app’s home screen, tap the “Search” bar, type the playlist name, and tap to open it to start listening to your favorite songs.
Step 3: You will find the playlist available under the video player. Simply tap the crisscrossed arrows “Shuffle” icon below the playlist’s title.

That’s all to it! Now you can enjoy your YouTube playlist in totally random order.
Part 3. How To Shuffle YouTube Playlist on TV?
The YouTube app is also available on smart TVs, which many people find to be a more enjoyable experience than watching YouTube videos on a small screen.
However, unfortunately, there is no way to shuffle a YouTube playlist on a Smart TV. This is a feature that is currently only available on the YouTube website and apps.
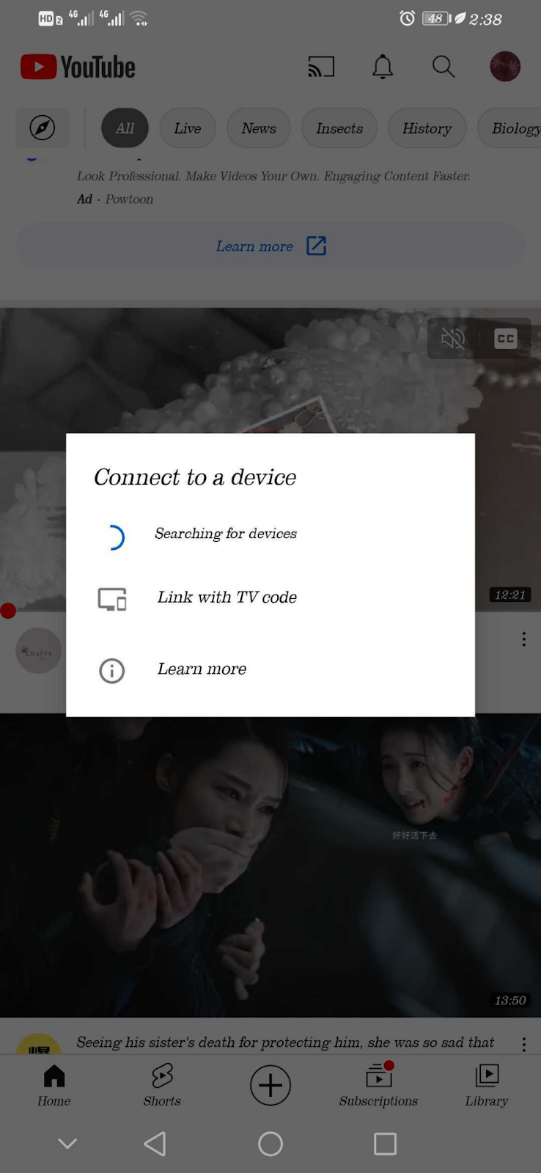
But if your Smart TV comes with a built-in Chromecast option, you can screen mirror the YouTube app on your TV and shuffle the playlist to your liking in the following way:
Step 1: In the first step, make sure your Smart TV and mobile device are connected to the same internet connection.
Step 2: In the next step, launch the YouTube app on your device, and access your playlist under the “Library” tab. Tap the “Shuffle” icon in the playlist details section and play your playlist
Step 3: In the final step, tap the “Cast” icon at the top-right of the screen and select your TV from the list to cast to.
Now you can enjoy randomly listen to your favorite songs on a more prominent display without getting bored.
Note:
You can also use other streaming devices like Firestick or Apple Airplay to cast YouTube on your Smart TV.
A Bouns Tip: How To Make a Music Video by Yourself?
We hope you have found appropriate solutions to shuffle your YouTube Playlist. Besides, supposing you are a music and YouTube lover, do you want to create videos with your favourite music? If yes, you can watch the video we have prepared for you. In this video, you will learn how to easily use a user-friendly video editor, Filmora, to make music videos!
In this comprehensive guide, we’ve provided a detailed step-by-step guide to show you how to shuffle YouTube playlists on your computer, mobile device, or Smart TV.
Hopefully, you’ve found this article informative and can now enjoy watching or listening to your favorite video/song in a random order in your YouTube playlist.
We often create playlists on YouTube for different moods, genres, and occasions, but you may want to change the order of the videos or songs in your list. This is where the shuffling feature can help you.
Shuffling your YouTube playlist is an excellent way to mix things up and play various videos or songs from different channels without manually selecting each one.
But if you don’t know how to use the “Shuffle” feature, we’ll show you how to shuffle YouTube playlists on PCs, phones, and TVs. So, keep reading to start randomizing your YouTube playlist to mix up your music or video collection!
How To Shuffle YouTube Playlist On PCs/Phones/TVs?
Whether it’s a mix of our favorite songs, a set of dance videos to help get us through our workout, or a compilation of cat videos that never fail to make us smile, we all have that one go-to playlist we want to listen to over and over again.
But sometimes, even our favorite playlist can feel a little stale. That’s when it’s time to shuffle things up and give the playlist a fresh new feel.
To help you with this, we’ve provided step-by-step tutorials to help you shuffle Youtube playlists on your computer, phone, or Smart TV without having much trouble.
Part 1. How to Shuffle YouTube Playlist on PC?
Here is the step-by-step guide that can help you quickly shuffle your YouTube playlist on your PC, whether it’s before playback while watching, or from the Library:
How To Shuffle the Playlist Before Playlist Playback
The following is a quick rundown of the steps you need to take to shuffle the playlist before playback:
Step 1: First, open a browser on your PC to visit the YouTubewebsite and log in to your account using your credentials.
Step 2: Now, click the “Menu” (hamburger) icon on the top left of the YouTube home page and select your playlist from the menu.
Step 3: On the next page, click the “Shuffle” button next to the “Play All” option in the playlist details section to randomize your YouTube playlist.
That’s about it! Your videos/songs will now play in random order.
How To Shuffle The Playlist While Listening
To learn how to shuffle a YouTube playlist while listening to your favorite songs, do the following steps in sequence:
Step 1: Launch your preferred browser on your PC and head to the “YouTube” homepage.
Step 2: Now, use the search icon to find your favorite song’s playlist or choose from the left “Menu” panel, and click “Play All” to listen to the music.
Step 3: When you start playing, you’ll find your playlist next to the video player. Click the crisscrossed arrows “Shuffle” icon below the playlist title, and the songs will start playing randomly instead of in proper order.
How To Shuffle The Playlist In the Library
If you want to randomize your YouTube playlist in the library section, follow these step-by-step instructions:
Step 1: In the first step, head to the YouTube website using your preferred browser on the PC and sign in to your account.
Step 2: Click the “Library” option from the left side panel on the YouTube homepage and scroll down to the “Playlists” section.
Step 3: In the next step, find your playlist and click the “View Full Playlist” option below. This will take you to the playlist page.
Step 4: Finally, on the playlist page, click the “Shuffle” option next to “Play All” in the details section. Now, when you start watching the videos in the playlist, they will play randomly.
Part 2. How To Shuffle YouTube Playlist On Handy?
It is possible to shuffle your YouTube playlist on your handy (iPhone or Android) with the following workarounds.
How To Shuffle The Playlist Before Playlist Playback/From Library
The following steps will help you shuffle your favorite playlists before playlist playback or from the Library:
Step 1: If the YouTube app is not installed on your phone, head to the “App Store “ or “GooglePlay Store “ and install the app.
Step 2: Now, launch the YouTube app on your handy and tap the “Library” option at the bottom right corner of the app’s home screen.
Step 3: Now, scroll down to the “Playlist” section and tap the playlist you want to shuffle. On the playlist screen, tap “Shuffle” next to the “Play All” option, and that’s it!
You can now enjoy your favorite videos and songs in a new order.
How To Shuffle The Playlist While Listening
To change the order of your favorite songs in the YouTube playlist while listening to it on your mobile device, do the following steps:
Step 1: First, open the “YouTube” app on your device and log into your account if you are not signed in already.
Step 2: On the app’s home screen, tap the “Search” bar, type the playlist name, and tap to open it to start listening to your favorite songs.
Step 3: You will find the playlist available under the video player. Simply tap the crisscrossed arrows “Shuffle” icon below the playlist’s title.
That’s all to it! Now you can enjoy your YouTube playlist in totally random order.
Part 3. How To Shuffle YouTube Playlist on TV?
The YouTube app is also available on smart TVs, which many people find to be a more enjoyable experience than watching YouTube videos on a small screen.
However, unfortunately, there is no way to shuffle a YouTube playlist on a Smart TV. This is a feature that is currently only available on the YouTube website and apps.
But if your Smart TV comes with a built-in Chromecast option, you can screen mirror the YouTube app on your TV and shuffle the playlist to your liking in the following way:
Step 1: In the first step, make sure your Smart TV and mobile device are connected to the same internet connection.
Step 2: In the next step, launch the YouTube app on your device, and access your playlist under the “Library” tab. Tap the “Shuffle” icon in the playlist details section and play your playlist
Step 3: In the final step, tap the “Cast” icon at the top-right of the screen and select your TV from the list to cast to.
Now you can enjoy randomly listen to your favorite songs on a more prominent display without getting bored.
Note:
You can also use other streaming devices like Firestick or Apple Airplay to cast YouTube on your Smart TV.
A Bouns Tip: How To Make a Music Video by Yourself?
We hope you have found appropriate solutions to shuffle your YouTube Playlist. Besides, supposing you are a music and YouTube lover, do you want to create videos with your favourite music? If yes, you can watch the video we have prepared for you. In this video, you will learn how to easily use a user-friendly video editor, Filmora, to make music videos!
In this comprehensive guide, we’ve provided a detailed step-by-step guide to show you how to shuffle YouTube playlists on your computer, mobile device, or Smart TV.
Hopefully, you’ve found this article informative and can now enjoy watching or listening to your favorite video/song in a random order in your YouTube playlist.
Also read:
- Deciphering YouTube Popularity Factors for Higher Placement
- Boost Engagement with Custom Images for Your Videos for 2024
- In 2024, Enhancing Viewer Interest with Accurate Time Stamping
- Your Guide to 50 Creative, Free YouTube Advertising Options
- Is Your YT Channel Earning as It Should? – Tips to Find Out
- [New] Crafting Fast Fortnite Icons in Minutes
- Unveiling the World Through Your Lens How To Become A Professional Travel Vlogger
- 2024 Approved Beyond Likes Understanding YouTube’s True View Metrics
- 2024 Approved Essential Video Equipment for Successful YouTube Channels
- [New] Choosing the Right Tool for Your YouTube-to-AVI Desire
- [Updated] Audiovisual Innovators Best Portable Devices for Editors
- From Script to Screen The Compreeved Guide to YouTube Video Edits
- Capturing the Globe From Novice to Experienced Travel Videographer for 2024
- From Raw to Masterpiece The Premier Free Mobile Editors for Android
- Aspect Ratio Fundamentals for Effective YouTube Content Creation
- [New] Erasing Extra Borders for Smooth YouTube Playback
- Ultimate Guide to Best YouTube Banner Size and Channel Art Dimension for 2024
- In 2024, Building an Engaging Sports Highlight Reel
- Boost Engagement on YouTube by Adding Emojis
- YouTube Vs. DailyMention Spotlighting Key Aspects
- 5 Innovative YouTube Thumbnail Designers for Aspiring Filmmakers for 2024
- [New] 15 Premium, Free Music Websites Every Videographer Needs
- Altering Who Can Access Your YouTube Videos for 2024
- Premium 7 Vlog Cameras Boosting Audience Engagement & Retention
- [Updated] Dive Into the Art of ASMR Recording – A Comprehensive Overview
- In 2024, Best Video Experts in Photo-Song Collaboration
- In 2024, How to Spy on Text Messages from Computer & Realme 11 Pro+ | Dr.fone
- In 2024, Top 10 Unique Gaming Screen Capture Applications
- 2024 Approved Learn the Ins and Outs of Adding GIFs on Instagram in 4 Steps
- Kazam Screen Recorder Review for 2024
- New 2024 Approved What to Use Instead of Windows Movie Maker A Comprehensive Guide
- New The Best Free Video Trimmers with No Watermark Restrictions for 2024
- [New] Enhancing Your Snapchat Experience Mobile Recordings for 2024
- Can I Bypass a Forgotten Phone Password Of Realme GT Neo 5?
- In 2024, How to Unlock Itel A60 Phone without Google Account?
- [New] Unlocking Secrets of Sending MMC Films to Vimeo for 2024
- 3 Ways to Track Itel P55+ without Them Knowing | Dr.fone
- Updated 2024 Approved Essential Video Editing Software for Non-Experts
- In 2024, Recommended Best Applications for Mirroring Your Xiaomi 14 Ultra Screen | Dr.fone
- Updated 2024 Approved A Step-by-Step Guide to Video Editing with QuickTime on Mac
- 2024 Approved Official 4 Best Ways to Get Filmora Discount Codes
- In 2024, How To Use Special Features - Virtual Location On Poco X5 Pro? | Dr.fone
- New Learn to Merge Clips in DaVinci Resolve Simple Steps
- Title: "Animated Text That Jumps Master Class with Easy Steps for 2024"
- Author: Kevin
- Created at : 2024-05-25 14:39:21
- Updated at : 2024-05-26 14:39:21
- Link: https://youtube-videos.techidaily.com/animated-text-that-jumps-master-class-with-easy-steps-for-2024/
- License: This work is licensed under CC BY-NC-SA 4.0.
