
:max_bytes(150000):strip_icc()/Kenatrailer-c3260ddd4c83447cb3ff119d7e772750.JPG)
An Owner's Guide to Playlist Permutations in YT
An Owner’s Guide to Playlist Permutations in YT
We often create playlists on YouTube for different moods, genres, and occasions, but you may want to change the order of the videos or songs in your list. This is where the shuffling feature can help you.
Shuffling your YouTube playlist is an excellent way to mix things up and play various videos or songs from different channels without manually selecting each one.
But if you don’t know how to use the “Shuffle” feature, we’ll show you how to shuffle YouTube playlists on PCs, phones, and TVs. So, keep reading to start randomizing your YouTube playlist to mix up your music or video collection!
How To Shuffle YouTube Playlist On PCs/Phones/TVs?
Whether it’s a mix of our favorite songs, a set of dance videos to help get us through our workout, or a compilation of cat videos that never fail to make us smile, we all have that one go-to playlist we want to listen to over and over again.
But sometimes, even our favorite playlist can feel a little stale. That’s when it’s time to shuffle things up and give the playlist a fresh new feel.
To help you with this, we’ve provided step-by-step tutorials to help you shuffle Youtube playlists on your computer, phone, or Smart TV without having much trouble.
Part 1. How to Shuffle YouTube Playlist on PC?
Here is the step-by-step guide that can help you quickly shuffle your YouTube playlist on your PC, whether it’s before playback while watching, or from the Library:
How To Shuffle the Playlist Before Playlist Playback
The following is a quick rundown of the steps you need to take to shuffle the playlist before playback:
Step 1: First, open a browser on your PC to visit the YouTubewebsite and log in to your account using your credentials.
Step 2: Now, click the “Menu” (hamburger) icon on the top left of the YouTube home page and select your playlist from the menu.

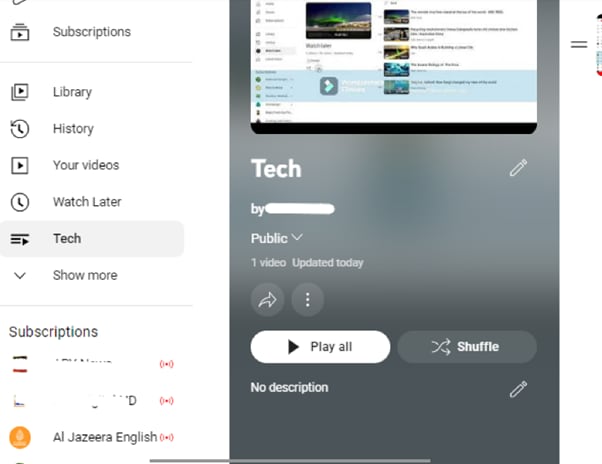
Step 3: On the next page, click the “Shuffle” button next to the “Play All” option in the playlist details section to randomize your YouTube playlist.
That’s about it! Your videos/songs will now play in random order.
How To Shuffle The Playlist While Listening
To learn how to shuffle a YouTube playlist while listening to your favorite songs, do the following steps in sequence:
Step 1: Launch your preferred browser on your PC and head to the “YouTube” homepage.
Step 2: Now, use the search icon to find your favorite song’s playlist or choose from the left “Menu” panel, and click “Play All” to listen to the music.
Step 3: When you start playing, you’ll find your playlist next to the video player. Click the crisscrossed arrows “Shuffle” icon below the playlist title, and the songs will start playing randomly instead of in proper order.

How To Shuffle The Playlist In the Library
If you want to randomize your YouTube playlist in the library section, follow these step-by-step instructions:
Step 1: In the first step, head to the YouTube website using your preferred browser on the PC and sign in to your account.
Step 2: Click the “Library” option from the left side panel on the YouTube homepage and scroll down to the “Playlists” section.
Step 3: In the next step, find your playlist and click the “View Full Playlist” option below. This will take you to the playlist page.
Step 4: Finally, on the playlist page, click the “Shuffle” option next to “Play All” in the details section. Now, when you start watching the videos in the playlist, they will play randomly.
Part 2. How To Shuffle YouTube Playlist On Handy?
It is possible to shuffle your YouTube playlist on your handy (iPhone or Android) with the following workarounds.
How To Shuffle The Playlist Before Playlist Playback/From Library
The following steps will help you shuffle your favorite playlists before playlist playback or from the Library:
Step 1: If the YouTube app is not installed on your phone, head to the “App Store “ or “GooglePlay Store “ and install the app.
Step 2: Now, launch the YouTube app on your handy and tap the “Library” option at the bottom right corner of the app’s home screen.
Step 3: Now, scroll down to the “Playlist” section and tap the playlist you want to shuffle. On the playlist screen, tap “Shuffle” next to the “Play All” option, and that’s it!

You can now enjoy your favorite videos and songs in a new order.
How To Shuffle The Playlist While Listening
To change the order of your favorite songs in the YouTube playlist while listening to it on your mobile device, do the following steps:
Step 1: First, open the “YouTube” app on your device and log into your account if you are not signed in already.
Step 2: On the app’s home screen, tap the “Search” bar, type the playlist name, and tap to open it to start listening to your favorite songs.
Step 3: You will find the playlist available under the video player. Simply tap the crisscrossed arrows “Shuffle” icon below the playlist’s title.

That’s all to it! Now you can enjoy your YouTube playlist in totally random order.
Part 3. How To Shuffle YouTube Playlist on TV?
The YouTube app is also available on smart TVs, which many people find to be a more enjoyable experience than watching YouTube videos on a small screen.
However, unfortunately, there is no way to shuffle a YouTube playlist on a Smart TV. This is a feature that is currently only available on the YouTube website and apps.
But if your Smart TV comes with a built-in Chromecast option, you can screen mirror the YouTube app on your TV and shuffle the playlist to your liking in the following way:
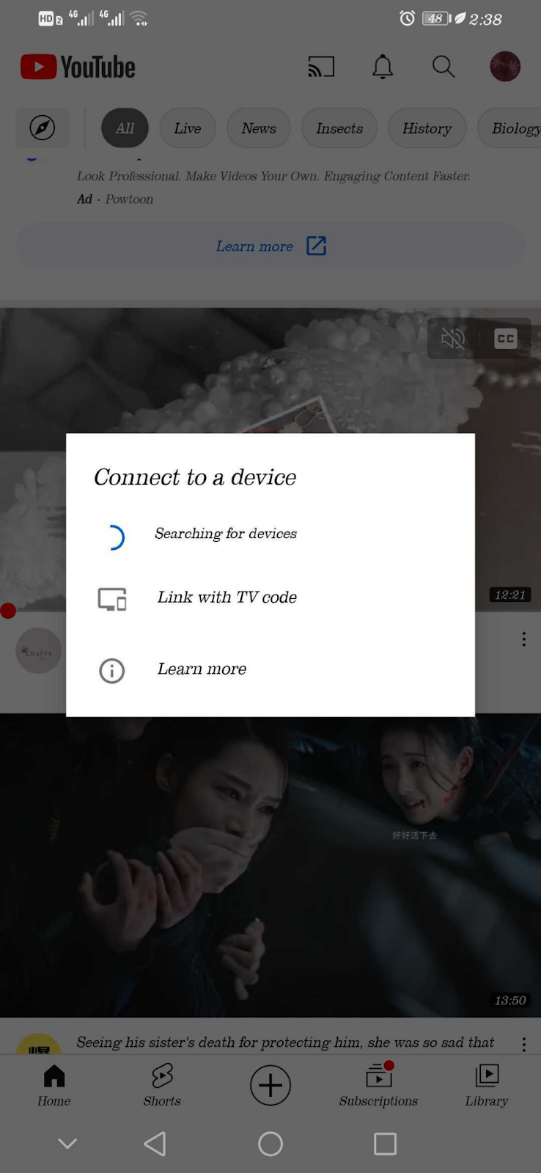
Step 1: In the first step, make sure your Smart TV and mobile device are connected to the same internet connection.
Step 2: In the next step, launch the YouTube app on your device, and access your playlist under the “Library” tab. Tap the “Shuffle” icon in the playlist details section and play your playlist
Step 3: In the final step, tap the “Cast” icon at the top-right of the screen and select your TV from the list to cast to.
Now you can enjoy randomly listen to your favorite songs on a more prominent display without getting bored.
Note:
You can also use other streaming devices like Firestick or Apple Airplay to cast YouTube on your Smart TV.
A Bouns Tip: How To Make a Music Video by Yourself?
We hope you have found appropriate solutions to shuffle your YouTube Playlist. Besides, supposing you are a music and YouTube lover, do you want to create videos with your favourite music? If yes, you can watch the video we have prepared for you. In this video, you will learn how to easily use a user-friendly video editor, Filmora, to make music videos!
In this comprehensive guide, we’ve provided a detailed step-by-step guide to show you how to shuffle YouTube playlists on your computer, mobile device, or Smart TV.
Hopefully, you’ve found this article informative and can now enjoy watching or listening to your favorite video/song in a random order in your YouTube playlist.
We often create playlists on YouTube for different moods, genres, and occasions, but you may want to change the order of the videos or songs in your list. This is where the shuffling feature can help you.
Shuffling your YouTube playlist is an excellent way to mix things up and play various videos or songs from different channels without manually selecting each one.
But if you don’t know how to use the “Shuffle” feature, we’ll show you how to shuffle YouTube playlists on PCs, phones, and TVs. So, keep reading to start randomizing your YouTube playlist to mix up your music or video collection!
How To Shuffle YouTube Playlist On PCs/Phones/TVs?
Whether it’s a mix of our favorite songs, a set of dance videos to help get us through our workout, or a compilation of cat videos that never fail to make us smile, we all have that one go-to playlist we want to listen to over and over again.
But sometimes, even our favorite playlist can feel a little stale. That’s when it’s time to shuffle things up and give the playlist a fresh new feel.
To help you with this, we’ve provided step-by-step tutorials to help you shuffle Youtube playlists on your computer, phone, or Smart TV without having much trouble.
Part 1. How to Shuffle YouTube Playlist on PC?
Here is the step-by-step guide that can help you quickly shuffle your YouTube playlist on your PC, whether it’s before playback while watching, or from the Library:
How To Shuffle the Playlist Before Playlist Playback
The following is a quick rundown of the steps you need to take to shuffle the playlist before playback:
Step 1: First, open a browser on your PC to visit the YouTubewebsite and log in to your account using your credentials.
Step 2: Now, click the “Menu” (hamburger) icon on the top left of the YouTube home page and select your playlist from the menu.
Step 3: On the next page, click the “Shuffle” button next to the “Play All” option in the playlist details section to randomize your YouTube playlist.
That’s about it! Your videos/songs will now play in random order.
How To Shuffle The Playlist While Listening
To learn how to shuffle a YouTube playlist while listening to your favorite songs, do the following steps in sequence:
Step 1: Launch your preferred browser on your PC and head to the “YouTube” homepage.
Step 2: Now, use the search icon to find your favorite song’s playlist or choose from the left “Menu” panel, and click “Play All” to listen to the music.
Step 3: When you start playing, you’ll find your playlist next to the video player. Click the crisscrossed arrows “Shuffle” icon below the playlist title, and the songs will start playing randomly instead of in proper order.
How To Shuffle The Playlist In the Library
If you want to randomize your YouTube playlist in the library section, follow these step-by-step instructions:
Step 1: In the first step, head to the YouTube website using your preferred browser on the PC and sign in to your account.
Step 2: Click the “Library” option from the left side panel on the YouTube homepage and scroll down to the “Playlists” section.
Step 3: In the next step, find your playlist and click the “View Full Playlist” option below. This will take you to the playlist page.
Step 4: Finally, on the playlist page, click the “Shuffle” option next to “Play All” in the details section. Now, when you start watching the videos in the playlist, they will play randomly.
Part 2. How To Shuffle YouTube Playlist On Handy?
It is possible to shuffle your YouTube playlist on your handy (iPhone or Android) with the following workarounds.
How To Shuffle The Playlist Before Playlist Playback/From Library
The following steps will help you shuffle your favorite playlists before playlist playback or from the Library:
Step 1: If the YouTube app is not installed on your phone, head to the “App Store “ or “GooglePlay Store “ and install the app.
Step 2: Now, launch the YouTube app on your handy and tap the “Library” option at the bottom right corner of the app’s home screen.
Step 3: Now, scroll down to the “Playlist” section and tap the playlist you want to shuffle. On the playlist screen, tap “Shuffle” next to the “Play All” option, and that’s it!
You can now enjoy your favorite videos and songs in a new order.
How To Shuffle The Playlist While Listening
To change the order of your favorite songs in the YouTube playlist while listening to it on your mobile device, do the following steps:
Step 1: First, open the “YouTube” app on your device and log into your account if you are not signed in already.
Step 2: On the app’s home screen, tap the “Search” bar, type the playlist name, and tap to open it to start listening to your favorite songs.
Step 3: You will find the playlist available under the video player. Simply tap the crisscrossed arrows “Shuffle” icon below the playlist’s title.
That’s all to it! Now you can enjoy your YouTube playlist in totally random order.
Part 3. How To Shuffle YouTube Playlist on TV?
The YouTube app is also available on smart TVs, which many people find to be a more enjoyable experience than watching YouTube videos on a small screen.
However, unfortunately, there is no way to shuffle a YouTube playlist on a Smart TV. This is a feature that is currently only available on the YouTube website and apps.
But if your Smart TV comes with a built-in Chromecast option, you can screen mirror the YouTube app on your TV and shuffle the playlist to your liking in the following way:
Step 1: In the first step, make sure your Smart TV and mobile device are connected to the same internet connection.
Step 2: In the next step, launch the YouTube app on your device, and access your playlist under the “Library” tab. Tap the “Shuffle” icon in the playlist details section and play your playlist
Step 3: In the final step, tap the “Cast” icon at the top-right of the screen and select your TV from the list to cast to.
Now you can enjoy randomly listen to your favorite songs on a more prominent display without getting bored.
Note:
You can also use other streaming devices like Firestick or Apple Airplay to cast YouTube on your Smart TV.
A Bouns Tip: How To Make a Music Video by Yourself?
We hope you have found appropriate solutions to shuffle your YouTube Playlist. Besides, supposing you are a music and YouTube lover, do you want to create videos with your favourite music? If yes, you can watch the video we have prepared for you. In this video, you will learn how to easily use a user-friendly video editor, Filmora, to make music videos!
In this comprehensive guide, we’ve provided a detailed step-by-step guide to show you how to shuffle YouTube playlists on your computer, mobile device, or Smart TV.
Hopefully, you’ve found this article informative and can now enjoy watching or listening to your favorite video/song in a random order in your YouTube playlist.
The Essential Guide for DIY GIF Makers: YouTube to Visual Storytelling
How to Create GIFs from YouTube Videos

Shanoon Cox
Mar 27, 2024• Proven solutions
Who doesn’t love Gifs? They are one of the most entertaining means to communicate on the internet. But have you tried creating a GIF from YouTube videos? Generally, GIFs use humorous or relevant scenes from movies or shows to make them relatable to the situation. If you’re someone who wants to create GIFs from YouTube, this is for you.
The article below will show you how to create GIFs from YouTube videos on the desktop computers and mobile devices with some free online GIF makers and apps.
Part 1: How to Create GIFs from a YouTube Video on the Computer?
1. FreeGifMAKER.me
FreeGifMaker is a simple online tool that allows the creation of animated Gifs free of cost. A minimum of two pictures has to be uploaded out of ten. It’s super easy and takes a couple of minutes to make a GIF from a YouTube video.
Find out how to create GIFs using FreeGifMaker.me using these steps.
- Open the website on your desktop by typing http://freegifmaker.me/youtube-to-gif/
- Go to YouTube and copy the URL of the video you want to make a GIF. Paste it on the above-mentioned website.
- Click on “Load YouTube Video” below the URL space and wait for a few seconds while the tool checks the video source.
- After the YouTube video is loaded, finally enter the gif duration, start time and click on the “Make a GIF button” and it will redirect you to the result page.
2. VEED.IO
VEED is another easy way to make GIFs from YouTube videos. VEED allows you to copy a YouTube video link of your choice and paste it on VEED without any difficulty. VEED not only creates GIFs from YouTube videos but also gives few more facilities like trimming, adding text, cropping to the clip which helps in creating super-cool GIFs. VEED has both free and Pro versions and is a perfect browser software.
How to use VEED only in 3 steps, know about it below:
- First, you need to copy the link to the YouTube video of your choice and paste it into VEED. From there the software will start importing the video into its project editor and you can start creating the GIF from there.
- For the editing part, you need to trim the part of the video in which you want to make the GIF and crop the GIF. You can easily do that by choosing the canvas size menu available. After that, you can add text, font style, color, and size to your GIF.
- In the last step, you just have to download the GIF which you have made in VEED.
3. Kapwing
Kapwing is a great stage for creating GIFs as well as videos and images. Kapwing is one of the most used and liked online video editors available. It provides one single step for all the things to do while creating a GIF – upload, editing, and sharing the file.
To create unique GIFs with Kapwing, follow these easy steps.
- First, you need to open Kapwing video editor and copy the URL of the YouTube video of your choice and paste it on Kapwing to create your GIF from the video. Any video which is shorter than 30 minutes and less than 500 MB is supported by Kapwing.
- Once you have uploaded the video, you will find the video appearing in the timeline. The section of the video that you want to make the GIF of needs to be cut with the sliders which are available at the end. A GIF can be usually of any length but to maintain good resolution, it is always advised to not make the segment more than 10 seconds.
- You can preview the GIF you created after trimming the video which will allow you to see how the final output would be like. Other edits such as cropping, adding text, and experimenting with the speed can be done on Kapwing as well.
- In the last and final step, you just need to export the GIF which you will find in the dropdown arrow available just beside the red “Export Video” button. Then click on the dropdown button and choose the option “Export as GIF”.
After processing the GIF, you need to save it by downloading it.
4. File-converter-online.com
This online free video editor can convert videos into GIF without any watermark and the maximum length of the GIF from the video clip can be 20 seconds, which can be set by you as needed. It provides a simple and free GIF maker that again offers special effects as well such as setting up the speed of the video.
You can create your desirable GIF from YouTube video in 3 easy steps.
- First, provide the specific link of the YouTube video which you want to create the GIF of in the space given.
- Apply the start time of the video by sliding with the given slider and then set the desirable duration of the GIF which is available in the next “Duration (seconds)” by sliding the seconds.
- Next, you can choose the speed of the video which is optional, and then set the resolution from higher to lower as per your choice.
- The final step involves creating the GIF which you can do by clicking on the red button “Create GIF from the video” available below the resolution option and finally the downloading will start after a short waiting on the next page.
5. Clideo
Clideo is one of the most reliable video converters available online. It can create an animated GIF from YouTube videos without much complication.
You can make GIF on your own by following the 3 easy steps mentioned below.
- First, you need to copy your YouTube video that you want to create a GIF with. Come back on Clideo and you will find a dropdown menu beside “Choose file”, there paste the link that you have copied earlier in the URL space. You can also select Google Drive or Dropbox for the same.
- After pasting the URL, you have to choose the ‘infinity sign’ given on the right side which will create an endless GIF without sound. Click on the ‘loop’ button available just below the panel on the right side.
- After completing the steps, you can watch the preview of the GIF and go back to editing if you need to change anything. Else save the output on your PC or Mobile phone.
Part 2: How to Make a GIF from a YouTube Video on the Android and iPhone?
1. GIF Toaster – GIF Maker
Gif Toaster is one of the video editing apps which makes the work of creating Gif from YouTube video super-easy. It can convert photos, panoramas and, videos into GIFs easily. You just need to download the app to make GIFs of your own choice.

You need to follow a few simple steps to create GIFs on your own.
- It is accessible on the iOS App Store and the Google Play for free so you need to install GIF Toaster on your device. Once done, tap the “Make GIF” option available below, you can also click “Combine GIFs” to combine more than one video. After completing, scroll down the dropdown menu beside “Video>GIF” and select the video which you want to convert into GIF.
- Once the selection is done, you will be provided with various options like “Basic Option”, “Direction Option”, “Effect Option” where you can control the playback speed, range along with other options available. You also get the option to choose “Filters” for making the GIF.
- After selecting the options of your choice, you have to scroll back to the top again and press “Convert” to quickly convert the video into GIF.
- Once the GIF is ready, you will be able to see the final result and you just need to ‘Save’ the file.
Part 3: Bonus: How to Create GIFS from YouTube video on iPhone without installing any app?
It is now possible to convert YouTube videos into GIFs by using the 5SecondsApp available for iOS. To make this possible you just require few things in your iPhone – the device should be iOS 11 or more, YouTube in the browser or app, and the 5SecondsApp already available in the App store.
First, you need to find a video that is not more than 10 seconds then begin the screen recording on the iOS recording feature and go back to YouTube to play the video and record the portion you need. To make the GIF you have to launch the app and tap the plus option there. Later, trim the video as you see fit. After you’re done, crop the video with the help of the crop tool and finally save it.
Part 4: Why Should You Use GIFs?
1. GIFs don’t prevent web pages from loading quickly
GIFs which are animated becomes more popular for any website as it gives meaning compacted in a small video the website uses to boost its chances of getting more views. While GIF does not make a website much slow but for better performance, it can be converted into lossy optimizations which do not make a huge difference in front of the human eyes or it can also be converted into HTML5 videos which makes the GIF 95% smaller in size.
2. GIF is an integral part of communicating on social media
Using GIFs makes any communication bright and friendly. It delivers great messages through short animated videos and has become the spotlight for communication in the past few years. Almost everyone using social media is using GIF for communicating with their friends and family.
Final Thoughts
There are many apps and video editors available today available free of cost. You can easily make GIFs from your most-liked video on YouTube. It is smooth to create GIFs on your own with the help of these editors mentioned above. Each one of them is having a free version and easy to handle so do not forget to try them next time you are making a GIF from YouTube videos.
Shanoon Cox
Shanoon Cox is a writer and a lover of all things video.
Follow @Shanoon Cox
Shanoon Cox
Mar 27, 2024• Proven solutions
Who doesn’t love Gifs? They are one of the most entertaining means to communicate on the internet. But have you tried creating a GIF from YouTube videos? Generally, GIFs use humorous or relevant scenes from movies or shows to make them relatable to the situation. If you’re someone who wants to create GIFs from YouTube, this is for you.
The article below will show you how to create GIFs from YouTube videos on the desktop computers and mobile devices with some free online GIF makers and apps.
Part 1: How to Create GIFs from a YouTube Video on the Computer?
1. FreeGifMAKER.me
FreeGifMaker is a simple online tool that allows the creation of animated Gifs free of cost. A minimum of two pictures has to be uploaded out of ten. It’s super easy and takes a couple of minutes to make a GIF from a YouTube video.
Find out how to create GIFs using FreeGifMaker.me using these steps.
- Open the website on your desktop by typing http://freegifmaker.me/youtube-to-gif/
- Go to YouTube and copy the URL of the video you want to make a GIF. Paste it on the above-mentioned website.
- Click on “Load YouTube Video” below the URL space and wait for a few seconds while the tool checks the video source.
- After the YouTube video is loaded, finally enter the gif duration, start time and click on the “Make a GIF button” and it will redirect you to the result page.
2. VEED.IO
VEED is another easy way to make GIFs from YouTube videos. VEED allows you to copy a YouTube video link of your choice and paste it on VEED without any difficulty. VEED not only creates GIFs from YouTube videos but also gives few more facilities like trimming, adding text, cropping to the clip which helps in creating super-cool GIFs. VEED has both free and Pro versions and is a perfect browser software.
How to use VEED only in 3 steps, know about it below:
- First, you need to copy the link to the YouTube video of your choice and paste it into VEED. From there the software will start importing the video into its project editor and you can start creating the GIF from there.
- For the editing part, you need to trim the part of the video in which you want to make the GIF and crop the GIF. You can easily do that by choosing the canvas size menu available. After that, you can add text, font style, color, and size to your GIF.
- In the last step, you just have to download the GIF which you have made in VEED.
3. Kapwing
Kapwing is a great stage for creating GIFs as well as videos and images. Kapwing is one of the most used and liked online video editors available. It provides one single step for all the things to do while creating a GIF – upload, editing, and sharing the file.
To create unique GIFs with Kapwing, follow these easy steps.
- First, you need to open Kapwing video editor and copy the URL of the YouTube video of your choice and paste it on Kapwing to create your GIF from the video. Any video which is shorter than 30 minutes and less than 500 MB is supported by Kapwing.
- Once you have uploaded the video, you will find the video appearing in the timeline. The section of the video that you want to make the GIF of needs to be cut with the sliders which are available at the end. A GIF can be usually of any length but to maintain good resolution, it is always advised to not make the segment more than 10 seconds.
- You can preview the GIF you created after trimming the video which will allow you to see how the final output would be like. Other edits such as cropping, adding text, and experimenting with the speed can be done on Kapwing as well.
- In the last and final step, you just need to export the GIF which you will find in the dropdown arrow available just beside the red “Export Video” button. Then click on the dropdown button and choose the option “Export as GIF”.
After processing the GIF, you need to save it by downloading it.
4. File-converter-online.com
This online free video editor can convert videos into GIF without any watermark and the maximum length of the GIF from the video clip can be 20 seconds, which can be set by you as needed. It provides a simple and free GIF maker that again offers special effects as well such as setting up the speed of the video.
You can create your desirable GIF from YouTube video in 3 easy steps.
- First, provide the specific link of the YouTube video which you want to create the GIF of in the space given.
- Apply the start time of the video by sliding with the given slider and then set the desirable duration of the GIF which is available in the next “Duration (seconds)” by sliding the seconds.
- Next, you can choose the speed of the video which is optional, and then set the resolution from higher to lower as per your choice.
- The final step involves creating the GIF which you can do by clicking on the red button “Create GIF from the video” available below the resolution option and finally the downloading will start after a short waiting on the next page.
5. Clideo
Clideo is one of the most reliable video converters available online. It can create an animated GIF from YouTube videos without much complication.
You can make GIF on your own by following the 3 easy steps mentioned below.
- First, you need to copy your YouTube video that you want to create a GIF with. Come back on Clideo and you will find a dropdown menu beside “Choose file”, there paste the link that you have copied earlier in the URL space. You can also select Google Drive or Dropbox for the same.
- After pasting the URL, you have to choose the ‘infinity sign’ given on the right side which will create an endless GIF without sound. Click on the ‘loop’ button available just below the panel on the right side.
- After completing the steps, you can watch the preview of the GIF and go back to editing if you need to change anything. Else save the output on your PC or Mobile phone.
Part 2: How to Make a GIF from a YouTube Video on the Android and iPhone?
1. GIF Toaster – GIF Maker
Gif Toaster is one of the video editing apps which makes the work of creating Gif from YouTube video super-easy. It can convert photos, panoramas and, videos into GIFs easily. You just need to download the app to make GIFs of your own choice.
You need to follow a few simple steps to create GIFs on your own.
- It is accessible on the iOS App Store and the Google Play for free so you need to install GIF Toaster on your device. Once done, tap the “Make GIF” option available below, you can also click “Combine GIFs” to combine more than one video. After completing, scroll down the dropdown menu beside “Video>GIF” and select the video which you want to convert into GIF.
- Once the selection is done, you will be provided with various options like “Basic Option”, “Direction Option”, “Effect Option” where you can control the playback speed, range along with other options available. You also get the option to choose “Filters” for making the GIF.
- After selecting the options of your choice, you have to scroll back to the top again and press “Convert” to quickly convert the video into GIF.
- Once the GIF is ready, you will be able to see the final result and you just need to ‘Save’ the file.
Part 3: Bonus: How to Create GIFS from YouTube video on iPhone without installing any app?
It is now possible to convert YouTube videos into GIFs by using the 5SecondsApp available for iOS. To make this possible you just require few things in your iPhone – the device should be iOS 11 or more, YouTube in the browser or app, and the 5SecondsApp already available in the App store.
First, you need to find a video that is not more than 10 seconds then begin the screen recording on the iOS recording feature and go back to YouTube to play the video and record the portion you need. To make the GIF you have to launch the app and tap the plus option there. Later, trim the video as you see fit. After you’re done, crop the video with the help of the crop tool and finally save it.
Part 4: Why Should You Use GIFs?
1. GIFs don’t prevent web pages from loading quickly
GIFs which are animated becomes more popular for any website as it gives meaning compacted in a small video the website uses to boost its chances of getting more views. While GIF does not make a website much slow but for better performance, it can be converted into lossy optimizations which do not make a huge difference in front of the human eyes or it can also be converted into HTML5 videos which makes the GIF 95% smaller in size.
2. GIF is an integral part of communicating on social media
Using GIFs makes any communication bright and friendly. It delivers great messages through short animated videos and has become the spotlight for communication in the past few years. Almost everyone using social media is using GIF for communicating with their friends and family.
Final Thoughts
There are many apps and video editors available today available free of cost. You can easily make GIFs from your most-liked video on YouTube. It is smooth to create GIFs on your own with the help of these editors mentioned above. Each one of them is having a free version and easy to handle so do not forget to try them next time you are making a GIF from YouTube videos.
Shanoon Cox
Shanoon Cox is a writer and a lover of all things video.
Follow @Shanoon Cox
Also read:
- Top 5 YouTube Video Editor Alternatives
- Key 10 Acoustic Amplifiers for Android, iOS
- 2024 Approved Breaking Free From the Static of ZERO Views on YouTube Videos
- Parody Playground Top 10 Laugh-Out-Loud Songs
- [New] Discover How to Craft Videos Flawlessly in 8 Tools
- Tricks to Automate iPhone Video Loops
- In 2024, Deciphering the Best YouTube Video Trackers for Success
- 2024 Approved Boosting Yield Strategies for Successful Money-Making on Mobile YouTube
- 2024 Approved Elevate Engagement - Discover These Top 12 Techniques for Video Success
- [New] Discovering Top 10 Must-Watch Business Video Hubs
- Fine-Tune YouTube Video Pacing - Desktop/Mobile
- Streaming Success Choose the Right Stabilizer Brand
- [Updated] Boredom Be Gone Find Joy with These Top 15 Humorists
- Achieve Optimum Stability Incorrances for Tripods in Vlog Shoots for 2024
- Best Tales for YouTube Triumph Top 3 Strategies
- [New] Dissecting Top-Viewed Video Dynamics on YouTube
- [Updated] Dive Deep Into the World of Creator Studio
- From Novice to Pro Simplified YouTube Live Streaming with OBS
- 2024 Approved Elevate Your YouTube Presence with Custom Animated Subscription Buttons in Filmora
- [New] Behind the Scenes Creating Successful YouTube Shorts Videos
- [Updated] Enhance Branding The Ultimate Guide to Custom URLs for YouTube
- Perfect Thumbnail Size for Click-Through Rates
- [Updated] Become a Shorts Connoisseur Must-Know Facts
- Become a Freelance Transcriber Tips and Tricks for YouTube Content for 2024
- In 2024, Android-Centric Top Downloads for YouTube Videos Explored
- In 2024, 5 Innovative Strategies for Crafting YouTube Titles & Tags
- [Updated] CarryMinati's Income Blueprint Journey Through 2023
- 5 Ways to Restart Poco C50 Without Power Button | Dr.fone
- In 2024, Top 10 Password Cracking Tools For Infinix Note 30 VIP
- Ultimate Guide to Free PPTP VPN For Beginners On Vivo Y27s | Dr.fone
- Fix Unfortunately Settings Has Stopped on Honor Magic 6 Lite Quickly | Dr.fone
- [New] In 2024, 8 Techniques for High-Quality PC Audio Documentation
- [New] Dining Dynamics Hot Recipe Vlogs on TikTok
- How to Reset Samsung Galaxy F04 without Losing Data | Dr.fone
- Hard Reset Vivo S17e in 3 Efficient Ways | Dr.fone
- Easy Guide How To Bypass Realme C53 FRP Android 10/11/12/13
- [Updated] 2024'S Premier Camcorder Picks – Thorough Reviews
- In 2024, Azure Speech-to-Text Your Ultimate Development Toolkit
- [New] 2024 Approved Tips for Creating a Viral Buzz on Facebook that You Should Know
- In 2024, Assessing Different Versions Available for Windows Movie Maker
- In 2024, Asus's ProArt PA 329Q – An Elite Professional 4K Display Examination
- Best Android Data Recovery - undelete lost call logs from Itel
- New Online Video Editors Compatible with Chromebooks 2023 Review
- Undo History Rewinding Videos on Apple Devices
- Pinnacle Avi Player Mobile & Desktop Excellence
- Updated It Is Easy to Separate the Audio From the Video in DaVinci Resolve. But, to Avail of This Feature, You Need to Follow Proper Steps, and This Article Is All About It
- 2024 Approved How to Use LUTs in Lumafusion & Free Resource
- Unleash the Power of Live Captures An Introduction to Vimeo Record
- How to Unlock Vivo V29 Phone with Broken Screen
- [New] 2024 Approved Unleash Power in Social Media 10 Advanced Tactics for FB Optimization
- A Complete Guide To OEM Unlocking on Tecno Spark 10C
- In 2024, 10 Easy-to-Use FRP Bypass Tools for Unlocking Google Accounts On Vivo Y100i Power 5G
- Discover Your Ideal Drawing Tool Chromebook's Finest List
- Title: An Owner's Guide to Playlist Permutations in YT
- Author: Kevin
- Created at : 2024-05-25 14:39:01
- Updated at : 2024-05-26 14:39:01
- Link: https://youtube-videos.techidaily.com/an-owners-guide-to-playlist-permutations-in-yt/
- License: This work is licensed under CC BY-NC-SA 4.0.
