
"Adding Vibrancy Easy YouTube Subscribe Animations with Filmora for 2024"
Adding Vibrancy: Easy YouTube Subscribe Animations with Filmora
How to Make Your YouTube Animated Subscribe Button Easily With Filmora

Richard Bennett
Mar 27, 2024• Proven solutions
The main goal of every content creator is to increase its audience to expand its reach and views. To do so, it’s essential to provide something unique and different to the viewer. Without providing them the content they are looking for, it is impossible to grow your channel and reach. Once your content is ready and you are getting many views, it is essential to make these potential viewers your permanent viewers. The animated subscribe button will help you achieve this goal. While your viewers are watching your videos, you must remind them about subscribing to your channel for receiving such incredible content in the future. Subscribe animation plays a vital role in converting your viewers into subscribers.
There are so many platforms on the internet from where you can get Youtube subscribe button animation free, and you can also purchase these subscribe png gifs. But creating your own animated subscribe button can make you stand out from the crowd and make your videos unique and exclusive. Because it enables you to design it the way you want according to your brand, so, let’s create your own subscribe animation using Wondershare Filmora .
Step-By-Step guide
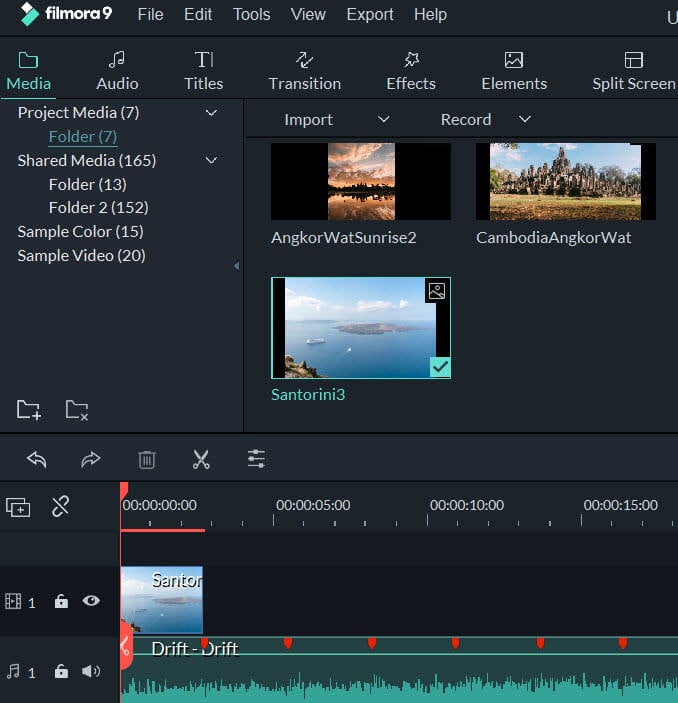
Step 1: To get started,open Filmora X. On your upper left corner, click on the “Sample Colors,” select the Green color and drag it to Video Track into the timeline. We are using a Green background to easily remove it using the green screen feature in Filmora to use it in our future projects after exporting it, without creating it again. Adjust the duration of this track according to your requirement. In my case, I am trying to make an animated subscribe button of 5 seconds.
Step 2: Lock this track by clicking on the lock icon to work on subscribe animation without disturbing the background easily.
Step 3: Now it’s time to design the subscribe png gif. Go to the Sample colors again and drag the red color into the time above the green background.
Step 4: Double click on the red color in the timeline and adjust its size. Make it look like a subscribe button that is a rectangle and place it at the bottom center of the background. You can put it anywhere you want it to appear in your future videos.
Step 5: Now, let’s add Subscribe text into the button. Go to the Title and select any style that you like. “Basic 6” will work perfectly fine for this purpose. Drag and drop it into the timeline above all tracks.
Step 6: Double click on the Title on the timeline and edit it with “Subscribe” and place it under the red rectangle and click OK.
Step 7: We have put a cursor that can click on the animated subscribe button. You can use Google Search to find a transparent cursor. Make sure to save it in png format. Download it and import it into Filmora.
Step 8: Drag and drop the cursor into the timeline and place it above all the other three tracks to make it prominent. Adjust the size of the cursor place it on the Subscribe button where you want it to appear.
Step 9: Now, it’s time to animate the design using keyframes. First of all, let’s animate the red rectangle. Double click on the red color on the timeline. Go to the ‘Animation’ tab and then click ‘Customize.’ Move to the 1 second in the timeline and click ‘Add.’
Step 10: Now go back to the beginning in the timeline and adjust the scale to 0%. It will make the rectangle pop up when you play the clip.
Step 11: Text needs to be animated as well to match it with the rectangle. Double click on the text in the timeline and click ‘ADVANCED.’
Step 12: In this Advance text editor, go to the ‘Animation’ tab and select any animation that you like. On the timeline under the preview screen, adjusts the dark areas according to the time you set on the rectangle, which was 1 second. We want the text to appear on the screen in 1 second, like the rectangle. Also, adjust the ending time when you want the text to disappear again. We have set it on 4 seconds. Which means it will start to fade after 4 seconds.
Step 13: Now, to animate the mouse cursor, we will use the same process we used for a rectangle that is key framing. Double click on the cursor track on the timeline and move the time on your timeline to a point when you want the cursor to appear. Now add a key frame by clicking ‘Add’.
Step 14: Now jump back to a point in your timeline, when the cursor will start appearing from outside the screen. Move the cursor outside the screen from where you want it to start moving toward the subscribe animation.
Step 15: To animate the click of the cursor, move ahead a little bit into your timeline and scale down the cursor to around 70%. Move it a little further and scale it up to 100%.
Step 16: You can add the sound of mouse click to make it more realistic. You can find this sound anywhere on the internet. Download it and import it into Filmora. Now place it into the timeline where it can match the movement of the cursor.
Step 17: Now it’s time to make this subscribe animation button disappear. Move forward into the time to the end, at around 4 seconds. Double click on the red button in the timeline and add a key frame at its actual scale.
Step 18: After that, move further in the timeline to the end and make its scale 0. It will make it disappear.
Step 19: Do the same with the cursor. Double click on the cursor in the time and add a key frame at its actual position.
Step 20: Move ahead when you want it to disappear. Move the cursor out of the screen and click ‘OK’.
Step 21: Your Subscribe png gif is ready to be exported and used in your videos. Click on export and choose from various formats and options to choose from while exporting it.
You may also like: How to Get People to Subscribe Channel
Conclusion:Your own Animated Subscribe Button is ready to be used in your future videos and projects. This is a ready-to-use subscribe button that can be easily used using the green screen effect in Filmora. Just import the clip, remove the green screen, and you are good to go. You can also customize this Subscribe Animation using your channel and more. Keep experimenting with new things using Filmora.


Richard Bennett
Richard Bennett is a writer and a lover of all things video.
Follow @Richard Bennett
Richard Bennett
Mar 27, 2024• Proven solutions
The main goal of every content creator is to increase its audience to expand its reach and views. To do so, it’s essential to provide something unique and different to the viewer. Without providing them the content they are looking for, it is impossible to grow your channel and reach. Once your content is ready and you are getting many views, it is essential to make these potential viewers your permanent viewers. The animated subscribe button will help you achieve this goal. While your viewers are watching your videos, you must remind them about subscribing to your channel for receiving such incredible content in the future. Subscribe animation plays a vital role in converting your viewers into subscribers.
There are so many platforms on the internet from where you can get Youtube subscribe button animation free, and you can also purchase these subscribe png gifs. But creating your own animated subscribe button can make you stand out from the crowd and make your videos unique and exclusive. Because it enables you to design it the way you want according to your brand, so, let’s create your own subscribe animation using Wondershare Filmora .
Step-By-Step guide
Step 1: To get started,open Filmora X. On your upper left corner, click on the “Sample Colors,” select the Green color and drag it to Video Track into the timeline. We are using a Green background to easily remove it using the green screen feature in Filmora to use it in our future projects after exporting it, without creating it again. Adjust the duration of this track according to your requirement. In my case, I am trying to make an animated subscribe button of 5 seconds.
Step 2: Lock this track by clicking on the lock icon to work on subscribe animation without disturbing the background easily.
Step 3: Now it’s time to design the subscribe png gif. Go to the Sample colors again and drag the red color into the time above the green background.
Step 4: Double click on the red color in the timeline and adjust its size. Make it look like a subscribe button that is a rectangle and place it at the bottom center of the background. You can put it anywhere you want it to appear in your future videos.
Step 5: Now, let’s add Subscribe text into the button. Go to the Title and select any style that you like. “Basic 6” will work perfectly fine for this purpose. Drag and drop it into the timeline above all tracks.
Step 6: Double click on the Title on the timeline and edit it with “Subscribe” and place it under the red rectangle and click OK.
Step 7: We have put a cursor that can click on the animated subscribe button. You can use Google Search to find a transparent cursor. Make sure to save it in png format. Download it and import it into Filmora.
Step 8: Drag and drop the cursor into the timeline and place it above all the other three tracks to make it prominent. Adjust the size of the cursor place it on the Subscribe button where you want it to appear.
Step 9: Now, it’s time to animate the design using keyframes. First of all, let’s animate the red rectangle. Double click on the red color on the timeline. Go to the ‘Animation’ tab and then click ‘Customize.’ Move to the 1 second in the timeline and click ‘Add.’
Step 10: Now go back to the beginning in the timeline and adjust the scale to 0%. It will make the rectangle pop up when you play the clip.
Step 11: Text needs to be animated as well to match it with the rectangle. Double click on the text in the timeline and click ‘ADVANCED.’
Step 12: In this Advance text editor, go to the ‘Animation’ tab and select any animation that you like. On the timeline under the preview screen, adjusts the dark areas according to the time you set on the rectangle, which was 1 second. We want the text to appear on the screen in 1 second, like the rectangle. Also, adjust the ending time when you want the text to disappear again. We have set it on 4 seconds. Which means it will start to fade after 4 seconds.
Step 13: Now, to animate the mouse cursor, we will use the same process we used for a rectangle that is key framing. Double click on the cursor track on the timeline and move the time on your timeline to a point when you want the cursor to appear. Now add a key frame by clicking ‘Add’.
Step 14: Now jump back to a point in your timeline, when the cursor will start appearing from outside the screen. Move the cursor outside the screen from where you want it to start moving toward the subscribe animation.
Step 15: To animate the click of the cursor, move ahead a little bit into your timeline and scale down the cursor to around 70%. Move it a little further and scale it up to 100%.
Step 16: You can add the sound of mouse click to make it more realistic. You can find this sound anywhere on the internet. Download it and import it into Filmora. Now place it into the timeline where it can match the movement of the cursor.
Step 17: Now it’s time to make this subscribe animation button disappear. Move forward into the time to the end, at around 4 seconds. Double click on the red button in the timeline and add a key frame at its actual scale.
Step 18: After that, move further in the timeline to the end and make its scale 0. It will make it disappear.
Step 19: Do the same with the cursor. Double click on the cursor in the time and add a key frame at its actual position.
Step 20: Move ahead when you want it to disappear. Move the cursor out of the screen and click ‘OK’.
Step 21: Your Subscribe png gif is ready to be exported and used in your videos. Click on export and choose from various formats and options to choose from while exporting it.
You may also like: How to Get People to Subscribe Channel
Conclusion:Your own Animated Subscribe Button is ready to be used in your future videos and projects. This is a ready-to-use subscribe button that can be easily used using the green screen effect in Filmora. Just import the clip, remove the green screen, and you are good to go. You can also customize this Subscribe Animation using your channel and more. Keep experimenting with new things using Filmora.
Richard Bennett
Richard Bennett is a writer and a lover of all things video.
Follow @Richard Bennett
Easy MP3 Conversion: From MP3 Files to YouTube Videos [3 Ways]
MP3 to YouTube Converter: Upload MP3 to YouTube
Richard Bennett
Mar 27, 2024• Proven solutions
Latest survey shows that Google’s video streaming site Youtube has surpassed radio, as well as CDs to be the most popular way American adolescents listen to music. Almost 91% of the music fans would listen to the samples before they purchase a song on iTunes. “Watching” music is getting more and more popular with Youtube’s arising popularity among music fans.
However, here comes the dilemma if you are trying to share your favorite music list with your friends on Youtube since Youtube is not designed to host files that are purely audio. Only video files are allowed to be uploaded to its server. Despite all this, is there a safe and easy solution to this issue? The answer if absolutely Yes! Wondershare audio converter let you upload an MP3 to Youtube by converting them to videos files first without losing any of its quality, helping you remove the barrier of uploading audio files to Youtube.
With it, you can not only add pictures to your MP3 files but also retouch them with various fantastic effects. Now follow the steps below to check out how to achieve it.
1 Import Files to Audio Converter
Before upload MP3 to YouTube, you can collect the relevant image, album cover or band picture to your music. Then run this MP3 to YouTube converter and choose 16:9 or 4:3 ratio according to your needs. After that, click “Import” to add the MP3 file and the pictures to the program. Then all the imported files will be displayed as thumbnails in the Media library.
2 Add Pictures to MP3 Files
Drag and drop your MP3 file to the music layer, and the picture to the video layer. These will be located under the timeline bar. Then choose the picture and move your mouse to expand the picture exposure time frame exactly as long as your MP3 file. If less, the remaining part will be blacked out, while too long will create silence in the overextended portions of the video.
If you want to add and show multiple pictures at a time for a single MP3 file, drag-n-drop them to the PIP layers. This MP3 to YouTube converter supports up to 10 pictures for the same MP3 file. Then adjust the position and size of each picture. You can also do more touch up to your creation. For example, you can right click and choose edit to add motion, mask and more effects as you like.
3 Directly Upload MP3s to YouTube
Watch and check the audio quality of your video. When you are satisfied, click “Create” and switch to the YouTube tab. Enter your YouTube Account, Password and related MP3 information to directly upload your works to YouTube.

Tip:
Besides uploading to YouTube, you can also save your creation to various formats and play on different devices or burn to DVD.
See, it’s easy convert MP3 to YouTube using this powerful video editing tool. Download and have a try now!
Richard Bennett
Richard Bennett is a writer and a lover of all things video.
Follow @Richard Bennett
Richard Bennett
Mar 27, 2024• Proven solutions
Latest survey shows that Google’s video streaming site Youtube has surpassed radio, as well as CDs to be the most popular way American adolescents listen to music. Almost 91% of the music fans would listen to the samples before they purchase a song on iTunes. “Watching” music is getting more and more popular with Youtube’s arising popularity among music fans.
However, here comes the dilemma if you are trying to share your favorite music list with your friends on Youtube since Youtube is not designed to host files that are purely audio. Only video files are allowed to be uploaded to its server. Despite all this, is there a safe and easy solution to this issue? The answer if absolutely Yes! Wondershare audio converter let you upload an MP3 to Youtube by converting them to videos files first without losing any of its quality, helping you remove the barrier of uploading audio files to Youtube.
With it, you can not only add pictures to your MP3 files but also retouch them with various fantastic effects. Now follow the steps below to check out how to achieve it.
1 Import Files to Audio Converter
Before upload MP3 to YouTube, you can collect the relevant image, album cover or band picture to your music. Then run this MP3 to YouTube converter and choose 16:9 or 4:3 ratio according to your needs. After that, click “Import” to add the MP3 file and the pictures to the program. Then all the imported files will be displayed as thumbnails in the Media library.
2 Add Pictures to MP3 Files
Drag and drop your MP3 file to the music layer, and the picture to the video layer. These will be located under the timeline bar. Then choose the picture and move your mouse to expand the picture exposure time frame exactly as long as your MP3 file. If less, the remaining part will be blacked out, while too long will create silence in the overextended portions of the video.
If you want to add and show multiple pictures at a time for a single MP3 file, drag-n-drop them to the PIP layers. This MP3 to YouTube converter supports up to 10 pictures for the same MP3 file. Then adjust the position and size of each picture. You can also do more touch up to your creation. For example, you can right click and choose edit to add motion, mask and more effects as you like.
3 Directly Upload MP3s to YouTube
Watch and check the audio quality of your video. When you are satisfied, click “Create” and switch to the YouTube tab. Enter your YouTube Account, Password and related MP3 information to directly upload your works to YouTube.
Tip:
Besides uploading to YouTube, you can also save your creation to various formats and play on different devices or burn to DVD.
See, it’s easy convert MP3 to YouTube using this powerful video editing tool. Download and have a try now!
Richard Bennett
Richard Bennett is a writer and a lover of all things video.
Follow @Richard Bennett
Also read:
- [New] Earning Strategies for Successful Youtube Shorts Must-Haves, Earnings Prospects
- [Updated] DIY Dynamics Unlock Creative Animation Potential
- [Updated] Enhancing Viewers' Interest with Innovative Valorant Thumbnail Ideas
- [Updated] Online Aggregators for Securing Affiliates on Google's Platform
- [Updated] Seamless Streaming, Smarter Storing Top 51 Exclusive Android Mobile Video Trimming Software
- 2024 Approved Revolutionize Your Memes with These 7 Top GIF Creation Techniques
- Broadview Networks Navigating MCN Choices for 2024
- Does Recording Your Viewed YouTube Content Violate Laws, In 2024
- Effortless Techniques for Capturing Visuals in PS4 Games
- Essential Guide Pro Audio Recording in Audacity
- Grab the Cheapest Apple Watch Series N9 Ever! Special Offer Ends Soon, Don't Miss Out | ZDNET.
- How to See Someones Location on Apple iPhone 11 Pro Max | Dr.fone
- In 2024, Prank Your Friends! Easy Ways to Fake and Share Google Maps Location On Tecno Pova 5 Pro | Dr.fone
- Savvy Sponsorship Strategies for Small-Scale Sites
- Step-by-Step Fix: Dealing with Freeze Frames While Playing Fallout 4 on Desktop
- Ultimate Movie Watchlists Streamlining Screen Time
- Title: Adding Vibrancy Easy YouTube Subscribe Animations with Filmora for 2024
- Author: Kevin
- Created at : 2025-02-18 16:10:07
- Updated at : 2025-02-20 18:05:37
- Link: https://youtube-videos.techidaily.com/adding-vibrancy-easy-youtube-subscribe-animations-with-filmora-for-2024/
- License: This work is licensed under CC BY-NC-SA 4.0.