A Vlogger's Guide To Camera Lenses

Mastering Shots: A Vlogger’s Lens Compendium
A Vlogger’s Guide To Camera Lenses

Richard Bennett
Nov 01, 2022• Proven solutions
The staple of any vlog is the talking headshot, a shot of the speaker talking directly to the audience. You can compose this shot with different kinds of lenses for your interchangeable lens camera.
But which kind of lens is the right lens for you as a vlogger?
In this article, I’m going to help you figure that out.
- Part 1: Three Focal Length Groups: Wide, Standard, Telephoto
- Part 2: Vlogging With Each Focal Length Group
- Part 3: Crop Factor
- Part 4: Focal Length Equivalency Table
- Part 5: Aperture
- Part 6: Vlogging With a Fast Lens
- Part 7: Optical Image Stabilization
Three Focal Length Groups: Wide, Standard, Telephoto
There are three main ranges in focal lengths that camera lenses can be categorized into wide, standard, and telephoto.
Wide-Angle Lens
Wide-angle lenses can “see more.” They allow more of your scene to fit inside your frame. Objects that are closer to the lens appear much bigger while objects that are further away appear even smaller. Perspectives are also enhanced, making close objects and people that just make it into the sides of the frame appear more stretched out. Out of all the other ranges in focal lengths, wide-angle lenses will appear the least zoomed in.
Standard Lens
With standard lenses or normal lenses, you won’t get the stretched out objects or enhanced perspectives that you get from wide-angle lenses. Instead, standard lenses are meant to see scenes as the natural human eye is meant to see them. If you shoot a scene with both a wide-angle lens and a standard lens from the same position, you’ll notice that less of the scene fits into your frame. Standard lenses will appear more zoomed-in than wide-angle lenses, but less zoomed-in than telephoto lenses.
Telephoto Lens
Out of all the other ranges in focal lengths, telephoto lenses will appear the most zoomed in. This can be beneficial for the shooter who wants to get a closer shot of a scene without having to physically be in close proximity to the scene. Objects that are further away in the background also appear larger and closer than they would appear on wide-angle or standard lenses.
Vlogging With Each Focal Length Group
You can get your talking head footage using lenses from any of the three focal length groups. Depending on how you plan to vlog most of the time, though, one of the three focal lengths might be more suitable for you.
When to vlog with a wide-angle lens
Wide-angle lenses are the most commonly used lenses for vlogging. Wide-angle lenses are great when you need to be close to your camera. This might be the case for you if your recording space is small or if you want to film yourself as you hold your camera up with your own hand.
Being close to your camera not only gives you the option to use your camera’s built-in microphone, but it also gives you the option to make use of camera-mounted shotgun microphones.
When to vlog with a standard lens
Standard lenses are great when you have more space to be further away from your camera. The perspectives in your shot will look more natural through a standard lens, making your talking head footage feel more corporate or professional. You’ll also be able to get blurrier backgrounds using a standard lens versus a wide-angle lens.
Being further away from your camera, however, means that you’ll have to use a separate microphone positioned closer to you.
When to vlog with a telephoto lens
As telephoto lenses are even more zoomed in, you’ll need to be even further away from your camera to fit yourself inside your camera frame. Why would any vlogger ever need to be that far away from their camera? One word… teleprompter. If you want or need to stick to a script, you’ll have to be far away enough from your camera that it doesn’t appear like your eyes are scanning left to right. You then close in the distance with a telephoto lens.
In the above video, Marcos Rocha compares different focal lengths for talking head videos. Which focal length range do you like the look of?
Crop Factor
Focal lengths in camera lenses are measured in millimeters. You can vlog yourself handheld with a 24mm lens on a camera with a full-frame sensor (the sensor is the piece of hardware inside your camera that turns the light it receives into a digital image). But if you use a 24mm lens on a camera with a smaller sensor, like an APS-C sensor or even smaller Micro 4/3 sensor, more of you will get cropped out (see below).
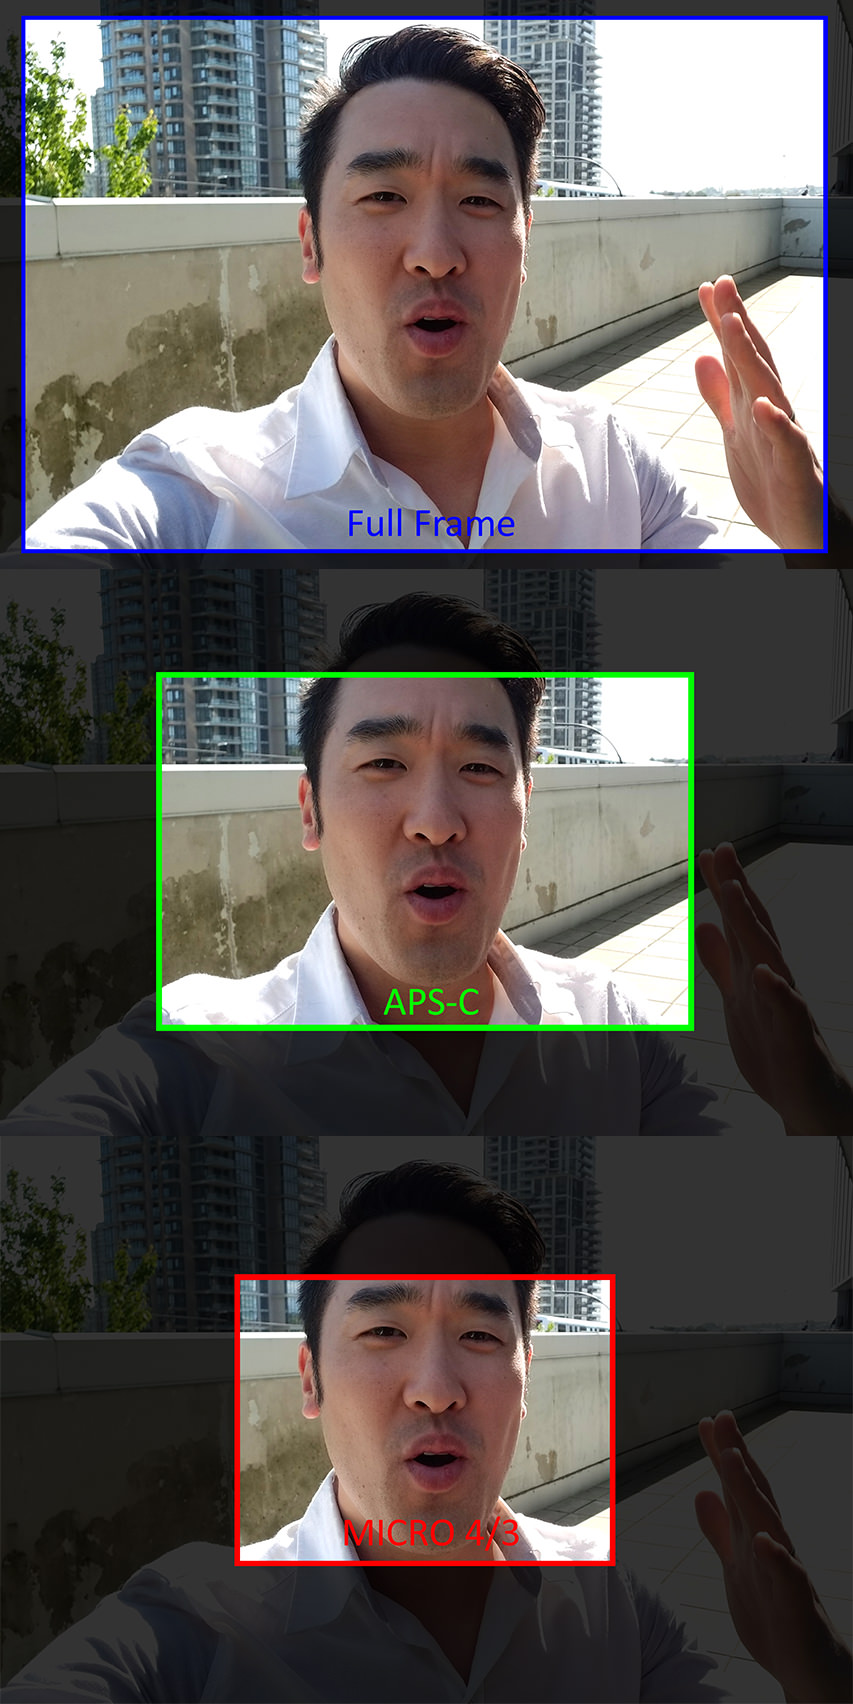
In order to make up for the cropping that occurs, you will need to use a wider lens on cameras with smaller sensors to get the same shot you’d get with a full-frame camera.
Focal Length Equivalency Table
This table shows you the focal lengths needed to achieve the same shot between cameras with different sensor sizes. In order to take a shot as wide as the shot I took of myself with the 24mm lens on my full-frame camera, I would need a 15mm lens on an APS-C sensor camera or a 12mm lens on a micro 4/3 camera.
| Focal Length / Sensor | Full Frame | APS-C | Micro 4/3 |
|---|---|---|---|
| Wide (Handheld Selfie-Safe) | 16mm | 10mm | 8mm |
| Wide (Handheld Selfie-Safe) | 18mm | 11mm | 9mm |
| Wide (Handheld Selfie-Safe) | 24mm | 15mm | 12mm |
| Wide | 35mm | 22mm | 18mm |
| Standard | 50mm | 31mm | 25mm |
| Telephoto | 70mm | 44mm | 35mm |
| Telephoto | 100mm | 63mm | 50mm |
| Telephoto | 200mm | 125mm | 100mm |
Aperture
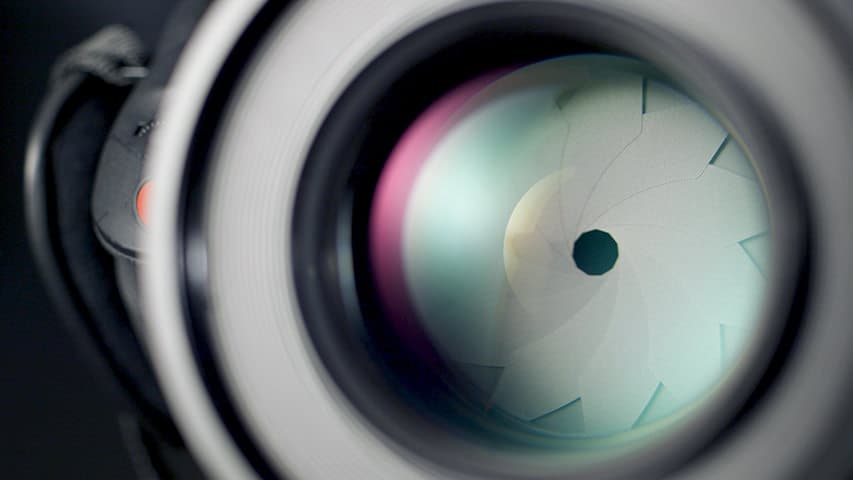
The next thing to consider when you’re looking for a lens is the aperture, the hole (often adjustable) within the lens that lets light in. Aperture for camera lenses is measured in f-stops (f/1.4, f/1.8, f/2.0) - the smaller the f-stop number, the larger the aperture (bigger hole letting even more light in).

Because larger aperture lenses let more light in, they need a shorter time for cameras to compose an image. This is why larger aperture lenses are also called “fast” lenses.
Fast lenses are more expensive because they cost more to produce. There’s a lot more that goes into them, including larger and higher quality glass elements.
But do you even need a fast lens?
Vlogging With a Fast Lens
Pros of Vlogging With a Fast Lens
- Better low-light performance
- Better autofocus performance
- Better “bokeh” (out-of-focus areas, like your background, having that nice blurry look that you see in a lot of movies)
Cons of Vlogging With a Fast Lens
- More expensive
- Moving subjects more likely to get out of focus when shooting with a large aperture
- Better continuous autofocus performance needed when shooting moving subjects with a large aperture
Optical Image Stabilization
Finally, you’ll have to decide whether or not you want your lens to have built-in optical image stabilization (OIS).
OIS is very beneficial to have on a lens if you’re a vlogger who films mostly handheld footage. Although this technology adds to the price of your lens as well, it can greatly help you to capture smoother footage that may otherwise be shaky. Nikon calls this technology “Vibration Reduction” (VR) for their lenses.
In the above video, you can see how much OIS can help to stabilize your footage. MicBergsma simultaneously compares the footage between two GoPro Hero5 Blacks, one with OIS on and one with OIS off.
If, however, you are shooting most of your vlogs on a tripod, you won’t need a lens with OIS.
Looking for ways to set up your talking-head shot for YouTube with any of these lenses? Check out our post on 4 Ways To Set Up Your Talking-Head Shots For YouTube .

Richard Bennett
Richard Bennett is a writer and a lover of all things video.
Follow @Richard Bennett
Richard Bennett
Nov 01, 2022• Proven solutions
The staple of any vlog is the talking headshot, a shot of the speaker talking directly to the audience. You can compose this shot with different kinds of lenses for your interchangeable lens camera.
But which kind of lens is the right lens for you as a vlogger?
In this article, I’m going to help you figure that out.
- Part 1: Three Focal Length Groups: Wide, Standard, Telephoto
- Part 2: Vlogging With Each Focal Length Group
- Part 3: Crop Factor
- Part 4: Focal Length Equivalency Table
- Part 5: Aperture
- Part 6: Vlogging With a Fast Lens
- Part 7: Optical Image Stabilization
Three Focal Length Groups: Wide, Standard, Telephoto
There are three main ranges in focal lengths that camera lenses can be categorized into wide, standard, and telephoto.
Wide-Angle Lens
Wide-angle lenses can “see more.” They allow more of your scene to fit inside your frame. Objects that are closer to the lens appear much bigger while objects that are further away appear even smaller. Perspectives are also enhanced, making close objects and people that just make it into the sides of the frame appear more stretched out. Out of all the other ranges in focal lengths, wide-angle lenses will appear the least zoomed in.
Standard Lens
With standard lenses or normal lenses, you won’t get the stretched out objects or enhanced perspectives that you get from wide-angle lenses. Instead, standard lenses are meant to see scenes as the natural human eye is meant to see them. If you shoot a scene with both a wide-angle lens and a standard lens from the same position, you’ll notice that less of the scene fits into your frame. Standard lenses will appear more zoomed-in than wide-angle lenses, but less zoomed-in than telephoto lenses.
Telephoto Lens
Out of all the other ranges in focal lengths, telephoto lenses will appear the most zoomed in. This can be beneficial for the shooter who wants to get a closer shot of a scene without having to physically be in close proximity to the scene. Objects that are further away in the background also appear larger and closer than they would appear on wide-angle or standard lenses.
Vlogging With Each Focal Length Group
You can get your talking head footage using lenses from any of the three focal length groups. Depending on how you plan to vlog most of the time, though, one of the three focal lengths might be more suitable for you.
When to vlog with a wide-angle lens
Wide-angle lenses are the most commonly used lenses for vlogging. Wide-angle lenses are great when you need to be close to your camera. This might be the case for you if your recording space is small or if you want to film yourself as you hold your camera up with your own hand.
Being close to your camera not only gives you the option to use your camera’s built-in microphone, but it also gives you the option to make use of camera-mounted shotgun microphones.
When to vlog with a standard lens
Standard lenses are great when you have more space to be further away from your camera. The perspectives in your shot will look more natural through a standard lens, making your talking head footage feel more corporate or professional. You’ll also be able to get blurrier backgrounds using a standard lens versus a wide-angle lens.
Being further away from your camera, however, means that you’ll have to use a separate microphone positioned closer to you.
When to vlog with a telephoto lens
As telephoto lenses are even more zoomed in, you’ll need to be even further away from your camera to fit yourself inside your camera frame. Why would any vlogger ever need to be that far away from their camera? One word… teleprompter. If you want or need to stick to a script, you’ll have to be far away enough from your camera that it doesn’t appear like your eyes are scanning left to right. You then close in the distance with a telephoto lens.
In the above video, Marcos Rocha compares different focal lengths for talking head videos. Which focal length range do you like the look of?
Crop Factor
Focal lengths in camera lenses are measured in millimeters. You can vlog yourself handheld with a 24mm lens on a camera with a full-frame sensor (the sensor is the piece of hardware inside your camera that turns the light it receives into a digital image). But if you use a 24mm lens on a camera with a smaller sensor, like an APS-C sensor or even smaller Micro 4/3 sensor, more of you will get cropped out (see below).

In order to make up for the cropping that occurs, you will need to use a wider lens on cameras with smaller sensors to get the same shot you’d get with a full-frame camera.
Focal Length Equivalency Table
This table shows you the focal lengths needed to achieve the same shot between cameras with different sensor sizes. In order to take a shot as wide as the shot I took of myself with the 24mm lens on my full-frame camera, I would need a 15mm lens on an APS-C sensor camera or a 12mm lens on a micro 4/3 camera.
| Focal Length / Sensor | Full Frame | APS-C | Micro 4/3 |
|---|---|---|---|
| Wide (Handheld Selfie-Safe) | 16mm | 10mm | 8mm |
| Wide (Handheld Selfie-Safe) | 18mm | 11mm | 9mm |
| Wide (Handheld Selfie-Safe) | 24mm | 15mm | 12mm |
| Wide | 35mm | 22mm | 18mm |
| Standard | 50mm | 31mm | 25mm |
| Telephoto | 70mm | 44mm | 35mm |
| Telephoto | 100mm | 63mm | 50mm |
| Telephoto | 200mm | 125mm | 100mm |
Aperture

The next thing to consider when you’re looking for a lens is the aperture, the hole (often adjustable) within the lens that lets light in. Aperture for camera lenses is measured in f-stops (f/1.4, f/1.8, f/2.0) - the smaller the f-stop number, the larger the aperture (bigger hole letting even more light in).

Because larger aperture lenses let more light in, they need a shorter time for cameras to compose an image. This is why larger aperture lenses are also called “fast” lenses.
Fast lenses are more expensive because they cost more to produce. There’s a lot more that goes into them, including larger and higher quality glass elements.
But do you even need a fast lens?
Vlogging With a Fast Lens
Pros of Vlogging With a Fast Lens
- Better low-light performance
- Better autofocus performance
- Better “bokeh” (out-of-focus areas, like your background, having that nice blurry look that you see in a lot of movies)
Cons of Vlogging With a Fast Lens
- More expensive
- Moving subjects more likely to get out of focus when shooting with a large aperture
- Better continuous autofocus performance needed when shooting moving subjects with a large aperture
Optical Image Stabilization
Finally, you’ll have to decide whether or not you want your lens to have built-in optical image stabilization (OIS).
OIS is very beneficial to have on a lens if you’re a vlogger who films mostly handheld footage. Although this technology adds to the price of your lens as well, it can greatly help you to capture smoother footage that may otherwise be shaky. Nikon calls this technology “Vibration Reduction” (VR) for their lenses.
In the above video, you can see how much OIS can help to stabilize your footage. MicBergsma simultaneously compares the footage between two GoPro Hero5 Blacks, one with OIS on and one with OIS off.
If, however, you are shooting most of your vlogs on a tripod, you won’t need a lens with OIS.
Looking for ways to set up your talking-head shot for YouTube with any of these lenses? Check out our post on 4 Ways To Set Up Your Talking-Head Shots For YouTube .

Richard Bennett
Richard Bennett is a writer and a lover of all things video.
Follow @Richard Bennett
Richard Bennett
Nov 01, 2022• Proven solutions
The staple of any vlog is the talking headshot, a shot of the speaker talking directly to the audience. You can compose this shot with different kinds of lenses for your interchangeable lens camera.
But which kind of lens is the right lens for you as a vlogger?
In this article, I’m going to help you figure that out.
- Part 1: Three Focal Length Groups: Wide, Standard, Telephoto
- Part 2: Vlogging With Each Focal Length Group
- Part 3: Crop Factor
- Part 4: Focal Length Equivalency Table
- Part 5: Aperture
- Part 6: Vlogging With a Fast Lens
- Part 7: Optical Image Stabilization
Three Focal Length Groups: Wide, Standard, Telephoto
There are three main ranges in focal lengths that camera lenses can be categorized into wide, standard, and telephoto.
Wide-Angle Lens
Wide-angle lenses can “see more.” They allow more of your scene to fit inside your frame. Objects that are closer to the lens appear much bigger while objects that are further away appear even smaller. Perspectives are also enhanced, making close objects and people that just make it into the sides of the frame appear more stretched out. Out of all the other ranges in focal lengths, wide-angle lenses will appear the least zoomed in.
Standard Lens
With standard lenses or normal lenses, you won’t get the stretched out objects or enhanced perspectives that you get from wide-angle lenses. Instead, standard lenses are meant to see scenes as the natural human eye is meant to see them. If you shoot a scene with both a wide-angle lens and a standard lens from the same position, you’ll notice that less of the scene fits into your frame. Standard lenses will appear more zoomed-in than wide-angle lenses, but less zoomed-in than telephoto lenses.
Telephoto Lens
Out of all the other ranges in focal lengths, telephoto lenses will appear the most zoomed in. This can be beneficial for the shooter who wants to get a closer shot of a scene without having to physically be in close proximity to the scene. Objects that are further away in the background also appear larger and closer than they would appear on wide-angle or standard lenses.
Vlogging With Each Focal Length Group
You can get your talking head footage using lenses from any of the three focal length groups. Depending on how you plan to vlog most of the time, though, one of the three focal lengths might be more suitable for you.
When to vlog with a wide-angle lens
Wide-angle lenses are the most commonly used lenses for vlogging. Wide-angle lenses are great when you need to be close to your camera. This might be the case for you if your recording space is small or if you want to film yourself as you hold your camera up with your own hand.
Being close to your camera not only gives you the option to use your camera’s built-in microphone, but it also gives you the option to make use of camera-mounted shotgun microphones.
When to vlog with a standard lens
Standard lenses are great when you have more space to be further away from your camera. The perspectives in your shot will look more natural through a standard lens, making your talking head footage feel more corporate or professional. You’ll also be able to get blurrier backgrounds using a standard lens versus a wide-angle lens.
Being further away from your camera, however, means that you’ll have to use a separate microphone positioned closer to you.
When to vlog with a telephoto lens
As telephoto lenses are even more zoomed in, you’ll need to be even further away from your camera to fit yourself inside your camera frame. Why would any vlogger ever need to be that far away from their camera? One word… teleprompter. If you want or need to stick to a script, you’ll have to be far away enough from your camera that it doesn’t appear like your eyes are scanning left to right. You then close in the distance with a telephoto lens.
In the above video, Marcos Rocha compares different focal lengths for talking head videos. Which focal length range do you like the look of?
Crop Factor
Focal lengths in camera lenses are measured in millimeters. You can vlog yourself handheld with a 24mm lens on a camera with a full-frame sensor (the sensor is the piece of hardware inside your camera that turns the light it receives into a digital image). But if you use a 24mm lens on a camera with a smaller sensor, like an APS-C sensor or even smaller Micro 4/3 sensor, more of you will get cropped out (see below).

In order to make up for the cropping that occurs, you will need to use a wider lens on cameras with smaller sensors to get the same shot you’d get with a full-frame camera.
Focal Length Equivalency Table
This table shows you the focal lengths needed to achieve the same shot between cameras with different sensor sizes. In order to take a shot as wide as the shot I took of myself with the 24mm lens on my full-frame camera, I would need a 15mm lens on an APS-C sensor camera or a 12mm lens on a micro 4/3 camera.
| Focal Length / Sensor | Full Frame | APS-C | Micro 4/3 |
|---|---|---|---|
| Wide (Handheld Selfie-Safe) | 16mm | 10mm | 8mm |
| Wide (Handheld Selfie-Safe) | 18mm | 11mm | 9mm |
| Wide (Handheld Selfie-Safe) | 24mm | 15mm | 12mm |
| Wide | 35mm | 22mm | 18mm |
| Standard | 50mm | 31mm | 25mm |
| Telephoto | 70mm | 44mm | 35mm |
| Telephoto | 100mm | 63mm | 50mm |
| Telephoto | 200mm | 125mm | 100mm |
Aperture

The next thing to consider when you’re looking for a lens is the aperture, the hole (often adjustable) within the lens that lets light in. Aperture for camera lenses is measured in f-stops (f/1.4, f/1.8, f/2.0) - the smaller the f-stop number, the larger the aperture (bigger hole letting even more light in).

Because larger aperture lenses let more light in, they need a shorter time for cameras to compose an image. This is why larger aperture lenses are also called “fast” lenses.
Fast lenses are more expensive because they cost more to produce. There’s a lot more that goes into them, including larger and higher quality glass elements.
But do you even need a fast lens?
Vlogging With a Fast Lens
Pros of Vlogging With a Fast Lens
- Better low-light performance
- Better autofocus performance
- Better “bokeh” (out-of-focus areas, like your background, having that nice blurry look that you see in a lot of movies)
Cons of Vlogging With a Fast Lens
- More expensive
- Moving subjects more likely to get out of focus when shooting with a large aperture
- Better continuous autofocus performance needed when shooting moving subjects with a large aperture
Optical Image Stabilization
Finally, you’ll have to decide whether or not you want your lens to have built-in optical image stabilization (OIS).
OIS is very beneficial to have on a lens if you’re a vlogger who films mostly handheld footage. Although this technology adds to the price of your lens as well, it can greatly help you to capture smoother footage that may otherwise be shaky. Nikon calls this technology “Vibration Reduction” (VR) for their lenses.
In the above video, you can see how much OIS can help to stabilize your footage. MicBergsma simultaneously compares the footage between two GoPro Hero5 Blacks, one with OIS on and one with OIS off.
If, however, you are shooting most of your vlogs on a tripod, you won’t need a lens with OIS.
Looking for ways to set up your talking-head shot for YouTube with any of these lenses? Check out our post on 4 Ways To Set Up Your Talking-Head Shots For YouTube .

Richard Bennett
Richard Bennett is a writer and a lover of all things video.
Follow @Richard Bennett
Richard Bennett
Nov 01, 2022• Proven solutions
The staple of any vlog is the talking headshot, a shot of the speaker talking directly to the audience. You can compose this shot with different kinds of lenses for your interchangeable lens camera.
But which kind of lens is the right lens for you as a vlogger?
In this article, I’m going to help you figure that out.
- Part 1: Three Focal Length Groups: Wide, Standard, Telephoto
- Part 2: Vlogging With Each Focal Length Group
- Part 3: Crop Factor
- Part 4: Focal Length Equivalency Table
- Part 5: Aperture
- Part 6: Vlogging With a Fast Lens
- Part 7: Optical Image Stabilization
Three Focal Length Groups: Wide, Standard, Telephoto
There are three main ranges in focal lengths that camera lenses can be categorized into wide, standard, and telephoto.
Wide-Angle Lens
Wide-angle lenses can “see more.” They allow more of your scene to fit inside your frame. Objects that are closer to the lens appear much bigger while objects that are further away appear even smaller. Perspectives are also enhanced, making close objects and people that just make it into the sides of the frame appear more stretched out. Out of all the other ranges in focal lengths, wide-angle lenses will appear the least zoomed in.
Standard Lens
With standard lenses or normal lenses, you won’t get the stretched out objects or enhanced perspectives that you get from wide-angle lenses. Instead, standard lenses are meant to see scenes as the natural human eye is meant to see them. If you shoot a scene with both a wide-angle lens and a standard lens from the same position, you’ll notice that less of the scene fits into your frame. Standard lenses will appear more zoomed-in than wide-angle lenses, but less zoomed-in than telephoto lenses.
Telephoto Lens
Out of all the other ranges in focal lengths, telephoto lenses will appear the most zoomed in. This can be beneficial for the shooter who wants to get a closer shot of a scene without having to physically be in close proximity to the scene. Objects that are further away in the background also appear larger and closer than they would appear on wide-angle or standard lenses.
Vlogging With Each Focal Length Group
You can get your talking head footage using lenses from any of the three focal length groups. Depending on how you plan to vlog most of the time, though, one of the three focal lengths might be more suitable for you.
When to vlog with a wide-angle lens
Wide-angle lenses are the most commonly used lenses for vlogging. Wide-angle lenses are great when you need to be close to your camera. This might be the case for you if your recording space is small or if you want to film yourself as you hold your camera up with your own hand.
Being close to your camera not only gives you the option to use your camera’s built-in microphone, but it also gives you the option to make use of camera-mounted shotgun microphones.
When to vlog with a standard lens
Standard lenses are great when you have more space to be further away from your camera. The perspectives in your shot will look more natural through a standard lens, making your talking head footage feel more corporate or professional. You’ll also be able to get blurrier backgrounds using a standard lens versus a wide-angle lens.
Being further away from your camera, however, means that you’ll have to use a separate microphone positioned closer to you.
When to vlog with a telephoto lens
As telephoto lenses are even more zoomed in, you’ll need to be even further away from your camera to fit yourself inside your camera frame. Why would any vlogger ever need to be that far away from their camera? One word… teleprompter. If you want or need to stick to a script, you’ll have to be far away enough from your camera that it doesn’t appear like your eyes are scanning left to right. You then close in the distance with a telephoto lens.
In the above video, Marcos Rocha compares different focal lengths for talking head videos. Which focal length range do you like the look of?
Crop Factor
Focal lengths in camera lenses are measured in millimeters. You can vlog yourself handheld with a 24mm lens on a camera with a full-frame sensor (the sensor is the piece of hardware inside your camera that turns the light it receives into a digital image). But if you use a 24mm lens on a camera with a smaller sensor, like an APS-C sensor or even smaller Micro 4/3 sensor, more of you will get cropped out (see below).

In order to make up for the cropping that occurs, you will need to use a wider lens on cameras with smaller sensors to get the same shot you’d get with a full-frame camera.
Focal Length Equivalency Table
This table shows you the focal lengths needed to achieve the same shot between cameras with different sensor sizes. In order to take a shot as wide as the shot I took of myself with the 24mm lens on my full-frame camera, I would need a 15mm lens on an APS-C sensor camera or a 12mm lens on a micro 4/3 camera.
| Focal Length / Sensor | Full Frame | APS-C | Micro 4/3 |
|---|---|---|---|
| Wide (Handheld Selfie-Safe) | 16mm | 10mm | 8mm |
| Wide (Handheld Selfie-Safe) | 18mm | 11mm | 9mm |
| Wide (Handheld Selfie-Safe) | 24mm | 15mm | 12mm |
| Wide | 35mm | 22mm | 18mm |
| Standard | 50mm | 31mm | 25mm |
| Telephoto | 70mm | 44mm | 35mm |
| Telephoto | 100mm | 63mm | 50mm |
| Telephoto | 200mm | 125mm | 100mm |
Aperture

The next thing to consider when you’re looking for a lens is the aperture, the hole (often adjustable) within the lens that lets light in. Aperture for camera lenses is measured in f-stops (f/1.4, f/1.8, f/2.0) - the smaller the f-stop number, the larger the aperture (bigger hole letting even more light in).

Because larger aperture lenses let more light in, they need a shorter time for cameras to compose an image. This is why larger aperture lenses are also called “fast” lenses.
Fast lenses are more expensive because they cost more to produce. There’s a lot more that goes into them, including larger and higher quality glass elements.
But do you even need a fast lens?
Vlogging With a Fast Lens
Pros of Vlogging With a Fast Lens
- Better low-light performance
- Better autofocus performance
- Better “bokeh” (out-of-focus areas, like your background, having that nice blurry look that you see in a lot of movies)
Cons of Vlogging With a Fast Lens
- More expensive
- Moving subjects more likely to get out of focus when shooting with a large aperture
- Better continuous autofocus performance needed when shooting moving subjects with a large aperture
Optical Image Stabilization
Finally, you’ll have to decide whether or not you want your lens to have built-in optical image stabilization (OIS).
OIS is very beneficial to have on a lens if you’re a vlogger who films mostly handheld footage. Although this technology adds to the price of your lens as well, it can greatly help you to capture smoother footage that may otherwise be shaky. Nikon calls this technology “Vibration Reduction” (VR) for their lenses.
In the above video, you can see how much OIS can help to stabilize your footage. MicBergsma simultaneously compares the footage between two GoPro Hero5 Blacks, one with OIS on and one with OIS off.
If, however, you are shooting most of your vlogs on a tripod, you won’t need a lens with OIS.
Looking for ways to set up your talking-head shot for YouTube with any of these lenses? Check out our post on 4 Ways To Set Up Your Talking-Head Shots For YouTube .

Richard Bennett
Richard Bennett is a writer and a lover of all things video.
Follow @Richard Bennett
Rapid Learning Path for Keying Mastery
The world of video-making owes much of its magic to small leaps of innovation. One of these leaps is the use of the chroma key background, which most people know by the more colloquial term—green screen.

Chroma key, also known as green screen or blue screen, is a cool hack for seamless visual storytelling, allowing content creators to replace backgrounds with any image or video they want. This technique is widely embraced in film, television, and online content, and has opened the door to limitless creative possibilities. Aside from its ability to maximize creativity, it is also cheap to employ and convenient to set up, which has made it a staple for everyone who works with visuals.
In this simple guide, we’ll delve into the fundamentals of the chroma key effect, how it is used for video making, and how to leverage that as you perfect your visual content.
YouTube Video Background Creating realistic video scenes at your will is easy to complete with Filmora green screen removal.
Create Video Backgrounds Create Video Backgrounds Learn Green Screen

How Does Chroma Key Work?

Chroma Keying is done by singling out a specific color (usually green or blue) from the foreground, removing it, and replacing it with a different background (for example, a sunset). This process typically follows a series of steps:
- Background Selection:
A solid, single-color background, often green or blue, that contrasts well with the subject must be used. The color chosen should not be present in the subject or any props in the camera field to avoid unintentional transparency.
- Color Keying:
This requires the use of specialized visual effects software to key out the chosen color. The green or blue background is designated as transparent, making everything of that color see-through. The software distinguishes between the keyed color and the subject, creating a mask for the transparent areas.
- Foreground Filming:
This involves filming the subject against the live chroma key background. During filming, the chosen background color (green or blue) won’t appear in the final result due to its transparency. The subject is captured as if separately from the isolated background.
- Post-Processing:
In post-production processing, the editor takes the keyed-out color and replaces it with the new background of their choice. This step creates the illusion that the subject is in a different setting or environment. The transparent areas become filled with the chosen background which, if done right, results in a cohesive and visually appealing composition.
Why Green?
Theoretically, the chroma key background can be any solid color. However, the most commonly used colors are studio blue and bright green, with the latter far more common.
The choice of background color depends on the specific requirements of the production and the colors present in the scenes being filmed.
Free Download For Win 7 or later(64-bit)
Free Download For macOS 10.14 or later
Contrast
The less similar your chosen background color is to natural skin tones, the easier to isolate and replace in your footage. Bright green provides a strong contrast to most human skin tones and is less likely to be present in costumes or natural surroundings, making it easier to isolate subjects during the color separation.
Luminance
The color green emits light with greater intensity than blue, allowing for far more effective isolation by cameras during filming. This also means that blue screens demand increased lighting for proper exposure compared to green. This situation may be less than ideal if you lack powerful lighting or you don’t have the big bucks for them.
Digital Sensors
Many digital cameras and sensors are more sensitive to green wavelengths, resulting in cleaner and more accurate color keying during post-processing. Modern technology has also evolved to optimize for a green background, making it a more practical choice for the chroma key effect.
Wardrobe and Set Design
Bright green occurs less naturally in costumes and set designs than other colors, making green the optimal choice for reducing the likelihood of color spill and keying issues. However, if you know your scene will have lots of green, it is probably best to film with a blue screen, so there’s less risk of color spill and less post-production work.
Setting up Your Own Chroma Key Studio
Setting up your chroma key is convenient and straightforward, but there are some key factors to consider while setting up to ensure maximal performance.
Choosing the Right Background Color
The first step in the chroma key setup is selecting the right background color to be keyed out. This choice determines your effective color separation and ensures a smooth keying process during editing. Choosing a chroma-key background color that contrasts distinctly with the subject’s colors is essential for effective color separation. This prevents unintentional transparency, color spill, and ensures a polished final result.
Lighting Considerations
Lighting is an important part of the chroma-keying process. Bold, uniform, and consistent lighting on both the subject and the background makes it easy to delineate one from the other fully. This minimizes shadows and variations in color, creating a smooth and seamless keying process. Multiple diffuse lights from different angles are often used to illuminate the green screen evenly.
Positioning/Camera
Proper subject and camera placement are necessary to ensure an even color-keying process during post-production. To prevent shadow interference, the green screen should be smooth, tense, and without wrinkles or shadows.
High-quality cameras are essential every time, especially for chroma keying. Images with better definition are easier to key, so camera quality significantly affects the outcome. Even if your camera isn’t the best, merely shooting well can ensure a clean color-keying process during editing, resulting in professional-looking visuals.
Recording Tips for Chroma Key
- Proper Lighting
Maintaining uniform and well-defined lighting during recording is essential for a successful chroma-keying process. This consistency ensures a seamless keying process during post-production.
- Keep Distance from the Green Screen
The optimal distance between the subject and the green screen minimizes color spill and allows for natural movements. Proper distance between subject and background allows for easier isolation of the background and much smoother post-editing. A recommended starting point for the issue is around 6 to 10 feet from the background.
- Subjects and Clothing
As mentioned before, the choice of costume for Selecting appropriate clothing that doesn’t match the chroma key color prevents transparency issues. Subjects also have to be positioned in such a way that there is minimal light interference and reflection. These contribute to a flawless chroma key outcome.
3 Basic Troubleshooting Strategies
- Color Spill
Sometimes, reflected light from your green background can be cast on your subject and may remain so when the background light is keyed out. This phenomenon is known as a color spill. It is usually because of uneven lighting or shooting around reflecting surfaces. Avoiding spill can differentiate between good and lousy chroma key aftereffects.
Human hair is one area where color spill can show up unsuspectingly. Due to the translucency of hair, it is common for some unintended light to seep through. This allows some background visibility, which you do not want with a chroma key. This is especially notable with lighter hair colors like blond hair.
There are ways to account for this. Many video-editing software have features such as spill suppression and screen matte adjustments that can enhance the final footage. Specialized plugins also go a long way in ensuring minimizing spill. Addressing spill correction tackles unwanted green artifacts and ensures a clean keying process.
- Poor Lighting
Suboptimal green screen lighting can lead to inconsistencies in keying and editing, undermining your product. One way to avoid this is to light the screen and subject separately. Another tip, although expensive, is using multiple diffuse light sources and trying to maintain even lighting across every square foot of your scene. Super bright or dark spots can ruin your output, so it’s worth the extra effort if you don’t want to deal with problematic post-production.
- Poorly Refined Edges
Chroma keying should leave your videos with crisp, defined, natural-looking edges. But post-production editing can make all the difference if it doesn’t come out to your taste. Softening and refining edges make a smoother transition between the foreground object and the new background. Light adjustments to edge thickness and screen matte settings can also help enhance overall visual quality and add finesse to your work.
Conclusion
Green screen photography produces excellent results, and its ease of use makes it indispensable for videographers of all levels. In this guide, we’ve discussed chroma key technology, its role in the industry, and how to apply it to your craft to elevate visual content.
Chroma key, also known as green screen or blue screen, is a cool hack for seamless visual storytelling, allowing content creators to replace backgrounds with any image or video they want. This technique is widely embraced in film, television, and online content, and has opened the door to limitless creative possibilities. Aside from its ability to maximize creativity, it is also cheap to employ and convenient to set up, which has made it a staple for everyone who works with visuals.
In this simple guide, we’ll delve into the fundamentals of the chroma key effect, how it is used for video making, and how to leverage that as you perfect your visual content.
YouTube Video Background Creating realistic video scenes at your will is easy to complete with Filmora green screen removal.
Create Video Backgrounds Create Video Backgrounds Learn Green Screen

How Does Chroma Key Work?

Chroma Keying is done by singling out a specific color (usually green or blue) from the foreground, removing it, and replacing it with a different background (for example, a sunset). This process typically follows a series of steps:
- Background Selection:
A solid, single-color background, often green or blue, that contrasts well with the subject must be used. The color chosen should not be present in the subject or any props in the camera field to avoid unintentional transparency.
- Color Keying:
This requires the use of specialized visual effects software to key out the chosen color. The green or blue background is designated as transparent, making everything of that color see-through. The software distinguishes between the keyed color and the subject, creating a mask for the transparent areas.
- Foreground Filming:
This involves filming the subject against the live chroma key background. During filming, the chosen background color (green or blue) won’t appear in the final result due to its transparency. The subject is captured as if separately from the isolated background.
- Post-Processing:
In post-production processing, the editor takes the keyed-out color and replaces it with the new background of their choice. This step creates the illusion that the subject is in a different setting or environment. The transparent areas become filled with the chosen background which, if done right, results in a cohesive and visually appealing composition.
Why Green?
Theoretically, the chroma key background can be any solid color. However, the most commonly used colors are studio blue and bright green, with the latter far more common.
The choice of background color depends on the specific requirements of the production and the colors present in the scenes being filmed.
Free Download For Win 7 or later(64-bit)
Free Download For macOS 10.14 or later
Contrast
The less similar your chosen background color is to natural skin tones, the easier to isolate and replace in your footage. Bright green provides a strong contrast to most human skin tones and is less likely to be present in costumes or natural surroundings, making it easier to isolate subjects during the color separation.
Luminance
The color green emits light with greater intensity than blue, allowing for far more effective isolation by cameras during filming. This also means that blue screens demand increased lighting for proper exposure compared to green. This situation may be less than ideal if you lack powerful lighting or you don’t have the big bucks for them.
Digital Sensors
Many digital cameras and sensors are more sensitive to green wavelengths, resulting in cleaner and more accurate color keying during post-processing. Modern technology has also evolved to optimize for a green background, making it a more practical choice for the chroma key effect.
Wardrobe and Set Design
Bright green occurs less naturally in costumes and set designs than other colors, making green the optimal choice for reducing the likelihood of color spill and keying issues. However, if you know your scene will have lots of green, it is probably best to film with a blue screen, so there’s less risk of color spill and less post-production work.
Setting up Your Own Chroma Key Studio
Setting up your chroma key is convenient and straightforward, but there are some key factors to consider while setting up to ensure maximal performance.
Choosing the Right Background Color
The first step in the chroma key setup is selecting the right background color to be keyed out. This choice determines your effective color separation and ensures a smooth keying process during editing. Choosing a chroma-key background color that contrasts distinctly with the subject’s colors is essential for effective color separation. This prevents unintentional transparency, color spill, and ensures a polished final result.
Lighting Considerations
Lighting is an important part of the chroma-keying process. Bold, uniform, and consistent lighting on both the subject and the background makes it easy to delineate one from the other fully. This minimizes shadows and variations in color, creating a smooth and seamless keying process. Multiple diffuse lights from different angles are often used to illuminate the green screen evenly.
Positioning/Camera
Proper subject and camera placement are necessary to ensure an even color-keying process during post-production. To prevent shadow interference, the green screen should be smooth, tense, and without wrinkles or shadows.
High-quality cameras are essential every time, especially for chroma keying. Images with better definition are easier to key, so camera quality significantly affects the outcome. Even if your camera isn’t the best, merely shooting well can ensure a clean color-keying process during editing, resulting in professional-looking visuals.
Recording Tips for Chroma Key
- Proper Lighting
Maintaining uniform and well-defined lighting during recording is essential for a successful chroma-keying process. This consistency ensures a seamless keying process during post-production.
- Keep Distance from the Green Screen
The optimal distance between the subject and the green screen minimizes color spill and allows for natural movements. Proper distance between subject and background allows for easier isolation of the background and much smoother post-editing. A recommended starting point for the issue is around 6 to 10 feet from the background.
- Subjects and Clothing
As mentioned before, the choice of costume for Selecting appropriate clothing that doesn’t match the chroma key color prevents transparency issues. Subjects also have to be positioned in such a way that there is minimal light interference and reflection. These contribute to a flawless chroma key outcome.
3 Basic Troubleshooting Strategies
- Color Spill
Sometimes, reflected light from your green background can be cast on your subject and may remain so when the background light is keyed out. This phenomenon is known as a color spill. It is usually because of uneven lighting or shooting around reflecting surfaces. Avoiding spill can differentiate between good and lousy chroma key aftereffects.
Human hair is one area where color spill can show up unsuspectingly. Due to the translucency of hair, it is common for some unintended light to seep through. This allows some background visibility, which you do not want with a chroma key. This is especially notable with lighter hair colors like blond hair.
There are ways to account for this. Many video-editing software have features such as spill suppression and screen matte adjustments that can enhance the final footage. Specialized plugins also go a long way in ensuring minimizing spill. Addressing spill correction tackles unwanted green artifacts and ensures a clean keying process.
- Poor Lighting
Suboptimal green screen lighting can lead to inconsistencies in keying and editing, undermining your product. One way to avoid this is to light the screen and subject separately. Another tip, although expensive, is using multiple diffuse light sources and trying to maintain even lighting across every square foot of your scene. Super bright or dark spots can ruin your output, so it’s worth the extra effort if you don’t want to deal with problematic post-production.
- Poorly Refined Edges
Chroma keying should leave your videos with crisp, defined, natural-looking edges. But post-production editing can make all the difference if it doesn’t come out to your taste. Softening and refining edges make a smoother transition between the foreground object and the new background. Light adjustments to edge thickness and screen matte settings can also help enhance overall visual quality and add finesse to your work.
Conclusion
Green screen photography produces excellent results, and its ease of use makes it indispensable for videographers of all levels. In this guide, we’ve discussed chroma key technology, its role in the industry, and how to apply it to your craft to elevate visual content.
Also read:
- [New] 3 Efficient Methods for Saving YouTube's Standardized Images
- [New] Swift Searches for Abandoned Reddit Discussions
- [Updated] Demystifying Creator Studio A Practical Handbook
- [Updated] In 2024, Enhancing On-Screen Appeal Essential Tips for Talking-Head Shots
- 2024 Approved A Complete Guide of ScreenRec for Laptop
- 2024 Approved Streamline Projects with Free Video Intros
- Apple Excellence – iPhone's Best No-Cost Image Assemblers & Layouts for 2024
- Demystifying the Math of YouTube Ratio Perfection for 2024
- Dive Into a Stream of 9 Full-Length Festive Flicks - No Charge for 2024
- Echoes of Excellence 10 Strategies for Superior Sound Quality for 2024
- HP Laptop Volume Issue Fixed: Restoring Audio in Windows 11
- Instagram-Ready The Pathway to Perfecting Your Video Content for 2024
- Integrating ABYBY FlexiCapture with Laserfiche: Enhanced Document Processing by ABBYY
- Obtain Exclusive Free Media From Elite 4 YouTube Clips
- Pioneering Thought Machines: Discovering the Roots of Artificletechnology
- Snapshot Surprises Yearly YT Stats & Trends in Graphics
- YouTube's Income Leap at 500 Subs Count
- Title: A Vlogger's Guide To Camera Lenses
- Author: Kevin
- Created at : 2025-02-15 16:39:52
- Updated at : 2025-02-20 18:14:16
- Link: https://youtube-videos.techidaily.com/a-vloggers-guide-to-camera-lenses/
- License: This work is licensed under CC BY-NC-SA 4.0.