
"A Tale of Two Approaches Polite vs Aggressive Asking"
A Tale of Two Approaches: Polite vs Aggressive Asking
How to Get People to Subscribe to Your YouTube Channel

Richard Bennett
Oct 26, 2023• Proven solutions
The following is a step-by-step tutorial on how to get more subscribers by asking the right way. People are more likely to do something if you give them a bit of a nudge, and that includes subscribing to your YouTube channel.
There are people who think that if people like their videos they’ll subscribe, so they shouldn’t bother people by asking. This is, simply put, wrong. When people are browsing YouTube their minds are on what video they want to watch next, not whether or not they want to subscribe – unless you remind them.
What is a ‘Call To Action’?
It has become the norm for YouTubers to ask viewers to subscribe in their sign-offs. A typical CTA (‘call to action’) goes something like this:
“Thanks for watching. If you liked this video, make sure to subscribe for more!”
That’s great. At the end of a video is a good place to ask people to subscribe, but is it the best and only place you should be reminding them? If you take a peek at your analytics and you might find that most of your viewers aren’t watching to the ends of your videos (people have short attention spans).
A More Effective Way of Asking For Subscribers
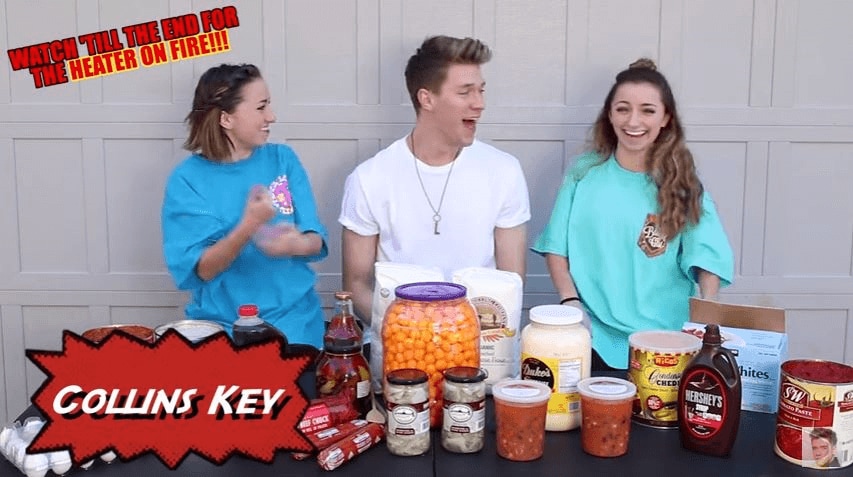
Collins Key is one YouTuber who has mastered asking for subscribers early on, and given that he has over 7 million subscribers himself I’d say it’s working out. Check out the technique in this video collab with Brooklyn and Bailey:
Step 1: How to Hook The Viewer
As you can see, the video starts with a ‘flash forward’ to one of the twins saying the heater is on fire and then a reminder of what’s going to happen later – the heater catching fire – is written in the top left of the screen so it stays on the viewers’ mind. This is one way in which the viewer is immediately hooked.
Step 2: Get to The Point Quickly
Shortly after, while still in the first 30 seconds of the video, Collins gets right to the point and introduces the Twin Telepathy Challenge promised in the title of the video. The hook with the heater catching fire is effective, but it’s not essential. It happens to suit Collins’ style, and it happens to have happened. Getting to the main point of the video quickly – usually in the first 15 seconds, not the first 30 (it’s in the first 15 seconds that most viewers click away) – is vital. People click on videos for a reason, and if they don’t see a sign of that payoff quickly they’ll leave.
Step 3: Create A Moment - Make Subscribing Part of the Experience
It’s only after hooking the viewer in and reiterating the promise of the title that Collins asks viewers to subscribe. The really clever thing about how he asks is that he carves out time in the video for the viewer to comply with his request. He gives 5 seconds and does a countdown.
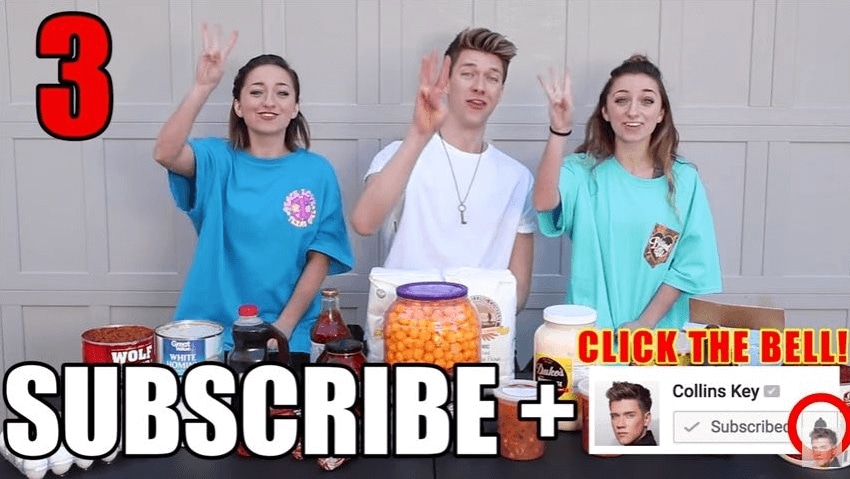
Collins Key has been one of the fastest-growing channels on YouTube. He does not implement this strategy in every video, but it’s not a stretch to think it’s had something to do with his success. Instead of simply asking you to subscribe at the end of the video, he creates a part of the video early on – before people who don’t watch until the end will have clicked away – where you feel as if you’re ‘supposed to’ subscribe.
Polish Your YouTube Videos with Filmora
Even with the above tricks, you may not get the subscribers as you wish unless you can make sure your videos and contents are of high quality. As YouTube is getting more and more popular and more YouTubers are competing for subscribers, you will need to polish your YouTube videos.
As one of the most widely used video editing software in YouTube video editing, Filmora video editor provides lots of templates and effects with an intuitive interface, which saves much time. Its features like motion tracking, audio ducking, keyframing, color matching and effects will help make your video impressive enough to get pepople to subscribe to your channel.
Here is a tutorial video about how to use Filmora to edit your YouTube video. Check it out and try Filmora if you are interested.


That’s how you can get more YouTube subscribers by asking the right way. You may follow the instructions and try it yourself. Do not forget to track your YouTube subscribers in real time to make necessary adjustments.
Richard Bennett
Richard Bennett is a writer and a lover of all things video.
Follow @Richard Bennett
Richard Bennett
Oct 26, 2023• Proven solutions
The following is a step-by-step tutorial on how to get more subscribers by asking the right way. People are more likely to do something if you give them a bit of a nudge, and that includes subscribing to your YouTube channel.
There are people who think that if people like their videos they’ll subscribe, so they shouldn’t bother people by asking. This is, simply put, wrong. When people are browsing YouTube their minds are on what video they want to watch next, not whether or not they want to subscribe – unless you remind them.
What is a ‘Call To Action’?
It has become the norm for YouTubers to ask viewers to subscribe in their sign-offs. A typical CTA (‘call to action’) goes something like this:
“Thanks for watching. If you liked this video, make sure to subscribe for more!”
That’s great. At the end of a video is a good place to ask people to subscribe, but is it the best and only place you should be reminding them? If you take a peek at your analytics and you might find that most of your viewers aren’t watching to the ends of your videos (people have short attention spans).
A More Effective Way of Asking For Subscribers
Collins Key is one YouTuber who has mastered asking for subscribers early on, and given that he has over 7 million subscribers himself I’d say it’s working out. Check out the technique in this video collab with Brooklyn and Bailey:
Step 1: How to Hook The Viewer
As you can see, the video starts with a ‘flash forward’ to one of the twins saying the heater is on fire and then a reminder of what’s going to happen later – the heater catching fire – is written in the top left of the screen so it stays on the viewers’ mind. This is one way in which the viewer is immediately hooked.
Step 2: Get to The Point Quickly
Shortly after, while still in the first 30 seconds of the video, Collins gets right to the point and introduces the Twin Telepathy Challenge promised in the title of the video. The hook with the heater catching fire is effective, but it’s not essential. It happens to suit Collins’ style, and it happens to have happened. Getting to the main point of the video quickly – usually in the first 15 seconds, not the first 30 (it’s in the first 15 seconds that most viewers click away) – is vital. People click on videos for a reason, and if they don’t see a sign of that payoff quickly they’ll leave.
Step 3: Create A Moment - Make Subscribing Part of the Experience
It’s only after hooking the viewer in and reiterating the promise of the title that Collins asks viewers to subscribe. The really clever thing about how he asks is that he carves out time in the video for the viewer to comply with his request. He gives 5 seconds and does a countdown.
Collins Key has been one of the fastest-growing channels on YouTube. He does not implement this strategy in every video, but it’s not a stretch to think it’s had something to do with his success. Instead of simply asking you to subscribe at the end of the video, he creates a part of the video early on – before people who don’t watch until the end will have clicked away – where you feel as if you’re ‘supposed to’ subscribe.
Polish Your YouTube Videos with Filmora
Even with the above tricks, you may not get the subscribers as you wish unless you can make sure your videos and contents are of high quality. As YouTube is getting more and more popular and more YouTubers are competing for subscribers, you will need to polish your YouTube videos.
As one of the most widely used video editing software in YouTube video editing, Filmora video editor provides lots of templates and effects with an intuitive interface, which saves much time. Its features like motion tracking, audio ducking, keyframing, color matching and effects will help make your video impressive enough to get pepople to subscribe to your channel.
Here is a tutorial video about how to use Filmora to edit your YouTube video. Check it out and try Filmora if you are interested.
That’s how you can get more YouTube subscribers by asking the right way. You may follow the instructions and try it yourself. Do not forget to track your YouTube subscribers in real time to make necessary adjustments.
Richard Bennett
Richard Bennett is a writer and a lover of all things video.
Follow @Richard Bennett
Flickering Fonts: 2 Innovative Text Techniques
How to Create Animated Bouncing Text

Liza Brown
Mar 27, 2024• Proven solutions
Earlier, you learned how to have a bounce text effect in Adobe After Effects . However, because AE is a complex application and has a steep learning curve, this section explains the two alternative ways to get the same effect on your existing video footage.
Method 1: How to Create Bouncing Text in Filmora Video Editor?
When talking about Wondershare Filmora , the application is populated with several presets for texts and titles, animations, effects, filters, and much more.
These pre-built templates not only make your task easier, they also save your decent amount of time that you would spend while working with After Effects or any other similar app that requires you to build things from scratch.
You can follow the instructions given below to add animated bounce text to any of your video footages with Filmora:
Step 1: Add a Footage to Timeline
Launch Wondershare Filmora on your Windows or Mac PC. By default, the aspect ratio of the project is set to 16:9. Click anywhere inside the Media window at the upper-left section, and select and import footage you want to add bounce text to.
Step 2: Insert Text and Add Bounce Effect
Click Titles from the standard toolbar at the top, and click and drag your preferred title template from the Library to the timeline. In case you don’t want any specific animation or style on the title, you can use the default title.
In the timeline, double-click the title you just added, use the upper-left section to edit the text, go to the Animation tab from the left pane, scroll down the list, and double-click the Up Down 1 or Up Down 2 preset to apply the bounce effect to the credits. Click OK to save the changes and to get back to the main window.

Step 3: Add Shake Filters
Go to Effects from the standard toolbar, expand the Filters category from the left pane, and click Shake. From the Library window, click and drag your preferred shake filter to the timeline. Here, I will choose Mild.

You can customize the default effect by double-clicking the shake filter in the timeline, using the sliders in the upper-left area of the interface to make necessary adjustments, and then clicking OK to save the changes and to get back to the previous interface.

Step 4: Export the Final Output
Click EXPORT from the top of the interface, go to the Local tab in the Export box, choose your preferred output format from the list in the left, make required customizations from the right pane, and click EXPORT from the bottom-right corner to export the video.

Now, you can add the bouncing text video and the background video to the timeline, and then place the bouncing text video above the background video track.
Double click the text track, go to the Chroma Key effect, select the Color Picker tool, and click anywhere in the Preview window to get things right. Finally, export the entire project to your preferred output format as explained in Step 4.
As explained before, Wondeshare Filmora makes the entire process of creating and adding bounce text effect pretty simple. With all the pre-build templates, and the versatility of the options that can be used to customize those presets, you can come up with the effects that are usually obtained when you start generating them from the scratch.
Method 2: Generate Animated Bouncing Texts Online
If you don’t want any heavy and resource-intensive app on your PC merely for some special text effects, you can try any of the online solutions instead. The benefit of using any such web app is that all the processing is done on site’s server, and it is only a web browser and an Internet connection that you need to have at your side.
Some most trusted websites to generate bounce text are listed below:
1. ENGFTO
Website: https://engfto.com/index/create%5Fanimated%5Fbouncing%5Ftext/0-26

You can follow the instructions given below to use Engfto to generate bouncing text for your footages:
Step 1: Get to the Animated Bouncing Text Page
Launch your favorite web browser, and go to the link given above to get to the Engfto’s animated bouncing text page.
Step 2: Customize Text and Preferences
Modify the values in the fields under the SIZE AREA and TEXT sections to customize the text area, the text itself, its size, and font. Next, adjust the values in the fields under the EFFECT PARAMETERS section to get the required bounce effect. Also, use the fields under the BACKGROUND section to either change the background color, or pick a background image from your PC.
Step 3: Obtain the Animated Text
Click the SAVE GIF ANIMATION button from the lower section of the page to download the animated text to your PC.
2. Loading.io
The instructions given below explain how to use Loading.io to get animated bounce text effect for your footages:
Step 1: Get to the Loading.io Webpage
Launch your favorite web browser and go to https://loading.io/animation/text/ .
Step 2: Customize the Text and Choose Animation Effect

Use the options available on the webpage to type your text, and change its font, color, background, transparency level etc. Select Bounce (or any of its variants) from the Animation drop-down list, and adjust the speed using the Speed slider.
Step 3: Obtain the Text
Click your preferred option from next to the Download As section to download the animated text to your PC.
Note: Regardless of the web solution you choose to generate and obtain animated bounce text, you will still need a post-production tool to add the downloaded text to your footage.
Conclusion
Generating bounce text effect is much simpler when you use Wondershare Filmora or any of the online solutions as explained in Method 2. While the former gives you more flexibility when it comes to customizations, the latter doesn’t require any app to be installed on your PC. In addition, many times the web apps offer their services for free, and therefore they are preferred by the novice users who are not much into post-production processes.
Liza Brown
Liza Brown is a writer and a lover of all things video.
Follow @Liza Brown
Liza Brown
Mar 27, 2024• Proven solutions
Earlier, you learned how to have a bounce text effect in Adobe After Effects . However, because AE is a complex application and has a steep learning curve, this section explains the two alternative ways to get the same effect on your existing video footage.
Method 1: How to Create Bouncing Text in Filmora Video Editor?
When talking about Wondershare Filmora , the application is populated with several presets for texts and titles, animations, effects, filters, and much more.
These pre-built templates not only make your task easier, they also save your decent amount of time that you would spend while working with After Effects or any other similar app that requires you to build things from scratch.
You can follow the instructions given below to add animated bounce text to any of your video footages with Filmora:
Step 1: Add a Footage to Timeline
Launch Wondershare Filmora on your Windows or Mac PC. By default, the aspect ratio of the project is set to 16:9. Click anywhere inside the Media window at the upper-left section, and select and import footage you want to add bounce text to.
Step 2: Insert Text and Add Bounce Effect
Click Titles from the standard toolbar at the top, and click and drag your preferred title template from the Library to the timeline. In case you don’t want any specific animation or style on the title, you can use the default title.
In the timeline, double-click the title you just added, use the upper-left section to edit the text, go to the Animation tab from the left pane, scroll down the list, and double-click the Up Down 1 or Up Down 2 preset to apply the bounce effect to the credits. Click OK to save the changes and to get back to the main window.
Step 3: Add Shake Filters
Go to Effects from the standard toolbar, expand the Filters category from the left pane, and click Shake. From the Library window, click and drag your preferred shake filter to the timeline. Here, I will choose Mild.
You can customize the default effect by double-clicking the shake filter in the timeline, using the sliders in the upper-left area of the interface to make necessary adjustments, and then clicking OK to save the changes and to get back to the previous interface.
Step 4: Export the Final Output
Click EXPORT from the top of the interface, go to the Local tab in the Export box, choose your preferred output format from the list in the left, make required customizations from the right pane, and click EXPORT from the bottom-right corner to export the video.
Now, you can add the bouncing text video and the background video to the timeline, and then place the bouncing text video above the background video track.
Double click the text track, go to the Chroma Key effect, select the Color Picker tool, and click anywhere in the Preview window to get things right. Finally, export the entire project to your preferred output format as explained in Step 4.
As explained before, Wondeshare Filmora makes the entire process of creating and adding bounce text effect pretty simple. With all the pre-build templates, and the versatility of the options that can be used to customize those presets, you can come up with the effects that are usually obtained when you start generating them from the scratch.
Method 2: Generate Animated Bouncing Texts Online
If you don’t want any heavy and resource-intensive app on your PC merely for some special text effects, you can try any of the online solutions instead. The benefit of using any such web app is that all the processing is done on site’s server, and it is only a web browser and an Internet connection that you need to have at your side.
Some most trusted websites to generate bounce text are listed below:
1. ENGFTO
Website: https://engfto.com/index/create%5Fanimated%5Fbouncing%5Ftext/0-26
You can follow the instructions given below to use Engfto to generate bouncing text for your footages:
Step 1: Get to the Animated Bouncing Text Page
Launch your favorite web browser, and go to the link given above to get to the Engfto’s animated bouncing text page.
Step 2: Customize Text and Preferences
Modify the values in the fields under the SIZE AREA and TEXT sections to customize the text area, the text itself, its size, and font. Next, adjust the values in the fields under the EFFECT PARAMETERS section to get the required bounce effect. Also, use the fields under the BACKGROUND section to either change the background color, or pick a background image from your PC.
Step 3: Obtain the Animated Text
Click the SAVE GIF ANIMATION button from the lower section of the page to download the animated text to your PC.
2. Loading.io
The instructions given below explain how to use Loading.io to get animated bounce text effect for your footages:
Step 1: Get to the Loading.io Webpage
Launch your favorite web browser and go to https://loading.io/animation/text/ .
Step 2: Customize the Text and Choose Animation Effect
Use the options available on the webpage to type your text, and change its font, color, background, transparency level etc. Select Bounce (or any of its variants) from the Animation drop-down list, and adjust the speed using the Speed slider.
Step 3: Obtain the Text
Click your preferred option from next to the Download As section to download the animated text to your PC.
Note: Regardless of the web solution you choose to generate and obtain animated bounce text, you will still need a post-production tool to add the downloaded text to your footage.
Conclusion
Generating bounce text effect is much simpler when you use Wondershare Filmora or any of the online solutions as explained in Method 2. While the former gives you more flexibility when it comes to customizations, the latter doesn’t require any app to be installed on your PC. In addition, many times the web apps offer their services for free, and therefore they are preferred by the novice users who are not much into post-production processes.
Liza Brown
Liza Brown is a writer and a lover of all things video.
Follow @Liza Brown
Also read:
- [New] Dialing in on YouTube Success Identifying Ranks Boosters
- [New] Enhance Your Presence Best Free Tools for Intriguing Openings
- [Updated] 2024 Approved Enchanting Viewers The Art of Crafting Engaging YouTube Description Templates
- [Updated] 2024 Approved Quick & Easy IPhone Screen Recording Tutorial
- [Updated] Complete Guide to Aspect Ratios About YouTube Videos/Shorts/Ads
- [Updated] Early Bird's Youtube Strategies for Channel and Revenue
- [Updated] In 2024, Basic Tactics to Archive Webcam Chats
- [Updated] Sticker-Enhanced Imagery IOS and Android's Best App Companions
- [Updated] Virtual Filmscapes The Future of Entertainment for 2024
- Avoiding Pitfalls: Humorous Interactions on Facebook
- Best YouTube-to-WebM Tools A Compreenasive Review & Ranking for 2024
- Crafted Clicks Guide to Software & Sites for Superior Photo Framing
- Efficient Tools Simplifying the Task of Feedback Erasure
- How to Make Free Intros for YouTube? [+Templates] for 2024
- In 2024, Discover the Best Tools & Tips to Accurately Tag Your Videos
- The Methodical Path to Discovering Hidden YouTube Footage
- Title: A Tale of Two Approaches Polite vs Aggressive Asking
- Author: Kevin
- Created at : 2025-02-14 16:03:56
- Updated at : 2025-02-20 18:05:17
- Link: https://youtube-videos.techidaily.com/a-tale-of-two-approaches-polite-vs-aggressive-asking/
- License: This work is licensed under CC BY-NC-SA 4.0.