:max_bytes(150000):strip_icc():format(webp)/Rearviewofboywithlaptoponsofa-31ba45dfa7fb4553a257c133b352ef64.jpg)
"A Comprehensive Guide to Achieving Smooth Color-Keying"

A Comprehensive Guide to Achieving Smooth Color-Keying
The world of video-making owes much of its magic to small leaps of innovation. One of these leaps is the use of the chroma key background, which most people know by the more colloquial term—green screen.

Chroma key, also known as green screen or blue screen, is a cool hack for seamless visual storytelling, allowing content creators to replace backgrounds with any image or video they want. This technique is widely embraced in film, television, and online content, and has opened the door to limitless creative possibilities. Aside from its ability to maximize creativity, it is also cheap to employ and convenient to set up, which has made it a staple for everyone who works with visuals.
In this simple guide, we’ll delve into the fundamentals of the chroma key effect, how it is used for video making, and how to leverage that as you perfect your visual content.
YouTube Video Background Creating realistic video scenes at your will is easy to complete with Filmora green screen removal.
Create Video Backgrounds Create Video Backgrounds Learn Green Screen

How Does Chroma Key Work?

Chroma Keying is done by singling out a specific color (usually green or blue) from the foreground, removing it, and replacing it with a different background (for example, a sunset). This process typically follows a series of steps:
- Background Selection:
A solid, single-color background, often green or blue, that contrasts well with the subject must be used. The color chosen should not be present in the subject or any props in the camera field to avoid unintentional transparency.
- Color Keying:
This requires the use of specialized visual effects software to key out the chosen color. The green or blue background is designated as transparent, making everything of that color see-through. The software distinguishes between the keyed color and the subject, creating a mask for the transparent areas.
- Foreground Filming:
This involves filming the subject against the live chroma key background. During filming, the chosen background color (green or blue) won’t appear in the final result due to its transparency. The subject is captured as if separately from the isolated background.
- Post-Processing:
In post-production processing, the editor takes the keyed-out color and replaces it with the new background of their choice. This step creates the illusion that the subject is in a different setting or environment. The transparent areas become filled with the chosen background which, if done right, results in a cohesive and visually appealing composition.
Why Green?
Theoretically, the chroma key background can be any solid color. However, the most commonly used colors are studio blue and bright green, with the latter far more common.
The choice of background color depends on the specific requirements of the production and the colors present in the scenes being filmed.
Free Download For Win 7 or later(64-bit)
Free Download For macOS 10.14 or later
Contrast
The less similar your chosen background color is to natural skin tones, the easier to isolate and replace in your footage. Bright green provides a strong contrast to most human skin tones and is less likely to be present in costumes or natural surroundings, making it easier to isolate subjects during the color separation.
Luminance
The color green emits light with greater intensity than blue, allowing for far more effective isolation by cameras during filming. This also means that blue screens demand increased lighting for proper exposure compared to green. This situation may be less than ideal if you lack powerful lighting or you don’t have the big bucks for them.
Digital Sensors
Many digital cameras and sensors are more sensitive to green wavelengths, resulting in cleaner and more accurate color keying during post-processing. Modern technology has also evolved to optimize for a green background, making it a more practical choice for the chroma key effect.
Wardrobe and Set Design
Bright green occurs less naturally in costumes and set designs than other colors, making green the optimal choice for reducing the likelihood of color spill and keying issues. However, if you know your scene will have lots of green, it is probably best to film with a blue screen, so there’s less risk of color spill and less post-production work.
Setting up Your Own Chroma Key Studio
Setting up your chroma key is convenient and straightforward, but there are some key factors to consider while setting up to ensure maximal performance.
Choosing the Right Background Color
The first step in the chroma key setup is selecting the right background color to be keyed out. This choice determines your effective color separation and ensures a smooth keying process during editing. Choosing a chroma-key background color that contrasts distinctly with the subject’s colors is essential for effective color separation. This prevents unintentional transparency, color spill, and ensures a polished final result.
Lighting Considerations
Lighting is an important part of the chroma-keying process. Bold, uniform, and consistent lighting on both the subject and the background makes it easy to delineate one from the other fully. This minimizes shadows and variations in color, creating a smooth and seamless keying process. Multiple diffuse lights from different angles are often used to illuminate the green screen evenly.
Positioning/Camera
Proper subject and camera placement are necessary to ensure an even color-keying process during post-production. To prevent shadow interference, the green screen should be smooth, tense, and without wrinkles or shadows.
High-quality cameras are essential every time, especially for chroma keying. Images with better definition are easier to key, so camera quality significantly affects the outcome. Even if your camera isn’t the best, merely shooting well can ensure a clean color-keying process during editing, resulting in professional-looking visuals.
Recording Tips for Chroma Key
- Proper Lighting
Maintaining uniform and well-defined lighting during recording is essential for a successful chroma-keying process. This consistency ensures a seamless keying process during post-production.
- Keep Distance from the Green Screen
The optimal distance between the subject and the green screen minimizes color spill and allows for natural movements. Proper distance between subject and background allows for easier isolation of the background and much smoother post-editing. A recommended starting point for the issue is around 6 to 10 feet from the background.
- Subjects and Clothing
As mentioned before, the choice of costume for Selecting appropriate clothing that doesn’t match the chroma key color prevents transparency issues. Subjects also have to be positioned in such a way that there is minimal light interference and reflection. These contribute to a flawless chroma key outcome.
3 Basic Troubleshooting Strategies
- Color Spill
Sometimes, reflected light from your green background can be cast on your subject and may remain so when the background light is keyed out. This phenomenon is known as a color spill. It is usually because of uneven lighting or shooting around reflecting surfaces. Avoiding spill can differentiate between good and lousy chroma key aftereffects.
Human hair is one area where color spill can show up unsuspectingly. Due to the translucency of hair, it is common for some unintended light to seep through. This allows some background visibility, which you do not want with a chroma key. This is especially notable with lighter hair colors like blond hair.
There are ways to account for this. Many video-editing software have features such as spill suppression and screen matte adjustments that can enhance the final footage. Specialized plugins also go a long way in ensuring minimizing spill. Addressing spill correction tackles unwanted green artifacts and ensures a clean keying process.
- Poor Lighting
Suboptimal green screen lighting can lead to inconsistencies in keying and editing, undermining your product. One way to avoid this is to light the screen and subject separately. Another tip, although expensive, is using multiple diffuse light sources and trying to maintain even lighting across every square foot of your scene. Super bright or dark spots can ruin your output, so it’s worth the extra effort if you don’t want to deal with problematic post-production.
- Poorly Refined Edges
Chroma keying should leave your videos with crisp, defined, natural-looking edges. But post-production editing can make all the difference if it doesn’t come out to your taste. Softening and refining edges make a smoother transition between the foreground object and the new background. Light adjustments to edge thickness and screen matte settings can also help enhance overall visual quality and add finesse to your work.
Conclusion
Green screen photography produces excellent results, and its ease of use makes it indispensable for videographers of all levels. In this guide, we’ve discussed chroma key technology, its role in the industry, and how to apply it to your craft to elevate visual content.
Chroma key, also known as green screen or blue screen, is a cool hack for seamless visual storytelling, allowing content creators to replace backgrounds with any image or video they want. This technique is widely embraced in film, television, and online content, and has opened the door to limitless creative possibilities. Aside from its ability to maximize creativity, it is also cheap to employ and convenient to set up, which has made it a staple for everyone who works with visuals.
In this simple guide, we’ll delve into the fundamentals of the chroma key effect, how it is used for video making, and how to leverage that as you perfect your visual content.
YouTube Video Background Creating realistic video scenes at your will is easy to complete with Filmora green screen removal.
Create Video Backgrounds Create Video Backgrounds Learn Green Screen

How Does Chroma Key Work?

Chroma Keying is done by singling out a specific color (usually green or blue) from the foreground, removing it, and replacing it with a different background (for example, a sunset). This process typically follows a series of steps:
- Background Selection:
A solid, single-color background, often green or blue, that contrasts well with the subject must be used. The color chosen should not be present in the subject or any props in the camera field to avoid unintentional transparency.
- Color Keying:
This requires the use of specialized visual effects software to key out the chosen color. The green or blue background is designated as transparent, making everything of that color see-through. The software distinguishes between the keyed color and the subject, creating a mask for the transparent areas.
- Foreground Filming:
This involves filming the subject against the live chroma key background. During filming, the chosen background color (green or blue) won’t appear in the final result due to its transparency. The subject is captured as if separately from the isolated background.
- Post-Processing:
In post-production processing, the editor takes the keyed-out color and replaces it with the new background of their choice. This step creates the illusion that the subject is in a different setting or environment. The transparent areas become filled with the chosen background which, if done right, results in a cohesive and visually appealing composition.
Why Green?
Theoretically, the chroma key background can be any solid color. However, the most commonly used colors are studio blue and bright green, with the latter far more common.
The choice of background color depends on the specific requirements of the production and the colors present in the scenes being filmed.
Free Download For Win 7 or later(64-bit)
Free Download For macOS 10.14 or later
Contrast
The less similar your chosen background color is to natural skin tones, the easier to isolate and replace in your footage. Bright green provides a strong contrast to most human skin tones and is less likely to be present in costumes or natural surroundings, making it easier to isolate subjects during the color separation.
Luminance
The color green emits light with greater intensity than blue, allowing for far more effective isolation by cameras during filming. This also means that blue screens demand increased lighting for proper exposure compared to green. This situation may be less than ideal if you lack powerful lighting or you don’t have the big bucks for them.
Digital Sensors
Many digital cameras and sensors are more sensitive to green wavelengths, resulting in cleaner and more accurate color keying during post-processing. Modern technology has also evolved to optimize for a green background, making it a more practical choice for the chroma key effect.
Wardrobe and Set Design
Bright green occurs less naturally in costumes and set designs than other colors, making green the optimal choice for reducing the likelihood of color spill and keying issues. However, if you know your scene will have lots of green, it is probably best to film with a blue screen, so there’s less risk of color spill and less post-production work.
Setting up Your Own Chroma Key Studio
Setting up your chroma key is convenient and straightforward, but there are some key factors to consider while setting up to ensure maximal performance.
Choosing the Right Background Color
The first step in the chroma key setup is selecting the right background color to be keyed out. This choice determines your effective color separation and ensures a smooth keying process during editing. Choosing a chroma-key background color that contrasts distinctly with the subject’s colors is essential for effective color separation. This prevents unintentional transparency, color spill, and ensures a polished final result.
Lighting Considerations
Lighting is an important part of the chroma-keying process. Bold, uniform, and consistent lighting on both the subject and the background makes it easy to delineate one from the other fully. This minimizes shadows and variations in color, creating a smooth and seamless keying process. Multiple diffuse lights from different angles are often used to illuminate the green screen evenly.
Positioning/Camera
Proper subject and camera placement are necessary to ensure an even color-keying process during post-production. To prevent shadow interference, the green screen should be smooth, tense, and without wrinkles or shadows.
High-quality cameras are essential every time, especially for chroma keying. Images with better definition are easier to key, so camera quality significantly affects the outcome. Even if your camera isn’t the best, merely shooting well can ensure a clean color-keying process during editing, resulting in professional-looking visuals.
Recording Tips for Chroma Key
- Proper Lighting
Maintaining uniform and well-defined lighting during recording is essential for a successful chroma-keying process. This consistency ensures a seamless keying process during post-production.
- Keep Distance from the Green Screen
The optimal distance between the subject and the green screen minimizes color spill and allows for natural movements. Proper distance between subject and background allows for easier isolation of the background and much smoother post-editing. A recommended starting point for the issue is around 6 to 10 feet from the background.
- Subjects and Clothing
As mentioned before, the choice of costume for Selecting appropriate clothing that doesn’t match the chroma key color prevents transparency issues. Subjects also have to be positioned in such a way that there is minimal light interference and reflection. These contribute to a flawless chroma key outcome.
3 Basic Troubleshooting Strategies
- Color Spill
Sometimes, reflected light from your green background can be cast on your subject and may remain so when the background light is keyed out. This phenomenon is known as a color spill. It is usually because of uneven lighting or shooting around reflecting surfaces. Avoiding spill can differentiate between good and lousy chroma key aftereffects.
Human hair is one area where color spill can show up unsuspectingly. Due to the translucency of hair, it is common for some unintended light to seep through. This allows some background visibility, which you do not want with a chroma key. This is especially notable with lighter hair colors like blond hair.
There are ways to account for this. Many video-editing software have features such as spill suppression and screen matte adjustments that can enhance the final footage. Specialized plugins also go a long way in ensuring minimizing spill. Addressing spill correction tackles unwanted green artifacts and ensures a clean keying process.
- Poor Lighting
Suboptimal green screen lighting can lead to inconsistencies in keying and editing, undermining your product. One way to avoid this is to light the screen and subject separately. Another tip, although expensive, is using multiple diffuse light sources and trying to maintain even lighting across every square foot of your scene. Super bright or dark spots can ruin your output, so it’s worth the extra effort if you don’t want to deal with problematic post-production.
- Poorly Refined Edges
Chroma keying should leave your videos with crisp, defined, natural-looking edges. But post-production editing can make all the difference if it doesn’t come out to your taste. Softening and refining edges make a smoother transition between the foreground object and the new background. Light adjustments to edge thickness and screen matte settings can also help enhance overall visual quality and add finesse to your work.
Conclusion
Green screen photography produces excellent results, and its ease of use makes it indispensable for videographers of all levels. In this guide, we’ve discussed chroma key technology, its role in the industry, and how to apply it to your craft to elevate visual content.
Green Technology for Impactful CTAs via Subs
Create High-Quality Video - Wondershare Filmora
An easy and powerful YouTube video editor
Numerous video and audio effects to choose from
Detailed tutorials provided by the official channel
Advances in filmmaking have brought many concepts into reality. And the green screen is one common practice. Green screen technology is a technique where you use two images or video streams to composite them together. You can use any background images, either foreground or behind the actors. For YouTube, you can use green screen subscribe to facilitate video Call To Action. A green screen easily produces impossible scenes and expands filming ideas. Everything done at the Studio is also the best way to protect actors from hazardous environments.
More so, the best trick is to allow actors to appear together on the screen even when the scenes were captured separately. And did you know that subscribe green screen makes it easy to add YouTube Call To Action and direct viewers on what to do?

Methods to add a subscribe button to your video
Viewers are not likely to subscribe to any channel if they are not guided. One best method is to engage a subscribe button to your video and draw the attention of as many as possible.
1 Use Subscribe Green Screen
Put your green screen to work by subscribing to it. Follow these steps to produce eye-catching videos, with a call to action closing point.
Step 1. Set screen
You need to create a background at the Studio – and that’s the green screen. Keenly hand it on a frame before you start filming. Also, note that no wrinkles or fold-ups are visible.

Step 2. Adjust lighting
Lighting is important to facilitate high-resolution video output quality. Put appropriate lighting settings to avoid directional shadows and get the best results.
Step 3. Set up the subject
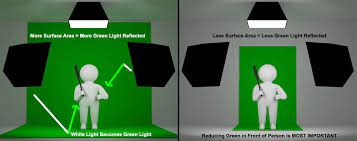
Give ample space between the subject and the green screen for an effective outcome. If they are too close, there will be a reflection of the green screen on the subject. It isn’t professional as it will be hard when it comes to matching to a different background.
Step 4. Start filming
Begin to film your video and ensure you take various shots for comparison. It is good to film at different angles to see what works best.
Step 5. Polish the rough cut
Tune all the footage to perfect video clips. It will save your efforts when keying out green screen footage. Remove the unwanted parts by trimming. You can also do other edits like merge and split where necessary.
Step 6. Key out the footage and edit the green screen
Your footage is now ready, and you are now free to edit the green screen. It is better to engage reliable editing software to remove the green traces in the shot.
Step 7. Paste the new background
Any background concept can now fit in. Add your desired background video or image in a new layer below the subject. You can continue to make other necessary adjustments like sharpness and hue for reality.
Step 8. Add Call To Action
Finally, tell your viewers to subscribe to your YouTube channel while watching the video. You can also introduce your other channels that aren’t yet known or those that have not reached 1,000 subscribers.
2 Using YouTube Studio
You can also enable the green screen to subscribe via the YouTube Studio. It is a YouTube application that provides you with the tools you need to create a successful YouTube channel. You can manage your videos, respond to comments and even add adverts to your content for pay. Here are the steps to add subscribe button.
Step 1. First, go directly to “studio.youtube.com” or click on your profile picture on the YouTube page to launch YT Studio.
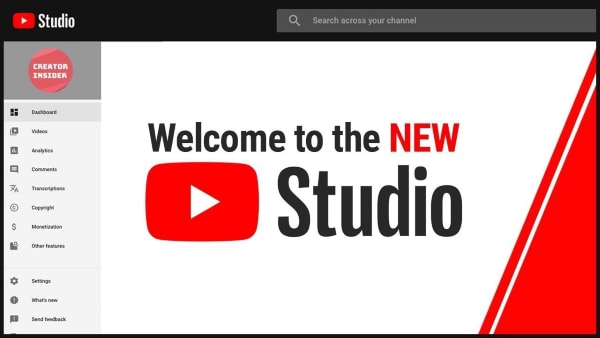
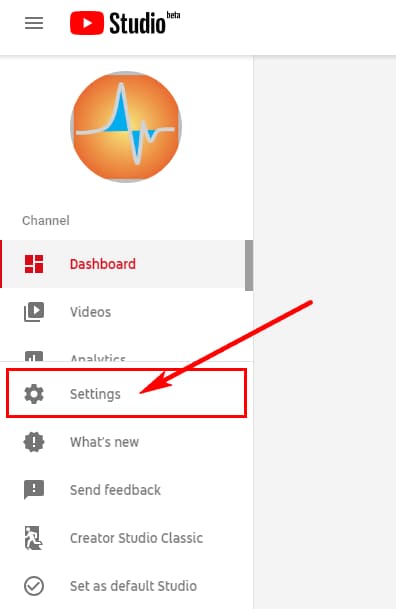
Step 2. Click on the “Menu” option and choose the “Settings”> “Channel” option.
Step 3. Then select the “Choose” image and select which subscribe button image you wish to use as your branding watermark. You can easily get one on the Google images section.
Step 4. Next, choose the display time for the branding watermark. It could be a custom start time if you want the branding watermark to start showing at a specific time. You can also choose “End or video” for it to appear at the last 10 to 15 seconds of your video. Likewise, the branding watermark can show throughout the video if you choose the “Entire video” option.
Step 5. Finally, save the changes. Voila! Viewers can subscribe to your channel easily, with a single click of a button.
3 Using Subscribe Effects
You can also use the subscribers’ effects to add a Call To Action. Remember, your main aim is to increase the audience to your channel. And in most cases, viewers forget to subscribe even though they love your video. Perhaps they don’t understand the importance it holds to your channel. You can do this using a reliable video editor software – Filmora.
Filmora is a sophisticated tool that is easy to use and export your videos to your computer and upload them to YouTube. It has over 300 effects for YouTubers and comprises exclusive overlays for any scene. Follow these steps to add the subscribe button with subscribe effects.
Key Features of Filmora
- Edit and export your videos at up to 4K resolution
- Supports GIF animation, which you can use for CTA
- It has an advanced text editor
- Easily remove background noise for a polished video sound
- It has an audio equalizer functionality for audio uniformity
- It has the video stabilization functionality
For Win 7 or later (64-bit)
For macOS 10.12 or later
Step 1. Launch Filmora
Open Filmora on your computer, then navigate to the upper left corner of the screen. Click on the “Sample Colors” and select the “Green color.” Next, drag it to video track into the timeline. Then adjust the duration of your video track to your preference.

Step 2. Design the subscribe GIF animation
Use a different color shade to design the subscribe GIF animation. Take “Red” in this case as it smartly blends with the green color that we choose earlier. Drag the red color above the green background.

Step 3. Adjust the red box
Make the added color red button look like a subscribe button. Then place it at any point you want it to appear in front of the background.
Step 4. Add the subscribe text
Write a text into the button. Filmora offers you various styles of text to choose from. You can select the text style you want to use, then drag and drop it into the timeline.

Step 5. Edit title with “Subscribe”
Edit your text with the word “Subscribe,” then place it under the red rectangle and hit the “OK” button.
Step 6. Animate the “Subscribe” button
Double click on the “Red” button. Just go to the “Animate” tab and click on the “Customize” option. Next, click on the “Add” button.

Step 7. Animate text as well
Go to the “Text” option in the timeline and click on “Advanced” text editor. Then go to the “Animation” tab and select the animation you wish to use. Here, you can adjust your text’s start and ending time when you want it to start fading.
Step 8. Export GIF
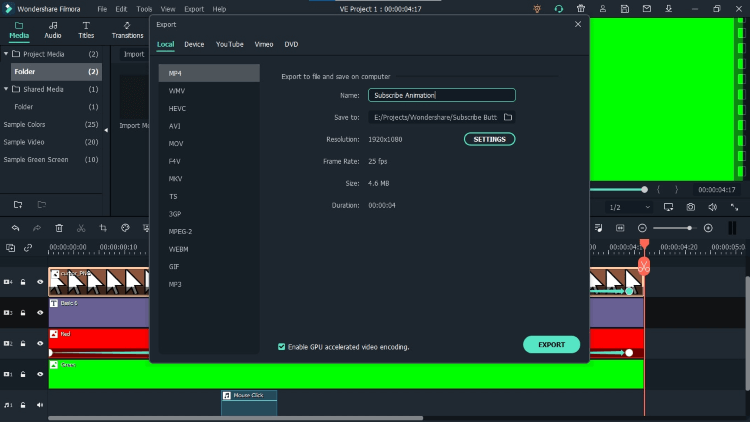
Your Subscribe GIF is now ready to be exported to your video. Hit the “Export” button and select which format to export it in.
Extra Tip: Ways to Include Calls to Action on videos
Know how to include CTA in your video marketing strategy to boost your subscribers.
- Include Annotations
Annotations are eye-catching and a quick reminder for viewers. You have a variety to choose from, like bubbles, shoutouts, etc. They are used to remind you to subscribe to the channel, view another video, or comment after watching it. - Edit CTAs in your video
It lets the viewer know what to do next before the video ends. The likely reminder is to subscribe to the channel. They could also be reminded to watch the next video or leave a comment. - YouTube Ad Overlays also work
However, ad overlay is for content creators with Google AdWords enabled on their YT channel. Adding an Ad Overlay will link you to any part of the web. Do you want to know the best part? No cost at all! You only need to pay for the views you buy during your video promotion.
Conclusion
● The best strategy to get viewers to subscribe to your YouTube channel is to engage a Call To Action. A bigger number of subscribers guarantees more watch time and the possible growth of your channel. Subscribe green screen even makes it perfect as far as video creation is concerned. You can get different video background ideas and make every scene look authentic. You can engage a third-party tool like Filmora. It will effortlessly add a green screen subscribe in a few steps. Likewise, you can add annotations and other text styles to enhance your look.
Advances in filmmaking have brought many concepts into reality. And the green screen is one common practice. Green screen technology is a technique where you use two images or video streams to composite them together. You can use any background images, either foreground or behind the actors. For YouTube, you can use green screen subscribe to facilitate video Call To Action. A green screen easily produces impossible scenes and expands filming ideas. Everything done at the Studio is also the best way to protect actors from hazardous environments.
More so, the best trick is to allow actors to appear together on the screen even when the scenes were captured separately. And did you know that subscribe green screen makes it easy to add YouTube Call To Action and direct viewers on what to do?

Methods to add a subscribe button to your video
Viewers are not likely to subscribe to any channel if they are not guided. One best method is to engage a subscribe button to your video and draw the attention of as many as possible.
1 Use Subscribe Green Screen
Put your green screen to work by subscribing to it. Follow these steps to produce eye-catching videos, with a call to action closing point.
Step 1. Set screen
You need to create a background at the Studio – and that’s the green screen. Keenly hand it on a frame before you start filming. Also, note that no wrinkles or fold-ups are visible.

Step 2. Adjust lighting
Lighting is important to facilitate high-resolution video output quality. Put appropriate lighting settings to avoid directional shadows and get the best results.
Step 3. Set up the subject
Give ample space between the subject and the green screen for an effective outcome. If they are too close, there will be a reflection of the green screen on the subject. It isn’t professional as it will be hard when it comes to matching to a different background.

Step 4. Start filming
Begin to film your video and ensure you take various shots for comparison. It is good to film at different angles to see what works best.
Step 5. Polish the rough cut
Tune all the footage to perfect video clips. It will save your efforts when keying out green screen footage. Remove the unwanted parts by trimming. You can also do other edits like merge and split where necessary.
Step 6. Key out the footage and edit the green screen
Your footage is now ready, and you are now free to edit the green screen. It is better to engage reliable editing software to remove the green traces in the shot.
Step 7. Paste the new background
Any background concept can now fit in. Add your desired background video or image in a new layer below the subject. You can continue to make other necessary adjustments like sharpness and hue for reality.
Step 8. Add Call To Action
Finally, tell your viewers to subscribe to your YouTube channel while watching the video. You can also introduce your other channels that aren’t yet known or those that have not reached 1,000 subscribers.
2 Using YouTube Studio
You can also enable the green screen to subscribe via the YouTube Studio. It is a YouTube application that provides you with the tools you need to create a successful YouTube channel. You can manage your videos, respond to comments and even add adverts to your content for pay. Here are the steps to add subscribe button.
Step 1. First, go directly to “studio.youtube.com” or click on your profile picture on the YouTube page to launch YT Studio.

Step 2. Click on the “Menu” option and choose the “Settings”> “Channel” option.

Step 3. Then select the “Choose” image and select which subscribe button image you wish to use as your branding watermark. You can easily get one on the Google images section.
Step 4. Next, choose the display time for the branding watermark. It could be a custom start time if you want the branding watermark to start showing at a specific time. You can also choose “End or video” for it to appear at the last 10 to 15 seconds of your video. Likewise, the branding watermark can show throughout the video if you choose the “Entire video” option.
Step 5. Finally, save the changes. Voila! Viewers can subscribe to your channel easily, with a single click of a button.
3 Using Subscribe Effects
You can also use the subscribers’ effects to add a Call To Action. Remember, your main aim is to increase the audience to your channel. And in most cases, viewers forget to subscribe even though they love your video. Perhaps they don’t understand the importance it holds to your channel. You can do this using a reliable video editor software – Filmora.
Filmora is a sophisticated tool that is easy to use and export your videos to your computer and upload them to YouTube. It has over 300 effects for YouTubers and comprises exclusive overlays for any scene. Follow these steps to add the subscribe button with subscribe effects.
Key Features of Filmora
- Edit and export your videos at up to 4K resolution
- Supports GIF animation, which you can use for CTA
- It has an advanced text editor
- Easily remove background noise for a polished video sound
- It has an audio equalizer functionality for audio uniformity
- It has the video stabilization functionality
For Win 7 or later (64-bit)
For macOS 10.12 or later
Step 1. Launch Filmora
Open Filmora on your computer, then navigate to the upper left corner of the screen. Click on the “Sample Colors” and select the “Green color.” Next, drag it to video track into the timeline. Then adjust the duration of your video track to your preference.

Step 2. Design the subscribe GIF animation
Use a different color shade to design the subscribe GIF animation. Take “Red” in this case as it smartly blends with the green color that we choose earlier. Drag the red color above the green background.

Step 3. Adjust the red box
Make the added color red button look like a subscribe button. Then place it at any point you want it to appear in front of the background.
Step 4. Add the subscribe text
Write a text into the button. Filmora offers you various styles of text to choose from. You can select the text style you want to use, then drag and drop it into the timeline.

Step 5. Edit title with “Subscribe”
Edit your text with the word “Subscribe,” then place it under the red rectangle and hit the “OK” button.
Step 6. Animate the “Subscribe” button
Double click on the “Red” button. Just go to the “Animate” tab and click on the “Customize” option. Next, click on the “Add” button.

Step 7. Animate text as well
Go to the “Text” option in the timeline and click on “Advanced” text editor. Then go to the “Animation” tab and select the animation you wish to use. Here, you can adjust your text’s start and ending time when you want it to start fading.
Step 8. Export GIF
Your Subscribe GIF is now ready to be exported to your video. Hit the “Export” button and select which format to export it in.

Extra Tip: Ways to Include Calls to Action on videos
Know how to include CTA in your video marketing strategy to boost your subscribers.
- Include Annotations
Annotations are eye-catching and a quick reminder for viewers. You have a variety to choose from, like bubbles, shoutouts, etc. They are used to remind you to subscribe to the channel, view another video, or comment after watching it. - Edit CTAs in your video
It lets the viewer know what to do next before the video ends. The likely reminder is to subscribe to the channel. They could also be reminded to watch the next video or leave a comment. - YouTube Ad Overlays also work
However, ad overlay is for content creators with Google AdWords enabled on their YT channel. Adding an Ad Overlay will link you to any part of the web. Do you want to know the best part? No cost at all! You only need to pay for the views you buy during your video promotion.
Conclusion
● The best strategy to get viewers to subscribe to your YouTube channel is to engage a Call To Action. A bigger number of subscribers guarantees more watch time and the possible growth of your channel. Subscribe green screen even makes it perfect as far as video creation is concerned. You can get different video background ideas and make every scene look authentic. You can engage a third-party tool like Filmora. It will effortlessly add a green screen subscribe in a few steps. Likewise, you can add annotations and other text styles to enhance your look.
Advances in filmmaking have brought many concepts into reality. And the green screen is one common practice. Green screen technology is a technique where you use two images or video streams to composite them together. You can use any background images, either foreground or behind the actors. For YouTube, you can use green screen subscribe to facilitate video Call To Action. A green screen easily produces impossible scenes and expands filming ideas. Everything done at the Studio is also the best way to protect actors from hazardous environments.
More so, the best trick is to allow actors to appear together on the screen even when the scenes were captured separately. And did you know that subscribe green screen makes it easy to add YouTube Call To Action and direct viewers on what to do?

Methods to add a subscribe button to your video
Viewers are not likely to subscribe to any channel if they are not guided. One best method is to engage a subscribe button to your video and draw the attention of as many as possible.
1 Use Subscribe Green Screen
Put your green screen to work by subscribing to it. Follow these steps to produce eye-catching videos, with a call to action closing point.
Step 1. Set screen
You need to create a background at the Studio – and that’s the green screen. Keenly hand it on a frame before you start filming. Also, note that no wrinkles or fold-ups are visible.

Step 2. Adjust lighting
Lighting is important to facilitate high-resolution video output quality. Put appropriate lighting settings to avoid directional shadows and get the best results.
Step 3. Set up the subject
Give ample space between the subject and the green screen for an effective outcome. If they are too close, there will be a reflection of the green screen on the subject. It isn’t professional as it will be hard when it comes to matching to a different background.

Step 4. Start filming
Begin to film your video and ensure you take various shots for comparison. It is good to film at different angles to see what works best.
Step 5. Polish the rough cut
Tune all the footage to perfect video clips. It will save your efforts when keying out green screen footage. Remove the unwanted parts by trimming. You can also do other edits like merge and split where necessary.
Step 6. Key out the footage and edit the green screen
Your footage is now ready, and you are now free to edit the green screen. It is better to engage reliable editing software to remove the green traces in the shot.
Step 7. Paste the new background
Any background concept can now fit in. Add your desired background video or image in a new layer below the subject. You can continue to make other necessary adjustments like sharpness and hue for reality.
Step 8. Add Call To Action
Finally, tell your viewers to subscribe to your YouTube channel while watching the video. You can also introduce your other channels that aren’t yet known or those that have not reached 1,000 subscribers.
2 Using YouTube Studio
You can also enable the green screen to subscribe via the YouTube Studio. It is a YouTube application that provides you with the tools you need to create a successful YouTube channel. You can manage your videos, respond to comments and even add adverts to your content for pay. Here are the steps to add subscribe button.
Step 1. First, go directly to “studio.youtube.com” or click on your profile picture on the YouTube page to launch YT Studio.

Step 2. Click on the “Menu” option and choose the “Settings”> “Channel” option.

Step 3. Then select the “Choose” image and select which subscribe button image you wish to use as your branding watermark. You can easily get one on the Google images section.
Step 4. Next, choose the display time for the branding watermark. It could be a custom start time if you want the branding watermark to start showing at a specific time. You can also choose “End or video” for it to appear at the last 10 to 15 seconds of your video. Likewise, the branding watermark can show throughout the video if you choose the “Entire video” option.
Step 5. Finally, save the changes. Voila! Viewers can subscribe to your channel easily, with a single click of a button.
3 Using Subscribe Effects
You can also use the subscribers’ effects to add a Call To Action. Remember, your main aim is to increase the audience to your channel. And in most cases, viewers forget to subscribe even though they love your video. Perhaps they don’t understand the importance it holds to your channel. You can do this using a reliable video editor software – Filmora.
Filmora is a sophisticated tool that is easy to use and export your videos to your computer and upload them to YouTube. It has over 300 effects for YouTubers and comprises exclusive overlays for any scene. Follow these steps to add the subscribe button with subscribe effects.
Key Features of Filmora
- Edit and export your videos at up to 4K resolution
- Supports GIF animation, which you can use for CTA
- It has an advanced text editor
- Easily remove background noise for a polished video sound
- It has an audio equalizer functionality for audio uniformity
- It has the video stabilization functionality
For Win 7 or later (64-bit)
For macOS 10.12 or later
Step 1. Launch Filmora
Open Filmora on your computer, then navigate to the upper left corner of the screen. Click on the “Sample Colors” and select the “Green color.” Next, drag it to video track into the timeline. Then adjust the duration of your video track to your preference.

Step 2. Design the subscribe GIF animation
Use a different color shade to design the subscribe GIF animation. Take “Red” in this case as it smartly blends with the green color that we choose earlier. Drag the red color above the green background.

Step 3. Adjust the red box
Make the added color red button look like a subscribe button. Then place it at any point you want it to appear in front of the background.
Step 4. Add the subscribe text
Write a text into the button. Filmora offers you various styles of text to choose from. You can select the text style you want to use, then drag and drop it into the timeline.

Step 5. Edit title with “Subscribe”
Edit your text with the word “Subscribe,” then place it under the red rectangle and hit the “OK” button.
Step 6. Animate the “Subscribe” button
Double click on the “Red” button. Just go to the “Animate” tab and click on the “Customize” option. Next, click on the “Add” button.

Step 7. Animate text as well
Go to the “Text” option in the timeline and click on “Advanced” text editor. Then go to the “Animation” tab and select the animation you wish to use. Here, you can adjust your text’s start and ending time when you want it to start fading.
Step 8. Export GIF
Your Subscribe GIF is now ready to be exported to your video. Hit the “Export” button and select which format to export it in.

Extra Tip: Ways to Include Calls to Action on videos
Know how to include CTA in your video marketing strategy to boost your subscribers.
- Include Annotations
Annotations are eye-catching and a quick reminder for viewers. You have a variety to choose from, like bubbles, shoutouts, etc. They are used to remind you to subscribe to the channel, view another video, or comment after watching it. - Edit CTAs in your video
It lets the viewer know what to do next before the video ends. The likely reminder is to subscribe to the channel. They could also be reminded to watch the next video or leave a comment. - YouTube Ad Overlays also work
However, ad overlay is for content creators with Google AdWords enabled on their YT channel. Adding an Ad Overlay will link you to any part of the web. Do you want to know the best part? No cost at all! You only need to pay for the views you buy during your video promotion.
Conclusion
● The best strategy to get viewers to subscribe to your YouTube channel is to engage a Call To Action. A bigger number of subscribers guarantees more watch time and the possible growth of your channel. Subscribe green screen even makes it perfect as far as video creation is concerned. You can get different video background ideas and make every scene look authentic. You can engage a third-party tool like Filmora. It will effortlessly add a green screen subscribe in a few steps. Likewise, you can add annotations and other text styles to enhance your look.
Advances in filmmaking have brought many concepts into reality. And the green screen is one common practice. Green screen technology is a technique where you use two images or video streams to composite them together. You can use any background images, either foreground or behind the actors. For YouTube, you can use green screen subscribe to facilitate video Call To Action. A green screen easily produces impossible scenes and expands filming ideas. Everything done at the Studio is also the best way to protect actors from hazardous environments.
More so, the best trick is to allow actors to appear together on the screen even when the scenes were captured separately. And did you know that subscribe green screen makes it easy to add YouTube Call To Action and direct viewers on what to do?

Methods to add a subscribe button to your video
Viewers are not likely to subscribe to any channel if they are not guided. One best method is to engage a subscribe button to your video and draw the attention of as many as possible.
1 Use Subscribe Green Screen
Put your green screen to work by subscribing to it. Follow these steps to produce eye-catching videos, with a call to action closing point.
Step 1. Set screen
You need to create a background at the Studio – and that’s the green screen. Keenly hand it on a frame before you start filming. Also, note that no wrinkles or fold-ups are visible.

Step 2. Adjust lighting
Lighting is important to facilitate high-resolution video output quality. Put appropriate lighting settings to avoid directional shadows and get the best results.
Step 3. Set up the subject
Give ample space between the subject and the green screen for an effective outcome. If they are too close, there will be a reflection of the green screen on the subject. It isn’t professional as it will be hard when it comes to matching to a different background.

Step 4. Start filming
Begin to film your video and ensure you take various shots for comparison. It is good to film at different angles to see what works best.
Step 5. Polish the rough cut
Tune all the footage to perfect video clips. It will save your efforts when keying out green screen footage. Remove the unwanted parts by trimming. You can also do other edits like merge and split where necessary.
Step 6. Key out the footage and edit the green screen
Your footage is now ready, and you are now free to edit the green screen. It is better to engage reliable editing software to remove the green traces in the shot.
Step 7. Paste the new background
Any background concept can now fit in. Add your desired background video or image in a new layer below the subject. You can continue to make other necessary adjustments like sharpness and hue for reality.
Step 8. Add Call To Action
Finally, tell your viewers to subscribe to your YouTube channel while watching the video. You can also introduce your other channels that aren’t yet known or those that have not reached 1,000 subscribers.
2 Using YouTube Studio
You can also enable the green screen to subscribe via the YouTube Studio. It is a YouTube application that provides you with the tools you need to create a successful YouTube channel. You can manage your videos, respond to comments and even add adverts to your content for pay. Here are the steps to add subscribe button.
Step 1. First, go directly to “studio.youtube.com” or click on your profile picture on the YouTube page to launch YT Studio.

Step 2. Click on the “Menu” option and choose the “Settings”> “Channel” option.

Step 3. Then select the “Choose” image and select which subscribe button image you wish to use as your branding watermark. You can easily get one on the Google images section.
Step 4. Next, choose the display time for the branding watermark. It could be a custom start time if you want the branding watermark to start showing at a specific time. You can also choose “End or video” for it to appear at the last 10 to 15 seconds of your video. Likewise, the branding watermark can show throughout the video if you choose the “Entire video” option.
Step 5. Finally, save the changes. Voila! Viewers can subscribe to your channel easily, with a single click of a button.
3 Using Subscribe Effects
You can also use the subscribers’ effects to add a Call To Action. Remember, your main aim is to increase the audience to your channel. And in most cases, viewers forget to subscribe even though they love your video. Perhaps they don’t understand the importance it holds to your channel. You can do this using a reliable video editor software – Filmora.
Filmora is a sophisticated tool that is easy to use and export your videos to your computer and upload them to YouTube. It has over 300 effects for YouTubers and comprises exclusive overlays for any scene. Follow these steps to add the subscribe button with subscribe effects.
Key Features of Filmora
- Edit and export your videos at up to 4K resolution
- Supports GIF animation, which you can use for CTA
- It has an advanced text editor
- Easily remove background noise for a polished video sound
- It has an audio equalizer functionality for audio uniformity
- It has the video stabilization functionality
For Win 7 or later (64-bit)
For macOS 10.12 or later
Step 1. Launch Filmora
Open Filmora on your computer, then navigate to the upper left corner of the screen. Click on the “Sample Colors” and select the “Green color.” Next, drag it to video track into the timeline. Then adjust the duration of your video track to your preference.

Step 2. Design the subscribe GIF animation
Use a different color shade to design the subscribe GIF animation. Take “Red” in this case as it smartly blends with the green color that we choose earlier. Drag the red color above the green background.

Step 3. Adjust the red box
Make the added color red button look like a subscribe button. Then place it at any point you want it to appear in front of the background.
Step 4. Add the subscribe text
Write a text into the button. Filmora offers you various styles of text to choose from. You can select the text style you want to use, then drag and drop it into the timeline.

Step 5. Edit title with “Subscribe”
Edit your text with the word “Subscribe,” then place it under the red rectangle and hit the “OK” button.
Step 6. Animate the “Subscribe” button
Double click on the “Red” button. Just go to the “Animate” tab and click on the “Customize” option. Next, click on the “Add” button.

Step 7. Animate text as well
Go to the “Text” option in the timeline and click on “Advanced” text editor. Then go to the “Animation” tab and select the animation you wish to use. Here, you can adjust your text’s start and ending time when you want it to start fading.
Step 8. Export GIF
Your Subscribe GIF is now ready to be exported to your video. Hit the “Export” button and select which format to export it in.

Extra Tip: Ways to Include Calls to Action on videos
Know how to include CTA in your video marketing strategy to boost your subscribers.
- Include Annotations
Annotations are eye-catching and a quick reminder for viewers. You have a variety to choose from, like bubbles, shoutouts, etc. They are used to remind you to subscribe to the channel, view another video, or comment after watching it. - Edit CTAs in your video
It lets the viewer know what to do next before the video ends. The likely reminder is to subscribe to the channel. They could also be reminded to watch the next video or leave a comment. - YouTube Ad Overlays also work
However, ad overlay is for content creators with Google AdWords enabled on their YT channel. Adding an Ad Overlay will link you to any part of the web. Do you want to know the best part? No cost at all! You only need to pay for the views you buy during your video promotion.
Conclusion
● The best strategy to get viewers to subscribe to your YouTube channel is to engage a Call To Action. A bigger number of subscribers guarantees more watch time and the possible growth of your channel. Subscribe green screen even makes it perfect as far as video creation is concerned. You can get different video background ideas and make every scene look authentic. You can engage a third-party tool like Filmora. It will effortlessly add a green screen subscribe in a few steps. Likewise, you can add annotations and other text styles to enhance your look.
Also read:
- Subtitle Extraction Top 10 Free Apps Rated
- Vintage Video Making Masterclass Complete Tutorial
- High-End Conversion YouTube Shorts to Professionally Produced MP4
- In 2024, Best 5 YouTube Video Editor Alternatives
- In 2024, Cutting-Edge Techniques for iOS Users Uploading Videos to YouTube
- Unlocking iPhone's Loop Functionality
- Essential Guide to Hashtagging for Game-Focused YT Channels for 2024
- [Updated] Channel Triumphs with Trending Hashtags
- [New] Engineering Captivating Video Teasers for Online Presence
- Perfecting Your Valorant Thumbnails A Comprehensive Tutorial
- Unveiling TSeries’ Income Stream From Youtube Content Consumption
- Savory Screens Culinary Content Creation
- Ultimate Shot Selection - Best Stabilizers Reviewed
- The Essential Manual for YouTube-to-GIF Conversion Online
- Beauty Vlogs From Basics to Brilliance Launching a YouTube Channel
- [Updated] Conquer YouTube Creator Studio A Comprehensive Guide
- 2024 Approved Efficiently Shifting Videos YouTube to Dailymotion Strategy
- 2024 Approved Capture Chuckles Quickly Efficient Methods for Exciting YouTube Reaction Videos (3 Tips)
- Crafting a Customized Soundscape YouTube Playlist Building on the Internet/Apps for 2024
- [Updated] Becoming a Confident Content Creator YouTube's Top Tips
- [New] 10 FREE YouTube Playlist Downloaders [Online/PC/Android/iOS]2
- How to Upload Twitch Streams to YouTube
- Unveiling the Process of Identifying YouTube Audience
- 2024 Approved Comprehensive Guide to YouTube Video Captioning
- Elevate Your Youtube Presence Essential Tips for Engaging Shorts for 2024
- The Art of Easy Story Making
- Updated Aspect Ratio Calculators Finding the Perfect Balance for 2024
- [Updated] How to Video Chat/Call on Snapchat with 3 Steps for 2024
- Get It Right Three Pro Tips for LOL Gameplay Captures
- [New] 2024 Approved Insta-Marketing Brilliance Top 10 Innovative Approaches for Video Ads
- Pixel Perfect Mastering Aspect Ratio and Resolution Calculations for 2024
- [Updated] Apeaksoft's Screen Recorder Mastery - 2023 Exposed for 2024
- New In 2024, Detect Air Release Sonic Capture
- How to Change Netflix Location to Get More Country Version On Oppo Reno 11F 5G | Dr.fone
- [Updated] Saving Smiles The Ultimate List of TwitVid Tools
- In 2024, How to Remove a Previously Synced Google Account from Your Vivo S18 Pro
- Generate Hits Adobe-Made Memes
- In 2024, A Quick Guide to Tecno Pova 6 Pro 5G FRP Bypass Instantly
- Ignite Discussion with Custom, Creative Story Inquiries
- In 2024, Top 10 Highest Grade Clear & Free TikTok Downloader
- Unlocking the Full Capabilities of MorphVOX Voice Alteration
- [Updated] In 2024, A Pocket Guide for Channel Setup and Management on Discord
- New In 2024, A Guide to Copyright-Free Tracks Perfect for Videographic Artistry
- Transform Typography in After Effects With Premium Plug-Ins
- Title: "A Comprehensive Guide to Achieving Smooth Color-Keying"
- Author: Kevin
- Created at : 2024-05-25 14:35:32
- Updated at : 2024-05-26 14:35:32
- Link: https://youtube-videos.techidaily.com/a-comprehensive-guide-to-achieving-smooth-color-keying/
- License: This work is licensed under CC BY-NC-SA 4.0.

