
:max_bytes(150000):strip_icc()/videoonspotify-0f90e61ce0df40958648b79e5c0a9b5a.jpg)
A Comprehensible Breakdown for YouTube Annotation and Card Implementation for 2024
A Comprehensible Breakdown for YouTube Annotation and Card Implementation
How to Add YouTube Annotations and Cards?

Richard Bennett
Mar 27, 2024• Proven solutions
Update: YouTube has replaced annotation with end screen. You can find the latest informaiton about YouTube screen and YouTube cards here.
YouTube Cards and Annotations are very useful if you want to encourage your viewrs to take an action, like Subscribe, go to another video or associated website, etc. Today, we’re going to show you the differences between cards and annotations, and how to add them in YouTube videos.
Do you want to make your YouTube video more attractive? Wondershare Filmora is a such video editing software designed for YouTube creator. It not only allows you cut, trim, crop, zoom, reverse, rotate the video clips, but also makes the advanced features like green screen, PIP, tilt-shift and mosaic easy like a piece of cake. With Wondershare Filmora, you can ignite your YouTube videos with over 300 effects like Fashion, Beauty, Block Buster, Travel, etc.
 Download Mac Version ](https://tools.techidaily.com/wondershare/filmora/download/ )
The main difference between annotation and cards is their outlook. Cards are more graphical whereas annotations are text based. The cards slide in once you click the small “i” button on the video where as the annotation is there based on the timings set by the user. Moreover the main differences between the two are:
1. YouTube Cards are small and unobtrusive, unless a viewer chooses to click on them, which is why they are the better option when you are trying to get views on other videos. Irritating a few people with a big annotation might be worth it if you also draw other people’s attention to your cause or website, but it is not a good way to endear yourself to people you are trying to get views and subscriptions from. When a card is clicked a thumbnail will appear with a link to your additional content. YouTube Cards are often better than annotations for adding links to your videos because they look much tidier. Also, unlike annotations, cards will be visible to people watching your videos on their mobile devices.
2. You cannot use Cards just to insert notes into your videos, though, and you cannot adjust their size like you can with annotations. So, if you do need a link to be large and extremely noticeable, annotations might still be your best option. Cards and annotations can even be used in combination sometimes.
How to add YouTube Cards
YouTube Cards are similar to annotations but more interactive. They allow the owner of the video to add images and other links. A small box appears, clicking on which will activate the cards.
- Click on the “Video Manager” tab

- Click “Edit” tab under the video screen shot you want to add the card on
- Click on the “Cards” tab

- On the right panel click on “Add Card” drop down menu and select the type of card you want to add
- Click on the create button which will open the corresponding video
- Once you finish the subsequent information required click create card
- Select the timeline for the playhead to appear which leads to the card slide

- Apply changes and exit
How to add YouTube annotations
YouTube Annotation is addition of a text layer, link or hotspots over your video. They add interactive boxes which link to other websites or videos (any link you want).
- Click on the video manager tab
- Click edit tab under the video screen shot you want to add the annotation on
- Click on the “End screen & Annotation” tab

- On the right panel click on “+ Add Element” and select the kind of annotation you want to add
- Adjust the position of Annotation, you can drag the rectangle to locate it at any position of the video, move the slide to set the start and end time of the annotation

- Apply changes
The types of YouTube annotations:
1. Speech Bubbles
Speech Bubbles: look like the dialogue box in a comic strip. There is a tail which you can adjust so it looks like one of the people in your video is saying what is written in the annotation. Speech bubbles are great for adding in funny comments.
2. Notes
Notes: come in a limited selection of colors and can be adjusted to take up a maximum of 30% of your player screen. Sometimes you need a huge annotation to get an important point across, but using huge note annotations too often – especially near the beginnings of your videos – will annoy viewers. If you need a large note annotation make sure to place it later in your video, when a viewer will already be invested in what they are watching and less likely to click away.
3. Titles
Titles: are large pieces of text that go either at the beginning of your video or in-between different topics within your video. YouTube’s titles are not very nice to look at, but they are a decent option if you do not have access to video editing software.
4. Spotlights
Spotlights: have a subtle border and are completely clear inside. Your text only appears when a user hovers over the spotlight. Spotlights are great for turning elements within your video into links.
5. Labels
Labels: are completely transparent, like spotlights, but the user does not have to hover over them for your text to be visible.
6. Pauses
Pauses: are no longer available to add to your videos, although Pause Annotations added before they were removed still work. Pause Annotations used to stop your video for a set period of time when your annotation appeared.
If somebody watches your video and gets to the end then that means they enjoyed it and will probably be open to checking out more of your content. Rather than hoping that your other videos show up in the ‘Suggested Videos’ YouTube will show after yours has finished playing you should always include an outro, or ending card, after your video to recommend your own work. Annotations are used in a lot of successful YouTuber’s ending cards.
One form this takes is small Note annotations in the bottom corners of the screen, one linking to your previous video and one to the next. Sometimes your viewers might not necessarily get the most enjoyment out of your videos by watching them in order, though. Sometimes you want to link viewers to the videos that are most related to the one they just watched.
The best outros also include a subscribe button, which can be created using annotations. These annotations work best when combined with a verbal call to action. Make sure your outro lasts long enough for people to make the decision to subscribe or click another video.
No matter what kind of annotations you are using, you should never use more than two of them at a time anywhere except for your outro. You should also never place annotations at the very top of your screen, or in the middle at the bottom. If your video is embedding on a separate website then the player will cover annotations at the top of the screen, and ads might cover annotations placed in the bottom-middle of the screen. Keep in mind when using annotations that they will not be visible to users watching your videos on mobile devices. If mobile traffic is very important to you then consider using YouTube Cards.
Richard Bennett
Richard Bennett is a writer and a lover of all things video.
Follow @Richard Bennett
Richard Bennett
Mar 27, 2024• Proven solutions
Update: YouTube has replaced annotation with end screen. You can find the latest informaiton about YouTube screen and YouTube cards here.
YouTube Cards and Annotations are very useful if you want to encourage your viewrs to take an action, like Subscribe, go to another video or associated website, etc. Today, we’re going to show you the differences between cards and annotations, and how to add them in YouTube videos.
Do you want to make your YouTube video more attractive? Wondershare Filmora is a such video editing software designed for YouTube creator. It not only allows you cut, trim, crop, zoom, reverse, rotate the video clips, but also makes the advanced features like green screen, PIP, tilt-shift and mosaic easy like a piece of cake. With Wondershare Filmora, you can ignite your YouTube videos with over 300 effects like Fashion, Beauty, Block Buster, Travel, etc.
Download Mac Version ](https://tools.techidaily.com/wondershare/filmora/download/ )
The main difference between annotation and cards is their outlook. Cards are more graphical whereas annotations are text based. The cards slide in once you click the small “i” button on the video where as the annotation is there based on the timings set by the user. Moreover the main differences between the two are:
1. YouTube Cards are small and unobtrusive, unless a viewer chooses to click on them, which is why they are the better option when you are trying to get views on other videos. Irritating a few people with a big annotation might be worth it if you also draw other people’s attention to your cause or website, but it is not a good way to endear yourself to people you are trying to get views and subscriptions from. When a card is clicked a thumbnail will appear with a link to your additional content. YouTube Cards are often better than annotations for adding links to your videos because they look much tidier. Also, unlike annotations, cards will be visible to people watching your videos on their mobile devices.
2. You cannot use Cards just to insert notes into your videos, though, and you cannot adjust their size like you can with annotations. So, if you do need a link to be large and extremely noticeable, annotations might still be your best option. Cards and annotations can even be used in combination sometimes.
How to add YouTube Cards
YouTube Cards are similar to annotations but more interactive. They allow the owner of the video to add images and other links. A small box appears, clicking on which will activate the cards.
- Click on the “Video Manager” tab
- Click “Edit” tab under the video screen shot you want to add the card on
- Click on the “Cards” tab
- On the right panel click on “Add Card” drop down menu and select the type of card you want to add
- Click on the create button which will open the corresponding video
- Once you finish the subsequent information required click create card
- Select the timeline for the playhead to appear which leads to the card slide
- Apply changes and exit
How to add YouTube annotations
YouTube Annotation is addition of a text layer, link or hotspots over your video. They add interactive boxes which link to other websites or videos (any link you want).
- Click on the video manager tab
- Click edit tab under the video screen shot you want to add the annotation on
- Click on the “End screen & Annotation” tab
- On the right panel click on “+ Add Element” and select the kind of annotation you want to add
- Adjust the position of Annotation, you can drag the rectangle to locate it at any position of the video, move the slide to set the start and end time of the annotation
- Apply changes
The types of YouTube annotations:
1. Speech Bubbles
Speech Bubbles: look like the dialogue box in a comic strip. There is a tail which you can adjust so it looks like one of the people in your video is saying what is written in the annotation. Speech bubbles are great for adding in funny comments.
2. Notes
Notes: come in a limited selection of colors and can be adjusted to take up a maximum of 30% of your player screen. Sometimes you need a huge annotation to get an important point across, but using huge note annotations too often – especially near the beginnings of your videos – will annoy viewers. If you need a large note annotation make sure to place it later in your video, when a viewer will already be invested in what they are watching and less likely to click away.
3. Titles
Titles: are large pieces of text that go either at the beginning of your video or in-between different topics within your video. YouTube’s titles are not very nice to look at, but they are a decent option if you do not have access to video editing software.
4. Spotlights
Spotlights: have a subtle border and are completely clear inside. Your text only appears when a user hovers over the spotlight. Spotlights are great for turning elements within your video into links.
5. Labels
Labels: are completely transparent, like spotlights, but the user does not have to hover over them for your text to be visible.
6. Pauses
Pauses: are no longer available to add to your videos, although Pause Annotations added before they were removed still work. Pause Annotations used to stop your video for a set period of time when your annotation appeared.
If somebody watches your video and gets to the end then that means they enjoyed it and will probably be open to checking out more of your content. Rather than hoping that your other videos show up in the ‘Suggested Videos’ YouTube will show after yours has finished playing you should always include an outro, or ending card, after your video to recommend your own work. Annotations are used in a lot of successful YouTuber’s ending cards.
One form this takes is small Note annotations in the bottom corners of the screen, one linking to your previous video and one to the next. Sometimes your viewers might not necessarily get the most enjoyment out of your videos by watching them in order, though. Sometimes you want to link viewers to the videos that are most related to the one they just watched.
The best outros also include a subscribe button, which can be created using annotations. These annotations work best when combined with a verbal call to action. Make sure your outro lasts long enough for people to make the decision to subscribe or click another video.
No matter what kind of annotations you are using, you should never use more than two of them at a time anywhere except for your outro. You should also never place annotations at the very top of your screen, or in the middle at the bottom. If your video is embedding on a separate website then the player will cover annotations at the top of the screen, and ads might cover annotations placed in the bottom-middle of the screen. Keep in mind when using annotations that they will not be visible to users watching your videos on mobile devices. If mobile traffic is very important to you then consider using YouTube Cards.
Richard Bennett
Richard Bennett is a writer and a lover of all things video.
Follow @Richard Bennett
Channel Name Wizardry: Brainstorm & Create
Best YouTube Names Generators [+ How to Brainstorm]

Liza Brown
Oct 26, 2023• Proven solutions
It’s important to have a good name for your YouTube channel – something that people will remember. The following is a list of the 3 best YouTube name generators, an easy step-by-step for brainstorming, and instructions for updating your YouTube name.
Whether you’re a YouTuber beginner or want to improve your YouTube videos to the next level, a good YouTube video editing software will be a good helper. Wondershare Filmora is a video editor for all YouTube creators with plentiful effects and templates, and you can download it directly and have a try before purchasing.

- YouTube Name Generators
- How to Come Up With a Good YouTube Name
- How to Change Your YouTube Name
- Requesting a Custom URL for YouTube
Part 1: 3 Awesome YouTube Name Generators
Need some help brainstorming your channel name? Here are 3 tools for getting started. Even if you don’t use one of the names you generate you’ll get some great inspiration.
1. SpinXO
Key points:
- Lots of options
- Checks availability
This is a great generator. If you were brainstorming yourself, you’d probably write out a bunch of words related to yourself and the kinds of videos you want to make and see what goes together. SpinXO does that for you, and mixes in other words that sound good in usernames.
Here’s what happened when I tried to name a hypothetical baking channel:
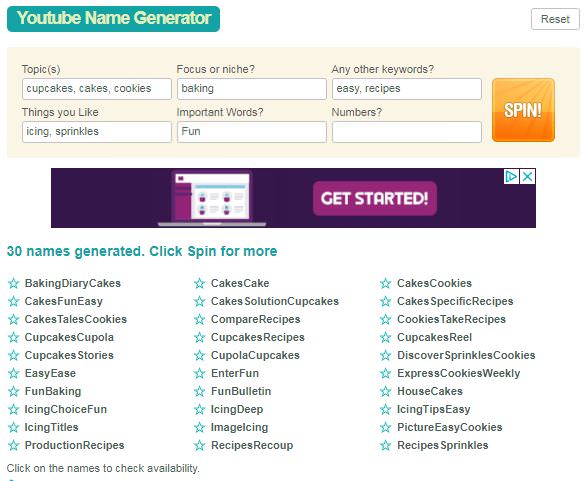
Not all of the results are great, but there are some cool sounding options in there.
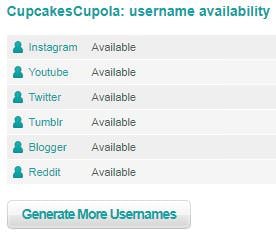
One of the most useful features of SpinXO is that you can check the availability of the usernames. I liked the sound of CupcakesCupola, and when I clicked on it I was able to see that nobody else was using it on other sites.
2. Name Generator
Key points:
- Can be hilarious
- Names tend to be a bit long
This is a fairly limited generator. You plunk in a prefix and a suffix, and it generates a random word or term to stuff between them. Here’s what I got for my fictional cupcake channel:
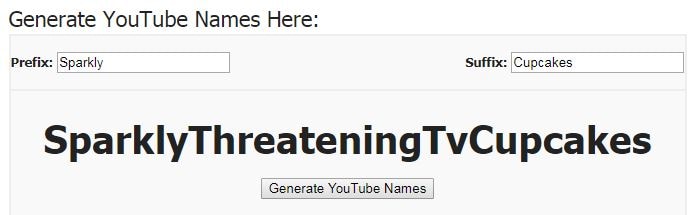
So, on one hand - that’s hilarious and I’m considering legally changing my name. On the other hand, all of the results look exactly like this (which means they’re all a bit too long). It shows you a longer list if you scroll down:
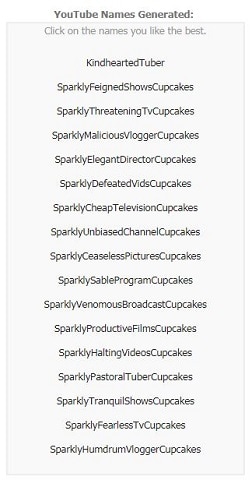
You can pick your favorite names and it’ll list them out so you can easily copy them into a word document. That’ll be useful if you’re collecting options from several sites.
3. Username Generator
Key points:
- Can generate a huge number of names at once
- You only input one word
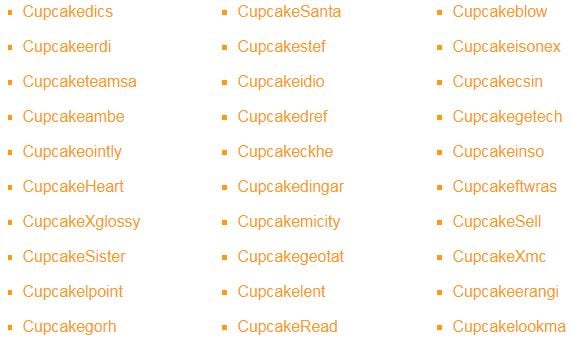
For this name generator, you type in one important word and choose how many results you want to see. You can see up to 300 at once.

The generator will take your keyword and add endings (and occasional beginnings) to it. Some endings are words, and some are just suffixes. Here’s what I got:
Part 2: How to Come Up With a Good YouTube Name – 3 Easy Steps
The name of your YouTube channel needs to accomplish two things:
- Tell viewers what your channel is about
- Stick in viewer’s heads by being catchy and unique
Here’s how you can brainstorm the perfect name for your channel!
Step 1: Gather up relevant words
Open up a journal (or a word document) and start writing down words that relate to you and your channel.
You may want to make one list of ‘you’ words (personality traits, nicknames, titles, etc.) and another of words related to your channel’s category (i.e. gaming, makeup, or baking).
Step 2: Combinations
Start combining your ‘you’ words with your category words to see what sounds good. You may want to use one of the name generators above (anchor) for this part.
Try to keep your name fairly short (3 words or less) so it’s easier for people to remember. Don’t include numbers if you can avoid it.
Step 3: Say it out loud
Once you have a shortlist of potential names, read them aloud to yourself to make sure they sound good. Ideally, you want to get that ‘oh, that has a nice ring to it!’ feeling.
Part 3: How to Change Your YouTube Name
In the early days of YouTube, you couldn’t change your name, but now you can!
- Click on your account icon in the top right corner of YouTube and choose settings.
- Click Edit on Google.
- Update your name and click OK.
Part 4: Requesting a Custom URL for YouTube
Here are several types of YouTube channel URL , wouldn’t it be nice if, instead of a string of numbers and letters, your channel URL included your name? YouTube can do that for you!
You need…
- 100 Subscribers
- to have been on YouTube for 30 days
- use a photo as your channel icon/profile picture
- have uploaded channel art
Here’s how to get your custom URL:
- Click on your icon in the top right corner of YouTube and choose Advanced under Settings / the gear icon.
- If you meet the qualifications above, you’ll see ‘You’re eligible for a custom URL’ under Channel Settings.
- YouTube will show you the custom URL you’re approved for in the Get a custom URL box. You can’t change what’s there, but you can add to the end of it.
- Click Change URL after reading the terms of use.
You can delete your custom URL and claim a new one, but doing this might be confusing for your followers.
If you already have a YouTube channel name – are you happy with it? How did you choose it?
Liza Brown
Liza Brown is a writer and a lover of all things video.
Follow @Liza Brown
Liza Brown
Oct 26, 2023• Proven solutions
It’s important to have a good name for your YouTube channel – something that people will remember. The following is a list of the 3 best YouTube name generators, an easy step-by-step for brainstorming, and instructions for updating your YouTube name.
Whether you’re a YouTuber beginner or want to improve your YouTube videos to the next level, a good YouTube video editing software will be a good helper. Wondershare Filmora is a video editor for all YouTube creators with plentiful effects and templates, and you can download it directly and have a try before purchasing.
- YouTube Name Generators
- How to Come Up With a Good YouTube Name
- How to Change Your YouTube Name
- Requesting a Custom URL for YouTube
Part 1: 3 Awesome YouTube Name Generators
Need some help brainstorming your channel name? Here are 3 tools for getting started. Even if you don’t use one of the names you generate you’ll get some great inspiration.
1. SpinXO
Key points:
- Lots of options
- Checks availability
This is a great generator. If you were brainstorming yourself, you’d probably write out a bunch of words related to yourself and the kinds of videos you want to make and see what goes together. SpinXO does that for you, and mixes in other words that sound good in usernames.
Here’s what happened when I tried to name a hypothetical baking channel:
Not all of the results are great, but there are some cool sounding options in there.
One of the most useful features of SpinXO is that you can check the availability of the usernames. I liked the sound of CupcakesCupola, and when I clicked on it I was able to see that nobody else was using it on other sites.
2. Name Generator
Key points:
- Can be hilarious
- Names tend to be a bit long
This is a fairly limited generator. You plunk in a prefix and a suffix, and it generates a random word or term to stuff between them. Here’s what I got for my fictional cupcake channel:
So, on one hand - that’s hilarious and I’m considering legally changing my name. On the other hand, all of the results look exactly like this (which means they’re all a bit too long). It shows you a longer list if you scroll down:
You can pick your favorite names and it’ll list them out so you can easily copy them into a word document. That’ll be useful if you’re collecting options from several sites.
3. Username Generator
Key points:
- Can generate a huge number of names at once
- You only input one word
For this name generator, you type in one important word and choose how many results you want to see. You can see up to 300 at once.
The generator will take your keyword and add endings (and occasional beginnings) to it. Some endings are words, and some are just suffixes. Here’s what I got:
Part 2: How to Come Up With a Good YouTube Name – 3 Easy Steps
The name of your YouTube channel needs to accomplish two things:
- Tell viewers what your channel is about
- Stick in viewer’s heads by being catchy and unique
Here’s how you can brainstorm the perfect name for your channel!
Step 1: Gather up relevant words
Open up a journal (or a word document) and start writing down words that relate to you and your channel.
You may want to make one list of ‘you’ words (personality traits, nicknames, titles, etc.) and another of words related to your channel’s category (i.e. gaming, makeup, or baking).
Step 2: Combinations
Start combining your ‘you’ words with your category words to see what sounds good. You may want to use one of the name generators above (anchor) for this part.
Try to keep your name fairly short (3 words or less) so it’s easier for people to remember. Don’t include numbers if you can avoid it.
Step 3: Say it out loud
Once you have a shortlist of potential names, read them aloud to yourself to make sure they sound good. Ideally, you want to get that ‘oh, that has a nice ring to it!’ feeling.
Part 3: How to Change Your YouTube Name
In the early days of YouTube, you couldn’t change your name, but now you can!
- Click on your account icon in the top right corner of YouTube and choose settings.
- Click Edit on Google.
- Update your name and click OK.
Part 4: Requesting a Custom URL for YouTube
Here are several types of YouTube channel URL , wouldn’t it be nice if, instead of a string of numbers and letters, your channel URL included your name? YouTube can do that for you!
You need…
- 100 Subscribers
- to have been on YouTube for 30 days
- use a photo as your channel icon/profile picture
- have uploaded channel art
Here’s how to get your custom URL:
- Click on your icon in the top right corner of YouTube and choose Advanced under Settings / the gear icon.
- If you meet the qualifications above, you’ll see ‘You’re eligible for a custom URL’ under Channel Settings.
- YouTube will show you the custom URL you’re approved for in the Get a custom URL box. You can’t change what’s there, but you can add to the end of it.
- Click Change URL after reading the terms of use.
You can delete your custom URL and claim a new one, but doing this might be confusing for your followers.
If you already have a YouTube channel name – are you happy with it? How did you choose it?
Liza Brown
Liza Brown is a writer and a lover of all things video.
Follow @Liza Brown
Also read:
- Budget-Friendly Recorder Choices for YouTube Vloggers
- [Updated] Beauty Brilliance Inside the World of Youtube Cosmetics
- In 2024, Editing Experience Workshop
- 2024 Approved Disabling YouTube Shorts for Good A Simple Approach
- Strategic Hash Tags Chart Your Way to $60,000 in Views
- 2024 Approved Elevating Engagement Optimal Size & Ratio on YouTube
- [New] Boost Channels and Views Through Savvy YouTube Analysis
- In 2024, Architects of Online Marvel Adventures
- Breaking Down YouTube Revenue per Million Views
- [Updated] Broadcast Excellence Incorrante Video Loops Into Television
- Engineering Engaging Media Excerpts for 2024
- In 2024, Effortless Entertainment Looping YouTube Videos for TV Viewers
- 2024 Approved Discover the Top 9 Free Online Tools to Craft Your Logo
- [Updated] Effortlessly Embedding Visual Media in Free Content Creation
- 2024 Approved Edit with Ease The Top 10 YouTube Video Trimmers Guide
- 2024'S Must-Watch Science Youtubers for a World of Knowledge
- Discover the Top 30 FreeFire Hashtags for Amplifying Video Growth
- Unlock the Full Potential of Your YouTube Videos Top 11 SEO Tips
- Unlock YouTube Video Prompts with GS Subscription
- Seamless Time Logging on YouTube (Desktop/Mobile)
- Best Live Recording Gadgets for YouTube Content Creators
- [New] Achieving Financial Gain Through YouTube Videos
- [Updated] Best 10 YouTube Volume Boosters for Windows, macOS, Android, and iPhone
- Seek Out Stimulating YouTube Snippets
- In 2024, Achieving ASMR Bliss Selecting the Right Mic
- Charting a Path to Profit Calculating Video View Requirements
- In 2024, Capture Clarity High-Quality Screen Recordings for YouTubers (PC/Mac)
- Complete Walkthrough to Grab YouTube Playlists
- In 2024, Avoid Blandness - Optimize Your Thumbnail with 20 Fonts
- The Battle of Broadcads Vimeo & YouTube's Face-Off
- [New] Ascend Your Earning Game Executing a Three-Part Blueprint for YouTube Revenue Analysis
- [Updated] Cutting-Edge Method Quick Erasure of Youtube Comments
- [New] Best Live Recording Gadgets for YouTube Content Creators
- Analyzing User Interface and Features in YouTube Mobile App
- Reimagining Blockbuster Films, Ranked #7-1
- In 2024, Cutting-Edge Voice Altering Apps for Vloggers
- [Updated] Deep Dive Into Rank Tracker Solutions for Peak Success on YouTube
- Constructing an Accessible Subscribe URL to YT Channels for 2024
- Swiftly Switch Songs in YT Playlist, Here's How
- In 2024, Are There Legal Restrictions to Recording YouTube Videos?
- In 2024, Countering Harshness Maintaining Poise Online
- Enhancing Quality without the Mic A Practical Guide for 2024
- Monetize Your Youtube Shorts Essentials, Possible Income
- [New] Elevate Visuals Thumbnails with Flair
- Master the Art of YT Channel Creation, Right From Your Smartphone
- Updated 2024 Approved The Ultimate List of Easy-to-Use Neon Text Generators
- [New] In 2024, Tech-Savvy Approach to Cutting Out Background Noise in Google Meet
- [New] Essential Platforms Secure & Reliable Video Services for SMEs
- [Updated] 2024 Approved Auditory Appeal Infusing Music Into Instagram Stories
- 2024 Approved Facebook Vids Made Simple as MP4 Downloads
- In 2024, How to Change/Add Location Filters on Snapchat For your Vivo Y78+ | Dr.fone
- New Unlock Advanced Video Editing Adding 3D Effects on Windows 10 and 11
- [Updated] Enhance Connection Top Tips to Craft Compelling Facebook Profiles for 2024
- Break Free From Sony Vegas Explore These Exceptional Windows Alternatives
- In 2024, Ways to trade pokemon go from far away On Apple iPhone 13 Pro? | Dr.fone
- Transforming Snaps Into Animated Characters in Snapchat for 2024
- [New] Conquering the Top 5 Common Instagram Video Issues for 2024
- In 2024, How to Transfer Contacts from Vivo S17e to Outlook | Dr.fone
- [Updated] 2024 Approved Ultimate Guide to Professional-Grade Mobile Screencasting with Mobizen
- Immediate Impact Shots Learn the Top 5 Home Film Tips Now
- Unlock Your Disabled Apple iPhone 15 Plus Without iTunes in 5 Ways
- In 2024, Essential Knowledge for Compiling a Top-Notch Auditory Archive on YouTube
- In 2024, How to Turn Off Find My iPhone 6s when Phone is Broken?
- [Updated] 2024 Approved Top 5 iOS Platforms Mimicking PS2
- 2024 Approved Inside Out Stardew Valley and the Allure of Ginger Island
- All Things You Need to Know about Wipe Data/Factory Reset For Asus ROG Phone 7 Ultimate | Dr.fone
- In 2024, How to Use Pokémon Emerald Master Ball Cheat On Nokia C12 Pro | Dr.fone
- File Format and Extension of filename dont Match in Excel 2003 File | Stellar
- New 5 Top Sites to Download Royalty Free Comedy Background Music for 2024
- [Updated] In 2024, Sweet Surveillance Guide to Recording Summer Treats
- Full Guide on Mirroring Your Infinix Smart 8 to Your PC/Mac | Dr.fone
- [Updated] In 2024, Spark Interest How to Make Your Vids Shine on Insta
- Tips to Share Pre-Recorded Videos Live on Facebook
- M31 LUT (Teal and Orange LUT) Free Download for 2024
- How Can I Catch the Regional Pokémon without Traveling On Motorola Moto G14 | Dr.fone
- 10 Easy-to-Use FRP Bypass Tools for Unlocking Google Accounts On Lava Yuva 3
- [New] In 2024, Mastering the Art of Motion Creating Engaging, Profitable FB Ads
- Trim, Cut, and Split AVI Files Like a Pro Updated for 2024
- Recommended Best Applications for Mirroring Your Vivo Y100 5G Screen | Dr.fone
- 3 Things You Must Know about Fake Snapchat Location On Samsung Galaxy A24 | Dr.fone
- A Working Guide For Pachirisu Pokemon Go Map On Lava Storm 5G | Dr.fone
- In 2024, 5 Quick Methods to Bypass Motorola Razr 40 Ultra FRP
- 2024 Approved Building a Business on Snapchat A Beginner's Blueprint
- In 2024, Dose Life360 Notify Me When Someone Checks My Location On Realme C51? | Dr.fone
- In 2024, Trouble with Apple iPhone 14 Pro Max Swipe-Up? Try These 11 Solutions | Dr.fone
- New 2024 Approved The Best of the Best Top AVCHD Video Editors
- Complete Tutorial for Vivo Y78 5G Hard Reset | Dr.fone
- [Updated] In 2024, Camera Glitches Ended by OBS Fix
- Title: A Comprehensible Breakdown for YouTube Annotation and Card Implementation for 2024
- Author: Kevin
- Created at : 2024-05-25 14:35:29
- Updated at : 2024-05-26 14:35:29
- Link: https://youtube-videos.techidaily.com/a-comprehensible-breakdown-for-youtube-annotation-and-card-implementation-for-2024/
- License: This work is licensed under CC BY-NC-SA 4.0.
