A Beginner's Guide to Making Attractive Video Thumbnails for Social Media Platforms for 2024
A Beginner’s Guide to Making Attractive Video Thumbnails for Social Media Platforms
How to Make Video Thumbnails for YouTube

Richard Bennett
Oct 26, 2023• Proven solutions
The video thumbnails you use for YouTube are vital to getting views and subscribers. There are a lot of things that go into making people watch your videos, but your video thumbnail might be the most important factor.
Here are 5 easy tips for creating thumbnails that get views.
- Have a Consistent Layout
- Use Your Face
- Use Graphics/Emojis That is On Topic
- Make Your Text Huge
- Keep It Clutter-Free!
Contest now closed.
Edit Your Videos Before Creating Video Thumbnails


1. Have a Consistent Layout
Your thumbnails all must look like part of the same set. You want viewers to recognize your videos like yours, and they are more likely to do that if you build up a standard layout that they can start associating with you.
An example of a standard layout could be you in the middle of the screen wearing an expression that matches the theme of your video, with your title written underneath your face. Every individual thumbnail would still be different, but you and the text would always be in the same spot.
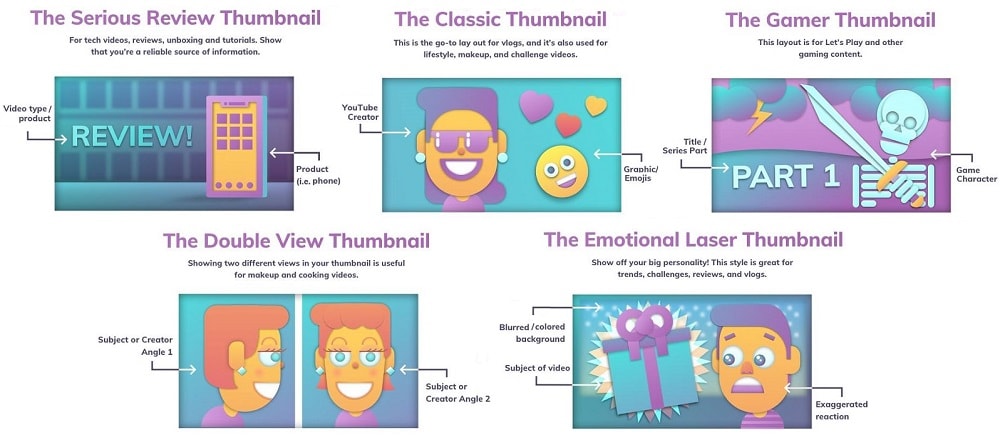
2. Use Your Face
People feel automatically connected and drawn into images that make eye contact. This makes thumbnails which feature faces more click-able than thumbnails which don’t, in most genres (i.e. if you make food videos then this may not apply – featuring the food might be more important than featuring your face). Check out more tips like this here .
Also, if somebody recognizes you in your thumbnail from a previous video of yours, that will go a long way towards making them click.
3. Use Graphics/Emojis that are On Topic
Anybody can take a screenshot of themselves in their video and use it as a thumbnail. To make your thumbnails look polished, consider using small images (like emojis or hearts) to stand out. This will add color and personality to your thumbnail.
Make sure the images you choose are relevant to the topic of your video.
4. Make Your Text Huge
If you use text in your thumbnail (you don’t have to) then it should be to add context. For example, if the main image is just you smiling then you might need some text to let viewers know the video is a makeup tutorial.
Thumbnails might look large while you’re putting them together in your image editor, but when they’re displayed on YouTube they’re a lot smaller. That goes double if a viewer is watching on their phone. So, make sure that any text you use is large enough that it can be read easily on small screens.
5. Keep it Clutter-Free
It’s great to add text and emojis to your thumbnails, but you do need to be careful not to add too much. You never want your thumbnails to look cluttered. Viewers should be able to glance at your thumbnails and know exactly what kind of video to expect – that’s difficult to do if there’s too much to process.
A good rule for text is to use only 1-3 words. That way they won’t clutter your screen, and you can make them large enough to read on small-screened devices.
For even more tips on making great YouTube thumbnails, click here .
Use these tips to make video thumbnails for YouTube, and tell us what kind of results you get!
Richard Bennett
Richard Bennett is a writer and a lover of all things video.
Follow @Richard Bennett
Richard Bennett
Oct 26, 2023• Proven solutions
The video thumbnails you use for YouTube are vital to getting views and subscribers. There are a lot of things that go into making people watch your videos, but your video thumbnail might be the most important factor.
Here are 5 easy tips for creating thumbnails that get views.
- Have a Consistent Layout
- Use Your Face
- Use Graphics/Emojis That is On Topic
- Make Your Text Huge
- Keep It Clutter-Free!
Contest now closed.
Edit Your Videos Before Creating Video Thumbnails
1. Have a Consistent Layout
Your thumbnails all must look like part of the same set. You want viewers to recognize your videos like yours, and they are more likely to do that if you build up a standard layout that they can start associating with you.
An example of a standard layout could be you in the middle of the screen wearing an expression that matches the theme of your video, with your title written underneath your face. Every individual thumbnail would still be different, but you and the text would always be in the same spot.
2. Use Your Face
People feel automatically connected and drawn into images that make eye contact. This makes thumbnails which feature faces more click-able than thumbnails which don’t, in most genres (i.e. if you make food videos then this may not apply – featuring the food might be more important than featuring your face). Check out more tips like this here .
Also, if somebody recognizes you in your thumbnail from a previous video of yours, that will go a long way towards making them click.
3. Use Graphics/Emojis that are On Topic
Anybody can take a screenshot of themselves in their video and use it as a thumbnail. To make your thumbnails look polished, consider using small images (like emojis or hearts) to stand out. This will add color and personality to your thumbnail.
Make sure the images you choose are relevant to the topic of your video.
4. Make Your Text Huge
If you use text in your thumbnail (you don’t have to) then it should be to add context. For example, if the main image is just you smiling then you might need some text to let viewers know the video is a makeup tutorial.
Thumbnails might look large while you’re putting them together in your image editor, but when they’re displayed on YouTube they’re a lot smaller. That goes double if a viewer is watching on their phone. So, make sure that any text you use is large enough that it can be read easily on small screens.
5. Keep it Clutter-Free
It’s great to add text and emojis to your thumbnails, but you do need to be careful not to add too much. You never want your thumbnails to look cluttered. Viewers should be able to glance at your thumbnails and know exactly what kind of video to expect – that’s difficult to do if there’s too much to process.
A good rule for text is to use only 1-3 words. That way they won’t clutter your screen, and you can make them large enough to read on small-screened devices.
For even more tips on making great YouTube thumbnails, click here .
Use these tips to make video thumbnails for YouTube, and tell us what kind of results you get!
Richard Bennett
Richard Bennett is a writer and a lover of all things video.
Follow @Richard Bennett
Channel-Building Gear: A Quick Start Guide
The Best YouTube Equipment: What You Need to Start Your Channel
Richard Bennett
Mar 27, 2024• Proven solutions
When you first started your vlog you likely looked for tips from well-established vloggers. Something that may have been surprising was the amount of equipment it takes to run a successful vlog. Besides your camera you need equipment for stabilizing it, for lighting your shots, and for recording better audio than your camera is capable of. If you still don’t know which camera to use, this article will tell you the best cameras for YouTube .
Do not be overwhelmed! There are loads of affordable options for YouTube equipment. There are even some tricks you can use to get by without some pieces of equipment until you are ready to make the investment.
Here are examples of some of the best YouTube equipment. Watch for the ‘Free Option!’ at the bottom of every section!
1. Stabilizers for YouTube
Selfie Stick: A lot of vloggers like to record from their phones, and selfie sticks make great stabilizers. You can put one end on the ground and use your selfie stick similarly to a monopod. Selfie sticks are also very affordable. The Cazbe Selfie Stick is only about $40. If you want to be a bit more sophisticated about your smartphone video then you might consider the KumbaCam 3 Axis Smart Phone Stabilizer, which is described as a ‘selfie stick on steroids’. It is a pricier option at $350.

Tripod: A tripod is what most people think of when they think of stabilizing their cameras. Tripods come in different weights and sizes, and there are even tripods specifically for smartphones. There is a wide range of pricing for tripods. Mid-range is about $50.

Free Option! Any Available Surface: Kitchen tables. Desks. Park benches. Trees. Your friend’s shoulder, if you ask nicely. Anything you can rest your camera on top of can be used to record a steady video.
2. Lighting for YouTube Videos
Softbox Lights: These are the kinds of lights that were probably used to take your school photos. They create soft, diffused, light and can be fairly affordable. The LimoStudio 700W Photography Softbox Lighting Kit is $167, and that is about the average.

LED Panel Light: LED panels produce high quality light. Prices vary. The Aputure Amaran AL-528S LED Video Light costs $358 (with stand). There are also LED panel lights which can be mounted onto your camera, like the Julius Studio NEW 160 LED 160 Dimmable Ultra High Power Panel Light which costs $111.

Free Option! The Sun: Natural light is always powerful enough to make your videos look great. Consider recording outside, or near a window in your house.
3. Audio Equipment for YouTube
Snoball: A Blue Snoball USB mic is an extremely affordable option at $60, although it does not have good range. You have to stay close to your computer if you use a Snoball.

Shotgun: You can get a shotgun mic to attach to your camera at a fairly decent price. The RØDE Video Shotgun Mic is only $140. You will not be able to stray far from your camera as it works best when you are close to it.

MP3 Recorder: A very high quality voice recorder is one way to record great audio and still be able to move freely. The Roland R-05 WAVE/MP3 Recorder is a great choice at $200.

LAV System: A lavalier, or lapel, mic system is a lot of vloggers’ favorite way to record dialogue because the mics are small and clip right on to your clothing. This is a more expensive option. The Sony LAV Wireless Mic System is $600.

Free Option! Audacity: Audacity is free audio recording/editing software that is popular with vloggers. If you do not have access to an external mic then you might be able to increase the quality of your sound recording using Audacity. You can download the latest version of Audacity for free from Audacityteam.org
4. Editing Your YouTube Videos
Filmora Video Editor: Filmora is a great program for beginners, but it is also powerful enough to satisfy more experienced vloggers. Filmora has both advanced tools like green screen or picture-in-picture, and a lot of fun features like filters, animated titles, and overlays.
Download Mac Version ](https://tools.techidaily.com/wondershare/filmora/download/ )
Adobe Premiere Pro: Premiere is professional grade software that boasts an ‘industry-leading video production toolset’. You can get Premiere Pro as part of the single-app Creative Cloud plan for $19.99 a month.
Free Option! Filmora: Filmora’s mobile app, Filmora, is available for free for a limited time for both Android and iPhone. It has a ton of features, and a really intuitive interface designed specifically for the mobile format.
Richard Bennett
Richard Bennett is a writer and a lover of all things video.
Follow @Richard Bennett
Richard Bennett
Mar 27, 2024• Proven solutions
When you first started your vlog you likely looked for tips from well-established vloggers. Something that may have been surprising was the amount of equipment it takes to run a successful vlog. Besides your camera you need equipment for stabilizing it, for lighting your shots, and for recording better audio than your camera is capable of. If you still don’t know which camera to use, this article will tell you the best cameras for YouTube .
Do not be overwhelmed! There are loads of affordable options for YouTube equipment. There are even some tricks you can use to get by without some pieces of equipment until you are ready to make the investment.
Here are examples of some of the best YouTube equipment. Watch for the ‘Free Option!’ at the bottom of every section!
1. Stabilizers for YouTube
Selfie Stick: A lot of vloggers like to record from their phones, and selfie sticks make great stabilizers. You can put one end on the ground and use your selfie stick similarly to a monopod. Selfie sticks are also very affordable. The Cazbe Selfie Stick is only about $40. If you want to be a bit more sophisticated about your smartphone video then you might consider the KumbaCam 3 Axis Smart Phone Stabilizer, which is described as a ‘selfie stick on steroids’. It is a pricier option at $350.
Tripod: A tripod is what most people think of when they think of stabilizing their cameras. Tripods come in different weights and sizes, and there are even tripods specifically for smartphones. There is a wide range of pricing for tripods. Mid-range is about $50.
Free Option! Any Available Surface: Kitchen tables. Desks. Park benches. Trees. Your friend’s shoulder, if you ask nicely. Anything you can rest your camera on top of can be used to record a steady video.
2. Lighting for YouTube Videos
Softbox Lights: These are the kinds of lights that were probably used to take your school photos. They create soft, diffused, light and can be fairly affordable. The LimoStudio 700W Photography Softbox Lighting Kit is $167, and that is about the average.
LED Panel Light: LED panels produce high quality light. Prices vary. The Aputure Amaran AL-528S LED Video Light costs $358 (with stand). There are also LED panel lights which can be mounted onto your camera, like the Julius Studio NEW 160 LED 160 Dimmable Ultra High Power Panel Light which costs $111.
Free Option! The Sun: Natural light is always powerful enough to make your videos look great. Consider recording outside, or near a window in your house.
3. Audio Equipment for YouTube
Snoball: A Blue Snoball USB mic is an extremely affordable option at $60, although it does not have good range. You have to stay close to your computer if you use a Snoball.
Shotgun: You can get a shotgun mic to attach to your camera at a fairly decent price. The RØDE Video Shotgun Mic is only $140. You will not be able to stray far from your camera as it works best when you are close to it.
MP3 Recorder: A very high quality voice recorder is one way to record great audio and still be able to move freely. The Roland R-05 WAVE/MP3 Recorder is a great choice at $200.
LAV System: A lavalier, or lapel, mic system is a lot of vloggers’ favorite way to record dialogue because the mics are small and clip right on to your clothing. This is a more expensive option. The Sony LAV Wireless Mic System is $600.
Free Option! Audacity: Audacity is free audio recording/editing software that is popular with vloggers. If you do not have access to an external mic then you might be able to increase the quality of your sound recording using Audacity. You can download the latest version of Audacity for free from Audacityteam.org
4. Editing Your YouTube Videos
Filmora Video Editor: Filmora is a great program for beginners, but it is also powerful enough to satisfy more experienced vloggers. Filmora has both advanced tools like green screen or picture-in-picture, and a lot of fun features like filters, animated titles, and overlays.
Download Mac Version ](https://tools.techidaily.com/wondershare/filmora/download/ )
Adobe Premiere Pro: Premiere is professional grade software that boasts an ‘industry-leading video production toolset’. You can get Premiere Pro as part of the single-app Creative Cloud plan for $19.99 a month.
Free Option! Filmora: Filmora’s mobile app, Filmora, is available for free for a limited time for both Android and iPhone. It has a ton of features, and a really intuitive interface designed specifically for the mobile format.
Richard Bennett
Richard Bennett is a writer and a lover of all things video.
Follow @Richard Bennett
Also read:
- [New] 2024 Approved Essential Free Tools Perfecting Your Video Calls
- [New] In 2024, Unleash Your Adventure with Panasonic's Cutting-Edge HX-A1 Cam
- [Updated] 2024 Approved Practical Steps in Mastering Telegram Web Services
- [Updated] 2024 Approved The Ultimate Guide to Sync OBS with Facebook
- [Updated] Aim for Affluence Enroll Now in YouTube's Partner Programme
- [Updated] Become a Pro in Calculating YouTube Ratio Measures
- [Updated] Essential YouTube to Mp3 Conversion Apps Reviewed
- Break Bot Patterns, Enhance Organic Video Reach
- Channel Cash Flow Harnessing YouTube Ad Revenue Anywhere for 2024
- Crafting a Content Schedule The Path to Gaining Traction on YouTube
- Evaluating the Latest Whoop 4: The Ultimate Wearable Companion for Active Lifestyle Management
- Explore Exceptional Digital Booklets - Start Your Journey on Flipbuilder.com Today!
- FlixFortress Over a Hundred Channels of Fortitude
- Full Tutorial to Bypass Your Poco X6 Face Lock?
- In 2024, Expert Online Workshop Title Author
- Mastering the Digital Sphere with Key Platforms: Facebook, Twitter, Instagram & YouTube
- Recover your music after Note 30 VIP has been deleted
- Rise From Viewer Emptiness Exploring Why Your Videos Stay Unwatched
- Techniques for Perfect Chroma Key Compositing
- Title: A Beginner's Guide to Making Attractive Video Thumbnails for Social Media Platforms for 2024
- Author: Kevin
- Created at : 2025-02-19 18:02:03
- Updated at : 2025-02-20 17:04:41
- Link: https://youtube-videos.techidaily.com/a-beginners-guide-to-making-attractive-video-thumbnails-for-social-media-platforms-for-2024/
- License: This work is licensed under CC BY-NC-SA 4.0.