
"2024 Approved Essential Steps to Create YouTube Beginnings & Ends on a Budget"
Essential Steps to Create YouTube Beginnings & Ends on a Budget
How to Create YouTube Intros & End Cards - Free and Easy

Shanoon Cox
Oct 26, 2023• Proven solutions
Part1: Intros
Elements of an Intro
Intros should only last about five seconds, and that can be cut down to two or three if you have a larger following.
When your intro video is longer than five seconds viewers are more likely to click away. The first 15 seconds of a video is when viewers are most likely to decide to click on one of the recommended videos, or go back to their search results and choose something else. The odds of them leaving within these first 15 seconds are greater if you do not get right to the main point of your video. That is why long intro sequences are bad for your watch time.
Whether it is better to put your intro at the very beginning of your video, or after you introduce your topic, will depend on your viewers. You may want to try it both ways and then look at your retention report (found in your YouTube Creator Studio under Analytics) to see which works best for you.
Top Intro Sites
There are a few different sites where you can download animated intros, customized to include your username or logo. Here are two of the best:
FlixPress.com
This is probably the most popular intro site. There are a lot of great animated intros available for under $5, or even for free.
IntroMaker.net
This is another site with really professional looking intros for $5. They only have two free options, though.
Creating an Intro in Filmora
You can create a simple intro card in Filmora.


- Choose your background. You may want to use a short clip as your intro, or you may just want a colored background.
- Drag your clip or background into the video track of your timeline and trim it down to five seconds.
- If you have a logo, import it into Filmora and drag it into your picture-in-picture track.
- With your logo selected, click on the Green Screen icon. In the pop-up, select the background of your logo to make it transparent. For this to work your logo cannot be the same color as its background.
- Click on the editing icon with your logo selected and choose an animation.
- Go to the Text/Titles menu and choose an animated title that suits your channel. Drag it into your text track and edit it to include your name.
- The last piece of your intro is sound. You can choose a song from Filmora’s library and cut it down to five seconds, or import your sound effect.
- Export your video and save it for use in all of your other videos.
Part 2: End Cards
When your video ends, YouTube will recommend a selection of videos users may want to watch next. Often, these recommendations will not include more of your videos.
To keep viewers on your channel, you can create your End Card which recommends other content you have created.
Elements of an End Card
An end card includes clips from two or three of your videos, muted, and shrunk down to thumbnail-size. Using spotlight annotations you can make these thumbnails click-able.
It is also important that your end card includes multiple calls to action. A call to action is meant to spur a viewer to some kind of action. Writing ‘Check out this video’ above one of your thumbnails is a call to action.
You should also have a subscribe link somewhere in your end card, ideally a very noticeable button with a proven call to action like ‘Subscribe Now!’.
Some creators will leave their end cards at that and play music overtop, but it can be even more effective to include a voiceover where you ask viewers to subscribe and watch your other videos.
How To Make an End Card
- Choose a static background. You may want to download an end card template or create one in a drawing program. If you do, make sure to include calls to action like ‘Watch more!’ and ‘Subscribe’.
- Drag your background into your timeline at the end of your video.
- Import two or three of your previous videos and drag them into your picture in picture tracks. Each clip should be on its track.
- Trim the clips in your picture in picture track down to the same length as your end card.
- Shrink your clips down to thumbnail-size by dragging their corners in the preview window.
- Position your clips so they are spaced evenly by dragging them in the preview screen.
- Mute your clips.
- If your background does not include any calls to action, choose a title from the Text/Titles menu in Filmora and create at least two – one asking viewers to subscribe, and one asking them to watch your suggested videos.
- Export your video from Filmora and upload it to YouTube.
- Go to your Video Manager and select Annotations in the drop-down menu next to your video.
- Go to your end card in the previewer, as that is where you want to add your annotations.
- Click Add Annotation and add a spotlight annotation to your video. Stretch it over one of your thumbnails and then check the Link box under your Annotation’s timing. Insert a link to the video you are previewing.
- Repeat for any other thumbnails. For your subscribe button, change where it said ‘Video’ to ‘Subscribe’ and enter your channel URL.
- Click Apply Changes.
Shanoon Cox
Shanoon Cox is a writer and a lover of all things video.
Follow @Shanoon Cox
Shanoon Cox
Oct 26, 2023• Proven solutions
Part1: Intros
Elements of an Intro
Intros should only last about five seconds, and that can be cut down to two or three if you have a larger following.
When your intro video is longer than five seconds viewers are more likely to click away. The first 15 seconds of a video is when viewers are most likely to decide to click on one of the recommended videos, or go back to their search results and choose something else. The odds of them leaving within these first 15 seconds are greater if you do not get right to the main point of your video. That is why long intro sequences are bad for your watch time.
Whether it is better to put your intro at the very beginning of your video, or after you introduce your topic, will depend on your viewers. You may want to try it both ways and then look at your retention report (found in your YouTube Creator Studio under Analytics) to see which works best for you.
Top Intro Sites
There are a few different sites where you can download animated intros, customized to include your username or logo. Here are two of the best:
FlixPress.com
This is probably the most popular intro site. There are a lot of great animated intros available for under $5, or even for free.
IntroMaker.net
This is another site with really professional looking intros for $5. They only have two free options, though.
Creating an Intro in Filmora
You can create a simple intro card in Filmora.
- Choose your background. You may want to use a short clip as your intro, or you may just want a colored background.
- Drag your clip or background into the video track of your timeline and trim it down to five seconds.
- If you have a logo, import it into Filmora and drag it into your picture-in-picture track.
- With your logo selected, click on the Green Screen icon. In the pop-up, select the background of your logo to make it transparent. For this to work your logo cannot be the same color as its background.
- Click on the editing icon with your logo selected and choose an animation.
- Go to the Text/Titles menu and choose an animated title that suits your channel. Drag it into your text track and edit it to include your name.
- The last piece of your intro is sound. You can choose a song from Filmora’s library and cut it down to five seconds, or import your sound effect.
- Export your video and save it for use in all of your other videos.
Part 2: End Cards
When your video ends, YouTube will recommend a selection of videos users may want to watch next. Often, these recommendations will not include more of your videos.
To keep viewers on your channel, you can create your End Card which recommends other content you have created.
Elements of an End Card
An end card includes clips from two or three of your videos, muted, and shrunk down to thumbnail-size. Using spotlight annotations you can make these thumbnails click-able.
It is also important that your end card includes multiple calls to action. A call to action is meant to spur a viewer to some kind of action. Writing ‘Check out this video’ above one of your thumbnails is a call to action.
You should also have a subscribe link somewhere in your end card, ideally a very noticeable button with a proven call to action like ‘Subscribe Now!’.
Some creators will leave their end cards at that and play music overtop, but it can be even more effective to include a voiceover where you ask viewers to subscribe and watch your other videos.
How To Make an End Card
- Choose a static background. You may want to download an end card template or create one in a drawing program. If you do, make sure to include calls to action like ‘Watch more!’ and ‘Subscribe’.
- Drag your background into your timeline at the end of your video.
- Import two or three of your previous videos and drag them into your picture in picture tracks. Each clip should be on its track.
- Trim the clips in your picture in picture track down to the same length as your end card.
- Shrink your clips down to thumbnail-size by dragging their corners in the preview window.
- Position your clips so they are spaced evenly by dragging them in the preview screen.
- Mute your clips.
- If your background does not include any calls to action, choose a title from the Text/Titles menu in Filmora and create at least two – one asking viewers to subscribe, and one asking them to watch your suggested videos.
- Export your video from Filmora and upload it to YouTube.
- Go to your Video Manager and select Annotations in the drop-down menu next to your video.
- Go to your end card in the previewer, as that is where you want to add your annotations.
- Click Add Annotation and add a spotlight annotation to your video. Stretch it over one of your thumbnails and then check the Link box under your Annotation’s timing. Insert a link to the video you are previewing.
- Repeat for any other thumbnails. For your subscribe button, change where it said ‘Video’ to ‘Subscribe’ and enter your channel URL.
- Click Apply Changes.
Shanoon Cox
Shanoon Cox is a writer and a lover of all things video.
Follow @Shanoon Cox
5 Tools for Cutting Edge Video Title & Tag Generation
Best 5 YouTube Tag Generators & Tips to Tag Videos Properly

Richard Bennett
Oct 26, 2023• Proven solutions
If you want a faster, easier way to use YouTube tags to get more views, here’s a list of top 5 YouTube tag generators.
Metadata and engagement are 2 key factors that YouTube uses to determine your video visibility. YouTube can’t read your video content, so YouTube tags help it understand which keyword search results or video suggestions should your video be featured. These tools are going to help you master YouTube keywords and search.
| Tag Generator | Price | Highlights & Additional Features |
|---|---|---|
| Rapid Tags | Free | Allows you to copy and save tags and features by language. It also comes with a tag analyzer and ranker. |
| Better Way to Web | Free | Detect tags from a Youtube Video. |
| Keyword Keg | From $8/Month. Shows Top 5 Results in Free Version. | Shows search Volume, trend, ad suggestion. |
| Tag Keywords | Free | A complete list of tags with filtering capabilities. |
| SEO Book | Free | Suggest tags based on your title, description, and keywords. |
Best 5 YouTube Tag Generators
1. Rapid Tags
Price: Free
As the name indicates, it can generate your desired tags fast. The best part is that users can also initiate a search on the basis of language filters.
Key Features:
- Allows users to copy and save tags.
- Comes with a tag ranker and analyzer tool.
2. Better Way to Web
Price: Free
There are two techniques to generate tags using the Better Way to Web tool. The very first option is to check relevant tags by using URLs and the second option is to initiate a search by specific keywords.
Key Features:
- Offers an easy way to check tags of your competitors.
- Fast response.
3. Keyword Keg
Price: From $8 per Month
It is the best way to optimize your channel tags, descriptions, and titles. One can filter out results with this advanced tool so that only highly relevant tags can be generated.
Key Features:
- Rated high for its easy search options.
- Serves better for staying on top of search engines.
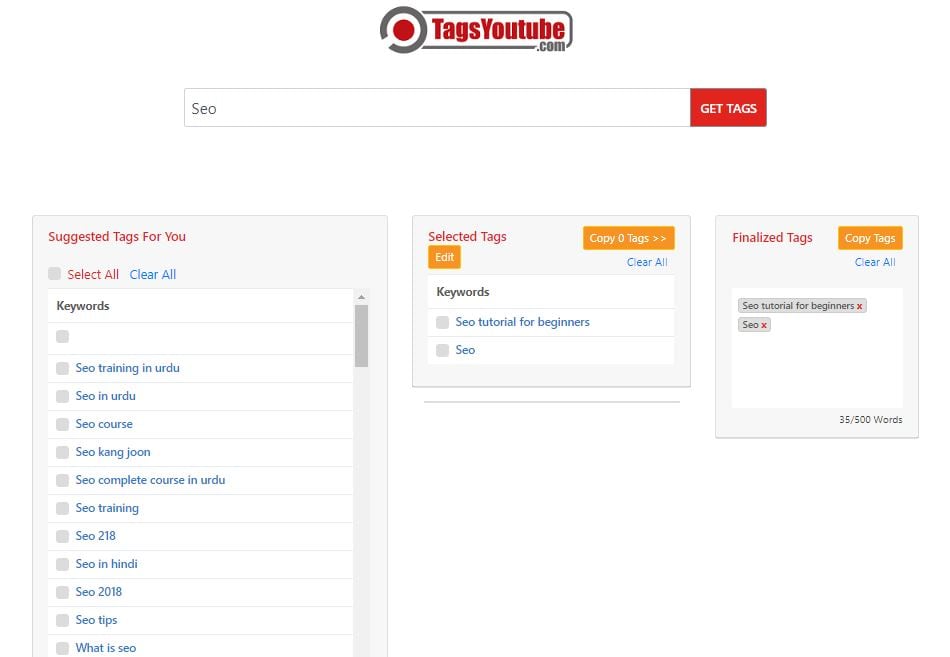
4. Tags YouTube
Price: Free
Simply type in the keywords you want ideas for and this tool will generate related words. Using TagsYouTube, you can optimize your YouTube keyword brainstorming process and help reach a wider audience.
Key Features:
- Filter the keywords that you want to apply to your video.
- One click copy button to copy all the tags you want.
5. SEO Book
Price: Free
This tool is offering high-quality results with competitive marketing strategies. Users can avail exact idea about where their keywords rank, and they can also track a new set of powerful keywords.
Key Features:
- Global footprint.
- Risk-free.
- Follow the most effective SEO strategies.
How to Tag Properly on YouTube?
Tip 1 Relevancy
The most important thing that you need to know about channel tags is that one must always stay away from misleading tags. Always check the relevance of tags or keywords before you add them to your channel. Working with highly relevant keywords may develop a slower route map to success with top rankings but it always promises a sustainable and more legitimate solution.
Tip 2 Mix Long Tail and General Tags
It is not sufficient to use general tags for channel posts, rather one should go for a mixture of the long tail and general tags. It helps to make your data more valuable because it can address a wide range of audience.
Tip 3 Use Around 10 Tags
You will not be able to get desired results with 3 or 4 tags, however, you won’t need 15 or 20 tags; rather an optimized solution is preferred. The best idea is to use almost 10 tags for one post as it can make your posts more relevant to the specific audience.
Tip 4 Analyze Competitors
Never forget to check the tags of your competitors; it will help you to improve your results against them. There are so many tools available online that can help you to track tags of your competitors so that you can also use a similar set of potential keywords.
Tip 5 Monitor and Update Tags
Stay tuned to new trends and then adjust strategy accordingly to make them more effective. It is a good idea to bring the best value to your videos with relevant audience attraction. It will soon update your videos into suggestions for related search results of the audience. On one side, it helps to make the perfect link between two related videos and at the same time, it helps to rank videos with higher ranking due to more specific keywords.
In 12 steps, you canimprove your YouTube SEO , see how!
Any good or bad experiences with YouTube tag generators? Share in the comment and discuss with other YouTubers!
Making Better YouTube Videos with Filmora
As one of the most widely used video editing software in YouTube video editing, Filmora provides lots of templates and effects with an intuitive interface, which saves much time. Download the free trial version and get started now.
Richard Bennett
Richard Bennett is a writer and a lover of all things video.
Follow @Richard Bennett
Richard Bennett
Oct 26, 2023• Proven solutions
If you want a faster, easier way to use YouTube tags to get more views, here’s a list of top 5 YouTube tag generators.
Metadata and engagement are 2 key factors that YouTube uses to determine your video visibility. YouTube can’t read your video content, so YouTube tags help it understand which keyword search results or video suggestions should your video be featured. These tools are going to help you master YouTube keywords and search.
| Tag Generator | Price | Highlights & Additional Features |
|---|---|---|
| Rapid Tags | Free | Allows you to copy and save tags and features by language. It also comes with a tag analyzer and ranker. |
| Better Way to Web | Free | Detect tags from a Youtube Video. |
| Keyword Keg | From $8/Month. Shows Top 5 Results in Free Version. | Shows search Volume, trend, ad suggestion. |
| Tag Keywords | Free | A complete list of tags with filtering capabilities. |
| SEO Book | Free | Suggest tags based on your title, description, and keywords. |
Best 5 YouTube Tag Generators
1. Rapid Tags
Price: Free
As the name indicates, it can generate your desired tags fast. The best part is that users can also initiate a search on the basis of language filters.
Key Features:
- Allows users to copy and save tags.
- Comes with a tag ranker and analyzer tool.
2. Better Way to Web
Price: Free
There are two techniques to generate tags using the Better Way to Web tool. The very first option is to check relevant tags by using URLs and the second option is to initiate a search by specific keywords.
Key Features:
- Offers an easy way to check tags of your competitors.
- Fast response.
3. Keyword Keg
Price: From $8 per Month
It is the best way to optimize your channel tags, descriptions, and titles. One can filter out results with this advanced tool so that only highly relevant tags can be generated.
Key Features:
- Rated high for its easy search options.
- Serves better for staying on top of search engines.
4. Tags YouTube
Price: Free
Simply type in the keywords you want ideas for and this tool will generate related words. Using TagsYouTube, you can optimize your YouTube keyword brainstorming process and help reach a wider audience.
Key Features:
- Filter the keywords that you want to apply to your video.
- One click copy button to copy all the tags you want.
5. SEO Book
Price: Free
This tool is offering high-quality results with competitive marketing strategies. Users can avail exact idea about where their keywords rank, and they can also track a new set of powerful keywords.
Key Features:
- Global footprint.
- Risk-free.
- Follow the most effective SEO strategies.
How to Tag Properly on YouTube?
Tip 1 Relevancy
The most important thing that you need to know about channel tags is that one must always stay away from misleading tags. Always check the relevance of tags or keywords before you add them to your channel. Working with highly relevant keywords may develop a slower route map to success with top rankings but it always promises a sustainable and more legitimate solution.
Tip 2 Mix Long Tail and General Tags
It is not sufficient to use general tags for channel posts, rather one should go for a mixture of the long tail and general tags. It helps to make your data more valuable because it can address a wide range of audience.
Tip 3 Use Around 10 Tags
You will not be able to get desired results with 3 or 4 tags, however, you won’t need 15 or 20 tags; rather an optimized solution is preferred. The best idea is to use almost 10 tags for one post as it can make your posts more relevant to the specific audience.
Tip 4 Analyze Competitors
Never forget to check the tags of your competitors; it will help you to improve your results against them. There are so many tools available online that can help you to track tags of your competitors so that you can also use a similar set of potential keywords.
Tip 5 Monitor and Update Tags
Stay tuned to new trends and then adjust strategy accordingly to make them more effective. It is a good idea to bring the best value to your videos with relevant audience attraction. It will soon update your videos into suggestions for related search results of the audience. On one side, it helps to make the perfect link between two related videos and at the same time, it helps to rank videos with higher ranking due to more specific keywords.
In 12 steps, you canimprove your YouTube SEO , see how!
Any good or bad experiences with YouTube tag generators? Share in the comment and discuss with other YouTubers!
Making Better YouTube Videos with Filmora
As one of the most widely used video editing software in YouTube video editing, Filmora provides lots of templates and effects with an intuitive interface, which saves much time. Download the free trial version and get started now.
Richard Bennett
Richard Bennett is a writer and a lover of all things video.
Follow @Richard Bennett
Also read:
- [New] Innovative Yet Straightforward Home Designs in MC
- [New] Keeping Viewers Hooked The Ultimate Guide for Enhanced Audience Loyalty on YouTube
- [New] Mirrorless 4K Cameras Top 10 List Unveiled for 2024
- [Updated] 2024 Approved Navigating Video Migration YouTube to Dailymotion Process
- [Updated] In 2024, Superior Live Streaming & Conferencing Apps
- 2024 Approved A Compre Written in Code Deciphering YouTube Backlink Building Techniques
- 2024 Approved Bridging the Gap YouTube Editing Mastered in iMovie Workflows
- 2024 Approved Crafting Engaging YouTube Thumbnails A Step-by-Step Guide
- 2024 Approved Revolutionizing Sketches Prime iPadOS Drawing Software
- Amplifying Your Brand The FameBit Approach to YouTube Affiliates
- Analyze YouTube Data Efficiently with Social Blade Tools for 2024
- Crafting Compact Cities for a Sustainable Future
- Earning More Utilizing YouTube's Income Tools on All Devices
- In 2024, Amplifying Your Brand The FameBit Approach to YouTube Affiliates
- In 2024, Gecata Game Recorder Review [Complete]
- Speed Up Your YouTube Downloads on Mac with ATube Catcher Pro
- The Finishing Touch Journalism's Close Call
- Title: 2024 Approved Essential Steps to Create YouTube Beginnings & Ends on a Budget
- Author: Kevin
- Created at : 2025-02-13 16:15:14
- Updated at : 2025-02-20 17:01:28
- Link: https://youtube-videos.techidaily.com/2024-approved-essential-steps-to-create-youtube-beginnings-and-ends-on-a-budget/
- License: This work is licensed under CC BY-NC-SA 4.0.