
"2024 Approved Enhancing Engagement Essential Video Formats for YouTube Viewers"
Enhancing Engagement: Essential Video Formats for YouTube Viewers
Best Video Format for YouTube Uploading

Richard Bennett
Feb 01, 2024• Proven solutions
Uploading your content in the best video format for YouTube can save you a lot of frustration. In this article, we will teach you about some of the best video formats and settings .
To upload a video to YouTube you have to make sure that you are using one of the video file formats that is supported by the platform itself. Here they are:
- MP4
- MOV
- AVI
- FLV
- 3GPP
- WMV
- WebM
- MPEGS
YouTube recommends uploading your videos as MP4 files. Some benefits of MP4s are that the files are not as large as AVIs, they provide better quality than FLVs, and they often display with the same quality or better as you would get watching the video on a native video player. Other file formats like 3GPP and MPEG-PS generally have resolutions too small for high-resolution tablets or desktop devices.
If your phone or video editing software does not output MP4 videos, consider getting video editing software or a conversion program that can (like Filmora Video Editor).
Filmora is an easy-to-use video editing program that can export to MP4, WMV, AVI, MOV, F4V, MKV, TS, 3GP, MPEG-2, WEBM, GIF, and MP3. You can convert a video to an MP4 simply by importing it into Filmora, dragging it into the timeline, and exporting it in the MP4 format.
The Best Upload Settings for YouTube
The best video code:
The best video format: MP4
Audio should be produced using the LC format and stereo 5.1 or standard stereo. You can upload separate MP3 audio format files for voiceovers if you need to.
The aspect ratio for a video should be 16:9 so that it won’t have black bars on the side when uploaded to YouTube. YouTube has also made it possible for 9:16 (portrait) style videos to be viewed without black bars, full screen, using their iOS app.
You should export in at least 30 frames per second. Many creators push that to 60 frames per second, which is better for most types of videos (although it may not make a noticeable difference for others).
The maximum size for quick upload and load time on YouTube is generally under 2gb. Luckily MP4 offers a great degree of compression without sacrificing too much image quality.
If you scale down the file size of the video by reducing the resolution or choosing a format with more compression, that can cause you to lose quality. If you need a smaller file, it’s always better to scale down the length of a video rather than continually compress the file or lose frames from the video.
Although a 2 GB file of a very long will easily upload to YouTube, it will probably be very low quality.
Do you agree that MP4 is the best video format for YouTube, or do you use something else?
Create Stunning Videos with a High-Quality Video Editor


Richard Bennett
Richard Bennett is a writer and a lover of all things video.
Follow @Richard Bennett
Richard Bennett
Feb 01, 2024• Proven solutions
Uploading your content in the best video format for YouTube can save you a lot of frustration. In this article, we will teach you about some of the best video formats and settings .
To upload a video to YouTube you have to make sure that you are using one of the video file formats that is supported by the platform itself. Here they are:
- MP4
- MOV
- AVI
- FLV
- 3GPP
- WMV
- WebM
- MPEGS
YouTube recommends uploading your videos as MP4 files. Some benefits of MP4s are that the files are not as large as AVIs, they provide better quality than FLVs, and they often display with the same quality or better as you would get watching the video on a native video player. Other file formats like 3GPP and MPEG-PS generally have resolutions too small for high-resolution tablets or desktop devices.
If your phone or video editing software does not output MP4 videos, consider getting video editing software or a conversion program that can (like Filmora Video Editor).
Filmora is an easy-to-use video editing program that can export to MP4, WMV, AVI, MOV, F4V, MKV, TS, 3GP, MPEG-2, WEBM, GIF, and MP3. You can convert a video to an MP4 simply by importing it into Filmora, dragging it into the timeline, and exporting it in the MP4 format.
The Best Upload Settings for YouTube
The best video code:
The best video format: MP4
Audio should be produced using the LC format and stereo 5.1 or standard stereo. You can upload separate MP3 audio format files for voiceovers if you need to.
The aspect ratio for a video should be 16:9 so that it won’t have black bars on the side when uploaded to YouTube. YouTube has also made it possible for 9:16 (portrait) style videos to be viewed without black bars, full screen, using their iOS app.
You should export in at least 30 frames per second. Many creators push that to 60 frames per second, which is better for most types of videos (although it may not make a noticeable difference for others).
The maximum size for quick upload and load time on YouTube is generally under 2gb. Luckily MP4 offers a great degree of compression without sacrificing too much image quality.
If you scale down the file size of the video by reducing the resolution or choosing a format with more compression, that can cause you to lose quality. If you need a smaller file, it’s always better to scale down the length of a video rather than continually compress the file or lose frames from the video.
Although a 2 GB file of a very long will easily upload to YouTube, it will probably be very low quality.
Do you agree that MP4 is the best video format for YouTube, or do you use something else?
Create Stunning Videos with a High-Quality Video Editor
Richard Bennett
Richard Bennett is a writer and a lover of all things video.
Follow @Richard Bennett
Flair and Finesse in Your Gaming YouTube Channel
How to Live Stream on YouTube Gaming?
Richard Bennett
Mar 27, 2024• Proven solutions
1. Live Stream on YouTube Gaming with OBS
You need to follow these simple Step s to use OBS for YouTube Live Streaming:
**Step 1:**First of all you need to login to your YouTube account. You might be aware of the fact that same YouTube account is used for YouTube gaming needs.
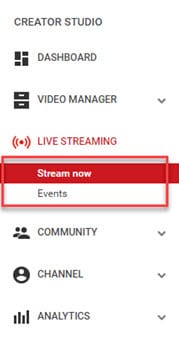
**Step 2:**Once entered inside your account then you need to visit the Go live streaming options and then from drop down menu simply choose Stream Now option.
**Step 3:**It is time to fill the details on screen; put impressive words for your live stream description so that it can grab attention of more viewers. Then select category as ‘Gaming’.

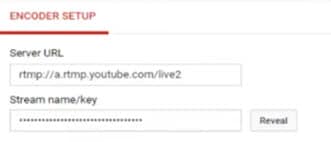
**Step 4:**Now you need to copy the stream key.
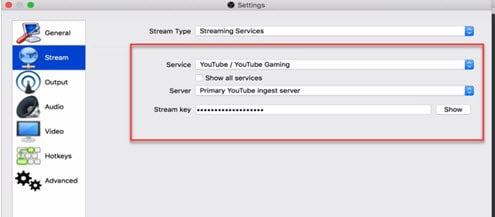
**Step 5:**Now open your OBS tool and then select YouTube as your active game streaming service. Users here need to paste that copied streaming key of Step 5 into the space provided on OBS settings page.
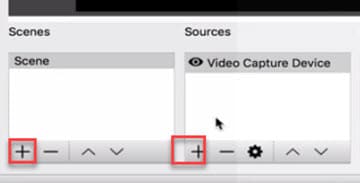
**Step 6:**It is time to make your desktop a video source.
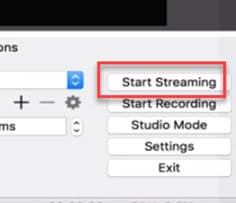
**Step 7:**Once all these settings are completed then you need to hit the start streaming option.
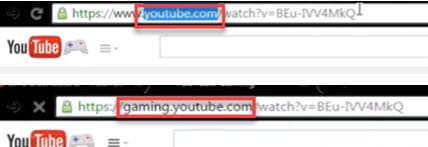
**Step 8:**The service may take few seconds to bring your live on YouTube and after this small duration you will be connected to your channel with your streamed content. Then change your url from youtube.com to gaming.youtube.com
**Step 9:**You are all set to be live on your YouTube gaming profile.
2. Live Stream on YouTube with Elgato Game Capture HD
A: Basic Settings for Elgato Game Capture HD
The Step s below will help you to get ready for streaming with all basic settings that are required by Elgato Game Capture HD tool.
**Step 1:**First of all, you need to open your browser, search for Elgato Game Capture HD software on its official website and then download it for your system. Get it installed.
**Step 2:**Once installation process is complete then launch your software.
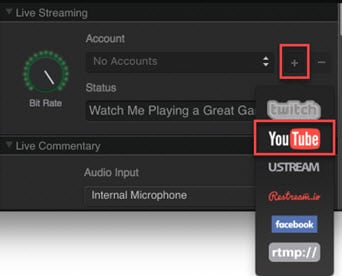
**Step 3:**Now you need to hit the add button on screen and select YouTube from drop down menu.
Step 4: It is time to sign in with your Google Account.
**Step 5:**After sign up process, allow the Elgato Game Capture tool to make connection with your YouTube account.

**Step 6:**Soon you will be able to access you account from Elgato platform.

**Step 7:**It is time to make adjustments for streaming settings.
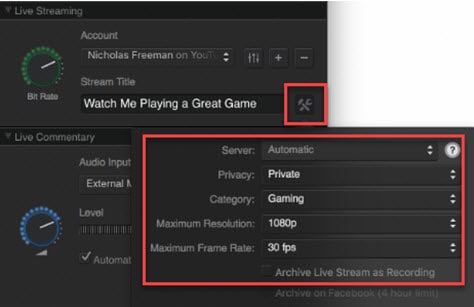
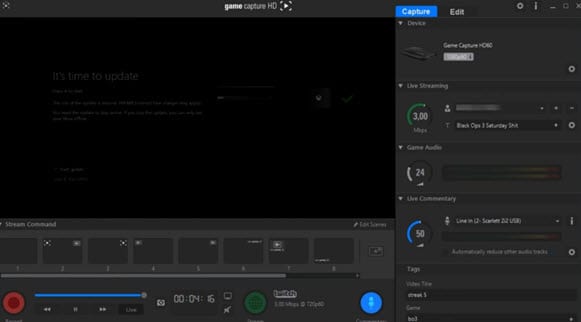
B: Test your Bandwidth and make adjustments for Stream settings
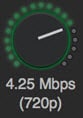
It is essential to check speed of your internet connection during live streaming because if it goes slow then your content will become annoying to viewers and it will decay the reputation of your channel. So prefer to use following Step s to complete the basic settings and to test your internet connection.
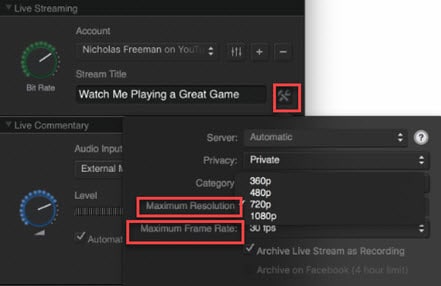
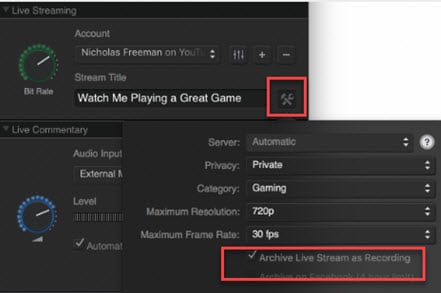
**Step 1:**Open your browser and then visit the speedtest.net platform. You can also use other similar kind of websites to ensure the speed of your internet. Note that you will find a Bit Rate dial in the live streaming section, here you can make adjustments for bit rates to bring it to desired level.
**Step 2:**It is also possible to make customized settings for frame rate and resolution as per need of your stream content.
**Step 3:**One can also prefer to archive his streaming.
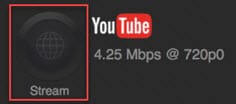
**Step 4:**As soon as you have completed all above settings then you need to hit the stream button on screen.
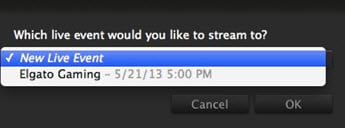
**Step 5:**Soon your software will ask you to select the event that you want to stream, choose your desired event and then press Ok. Soon you will be live on YouTube.
Richard Bennett
Richard Bennett is a writer and a lover of all things video.
Follow @Richard Bennett
Richard Bennett
Mar 27, 2024• Proven solutions
1. Live Stream on YouTube Gaming with OBS
You need to follow these simple Step s to use OBS for YouTube Live Streaming:
**Step 1:**First of all you need to login to your YouTube account. You might be aware of the fact that same YouTube account is used for YouTube gaming needs.
**Step 2:**Once entered inside your account then you need to visit the Go live streaming options and then from drop down menu simply choose Stream Now option.
**Step 3:**It is time to fill the details on screen; put impressive words for your live stream description so that it can grab attention of more viewers. Then select category as ‘Gaming’.
**Step 4:**Now you need to copy the stream key.
**Step 5:**Now open your OBS tool and then select YouTube as your active game streaming service. Users here need to paste that copied streaming key of Step 5 into the space provided on OBS settings page.
**Step 6:**It is time to make your desktop a video source.
**Step 7:**Once all these settings are completed then you need to hit the start streaming option.
**Step 8:**The service may take few seconds to bring your live on YouTube and after this small duration you will be connected to your channel with your streamed content. Then change your url from youtube.com to gaming.youtube.com
**Step 9:**You are all set to be live on your YouTube gaming profile.
2. Live Stream on YouTube with Elgato Game Capture HD
A: Basic Settings for Elgato Game Capture HD
The Step s below will help you to get ready for streaming with all basic settings that are required by Elgato Game Capture HD tool.
**Step 1:**First of all, you need to open your browser, search for Elgato Game Capture HD software on its official website and then download it for your system. Get it installed.
**Step 2:**Once installation process is complete then launch your software.
**Step 3:**Now you need to hit the add button on screen and select YouTube from drop down menu.
Step 4: It is time to sign in with your Google Account.
**Step 5:**After sign up process, allow the Elgato Game Capture tool to make connection with your YouTube account.
**Step 6:**Soon you will be able to access you account from Elgato platform.
**Step 7:**It is time to make adjustments for streaming settings.
B: Test your Bandwidth and make adjustments for Stream settings
It is essential to check speed of your internet connection during live streaming because if it goes slow then your content will become annoying to viewers and it will decay the reputation of your channel. So prefer to use following Step s to complete the basic settings and to test your internet connection.
**Step 1:**Open your browser and then visit the speedtest.net platform. You can also use other similar kind of websites to ensure the speed of your internet. Note that you will find a Bit Rate dial in the live streaming section, here you can make adjustments for bit rates to bring it to desired level.
**Step 2:**It is also possible to make customized settings for frame rate and resolution as per need of your stream content.
**Step 3:**One can also prefer to archive his streaming.
**Step 4:**As soon as you have completed all above settings then you need to hit the stream button on screen.
**Step 5:**Soon your software will ask you to select the event that you want to stream, choose your desired event and then press Ok. Soon you will be live on YouTube.
Richard Bennett
Richard Bennett is a writer and a lover of all things video.
Follow @Richard Bennett
Also read:
- [New] Earn Extra Bucks Maximizing YouTube's Mobile Revenue Opportunities
- [New] In 2024, Gain Recovery of Personal Snapshots
- [New] Navigating Top 10 Affordable Mobile Video Services
- [Updated] Climate Change Mitigation Through Urban Design Innovations
- [Updated] In 2024, Deciphering the Divergent Aspects of YouTubes & DailyMentions
- [Updated] Tips on Troubleshooting Frozen OBS Fullscreen Problem
- 2024 Approved Autoplay YouTube on Phones without Interruption
- 2024 Approved Clip Conquest Top Tags for Dominating Video Trends on Social Media
- CoD Vanguard PC Launch Issues Fixed Update
- Crafting Emotional Impact in Personal YouTube Content
- Exploring the IPad Pro: Embracing Apple's Top-Tier Tablet That Defies MacBook Comparison - ZDNet Insights
- In 2024, Enhance Clips Best Winter Bg's for Video Warmth
- In 2024, How to Detect and Stop mSpy from Spying on Your Nokia 130 Music | Dr.fone
- Site Officiel Du Logiciel WinXDVD - Extraction DVD, Conversion Vidéo Et Transfert Pour iOS
- The Quest for Perfect Playback APS4 Capturing Essentials for Enthusiasts for 2024
- The Ultimate List of 5 Effective YouTube Promotion Strategies for Success
- Title: 2024 Approved Enhancing Engagement Essential Video Formats for YouTube Viewers
- Author: Kevin
- Created at : 2025-02-16 17:16:06
- Updated at : 2025-02-20 16:39:13
- Link: https://youtube-videos.techidaily.com/2024-approved-enhancing-engagement-essential-video-formats-for-youtube-viewers/
- License: This work is licensed under CC BY-NC-SA 4.0.