
"2024 Approved Embrace the Pause Button 3 Techniques for Decelerating YouTube Video Playback (59 Chars, Slight Overage with Rich Content Justification)"
Embrace the Pause Button: 3 Techniques for Decelerating YouTube Video Playback (59 Chars, Slight Overage with Rich Content Justification)
YouTube Slow: How to Slow Down YouTube Videos [3 Ways]

Richard Bennett
Mar 27, 2024• Proven solutions
Have you ever wanted to learn something from a YouTube video, but found that the video is too fast? If you are wondering how to slow down YouTube videos, then you’re in the right place. Well, there are different ways to slow down YouTube videos and in this article, we will show you how to slow down the YouTube videos with 3 most effective ways: slow down the YouTube videos by changing playback video speed at playback, slow down YouTube video using YouTube’s Video Editor tools or change YouTube video speed to slow down or speed up with Wondershare Filmora video editor .
- Part 1: How to Play YouTube Videos in Slow Motion
- Part 2: Add Slow Motion with Wondershare Filmora (originally Wondershare Video Editor)
- Part 3: Add Slow Motion with YouTube Video Editor
Part 1: YouTube Slow Down: How to Play YouTube Videos in Slow Motion
While, you can now change the speed of any YouTube videos easily and watch YouTube videos in slow motion in a few steps. Below is how to slow down YouTube Videos:
- Open the video in YouTube
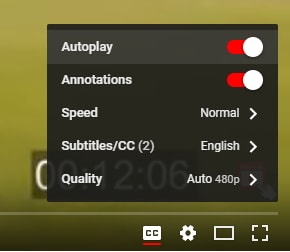
- Click the Settings icon on the bottom right and then you will see Autoplay, Annotations, Speed, Subtitles, and Quality options. By default, the speed is set to Normal. Click Speed and open the speed change options. The speed options are in multiples.
- Choose the target video speed from 0.25x, 0.5x, 0.75x to slow down the play back speed of the YouTube video. You can also select 1.25x, 1.5x, 1.75x or 2x to fast forward this YouTube video depending on how fast or slow you want the playback of the YouTube video to be.
- That’s it how to make a YouTube video slow down by changing the playback speed. If you selected 0.5X, you will see the playback speed is half of the original speed. You can now see the YouTube video is played back in a slower speed.
You May Also Like: Take good use of YouTube’s Enhancements feature to improve your video quality.
Besides, watching YouTube videos in slow motion, you can also make a slow motion video and upload to YouTube. The Flash from Zootopia is so impressive and you can see a lot of memes and gifs online about this funny cute sloth. In the following part, we will show you how to make a slow motion YouTube video like the sloth Flash in two ways by adding slow motion effects.
Part 2: Add Slow Motion to YT Videos with Wondershare Filmora video editor [3 Steps]Wondershare Filmora is an easy-to-use yet powerful video editing tool to which let beginners edit their YouTube videos in minutes. It includes every classic video editing functions including adjust playback speed, trim, crop, rotate, split as well as many special editing features like Jump Cut, Mosaic Blur and Tilt Shift. Now let’s see how to add slow motion with this video editing software.


Step 1. Import Video Footage to Filmora Video Editor
First of all, you need to import all your video footage for YouTube videos to Filmora. If you want to slow down a video downloaded from online, like youtube, please make sure there is copyright issue for you to use the video before processing. In case that you want to download YouTube with free youtube downloader, you can try Wondershare Free Youtube Downloader and Video DownloadHelper (Firefox Add-on).
After downloading YouTube videos on hard disk, you can now import it to this YouTube video editor. The downloaded YouTube videos is usually in FLV format, and Filmora has a wide range of support for video formats, which includes FLV as well. You can either click “Import” on the primary windows and select YouTube FLV video file from your computer, or simply drag and drop YouTube FLV file to the User’s Album. Next, drag YouTube video from User’s Album to Timeline for editing.

Step 2. One click to add slow motion to YouTube video
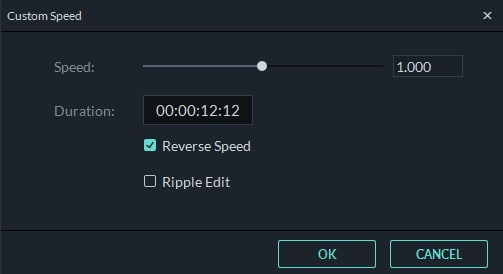
On the Timeline, click on the added YouTube video and select Speed and Duration to open up the video custom speed window. You will see the Speed option, Duration, Reverse Speed and Ripple Edit options. and the speed number indicates fast or slow motion. To slow down the YouTube video, drag the speed slider to left and you get a slow down version of the YouTube video. You can slow down the YouTube video in 0.01x. Click the OK button to save the slow motion settings and then click the Play button in the preview windows to have a look at the new YouTube slow down video. You can also change the duration of the YouTube video to change the YouTube video speed. For example, if you want to slow down a 30-second YouTube video to half speed, you can just enter the duration to 60 seconds to get a slow down motion effect.
With Filmora youtube video editor, you can also add the slow motion effects to some certain clips of the video footage. What you need to do is use the split feature to split the video first. Learn more details about How to Cut / Split / Trim Videos without Quality Loss
Step 3. Export slow down YouTube video
You could continue editing YouTube videos. When all done, click “Export” to save the result. You can save YouTube video in any popular formats on the computer by clicking “Format”. If you want to play YouTube video on iPod, iPhone, iPad, click “Device” and select your device. You can also share the YouTube video up to YouTube or Vimeo directly or burn YouTube video to DVD.

See, with Filmora video editor you can slow down YouTube videos with ease, what’s more, you can also apply reverse effects to play Youtube videos backwards. Download and try this YouTube Slow motion effect and you will master how to slow down YouTube videos.
Related:How to Make Slow/Fast Motion Videos
Part 3: Slow down YouTube videos with Slow Motion in YouTube Video Editor
Updated: From 20th September 2017 users will no longer be able to use the complimentary editing suite. Check the best YouTube video editor alternatives from this complete guide.
If you’ve ever been annoyed by the speed of your user-generated videos on YouTube, try out its own video editor. As YouTube has added a new “slow motion” tool to its YouTube Editor, it does pretty much exactly what it sounds like. Here is a simple guide on how to add slow motion with it.
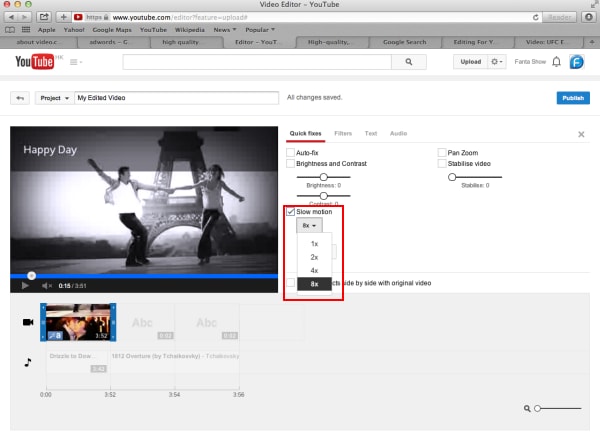
Step 1: Get Access to YouTube Video Editor. You can either go directly to the URL, which is https://www.youtube.com/editor , or click “Upload”>”Edit” to the Video Editor tab.
Step 2: Drag your video on the timeline and double click it. In the pop up window, you will see the “Slow Motion” option. Enable it and then select how slow you want the video to be. This applies the effect to the entire video that you’ve selected.
If you just want to slow down parts of the video, go back to the main editing tab, clip it from the original video using the slicing tool and add the slow-motion effect to that clip only. You can then arrange the different clips you have in the editor to create your final video.
Step 3: Tick the option “Preview effects side-by-side” with original video and then you can see how the original video plays compared to the one you’ve slowed down. If you’re happy with the result, hit “Done” to save the settings.
Conclusion
Above are the 3 ways that you can watch a YouTube video in slow motion, and slow down YouTube videos. You can directly change the playback speed of the YouTube video on Youtube, or download the YouTube video first and then slow down the speed of the YouTube video with some video editing software for YouTube like Filmora. No matter which way you prefer, we hope these information can help you slow down youtube videos.
Richard Bennett
Richard Bennett is a writer and a lover of all things video.
Follow @Richard Bennett
Richard Bennett
Mar 27, 2024• Proven solutions
Have you ever wanted to learn something from a YouTube video, but found that the video is too fast? If you are wondering how to slow down YouTube videos, then you’re in the right place. Well, there are different ways to slow down YouTube videos and in this article, we will show you how to slow down the YouTube videos with 3 most effective ways: slow down the YouTube videos by changing playback video speed at playback, slow down YouTube video using YouTube’s Video Editor tools or change YouTube video speed to slow down or speed up with Wondershare Filmora video editor .
- Part 1: How to Play YouTube Videos in Slow Motion
- Part 2: Add Slow Motion with Wondershare Filmora (originally Wondershare Video Editor)
- Part 3: Add Slow Motion with YouTube Video Editor
Part 1: YouTube Slow Down: How to Play YouTube Videos in Slow Motion
While, you can now change the speed of any YouTube videos easily and watch YouTube videos in slow motion in a few steps. Below is how to slow down YouTube Videos:
- Open the video in YouTube
- Click the Settings icon on the bottom right and then you will see Autoplay, Annotations, Speed, Subtitles, and Quality options. By default, the speed is set to Normal. Click Speed and open the speed change options. The speed options are in multiples.
- Choose the target video speed from 0.25x, 0.5x, 0.75x to slow down the play back speed of the YouTube video. You can also select 1.25x, 1.5x, 1.75x or 2x to fast forward this YouTube video depending on how fast or slow you want the playback of the YouTube video to be.
- That’s it how to make a YouTube video slow down by changing the playback speed. If you selected 0.5X, you will see the playback speed is half of the original speed. You can now see the YouTube video is played back in a slower speed.
You May Also Like: Take good use of YouTube’s Enhancements feature to improve your video quality.
Besides, watching YouTube videos in slow motion, you can also make a slow motion video and upload to YouTube. The Flash from Zootopia is so impressive and you can see a lot of memes and gifs online about this funny cute sloth. In the following part, we will show you how to make a slow motion YouTube video like the sloth Flash in two ways by adding slow motion effects.
Part 2: Add Slow Motion to YT Videos with Wondershare Filmora video editor [3 Steps]Wondershare Filmora is an easy-to-use yet powerful video editing tool to which let beginners edit their YouTube videos in minutes. It includes every classic video editing functions including adjust playback speed, trim, crop, rotate, split as well as many special editing features like Jump Cut, Mosaic Blur and Tilt Shift. Now let’s see how to add slow motion with this video editing software.
Step 1. Import Video Footage to Filmora Video Editor
First of all, you need to import all your video footage for YouTube videos to Filmora. If you want to slow down a video downloaded from online, like youtube, please make sure there is copyright issue for you to use the video before processing. In case that you want to download YouTube with free youtube downloader, you can try Wondershare Free Youtube Downloader and Video DownloadHelper (Firefox Add-on).
After downloading YouTube videos on hard disk, you can now import it to this YouTube video editor. The downloaded YouTube videos is usually in FLV format, and Filmora has a wide range of support for video formats, which includes FLV as well. You can either click “Import” on the primary windows and select YouTube FLV video file from your computer, or simply drag and drop YouTube FLV file to the User’s Album. Next, drag YouTube video from User’s Album to Timeline for editing.
Step 2. One click to add slow motion to YouTube video
On the Timeline, click on the added YouTube video and select Speed and Duration to open up the video custom speed window. You will see the Speed option, Duration, Reverse Speed and Ripple Edit options. and the speed number indicates fast or slow motion. To slow down the YouTube video, drag the speed slider to left and you get a slow down version of the YouTube video. You can slow down the YouTube video in 0.01x. Click the OK button to save the slow motion settings and then click the Play button in the preview windows to have a look at the new YouTube slow down video. You can also change the duration of the YouTube video to change the YouTube video speed. For example, if you want to slow down a 30-second YouTube video to half speed, you can just enter the duration to 60 seconds to get a slow down motion effect.
With Filmora youtube video editor, you can also add the slow motion effects to some certain clips of the video footage. What you need to do is use the split feature to split the video first. Learn more details about How to Cut / Split / Trim Videos without Quality Loss
Step 3. Export slow down YouTube video
You could continue editing YouTube videos. When all done, click “Export” to save the result. You can save YouTube video in any popular formats on the computer by clicking “Format”. If you want to play YouTube video on iPod, iPhone, iPad, click “Device” and select your device. You can also share the YouTube video up to YouTube or Vimeo directly or burn YouTube video to DVD.
See, with Filmora video editor you can slow down YouTube videos with ease, what’s more, you can also apply reverse effects to play Youtube videos backwards. Download and try this YouTube Slow motion effect and you will master how to slow down YouTube videos.
Related:How to Make Slow/Fast Motion Videos
Part 3: Slow down YouTube videos with Slow Motion in YouTube Video Editor
Updated: From 20th September 2017 users will no longer be able to use the complimentary editing suite. Check the best YouTube video editor alternatives from this complete guide.
If you’ve ever been annoyed by the speed of your user-generated videos on YouTube, try out its own video editor. As YouTube has added a new “slow motion” tool to its YouTube Editor, it does pretty much exactly what it sounds like. Here is a simple guide on how to add slow motion with it.
Step 1: Get Access to YouTube Video Editor. You can either go directly to the URL, which is https://www.youtube.com/editor , or click “Upload”>”Edit” to the Video Editor tab.
Step 2: Drag your video on the timeline and double click it. In the pop up window, you will see the “Slow Motion” option. Enable it and then select how slow you want the video to be. This applies the effect to the entire video that you’ve selected.
If you just want to slow down parts of the video, go back to the main editing tab, clip it from the original video using the slicing tool and add the slow-motion effect to that clip only. You can then arrange the different clips you have in the editor to create your final video.
Step 3: Tick the option “Preview effects side-by-side” with original video and then you can see how the original video plays compared to the one you’ve slowed down. If you’re happy with the result, hit “Done” to save the settings.
Conclusion
Above are the 3 ways that you can watch a YouTube video in slow motion, and slow down YouTube videos. You can directly change the playback speed of the YouTube video on Youtube, or download the YouTube video first and then slow down the speed of the YouTube video with some video editing software for YouTube like Filmora. No matter which way you prefer, we hope these information can help you slow down youtube videos.
Richard Bennett
Richard Bennett is a writer and a lover of all things video.
Follow @Richard Bennett
Ignite Your Creativity: Making Dynamic Splitscreen Videos
How to Make a Creative Split-screen Video for YouTube?

Liza Brown
Oct 26, 2023• Proven solutions
If we talk about post-production techniques and visual effects, then Split Screen has to be one of the smartest picks. After all, it lets us narrate our story via two (or more) screens and gives our audience a superior viewing experience. Though, a lot of users find it hard to implement the split-screen effect on YouTube videos. Here, I will let you know how to come up with all kinds of YouTube split-screen videos by using a professional video editor.
Part 1: The Diverse Applications of Split-screen Videos
Before we discuss how to work on YouTube split-screen videos, let’s quickly consider some major applications of this video effect.
One of the most popular applications of split-screen videos is for comparing two or more instances or perspectives in the same frame. For example, you might wish to depict the lifestyle of two people from different parts of the world or simply compare the effect of various seasons in a single video.

Videos are the best visual storytelling tools and just like any story, they can also have different perspectives. Ideally, the split-screen effect would be one of the best ways to show your audience all kinds of perspectives that can take place in your story.
One of the best examples was depicted in the movie “500 Days of Summer” in which we got several Expectations vs. Reality shots. These split-screen shots depicted the two major perspectives of the story in a single frame.

Have you ever wondered how filmmakers create a clone of a person in movies? To do that, we make the protagonist record both the scenes in front of the same background. Later, we implement a split-screen effect in which both the clips are combined in such a way that it makes the audience believe as if the scene has both, the character and their clone placed flawlessly.

Watch Video! Use Split-Screen for Your YouTube Videos
Part 2: How to Make Creative YouTube Split-screen Videos with Wondershare Filmora
If you want to come up with professional YouTube split-screen videos, then consider using a resourceful tool like Wondershare Filmora. Recently, the company has launched Wondershare Filmora for Mac V10.2 with an upgraded set of newly-added split-screen templates . Therefore, you can simply use the wide range of split-screen templates in Filmora and drag-and-drop your videos to implement the effect.
- Wondershare Filmora has recently added an extensive range of split-screen templates that you can instantly use and customize to meet your requirements.
- Apart from YouTube split-screen templates, you can also find options for other social platforms such as Instagram, Facebook, TikTok, etc.
- Without undergoing any technical hassle, you can just drag and drop your videos to the split-screen template and further make the needed changes.
- There are also dedicated options to edit the split-screen video, apply color correction, and even implement different stunning animated effects.
- Besides that, you can use Filmora to access numerous other editing options like motion tracking, keyframing, audio ducking, auto reframing, action cam editing, and more.
Creating or editing YouTube split-screen videos in Wondershare Filmora is extremely easy and can be done in the following way:
Step 1: Import the Videos You Want to Edit to Wondershare Filmora
Before you edit your YouTube split-screen video, you need to import clips to the application. To do this, just launch Wondershare Filmora on your system and click on the “Import” button to load your videos. You can also go to its Menu > File > Import Media to do the same.

Step 2: Select the Split-screen Template and Add Your Videos
Great! Once you have loaded the interface of Filmora, you can locate a “Split Screen” section from the top. Just click on it to browse a wide range of split-screen video templates for YouTube to include two, three, or more clips. You can just double-click any template to get its preview and drag-and-drop it to the timeline to start working on it.

If you want, you can take the playhead and drag the pointer to adjust the length of the split-screen template on the timeline. To add your clips, just double-click on the split-screen template and click on the drop icon from the preview window. Now, click on the source clip to add it to the template and adjust its position to get the desired effects.

Step 3: Edit Your YouTube Split-screen Video
Following the same drill, you can include multiple clips to the YouTube split-screen template. You can further go to its editing features and explore the “Video” tab to scale, reposition, or rotate your clips. There are also options to add borders in the split-screen effect to separate the clips distinctively in the video.

Apart from that, you can also go to the “Color” section to access various color correction features. From here, you can adjust the brightness, temperature, saturation, tint, and other effects in the video.

If you want to make your YouTube split-screen video more appealing, then go to the “Motion” feature. Here, you can easily implement any existing animated template for transitions and other effects.

Besides that, you can also click on the edit icon from the bottom panel of the Preview section to edit your videos separately.

Step 4: Export the YouTube Split-screen Video
That’s it! Once you are done editing the split-screen video, you can export it from Filmora and save it on your Mac. Just click on the Export option and select a location to save the YouTube split-screen video. There are also additional features to save the video in different formats, video resolutions, and frame rates here that you can explore.

There you go! After following this guide, you would be able to come up with all kinds of YouTube split-screen videos on your Mac. Ideally, with the help of a resourceful tool like Wondershare Filmora, working on a split-screen video is an effortless task. Since the tool has numerous split-screen templates for YouTube, you can just select any template, and customize it to create a stunning YouTube split-screen video in minutes.
Liza Brown
Liza Brown is a writer and a lover of all things video.
Follow @Liza Brown
Liza Brown
Oct 26, 2023• Proven solutions
If we talk about post-production techniques and visual effects, then Split Screen has to be one of the smartest picks. After all, it lets us narrate our story via two (or more) screens and gives our audience a superior viewing experience. Though, a lot of users find it hard to implement the split-screen effect on YouTube videos. Here, I will let you know how to come up with all kinds of YouTube split-screen videos by using a professional video editor.
Part 1: The Diverse Applications of Split-screen Videos
Before we discuss how to work on YouTube split-screen videos, let’s quickly consider some major applications of this video effect.
One of the most popular applications of split-screen videos is for comparing two or more instances or perspectives in the same frame. For example, you might wish to depict the lifestyle of two people from different parts of the world or simply compare the effect of various seasons in a single video.
Videos are the best visual storytelling tools and just like any story, they can also have different perspectives. Ideally, the split-screen effect would be one of the best ways to show your audience all kinds of perspectives that can take place in your story.
One of the best examples was depicted in the movie “500 Days of Summer” in which we got several Expectations vs. Reality shots. These split-screen shots depicted the two major perspectives of the story in a single frame.
Have you ever wondered how filmmakers create a clone of a person in movies? To do that, we make the protagonist record both the scenes in front of the same background. Later, we implement a split-screen effect in which both the clips are combined in such a way that it makes the audience believe as if the scene has both, the character and their clone placed flawlessly.
Watch Video! Use Split-Screen for Your YouTube Videos
Part 2: How to Make Creative YouTube Split-screen Videos with Wondershare Filmora
If you want to come up with professional YouTube split-screen videos, then consider using a resourceful tool like Wondershare Filmora. Recently, the company has launched Wondershare Filmora for Mac V10.2 with an upgraded set of newly-added split-screen templates . Therefore, you can simply use the wide range of split-screen templates in Filmora and drag-and-drop your videos to implement the effect.
- Wondershare Filmora has recently added an extensive range of split-screen templates that you can instantly use and customize to meet your requirements.
- Apart from YouTube split-screen templates, you can also find options for other social platforms such as Instagram, Facebook, TikTok, etc.
- Without undergoing any technical hassle, you can just drag and drop your videos to the split-screen template and further make the needed changes.
- There are also dedicated options to edit the split-screen video, apply color correction, and even implement different stunning animated effects.
- Besides that, you can use Filmora to access numerous other editing options like motion tracking, keyframing, audio ducking, auto reframing, action cam editing, and more.
Creating or editing YouTube split-screen videos in Wondershare Filmora is extremely easy and can be done in the following way:
Step 1: Import the Videos You Want to Edit to Wondershare Filmora
Before you edit your YouTube split-screen video, you need to import clips to the application. To do this, just launch Wondershare Filmora on your system and click on the “Import” button to load your videos. You can also go to its Menu > File > Import Media to do the same.
Step 2: Select the Split-screen Template and Add Your Videos
Great! Once you have loaded the interface of Filmora, you can locate a “Split Screen” section from the top. Just click on it to browse a wide range of split-screen video templates for YouTube to include two, three, or more clips. You can just double-click any template to get its preview and drag-and-drop it to the timeline to start working on it.
If you want, you can take the playhead and drag the pointer to adjust the length of the split-screen template on the timeline. To add your clips, just double-click on the split-screen template and click on the drop icon from the preview window. Now, click on the source clip to add it to the template and adjust its position to get the desired effects.
Step 3: Edit Your YouTube Split-screen Video
Following the same drill, you can include multiple clips to the YouTube split-screen template. You can further go to its editing features and explore the “Video” tab to scale, reposition, or rotate your clips. There are also options to add borders in the split-screen effect to separate the clips distinctively in the video.
Apart from that, you can also go to the “Color” section to access various color correction features. From here, you can adjust the brightness, temperature, saturation, tint, and other effects in the video.
If you want to make your YouTube split-screen video more appealing, then go to the “Motion” feature. Here, you can easily implement any existing animated template for transitions and other effects.
Besides that, you can also click on the edit icon from the bottom panel of the Preview section to edit your videos separately.
Step 4: Export the YouTube Split-screen Video
That’s it! Once you are done editing the split-screen video, you can export it from Filmora and save it on your Mac. Just click on the Export option and select a location to save the YouTube split-screen video. There are also additional features to save the video in different formats, video resolutions, and frame rates here that you can explore.
There you go! After following this guide, you would be able to come up with all kinds of YouTube split-screen videos on your Mac. Ideally, with the help of a resourceful tool like Wondershare Filmora, working on a split-screen video is an effortless task. Since the tool has numerous split-screen templates for YouTube, you can just select any template, and customize it to create a stunning YouTube split-screen video in minutes.
Liza Brown
Liza Brown is a writer and a lover of all things video.
Follow @Liza Brown
Also read:
- In 2024, DIY YouTube Thumbnails Made Simple
- YouTube to Written World Superior Convert Tools Online
- 2024 Approved Enhancing Views with These Premium Tools for YouTube SEO
- [Updated] Crafting Your Own YouTube Subscribe Shortcut
- In 2024, Crafting Engaging Video Content for Live Streams
- Boosting Your Channel Strategies for Skyrocketing View Counts for 2024
- Accelerate YT Growth Strategies for 1K+ Subscribers for 2024
- In 2024, Cut Expenses, Create Wow - Download High-Quality Templates for Videos
- Mastering YouTube Video Cuts A Beginner's Guide
- [New] Achieving Visual Excellence ASPECT RATIO Mastery on YOUTUBE
- [Updated] Diving Deep YouTube's Best Immersive Experiences
- How to Make a Cool YouTube Video Intro in iMovie?
- [New] Augment Video Timeframe on YouTube Platform
- Trailblazers Creating Engaging Marvellous Universe
- 2024 Approved Are There Natural Methods for Boosting Channels?
- Streamlining the Editing Process Elevating Your YouTube Content with PC
- Effortless and Effective - Embedding YouTube in GSlides for 2024
- The Essentials of Adding Emojis to Youtube Discussions
- In 2024, Cutting Through the Clutter How to Stream Top-Notch Upside-Down Content on Youtube
- [Updated] Effortlessly Create Engaging YouTube Thumbnails
- Simplify Crafting Effective YouTube Subscription Buttons
- A Gamer's Guide to Twisting Videos on YouTube (2E)
- Top Picks Procuring Start-Up YouTube Channel Monetization Platforms
- 2024 Approved Effective Visual Branding Crafting Compelling YouTube Logos
- 8 Tips on How to Vlog Confidently Like Popular YouTubers
- The Ultimate User-Friendly Untangle for YouTube Earnings Assessment
- Effective Use of AdSense on YouTube to Boost Channel Income
- From Screen to Share Mastering YouTubes' Thumbnail Artistry
- 2024 Approved Crystal Clear Capture Amping Up Your Home Studio Recordings
- Unlocking Monetization Success A 3-Step System to Determine Your YouTube Earnings
- 2024 Approved Boost Your Revenue Yielding Earnings From YouTube at 500 Followers
- In 2024, Crafting Charismatic Videos with DIY Camera Setups
- 2024 Approved Discover the Best Top 10 No-Cost Cinema Treasures Online
- Creative Compactness How to Reduce and Enhance iPhone Photos
- [Updated] 2024 Approved How to Achieve Clear Sound Tracks with Audacity by Eliminating Noise
- Cyber City Scenes Video Game List Like GTA V
- Precision Meets Creativity Top Accessories for YI 4K
- 2024 Approved Perfect Guide To Excel in TikTok Live Shopping
- Expert's Companion Navigating the Nuances of Mobizen Screen Recording
- [Updated] 2024 Approved Chortle Curators Humor Hunt
- YouTube SRT Extraction Three Practical Approaches for Downloading
- How to Repair corrupt MP4 and MOV files of Infinix Zero 30 5G?
- In 2024, FRP Hijacker by Hagard Download and Bypass your Itel P40 FRP Locks
- [Updated] 2024 Approved IPhone Slow Motion Shooting Essentials
- How Can Honor X50Mirror Share to PC? | Dr.fone
- In 2024, Best Cartoon Animation Software for Android and iOS
- [Updated] In 2024, Audience Expansion with Immersive 360 Videos on Social Media
- [Updated] 2024 Approved Unlocking the Power of Cross-Social Media File Transfers (YouTube & Facebook)
- New In 2024, Expert Choices Premier Cutting-Edge Programs for Noise Reduction in Singing and Recording
- Winning at Movie Watching Leading Windows Phone Apps
- Life360 Circle Everything You Need to Know On Gionee F3 Pro | Dr.fone
- The Complete Guide to Tunefab's Screen Capturing for 2024
- [New] In 2024, 10 Best Zoom Alternatives
- Updated 2024 Approved Video in Text Cinematic Intro【Filmora Tutorial】
- In 2024, Dose Life360 Notify Me When Someone Checks My Location On Lava Blaze 2? | Dr.fone
- Full Tutorial to Bypass Your Honor Face Lock?
- Title: "2024 Approved Embrace the Pause Button 3 Techniques for Decelerating YouTube Video Playback (59 Chars, Slight Overage with Rich Content Justification)"
- Author: Kevin
- Created at : 2024-06-26 14:16:38
- Updated at : 2024-06-27 14:16:38
- Link: https://youtube-videos.techidaily.com/2024-approved-embrace-the-pause-button-3-techniques-for-decelerating-youtube-video-playback-59-chars-slight-overage-with-rich-content-justification/
- License: This work is licensed under CC BY-NC-SA 4.0.
