
:max_bytes(150000):strip_icc()/d-link-router-4705a41645354fa29320d679d7f7e819.jpg)
"2024 Approved Elevating YouTube Live with High-Quality Webcam Cameras"
Elevating YouTube Live with High-Quality Webcam Cameras
Best Webcams for YouTube Livestreaming

Max Wales
Mar 27, 2024• Proven solutions
Broadcasting videos in real time on social media can be a great way to share some of the best moments of your life with your friends or to reach new customers for the products your company offers. YouTube is the world’s biggest video sharing platform that already allows its users to stream live videos through third-party applications such as Wirecast Play or OBS. Less than a month ago, YouTube has finally made possible live streaming directly from a computer’s webcam. The option is currently only available on Chrome browsers, but the company claims that more browsers will start offering this feature soon.
In this article, we are going to provide you with all the information you’ll need to create seamless live streams using a webcam and introduce you to some of the best webcam models in 2021.
Best webcams for YouTube Livestreaming in 2021
The quality of the video recording you intend to broadcast live is essential for the success of your live streams. Most built-in laptop webcams produce low-quality videos, and for that reason using an external webcam that captures high-resolution videos can help you create live streams that attract a lot of attention from YouTube’s community.
How to choose the right webcam for live streaming on YouTube?
Compatability: Even the best webcams on the market are completely useless if they are not compatible with your computer. Finding a webcam that works with a PC or a Mac shouldn’t be too difficult because both Windows and iOS platforms offer support for a wide range of models.
Video Resolution: YouTubers that just want to produce simple live streams don’t have to pay a lot of attention to the video resolution, because their videos don’t show too many details. Vloggers and gamers, on the other hand, should consider using webcams that produce 4K or HD footage since lower-priced options have a hard time realistically depicting colors. The quality of the video output a webcam produces can increase its price significantly, so there’s no reason investing in it if you don’t have the intention of utilizing its features to the fullest.
Sound Quality: Besides the video features, you should also look into the webcam’s audio options, because no one wants to watch a video with a terrible sound. Buying an external microphone is probably the best solution to this issue, but if you can’t afford one, then purchasing a webcam with decent audio recording features is the second best option.
Adjustable Location: Although the angle from which you are recording a stream may not seem important, poorly framed live streams are more likely to go unnoticed. A webcam that is easily adjustable can grant you the freedom of choosing your shots on every live stream you share online and it will enable you to control each and every detail in the video.
![]()

The All-in-One Screen Recorder & Video Editor
- Record desktop screen, voiceover, and webcam simultaneously
- Edit recorded clips quickly with a wide range of professional tools
- Built-in plentiful templates and effects
- Export to MP4, MOV, MKV, GIF and multiple formats
For Win 7 or later (64-bit)
For macOS 10.12 or later
 Secure Download
4 Best Webcams for YouTube Live streaming in 2021
There are thousands of different webcams you can use to record a live stream, but the models featured below are some of the very best currently available on the market.
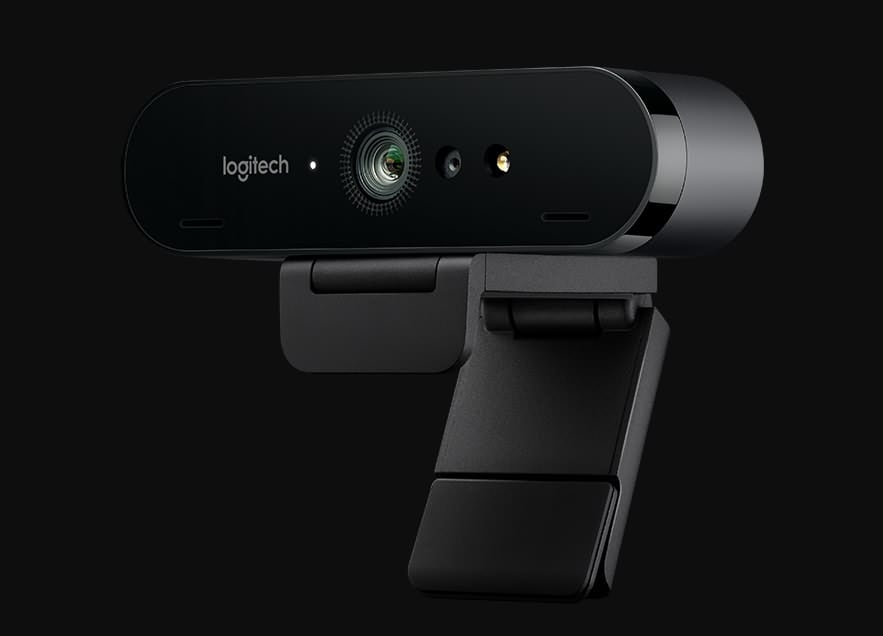
1. Logitech 4K Pro webcam
OS: Windows, macOS, Chrome OS
Price: $199
This is currently the only webcam on the market that supports 4K video recording, which makes it a forerunner of innovation and change. Besides the 4K option, the webcam’s features include a 5X digital zoom, infrared facial recognition and the amazing Right Light with HDR option that helps users record videos even under difficult light conditions.
The webcam can perform basic functions, like Skype calls, without the aid of third-party apps, which means that you can use it to create live streams on YouTube even if you don’t have a broadcasting software. The webcam’s stand is designed to fit almost any surface, so mounting the Logitech 4K Pro webcam to a laptop or monitor is quick and simple. The background replacement feature this Logitech’s webcam model offers can be quite useful if you want to use a different background in your YouTube live stream.
Pros:
- Produces incredibly clear and sharp images
- Superb background replacement options
- Expansive field of view
Cons:
- Poor audio recording options
- Internal software is basic
- A limited number of programs can capture 4K footage
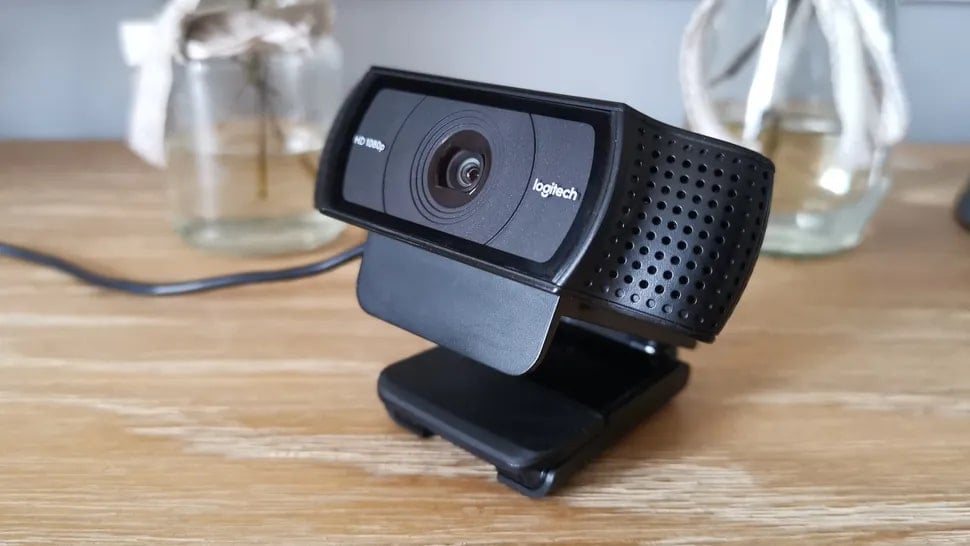
2. Logitech HD Pro C920
OS: macOS, Windows
Price: $99,99
Vloggers and all other YouTubers who care about video resolution will love using this webcam. Besides being capable of producing crystal clear videos in 1080p or HD 720 resolution at 30 or 60 fps, Logitech HD Pro C922 is also optimized for live streaming, which makes it a perfect webcam for live streaming on YouTube and all other video sharing platforms.
The webcam is equipped with two omnidirectional microphones that can record clear audio, but they pick up background noises easily, so using an external microphone for your live stream is still a much better option. The automatic low-light correction feature is designed to detect flickering lights in a video or increase visibility when streaming from a dimmed location. A foldable stand makes mounting the webcam easy, and you can also use a tripod if you want to record a live stream from an unusual perspective.
Pros:
- Produces 1080p and 720p resolution videos at 30 and 60 fps
- Allows users to integrate live images into their live streams
- Very easy to use
Cons
- Below average audio recording features
- Pricey
- Works only with OBS and XSplit broadcasting software
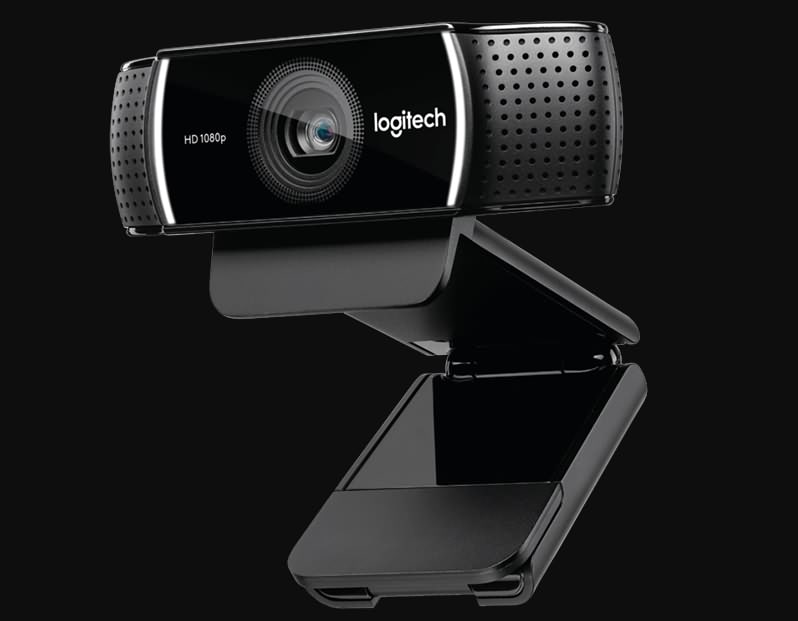
3. Logitech C922 Pro Stream webcam
OS: Windows, macOS, Xbox, Chrome OS, Android 5.0 or above
Price: $99,99
Professional streamers, who want to capture impeccable live streams, should look no further. Logitech C922 Pro Stream webcam is the premier option for anyone who wants to be regarded as a professional streamer. This Logitech’s webcam lets you capture live streams in 1080p at 30 fps or 720p at 60 fps, while also providing the background removal feature for live streams on Twitch and YouTube. The video compression ensures that your live streams don’t take up too much of your network’s resources.
The webcam’s microphones enable users to record clear audio and reduce the need to use an external mic on every live stream you make. The Logitech C922 Pro Stream webcam delivers stunning performances in low light conditions, and it also has a 78-degree field of view lens. The webcam’s mounting options are somewhat limited, which can have a negative effect on the visual appeal of your YouTube live streams.
Pros:
- Offers a solid support for audio recording
- Delivers stunning picture quality
- Compatible with a wide range of operating systems
Cons:
- Limited mounting options
- Not plug-and-play friendly on Mac devices
- More expensive than webcams with similar capabilities
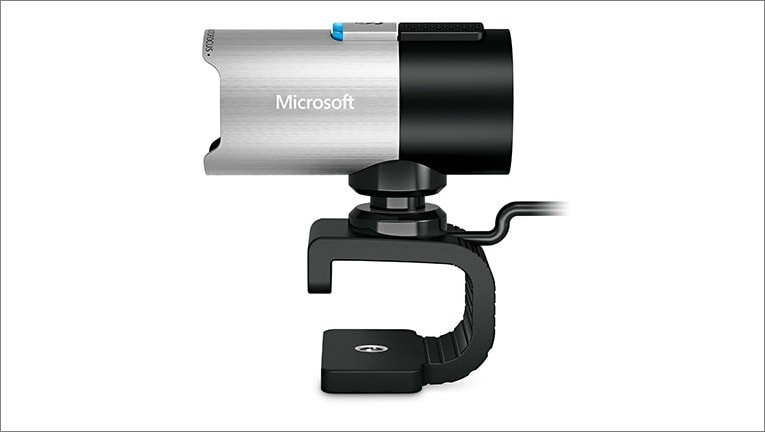
4. Microsoft LifeCam Studio
OS: Windows
Price: $99,95
The high-precision glass element lens this webcam features produces clear and sharp images. The Microsoft LifeCam Studio webcam has a 1080p HD sensor and it offers 720p HD video chat option. In addition to these remarkable features, the webcam is also equipped with TrueColor technology with face tracking that automatically adjusts the camera’s exposure to the environment and ensures that your live streams are always bright and colorful.
The Microsoft LifeCam Studio has a wide angle lens and an autofocus feature that guarantees that all live streams are always in focus. The webcam is Skype certified which means that it performs best when used with this software. Audio recording features exceed all expectations since the webcam can record natural audio recordings with no background noises. However, the limited compatibility narrows down the spectrum of its potential users.
Pros:
- Excellent video recording features.
- Crystal clear audio
- Great mounting options
Cons:
- Available only on Windows OS
- Demanding system requirements
- Not optimized for live streaming.
How to live stream from a webcam on YouTube in 2020
Although producing your own live stream on YouTube is easy, there are still a few steps you will have to take before you can start streaming from the webcam on your computer. If you don’t have a YouTube channel, you must make one, in order to be able to create your first live steam.
Step 1
Go to youtube.com/webcam , then complete the channel verification process and make sure that your channel doesn’t have any live streaming restrictions in the last 90 days. Head over to your channel, click on the Create a Video or Post icon in the upper right corner of the web page and select the GoLive option.
Afterward, you should give Chrome permission to access your webcam and the microphone you intend on using to record audio.
Step 2
Immediately after, the platform will ask you to give a title to your stream and it will let you choose whether or not you want the stream to be public or unlisted. It may be a good idea to create a few unlisted streams before you go public if you are still trying to figure out how this feature works.
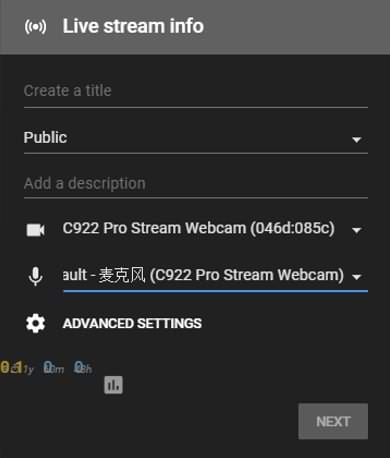
Proceed to select the camera and the microphone you intend to use to record the live stream, and you can also click on the Advanced Settings icon if you want to disable chat during the session or to specify that the live stream includes paid promotions.
Step 3
Once you’ve finished fine-tuning the advanced settings, you should click on the Next button. The platform will offer you to take or upload a thumbnail for your live stream.
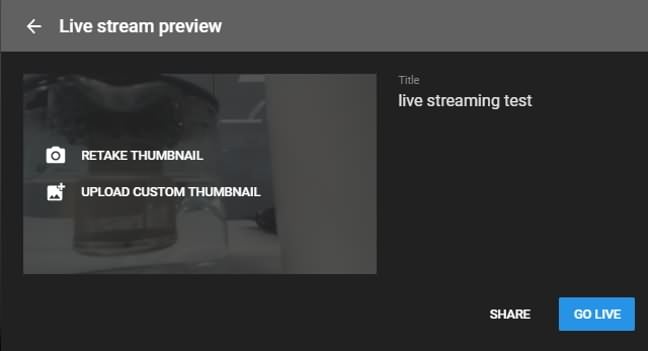
Clicking on the Share icon will enable you to share a live stream on social media, copy the link or access the embed code. Using the Share option is a great way to check if your live stream is functioning properly and to make sure that you are all set to begin the streaming session.
Step 4
Start your live stream by hitting the Go Live button. During the stream, you’ll be able to see and reply to comments people posted, the duration of the stream as well as the number of people following your live stream. If you haven’t shared your live stream before you started a new session you can do so while you are live. Click on the End Stream button to finish your webcam live stream on YouTube.
Step 5
After each live streaming session, YouTube will display some important statistics like the total and average watch time for the particular stream, the number of new subscribers or the number of playbacks of your live stream. The stream will be available for review in YouTube’s Creator Studio in the Events menu.
Max Wales
Max Wales is a writer and a lover of all things video.
Follow @Max Wales
Max Wales
Mar 27, 2024• Proven solutions
Broadcasting videos in real time on social media can be a great way to share some of the best moments of your life with your friends or to reach new customers for the products your company offers. YouTube is the world’s biggest video sharing platform that already allows its users to stream live videos through third-party applications such as Wirecast Play or OBS. Less than a month ago, YouTube has finally made possible live streaming directly from a computer’s webcam. The option is currently only available on Chrome browsers, but the company claims that more browsers will start offering this feature soon.
In this article, we are going to provide you with all the information you’ll need to create seamless live streams using a webcam and introduce you to some of the best webcam models in 2021.
Best webcams for YouTube Livestreaming in 2021
The quality of the video recording you intend to broadcast live is essential for the success of your live streams. Most built-in laptop webcams produce low-quality videos, and for that reason using an external webcam that captures high-resolution videos can help you create live streams that attract a lot of attention from YouTube’s community.
How to choose the right webcam for live streaming on YouTube?
Compatability: Even the best webcams on the market are completely useless if they are not compatible with your computer. Finding a webcam that works with a PC or a Mac shouldn’t be too difficult because both Windows and iOS platforms offer support for a wide range of models.
Video Resolution: YouTubers that just want to produce simple live streams don’t have to pay a lot of attention to the video resolution, because their videos don’t show too many details. Vloggers and gamers, on the other hand, should consider using webcams that produce 4K or HD footage since lower-priced options have a hard time realistically depicting colors. The quality of the video output a webcam produces can increase its price significantly, so there’s no reason investing in it if you don’t have the intention of utilizing its features to the fullest.
Sound Quality: Besides the video features, you should also look into the webcam’s audio options, because no one wants to watch a video with a terrible sound. Buying an external microphone is probably the best solution to this issue, but if you can’t afford one, then purchasing a webcam with decent audio recording features is the second best option.
Adjustable Location: Although the angle from which you are recording a stream may not seem important, poorly framed live streams are more likely to go unnoticed. A webcam that is easily adjustable can grant you the freedom of choosing your shots on every live stream you share online and it will enable you to control each and every detail in the video.
![]()
The All-in-One Screen Recorder & Video Editor
- Record desktop screen, voiceover, and webcam simultaneously
- Edit recorded clips quickly with a wide range of professional tools
- Built-in plentiful templates and effects
- Export to MP4, MOV, MKV, GIF and multiple formats
For Win 7 or later (64-bit)
For macOS 10.12 or later
Secure Download
4 Best Webcams for YouTube Live streaming in 2021
There are thousands of different webcams you can use to record a live stream, but the models featured below are some of the very best currently available on the market.
1. Logitech 4K Pro webcam
OS: Windows, macOS, Chrome OS
Price: $199
This is currently the only webcam on the market that supports 4K video recording, which makes it a forerunner of innovation and change. Besides the 4K option, the webcam’s features include a 5X digital zoom, infrared facial recognition and the amazing Right Light with HDR option that helps users record videos even under difficult light conditions.
The webcam can perform basic functions, like Skype calls, without the aid of third-party apps, which means that you can use it to create live streams on YouTube even if you don’t have a broadcasting software. The webcam’s stand is designed to fit almost any surface, so mounting the Logitech 4K Pro webcam to a laptop or monitor is quick and simple. The background replacement feature this Logitech’s webcam model offers can be quite useful if you want to use a different background in your YouTube live stream.
Pros:
- Produces incredibly clear and sharp images
- Superb background replacement options
- Expansive field of view
Cons:
- Poor audio recording options
- Internal software is basic
- A limited number of programs can capture 4K footage
2. Logitech HD Pro C920
OS: macOS, Windows
Price: $99,99
Vloggers and all other YouTubers who care about video resolution will love using this webcam. Besides being capable of producing crystal clear videos in 1080p or HD 720 resolution at 30 or 60 fps, Logitech HD Pro C922 is also optimized for live streaming, which makes it a perfect webcam for live streaming on YouTube and all other video sharing platforms.
The webcam is equipped with two omnidirectional microphones that can record clear audio, but they pick up background noises easily, so using an external microphone for your live stream is still a much better option. The automatic low-light correction feature is designed to detect flickering lights in a video or increase visibility when streaming from a dimmed location. A foldable stand makes mounting the webcam easy, and you can also use a tripod if you want to record a live stream from an unusual perspective.
Pros:
- Produces 1080p and 720p resolution videos at 30 and 60 fps
- Allows users to integrate live images into their live streams
- Very easy to use
Cons
- Below average audio recording features
- Pricey
- Works only with OBS and XSplit broadcasting software
3. Logitech C922 Pro Stream webcam
OS: Windows, macOS, Xbox, Chrome OS, Android 5.0 or above
Price: $99,99
Professional streamers, who want to capture impeccable live streams, should look no further. Logitech C922 Pro Stream webcam is the premier option for anyone who wants to be regarded as a professional streamer. This Logitech’s webcam lets you capture live streams in 1080p at 30 fps or 720p at 60 fps, while also providing the background removal feature for live streams on Twitch and YouTube. The video compression ensures that your live streams don’t take up too much of your network’s resources.
The webcam’s microphones enable users to record clear audio and reduce the need to use an external mic on every live stream you make. The Logitech C922 Pro Stream webcam delivers stunning performances in low light conditions, and it also has a 78-degree field of view lens. The webcam’s mounting options are somewhat limited, which can have a negative effect on the visual appeal of your YouTube live streams.
Pros:
- Offers a solid support for audio recording
- Delivers stunning picture quality
- Compatible with a wide range of operating systems
Cons:
- Limited mounting options
- Not plug-and-play friendly on Mac devices
- More expensive than webcams with similar capabilities
4. Microsoft LifeCam Studio
OS: Windows
Price: $99,95
The high-precision glass element lens this webcam features produces clear and sharp images. The Microsoft LifeCam Studio webcam has a 1080p HD sensor and it offers 720p HD video chat option. In addition to these remarkable features, the webcam is also equipped with TrueColor technology with face tracking that automatically adjusts the camera’s exposure to the environment and ensures that your live streams are always bright and colorful.
The Microsoft LifeCam Studio has a wide angle lens and an autofocus feature that guarantees that all live streams are always in focus. The webcam is Skype certified which means that it performs best when used with this software. Audio recording features exceed all expectations since the webcam can record natural audio recordings with no background noises. However, the limited compatibility narrows down the spectrum of its potential users.
Pros:
- Excellent video recording features.
- Crystal clear audio
- Great mounting options
Cons:
- Available only on Windows OS
- Demanding system requirements
- Not optimized for live streaming.
How to live stream from a webcam on YouTube in 2020
Although producing your own live stream on YouTube is easy, there are still a few steps you will have to take before you can start streaming from the webcam on your computer. If you don’t have a YouTube channel, you must make one, in order to be able to create your first live steam.
Step 1
Go to youtube.com/webcam , then complete the channel verification process and make sure that your channel doesn’t have any live streaming restrictions in the last 90 days. Head over to your channel, click on the Create a Video or Post icon in the upper right corner of the web page and select the GoLive option.
Afterward, you should give Chrome permission to access your webcam and the microphone you intend on using to record audio.
Step 2
Immediately after, the platform will ask you to give a title to your stream and it will let you choose whether or not you want the stream to be public or unlisted. It may be a good idea to create a few unlisted streams before you go public if you are still trying to figure out how this feature works.
Proceed to select the camera and the microphone you intend to use to record the live stream, and you can also click on the Advanced Settings icon if you want to disable chat during the session or to specify that the live stream includes paid promotions.
Step 3
Once you’ve finished fine-tuning the advanced settings, you should click on the Next button. The platform will offer you to take or upload a thumbnail for your live stream.
Clicking on the Share icon will enable you to share a live stream on social media, copy the link or access the embed code. Using the Share option is a great way to check if your live stream is functioning properly and to make sure that you are all set to begin the streaming session.
Step 4
Start your live stream by hitting the Go Live button. During the stream, you’ll be able to see and reply to comments people posted, the duration of the stream as well as the number of people following your live stream. If you haven’t shared your live stream before you started a new session you can do so while you are live. Click on the End Stream button to finish your webcam live stream on YouTube.
Step 5
After each live streaming session, YouTube will display some important statistics like the total and average watch time for the particular stream, the number of new subscribers or the number of playbacks of your live stream. The stream will be available for review in YouTube’s Creator Studio in the Events menu.
Max Wales
Max Wales is a writer and a lover of all things video.
Follow @Max Wales
Proven Techniques for Crafting Impactful YouTube Video Content
How To Edit YouTube Videos

Richard Bennett
Oct 26, 2023• Proven solutions
YouTube videos have a certain look and feel that many viewers have come to expect and enjoy. Much of the aesthetics of YouTube videos developed as a result of the biggest YouTubers having to quickly and efficiently edit videos together on a daily basis. Below is our list of some of the most common video editing techniques used by famous YouTubers.
Part 1: Introduction
1. Start Big
“I’m doing something really exciting… within the first ten seconds of this video. That way you stay here.” – Liza Koshy (How To Be A YouTuber 101!! | Lizzza)
In the same way that a teaser or trailer builds anticipation for a full film, many YouTubers start with a preview of the most high-energy part of their video.
In Jake Paul’s prank vlog (above), Jake shows his brother, Logan, chasing and beating him up as Jake screams for help at the top of his lungs. The already high-energy scene is even more intensified by the epic music playing in the background. This seven-second clip, which resurfaces halfway through the video, is enough to entice many viewers to continue watching. It very effectively leaves enough room for viewers to wonder, “How did Logan’s room actually look in the end?” “What was Logan’s initial reaction before he started chasing Jake?” By creating curiosity gaps like these, you can incentivize your viewers to close these gaps by watching longer.
2. Opening Title Introduction
Just as TV episodes begin with opening credits and theme music, quite similarly, some YouTubers start their YouTube videos with an intro.
Greg from “How To Drink” has an effective twenty-second intro (above). In this video, he shows you who he is and what his videos are generally about. Since these two things don’t change so much for him from video to video, he can start many of his videos off with this same intro.
Below is a video tutorial about how to add text and titles to video in Filmora, hope that helps you in creating your own YouTube video texts and titles.


For more information on intros, check out our post on How to Make a YouTube Intro?
Part 2: Cuts
1. Jump Cut
A jump cut is a simple and straightforward type of video editing cutting technique that “jumps” from one section of a clip to a later section of a clip, cutting out whatever happened in the middle. Some of the middle parts you might want to remove may include mistakes, long silent pauses, and filler words (umm, like, etc.).
Although the use of jump cuts to remove these parts had been discouraged for a long time in the film world, its extensive use by so many YouTubers has established it as its own style that many viewers have come to expect and enjoy. The jumpiness that comes from jump cuts can be effective in keeping your audience’s attention in a shock-inducing manner.
Jump cuts can also be used to show a passage of time in a creative way or make objects magically appear on-screen.
Zack King (above) makes a toy taxi magically appear in his hands using this video editing technique. Filmora allows you to do jump cut easily, you can watch the tutorial below and learn more jump cut tips and tricks .
2. Associative Cut
Not everyone in your audience may recognize the cultural or historical references you make in your videos. It can, therefore, be helpful (and also quite enjoyable) to show the original clip of the reference you are making.
In the same vlog that Jake Paul gets chased down by his brother (above), twenty-eight seconds into the video, Jake expresses his desire to go fast in his car. Right after he says “I want to go fast,” Jake cuts into a scene from the movie Talladega Nights. In that scene, Ricky Bobby, Will Ferrell’s character, also says that he wants to go fast.

Part 3: Transform
1. Zoom
Many YouTubers digitally adjust the zoom of their talking head shots in order to create additional emphasis or suspense. When zoom is used very slowly and smoothly, this technique can be effective in building up suspense and drawing a viewer deeper into the speaker’s message. When a drastic zoom is used suddenly, it can be effective in emphasizing a particular spoken line.
RiceGum is one YouTuber who uses zoom video editing effects extensively in his talking head videos. Want to pan and zoom your video footage too? Check our guide to getting Ken Burns Effect on Videos .
2. Camera Shake
Camera shake is a video effect that makes the original clip appear like it was filmed during a violent earthquake. Many YouTubers use this effect to emphasize their voice when they are talking about something erratic or out of control.
3. Color/Level Adjustment
A lot of comedy YouTubers change the color and levels of their videos in order to emphasize different moods. One common thing YouTubers do when they talk about anything slightly sad is to gradually fade out the colors in their talking head shots. In a cheesy way, the black and white look can emphasize a feeling of emptiness. For his “sad” reactions, PewDiePie often jump cuts into a black and white, slowed down clip of his sad face while playing some sad music in the background. To emphasize a darker message, some YouTubers increase the amount of shadows in their video. In the video below, while his daughter is delivering a darker message from 0:32 to 0:50, La Guardia Cross gradually adds more shadows around his daughter’s face through what appears to be a vignette effect.
Part 4: Transitions
1. Wipe
Many YouTubers transition from one scene into the next using a wipe transition. In a wipe transition, the next clip that you want to transition into slides into the frame horizontally or vertically until it completely covers the first clip. For additional wiping effect, many YouTubers also use a fast, high pitched “woosh” sound effect with this transition.
2. Zoom
The zoom transition is quite similar to the wipe transition, except it uses a zoom effect. Many of the top YouTubers combine this transition with a lower-pitched “woosh” sound effect.
Part 5: Visual Elements
In other genres of film, the only appropriate visual elements filmmakers can tastefully add to their footage seem to be clean looking, seamlessly integrated text and motion graphics. YouTube, on the other hand, is another world with much more room to get outrageous. Many of the top YouTubers add a lot of visual elements (emojis , images, filters, explosions) to their videos to emphasize their jokes, play-on-words, historical or cultural references, and mood.
1. Call-To-Action Visuals
Whether they’re prompting you to subscribe, like, comment, or check out their purchasable merchandise, many YouTubers include visuals to strengthen their calls-to-action.
Part 6: Time Manipulation
1. Timelapse
“The staple of any Casey Neistat vlog is the timelapse, which he uses both to further the narrative or set the time of day.” -@omgurheadsgone
A lot of cameras now come with a timelapse/hyperlapse function, requiring no further video editing. To achieve the kind of timelapses that Casey Neistat makes, though, you’ll have to film real-time footage and then manipulate the speed of it in post. Since sped up ambient sound is hardly ever pleasing to the ear, a lot of YouTubers replace the audio with music that enhances the mood of the timelapse.
2. Slow Motion
Slowing down footage is another way YouTubers like to manipulate the passage of time. This technique can draw the audience’s attention into the intricacies of a movement captured on film. But if you stretch your video clip digitally in order to achieve this look, your video may not look so smooth – your software will need to create extra frames of footage based on your existing footage. The solution around this problem is to make sure to record your video at a very high frame rate.

Part 7: Audio
1. Censor
The traditional practice for censoring out explicit language in television has been to replace profanity with a high pitched “bleep” sound effect . YouTubers, however, have popularized the use of animal sound effects to censor out explicit language. Epic Meal Time frequently uses the “caw” of a crow for this purpose.
2. Sound Effects
Whether it is pouring water into a cup or drinking a glass of water, adding louder sound effects can enhance your viewer’s experience of the action that is taking place on camera.
3. Background Music
Music is very effective in helping people feel all kinds of emotions. It is no wonder so many of the top YouTubers make gratuitous use of music in their videos. Some even add background music to every single clip of their entire YouTube video and only drop the music when the following technique (below) is used.
4. Muting Background Music
A lot of YouTubers who talk over background music abruptly mute the music when they want their audience to focus their attention on whatever it is that they have to say at that very moment. Isolating one’s speech in this way can be a very effective way to emphasize something serious or emphasize a punchline to a joke.
5. Voice-Over
Adding additional recorded verbal commentary is another technique used by many of the top YouTubers. This technique can be helpful when the visuals of your footage do not sufficiently communicate the full message you want to get across to your audience.
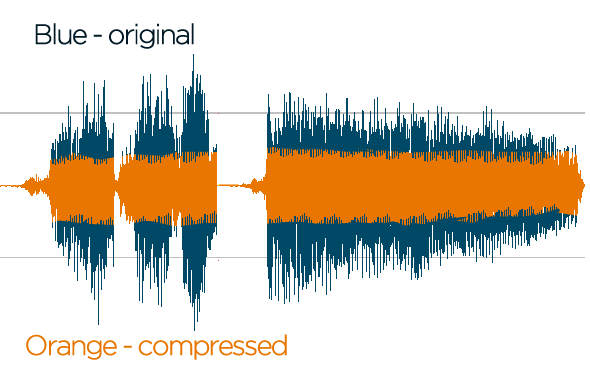
6. Compressor
A lot of video editing software programs give you the option to add compression to your video’s audio. Compression lessens the dynamic range between the softest and loudest parts of your audio. This technique can help your speech sound more uniform in volume.
For those who want to make their YouTube videos better, I recommend Wondershare Filmora for editing YouTube videos . Filmora video editor allows you to create and edit a YouTube video easily with plentiful templates and effects pre-programmed.
Richard Bennett
Richard Bennett is a writer and a lover of all things video.
Follow @Richard Bennett
Richard Bennett
Oct 26, 2023• Proven solutions
YouTube videos have a certain look and feel that many viewers have come to expect and enjoy. Much of the aesthetics of YouTube videos developed as a result of the biggest YouTubers having to quickly and efficiently edit videos together on a daily basis. Below is our list of some of the most common video editing techniques used by famous YouTubers.
Part 1: Introduction
1. Start Big
“I’m doing something really exciting… within the first ten seconds of this video. That way you stay here.” – Liza Koshy (How To Be A YouTuber 101!! | Lizzza)
In the same way that a teaser or trailer builds anticipation for a full film, many YouTubers start with a preview of the most high-energy part of their video.
In Jake Paul’s prank vlog (above), Jake shows his brother, Logan, chasing and beating him up as Jake screams for help at the top of his lungs. The already high-energy scene is even more intensified by the epic music playing in the background. This seven-second clip, which resurfaces halfway through the video, is enough to entice many viewers to continue watching. It very effectively leaves enough room for viewers to wonder, “How did Logan’s room actually look in the end?” “What was Logan’s initial reaction before he started chasing Jake?” By creating curiosity gaps like these, you can incentivize your viewers to close these gaps by watching longer.
2. Opening Title Introduction
Just as TV episodes begin with opening credits and theme music, quite similarly, some YouTubers start their YouTube videos with an intro.
Greg from “How To Drink” has an effective twenty-second intro (above). In this video, he shows you who he is and what his videos are generally about. Since these two things don’t change so much for him from video to video, he can start many of his videos off with this same intro.
Below is a video tutorial about how to add text and titles to video in Filmora, hope that helps you in creating your own YouTube video texts and titles.
For more information on intros, check out our post on How to Make a YouTube Intro?
Part 2: Cuts
1. Jump Cut
A jump cut is a simple and straightforward type of video editing cutting technique that “jumps” from one section of a clip to a later section of a clip, cutting out whatever happened in the middle. Some of the middle parts you might want to remove may include mistakes, long silent pauses, and filler words (umm, like, etc.).
Although the use of jump cuts to remove these parts had been discouraged for a long time in the film world, its extensive use by so many YouTubers has established it as its own style that many viewers have come to expect and enjoy. The jumpiness that comes from jump cuts can be effective in keeping your audience’s attention in a shock-inducing manner.
Jump cuts can also be used to show a passage of time in a creative way or make objects magically appear on-screen.
Zack King (above) makes a toy taxi magically appear in his hands using this video editing technique. Filmora allows you to do jump cut easily, you can watch the tutorial below and learn more jump cut tips and tricks .
2. Associative Cut
Not everyone in your audience may recognize the cultural or historical references you make in your videos. It can, therefore, be helpful (and also quite enjoyable) to show the original clip of the reference you are making.
In the same vlog that Jake Paul gets chased down by his brother (above), twenty-eight seconds into the video, Jake expresses his desire to go fast in his car. Right after he says “I want to go fast,” Jake cuts into a scene from the movie Talladega Nights. In that scene, Ricky Bobby, Will Ferrell’s character, also says that he wants to go fast.
Part 3: Transform
1. Zoom
Many YouTubers digitally adjust the zoom of their talking head shots in order to create additional emphasis or suspense. When zoom is used very slowly and smoothly, this technique can be effective in building up suspense and drawing a viewer deeper into the speaker’s message. When a drastic zoom is used suddenly, it can be effective in emphasizing a particular spoken line.
RiceGum is one YouTuber who uses zoom video editing effects extensively in his talking head videos. Want to pan and zoom your video footage too? Check our guide to getting Ken Burns Effect on Videos .
2. Camera Shake
Camera shake is a video effect that makes the original clip appear like it was filmed during a violent earthquake. Many YouTubers use this effect to emphasize their voice when they are talking about something erratic or out of control.
3. Color/Level Adjustment
A lot of comedy YouTubers change the color and levels of their videos in order to emphasize different moods. One common thing YouTubers do when they talk about anything slightly sad is to gradually fade out the colors in their talking head shots. In a cheesy way, the black and white look can emphasize a feeling of emptiness. For his “sad” reactions, PewDiePie often jump cuts into a black and white, slowed down clip of his sad face while playing some sad music in the background. To emphasize a darker message, some YouTubers increase the amount of shadows in their video. In the video below, while his daughter is delivering a darker message from 0:32 to 0:50, La Guardia Cross gradually adds more shadows around his daughter’s face through what appears to be a vignette effect.
Part 4: Transitions
1. Wipe
Many YouTubers transition from one scene into the next using a wipe transition. In a wipe transition, the next clip that you want to transition into slides into the frame horizontally or vertically until it completely covers the first clip. For additional wiping effect, many YouTubers also use a fast, high pitched “woosh” sound effect with this transition.
2. Zoom
The zoom transition is quite similar to the wipe transition, except it uses a zoom effect. Many of the top YouTubers combine this transition with a lower-pitched “woosh” sound effect.
Part 5: Visual Elements
In other genres of film, the only appropriate visual elements filmmakers can tastefully add to their footage seem to be clean looking, seamlessly integrated text and motion graphics. YouTube, on the other hand, is another world with much more room to get outrageous. Many of the top YouTubers add a lot of visual elements (emojis , images, filters, explosions) to their videos to emphasize their jokes, play-on-words, historical or cultural references, and mood.
1. Call-To-Action Visuals
Whether they’re prompting you to subscribe, like, comment, or check out their purchasable merchandise, many YouTubers include visuals to strengthen their calls-to-action.
Part 6: Time Manipulation
1. Timelapse
“The staple of any Casey Neistat vlog is the timelapse, which he uses both to further the narrative or set the time of day.” -@omgurheadsgone
A lot of cameras now come with a timelapse/hyperlapse function, requiring no further video editing. To achieve the kind of timelapses that Casey Neistat makes, though, you’ll have to film real-time footage and then manipulate the speed of it in post. Since sped up ambient sound is hardly ever pleasing to the ear, a lot of YouTubers replace the audio with music that enhances the mood of the timelapse.
2. Slow Motion
Slowing down footage is another way YouTubers like to manipulate the passage of time. This technique can draw the audience’s attention into the intricacies of a movement captured on film. But if you stretch your video clip digitally in order to achieve this look, your video may not look so smooth – your software will need to create extra frames of footage based on your existing footage. The solution around this problem is to make sure to record your video at a very high frame rate.
Part 7: Audio
1. Censor
The traditional practice for censoring out explicit language in television has been to replace profanity with a high pitched “bleep” sound effect . YouTubers, however, have popularized the use of animal sound effects to censor out explicit language. Epic Meal Time frequently uses the “caw” of a crow for this purpose.
2. Sound Effects
Whether it is pouring water into a cup or drinking a glass of water, adding louder sound effects can enhance your viewer’s experience of the action that is taking place on camera.
3. Background Music
Music is very effective in helping people feel all kinds of emotions. It is no wonder so many of the top YouTubers make gratuitous use of music in their videos. Some even add background music to every single clip of their entire YouTube video and only drop the music when the following technique (below) is used.
4. Muting Background Music
A lot of YouTubers who talk over background music abruptly mute the music when they want their audience to focus their attention on whatever it is that they have to say at that very moment. Isolating one’s speech in this way can be a very effective way to emphasize something serious or emphasize a punchline to a joke.
5. Voice-Over
Adding additional recorded verbal commentary is another technique used by many of the top YouTubers. This technique can be helpful when the visuals of your footage do not sufficiently communicate the full message you want to get across to your audience.
6. Compressor
A lot of video editing software programs give you the option to add compression to your video’s audio. Compression lessens the dynamic range between the softest and loudest parts of your audio. This technique can help your speech sound more uniform in volume.
For those who want to make their YouTube videos better, I recommend Wondershare Filmora for editing YouTube videos . Filmora video editor allows you to create and edit a YouTube video easily with plentiful templates and effects pre-programmed.
Richard Bennett
Richard Bennett is a writer and a lover of all things video.
Follow @Richard Bennett
Also read:
- [Updated] Essential Rules for a Positive YouTube Experience
- [New] Decoding YouTube Shorts All You Need to Understand
- 2024 Approved Blur the Borders Enhancing Your Video's Appeal on YT
- [Updated] Diving Into the World of YouTube Search Engine Rankings
- [New] Cut Down Clutter How to Efficiently Handle Unwanted YouTube Content (PC/Mobile)
- [New] 2024 Gaming Earnings on YouTube
- [New] Behind the Scenes of YouTube Income Generation
- Streamlining Revenue AdSense Tips for YouTubers
- [Updated] Enhancing Viewers' Staying Power Top 6 Strategies for YouTube Success
- Easy Ways To Get Free Views on YouTube! Alternative Methods for 2024
- 2024 Approved Breathtaking Lyric Videos Made Easy by Lyric Video Maker
- In 2024, Elevating Success Channel Ideas to Spark Momentum
- 2024 Approved 30 Powerful FreeGame Hashtags for Dominating YouTube
- Sourav Joshi’s Guide to YouTube Earning Power by 2024
- Chuckling Chords & Clever Cuts 10 Parody Classics
- 2024 Approved Effortless Calls Combining YouTube & Green Screens
- [Updated] Earning Strategies for Successful Youtube Shorts What You Need & How Much?
- [Updated] Elevating YouTube Consumption Strategies for Organizing Videos for Future Viewing
- Securing Youtube Tracks at No Cost, with Security in Mind
- [New] Elevate Views with Science-Backed Timing Tactics
- Essential Guide The Top 10 Inexpensive YouTube Channels for Visual Creators for 2024
- 2024 Approved Club Craft How to Download Best DJ Vids
- Leverage Online Platform Features to Spread Your Music
- Orderly Path to YouTube's Hidden Treasure Troves
- Add YouTube Melodies in iMovie Without Hurdles
- Monetizing Your Content on YouTube
- Monetizing Mastery A Triple Step Approach to Understanding YouTube Revenue
- Hands-On Guide to Optimize Your YouTube Channels with AdSense
- [New] Cutting-Edge Editing Techniques YouTube & Comparable Tools
- Essential Tips Enhancing Focus in Your YouTube Video
- Amplify Audience on Both Platforms Youtube + Twitch Strategy for 2024
- New Say Goodbye to Shaky Videos Top Stabilizer Apps for 2024
- [New] Superior Sound Servers Pioneering Bots to Elevate Your Discord Jamming for 2024
- [Updated] 2024 Approved Master the Art of Browsing and Playing FB Videos via AppleTV
- [Updated] Tweeting with Videos A Quick Tutorial
- Updated In 2024, Directory of Free, Non-Copyrighted Background Song Sources
- How to Share/Fake Location on WhatsApp for Samsung Galaxy S21 FE 5G (2023) | Dr.fone
- In 2024, How Do I Stop Someone From Tracking My Huawei P60? | Dr.fone
- In 2024, How to Spy on Text Messages from Computer & Nokia 105 Classic | Dr.fone
- Zero Dollar MP3 Recorders Skype Call Edition for 2024
- In 2024, Getting the Pokemon Go GPS Signal Not Found 11 Error in Tecno Pop 8 | Dr.fone
- Completing the Process of Disabling Your LinkedIn Profile for 2024
- New Some Must-Know Useful Lego Animation Ideas
- [New] 2024 Approved Detailed Steps to Record Hulu on Every OS and Device Type
- In 2024, Unlocking an iCloud Locked iPad and Apple iPhone 11 Pro Max
- Fake the Location to Get Around the MLB Blackouts on Motorola Moto G13 | Dr.fone
- Guide How To Unbrick a Bricked Itel A70 Phone | Dr.fone
- [Updated] Supercharge Your Status Top 8 Apps for Boosting Facebook Popularity for 2024
- Lenovo Screen Recording A Quick Guide
- 2024 Approved Top Five Protocols for Documenting YouTube LIVE Broadcasts
- In 2024, How To Unlock a Samsung Galaxy S23 Easily?
- How to Recover Files after iPhone 12 Pro Factory Reset? | Stellar
- How To Open Your iPhone 14 Without a Home Button
- Title: "2024 Approved Elevating YouTube Live with High-Quality Webcam Cameras"
- Author: Kevin
- Created at : 2024-05-25 14:31:21
- Updated at : 2024-05-26 14:31:21
- Link: https://youtube-videos.techidaily.com/2024-approved-elevating-youtube-live-with-high-quality-webcam-cameras/
- License: This work is licensed under CC BY-NC-SA 4.0.
