
:max_bytes(150000):strip_icc()/get-apps-not-in-app-store-1999916-d340eee3c6c84bfcbcd89df995856bd4.png)
"2024 Approved Efficient Video Cutting Techniques to Boost Your Content"
Efficient Video Cutting Techniques to Boost Your Content
How to Trim YouTube Videos?

Richard Bennett
Mar 27, 2024• Proven solutions
The world’s largest video sharing platform currently has nearly two billion active monthly users who upload over 400 hours of video content to their channels each minute. It is to see from these statistics why every video aspiring YouTubers post on their channels has to be perfect in every way in order to reach a wide audience. Fortunately, trimming a video even after you’ve uploaded it to YouTube is a quick and easy process, and in this article, we are going to show you a few different methods you can use to trim the videos you upload to YouTube. So, let’s get started.
In this article
- How to Trim a Video After You Upload it to Your YouTube Channel?
- Trimming a Video Before Posting On YouTube with Filmora Video Editor [4 Ways]
- Using Online Video Editing Platforms to Trim YouTube Videos
How to Trim a Video After You Upload it to Your YouTube Channel?
The YouTube Studio is no longer in beta phase, which means that the feature is here to stay. This is good news for all video creators who frequently update their YouTube videos after they upload them, as they no longer have to go through the endless uploads just because they wanted to trim a video.
Make sure that you’re signed into your YouTube channel, then click on your profile picture and select the YouTube Studio (Beta) option. On the left side of the screen, you’ll be able to see a menu that contains different subcategories like Analytics, Dashboard or Videos, so just click on the Videos option and proceed to select a video you’d like to trim. After the Videos submenu appears on the screen you should click on the Editor option and the video you selected will open in the YouTube’s video editor.

Click on the Trim button to start trimming the video and drag the blue bars located at the start and the end of the file to designate the portion of the video you’d like to remove. Preview the changes and confirm what you’ve made by clicking on the Save button located in the upper right corner of the screen and the new shortened version of the video will become available within a couple of hours.

In this way, you don’t need to take down the original video, edit it and re-upload. One of the benefits of trimming YouTube videos with the Trim feature in YouTube Editor is that this will keep your video URL and views and ranks etc.
Trimming a Video Before Posting On YouTube with Filmora Video Editor [4 Ways]


Method 1: Trim on Timeline
YouTubers who don’t want to rely on YouTube’s video editing capabilities can trim their footage with Filmora (to be honest, the Editor in YouTube platform has limited features). Filmora video editing software for PC and Mac computers offers a few different tools for trimming videos. After you’ve created a new project in Filmora, you should import a video clip into the editor by clicking on the Import drop-down menu and select the Import Media Files option. Each file you add to a project will be displayed in the Media tab, and you can just drag and drop it to a video track on the timeline.
All you have to do in order to trim a video after you’ve placed it on the timeline is drag one of its ends to the left or to the right. As you drag one of the clip’s edges the editor will only display the remaining footage while rendering the rest invisible. If at any point you want to access a portion of the video you’ve trimmed you just have to extend the file by dragging it until you’re able to see the segment you’re searching for.

Method 2: Using Filmora Split Tool
Filmora’s Split tool can help you separate the portion of the clip you want to remove from the segment you’d like to keep. Simply place the playhead at the exact location in the video clip where you want to make a cut, and click on the Split icon that looks like a pair of scissors. After the video is split, you should click on the clip you no longer need in order to select it and then hit the Delete button on your keyboard to remove it from the timeline.
Method 3: Using Scene Detection
Wondershare’s video editor also offers an automatic way to split a video clip into a number of separate scenes. Right-click on the video file located in the Filmora’s Media tab, and select the Scene Detection option from the menu and proceed to click on the Detect button, after the Scene Detection window pops up on the screen. The software will then automatically analyze the footage and divide it into separate scenes. Simply click on the Add to Timeline button once the process is completed to continue editing the video clip you’ve just split.

Method 4: Using Instant Cutter Tool
The Instant Cutter Tool enables you to quickly trim or merge high-resolution files recorded on action cameras as soon as you import them into a project in Filmora. Select the Import with Instant Cutter Tool option from the Import drop-down menu and wait for the Filmora Instant Cutter window to appear on the screen. In the upper left corner of this window, you will be able to see Trim and Merge tabs. Make sure that the Trim tab is selected and then click on the Open File button to import a video clip you’d like to trim. You can then use the trimming sliders to designate the parts of the video you’d like to remove or the set the In and Out points by clicking on the Set In Point or Set Out Point icons. Click on the Export button to save the new version of the video clip and click OK to complete the process.

Using Online Video Editing Platforms to Trim YouTube Videos
In case you’re looking for a tool that lets you save extracts of scenes from YouTube to your computer free of charge YT Cutter may be one of your best options.

This online video editing platform is remarkably easy to use since you just have to copy the link to the YouTube video you’d like to trim into YT Cutter’s URL box and then select how long the new video should be. Click on the Start and End buttons to set the duration of the video and click on the Download button to choose if you want to create a video, GIF or an audio file. The trimmed YouTube video will be available for download as soon as the platform processes it, and you just need to specify a folder on your hard drive before clicking on the Save button.
There’re many online video trimmers available on the market, some of them are totally free to use, check our guide about How to Trim Videos for Free Online .
Read More to Get : How to Download YouTube Videos without Any Software Easily >>
Conclusion
Trimming a video online or with a video editing software like Filmora is an effortless task that can be completed in just a couple of minutes. However, it is better to complete the entire video editing process before you upload a video to your YouTube channel because YouTube Studio and other online video editing platforms still offer only a limited amount of video editing tools. Which method of trimming YouTube videos do you like using the most? Leave a comment and share your opinions with us.
Richard Bennett
Richard Bennett is a writer and a lover of all things video.
Follow @Richard Bennett
Richard Bennett
Mar 27, 2024• Proven solutions
The world’s largest video sharing platform currently has nearly two billion active monthly users who upload over 400 hours of video content to their channels each minute. It is to see from these statistics why every video aspiring YouTubers post on their channels has to be perfect in every way in order to reach a wide audience. Fortunately, trimming a video even after you’ve uploaded it to YouTube is a quick and easy process, and in this article, we are going to show you a few different methods you can use to trim the videos you upload to YouTube. So, let’s get started.
In this article
- How to Trim a Video After You Upload it to Your YouTube Channel?
- Trimming a Video Before Posting On YouTube with Filmora Video Editor [4 Ways]
- Using Online Video Editing Platforms to Trim YouTube Videos
How to Trim a Video After You Upload it to Your YouTube Channel?
The YouTube Studio is no longer in beta phase, which means that the feature is here to stay. This is good news for all video creators who frequently update their YouTube videos after they upload them, as they no longer have to go through the endless uploads just because they wanted to trim a video.
Make sure that you’re signed into your YouTube channel, then click on your profile picture and select the YouTube Studio (Beta) option. On the left side of the screen, you’ll be able to see a menu that contains different subcategories like Analytics, Dashboard or Videos, so just click on the Videos option and proceed to select a video you’d like to trim. After the Videos submenu appears on the screen you should click on the Editor option and the video you selected will open in the YouTube’s video editor.
Click on the Trim button to start trimming the video and drag the blue bars located at the start and the end of the file to designate the portion of the video you’d like to remove. Preview the changes and confirm what you’ve made by clicking on the Save button located in the upper right corner of the screen and the new shortened version of the video will become available within a couple of hours.
In this way, you don’t need to take down the original video, edit it and re-upload. One of the benefits of trimming YouTube videos with the Trim feature in YouTube Editor is that this will keep your video URL and views and ranks etc.
Trimming a Video Before Posting On YouTube with Filmora Video Editor [4 Ways]
Method 1: Trim on Timeline
YouTubers who don’t want to rely on YouTube’s video editing capabilities can trim their footage with Filmora (to be honest, the Editor in YouTube platform has limited features). Filmora video editing software for PC and Mac computers offers a few different tools for trimming videos. After you’ve created a new project in Filmora, you should import a video clip into the editor by clicking on the Import drop-down menu and select the Import Media Files option. Each file you add to a project will be displayed in the Media tab, and you can just drag and drop it to a video track on the timeline.
All you have to do in order to trim a video after you’ve placed it on the timeline is drag one of its ends to the left or to the right. As you drag one of the clip’s edges the editor will only display the remaining footage while rendering the rest invisible. If at any point you want to access a portion of the video you’ve trimmed you just have to extend the file by dragging it until you’re able to see the segment you’re searching for.
Method 2: Using Filmora Split Tool
Filmora’s Split tool can help you separate the portion of the clip you want to remove from the segment you’d like to keep. Simply place the playhead at the exact location in the video clip where you want to make a cut, and click on the Split icon that looks like a pair of scissors. After the video is split, you should click on the clip you no longer need in order to select it and then hit the Delete button on your keyboard to remove it from the timeline.
Method 3: Using Scene Detection
Wondershare’s video editor also offers an automatic way to split a video clip into a number of separate scenes. Right-click on the video file located in the Filmora’s Media tab, and select the Scene Detection option from the menu and proceed to click on the Detect button, after the Scene Detection window pops up on the screen. The software will then automatically analyze the footage and divide it into separate scenes. Simply click on the Add to Timeline button once the process is completed to continue editing the video clip you’ve just split.
Method 4: Using Instant Cutter Tool
The Instant Cutter Tool enables you to quickly trim or merge high-resolution files recorded on action cameras as soon as you import them into a project in Filmora. Select the Import with Instant Cutter Tool option from the Import drop-down menu and wait for the Filmora Instant Cutter window to appear on the screen. In the upper left corner of this window, you will be able to see Trim and Merge tabs. Make sure that the Trim tab is selected and then click on the Open File button to import a video clip you’d like to trim. You can then use the trimming sliders to designate the parts of the video you’d like to remove or the set the In and Out points by clicking on the Set In Point or Set Out Point icons. Click on the Export button to save the new version of the video clip and click OK to complete the process.
Using Online Video Editing Platforms to Trim YouTube Videos
In case you’re looking for a tool that lets you save extracts of scenes from YouTube to your computer free of charge YT Cutter may be one of your best options.
This online video editing platform is remarkably easy to use since you just have to copy the link to the YouTube video you’d like to trim into YT Cutter’s URL box and then select how long the new video should be. Click on the Start and End buttons to set the duration of the video and click on the Download button to choose if you want to create a video, GIF or an audio file. The trimmed YouTube video will be available for download as soon as the platform processes it, and you just need to specify a folder on your hard drive before clicking on the Save button.
There’re many online video trimmers available on the market, some of them are totally free to use, check our guide about How to Trim Videos for Free Online .
Read More to Get : How to Download YouTube Videos without Any Software Easily >>
Conclusion
Trimming a video online or with a video editing software like Filmora is an effortless task that can be completed in just a couple of minutes. However, it is better to complete the entire video editing process before you upload a video to your YouTube channel because YouTube Studio and other online video editing platforms still offer only a limited amount of video editing tools. Which method of trimming YouTube videos do you like using the most? Leave a comment and share your opinions with us.
Richard Bennett
Richard Bennett is a writer and a lover of all things video.
Follow @Richard Bennett
Harnessing Powerful Tools for Effective YouTubers’ SEO
Improve Your YouTube Video Performance with Wondershare Filmora
An easy and powerful video editor for YouTube Video
Numerous video and audio effects to choose from
Detailed tutorials provided by the official channel
With more than 1 billion hours of video watched every day, YouTube is the world’s second-largest search engine. That means you should optimize your videos for YouTube, so they rank well on Google and show up in YouTube searches.
YouTube keywords are the words you include in your video title, description, and anywhere that will help YouTube’s algorithm know what your video is about and what it entails. Keep reading to learn more about YouTube keyword research.
In this article
Why Do We Need to Research YouTube Keywords?
How to Research Keywords on YouTube?
Why Do We Need to Research YouTube Keywords?
Researching YouTube keywords is essential to your success. Here are three reasons why you might want to consider YouTube keyword research.
Helps You Know What Your Audience Is Searching for
Keyword research allows you to understand what people search for when they are on YouTube. In turn, this helps you know what your potential customers are seeking. You’ll then include these terms on your content to increase the chances of your audience finding you on YouTube.
It Helps You Rank Higher
You can use YouTube videos to promote brand awareness and market your product. Having high-ranking videos is a cost-effective way to push your target audience through the sales funnel.
When creating YouTube videos, you need to ensure you are reaching your target audience. And that is why researching keywords is crucial.
Once you have performed YouTube keyword research and determined the most suitable keywords for your topic, you can now use them to create target content for your audience. In turn, this will help you increase the number of subscribers on your YouTube channel. Your chances of your video showing up on YouTube will increase, which will bring traffic to your business.
It’s the Cheapest Way to Market Your Products or Services
Video marketing is expensive, and that is why you have to find every possible edge for your video marketing if you want to lower your costs and increase your ROI. For this reason, keyword research will ensure your audience finds you without spending loads of money that you could have used on services like Google Ads.
Because keyword research allows your target audience to find you, this means more opportunities for you. Most of the users will share entertaining videos.
How to Research Keywords on YouTube?
There are several ways of conducting keyword research for YouTube to find out what people are searching for and determine the content in your video. They include:
1. Using YouTube Search

Although this method doesn’t provide all available search options, it’s still good for getting an idea of the type of keyword with which you’re dealing.
You can start your research by typing the keywords into YouTube’s search bar and reviewing the displayed results. It might be helpful to check out similar videos or video playlists. If your search seems too wide, you can enter several keywords at once (separated by commas), which will help you find better results.
2. Using Google’s Keyword Planner Tool

This tool is helpful for keyword difficulty and monthly searches volume assessment. If you only want to know the number of organic visits a given keyword gets, Google Keyword Planner might be helpful. The tool allows you to create lists consisting of related keywords and provides information about CPC (cost per click) and potential traffic in general.
3. Using YouTube Suggestions
What makes YouTube unique is its ability to suggest content based on your location, subscription, and watch history. You can use this method to find keyword ideas if you have subscribed to relevant channels. Also, you can rely on YouTube suggestions to find out whether a topic is popular or not.
4. Using YouTube Analytics
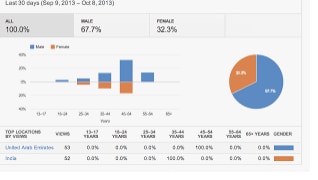
YouTube has a built-in Keyword Tool that is extremely helpful for researching the best keywords to use in your video titles, descriptions, and tags. This method allows you to see video search keywords with which users are finding your content. It is possible to review top organic keywords together with the respective engagement metrics, including bounce rate and average view duration.
5. Using Third-Party YouTube Keyword Tools
Last but not least, there are several third-party tools available on the market that provide both keyword difficulty and organic traffic estimation data for YouTube keywords. Some of these tools also offer similar features, including recommendations based on your existing subscriptions. Let’s look at some of the popular YouTube tools that you can use.
vidIQ
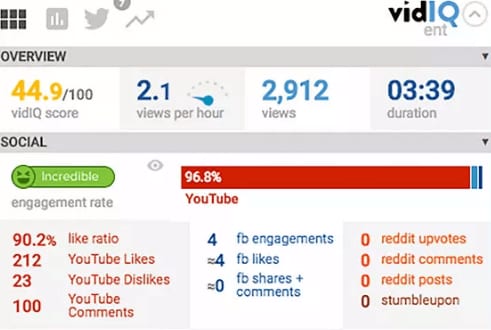
Designed to boost YouTube views, vidIQ is an effective SEO tool. The tool recommends keywords, descriptions, and titles that will help you to get more views and subscribers.
Performing vidIQ keyword research that relates to your video is a breeze. With just a few clicks, you will know what people are searching for and create content that they want to watch.
The tool allows you to enable inline keywords to know the tags your competitors use on search results. Use them to help you generate ideas relevant to your content. vidIQ also suggests ideal keywords like YouTube.
TubeBuddy

You can also use TubeBuddy to find and evaluate a range of YouTube keywords. You can do TubeBuddy keyword research on its mobile app or browser extension. The tool also shows how often people click on the results and how often users search a keyword.
Keyword Keg
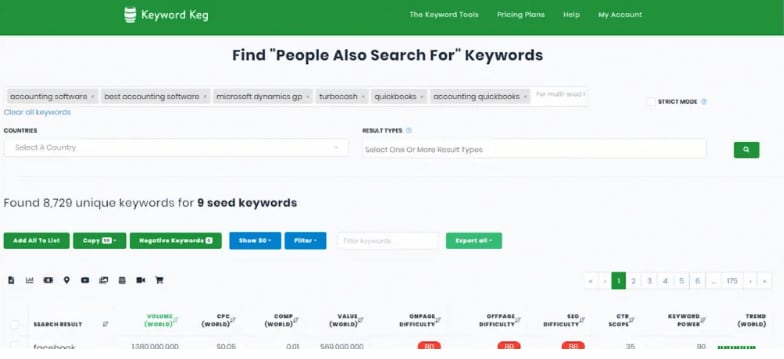
Using the YouTube suggest API, Keyword Keg shows you the terms users search most and the monthly number of searches. You’ll also see what other people are paying for CPC (cost per click). You can use this data to determine the best keywords for your YouTube videos.
Qusetion: Are keywords and Tags the Same Thing?
Answer: The main difference between tags and keywords is where you will place them. Keywords describe the content in your video to help search engines and YouTube’s algorithm find your video. Tags describe what the content in your video is about and how it’s connected.
Make Great YouTube Videos with Filmora
Having high-quality videos can make you stand out from your competitors. Filmora is a video editing software that allows you to create amazing YouTube videos. It has powerful editing tools that will enhance the quality of your videos.
You can also add over 800 cool effects and filters to your videos to make them fun to watch. With just a single click, you can add opacity and speed ramp effects as well as infinite zoom effects.
Additionally, you can adjust the dynamic range and white balance of Your YouTube videos. Furthermore, you can fine-tune the audio of your video to make it crisp and eliminate camera shake.
The best part is: Filmora is compatible with macOS X 10.12 or later and Windows 7, 8, and 10. It also supports all popular standard HD videos, audio, and image file formats.
Conclusion
Now that you know the importance of YouTube keyword research and how to perform keyword research, your target audience can find you easily.
With more than 1 billion hours of video watched every day, YouTube is the world’s second-largest search engine. That means you should optimize your videos for YouTube, so they rank well on Google and show up in YouTube searches.
YouTube keywords are the words you include in your video title, description, and anywhere that will help YouTube’s algorithm know what your video is about and what it entails. Keep reading to learn more about YouTube keyword research.
In this article
Why Do We Need to Research YouTube Keywords?
How to Research Keywords on YouTube?
Why Do We Need to Research YouTube Keywords?
Researching YouTube keywords is essential to your success. Here are three reasons why you might want to consider YouTube keyword research.
Helps You Know What Your Audience Is Searching for
Keyword research allows you to understand what people search for when they are on YouTube. In turn, this helps you know what your potential customers are seeking. You’ll then include these terms on your content to increase the chances of your audience finding you on YouTube.
It Helps You Rank Higher
You can use YouTube videos to promote brand awareness and market your product. Having high-ranking videos is a cost-effective way to push your target audience through the sales funnel.
When creating YouTube videos, you need to ensure you are reaching your target audience. And that is why researching keywords is crucial.
Once you have performed YouTube keyword research and determined the most suitable keywords for your topic, you can now use them to create target content for your audience. In turn, this will help you increase the number of subscribers on your YouTube channel. Your chances of your video showing up on YouTube will increase, which will bring traffic to your business.
It’s the Cheapest Way to Market Your Products or Services
Video marketing is expensive, and that is why you have to find every possible edge for your video marketing if you want to lower your costs and increase your ROI. For this reason, keyword research will ensure your audience finds you without spending loads of money that you could have used on services like Google Ads.
Because keyword research allows your target audience to find you, this means more opportunities for you. Most of the users will share entertaining videos.
How to Research Keywords on YouTube?
There are several ways of conducting keyword research for YouTube to find out what people are searching for and determine the content in your video. They include:
1. Using YouTube Search
Although this method doesn’t provide all available search options, it’s still good for getting an idea of the type of keyword with which you’re dealing.
You can start your research by typing the keywords into YouTube’s search bar and reviewing the displayed results. It might be helpful to check out similar videos or video playlists. If your search seems too wide, you can enter several keywords at once (separated by commas), which will help you find better results.
2. Using Google’s Keyword Planner Tool
This tool is helpful for keyword difficulty and monthly searches volume assessment. If you only want to know the number of organic visits a given keyword gets, Google Keyword Planner might be helpful. The tool allows you to create lists consisting of related keywords and provides information about CPC (cost per click) and potential traffic in general.
3. Using YouTube Suggestions
What makes YouTube unique is its ability to suggest content based on your location, subscription, and watch history. You can use this method to find keyword ideas if you have subscribed to relevant channels. Also, you can rely on YouTube suggestions to find out whether a topic is popular or not.
4. Using YouTube Analytics
YouTube has a built-in Keyword Tool that is extremely helpful for researching the best keywords to use in your video titles, descriptions, and tags. This method allows you to see video search keywords with which users are finding your content. It is possible to review top organic keywords together with the respective engagement metrics, including bounce rate and average view duration.
5. Using Third-Party YouTube Keyword Tools
Last but not least, there are several third-party tools available on the market that provide both keyword difficulty and organic traffic estimation data for YouTube keywords. Some of these tools also offer similar features, including recommendations based on your existing subscriptions. Let’s look at some of the popular YouTube tools that you can use.
vidIQ
Designed to boost YouTube views, vidIQ is an effective SEO tool. The tool recommends keywords, descriptions, and titles that will help you to get more views and subscribers.
Performing vidIQ keyword research that relates to your video is a breeze. With just a few clicks, you will know what people are searching for and create content that they want to watch.
The tool allows you to enable inline keywords to know the tags your competitors use on search results. Use them to help you generate ideas relevant to your content. vidIQ also suggests ideal keywords like YouTube.
TubeBuddy
You can also use TubeBuddy to find and evaluate a range of YouTube keywords. You can do TubeBuddy keyword research on its mobile app or browser extension. The tool also shows how often people click on the results and how often users search a keyword.
Keyword Keg
Using the YouTube suggest API, Keyword Keg shows you the terms users search most and the monthly number of searches. You’ll also see what other people are paying for CPC (cost per click). You can use this data to determine the best keywords for your YouTube videos.
Qusetion: Are keywords and Tags the Same Thing?
Answer: The main difference between tags and keywords is where you will place them. Keywords describe the content in your video to help search engines and YouTube’s algorithm find your video. Tags describe what the content in your video is about and how it’s connected.
Make Great YouTube Videos with Filmora
Having high-quality videos can make you stand out from your competitors. Filmora is a video editing software that allows you to create amazing YouTube videos. It has powerful editing tools that will enhance the quality of your videos.
You can also add over 800 cool effects and filters to your videos to make them fun to watch. With just a single click, you can add opacity and speed ramp effects as well as infinite zoom effects.
Additionally, you can adjust the dynamic range and white balance of Your YouTube videos. Furthermore, you can fine-tune the audio of your video to make it crisp and eliminate camera shake.
The best part is: Filmora is compatible with macOS X 10.12 or later and Windows 7, 8, and 10. It also supports all popular standard HD videos, audio, and image file formats.
Conclusion
Now that you know the importance of YouTube keyword research and how to perform keyword research, your target audience can find you easily.
Also read:
- Conquer YouTube's Realms A Step-by-Step Video Uploading Guidebook
- Chart a Course to Higher Views with Top Optimization Tactics for 2024
- [New] Earning Excellence A Guide to Maximize Money From Mobile YouTube Viewers
- Hidden Pitfalls Investing in Fraudulent Subscribers
- Backward Playmanship A Guide to Reversed YouTube Videos for 2024
- A Step-by-Step Guide to Enhancing Your YouTube Content Post-Uploading
- Craftsman of the Multimedia Medley
- Step-by-Step for Sports Video Compilation
- [New] Amplify Your Channel Effortless Tactics for More Views
- DIY Tips to Cut Unwanted Sounds From Your Videos for 2024
- In 2024, Elevate Your Content's Visibility Strategic Use of Imagery in Video Thumbnails
- Simplified Design Guide Add Your Own Style to Your Video Shorts
- Elevate Your YouTube Gaming Content With Key FreeFire Hashtags
- Enhance Videos Naturally - Free 9 YouTube Thumbnail Crafting Tips for 2024
- Banter Bonanza The Best Comedians on the Web for 2024
- Elevating Content Strategy Through YouTube Metrics for 2024
- Navigating Your Path as a First-Time YouTuber Sidestep These 8 Common Mistakes
- [New] Enliven YouTube Images A Burst of Neon Flair
- In 2024, A Comparative Analysis of Youtube's Ownership Vs. CC Licenses
- Creating a Custom URL for YouTube Autosub
- Women Rule The Top 10 YouTube Stars Amongst Genders
- 2024 Approved Discovering 8 YouTube Channels on the Rise at Lightning Speed
- The Key Role of Image Quality in Generating Clicks on YouTube Videos
- Strategies for Stumbling Upon Covert YouTube Videos
- [Updated] Best of Both Worlds YouTube’s VR Gems
- 2024 Approved Amplify Your Youtubes' Interaction with Emojis
- Charting the Course Establishing a Powerful Gaming Channel for 2024
- Essential Steps to Create YouTube Beginnings & Ends on a Budget
- Earnings Expansion on Glamour Channels for 2024
- Optimizing Your Content' Performance Premier Video Rank Tools
- [New] Drive More Watch Time, Not Churn Discover the Top 6 Techniques on YouTube
- A World Beyond Men Top 10 Inspirational YouTube Stars for 2024
- In 2024, Best Screener Tech Perfect for Creating Viral YouTube Moments
- In 2024, Dance of Words Crafting Bouncing Text Effects
- [Updated] Cool Climates, Cozy Cinematics Selecting Winter Backgrounds
- [New] QuickFlips How Tweets Jumpstart Video Fame for 2024
- Masterclass in Media Magic with Magix Video Pro X
- How to Change Nokia XR21 Location on Skout | Dr.fone
- New 2024 Approved The Comprehensive Checklist 8 Superior Internet-Accessible, Cost-Free Recording Solutions
- 17 Best Apps to Remove Image Background for 2024
- Top 8 Android Audio Workstations Elevating Your Music Creation for 2024
- [Updated] What's Not Advertised Ten Facts About Instagram Reels for 2024
- New Get iMovie-Like Features on Android with These 10 Alternative Apps for 2024
- [Updated] 2024 Approved Best 10 Screen Recorders for Mac
- Centralized Video Control MStream Edition
- [New] 2024 Approved Comparing Stream Quality with OBS Studio and Fraps
- In 2024, How To Change Samsung Galaxy A15 4G Lock Screen Password?
- In 2024, Top 6 Apps/Services to Trace Any Apple iPhone 14 Pro Max Location By Mobile Number | Dr.fone
- [New] 2024 Approved Unlock the Potential of Your Profile Picture on Discord
- Title: "2024 Approved Efficient Video Cutting Techniques to Boost Your Content"
- Author: Kevin
- Created at : 2024-05-25 14:29:45
- Updated at : 2024-05-26 14:29:45
- Link: https://youtube-videos.techidaily.com/2024-approved-efficient-video-cutting-techniques-to-boost-your-content/
- License: This work is licensed under CC BY-NC-SA 4.0.
