
:max_bytes(150000):strip_icc()/blu-ray-disc-player-information-1846364-ccbae6fd80244359a2a5fada4cd53e40.png)
"2024 Approved Efficient iOS-Based Strategies for YouTube Postings"
Efficient iOS-Based Strategies for YouTube Postings
Create High-Quality Video - Wondershare Filmora
An easy and powerful YouTube video editor
Numerous video and audio effects to choose from
Detailed tutorials provided by the official channel
Initially, iOS users had the option to load videos directly to YouTube via the tap-to-upload feature. However, this option is missing in the recent iOS devices versions. Therefore, many users search for possible ways to post a video on YouTube from iPhone. For this, you have to put some considerations into place before moving on. The video title length should not exceed 100 characters, while the description is maintained at 5,000 characters. Also, ensure the video length doesn’t exceed 15 minutes. Let’s roll out the best ways to upload your videos and make that big catch on subscribers.

In this article
01 [ How to upload a video to YouTube from iPhone or iPad](#Part 1)
02 [Why your phone doesn’t post videos to YouTube](#Part 2)
03 [Make your YouTube video better with Filmora](#Part 3)
How to upload a video to YouTube from iPhone or iPad
Are you ready to start on that big adventure and share your videos on YouTube? Follow these steps to learn how to upload a video to YouTube from your iPhone.
Method 1: Upload using the YouTube iOS app
Using the YouTube app is the simplest way to upload your YouTube videos. The YouTube app should be installed on your iOS device.
Step 1. Launch the YouTube app on your device, then sign in to your account. If you don’t have an account yet, you will need to “Sign up” for a new one before continuing the upload process.
Step 2. Click on the “+” icon found at the bottom of the screen.
Step 3. Then choose the “Upload a video” option from the populated list of options.
Step 4. Check out the pop-up that appears and “Allow access” to it.
Step 5. Edit your video to your preference by trimming or cropping as you desire. Then click on the “Next” option.

Step 6. Add “title and description” to your video. Remember, the title should contain less than 100 characters and the description no more than 500 characters.
Step 7. Then set the visibility mode as “Public” to enable you to share your video over the internet.
Step 8. Click on the “Upload” button to finally upload your video to YouTube.

Method 2: Upload using Photo App
The Photo App has a “Share” option that you can use to upload your videos to YouTube. Here is the guide.
Step 1. Go to your iOS device and tap on the “Photos” app.
Step 2. Then tap on the “Videos Folder” to locate the video you wish to upload to YouTube.

Step 3. Next, tap on the video that you want to upload.
Step 4. Then tap on the “Share” icon located at the bottom left of your iOS device screen.
Step 5. You’ll then access a “Share” menu from where you have various share options for your video.
Step 6. Choose the “YouTube” option to continue to share your video there. At this juncture, ensure you have logged in to your Google Account.

Step 7. You need to provide a “Title” and “Description” of your video. Then go to the “Privacy” Options and make your video “Public.”
Step 8. Finally, tap on the “Publish” tab found at the top-right corner of your screen to make your video viewable by the public.

Method 3: Upload video to YouTube using Safari
Safari is another alternative method to upload a video to YouTube.
Step 1. First, go to “youtube.com” on Safari and sign in.

Step 2. Then tap on the “account” icon at the top right side of the screen.
Step 3. Hit on the “Upload” icon and wait to be redirected to the YouTube Studio desktop site.
Step 4. Click on the “Select Files” option.
Step 5. Choose the video you wish to add to YouTube from the “Photo” library and tap on the “Add” button.

Step 6. Add your video’s “title and description” and hit the “Next” button.
Step 7. Tap on the “Next” button once more to go to the “Visibility” page.
Step 8. Select the “Public” option to upload your video to the public.
Why your phone doesn’t post videos to YouTube
Despite learning how to upload to YouTube from iPhone, you may be perplexed to realize that your phone refuses to post videos to YouTube. What could be the reason?
1) YouTube issues
In most cases, the problem doesn’t arise from your phone but from YouTube. This streaming app may also experience some hitches along the way. Remember that even if your phone sync with your YouTube account to upload videos from the “Camera Roll,” YouTube isn’t managed from the Camera Roll but the YouTube app directly. You can solve the issue by signing out of your YouTube account and signing back in.
2) Connection Strength
Some videos may appear quite large and cause a time-out during the upload process. Check your Wi-Fi or internet connection strength to determine if it needs a boost or wait until the streaming strength is strong for a quick upload. Test your internet speed by searching “internet test speed” on Google. Then click the “Run Speed Test” in the search box. A window will open and give you an estimate of the Mbps that your connection is operating at. If too low, switch to other alternatives.
3) Verify your YouTube account
Verifying your account will help you to enjoy YouTube’s full features. It’s then that you’ll manage to upload videos without any drawbacks. Also, that’s when you’ll manage to upload longer videos that go beyond the 15-minute duration.
4) Pay attention to the video size
There is a limit for videos to post to YouTube. If it is too large or long, the upload will cancel before completion.
5) Be patient
YouTube can save your partial upload for 24 hours. So, you can continue to upload from where you left. Learn to be patient as there could be a surge of user traffic, especially during evenings.
Make your YouTube video better with Filmora
Good video quality will make you go miles ahead of your marketing gig. You can use Filmora mobile application to make your videos look better before uploading them to YouTube. This intuitive video editing app has advanced features and several ways to compose creative videos.
- Stunning video effects that let you add animated text to video
- Easily record your voice-overs with its perfect sound effects
- Split functionality that allows you to slice your video footage into two or more separate video clips
- Playback your clips in reverse and adjust the speed for fast or slow motion
- Select the best aspect ratio for your video
- Advanced camera to create emoji selfies and other video beautification
- Directly share your videos to social media sites like YouTube and Facebook.
Check out the steps to edit your video with Filmora on your iOS device
Step 1. Download and install Filmora
For iOS devices, go to the “Apple Store” to download and install the app. Also, allow it to access your videos, camera, and pictures in the process.
Step 2. Import video
You may already have a video in your library that you wish to upload to YouTube. Nonetheless, you can shoot a video afresh to add. To shoot one, you need to settle on a topic before recording and downloading other images you may need. Ensure you watch what you are filming and use adequate lighting during the shooting process.
Next, begin to import your video file. Just open the application and select the “Create new video” option. Then choose the “Video” icon and select a folder that contains the video to be added. Hit the “Add” button from the bottom right corner.
Step 3. Edit video
Filmora has several editing features to make your video better. Use the “Edit tools” feature to turn your video into an impeccable piece. Easily add filters, adjust the speed, or create subtitles, among other functions. You can also split, trim, or delete the unwanted clip parts.
It is important to add a title and description to your video. Just use the “Titles” button to add the title. Other precepts that you can add include transitions, sound like voice-over,
Step 4. Export and share
You’ve just finished creating and editing your video. Click on the “Save” tab and let the application export your video. Then select the “Save to Camera Roll” option to save the video to your iPhone. Finally, you can upload and share the video directly to your YouTube account.
Conclusion
● However, it appears to be a difficult task; you must have found relief after going through these procedures. You don’t need prior knowledge on how to upload a video to YouTube from your iPhone. Several options are at your disposal. You can use the Safari, YouTube app, or the Photo app to upload your videos. The better part is that you can create top-notch videos with Filmora. This mobile video editing app has a lot to offer, ensuring quality content.
Initially, iOS users had the option to load videos directly to YouTube via the tap-to-upload feature. However, this option is missing in the recent iOS devices versions. Therefore, many users search for possible ways to post a video on YouTube from iPhone. For this, you have to put some considerations into place before moving on. The video title length should not exceed 100 characters, while the description is maintained at 5,000 characters. Also, ensure the video length doesn’t exceed 15 minutes. Let’s roll out the best ways to upload your videos and make that big catch on subscribers.
In this article
01 [ How to upload a video to YouTube from iPhone or iPad](#Part 1)
02 [Why your phone doesn’t post videos to YouTube](#Part 2)
03 [Make your YouTube video better with Filmora](#Part 3)
How to upload a video to YouTube from iPhone or iPad
Are you ready to start on that big adventure and share your videos on YouTube? Follow these steps to learn how to upload a video to YouTube from your iPhone.
Method 1: Upload using the YouTube iOS app
Using the YouTube app is the simplest way to upload your YouTube videos. The YouTube app should be installed on your iOS device.
Step 1. Launch the YouTube app on your device, then sign in to your account. If you don’t have an account yet, you will need to “Sign up” for a new one before continuing the upload process.
Step 2. Click on the “+” icon found at the bottom of the screen.
Step 3. Then choose the “Upload a video” option from the populated list of options.
Step 4. Check out the pop-up that appears and “Allow access” to it.
Step 5. Edit your video to your preference by trimming or cropping as you desire. Then click on the “Next” option.
Step 6. Add “title and description” to your video. Remember, the title should contain less than 100 characters and the description no more than 500 characters.
Step 7. Then set the visibility mode as “Public” to enable you to share your video over the internet.
Step 8. Click on the “Upload” button to finally upload your video to YouTube.
Method 2: Upload using Photo App
The Photo App has a “Share” option that you can use to upload your videos to YouTube. Here is the guide.
Step 1. Go to your iOS device and tap on the “Photos” app.
Step 2. Then tap on the “Videos Folder” to locate the video you wish to upload to YouTube.
Step 3. Next, tap on the video that you want to upload.
Step 4. Then tap on the “Share” icon located at the bottom left of your iOS device screen.
Step 5. You’ll then access a “Share” menu from where you have various share options for your video.
Step 6. Choose the “YouTube” option to continue to share your video there. At this juncture, ensure you have logged in to your Google Account.
Step 7. You need to provide a “Title” and “Description” of your video. Then go to the “Privacy” Options and make your video “Public.”
Step 8. Finally, tap on the “Publish” tab found at the top-right corner of your screen to make your video viewable by the public.
Method 3: Upload video to YouTube using Safari
Safari is another alternative method to upload a video to YouTube.
Step 1. First, go to “youtube.com” on Safari and sign in.
Step 2. Then tap on the “account” icon at the top right side of the screen.
Step 3. Hit on the “Upload” icon and wait to be redirected to the YouTube Studio desktop site.
Step 4. Click on the “Select Files” option.
Step 5. Choose the video you wish to add to YouTube from the “Photo” library and tap on the “Add” button.
Step 6. Add your video’s “title and description” and hit the “Next” button.
Step 7. Tap on the “Next” button once more to go to the “Visibility” page.
Step 8. Select the “Public” option to upload your video to the public.
Why your phone doesn’t post videos to YouTube
Despite learning how to upload to YouTube from iPhone, you may be perplexed to realize that your phone refuses to post videos to YouTube. What could be the reason?
1) YouTube issues
In most cases, the problem doesn’t arise from your phone but from YouTube. This streaming app may also experience some hitches along the way. Remember that even if your phone sync with your YouTube account to upload videos from the “Camera Roll,” YouTube isn’t managed from the Camera Roll but the YouTube app directly. You can solve the issue by signing out of your YouTube account and signing back in.
2) Connection Strength
Some videos may appear quite large and cause a time-out during the upload process. Check your Wi-Fi or internet connection strength to determine if it needs a boost or wait until the streaming strength is strong for a quick upload. Test your internet speed by searching “internet test speed” on Google. Then click the “Run Speed Test” in the search box. A window will open and give you an estimate of the Mbps that your connection is operating at. If too low, switch to other alternatives.
3) Verify your YouTube account
Verifying your account will help you to enjoy YouTube’s full features. It’s then that you’ll manage to upload videos without any drawbacks. Also, that’s when you’ll manage to upload longer videos that go beyond the 15-minute duration.
4) Pay attention to the video size
There is a limit for videos to post to YouTube. If it is too large or long, the upload will cancel before completion.
5) Be patient
YouTube can save your partial upload for 24 hours. So, you can continue to upload from where you left. Learn to be patient as there could be a surge of user traffic, especially during evenings.
Make your YouTube video better with Filmora
Good video quality will make you go miles ahead of your marketing gig. You can use Filmora mobile application to make your videos look better before uploading them to YouTube. This intuitive video editing app has advanced features and several ways to compose creative videos.
- Stunning video effects that let you add animated text to video
- Easily record your voice-overs with its perfect sound effects
- Split functionality that allows you to slice your video footage into two or more separate video clips
- Playback your clips in reverse and adjust the speed for fast or slow motion
- Select the best aspect ratio for your video
- Advanced camera to create emoji selfies and other video beautification
- Directly share your videos to social media sites like YouTube and Facebook.
Check out the steps to edit your video with Filmora on your iOS device
Step 1. Download and install Filmora
For iOS devices, go to the “Apple Store” to download and install the app. Also, allow it to access your videos, camera, and pictures in the process.
Step 2. Import video
You may already have a video in your library that you wish to upload to YouTube. Nonetheless, you can shoot a video afresh to add. To shoot one, you need to settle on a topic before recording and downloading other images you may need. Ensure you watch what you are filming and use adequate lighting during the shooting process.
Next, begin to import your video file. Just open the application and select the “Create new video” option. Then choose the “Video” icon and select a folder that contains the video to be added. Hit the “Add” button from the bottom right corner.
Step 3. Edit video
Filmora has several editing features to make your video better. Use the “Edit tools” feature to turn your video into an impeccable piece. Easily add filters, adjust the speed, or create subtitles, among other functions. You can also split, trim, or delete the unwanted clip parts.
It is important to add a title and description to your video. Just use the “Titles” button to add the title. Other precepts that you can add include transitions, sound like voice-over,
Step 4. Export and share
You’ve just finished creating and editing your video. Click on the “Save” tab and let the application export your video. Then select the “Save to Camera Roll” option to save the video to your iPhone. Finally, you can upload and share the video directly to your YouTube account.
Conclusion
● However, it appears to be a difficult task; you must have found relief after going through these procedures. You don’t need prior knowledge on how to upload a video to YouTube from your iPhone. Several options are at your disposal. You can use the Safari, YouTube app, or the Photo app to upload your videos. The better part is that you can create top-notch videos with Filmora. This mobile video editing app has a lot to offer, ensuring quality content.
Mastering the Monetized Space: A Buyer’s Primer
Building a following on a YouTube channel to monetize it can be difficult. It is even more difficult to turn it into a full-time occupation, especially if you are a beginner. So, it makes sense buying monetized YouTube channel. When you buy a monetized YouTube channel, it relieves you of the struggle of churning out high-quality content that connects with an audience. You also get a fully functional stream of generating additional income. In this article, we explore the top sites that offer monetized YouTube channel for sale, giving you an easier start on the platform.
YouTube Monetization Editor A cross-platform for editing any kind of videos and add creative effects to make them more attarctive!
Free Download Free Download Learn More

Part 1. Top 10 Sites to Buy Monetized YouTube Channels
Investing in a pre-existing, monetized YouTube channel is a great idea. It saves you time, allowing you to focus on creating quality content. However, make sure you buy a monetized YouTube channel from a reliable seller. Let’s have a look at the top sites to buy monetized YouTube channels:
1. UseViral
This is one of the best options available to buy monetize YouTube channel. They offer precious monetized YouTube channel packages. Your new channel will be ready for monetization with more than 4,000 watch time hours and a 1,000+ subscriber base.
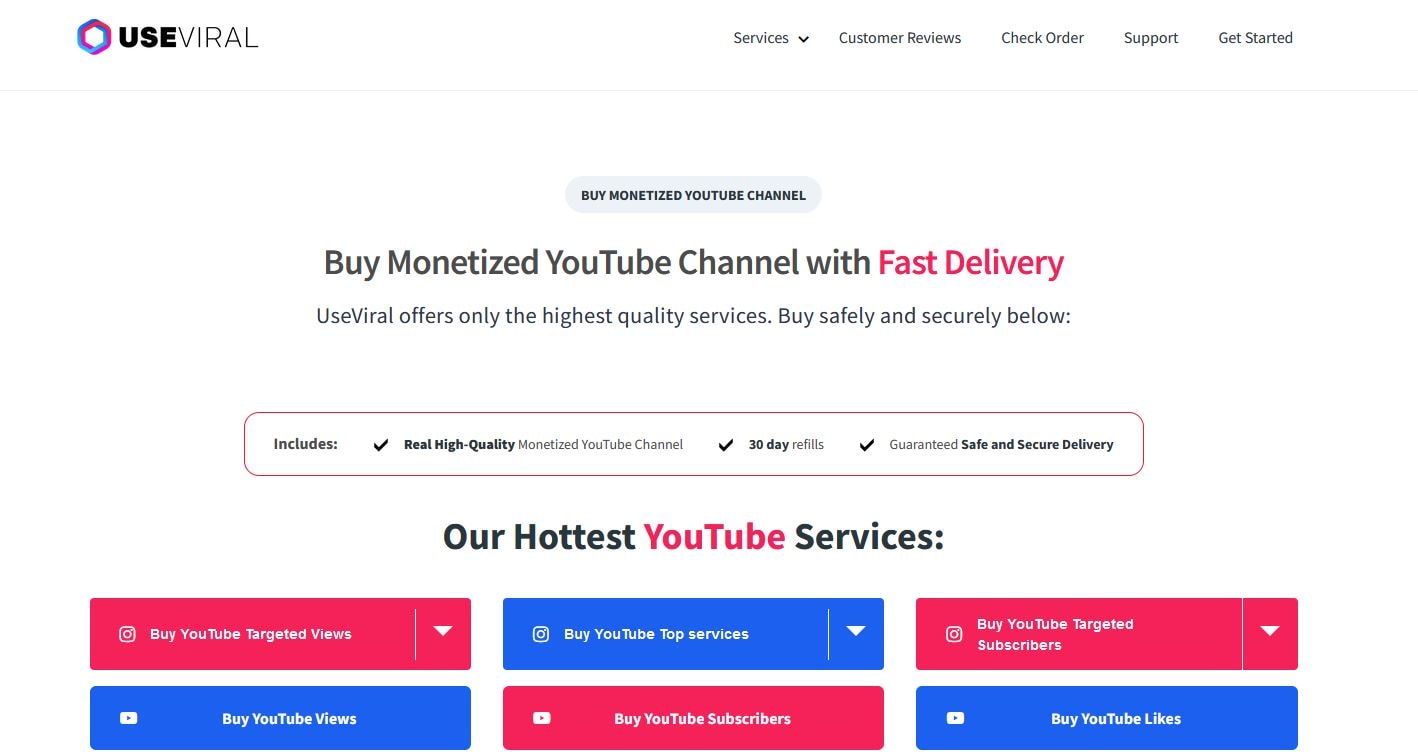
To get your monetized channel, you will be required to fill out a brief questionnaire. Explain your ideal market and video production needs to allow the UseViral team to understand what you are looking for. They let you know what you are paying for any extras.
Price: $599
Customer Rating: 9.5/10
2. SlidesMedia
This is a well-known social media growth strategist that allows you to buy a monetized YouTube channel. The site stands out for offering assistance with growing the YouTube channel and other social media platforms.

SlidesMedia promises to use only human editors on your YouTube channel. They give you a channel with genuine content. You also get the assurance that the content is not bot-generated..
Price: $529 - $2400.
Customer Rating: 9.3/10
3. AudienceGain
AudienceGain is a popular social media marketing platform. They offer a wide range of services, including selling monetized YouTube channels.
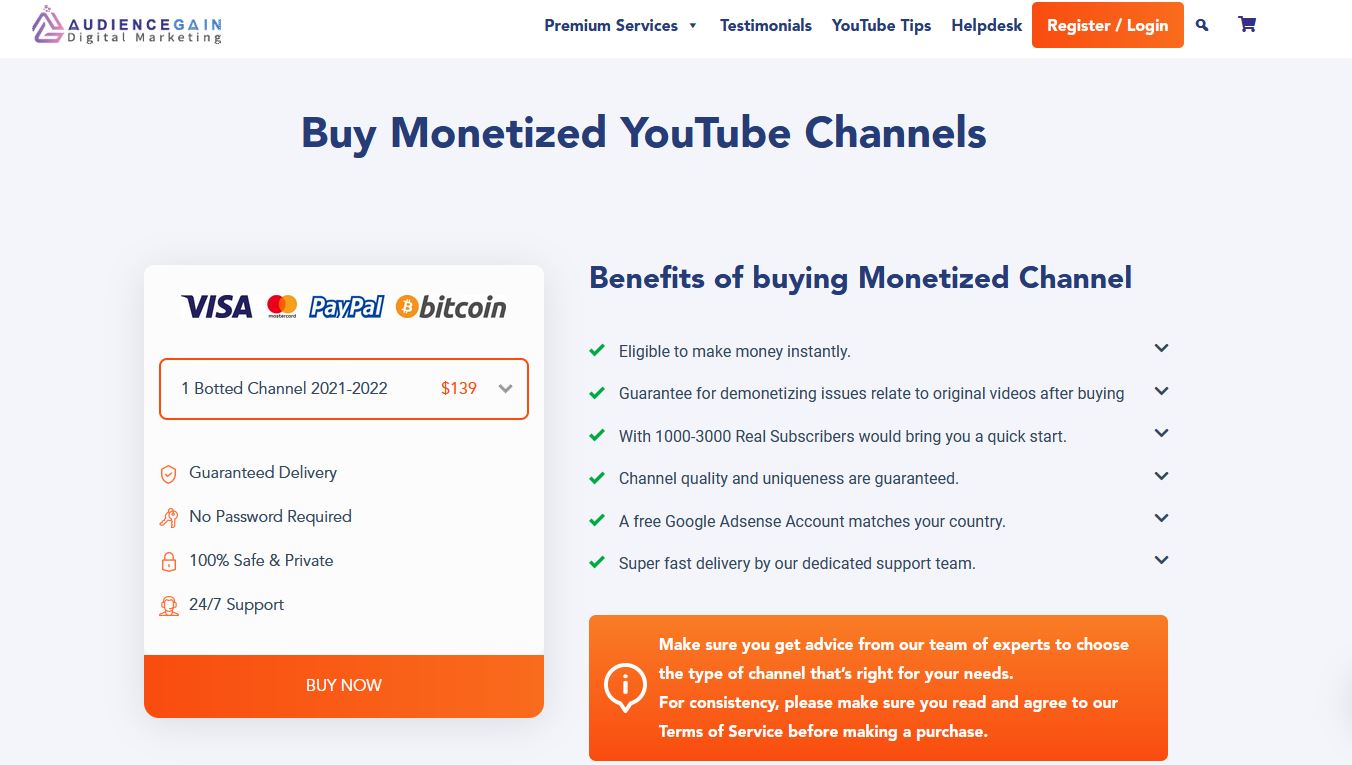
With a proven track record, AudienceGain stands out for offering quality customer service. They support you before, during, and after the purchase. They also provide organically grown channels to make sure you are not demonetized.
Price: $ 129 - $390
Customer Rating: 9.5/10
4. Fameswap
This is a flexible marketplace for selling and buying monetized YouTube channels. The site stands out for being selective in the kind of channels it features.
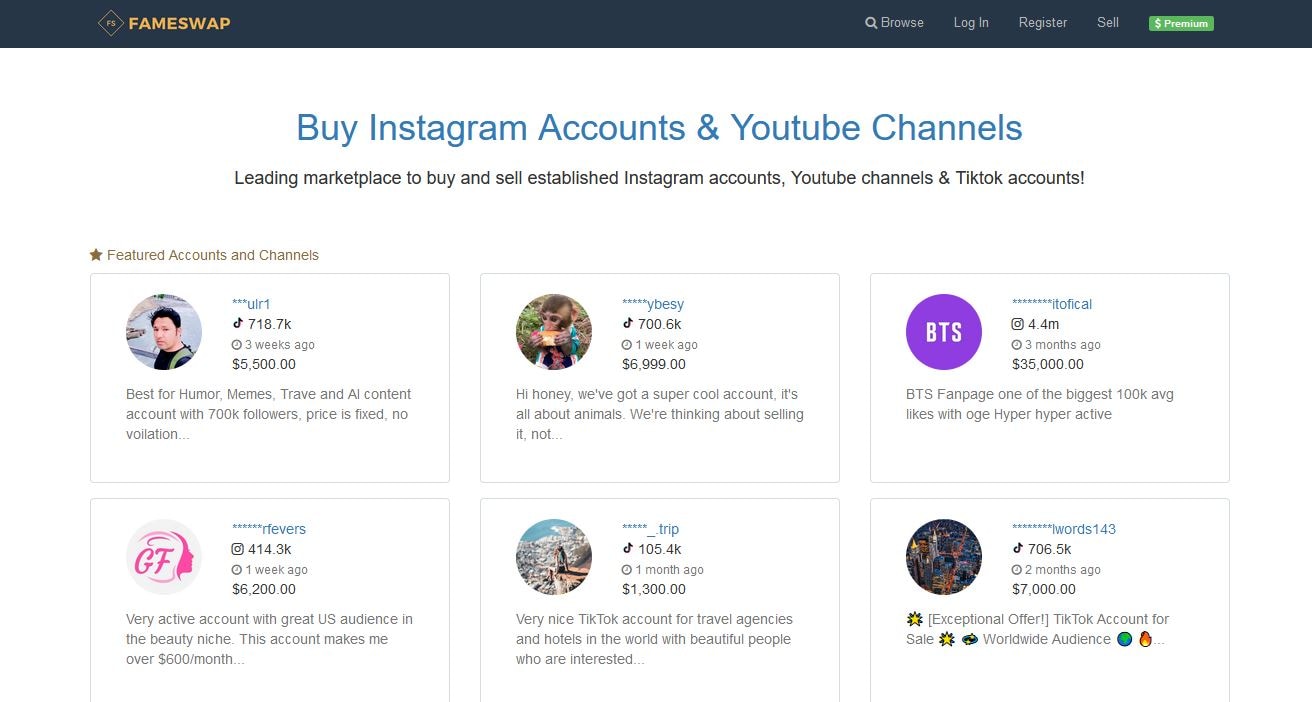
Fameswap offers a safe method of communication between vendors and buyers through an internal messaging system. You can invest in a channel that you are interested in, ranging from topics like fashion and beauty to entertainment and sports.
Price: Customized pricing
Customer Rating: 8.5/10
5. Eazy Viral
Another excellent choice is to buy a monetized YouTube channel. It allows you to choose from numerous channel types. Users also specify the number of subscribers and watch times they want.

Eazy Viral promises quality content that will not infringe on the rights of others. They also make it simple to monetize your videos and safeguard your AdSense account.
Price: $249 - $1100
Customer Rating: 9/10
6. EazySMM
With EazySMM, you get a unique starting point on your YouTube journey. Choose a YouTube monetized channel for sale on a niche you are interested in at a low price to get started.

EazySMM watches over its clients to make sure they are growing organically. They promise genuine channel views and subscriptions. Their services are also quick, delivering monetized channels within 12 to 48 hours of the purchase.
Price: Custom Pricing
Customer Rating: 8/10
7. 123accs
This platform allows you to buy YouTube channels that have not yet made money. You can then monetize the channel since it has already met the YouTube Partner Program eligibility criteria.
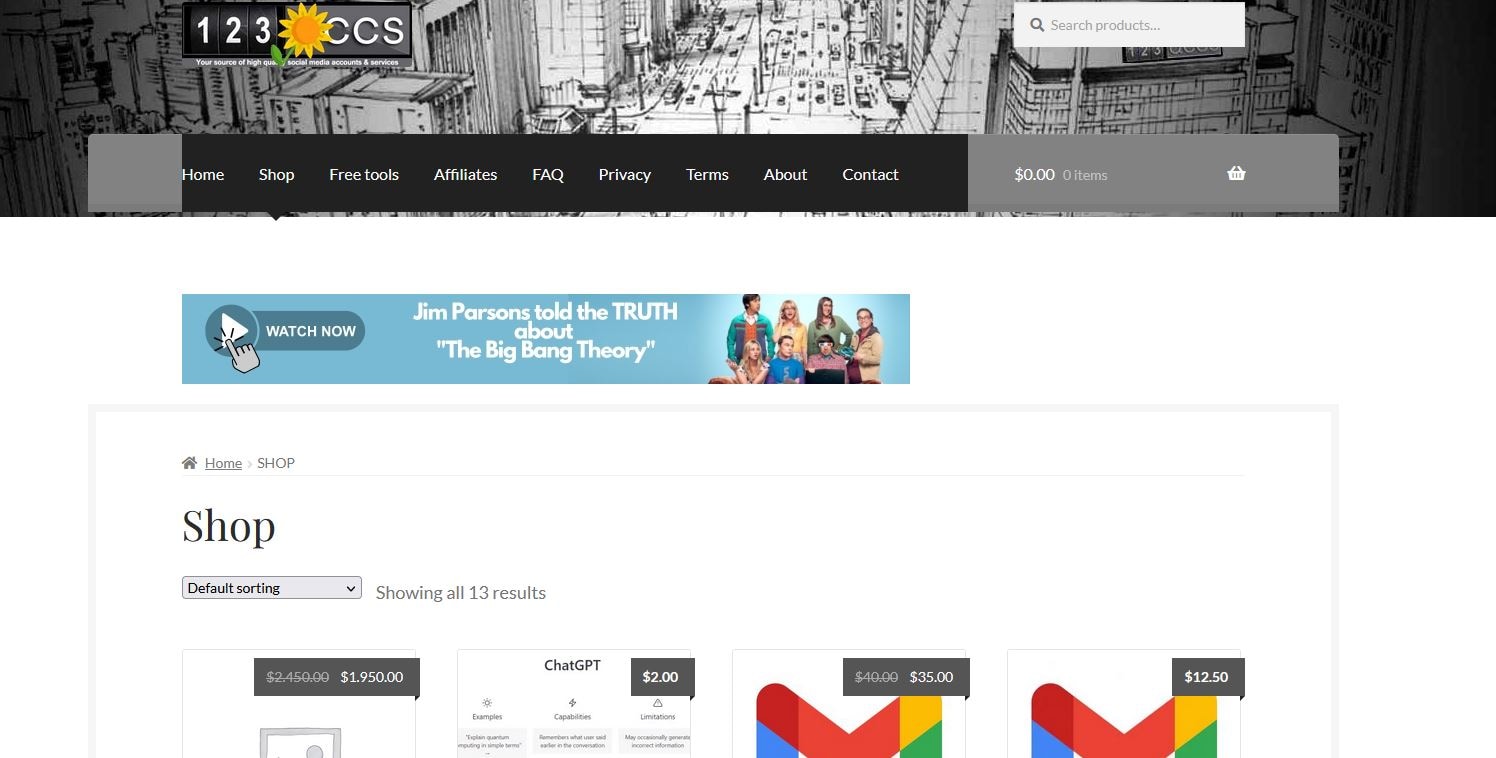
123accs offers new and affordable PVA accounts. Therefore, you can use the service to buy a monetized YouTube channel. Available options include 5 PVA accounts, 25 UK followers, 10 US follower accounts, and more.
Price: Custom Pricing
Customer Rating: 8/10
8. PlayerUp
PlayerUp offers monetized YouTube channels for sale in its marketplace. The platform offers authentic and affordable channels that users can rely on.
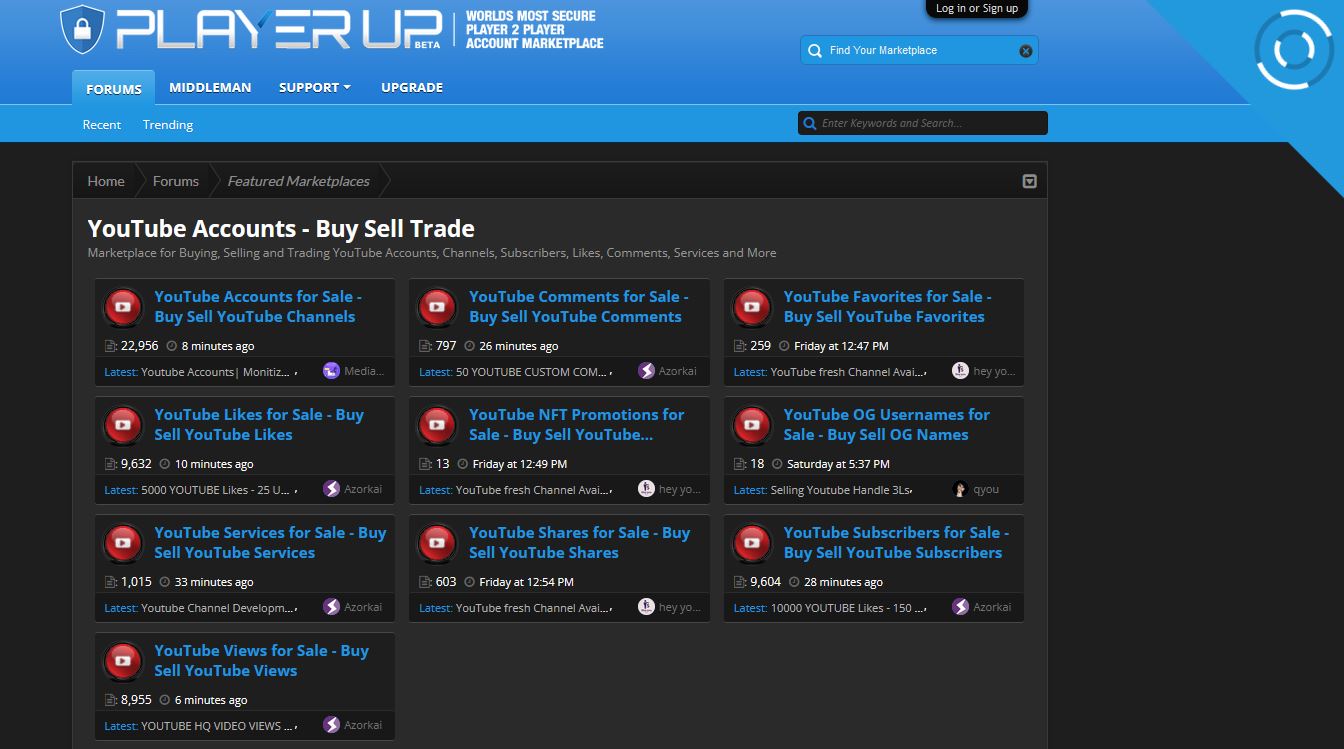
The high quality of the videos posted in the channels under sale will make them stand out in marketing campaigns. This is also a great platform for buying branded content and advanced filters.
Price: Custom Pricing
Customer Rating: 7.5/10
9. Trustiu
This is a great choice for for satisfying shopping experience. The platform makes it easy to purchase YouTube channels almost instantly.

Trustiu stands out for its affordable prices and a wide selection of choices. Users also have the freedom to choose the language they want for their channels.
Price: Custom Pricing
Customer Rating: 7.5/10
10. Accs Market
This social media marketplace allows you to buy monetized YouTube channels in a matter of few steps. Choose channels in entertainment of lifestyle niches.
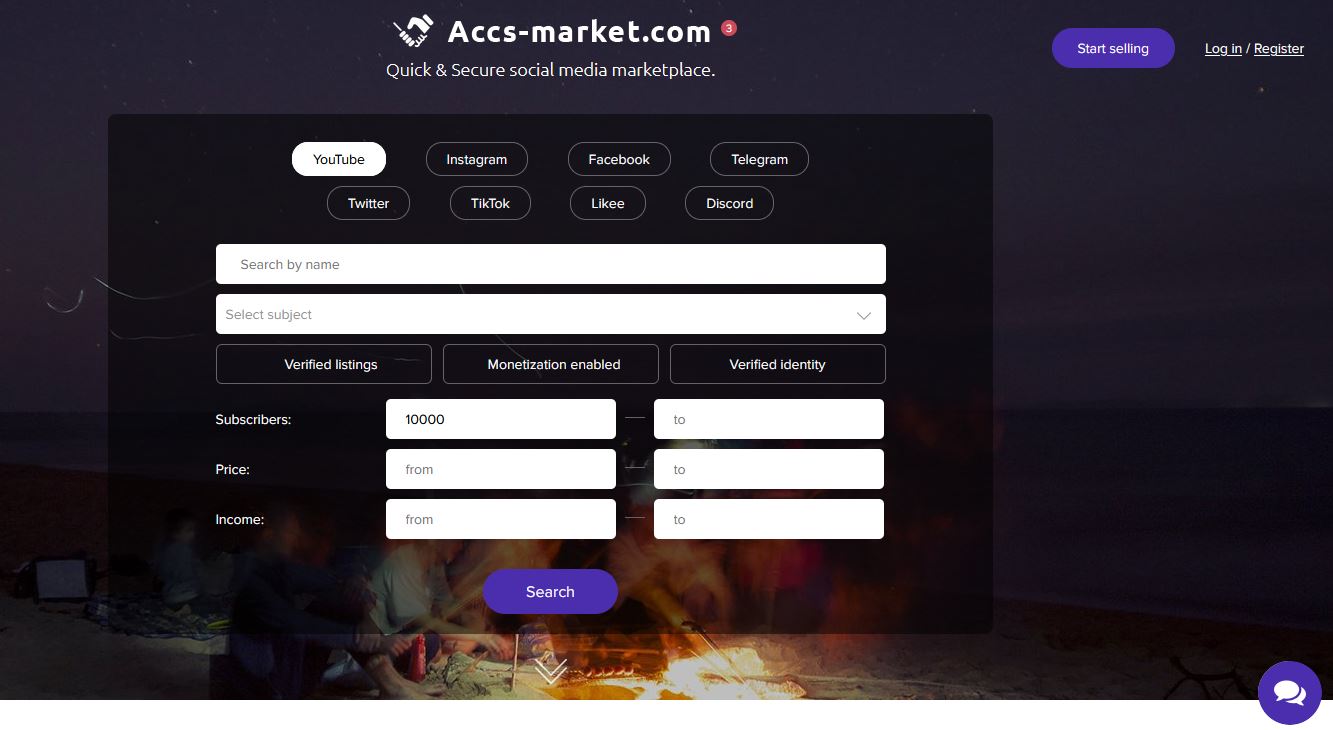
Accs market offers an affordable option for any type of video genre for sellers. From TV shows to movies, Accs Market has something for you.
Part 2. Editing YouTube Videos for Monetization with Wondershare Filmora
In addition to buying a monetized YouTube channel, you will need to create quality videos to remain relevant. This requires good video editing software. With Wondershare Filmora, you can edit any kind of video and add creative effects to make it more interesting. With the option to edit on your desktop or phone on the go, the software gives you more versatility.
Free Download For Win 7 or later(64-bit)
Free Download For macOS 10.14 or later
Wondershare offers a wide range of features that make video editing fun and easy. From automation tools to video enhancement, you can do a lot to your video on the same platform. The most useful features for YouTube monetization include:
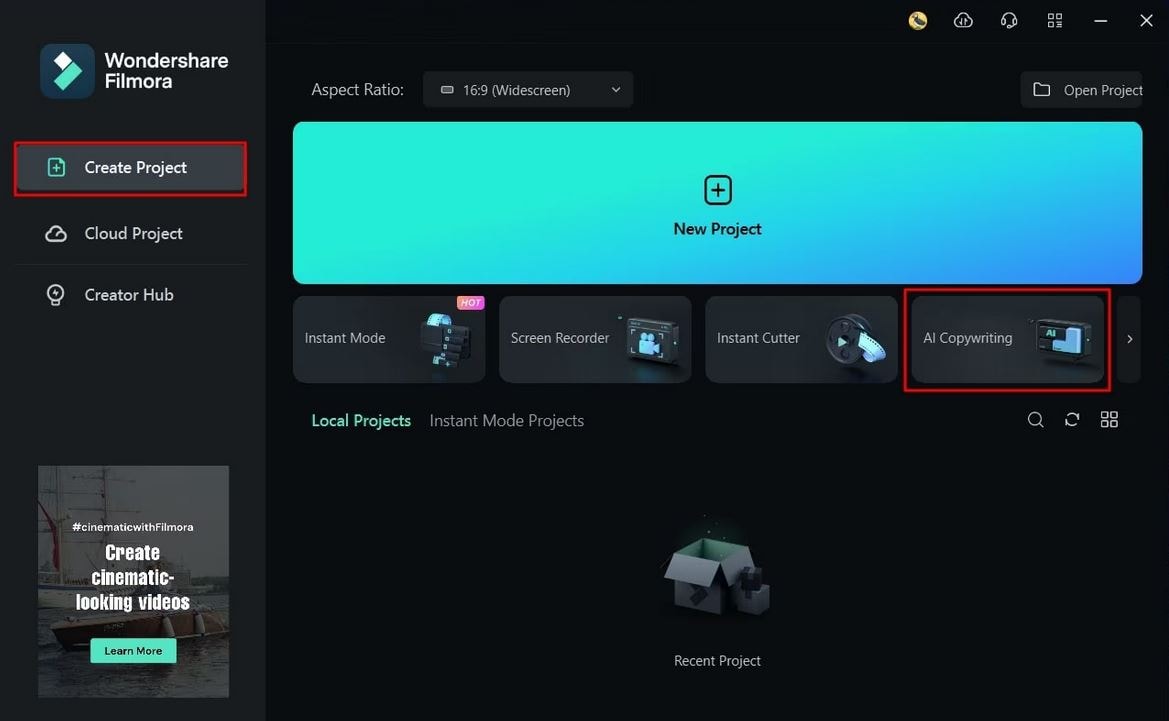
1. AI Copywriting
This feature integrates the ChatGPT API, allowing you to get inspiration through AI-generating scripts. You can also generate text during video editing, as well as YouTube Titles and Descriptions.
2. Auto Synchronization
The auto-synchronization feature allows you to effortlessly match your audio with the video. This makes it sound more clear and gives your audience a better watching experience.

3. Auto Reframe
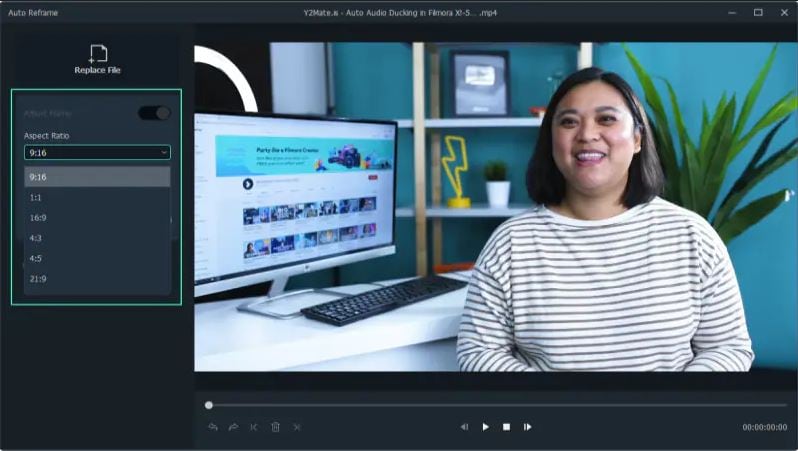
With the rise of YouTube Shorts, reframing your videos is now more of a necessity than an option. You need to appeal to both YouTube viewers and those who consume content in the vertical orientation. The Filmora Auto Reframe feature allows you to automatically resize your videos with no editing skills needed. To use this feature:
Step 1Start the Auto Reframe Feature
One of the ways is by clicking on the Auto Reframe option when you launch Filmora. The other option is to import the media and right-click on it to find the Auto Reframe feature.
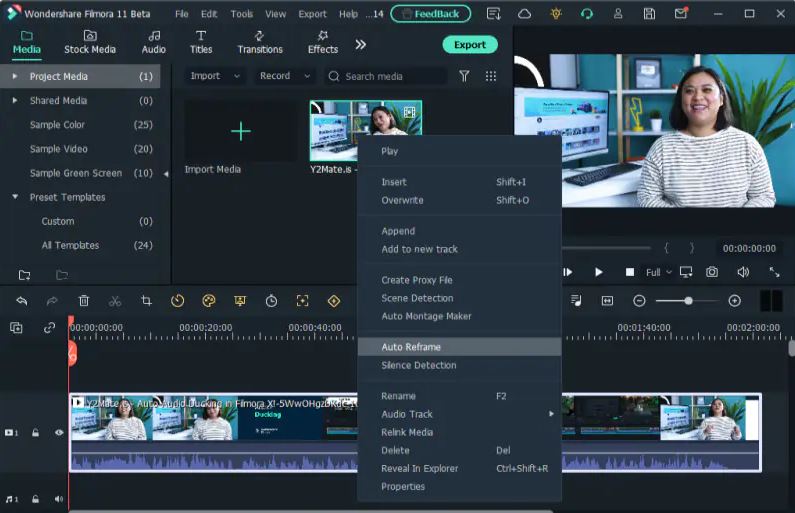
Step 2Adjust the Aspect Ratio and Motion Speed
Define the aspect ratio in the dialogue box that opens. A widescreen has an aspect ratio of 16:9 while a vertical one is 9:16.
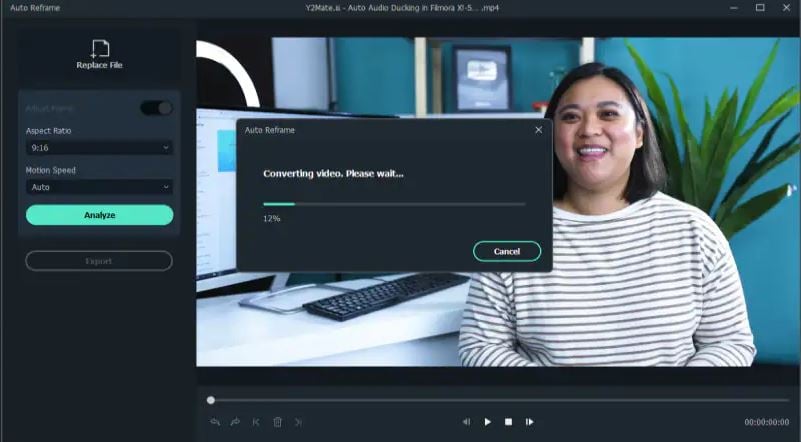
Step 3Analyze and Auto Reframe the Video
After adjusting the settings, tap on the Analysis option. This will prompt Filmora to analyze your video for completion. The video will be automatically reframed to your specified aspect ratio and speed.
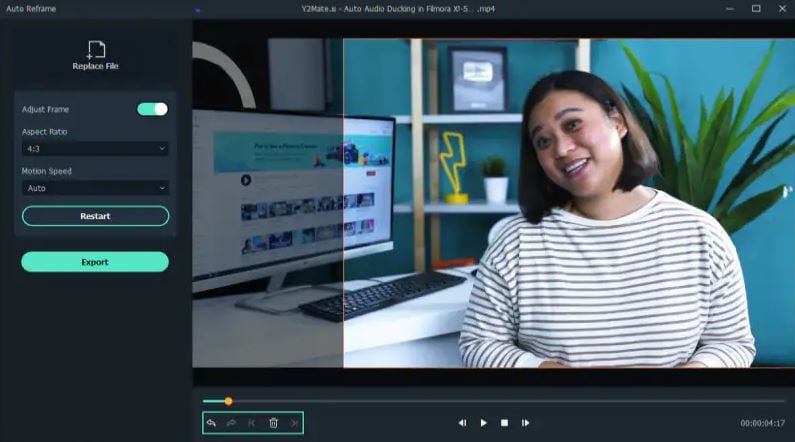
Step 4Preview and Export the Reframed Video
You can now preview the final video to make sure it runs as desired. Make any changes if necessary, and export the reframed video in MP4 format, ready for uploading to YouTube.
Conclusion
The first step to running a successful channel is to be accepted into the YouTube Partner Program. However, building a YouTube Channel from 0 views to meet the eligibility status can be difficult. That’s why buying a monetized YouTube channel is a great place to start. You will only need to focus on creating highly engaging content to continue earning and growing your channel. To ensure that the content you create is of high quality, we recommend using Wondershare Filmora. The video editing software comes with fantastic features that help you create great videos for your channel.
Free Download Free Download Learn More
Part 1. Top 10 Sites to Buy Monetized YouTube Channels
Investing in a pre-existing, monetized YouTube channel is a great idea. It saves you time, allowing you to focus on creating quality content. However, make sure you buy a monetized YouTube channel from a reliable seller. Let’s have a look at the top sites to buy monetized YouTube channels:
1. UseViral
This is one of the best options available to buy monetize YouTube channel. They offer precious monetized YouTube channel packages. Your new channel will be ready for monetization with more than 4,000 watch time hours and a 1,000+ subscriber base.
To get your monetized channel, you will be required to fill out a brief questionnaire. Explain your ideal market and video production needs to allow the UseViral team to understand what you are looking for. They let you know what you are paying for any extras.
Price: $599
Customer Rating: 9.5/10
2. SlidesMedia
This is a well-known social media growth strategist that allows you to buy a monetized YouTube channel. The site stands out for offering assistance with growing the YouTube channel and other social media platforms.
SlidesMedia promises to use only human editors on your YouTube channel. They give you a channel with genuine content. You also get the assurance that the content is not bot-generated..
Price: $529 - $2400.
Customer Rating: 9.3/10
3. AudienceGain
AudienceGain is a popular social media marketing platform. They offer a wide range of services, including selling monetized YouTube channels.
With a proven track record, AudienceGain stands out for offering quality customer service. They support you before, during, and after the purchase. They also provide organically grown channels to make sure you are not demonetized.
Price: $ 129 - $390
Customer Rating: 9.5/10
4. Fameswap
This is a flexible marketplace for selling and buying monetized YouTube channels. The site stands out for being selective in the kind of channels it features.
Fameswap offers a safe method of communication between vendors and buyers through an internal messaging system. You can invest in a channel that you are interested in, ranging from topics like fashion and beauty to entertainment and sports.
Price: Customized pricing
Customer Rating: 8.5/10
5. Eazy Viral
Another excellent choice is to buy a monetized YouTube channel. It allows you to choose from numerous channel types. Users also specify the number of subscribers and watch times they want.
Eazy Viral promises quality content that will not infringe on the rights of others. They also make it simple to monetize your videos and safeguard your AdSense account.
Price: $249 - $1100
Customer Rating: 9/10
6. EazySMM
With EazySMM, you get a unique starting point on your YouTube journey. Choose a YouTube monetized channel for sale on a niche you are interested in at a low price to get started.
EazySMM watches over its clients to make sure they are growing organically. They promise genuine channel views and subscriptions. Their services are also quick, delivering monetized channels within 12 to 48 hours of the purchase.
Price: Custom Pricing
Customer Rating: 8/10
7. 123accs
This platform allows you to buy YouTube channels that have not yet made money. You can then monetize the channel since it has already met the YouTube Partner Program eligibility criteria.
123accs offers new and affordable PVA accounts. Therefore, you can use the service to buy a monetized YouTube channel. Available options include 5 PVA accounts, 25 UK followers, 10 US follower accounts, and more.
Price: Custom Pricing
Customer Rating: 8/10
8. PlayerUp
PlayerUp offers monetized YouTube channels for sale in its marketplace. The platform offers authentic and affordable channels that users can rely on.
The high quality of the videos posted in the channels under sale will make them stand out in marketing campaigns. This is also a great platform for buying branded content and advanced filters.
Price: Custom Pricing
Customer Rating: 7.5/10
9. Trustiu
This is a great choice for for satisfying shopping experience. The platform makes it easy to purchase YouTube channels almost instantly.
Trustiu stands out for its affordable prices and a wide selection of choices. Users also have the freedom to choose the language they want for their channels.
Price: Custom Pricing
Customer Rating: 7.5/10
10. Accs Market
This social media marketplace allows you to buy monetized YouTube channels in a matter of few steps. Choose channels in entertainment of lifestyle niches.
Accs market offers an affordable option for any type of video genre for sellers. From TV shows to movies, Accs Market has something for you.
Part 2. Editing YouTube Videos for Monetization with Wondershare Filmora
In addition to buying a monetized YouTube channel, you will need to create quality videos to remain relevant. This requires good video editing software. With Wondershare Filmora, you can edit any kind of video and add creative effects to make it more interesting. With the option to edit on your desktop or phone on the go, the software gives you more versatility.
Free Download For Win 7 or later(64-bit)
Free Download For macOS 10.14 or later
Wondershare offers a wide range of features that make video editing fun and easy. From automation tools to video enhancement, you can do a lot to your video on the same platform. The most useful features for YouTube monetization include:
1. AI Copywriting
This feature integrates the ChatGPT API, allowing you to get inspiration through AI-generating scripts. You can also generate text during video editing, as well as YouTube Titles and Descriptions.
2. Auto Synchronization
The auto-synchronization feature allows you to effortlessly match your audio with the video. This makes it sound more clear and gives your audience a better watching experience.
3. Auto Reframe
With the rise of YouTube Shorts, reframing your videos is now more of a necessity than an option. You need to appeal to both YouTube viewers and those who consume content in the vertical orientation. The Filmora Auto Reframe feature allows you to automatically resize your videos with no editing skills needed. To use this feature:
Step 1Start the Auto Reframe Feature
One of the ways is by clicking on the Auto Reframe option when you launch Filmora. The other option is to import the media and right-click on it to find the Auto Reframe feature.
Step 2Adjust the Aspect Ratio and Motion Speed
Define the aspect ratio in the dialogue box that opens. A widescreen has an aspect ratio of 16:9 while a vertical one is 9:16.
Step 3Analyze and Auto Reframe the Video
After adjusting the settings, tap on the Analysis option. This will prompt Filmora to analyze your video for completion. The video will be automatically reframed to your specified aspect ratio and speed.
Step 4Preview and Export the Reframed Video
You can now preview the final video to make sure it runs as desired. Make any changes if necessary, and export the reframed video in MP4 format, ready for uploading to YouTube.
Conclusion
The first step to running a successful channel is to be accepted into the YouTube Partner Program. However, building a YouTube Channel from 0 views to meet the eligibility status can be difficult. That’s why buying a monetized YouTube channel is a great place to start. You will only need to focus on creating highly engaging content to continue earning and growing your channel. To ensure that the content you create is of high quality, we recommend using Wondershare Filmora. The video editing software comes with fantastic features that help you create great videos for your channel.
Also read:
- Crafting a YouTube Future Scaling Up or Staying Independent, In 2024
- [New] Divergent Paths in Video Sharing Comparing IGTV & YouTube
- 2024 Approved Elevate Your Vlogs Optimizing Title, Description & Tags
- Building Inspiring Lifestyle Content for Viewers
- [Updated] Beyond YouTube Elite Video Sharing Hubs Revealed
- [Updated] Cross-Platform Title Framework YTB to Other Apps
- Instantaneous Fortnite Tile Design Guide
- 2024 Approved A Professional's Playbook to Profitable YouTube Ventures
- [Updated] Deciphering YouTube Popularity Factors for Higher Placement
- Discovering Success Through the Most Effective 15 YouTube Themes
- Building a Brand, Building Income YouTube Edition
- Understanding Youtuber's Income Average Ad Revenues per Play?
- [Updated] Discovering Synergistic Partnerships on YouTube Platforms
- Crafting the Perfect YouTube Channel Url A Quick Guide for 2024
- Endless Escapades Discovering YouTube's 10 Best Films, Gratis
- Youtube on Your iPhone/iPad The Ultimate Downloading Guide
- Building a Successful YouTube Channel Sidestep These 8 Frequent Faux Pas
- Entering Income Territory with a Thousand Followers for 2024
- Unveiling YouTube's Best Mates for Quality Videos
- Convert YouTube Videos Smoothly Into Professional WebM Files
- Escalate Your Content Reach Leveraging Synergistic YouTube Outros
- Innovators Intertwining Video with Melodious Images
- 2024 Approved Buy YouTube Likes? Does It Really Help Boost Your Channel?
- [New] Cinematic Composer Software
- In 2024, Best 8 Evidenced Tools for Video Propagation
- Discovering the Ultimate 10 Free YouTube Artist Collaborators
- [Updated] Elevate Your Video Visibility Ethically One Million in Views
- In 2024, How To Add Custom Thumbnails to Your YouTube Videos
- Crafting Dynamic Collab Videos with Content Partners on YouTube for 2024
- Audio Extraction Made Easy YouTube Music on Your Mac
- [Updated] Charting the Course From AdSense Income to Savings
- 2024 Approved Elevate Viewing Experience – Enable AV1 on YouTube
- In 2024, Effortless Entertainment Looping YouTube Videos for TV Viewers
- [Updated] Beats & Bands How to Upload Music Online
- Quick Guide to Rearranging Your YouTube Collection
- In 2024, Design Principles for Eye-Catching YT Previews
- In 2024, Best Screener Tech Perfect for Creating Viral YouTube Moments
- Craft Proficient Content for Short-Form Video Best Edits Reviewed
- [Updated] Dissecting YouTube’s Features and Mechanisms After Uploading Content
- [Updated] Crafting Viral Videos on YouTube A Strategic Plan
- [Updated] Editor's Compendium Top Devices Transforming Media Projects
- The Ascent of Jake Paul in Online Video Fame
- [Updated] Embrace Creativity How to Attain Filmora FCC Accreditation
- In 2024, Essential List 6 Free Online Platforms for YouTube Short Downloads
- Idea Inception Using Google Trends to Fuel Videography
- Dissecting YouTubes' User Commentary
- In 2024, For People Wanting to Mock GPS on Vivo Y100 5G Devices | Dr.fone
- How to rescue lost call logs from Galaxy XCover 6 Pro Tactical Edition
- 2024 Approved The Ultimate List of Online Video Editors with Music Integration
- Top IMEI Unlokers for Your Motorola Defy 2 Phone
- Updated 2024 Approved VN Video Editor on Mac A Comprehensive Guide and Alternatives
- Updated In 2024, Innovations in Digital Vocal Alteration Top-Notch Applications
- How to Detect and Remove Spyware on Oppo Reno 8T? | Dr.fone
- [New] The Savvy Techie's Strategy for Saving Snapshots
- Dissecting ScreenCaptureX Pro's Latest Recording Capabilities
- Harmonizing Social Media Twitter + Tumblr Videos for 2024
- [New] 2024 Approved Android Developer's Choice Premier Tools for Extracting FB Videos
- Building Your Virtual Persona with Minimal Hassle
- 3 Effective Methods to Fake GPS location on Android For your Tecno Spark 10 5G | Dr.fone
- In 2024, Android Unlock Code Sim Unlock Your Huawei P60 Phone and Remove Locked Screen
- [New] ITop Review Necessary for Quality Recordings, In 2024
- In 2024, The Art of Angling Images A Comprehensive Instagram Rotation Handbook
- New Ubuntu Video Editing Made Easy 10 Free Software Choices for 2024
- New 2024 Approved Create Unforgettable Slideshows Top-Rated Photo Movie Software
- In 2024, Everything You Need To Know About Unlocked iPhone XS | Dr.fone
- WatchNetflix, Screenshare Master ScreenRecording on MacOS
- In 2024, En 2022, Puede Editar Todos Los Videos Inmediatamente Después De Capturarlos, Pero Primero Debe Descubrir Una Aplicación De Edición De Vlogs Que Realmente Le Guste Usar
- How to Unlock Your iPhone 8 Passcode 4 Easy Methods (With or Without iTunes) | Dr.fone
- Adding Descriptive Overlays to Your TikTok Clips
- How to Post Tweets on Facebook for 2024
- [Updated] 2024 Approved Visual Vault Verifier
- [Updated] How to Create a Puzzle Feed on Instagram to Catch Attention for 2024
- [Updated] In 2024, Saving Instagram's Finest in Your Photo Gallery
- In 2024, How to Add Adjustment Layer in Premiere Pro
- 2024 Approved How to Create the Night-to-Day Effect Video
- In 2024, Why is iPogo not working On Xiaomi Redmi A2? Fixed | Dr.fone
- [Updated] In 2024, Elevate Your Live Streaming Expert CamRecorder Guidance
- Proven Ways in How To Hide Location on Life360 For Samsung Galaxy S23 Ultra | Dr.fone
- Title: "2024 Approved Efficient iOS-Based Strategies for YouTube Postings"
- Author: Kevin
- Created at : 2024-05-25 14:29:40
- Updated at : 2024-05-26 14:29:40
- Link: https://youtube-videos.techidaily.com/2024-approved-efficient-ios-based-strategies-for-youtube-postings/
- License: This work is licensed under CC BY-NC-SA 4.0.
