
:max_bytes(150000):strip_icc()/InternetNetworking_GettyImages-876819100_anyaberkut_CROPPED-2622223ffceb418f993b2f804cb3e0e7.jpg)
"2024 Approved Discover the Secrets to YouTube's Rankings with Keywords"
Discover the Secrets to YouTube’s Rankings with Keywords
Improve Your YouTube Video Performance with Wondershare Filmora
An easy and powerful video editor for YouTube Video
Numerous video and audio effects to choose from
Detailed tutorials provided by the official channel
With more than 1 billion hours of video watched every day, YouTube is the world’s second-largest search engine. That means you should optimize your videos for YouTube, so they rank well on Google and show up in YouTube searches.
YouTube keywords are the words you include in your video title, description, and anywhere that will help YouTube’s algorithm know what your video is about and what it entails. Keep reading to learn more about YouTube keyword research.
In this article
Why Do We Need to Research YouTube Keywords?
How to Research Keywords on YouTube?
Why Do We Need to Research YouTube Keywords?
Researching YouTube keywords is essential to your success. Here are three reasons why you might want to consider YouTube keyword research.
Helps You Know What Your Audience Is Searching for
Keyword research allows you to understand what people search for when they are on YouTube. In turn, this helps you know what your potential customers are seeking. You’ll then include these terms on your content to increase the chances of your audience finding you on YouTube.
It Helps You Rank Higher
You can use YouTube videos to promote brand awareness and market your product. Having high-ranking videos is a cost-effective way to push your target audience through the sales funnel.
When creating YouTube videos, you need to ensure you are reaching your target audience. And that is why researching keywords is crucial.
Once you have performed YouTube keyword research and determined the most suitable keywords for your topic, you can now use them to create target content for your audience. In turn, this will help you increase the number of subscribers on your YouTube channel. Your chances of your video showing up on YouTube will increase, which will bring traffic to your business.
It’s the Cheapest Way to Market Your Products or Services
Video marketing is expensive, and that is why you have to find every possible edge for your video marketing if you want to lower your costs and increase your ROI. For this reason, keyword research will ensure your audience finds you without spending loads of money that you could have used on services like Google Ads.
Because keyword research allows your target audience to find you, this means more opportunities for you. Most of the users will share entertaining videos.
How to Research Keywords on YouTube?
There are several ways of conducting keyword research for YouTube to find out what people are searching for and determine the content in your video. They include:
1. Using YouTube Search

Although this method doesn’t provide all available search options, it’s still good for getting an idea of the type of keyword with which you’re dealing.
You can start your research by typing the keywords into YouTube’s search bar and reviewing the displayed results. It might be helpful to check out similar videos or video playlists. If your search seems too wide, you can enter several keywords at once (separated by commas), which will help you find better results.
2. Using Google’s Keyword Planner Tool

This tool is helpful for keyword difficulty and monthly searches volume assessment. If you only want to know the number of organic visits a given keyword gets, Google Keyword Planner might be helpful. The tool allows you to create lists consisting of related keywords and provides information about CPC (cost per click) and potential traffic in general.
3. Using YouTube Suggestions
What makes YouTube unique is its ability to suggest content based on your location, subscription, and watch history. You can use this method to find keyword ideas if you have subscribed to relevant channels. Also, you can rely on YouTube suggestions to find out whether a topic is popular or not.
4. Using YouTube Analytics
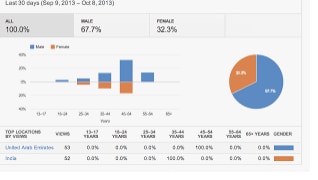
YouTube has a built-in Keyword Tool that is extremely helpful for researching the best keywords to use in your video titles, descriptions, and tags. This method allows you to see video search keywords with which users are finding your content. It is possible to review top organic keywords together with the respective engagement metrics, including bounce rate and average view duration.
5. Using Third-Party YouTube Keyword Tools
Last but not least, there are several third-party tools available on the market that provide both keyword difficulty and organic traffic estimation data for YouTube keywords. Some of these tools also offer similar features, including recommendations based on your existing subscriptions. Let’s look at some of the popular YouTube tools that you can use.
vidIQ
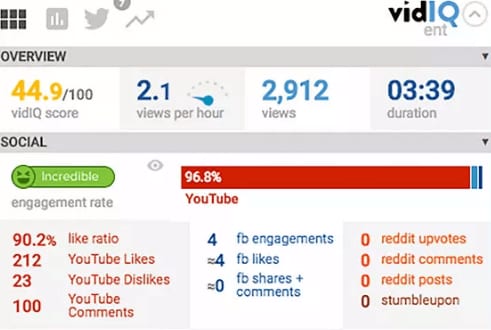
Designed to boost YouTube views, vidIQ is an effective SEO tool. The tool recommends keywords, descriptions, and titles that will help you to get more views and subscribers.
Performing vidIQ keyword research that relates to your video is a breeze. With just a few clicks, you will know what people are searching for and create content that they want to watch.
The tool allows you to enable inline keywords to know the tags your competitors use on search results. Use them to help you generate ideas relevant to your content. vidIQ also suggests ideal keywords like YouTube.
TubeBuddy

You can also use TubeBuddy to find and evaluate a range of YouTube keywords. You can do TubeBuddy keyword research on its mobile app or browser extension. The tool also shows how often people click on the results and how often users search a keyword.
Keyword Keg
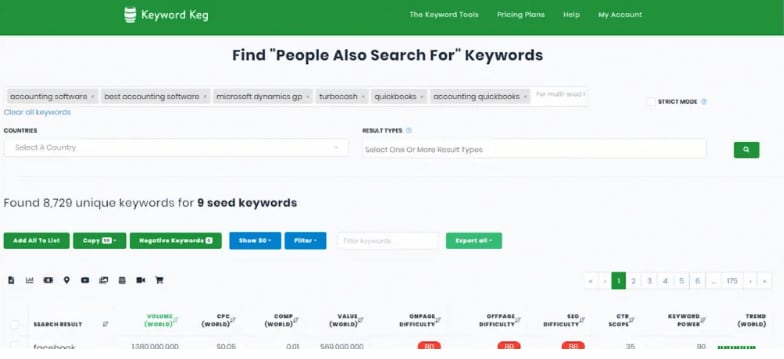
Using the YouTube suggest API, Keyword Keg shows you the terms users search most and the monthly number of searches. You’ll also see what other people are paying for CPC (cost per click). You can use this data to determine the best keywords for your YouTube videos.
Qusetion: Are keywords and Tags the Same Thing?
Answer: The main difference between tags and keywords is where you will place them. Keywords describe the content in your video to help search engines and YouTube’s algorithm find your video. Tags describe what the content in your video is about and how it’s connected.
Make Great YouTube Videos with Filmora
Having high-quality videos can make you stand out from your competitors. Filmora is a video editing software that allows you to create amazing YouTube videos. It has powerful editing tools that will enhance the quality of your videos.
You can also add over 800 cool effects and filters to your videos to make them fun to watch. With just a single click, you can add opacity and speed ramp effects as well as infinite zoom effects.
Additionally, you can adjust the dynamic range and white balance of Your YouTube videos. Furthermore, you can fine-tune the audio of your video to make it crisp and eliminate camera shake.
The best part is: Filmora is compatible with macOS X 10.12 or later and Windows 7, 8, and 10. It also supports all popular standard HD videos, audio, and image file formats.
Conclusion
Now that you know the importance of YouTube keyword research and how to perform keyword research, your target audience can find you easily.
With more than 1 billion hours of video watched every day, YouTube is the world’s second-largest search engine. That means you should optimize your videos for YouTube, so they rank well on Google and show up in YouTube searches.
YouTube keywords are the words you include in your video title, description, and anywhere that will help YouTube’s algorithm know what your video is about and what it entails. Keep reading to learn more about YouTube keyword research.
In this article
Why Do We Need to Research YouTube Keywords?
How to Research Keywords on YouTube?
Why Do We Need to Research YouTube Keywords?
Researching YouTube keywords is essential to your success. Here are three reasons why you might want to consider YouTube keyword research.
Helps You Know What Your Audience Is Searching for
Keyword research allows you to understand what people search for when they are on YouTube. In turn, this helps you know what your potential customers are seeking. You’ll then include these terms on your content to increase the chances of your audience finding you on YouTube.
It Helps You Rank Higher
You can use YouTube videos to promote brand awareness and market your product. Having high-ranking videos is a cost-effective way to push your target audience through the sales funnel.
When creating YouTube videos, you need to ensure you are reaching your target audience. And that is why researching keywords is crucial.
Once you have performed YouTube keyword research and determined the most suitable keywords for your topic, you can now use them to create target content for your audience. In turn, this will help you increase the number of subscribers on your YouTube channel. Your chances of your video showing up on YouTube will increase, which will bring traffic to your business.
It’s the Cheapest Way to Market Your Products or Services
Video marketing is expensive, and that is why you have to find every possible edge for your video marketing if you want to lower your costs and increase your ROI. For this reason, keyword research will ensure your audience finds you without spending loads of money that you could have used on services like Google Ads.
Because keyword research allows your target audience to find you, this means more opportunities for you. Most of the users will share entertaining videos.
How to Research Keywords on YouTube?
There are several ways of conducting keyword research for YouTube to find out what people are searching for and determine the content in your video. They include:
1. Using YouTube Search
Although this method doesn’t provide all available search options, it’s still good for getting an idea of the type of keyword with which you’re dealing.
You can start your research by typing the keywords into YouTube’s search bar and reviewing the displayed results. It might be helpful to check out similar videos or video playlists. If your search seems too wide, you can enter several keywords at once (separated by commas), which will help you find better results.
2. Using Google’s Keyword Planner Tool
This tool is helpful for keyword difficulty and monthly searches volume assessment. If you only want to know the number of organic visits a given keyword gets, Google Keyword Planner might be helpful. The tool allows you to create lists consisting of related keywords and provides information about CPC (cost per click) and potential traffic in general.
3. Using YouTube Suggestions
What makes YouTube unique is its ability to suggest content based on your location, subscription, and watch history. You can use this method to find keyword ideas if you have subscribed to relevant channels. Also, you can rely on YouTube suggestions to find out whether a topic is popular or not.
4. Using YouTube Analytics
YouTube has a built-in Keyword Tool that is extremely helpful for researching the best keywords to use in your video titles, descriptions, and tags. This method allows you to see video search keywords with which users are finding your content. It is possible to review top organic keywords together with the respective engagement metrics, including bounce rate and average view duration.
5. Using Third-Party YouTube Keyword Tools
Last but not least, there are several third-party tools available on the market that provide both keyword difficulty and organic traffic estimation data for YouTube keywords. Some of these tools also offer similar features, including recommendations based on your existing subscriptions. Let’s look at some of the popular YouTube tools that you can use.
vidIQ
Designed to boost YouTube views, vidIQ is an effective SEO tool. The tool recommends keywords, descriptions, and titles that will help you to get more views and subscribers.
Performing vidIQ keyword research that relates to your video is a breeze. With just a few clicks, you will know what people are searching for and create content that they want to watch.
The tool allows you to enable inline keywords to know the tags your competitors use on search results. Use them to help you generate ideas relevant to your content. vidIQ also suggests ideal keywords like YouTube.
TubeBuddy
You can also use TubeBuddy to find and evaluate a range of YouTube keywords. You can do TubeBuddy keyword research on its mobile app or browser extension. The tool also shows how often people click on the results and how often users search a keyword.
Keyword Keg
Using the YouTube suggest API, Keyword Keg shows you the terms users search most and the monthly number of searches. You’ll also see what other people are paying for CPC (cost per click). You can use this data to determine the best keywords for your YouTube videos.
Qusetion: Are keywords and Tags the Same Thing?
Answer: The main difference between tags and keywords is where you will place them. Keywords describe the content in your video to help search engines and YouTube’s algorithm find your video. Tags describe what the content in your video is about and how it’s connected.
Make Great YouTube Videos with Filmora
Having high-quality videos can make you stand out from your competitors. Filmora is a video editing software that allows you to create amazing YouTube videos. It has powerful editing tools that will enhance the quality of your videos.
You can also add over 800 cool effects and filters to your videos to make them fun to watch. With just a single click, you can add opacity and speed ramp effects as well as infinite zoom effects.
Additionally, you can adjust the dynamic range and white balance of Your YouTube videos. Furthermore, you can fine-tune the audio of your video to make it crisp and eliminate camera shake.
The best part is: Filmora is compatible with macOS X 10.12 or later and Windows 7, 8, and 10. It also supports all popular standard HD videos, audio, and image file formats.
Conclusion
Now that you know the importance of YouTube keyword research and how to perform keyword research, your target audience can find you easily.
Navigating the Seamless Shift From iMovie to YouTube Broadcasts
How to Upload a Video from iMovie to YouTube?

Liza Brown
Aug 18, 2022• Proven solutions
“Is iMovie good for YouTube?”
The iMovie is not only good for YouTube but various other social media platforms. The thing is, you have to compromise with the quality offered by Apple’s video editor iMovie. Well, iMovie is perfect for getting started for beginners. But, the professionals and ones who want a bit high features than basic ones should look elsewhere. Thus, we always recommend alternatives to a particular software for our audience. In this article, there is a mention of Wondershare Filmora to overcome the drawbacks of iMovie.
Without further ado, let’s begin with how to upload a video from iMovie to YouTube. We want to lead with the best iMovie export settings, specific troubleshooting issues, and our alternative intro section to overcome iMovie’s limitations.
Part 1: How to Upload a Video from iMovie to YouTube?
iMovie is ideal for making YouTube videos if you are too basic and are not looking for advanced features. Remember that professionalism pays in these platforms and helps you stand better among others. If you’re still interested in making introductory videos, here is a step-by-step guide on uploading a video to YouTube from iMovie on Mac first and leading with iPhone.
Step-by-Step Tutorial on how to upload a video from iMovie to YouTube on Mac
Step 1: Create a Project
On the first step, go to iMovie on Mac and click the Create New tab below.
Step 2: Import Media
Click the Import Media button and browse the files on your computer, as shown below.
Step 3: Edit Clips
It’s time to edit video footage. Drag your video to the timeline, as shown below.
Then, you can trim and drag the edges of video clips to allow editing.
Step 4: Add Titles
You can add titles by clicking the Title tab and further drag the Title’s template into the timeline.
Step 5: Export the Video
Click the Export button as follows after editing is over.
Select YouTube to upload your video over the platform directly.
Step 6: Save
After selecting the desired platform, click the Next tab to proceed with saving the file.
At last, save your video as shown below.
Step-by-Step Tutorial on how to upload iMovie to YouTube from iPhone
Step 1: Share the iMovie Project
Go to iMovie on your iPhone. Open the iMovie project on your iPhone and tap the Share button to select YouTube. Enter the information of Title, Description, Size, Tags, Privacy, and Location (optional).
Step 2: Upload iMovie Files
For ease of use, you can upload saved videos in Photo Library on your iPhone. Then, you can upload iMovie videos via the YouTube iOS app. Sign In to YouTube and click the Camera icon at the top of the Home page. Select your iPhone Photo Library file and set the video Title, Description, Size, Tags, and Privacy. Then, hit the Upload button to confirm.
Part 2: The Best iMovie Export Settings for YouTube Videos
As we all know that iMovie consists of a bit long procedure to export projects. Here are some tips on the best iMovie export settings to avoid an unnecessary headache.
- Set small resolution: Small resolution plays a more significant role, especially while uploading. Thus, you can set the smallest resolution in the Email tab of the Export button.
2. Change Export settings in the File tab: There is a File tab under the Export button. Click it and find various settings that you need to change to get the best export settings for YouTube 2021. Make the Title of the video as small as possible. Set the resolution at 1080P than 4K.
However, it isn’t going to upgrade the resolution if your video is already in the 1080P definition. Now, the last setting that will crazily offer you the best quality and lots of space-saving. You have to select Best (ProRes) in quality settings for this purpose. These settings also take less time to upload to YouTube.
3. Compress is not for speed: Various options you see in the Compresstab are not for speed. They are for how you save the video on a desktop. Thus, always choose the Better Quality tab than Faster.
- Do not export directly to YouTube: iMovie is pretty basic and doesn’t offer great settings to upload your video instantly. You may have to make changes to the uploaded video even if you do this as per our step-by-step guide mentioned above.
Part 3: How to fix the “Failed to Upload to YouTube” Error on iMovie?
The “iMovie to YouTube failed” problem occurs when you directly upload a YouTube video from iMovie. The issue will result if you upload from any third-party uploader. That is why the direct upload doesn’t work, especially in iMovie. You can opt to share your video to the desktop first and then drag it to upload to the YouTube platform.
Part 4: Upload Videos to YouTube with the Best Alternative to iMovie - Wondershare Filmora
“What can I use instead of iMovie to overcome its limitations?”
When you see that iMovie is not uploading to YouTube or iMovie upload to YouTube got stuck, go for a better alternative. In this section, we’d like to recommend Wondershare Filmora that offers the best export settings compared to iMovie. It is the go-to solution if you can’t upload video from iMovie to YouTube directly. Filmora further provides intuitive editing tools that professionally make your YouTube video projects.
Export Key Aspects of Wondershare Filmora in comparison to iMovie:
- It offers a long list of export resolutions to choose from.
- You get separate video and audio settings such as Encoder, Channel, Frame Rate, Bit Rate, Resolution, etc.
- It is further compatible with export to various devices including the iPhone, Samsung, iPod, Apple TV, iPad, Google Pixel, PSP, Smart TV, etc.
Step-by-Step Guide on how to upload a video from iMovie to YouTube via Wondershare Filmora
Step 1: Click the Export button and select resolution
After your project in Wondershare Filmora is over, click the Export tab and select video resolution from the Local tab, as shown below.
It has a list of formats. You can also edit the Name and saving location here.
Step 2: Select Quality
Select the Settings button and choose from three quality levels of Best, Better, and Good. You can also adjust video and audio parameters, including the Encoder, Frame Rate, Resolution, Bit Rate, etc.
Step 3: Select platform
Select the YouTube tab, Sign In to your YouTube account, and hit the Export button after modifying the Title and Quality if needed. Also, make sure to check the Enable GPU accelerated video encoding tab.
Select Wondershare Filmora as the ultimate solution even if iMovie upload to YouTube not showing up.
Conclusion
Hopefully, we’ve informed you of the relevant facts on how to upload a video from iMovie to YouTube. We have also examined the number of troubleshooting issues involved in the iMovie video editor. Well, you will get to face similar kinds of export difficulties in the iMovie editor. Also, the entire procedure to end the exporting task is a bit long in iMovie compared to any other video editing software. Thus, it’s crucial to check out what other alternatives the technological world has today. We can’t state to you a better beginner-friendly yet advanced editing option than Wondershare Filmora that rightly outtakes the iMovie video editor in all aspects.
Liza Brown
Liza Brown is a writer and a lover of all things video.
Follow @Liza Brown
Liza Brown
Aug 18, 2022• Proven solutions
“Is iMovie good for YouTube?”
The iMovie is not only good for YouTube but various other social media platforms. The thing is, you have to compromise with the quality offered by Apple’s video editor iMovie. Well, iMovie is perfect for getting started for beginners. But, the professionals and ones who want a bit high features than basic ones should look elsewhere. Thus, we always recommend alternatives to a particular software for our audience. In this article, there is a mention of Wondershare Filmora to overcome the drawbacks of iMovie.
Without further ado, let’s begin with how to upload a video from iMovie to YouTube. We want to lead with the best iMovie export settings, specific troubleshooting issues, and our alternative intro section to overcome iMovie’s limitations.
Part 1: How to Upload a Video from iMovie to YouTube?
iMovie is ideal for making YouTube videos if you are too basic and are not looking for advanced features. Remember that professionalism pays in these platforms and helps you stand better among others. If you’re still interested in making introductory videos, here is a step-by-step guide on uploading a video to YouTube from iMovie on Mac first and leading with iPhone.
Step-by-Step Tutorial on how to upload a video from iMovie to YouTube on Mac
Step 1: Create a Project
On the first step, go to iMovie on Mac and click the Create New tab below.
Step 2: Import Media
Click the Import Media button and browse the files on your computer, as shown below.
Step 3: Edit Clips
It’s time to edit video footage. Drag your video to the timeline, as shown below.
Then, you can trim and drag the edges of video clips to allow editing.
Step 4: Add Titles
You can add titles by clicking the Title tab and further drag the Title’s template into the timeline.
Step 5: Export the Video
Click the Export button as follows after editing is over.
Select YouTube to upload your video over the platform directly.
Step 6: Save
After selecting the desired platform, click the Next tab to proceed with saving the file.
At last, save your video as shown below.
Step-by-Step Tutorial on how to upload iMovie to YouTube from iPhone
Step 1: Share the iMovie Project
Go to iMovie on your iPhone. Open the iMovie project on your iPhone and tap the Share button to select YouTube. Enter the information of Title, Description, Size, Tags, Privacy, and Location (optional).
Step 2: Upload iMovie Files
For ease of use, you can upload saved videos in Photo Library on your iPhone. Then, you can upload iMovie videos via the YouTube iOS app. Sign In to YouTube and click the Camera icon at the top of the Home page. Select your iPhone Photo Library file and set the video Title, Description, Size, Tags, and Privacy. Then, hit the Upload button to confirm.
Part 2: The Best iMovie Export Settings for YouTube Videos
As we all know that iMovie consists of a bit long procedure to export projects. Here are some tips on the best iMovie export settings to avoid an unnecessary headache.
- Set small resolution: Small resolution plays a more significant role, especially while uploading. Thus, you can set the smallest resolution in the Email tab of the Export button.
2. Change Export settings in the File tab: There is a File tab under the Export button. Click it and find various settings that you need to change to get the best export settings for YouTube 2021. Make the Title of the video as small as possible. Set the resolution at 1080P than 4K.
However, it isn’t going to upgrade the resolution if your video is already in the 1080P definition. Now, the last setting that will crazily offer you the best quality and lots of space-saving. You have to select Best (ProRes) in quality settings for this purpose. These settings also take less time to upload to YouTube.
3. Compress is not for speed: Various options you see in the Compresstab are not for speed. They are for how you save the video on a desktop. Thus, always choose the Better Quality tab than Faster.
- Do not export directly to YouTube: iMovie is pretty basic and doesn’t offer great settings to upload your video instantly. You may have to make changes to the uploaded video even if you do this as per our step-by-step guide mentioned above.
Part 3: How to fix the “Failed to Upload to YouTube” Error on iMovie?
The “iMovie to YouTube failed” problem occurs when you directly upload a YouTube video from iMovie. The issue will result if you upload from any third-party uploader. That is why the direct upload doesn’t work, especially in iMovie. You can opt to share your video to the desktop first and then drag it to upload to the YouTube platform.
Part 4: Upload Videos to YouTube with the Best Alternative to iMovie - Wondershare Filmora
“What can I use instead of iMovie to overcome its limitations?”
When you see that iMovie is not uploading to YouTube or iMovie upload to YouTube got stuck, go for a better alternative. In this section, we’d like to recommend Wondershare Filmora that offers the best export settings compared to iMovie. It is the go-to solution if you can’t upload video from iMovie to YouTube directly. Filmora further provides intuitive editing tools that professionally make your YouTube video projects.
Export Key Aspects of Wondershare Filmora in comparison to iMovie:
- It offers a long list of export resolutions to choose from.
- You get separate video and audio settings such as Encoder, Channel, Frame Rate, Bit Rate, Resolution, etc.
- It is further compatible with export to various devices including the iPhone, Samsung, iPod, Apple TV, iPad, Google Pixel, PSP, Smart TV, etc.
Step-by-Step Guide on how to upload a video from iMovie to YouTube via Wondershare Filmora
Step 1: Click the Export button and select resolution
After your project in Wondershare Filmora is over, click the Export tab and select video resolution from the Local tab, as shown below.
It has a list of formats. You can also edit the Name and saving location here.
Step 2: Select Quality
Select the Settings button and choose from three quality levels of Best, Better, and Good. You can also adjust video and audio parameters, including the Encoder, Frame Rate, Resolution, Bit Rate, etc.
Step 3: Select platform
Select the YouTube tab, Sign In to your YouTube account, and hit the Export button after modifying the Title and Quality if needed. Also, make sure to check the Enable GPU accelerated video encoding tab.
Select Wondershare Filmora as the ultimate solution even if iMovie upload to YouTube not showing up.
Conclusion
Hopefully, we’ve informed you of the relevant facts on how to upload a video from iMovie to YouTube. We have also examined the number of troubleshooting issues involved in the iMovie video editor. Well, you will get to face similar kinds of export difficulties in the iMovie editor. Also, the entire procedure to end the exporting task is a bit long in iMovie compared to any other video editing software. Thus, it’s crucial to check out what other alternatives the technological world has today. We can’t state to you a better beginner-friendly yet advanced editing option than Wondershare Filmora that rightly outtakes the iMovie video editor in all aspects.
Liza Brown
Liza Brown is a writer and a lover of all things video.
Follow @Liza Brown
Also read:
- In 2024, Comparing YouTube and Dailymotion Notable Contrasts
- 2024 Approved Channel Title Genius Ideas for Your Video Hub
- [Updated] Boosting Engagement Joint Video Strategies for Growth
- Transfer Tactics for YouTube to Dailymotion Success
- [Updated] Aesthetic Enigma The Ultimate Backdrop Collection for Video Thumbnails
- 2024 Approved Essential Steps for Starting a YouTube Channel
- Cut Costs, Boost Creativity Learn the Secrets of Green Screen Artistry From 4 Leading Educators
- In 2024, Dissecting TSeries' Profit Generation Through YouTube Videos
- [Updated] Deciphering Finances How Much Do YouTubers Earn Per Ad?
- Find Your Digital Companion The Top 6 YouTube Personality Puzzles
- Unveiling Your Digital World How to Establish a YouTube Channel
- Tailored Insights Setting Up Your Personal/Business YT Channel Mobilely
- Mastering YouTube Video Sizing A Step-by-Step Approach
- Achieving YouTube Apex with Smart Management Tools
- [New] Cashing In on Content The Carminati Effect (AJay)
- [New] Building Your Brand Making Money with Vids
- [Updated] Dominating Viewers' Spaces Channel Empire Rules
- Brighten Up Techniques for Improving Video Lighting on YouTube for 2024
- A Step-by-Step Strategy for Merging Your YouTube & TikTok Presence
- [New] Blur the Borders Enhancing Your Video's Appeal on YT
- Yogic Journey Discovering Top Online Practitioners
- In 2024, Enhancing Your Content with Effortlessly Added YouTube Subtitles
- Channel Conclusion Mastery - Makers & Templates for Best Practices
- [Updated] Chuckle Chronicles Top YouTube Humorists' Masterpieces
- [Updated] Blitz 30-Second Guide to Fast Thumbnails
- In 2024, Epic YouTube's Ultimate Magic & Trick Editing Showstoppers
- [New] Defeating Dissidence A Guide for Content Makers
- Free Thumbnail Extract From YouTube Videos Today!
- In 2024, Enhance Your Music Library Top 6 Free iOS Apps for Audio Conversion
- [Updated] Engineering Captivating Video Teasers for Online Presence
- Cut Down Clutter Discover These 7 Ultimate Android App Blockers
- The Best Mirrorless Cams Top Picks for Your Next Vlog Project
- Financial Insights for Vids How Much Do YouTubers Earn Per Sponsorship?
- Elevate Your Content Game with These 5 Proven YouTube Marketing Hacks for 2024
- Epic Finn's Revenue Stream Analysis
- 15 Best Strongest Pokémon To Use in Pokémon GO PvP Leagues For Nokia C12 Plus | Dr.fone
- [New] Ultimate Terraria Enhancements List
- How to Downgrade Apple iPhone XR to the Previous iOS Version? | Dr.fone
- Updated Track Wolfs Mournful Lamentation Sound
- How To Recover Whatsapp Chat History From iPhone 6 Plus | Stellar
- Updated The Best Free Video Editors for Android Devices (No Watermark Included)
- 2024 Approved Your Ultimate PS4 Screen Recorder Inside the OBS Studio Guide
- Tall Tales Reimagined Edits for VT Videos on FCPX
- [New] In 2024, Optimized Vimeo Video Exporting Apps
- New Selecting Prime Android Applications for High-Quality Voice Recording (FREE) for 2024
- Syncing Twitter & Snapchat for Sharing Videos
- Can Life360 Track Or See Text Messages? What Can You Do with Life360 On Samsung Galaxy M14 5G? | Dr.fone
- In 2024, Fake the Location to Get Around the MLB Blackouts on Tecno Spark 20 Pro+ | Dr.fone
- 2024 Approved Cinema Journey IPhone Users' Best Choice for Films
- New In 2024, From Noise to Masterpiece 10 Glitch Art Video Editing Apps for Mobile Devices
- The Ultimate Checklist for Transferring Snaps to Photos Folder for 2024
- [New] 2024 Approved Innovative Approaches to Integrating Your FB Story
- [New] The Ultimate Hunt Cut to 7 FPS Giants
- In 2024, Maximizing Video Visibility Top Strategies on FB
- New Unleash the Power of Slow Motion A Kapwing Tutorial for Beginners for 2024
- [Updated] Stream and Save - Discover The Top 5 Recorders of Live Conferences for 2024
- How to Change Location on TikTok to See More Content On your Nokia C32 | Dr.fone
- In 2024, Everything You Need To Know About Unlocked iPhone 12 mini | Dr.fone
- How to Screen Mirroring Realme GT 3 to PC? | Dr.fone
- Updated Optimize Your Videos 2024 TikTok Aspect Ratio Best Practices
- [Updated] Ultimate Guide to Best Video Chatting Solutions (PC/Phone) for 2024
- Professional Video Editing Implementing the Ken Burns Effect in Camtasa for 2024
- [New] Selecting the Ideal Mac Screenshot Software
- New In 2024, Achieving Pristine Audio Quality Background Noise Elimination in iMovie, macOS Edition
- [Updated] Twists That Tell Stories Mastering the Art and Technique of Spinning Visuals for Maximum Impact on Social Media Platforms
- [New] 2024 Approved The Ultimate Guide to Peak Performance on Instagram
- 2024 Approved Elevate Group Video Sessions with Discord's Share Functionality
- Title: "2024 Approved Discover the Secrets to YouTube's Rankings with Keywords"
- Author: Kevin
- Created at : 2024-05-25 14:27:37
- Updated at : 2024-05-26 14:27:37
- Link: https://youtube-videos.techidaily.com/2024-approved-discover-the-secrets-to-youtubes-rankings-with-keywords/
- License: This work is licensed under CC BY-NC-SA 4.0.
