
:max_bytes(150000):strip_icc()/QueenEliminator-28047f0d10d94fe5941ae9f388d9c025.png)
"2024 Approved Directing Content Destination From iMovie Files To YouTube Platform"
Directing Content Destination: From iMovie Files To YouTube Platform
How to Upload a Video from iMovie to YouTube?

Liza Brown
Aug 18, 2022• Proven solutions
“Is iMovie good for YouTube?”
The iMovie is not only good for YouTube but various other social media platforms. The thing is, you have to compromise with the quality offered by Apple’s video editor iMovie. Well, iMovie is perfect for getting started for beginners. But, the professionals and ones who want a bit high features than basic ones should look elsewhere. Thus, we always recommend alternatives to a particular software for our audience. In this article, there is a mention of Wondershare Filmora to overcome the drawbacks of iMovie.
Without further ado, let’s begin with how to upload a video from iMovie to YouTube. We want to lead with the best iMovie export settings, specific troubleshooting issues, and our alternative intro section to overcome iMovie’s limitations.
Part 1: How to Upload a Video from iMovie to YouTube?
iMovie is ideal for making YouTube videos if you are too basic and are not looking for advanced features. Remember that professionalism pays in these platforms and helps you stand better among others. If you’re still interested in making introductory videos, here is a step-by-step guide on uploading a video to YouTube from iMovie on Mac first and leading with iPhone.
Step-by-Step Tutorial on how to upload a video from iMovie to YouTube on Mac
Step 1: Create a Project
On the first step, go to iMovie on Mac and click the Create New tab below.
Step 2: Import Media
Click the Import Media button and browse the files on your computer, as shown below.
Step 3: Edit Clips
It’s time to edit video footage. Drag your video to the timeline, as shown below.
Then, you can trim and drag the edges of video clips to allow editing.
Step 4: Add Titles
You can add titles by clicking the Title tab and further drag the Title’s template into the timeline.
Step 5: Export the Video
Click the Export button as follows after editing is over.
Select YouTube to upload your video over the platform directly.
Step 6: Save
After selecting the desired platform, click the Next tab to proceed with saving the file.
At last, save your video as shown below.
Step-by-Step Tutorial on how to upload iMovie to YouTube from iPhone
Step 1: Share the iMovie Project
Go to iMovie on your iPhone. Open the iMovie project on your iPhone and tap the Share button to select YouTube. Enter the information of Title, Description, Size, Tags, Privacy, and Location (optional).
Step 2: Upload iMovie Files
For ease of use, you can upload saved videos in Photo Library on your iPhone. Then, you can upload iMovie videos via the YouTube iOS app. Sign In to YouTube and click the Camera icon at the top of the Home page. Select your iPhone Photo Library file and set the video Title, Description, Size, Tags, and Privacy. Then, hit the Upload button to confirm.
Part 2: The Best iMovie Export Settings for YouTube Videos
As we all know that iMovie consists of a bit long procedure to export projects. Here are some tips on the best iMovie export settings to avoid an unnecessary headache.
- Set small resolution: Small resolution plays a more significant role, especially while uploading. Thus, you can set the smallest resolution in the Email tab of the Export button.
2. Change Export settings in the File tab: There is a File tab under the Export button. Click it and find various settings that you need to change to get the best export settings for YouTube 2021. Make the Title of the video as small as possible. Set the resolution at 1080P than 4K.
However, it isn’t going to upgrade the resolution if your video is already in the 1080P definition. Now, the last setting that will crazily offer you the best quality and lots of space-saving. You have to select Best (ProRes) in quality settings for this purpose. These settings also take less time to upload to YouTube.
3. Compress is not for speed: Various options you see in the Compresstab are not for speed. They are for how you save the video on a desktop. Thus, always choose the Better Quality tab than Faster.
- Do not export directly to YouTube: iMovie is pretty basic and doesn’t offer great settings to upload your video instantly. You may have to make changes to the uploaded video even if you do this as per our step-by-step guide mentioned above.
Part 3: How to fix the “Failed to Upload to YouTube” Error on iMovie?
The “iMovie to YouTube failed” problem occurs when you directly upload a YouTube video from iMovie. The issue will result if you upload from any third-party uploader. That is why the direct upload doesn’t work, especially in iMovie. You can opt to share your video to the desktop first and then drag it to upload to the YouTube platform.
Part 4: Upload Videos to YouTube with the Best Alternative to iMovie - Wondershare Filmora
“What can I use instead of iMovie to overcome its limitations?”
When you see that iMovie is not uploading to YouTube or iMovie upload to YouTube got stuck, go for a better alternative. In this section, we’d like to recommend Wondershare Filmora that offers the best export settings compared to iMovie. It is the go-to solution if you can’t upload video from iMovie to YouTube directly. Filmora further provides intuitive editing tools that professionally make your YouTube video projects.
Export Key Aspects of Wondershare Filmora in comparison to iMovie:
- It offers a long list of export resolutions to choose from.
- You get separate video and audio settings such as Encoder, Channel, Frame Rate, Bit Rate, Resolution, etc.
- It is further compatible with export to various devices including the iPhone, Samsung, iPod, Apple TV, iPad, Google Pixel, PSP, Smart TV, etc.
Step-by-Step Guide on how to upload a video from iMovie to YouTube via Wondershare Filmora
Step 1: Click the Export button and select resolution
After your project in Wondershare Filmora is over, click the Export tab and select video resolution from the Local tab, as shown below.
It has a list of formats. You can also edit the Name and saving location here.
Step 2: Select Quality
Select the Settings button and choose from three quality levels of Best, Better, and Good. You can also adjust video and audio parameters, including the Encoder, Frame Rate, Resolution, Bit Rate, etc.
Step 3: Select platform
Select the YouTube tab, Sign In to your YouTube account, and hit the Export button after modifying the Title and Quality if needed. Also, make sure to check the Enable GPU accelerated video encoding tab.
Select Wondershare Filmora as the ultimate solution even if iMovie upload to YouTube not showing up.
Conclusion
Hopefully, we’ve informed you of the relevant facts on how to upload a video from iMovie to YouTube. We have also examined the number of troubleshooting issues involved in the iMovie video editor. Well, you will get to face similar kinds of export difficulties in the iMovie editor. Also, the entire procedure to end the exporting task is a bit long in iMovie compared to any other video editing software. Thus, it’s crucial to check out what other alternatives the technological world has today. We can’t state to you a better beginner-friendly yet advanced editing option than Wondershare Filmora that rightly outtakes the iMovie video editor in all aspects.
Liza Brown
Liza Brown is a writer and a lover of all things video.
Follow @Liza Brown
Liza Brown
Aug 18, 2022• Proven solutions
“Is iMovie good for YouTube?”
The iMovie is not only good for YouTube but various other social media platforms. The thing is, you have to compromise with the quality offered by Apple’s video editor iMovie. Well, iMovie is perfect for getting started for beginners. But, the professionals and ones who want a bit high features than basic ones should look elsewhere. Thus, we always recommend alternatives to a particular software for our audience. In this article, there is a mention of Wondershare Filmora to overcome the drawbacks of iMovie.
Without further ado, let’s begin with how to upload a video from iMovie to YouTube. We want to lead with the best iMovie export settings, specific troubleshooting issues, and our alternative intro section to overcome iMovie’s limitations.
Part 1: How to Upload a Video from iMovie to YouTube?
iMovie is ideal for making YouTube videos if you are too basic and are not looking for advanced features. Remember that professionalism pays in these platforms and helps you stand better among others. If you’re still interested in making introductory videos, here is a step-by-step guide on uploading a video to YouTube from iMovie on Mac first and leading with iPhone.
Step-by-Step Tutorial on how to upload a video from iMovie to YouTube on Mac
Step 1: Create a Project
On the first step, go to iMovie on Mac and click the Create New tab below.
Step 2: Import Media
Click the Import Media button and browse the files on your computer, as shown below.
Step 3: Edit Clips
It’s time to edit video footage. Drag your video to the timeline, as shown below.
Then, you can trim and drag the edges of video clips to allow editing.
Step 4: Add Titles
You can add titles by clicking the Title tab and further drag the Title’s template into the timeline.
Step 5: Export the Video
Click the Export button as follows after editing is over.
Select YouTube to upload your video over the platform directly.
Step 6: Save
After selecting the desired platform, click the Next tab to proceed with saving the file.
At last, save your video as shown below.
Step-by-Step Tutorial on how to upload iMovie to YouTube from iPhone
Step 1: Share the iMovie Project
Go to iMovie on your iPhone. Open the iMovie project on your iPhone and tap the Share button to select YouTube. Enter the information of Title, Description, Size, Tags, Privacy, and Location (optional).
Step 2: Upload iMovie Files
For ease of use, you can upload saved videos in Photo Library on your iPhone. Then, you can upload iMovie videos via the YouTube iOS app. Sign In to YouTube and click the Camera icon at the top of the Home page. Select your iPhone Photo Library file and set the video Title, Description, Size, Tags, and Privacy. Then, hit the Upload button to confirm.
Part 2: The Best iMovie Export Settings for YouTube Videos
As we all know that iMovie consists of a bit long procedure to export projects. Here are some tips on the best iMovie export settings to avoid an unnecessary headache.
- Set small resolution: Small resolution plays a more significant role, especially while uploading. Thus, you can set the smallest resolution in the Email tab of the Export button.
2. Change Export settings in the File tab: There is a File tab under the Export button. Click it and find various settings that you need to change to get the best export settings for YouTube 2021. Make the Title of the video as small as possible. Set the resolution at 1080P than 4K.
However, it isn’t going to upgrade the resolution if your video is already in the 1080P definition. Now, the last setting that will crazily offer you the best quality and lots of space-saving. You have to select Best (ProRes) in quality settings for this purpose. These settings also take less time to upload to YouTube.
3. Compress is not for speed: Various options you see in the Compresstab are not for speed. They are for how you save the video on a desktop. Thus, always choose the Better Quality tab than Faster.
- Do not export directly to YouTube: iMovie is pretty basic and doesn’t offer great settings to upload your video instantly. You may have to make changes to the uploaded video even if you do this as per our step-by-step guide mentioned above.
Part 3: How to fix the “Failed to Upload to YouTube” Error on iMovie?
The “iMovie to YouTube failed” problem occurs when you directly upload a YouTube video from iMovie. The issue will result if you upload from any third-party uploader. That is why the direct upload doesn’t work, especially in iMovie. You can opt to share your video to the desktop first and then drag it to upload to the YouTube platform.
Part 4: Upload Videos to YouTube with the Best Alternative to iMovie - Wondershare Filmora
“What can I use instead of iMovie to overcome its limitations?”
When you see that iMovie is not uploading to YouTube or iMovie upload to YouTube got stuck, go for a better alternative. In this section, we’d like to recommend Wondershare Filmora that offers the best export settings compared to iMovie. It is the go-to solution if you can’t upload video from iMovie to YouTube directly. Filmora further provides intuitive editing tools that professionally make your YouTube video projects.
Export Key Aspects of Wondershare Filmora in comparison to iMovie:
- It offers a long list of export resolutions to choose from.
- You get separate video and audio settings such as Encoder, Channel, Frame Rate, Bit Rate, Resolution, etc.
- It is further compatible with export to various devices including the iPhone, Samsung, iPod, Apple TV, iPad, Google Pixel, PSP, Smart TV, etc.
Step-by-Step Guide on how to upload a video from iMovie to YouTube via Wondershare Filmora
Step 1: Click the Export button and select resolution
After your project in Wondershare Filmora is over, click the Export tab and select video resolution from the Local tab, as shown below.
It has a list of formats. You can also edit the Name and saving location here.
Step 2: Select Quality
Select the Settings button and choose from three quality levels of Best, Better, and Good. You can also adjust video and audio parameters, including the Encoder, Frame Rate, Resolution, Bit Rate, etc.
Step 3: Select platform
Select the YouTube tab, Sign In to your YouTube account, and hit the Export button after modifying the Title and Quality if needed. Also, make sure to check the Enable GPU accelerated video encoding tab.
Select Wondershare Filmora as the ultimate solution even if iMovie upload to YouTube not showing up.
Conclusion
Hopefully, we’ve informed you of the relevant facts on how to upload a video from iMovie to YouTube. We have also examined the number of troubleshooting issues involved in the iMovie video editor. Well, you will get to face similar kinds of export difficulties in the iMovie editor. Also, the entire procedure to end the exporting task is a bit long in iMovie compared to any other video editing software. Thus, it’s crucial to check out what other alternatives the technological world has today. We can’t state to you a better beginner-friendly yet advanced editing option than Wondershare Filmora that rightly outtakes the iMovie video editor in all aspects.
Liza Brown
Liza Brown is a writer and a lover of all things video.
Follow @Liza Brown
Scouring YouTubes’ Discussions
How to Search Comments on YouTube Quickly?

Richard Bennett
Mar 27, 2024• Proven solutions
Are you trying to search for something on a document or a web page? You know how to do that. You use the combination ‘Ctrl + F’ for Windows or ‘Command + F’ for Mac. But searching comments from the YouTube comments section can be tricky because –
- There are many comments on the video, most of which do not load immediately. You can keep scrolling and still not find the desired comment.
- Managing and analyzing the vast number of comments can be difficult for as busy a platform as YouTube.
So, if you want to search YouTube comments quickly, what can you do? We will show you in this blog.
Part 1: Using the Built-in YouTube Studio Feature to Search Comments
How does the built-in YouTube Studio Feature make searching comments on YouTube easier?
Comments are the best way to interact with subscribers on YouTube. YouTube’s Studio is a new addition to help creators filter and respond to comments and create a healthy community . Sometimes, YouTubers also receive hateful and inappropriate comments. You can use the Studio Feature to report or delete those comments as well.
If you have a channel, you can use this feature in some simple steps.
- Visit YouTubewebsite on your desktop and sign in to your YouTube account.
- Go to the top right corner of your homepage, and you will find your profile icon. Click on it and from the drop-down menu, select the YouTube Studio option.
- This will take you to the YouTube Studio home page. On the left side, find and click on the Comments option, and then you will see all comments your YouTube channel has received.
- You can now click on the Filter icon from the comments section and type in the search term directly. Or, you can click the Search from the options, and type in the words you are looking for.
- Click on Apply, and you will see the comments with the keywords you chose.
Besides the comment search feature, the YouTube Studio also has some in-built search filter categories, such as –
Search: Search for comments with particular search terms. You can also search comments posted by a specific channel by using their username as the search term.
Contains questions: Filter the comments which have questions.
Channel member status: Search for comments from the channel members. YouTube channel membership is only available to channels joined YouTube Partner Program.
Subscriber count: Filter comments with the channel subscriber count, you can search for comments from channels with a minimum number of subscribers (from 100-10M).
Response status: Filter the comments to which you have responded or haven’t responded to.
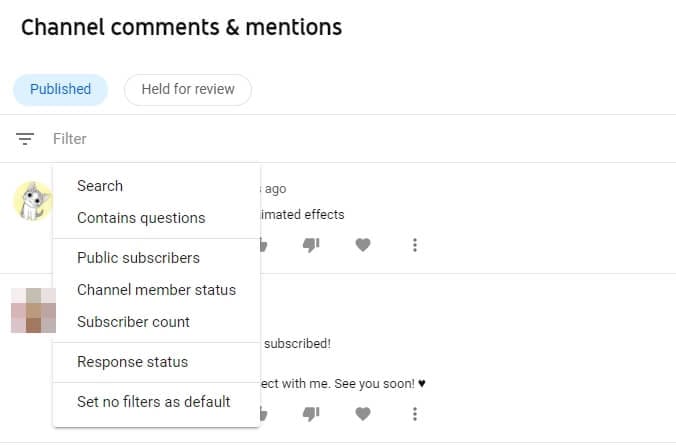
You can combine these additional filters to narrow your comments search for YouTube.
Part 2: Using YCS – YouTube Comment Search Extension
You can use the YouTube Comment Search browser extension supported by Google Chrome to help you search YouTube comments effortlessly. To use it, follow these steps below.
- First, you need to install this extension. You can click this URL https://chrome.google.com/webstore/detail/ycs-youtube-comment-searc/pmfhcilikeembgbiadjiojgfgcfbcoaa?hl=en Or, you can open the Chrome Extensions page, and in the search bar at the top, type in YCS – YouTube Comment Search and press Enter.
- Click on the result that appears and then tap on the Add to Chrome button. This will add the extension to your browser.
- Once you add the extension, openYouTube on your browser. Click on the video where you want to search the comments. You will find the YouTube Comment Search extension below it.
- Tap on ‘Load comments’ and wait till the extension loads all the comments on the video.
- Now type your keywords, press Enter, and YCS will show all comments having the keyword you typed.

Part 3: Using Comments Search for YouTube Extension
If you are looking for an easy method to search YouTube comments, you can use the Comments Search for YouTube extension. Google Chrome supports this extension that allows you to search comments on YouTube without leaving the website.
How can you use this extension to search YouTube comments? Here is a simple step-by-step tutorial.
- First, you need to download the extension fromGithub . Then, locate the file on your computer and unzip it.
- Next, you need to install it in the browser. Open your Chrome browser, and from the top right corner, click on the three vertical dots. You will find the Settings option towards the end of the drop-down menu, and then click on it.
- When the Settings page opens, select Extensions from the panel on the left side of the webpage. This will take you to a new tab.
- On the top right corner of the page, there will be a toggle switch called Developer Mode. Turn it on if it is off.
- Once the Developer Mode is on, you will see three options now. Click on Load unpacked. Locate the downloaded extension file and click on it. Finally, disable Developer Mode.
When you complete these steps, you click on the extension icon to search comments on YouTube. You can also do this by using the combination ‘Ctrl + S’ on the target YouTube page. The extension also includes some advanced features like –
1. Global Mode
In this mode, you can type ‘global: your parameter’ to search all comments on the channel that fit your parameter.
2. Advanced Mode
This mode allows you to enter special commands to carry out an advanced search. Some including typing –
- ‘:’ to look for comments with timestamps
- ‘:all’ to see all comments
- ‘:creator’ to get comments made by the creator
Part 4: How Do You Search Comments You Have Posted on YouTube?
Did you post a comment on your favorite celebrity’s video? Do you think it may be embarrassing and want to delete it now but cannot find it now amidst so many comments? It is where you can make use of YouTube’s Comment History feature.
YouTube has now added this feature which you can see all the comments you ever posted on YouTube in one place.
How to Use the Comment History feature to Search Comments?
You can see all the comments you have posted in the Comment History in a few quick steps.
- You have to visit YouTube on your desktop and sign in using your Google account.
- Once you sign in, click on the three horizontal lines at the top left corner of your YouTube page.
- Click on the History option and then you will find the option called Comments on the right side of your YouTube History page. Click on it to see all your YouTube comments.

You can also access the Comments History page directly fromhere .
Part 5: How to Find Out Who Posts the Most Comments on Your YouTube Videos?
If you are a creator on YouTube, the comments section becomes very important. Subscribers comment words of praise, encouragement, and feedback which help you grow. You may want to keep track of your most loyal followers. The best way to know that is by knowing who comments most on your videos.
Here is how you can figure out who is your channel super fan on the YouTube mobile app.
- Open YouTube app on your mobile device, and then sign in.
- From your public videos, select one from where you want to gather insights about your subscribers. Click on the video and scroll down to see the comments section.
- Choose a comment by someone whose engagement with your channel you want to check.
- On the left side of the comment, you will see the icon of the person’s channel. Click on it and you will see a pop-up menu with insights about the person. Here, you can learn about the number of comments they have posted on your channel.
This feature is helpful as it lists more than the number of comments made by someone. You can see insights like when they joined YouTube, how many subscribers they have, when someone subscribed to your channel, how many comments anyone posted on your videos, and how many responses they got from you. You can even see glimpses of all their comments. Clicking on them will take you to the whole conversation.
You can also see their channel’s banner from this section, which should tell you their channel’s niche.
Final Thoughts
YouTube is a global platform to share helpful and entertaining videos. The comments section of each video contains informative comments, feedback, and essential timestamps. Searching YouTube comments can help someone understand if the video is valuable or not. For many creators, the comments become the only way to engage with their supporters and create a tight-knit community.
Find feedback or questions. Report offensive comments. If you are a regular YouTube user, use our tips and tricks to search comments quickly and grow your channel.
Richard Bennett
Richard Bennett is a writer and a lover of all things video.
Follow @Richard Bennett
Richard Bennett
Mar 27, 2024• Proven solutions
Are you trying to search for something on a document or a web page? You know how to do that. You use the combination ‘Ctrl + F’ for Windows or ‘Command + F’ for Mac. But searching comments from the YouTube comments section can be tricky because –
- There are many comments on the video, most of which do not load immediately. You can keep scrolling and still not find the desired comment.
- Managing and analyzing the vast number of comments can be difficult for as busy a platform as YouTube.
So, if you want to search YouTube comments quickly, what can you do? We will show you in this blog.
Part 1: Using the Built-in YouTube Studio Feature to Search Comments
How does the built-in YouTube Studio Feature make searching comments on YouTube easier?
Comments are the best way to interact with subscribers on YouTube. YouTube’s Studio is a new addition to help creators filter and respond to comments and create a healthy community . Sometimes, YouTubers also receive hateful and inappropriate comments. You can use the Studio Feature to report or delete those comments as well.
If you have a channel, you can use this feature in some simple steps.
- Visit YouTubewebsite on your desktop and sign in to your YouTube account.
- Go to the top right corner of your homepage, and you will find your profile icon. Click on it and from the drop-down menu, select the YouTube Studio option.
- This will take you to the YouTube Studio home page. On the left side, find and click on the Comments option, and then you will see all comments your YouTube channel has received.
- You can now click on the Filter icon from the comments section and type in the search term directly. Or, you can click the Search from the options, and type in the words you are looking for.
- Click on Apply, and you will see the comments with the keywords you chose.
Besides the comment search feature, the YouTube Studio also has some in-built search filter categories, such as –
Search: Search for comments with particular search terms. You can also search comments posted by a specific channel by using their username as the search term.
Contains questions: Filter the comments which have questions.
Channel member status: Search for comments from the channel members. YouTube channel membership is only available to channels joined YouTube Partner Program.
Subscriber count: Filter comments with the channel subscriber count, you can search for comments from channels with a minimum number of subscribers (from 100-10M).
Response status: Filter the comments to which you have responded or haven’t responded to.
You can combine these additional filters to narrow your comments search for YouTube.
Part 2: Using YCS – YouTube Comment Search Extension
You can use the YouTube Comment Search browser extension supported by Google Chrome to help you search YouTube comments effortlessly. To use it, follow these steps below.
- First, you need to install this extension. You can click this URL https://chrome.google.com/webstore/detail/ycs-youtube-comment-searc/pmfhcilikeembgbiadjiojgfgcfbcoaa?hl=en Or, you can open the Chrome Extensions page, and in the search bar at the top, type in YCS – YouTube Comment Search and press Enter.
- Click on the result that appears and then tap on the Add to Chrome button. This will add the extension to your browser.
- Once you add the extension, openYouTube on your browser. Click on the video where you want to search the comments. You will find the YouTube Comment Search extension below it.
- Tap on ‘Load comments’ and wait till the extension loads all the comments on the video.
- Now type your keywords, press Enter, and YCS will show all comments having the keyword you typed.
Part 3: Using Comments Search for YouTube Extension
If you are looking for an easy method to search YouTube comments, you can use the Comments Search for YouTube extension. Google Chrome supports this extension that allows you to search comments on YouTube without leaving the website.
How can you use this extension to search YouTube comments? Here is a simple step-by-step tutorial.
- First, you need to download the extension fromGithub . Then, locate the file on your computer and unzip it.
- Next, you need to install it in the browser. Open your Chrome browser, and from the top right corner, click on the three vertical dots. You will find the Settings option towards the end of the drop-down menu, and then click on it.
- When the Settings page opens, select Extensions from the panel on the left side of the webpage. This will take you to a new tab.
- On the top right corner of the page, there will be a toggle switch called Developer Mode. Turn it on if it is off.
- Once the Developer Mode is on, you will see three options now. Click on Load unpacked. Locate the downloaded extension file and click on it. Finally, disable Developer Mode.
When you complete these steps, you click on the extension icon to search comments on YouTube. You can also do this by using the combination ‘Ctrl + S’ on the target YouTube page. The extension also includes some advanced features like –
1. Global Mode
In this mode, you can type ‘global: your parameter’ to search all comments on the channel that fit your parameter.
2. Advanced Mode
This mode allows you to enter special commands to carry out an advanced search. Some including typing –
- ‘:’ to look for comments with timestamps
- ‘:all’ to see all comments
- ‘:creator’ to get comments made by the creator
Part 4: How Do You Search Comments You Have Posted on YouTube?
Did you post a comment on your favorite celebrity’s video? Do you think it may be embarrassing and want to delete it now but cannot find it now amidst so many comments? It is where you can make use of YouTube’s Comment History feature.
YouTube has now added this feature which you can see all the comments you ever posted on YouTube in one place.
How to Use the Comment History feature to Search Comments?
You can see all the comments you have posted in the Comment History in a few quick steps.
- You have to visit YouTube on your desktop and sign in using your Google account.
- Once you sign in, click on the three horizontal lines at the top left corner of your YouTube page.
- Click on the History option and then you will find the option called Comments on the right side of your YouTube History page. Click on it to see all your YouTube comments.
You can also access the Comments History page directly fromhere .
Part 5: How to Find Out Who Posts the Most Comments on Your YouTube Videos?
If you are a creator on YouTube, the comments section becomes very important. Subscribers comment words of praise, encouragement, and feedback which help you grow. You may want to keep track of your most loyal followers. The best way to know that is by knowing who comments most on your videos.
Here is how you can figure out who is your channel super fan on the YouTube mobile app.
- Open YouTube app on your mobile device, and then sign in.
- From your public videos, select one from where you want to gather insights about your subscribers. Click on the video and scroll down to see the comments section.
- Choose a comment by someone whose engagement with your channel you want to check.
- On the left side of the comment, you will see the icon of the person’s channel. Click on it and you will see a pop-up menu with insights about the person. Here, you can learn about the number of comments they have posted on your channel.
This feature is helpful as it lists more than the number of comments made by someone. You can see insights like when they joined YouTube, how many subscribers they have, when someone subscribed to your channel, how many comments anyone posted on your videos, and how many responses they got from you. You can even see glimpses of all their comments. Clicking on them will take you to the whole conversation.
You can also see their channel’s banner from this section, which should tell you their channel’s niche.
Final Thoughts
YouTube is a global platform to share helpful and entertaining videos. The comments section of each video contains informative comments, feedback, and essential timestamps. Searching YouTube comments can help someone understand if the video is valuable or not. For many creators, the comments become the only way to engage with their supporters and create a tight-knit community.
Find feedback or questions. Report offensive comments. If you are a regular YouTube user, use our tips and tricks to search comments quickly and grow your channel.
Richard Bennett
Richard Bennett is a writer and a lover of all things video.
Follow @Richard Bennett
Also read:
- Academic History Lovers' Guide to Top YT Content for 2024
- In 2024, Epicurean Escapades Crafting Kitchen Films
- [New] Affordable YouTube Intro Designs and Templates
- [Updated] Charting the Course to Prodigy Status for Ajey (CarryMinati)
- Optimal Video Formats to Skyrocket Your YouTube Popularity
- Techniques to Improve Video Visibility on YouTube Platform
- In 2024, Breakthrough Techniques in YouTube Content Creation
- In 2024, Crafting Visual Stories In-Depth PC Editing Techniques for YouTube
- [New] A Beginner’s Pathway Building a Simple YouTube Signup
- [Updated] Comprehensive Instructions for Disposing of Video Downloads
- [New] Effortless Engagement How to Craft a Direct Subscribe Link
- Achieve Impact Innovative iMovie Techniques for YouTube Startups for 2024
- [Updated] 5 Leading Tools for Crafting Superior Video Titles and Tags
- 2024 Approved Earn on YouTube Decoding Recent Policy Changes
- Web Integration Adding YouTube Playlists Easily
- [Updated] In 2024, Transforming Home Security The Rise of Multi-Camera Recorders
- Remove FRP Lock on X100 Pro
- 2024 Approved Top 8 Speech-to-Text Tools Compatible with Windows & macOS Systems
- In 2024, Top 10 Best Talk with Strangers Apps
- Detailed Review & Alternatives of VOCALOID6 Voice Generator for 2024
- Updated The Vimeo Video Spectrum Examining the Role of Aspect Ratio in Content Quality
- [Updated] In 2024, From Novice to Viral Video Top 30 Anime Inspiration Ideas
- Best Subtitle Edit Replacements for Mac Users
- [New] Bizarre Battles Unconventional Gaming Challenges on TikTok for 2024
- [Updated] Innovating TikTok Posts for Twitter's Platform
- In 2024, How To Pause Life360 Location Sharing For Nokia C12 Pro | Dr.fone
- Leading 6 Social Spaces for Enterprise-Driven Collaboration
- 2024 Approved Bold Creation Mastering Timelapses & Animations with Movie Maker
- Achieve Smooth Operations in Virtual Collaboration for 2024
- How to Reset a Locked Itel P55+ Phone
- Title: "2024 Approved Directing Content Destination From iMovie Files To YouTube Platform"
- Author: Kevin
- Created at : 2024-05-25 17:02:23
- Updated at : 2024-05-26 17:02:23
- Link: https://youtube-videos.techidaily.com/2024-approved-directing-content-destination-from-imovie-files-to-youtube-platform/
- License: This work is licensed under CC BY-NC-SA 4.0.
