
:max_bytes(150000):strip_icc():format(webp)/5-best-texting-apps-for-android-tablets-in-2023-a5a6329d6b744167acf0a02f6a413ff2.jpg)
"2024 Approved Detailed Steps to Supercharge Your YouTube Audio Content"
Detailed Steps to Supercharge Your YouTube Audio Content
How to Edit Audio on YouTube

Richard Bennett
Mar 27, 2024• Proven solutions
In this article, we are going to show you how to edit audio with YouTube Video Editor, and the tips on adding your own audio file to YouTube.
- Part 1: Add your Own Audio File to YouTube Video
- Part 2: How to Edit Audio with YouTube Video Editor
Part 1: Add your Own Audio File to YouTube Video
Tools You Are Going to Need
YouTube video editor is far from meeting the needs of people who want to have more control on their audio. On the bright side, if you are interested in learning how to edit audio on YouTube, there is a solution. There are many video editors in the market that allow you to add your own music or audio files to a video. Windows Movie Maker, iMovie, Adobe Premiere, and Magisto are some of the video editors available for you to choose from. In this guide, we recommend the Wondershare Filmora video editor. Below is a quick tutorial about how to edit audio in Filmora.
 Download Mac Version ](https://tools.techidaily.com/wondershare/filmora/download/ )
Why Should You Choose Wondershare Filmora?
There are many advantages associated with the use of Wondershare Filmora. You will see that it allows you to fully edit any audio file and gain 100% control over your files. It is an integrated solution that lacks nothing in terms of efficiency and quality standards. To be more specific, Filmora offers the following unique features:
- Built-in audio editing tools that allow you to gain full control of your audio in an easy way
- Exclusive audio track that enables you to mute, detach or even de-noise the audio from video
- All audio effects can easily be adjusted with one click only
- The built-in Equalizer is capable enough to create amazing audio effects
- Directly upload your video to YouTube, Facebook or Vimeo from Wondershare Filmora
How to add audio files to YouTube video with Wondershare Filmora
Do you want to know more about audio editing? Please read this article: How to add audio to video.
Step 1 Import Video Clips into Filmora
Filmora supports a wide range of video formats, such as MKV, MOV, AVI, WebM and MP4, you can import the video clip shot with Camera, smartphone or camcorder easily to it.
Step 2 Detach Audio
If you want to edit the original audio of the video, you can choose to split the audio file from the video by using the Audio Detach option on Wondershare Filmora. Then, the audio file will be shown in the audio track, and you can cut or trim it.

Note: If you do not want to keep the original audio file in the video, you can delete it from the audio track directly.
Step 3Add Audio Files
Wondershare Filmora offers you multiple royalty free audio effects and music in its rich audio library. What is more, you can also import your own music or audio file from your computer or iTunes. Of course, you should know that the audio should be royalty free for you to make use of. In a different situation, you cannot upload it and benefit from its quality and nature.
Step 4Edit Audio
In this step, you can adjust the audio volume and pitch, etc. There are multiple options for you to benefit from, including the Audio Equalizer, Music, Mix Audio. In this way, you can make sure that the audio is exactly like you have wanted it to be. For further information as to how you can improve the sound quality of your recorded videos, you can check out: How to improve sound quality of recorded videos.
Step 5Save Your Work and Upload on YouTube
If you are satisfied with your work on the audio file and you wish to publish it, the process is quite simple. You just hit Export and select to upload the video to YouTube. After signing in to your YouTube account, you will be ready to start uploading the audio file.

In case you wish to edit the audio from an already published video, you have to download the video first. Then, you can follow the steps above to edit the audio file in Filmora. As one of the widely used video editing software for YouTubers, Filmora is here to empower your imagination. Just download the free trial version and try it now.

Part 2: How to Edit Audio with YouTube Video Editor
Unfortunately, YouTube does not allow users to upload audio files such as MP3, WAV, etc. Instead, you can only upload audio files which are offered by YouTube in the first place. Since YouTube has got a plentiful audio library, you can find a lot of audio there. In this part, we will show you how to add and edit audio with YouTube Video Editor.
You may also like: How to Add Music to YouTube Videos >>
Note: From 20th September 2017 users will no longer be able to use the complimentary editing suite. Check the best YouTube video editor alternatives from this complete guide. In the following part, I will show you how to add audio track , replace the original audio and adjust the audio position and length as well.
- Step 1: Sign in to your YouTube account
- **Step 2:**Click your profile avatar and select Creator Studio option.
- Step 3: In the left pane, go to Video Manager and then click Videos. In the Videos list, choose the video that you want to add new audio track, and then select Audio from the Edit button.

- Step 4: Now you can add or replace the audio in your video. Here you will find that there are various songs and audio files you can choose from. Click ADD TO VIDEO and the audio track will be added to the video directly.

- Step 5: Now you will see the audio track appears at the bottom of the player. Here you can trim and drag the audio bar to adjust the audio positon and length. To Trim the audio, click the beginning or the end of the audio bar and then drag it to the left or right. After trimming, drag it to meet the target position.

Conclusion
Normally, it would be better to add and edit audio to video before updating to YouTube. In this case, Filmora is highly recommended as one of the best video editor for YouTubers , which provides some royalty free music sound in the Music Library to choose from and also the audio editing tools like remove background noise from the video, add fade in and fade out effects with ease or play the video backward or fast forward.
Richard Bennett
Richard Bennett is a writer and a lover of all things video.
Follow @Richard Bennett
Richard Bennett
Mar 27, 2024• Proven solutions
In this article, we are going to show you how to edit audio with YouTube Video Editor, and the tips on adding your own audio file to YouTube.
- Part 1: Add your Own Audio File to YouTube Video
- Part 2: How to Edit Audio with YouTube Video Editor
Part 1: Add your Own Audio File to YouTube Video
Tools You Are Going to Need
YouTube video editor is far from meeting the needs of people who want to have more control on their audio. On the bright side, if you are interested in learning how to edit audio on YouTube, there is a solution. There are many video editors in the market that allow you to add your own music or audio files to a video. Windows Movie Maker, iMovie, Adobe Premiere, and Magisto are some of the video editors available for you to choose from. In this guide, we recommend the Wondershare Filmora video editor. Below is a quick tutorial about how to edit audio in Filmora.
Download Mac Version ](https://tools.techidaily.com/wondershare/filmora/download/ )
Why Should You Choose Wondershare Filmora?
There are many advantages associated with the use of Wondershare Filmora. You will see that it allows you to fully edit any audio file and gain 100% control over your files. It is an integrated solution that lacks nothing in terms of efficiency and quality standards. To be more specific, Filmora offers the following unique features:
- Built-in audio editing tools that allow you to gain full control of your audio in an easy way
- Exclusive audio track that enables you to mute, detach or even de-noise the audio from video
- All audio effects can easily be adjusted with one click only
- The built-in Equalizer is capable enough to create amazing audio effects
- Directly upload your video to YouTube, Facebook or Vimeo from Wondershare Filmora
How to add audio files to YouTube video with Wondershare Filmora
Do you want to know more about audio editing? Please read this article: How to add audio to video.
Step 1 Import Video Clips into Filmora
Filmora supports a wide range of video formats, such as MKV, MOV, AVI, WebM and MP4, you can import the video clip shot with Camera, smartphone or camcorder easily to it.
Step 2 Detach Audio
If you want to edit the original audio of the video, you can choose to split the audio file from the video by using the Audio Detach option on Wondershare Filmora. Then, the audio file will be shown in the audio track, and you can cut or trim it.
Note: If you do not want to keep the original audio file in the video, you can delete it from the audio track directly.
Step 3Add Audio Files
Wondershare Filmora offers you multiple royalty free audio effects and music in its rich audio library. What is more, you can also import your own music or audio file from your computer or iTunes. Of course, you should know that the audio should be royalty free for you to make use of. In a different situation, you cannot upload it and benefit from its quality and nature.
Step 4Edit Audio
In this step, you can adjust the audio volume and pitch, etc. There are multiple options for you to benefit from, including the Audio Equalizer, Music, Mix Audio. In this way, you can make sure that the audio is exactly like you have wanted it to be. For further information as to how you can improve the sound quality of your recorded videos, you can check out: How to improve sound quality of recorded videos.
Step 5Save Your Work and Upload on YouTube
If you are satisfied with your work on the audio file and you wish to publish it, the process is quite simple. You just hit Export and select to upload the video to YouTube. After signing in to your YouTube account, you will be ready to start uploading the audio file.
In case you wish to edit the audio from an already published video, you have to download the video first. Then, you can follow the steps above to edit the audio file in Filmora. As one of the widely used video editing software for YouTubers, Filmora is here to empower your imagination. Just download the free trial version and try it now.
Part 2: How to Edit Audio with YouTube Video Editor
Unfortunately, YouTube does not allow users to upload audio files such as MP3, WAV, etc. Instead, you can only upload audio files which are offered by YouTube in the first place. Since YouTube has got a plentiful audio library, you can find a lot of audio there. In this part, we will show you how to add and edit audio with YouTube Video Editor.
You may also like: How to Add Music to YouTube Videos >>
Note: From 20th September 2017 users will no longer be able to use the complimentary editing suite. Check the best YouTube video editor alternatives from this complete guide. In the following part, I will show you how to add audio track , replace the original audio and adjust the audio position and length as well.
- Step 1: Sign in to your YouTube account
- **Step 2:**Click your profile avatar and select Creator Studio option.
- Step 3: In the left pane, go to Video Manager and then click Videos. In the Videos list, choose the video that you want to add new audio track, and then select Audio from the Edit button.
- Step 4: Now you can add or replace the audio in your video. Here you will find that there are various songs and audio files you can choose from. Click ADD TO VIDEO and the audio track will be added to the video directly.
- Step 5: Now you will see the audio track appears at the bottom of the player. Here you can trim and drag the audio bar to adjust the audio positon and length. To Trim the audio, click the beginning or the end of the audio bar and then drag it to the left or right. After trimming, drag it to meet the target position.
Conclusion
Normally, it would be better to add and edit audio to video before updating to YouTube. In this case, Filmora is highly recommended as one of the best video editor for YouTubers , which provides some royalty free music sound in the Music Library to choose from and also the audio editing tools like remove background noise from the video, add fade in and fade out effects with ease or play the video backward or fast forward.
Richard Bennett
Richard Bennett is a writer and a lover of all things video.
Follow @Richard Bennett
The Ultimate Channel Finale Strategy + Best Templates & Makers
YouTube Outro Complete Guide [+Best Makers & Templates]
Richard Bennett
Mar 27, 2024• Proven solutions
The key reason your YouTube videos have a hundred views a year after publication is because they lack good YouTube intro and outro.
How interactive is your YouTube channel? Or, what’s the bounce rate of your YouTube videos? As you answer this, you’ll realize how important YouTube outro is. Very few people know to add outro to YouTube videos is the best YouTube SEO technique.
In this guide, I’ll demystify what YouTube outro is and how to make outro and add it to a YouTube video. If you are not a tech expert, use intro and outro makers highlighted herein to make your videos as interactive pas possible.
To get a sneak preview of what is entailed here; this guide has been subdivided into five parts:
- Part 1: YouTube Outro Prerequisites
- Part 2: Best 8 Intro And Outro Makers For YouTube
- Part 3: How To Make And Add Outro To YouTube Video
- Part 4: How To Add An Outro To A Youtube Video
- Part 5: Frequently Asked Questions about YouTube Outro
Part 1: YouTube Outro Prerequisites
In this part, we will learn what outros for YouTube are, the importance of land that distinguishes them from the intro. Also included are expert tips on how to make YouTube outro that attracts a hundred thousand subscribers in seven days included.
To understand what YouTube outro is and why you should add it to your videos, here is a detailed explanation.
Section 1: What is a Youtube Outro?
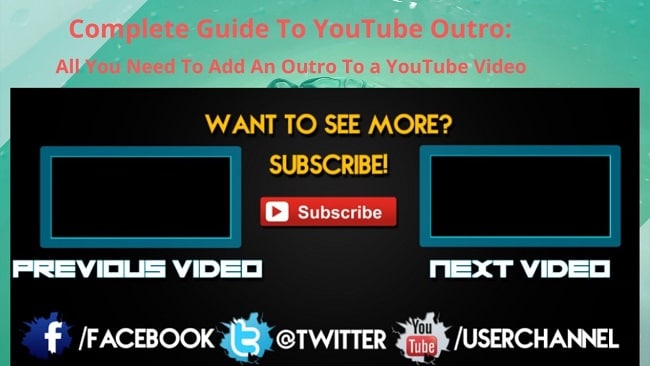
YouTube outro aka end screen is the last part of a video with a call to action statement, button or video suggestion to view other YouTube videos. In other words, it’s the last part of a video with calls to action links.
One of the most effective technical methods of optimizing YouTube videos is by adding an outro. This helps attract huge traffic, increase conversion and engage viewers.
Why spend your time adding outro? You can add Outro to YouTube videos to direct viewers to your website, other selected videos, engage viewers for longer and to persuade them to subscribe to the channel. In short, most end screens have four elements incorporated into an outro: Channel, subscribe, Video playlist and a website link.
Section 2: Difference Between Outro and Intro
Most YouTube videos have an intro and an outro. In this case, an intro is a short clip at the beginning of a YouTube video that introduces you to the viewers and your brand.
Even though video creators attach more emphasis on intros, both are both very critical. For your videos to achieve meaningful results, it’s important to view each as distinct from the other. Equally important to know, both intros and outros have different purposes.
| Differences Between YouTube Intro And Outro | |
|---|---|
| Intro | Outro |
| Inserted at the begging of a video | Inserted at the end of a video |
| Used to capture audience attention | Directs the audience to the next step |
| Introduces the topic | Suggests new topics to viewers |
| Attract viewers to the video | Contains a call-action button |
| Showcases a brand, logo, business slogan or a statement mission |
Section 3: YouTube Outro Requirements
Just as their requirements for any video uploaded on YouTube, outros are no exception. For your outro to be interactive, observe the following requirements:
1. Outro Resolution
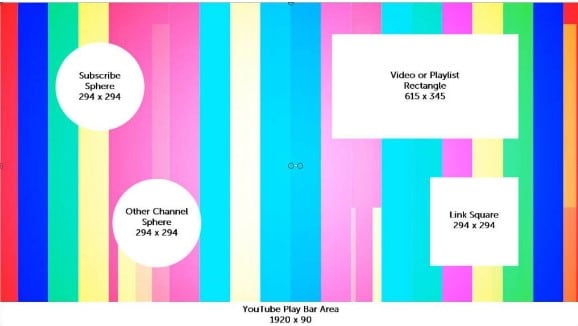
Outros for YouTube should have an aspect ratio of 16:9 and a resolution of 1920px X 1080px.
2. Outro Element Sizes and Dimensions
End screen templates comprise elements that are in different shapes and sizes. When using a YouTube outro size of 1920px X 1080px, here are the element dimensions to use:
- Subscribe – 294px X 294px
- Channel – 294px X 294px
- Website link - 294px X 294px
- Video playlist – 615px X 345px
3. Outro Length
If you want to make your outro boring, make it long. So, how long should YouTube outro be? For your outros to have a high conversation rate, they should be approximately 10-20 seconds long. However, the length of your video should be the determining factor. A one-hour YouTube video can have a longer outro.
Don’t be challenged by setting the above sizes because nearly all intro and outro makers have already set dimensions for the elements. The major requirements are done for you
Section 4: Best Practices When Making A YouTube Outro
Imagine given 10 seconds to showcase your YouTube channel and direct viewers on the next move without breaking the engagement! Different YouTube outros come in different styles; certainly a show of one’s degree of creativity.
At this point, you should be already be having the best outro maker in mind - Filmora. The below YouTube outro tips should coincide with the features of your selected outro maker.
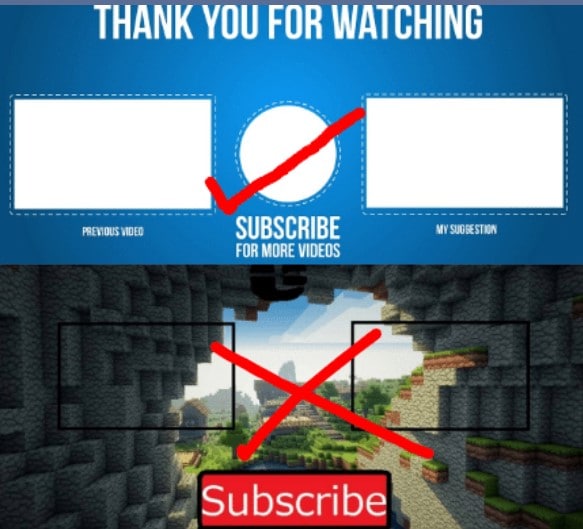
- Be relevant
The featured elements should be related to the video. Adding irrelevant elements your outro will most likely make the viewer click away.
- Keep to your goals
The big question is; what do you want to achieve from the YouTube end screen? Draw your attention to the subject matter of that particular video, your channel or the product highlighted in the video. Try to align your thoughts with those of the viewer.
Every video creator wishes for the following goals, increasing your channel subscribers, sending traffic to another site, viewing more videos and sharing to social media. Each YouTube outro element should have its own goal.
- Simple, clear and easy to interpret
Your outro will be meaningless if the audience cannot take action due to the complexity of either the language used or the ambiguity of words used. Use colors that pop out the elements making them the center of focus. Make them clear and avoid anything distractive.
- Use similar outro templates
Apart from being a good method of branding your channel, using similar outro on your videos adds credibility. It is, therefore, a good practice to have the consistency of colors, elements, images, and logos.
It’s absolutely important to understand all the prerequisites related to YouTube outros. Make use of the tips and requirements explained above when making and adding YouTube end screens to achieve the best results.
Part 2: Best 8 Intro And Outro Makers For YouTube
If you are wondering how to make the best magnetic intro and converting outro for your YouTube videos, this is your best article for you. Whether it’s the free online intro maker or the YouTube outro maker free no watermark, just select one that suits you most from the below list.
1. Wondershare Filmora
Quick fact – Using Filmora as an outro maker, allows you to select your admired background and outro template.
Do you want to make HD YouTube intros and outros that will grow your channel? I recommend Wondershare Filmora.
This software has the simplest friendly interface that any new and expert video editor would understand easily. This is very important for you; to use the best intro or outro for your YouTube videos, download Filmora video editor to get access to Filmstock. There are plenty of free and editable YouTube intro and outro templates ready for download.
Filmora is an all in one YouTube outro maker: you can download intro and outro templates, edit, add to your YouTube video and publish to your channel. There are innumerable backgrounds, transitions and effects to make an outro that matches the video colors, speed, and theme.
2. Outromaker
Quick fact – Outromaker is highly preferred for adding YouTube end screens with animated backgrounds that are mobile-friendly.
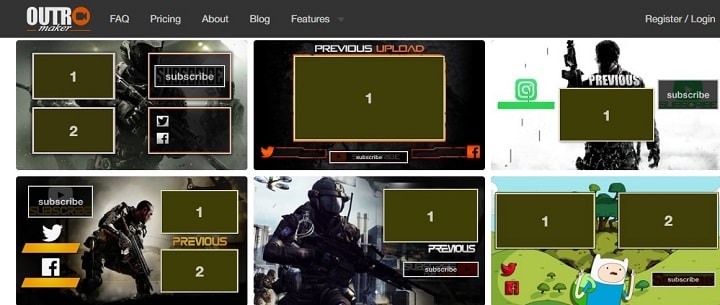
In spite of its pricey plans, Outro Maker continues to be more and more users due to its high genre of outro templates. Among the features included in this app are outro templates, YouTube mobile cards, and YouTube graphics.
To insert a Pokémon Go or animated cartoon background that rhymes with your videos, you have to register an account. Secondly, you must have a registered YouTube channel with videos. Lastly, subscribe to a paid plan.
3. MotionDen
Quick fact – MotionDen is an online into and outro maker. To create YouTube intro and outro without watermark, you have to first pay.
There are plenty of YouTube intro and outro templates for your marketing videos, showdown movies or hard sports videos. Only two pricing plans are available, namely $9.0/Video and $39/ month. Both plans produce HD intros and outros for YouTube and give access to directly publish to YouTube.
To start creating end screens, creating an account is a requirement. MotionDen has rich text editing features and direct typography to edit your logo.
4. Snappa
Quick fact- With Snappa as your YouTube outro maker, only 60 seconds are enough to create a professional high-quality outro.

This is the perfect YouTube outro maker online free with over a 5000+ outro template and million-plus royalty-free HD photos and graphics. Among the features it’s renowned for include, thousands of templates in different sizes, resizable graphics, a huge library of HD intros and outros and seamless integration with uploaded logos and custom fonts.
Most of the YouTube outro requirements like dimensions have been done for you. To access more features, subscribe to either the Pro plan for $10/month or the Team plan for $20/month.
5. Biteable
Quick fact- Biteable is a free online YouTube outro creator. It’s compatible with mobile phones and computers and is highly used by content marketing experts.

The clarity of the interface is enough to prove its simplicity and user-friendliness. The only requirement to use this app is registration. However, the free plan is limited to 10 projects per month, the basic content and 24/7 customer support. Its main limitation is any project under the free plan bears the Biteable watermark.
Biteable Youtube outro template download feature contains 85,000 Shutterstock clips. There are four optional pricing plans. The free plan with limited features, Starter Plan for $29/mo, Pro Plan for $29/mo and Unlimited Plan for $49/mo. You can also subscribe annually.
6. Tube Arsenal
Quick fact – Tube Arsenal is among the best HD intro and outro maker for YouTube. No monthly/annual subscription plans. Each outro template can be customized online.
Despite its high quality and professional templates, Tube Arsenal is suitable for both beginners and experts. Would you like to add the best YouTube outro songs to your videos? Select any intro or outro and on the customizing chart to the left, scroll to the bottom and click “Music”.
Some of the features include unlimited downloads, free downloads, online template customization and curated collection of intros and outros. Each outros’ price is determined by its resolution (720px for $9 and 180px for $11).
7. Animaker
Quick fact – Animaker takes cognizance of human creative ability. You can, therefore, create your own intro from scratch or edit the provided templates.

Animaker is among the world’s most used YouTube intro maker. It’s trusted by over 1000 big brands like Adidas, Google, UNICEF, and Uber. You can start with the free plan if it’s your first time then upgrade to the complex paid plans. The paid plans are Personal for $19/mo, Startup for $35/mo and Business for $59/mo.
There are many features to look out for in Animaker. Some include 50+ backgrounds YouTube intro music, over 175 sound effects, custom font support and pre-designed templates.
8. Video Jaguar
Quick fact – Video Jaguar is a cloud-based software used creating YouTube intros and outros. You can, therefore, use it from any location without downloading it.

This app’s outro maker interface comes equipped with easy to use features like full HD intro and outro templates, licensed music and text editor. There are also plenty of royalty-free photos.
Video Jaguar is majorly designed for marketers who specialize in video ads to grow their brand awareness.
You may also like: How to Convert YouTube to MP4 Safely? [Step by Step Guide] >>
Part 3: How To Make And Add Outro To YouTube Video
How to make a YouTube outro was comprehensively answered by the launch Filmora video editor. Why say Filmora? We all know how the best professional YouTube outros should look like, right? Go to the Filmora products page then click download. Among the features, you’ll find include transitions, backgrounds, effects, rich text editor and free audio and voiceover recorder among others.
Step 1: Start by downloading and installing Filmora on your Windows or Mac by clicking any of the below icons.
Step 2: Once it’s fully installed, double-click on the Filmora icon on your desktop to open a welcome screen for you to start a new project. Adjust the project aspect ratio to 16:9.
Step 3: Click the new project and wait for the software full interface to open. On the Filmora Filmstock page, search and select a YouTube outro template of your choice, download and save to your media.
Before importing the template, click “Sample Colours” to choose a color that rhymes with your video and set it as the background.
Click “Media” on the top menu and import your outro template to the timeline.
Step 4: Use the screen blind mode to edit the YouTube outro elements at the preview window. Also, you can select audio and add it as outro music for YouTube. Click “Title” to select your preferred font editor. Once you are done, export the outro to the media file.
Check this video tutorial. It’s very easy and simple to make a YouTube outro. Free to download the video maker and have a try now!
Part 4: How To Add An Outro To A Youtube Video
To understand the whole end screen process we will continue with the Filmora video editing procedure.
Step 1: Upload your video to the timeline and create a space for the video outro.
Step 2: Import the YouTube outro created earlier and drag it down to the timeline. Now that you have two imports on your timeline, drag the outro to the videos end section.

Step 3: Click “Export” to save or upload the video on YouTube. You now have your video with an end screen.
Part 5: Frequently Asked Questions about YouTube Outro

Best Websites for YouTube Outro Template Download
YouTube Outro templates are helping websites grow their revenue by setting pricing plans. Nevertheless, there are some websites with even better free outro templates for download. Here is a combination of both paid and free websites to download YouTube outros:
Best Websites to Find YouTube Outro Songs
Finding outro songs for YouTube is a bit challenging partly because not many YouTube outro makers have also songs on the website. Video creators also tend to use video audio in their end screens thereby reducing the demand for outro songs.
Despite their low demand, few websites continue to create YouTube outro songs like:
You may also like: 10 Best Sources to Download Free Outro Music [No Copyright] >>
Conclusion
We all wish to create YouTube videos that attract many viewers and eventually subscribers! To grow your YouTube channel, start adding outros to your videos before uploading them to YouTube. YouTube outro engages viewers for longer by clicking the suggested videos or helps grow the channel.
It’s not a surprise to find some of your videos with no outros despite the high number of free intro and outro YouTube makers. Use the above list to make a stunning outro for YouTube.
Was this guide helpful to you? Kindly share your comments or thoughts on the social media platforms on this site.
Richard Bennett
Richard Bennett is a writer and a lover of all things video.
Follow @Richard Bennett
Richard Bennett
Mar 27, 2024• Proven solutions
The key reason your YouTube videos have a hundred views a year after publication is because they lack good YouTube intro and outro.
How interactive is your YouTube channel? Or, what’s the bounce rate of your YouTube videos? As you answer this, you’ll realize how important YouTube outro is. Very few people know to add outro to YouTube videos is the best YouTube SEO technique.
In this guide, I’ll demystify what YouTube outro is and how to make outro and add it to a YouTube video. If you are not a tech expert, use intro and outro makers highlighted herein to make your videos as interactive pas possible.
To get a sneak preview of what is entailed here; this guide has been subdivided into five parts:
- Part 1: YouTube Outro Prerequisites
- Part 2: Best 8 Intro And Outro Makers For YouTube
- Part 3: How To Make And Add Outro To YouTube Video
- Part 4: How To Add An Outro To A Youtube Video
- Part 5: Frequently Asked Questions about YouTube Outro
Part 1: YouTube Outro Prerequisites
In this part, we will learn what outros for YouTube are, the importance of land that distinguishes them from the intro. Also included are expert tips on how to make YouTube outro that attracts a hundred thousand subscribers in seven days included.
To understand what YouTube outro is and why you should add it to your videos, here is a detailed explanation.
Section 1: What is a Youtube Outro?
YouTube outro aka end screen is the last part of a video with a call to action statement, button or video suggestion to view other YouTube videos. In other words, it’s the last part of a video with calls to action links.
One of the most effective technical methods of optimizing YouTube videos is by adding an outro. This helps attract huge traffic, increase conversion and engage viewers.
Why spend your time adding outro? You can add Outro to YouTube videos to direct viewers to your website, other selected videos, engage viewers for longer and to persuade them to subscribe to the channel. In short, most end screens have four elements incorporated into an outro: Channel, subscribe, Video playlist and a website link.
Section 2: Difference Between Outro and Intro
Most YouTube videos have an intro and an outro. In this case, an intro is a short clip at the beginning of a YouTube video that introduces you to the viewers and your brand.
Even though video creators attach more emphasis on intros, both are both very critical. For your videos to achieve meaningful results, it’s important to view each as distinct from the other. Equally important to know, both intros and outros have different purposes.
| Differences Between YouTube Intro And Outro | |
|---|---|
| Intro | Outro |
| Inserted at the begging of a video | Inserted at the end of a video |
| Used to capture audience attention | Directs the audience to the next step |
| Introduces the topic | Suggests new topics to viewers |
| Attract viewers to the video | Contains a call-action button |
| Showcases a brand, logo, business slogan or a statement mission |
Section 3: YouTube Outro Requirements
Just as their requirements for any video uploaded on YouTube, outros are no exception. For your outro to be interactive, observe the following requirements:
1. Outro Resolution
Outros for YouTube should have an aspect ratio of 16:9 and a resolution of 1920px X 1080px.
2. Outro Element Sizes and Dimensions
End screen templates comprise elements that are in different shapes and sizes. When using a YouTube outro size of 1920px X 1080px, here are the element dimensions to use:
- Subscribe – 294px X 294px
- Channel – 294px X 294px
- Website link - 294px X 294px
- Video playlist – 615px X 345px
3. Outro Length
If you want to make your outro boring, make it long. So, how long should YouTube outro be? For your outros to have a high conversation rate, they should be approximately 10-20 seconds long. However, the length of your video should be the determining factor. A one-hour YouTube video can have a longer outro.
Don’t be challenged by setting the above sizes because nearly all intro and outro makers have already set dimensions for the elements. The major requirements are done for you
Section 4: Best Practices When Making A YouTube Outro
Imagine given 10 seconds to showcase your YouTube channel and direct viewers on the next move without breaking the engagement! Different YouTube outros come in different styles; certainly a show of one’s degree of creativity.
At this point, you should be already be having the best outro maker in mind - Filmora. The below YouTube outro tips should coincide with the features of your selected outro maker.
- Be relevant
The featured elements should be related to the video. Adding irrelevant elements your outro will most likely make the viewer click away.
- Keep to your goals
The big question is; what do you want to achieve from the YouTube end screen? Draw your attention to the subject matter of that particular video, your channel or the product highlighted in the video. Try to align your thoughts with those of the viewer.
Every video creator wishes for the following goals, increasing your channel subscribers, sending traffic to another site, viewing more videos and sharing to social media. Each YouTube outro element should have its own goal.
- Simple, clear and easy to interpret
Your outro will be meaningless if the audience cannot take action due to the complexity of either the language used or the ambiguity of words used. Use colors that pop out the elements making them the center of focus. Make them clear and avoid anything distractive.
- Use similar outro templates
Apart from being a good method of branding your channel, using similar outro on your videos adds credibility. It is, therefore, a good practice to have the consistency of colors, elements, images, and logos.
It’s absolutely important to understand all the prerequisites related to YouTube outros. Make use of the tips and requirements explained above when making and adding YouTube end screens to achieve the best results.
Part 2: Best 8 Intro And Outro Makers For YouTube
If you are wondering how to make the best magnetic intro and converting outro for your YouTube videos, this is your best article for you. Whether it’s the free online intro maker or the YouTube outro maker free no watermark, just select one that suits you most from the below list.
1. Wondershare Filmora
Quick fact – Using Filmora as an outro maker, allows you to select your admired background and outro template.
Do you want to make HD YouTube intros and outros that will grow your channel? I recommend Wondershare Filmora.
This software has the simplest friendly interface that any new and expert video editor would understand easily. This is very important for you; to use the best intro or outro for your YouTube videos, download Filmora video editor to get access to Filmstock. There are plenty of free and editable YouTube intro and outro templates ready for download.
Filmora is an all in one YouTube outro maker: you can download intro and outro templates, edit, add to your YouTube video and publish to your channel. There are innumerable backgrounds, transitions and effects to make an outro that matches the video colors, speed, and theme.
2. Outromaker
Quick fact – Outromaker is highly preferred for adding YouTube end screens with animated backgrounds that are mobile-friendly.
In spite of its pricey plans, Outro Maker continues to be more and more users due to its high genre of outro templates. Among the features included in this app are outro templates, YouTube mobile cards, and YouTube graphics.
To insert a Pokémon Go or animated cartoon background that rhymes with your videos, you have to register an account. Secondly, you must have a registered YouTube channel with videos. Lastly, subscribe to a paid plan.
3. MotionDen
Quick fact – MotionDen is an online into and outro maker. To create YouTube intro and outro without watermark, you have to first pay.
There are plenty of YouTube intro and outro templates for your marketing videos, showdown movies or hard sports videos. Only two pricing plans are available, namely $9.0/Video and $39/ month. Both plans produce HD intros and outros for YouTube and give access to directly publish to YouTube.
To start creating end screens, creating an account is a requirement. MotionDen has rich text editing features and direct typography to edit your logo.
4. Snappa
Quick fact- With Snappa as your YouTube outro maker, only 60 seconds are enough to create a professional high-quality outro.
This is the perfect YouTube outro maker online free with over a 5000+ outro template and million-plus royalty-free HD photos and graphics. Among the features it’s renowned for include, thousands of templates in different sizes, resizable graphics, a huge library of HD intros and outros and seamless integration with uploaded logos and custom fonts.
Most of the YouTube outro requirements like dimensions have been done for you. To access more features, subscribe to either the Pro plan for $10/month or the Team plan for $20/month.
5. Biteable
Quick fact- Biteable is a free online YouTube outro creator. It’s compatible with mobile phones and computers and is highly used by content marketing experts.
The clarity of the interface is enough to prove its simplicity and user-friendliness. The only requirement to use this app is registration. However, the free plan is limited to 10 projects per month, the basic content and 24/7 customer support. Its main limitation is any project under the free plan bears the Biteable watermark.
Biteable Youtube outro template download feature contains 85,000 Shutterstock clips. There are four optional pricing plans. The free plan with limited features, Starter Plan for $29/mo, Pro Plan for $29/mo and Unlimited Plan for $49/mo. You can also subscribe annually.
6. Tube Arsenal
Quick fact – Tube Arsenal is among the best HD intro and outro maker for YouTube. No monthly/annual subscription plans. Each outro template can be customized online.
Despite its high quality and professional templates, Tube Arsenal is suitable for both beginners and experts. Would you like to add the best YouTube outro songs to your videos? Select any intro or outro and on the customizing chart to the left, scroll to the bottom and click “Music”.
Some of the features include unlimited downloads, free downloads, online template customization and curated collection of intros and outros. Each outros’ price is determined by its resolution (720px for $9 and 180px for $11).
7. Animaker
Quick fact – Animaker takes cognizance of human creative ability. You can, therefore, create your own intro from scratch or edit the provided templates.
Animaker is among the world’s most used YouTube intro maker. It’s trusted by over 1000 big brands like Adidas, Google, UNICEF, and Uber. You can start with the free plan if it’s your first time then upgrade to the complex paid plans. The paid plans are Personal for $19/mo, Startup for $35/mo and Business for $59/mo.
There are many features to look out for in Animaker. Some include 50+ backgrounds YouTube intro music, over 175 sound effects, custom font support and pre-designed templates.
8. Video Jaguar
Quick fact – Video Jaguar is a cloud-based software used creating YouTube intros and outros. You can, therefore, use it from any location without downloading it.
This app’s outro maker interface comes equipped with easy to use features like full HD intro and outro templates, licensed music and text editor. There are also plenty of royalty-free photos.
Video Jaguar is majorly designed for marketers who specialize in video ads to grow their brand awareness.
You may also like: How to Convert YouTube to MP4 Safely? [Step by Step Guide] >>
Part 3: How To Make And Add Outro To YouTube Video
How to make a YouTube outro was comprehensively answered by the launch Filmora video editor. Why say Filmora? We all know how the best professional YouTube outros should look like, right? Go to the Filmora products page then click download. Among the features, you’ll find include transitions, backgrounds, effects, rich text editor and free audio and voiceover recorder among others.
Step 1: Start by downloading and installing Filmora on your Windows or Mac by clicking any of the below icons.
Step 2: Once it’s fully installed, double-click on the Filmora icon on your desktop to open a welcome screen for you to start a new project. Adjust the project aspect ratio to 16:9.
Step 3: Click the new project and wait for the software full interface to open. On the Filmora Filmstock page, search and select a YouTube outro template of your choice, download and save to your media.
Before importing the template, click “Sample Colours” to choose a color that rhymes with your video and set it as the background.
Click “Media” on the top menu and import your outro template to the timeline.
Step 4: Use the screen blind mode to edit the YouTube outro elements at the preview window. Also, you can select audio and add it as outro music for YouTube. Click “Title” to select your preferred font editor. Once you are done, export the outro to the media file.
Check this video tutorial. It’s very easy and simple to make a YouTube outro. Free to download the video maker and have a try now!
Part 4: How To Add An Outro To A Youtube Video
To understand the whole end screen process we will continue with the Filmora video editing procedure.
Step 1: Upload your video to the timeline and create a space for the video outro.
Step 2: Import the YouTube outro created earlier and drag it down to the timeline. Now that you have two imports on your timeline, drag the outro to the videos end section.
Step 3: Click “Export” to save or upload the video on YouTube. You now have your video with an end screen.
Part 5: Frequently Asked Questions about YouTube Outro
Best Websites for YouTube Outro Template Download
YouTube Outro templates are helping websites grow their revenue by setting pricing plans. Nevertheless, there are some websites with even better free outro templates for download. Here is a combination of both paid and free websites to download YouTube outros:
Best Websites to Find YouTube Outro Songs
Finding outro songs for YouTube is a bit challenging partly because not many YouTube outro makers have also songs on the website. Video creators also tend to use video audio in their end screens thereby reducing the demand for outro songs.
Despite their low demand, few websites continue to create YouTube outro songs like:
You may also like: 10 Best Sources to Download Free Outro Music [No Copyright] >>
Conclusion
We all wish to create YouTube videos that attract many viewers and eventually subscribers! To grow your YouTube channel, start adding outros to your videos before uploading them to YouTube. YouTube outro engages viewers for longer by clicking the suggested videos or helps grow the channel.
It’s not a surprise to find some of your videos with no outros despite the high number of free intro and outro YouTube makers. Use the above list to make a stunning outro for YouTube.
Was this guide helpful to you? Kindly share your comments or thoughts on the social media platforms on this site.
Richard Bennett
Richard Bennett is a writer and a lover of all things video.
Follow @Richard Bennett
Also read:
- Generating an Auto-Subscribe Link for YouTube
- A Comprehensive Guide to Maximizing Channels' Earnings Through Trailers
- Unlock Video Potential Premium Lens Selection Tips
- [Updated] Earnings Expedition Navigating Your Way to Wealth with YouTube Mobile Content
- Top Tricks Making Powerful YT Thumbnails
- [New] How Do Beginners Make a Cool Video for YouTube on Mac
- Engaging Emojis Boost Your Video's Appeal Without Payments
- Dealing with YouTube's Challenging Earnings Model
- Choosing the Right Lights & Cameras for YouTube Videos
- In 2024, Downloading the Latest Tracks A Guide to Free Extractors for PC Users
- Highly Compensated Online Visionary Creator
- YouTube Stream Mastery Top-Rated Tech & Devices Guide for Creators
- Cut Down to Size Ranking the Best YouTube Video Editors
- [New] Designing a Memorable YouTube Sign-Off
- [New] 10 Ultimate Immersive VR Video Hits
- [New] Cutting-Edge Cosmetics Influential YouTubers of 2024
- Elevate Video Engagement Top 7 Free Thumbnail Design Tools
- Stand Out Creating Unique Thumbnails for Your YouTube Videos
- [Updated] Complete Walkthrough to Grab YouTube Playlists
- [New] Crafting Collabs that Attract and Retain Viewers
- Swiftly Switch Songs in YT Playlist, Here's How
- 2024 Approved Collaborative Video Workflows for Content Growth
- Mysterious Marvels YouTube's Greatest Magic Tricks Edited!
- Channel Branding Hacks 10 Must-Use Online Tools for 2024
- In 2024, Effortless Offline Access Best YouTube Playlist Downloaders
- Transforming Smartphone Videos Into Earnings A 2024 Guide to Monetization
- Breaking Into the World of YouTube Stellar Intros in iMovie for 2024
- In 2024, Breaking Down Barriers to Inaccessible YouTube Content
- [New] Earth’s Premier Online Income Tycoon
- Top-Tier Free Video Editing Software Guide for iPhone/iPad Users
- Cut to Perfection 10 Premier Online Video Editors Ranked for 2024
- Educational Journey Through Time with Top History YT Channels
- How to Block Youtube Channels on Computer and Mobile Phones
- 10 Top-Rated Digital Video Cutting Tools
- 2024 Approved Breaking Down Barriers with Shared YouTube Curations
- [Updated] Essential Guide to Aspect Ratios for Effective YouTube Engagement
- [New] Buy YouTube Subscribers - Hundreds of Subscribers for $5?
- [New] Boost Views with Smart YouTube Backlink Tactics
- Boosting Subscriber Commitment Top Strategies for Keeping Viewers Coming Back on YouTube
- [New] DIY Video Setups Perfect Self-Portraits for YouTubers
- A Practical Pathway for Profit Tracking The Straightforward Steps to Analyze YouTube Earnings
- [Updated] Reflect & Record Capture Your Window World
- [Updated] The Ultimate Playbook of IGTV Mastery Top 10 Branding Techniques for 2024
- [New] 2024 Approved Essential Insights Into Using Discord
- [Updated] In 2024, Top 10 Terraria Game Boosters
- Dose Life360 Notify Me When Someone Checks My Location On Samsung Galaxy S23? | Dr.fone
- 2024 Approved Best Discord Alternatives You Should Try
- [New] 2024 Approved Twitch Livestream Hacks to Boost Engagement and Followers
- [New] Navigating iMovie Video Submissions to Vimeo for 2024
- [New] 2024 Approved Top 5 Solutions to OBS Studio Video Editing
- [New] In 2024, Download Pc Sound Logger - X-Recorder App
- How To Revive Your Bricked Infinix Hot 40i in Minutes | Dr.fone
- Sound Engineering Simplified Gradual Diminishment in Lumafusion
- Top 5 Car Locator Apps for Oppo Reno 11F 5G | Dr.fone
- Updated The Ultimate List of Free Face Generator Websites
- Updated Free Online Face Makers Design Your Own Virtual Visage for 2024
- [New] In 2024, Explore 10 Open Source Teleconference Applications
- Things You Dont Know About Honor 90 Lite Reset Code | Dr.fone
- [Updated] Tweet Town Ranking the Trending Threads for 2024
- [Updated] In 2024, Correcting OBS Darkness During Live Streams
- Everything You Need To Know About Unlocked Apple iPhone 6 Plus | Dr.fone
- In 2024, How does the stardust trade cost In pokemon go On Oppo A79 5G? | Dr.fone
- Unlock Efficient Typing Top Mac Speech-to-Text Software with No Installation Required
- [Updated] Ultimate Shooter Showdown - Our Best Picks
- How to Separate Audio From Video in iMovie on Mac?
- Best Android Data Recovery - Undelete Lost Messages from Lava Agni 2 5G
- [New] Maintain Proper Aspect Ratio for Tweeted Movies for 2024
- Apple iPhone 15 Backup Password Never Set But Still Asking? Heres the Fix
- New Green Screen Magic Top 10 Free Apps for Android and iOS Updated List for 2024
- Revolutionary Approaches for Rapid SRT to Text Switch
- Essential Hacks for the Elusive iPhone X Users
- In 2024, Delete Gmail Account With/Without Password On Infinix Hot 40 Pro
- Catch or Beat Sleeping Snorlax on Pokemon Go For Apple iPhone 7 | Dr.fone
- How to Upgrade iPhone SE to the Latest iOS/iPadOS Version? | Dr.fone
- [New] 2024 Approved CostlessCapture Revolutionizing How You Record Play
- [Updated] 2024 Approved Unleash Your Potential with These TikTokers
- Updated Unbiased Review How to Use Filmora for Free Without Risks
- In 2024, Building a Unique Presence When Overshadowed by Influencers
- [New] 2024 Approved Essential Apps for Professional Video Editing on Android/PC
- 2024 Approved Streamlining Video Workflow Capture, Save, Refine Using Adobe Connect
- Want to Uninstall Google Play Service from Realme 11 Pro? Here is How | Dr.fone
- Title: "2024 Approved Detailed Steps to Supercharge Your YouTube Audio Content"
- Author: Kevin
- Created at : 2024-05-25 14:26:47
- Updated at : 2024-05-26 14:26:47
- Link: https://youtube-videos.techidaily.com/2024-approved-detailed-steps-to-supercharge-your-youtube-audio-content/
- License: This work is licensed under CC BY-NC-SA 4.0.
