
:max_bytes(150000):strip_icc()/fullscreenopen-b2ead701237e4e49ad80f4de91bd5be5.jpeg)
"2024 Approved Cut Through the Noise with These Top 10 YT Short Standout Strategies"
Cut Through the Noise with These Top 10 YT Short Standout Strategies
10 Expert Suggestions to Make Your YT Shorts Stand Out

Shanoon Cox
Oct 26, 2023• Proven solutions
To make it easier for its audience to find crisp and entertaining content, YouTube has recently come up with a dedicated “Shorts” feature.
Ideally, any YouTube user can find the Shorts option on the app to watch interesting videos of 60 seconds or less. Though, it might take a lot of effort to make your YouTube Shorts videos appealing.
If you also want to go viral, then get to know about these YouTube Shorts tips that every content creator should follow.
YouTube Shorts Feature and Shorts Fund: Things to Know
Before we make you familiar with all kinds of YouTube Shorts tips and tricks, let’s cover some basics. Ideally, YouTube has recently come up with the Shorts feature to focus on short-length videos (and to rival Instagram Reels and TikTok).
You can now find the Shorts icon at the bottom panel on the YouTube app. Using it, you can watch or record short videos on YouTube easily. These are short-form clips of 60 seconds or less that you can create via the Shorts interface of the YouTube app.
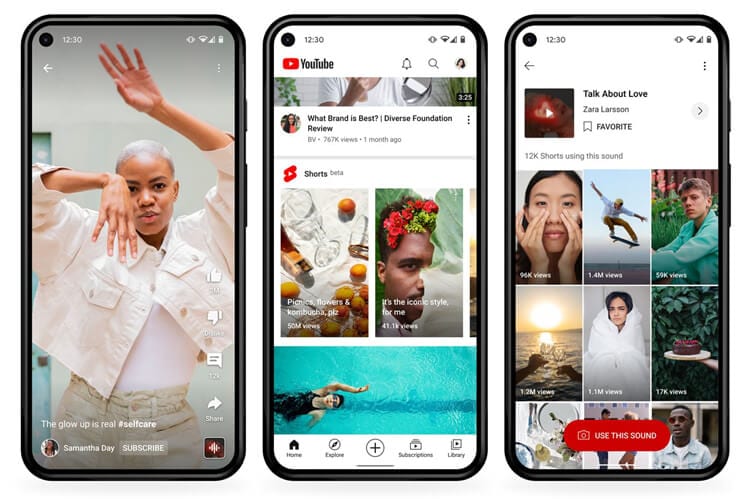
The interface would let you record multiple videos at different intervals and add sound to your clips as well. Later, you can post these short clips on your channel to get more views on YouTube.
YouTube Shorts Fund
YouTube Shorts already hosts a massive number of more than 6 billion daily views as of now. To promote it, Google has come up with a YouTube Shorts Fund of $100M that would be rewarded to various content creators each month.
That is, a “Shorts Bonus” would be added to the account of content creators to appreciate their viral content.
Top 10 Tips for YouTube Shorts That You Must Follow
Now when we have covered all the basics, let’s get to know about some effective YouTube Shorts tricks that would help you come up with interesting content and get more audience for it.
Tip 1: Learn How to Shoot YouTube Shorts
Before you start posting videos on YouTube Shorts, you should know how the feature works. Ideally, you can find a dedicated option for Shorts from the bottom panel on the updated YouTube app. From here, you can watch Shorts or simply choose to create them as well.
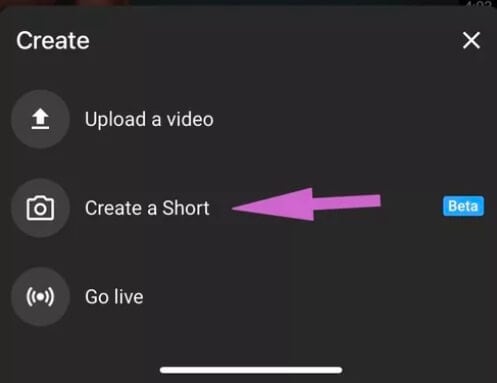
You can give YouTube access to your smartphone camera before you start recording. To record anything, you can just tap and hold the red button (the recording icon) on the interface.
As you would release it, the recording would be stopped. In this way, you can seamlessly move from one scene to another without worrying about editing in post-production.
Tip 2: Stick to a Selective Niche
To have a consistent growth of audience on YouTube shorts, you should stick to a specific niche. If you search on YouTube, you can find short videos related to funny, inspirational, fitness, romantic, and all kinds of niches.
Most of the prominent content creators already apply these YouTube Shorts tips in which they first identify their target audience. Based on that, you can work on the type of content that you want to create and share to attain consistent growth on YouTube.
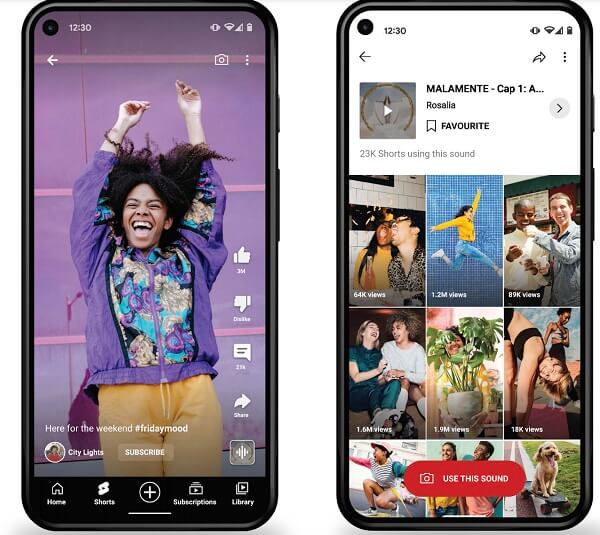
Tip 3: Add Appropriate Background Music to Your Short Videos
One of the best things about YouTube Shorts is that it lets us add a snippet of the music in the background, according to our content. Therefore, you must implement these tips for YouTube Shorts to make the most of this free feature of the app.
After recording your videos, you can tap on the “Sound” or the “Add Music” feature from the interface.
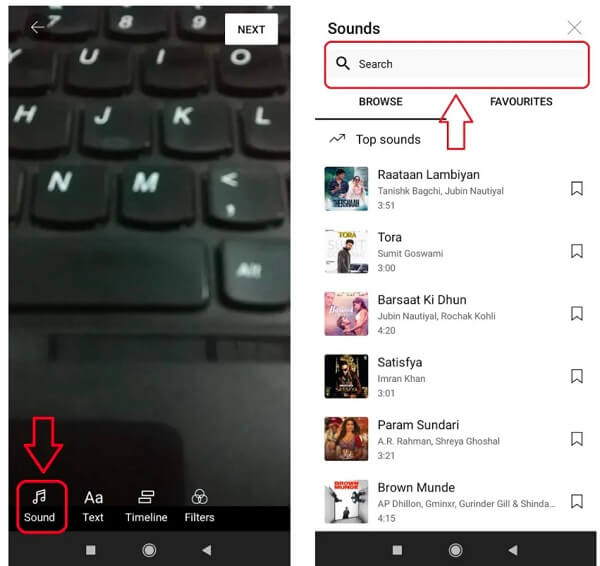
Now, YouTube will automatically load all kinds of trending music that you can use for free. If you want, you can enter the name of any song on the search option of YouTube shorts.
As you would select a track, it will automatically be loaded as the background music for your video. Though, you can also select a specific segment of the track and clip it accordingly to place it on your videos the way you like.
Tip 4: Insert Captions and Text Effects on Your Shorts
Apart from music, you can also add all kinds of text effects to make your YouTube Shorts videos appealing. After you have recorded a video, you can just tap on the text option from the bottom/side panel of the app.
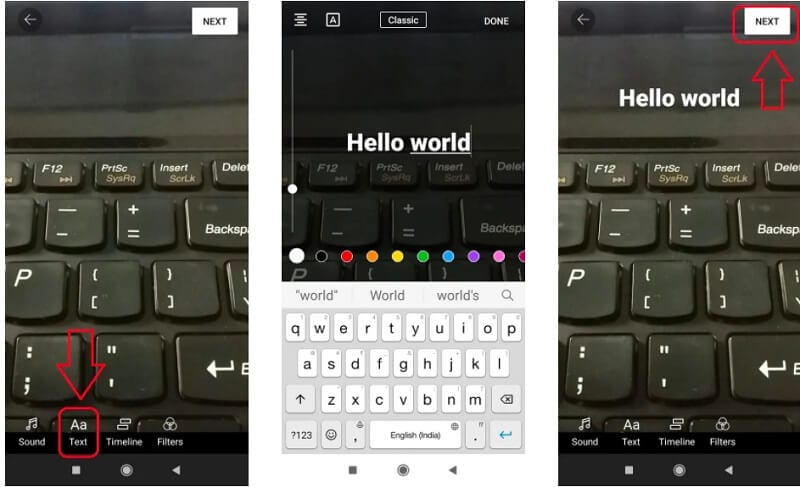
You can now type anything and place it on the video to make it more interesting. If you want, you can also implement these YouTube Shorts tips to add subtitles or pre/post video captions without any hassle.
Tip 5: Adjust the Playback Speed of YouTube Shorts
Since a lot of content creators are coming up with YouTube Shorts, you would have to walk an extra mile to make them more appealing. In these YouTube Shorts tricks, I would recommend adjusting the playback speed of the video.
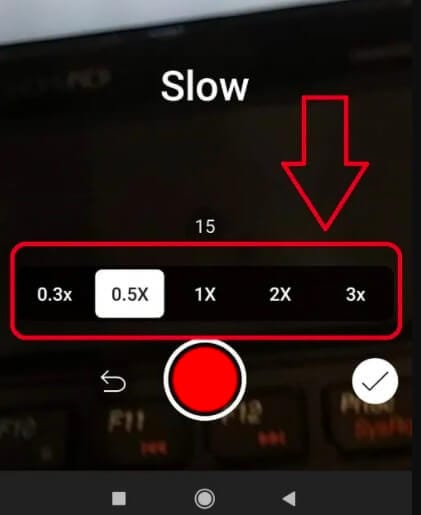
After recording the video, you can tap on the speed icon from the bottom/side panel. Here, you can make your videos play in slow motion or fast forward (in a range of 0.3x to 3x). This will add seamless speed control features to your videos without any technical issues.
Tip 6: Consider the Overall Length of Your Shorts Video
Even though the maximum length of the YouTube Shorts videos is 60 seconds, you don’t have to make it so long. If you look at most of the popular videos on YouTube Shorts, then you will find that they are of less than 30 seconds in length.
Remember, your goal is to come up with crisp and interesting content via YouTube Shorts. To implement these YouTube Shorts tips, you can consider the ideal length of 30-45 seconds and only have essential content in your videos.
Tip 7: Use the Timer Feature to Shoot Your Videos Correctly
A lot of people make the rookie mistake of shooting their videos for too long in Shorts. Therefore, if you want to implement these YouTube Shorts tips and tricks, then consider using the timer feature of the app.

Before shooting the video, you can tap on the timer button from the bottom and set up a preferred duration for it (like 10 or 15 seconds). In this way, you can be sure that you won’t go overboard and keep your videos short automatically.
Tip 8: Set a Preferred Target Audience for YouTube Shorts
Great! Now when you have recorded and edited your video by applying these tips for YouTube Shorts, you are ready to post them. While posting your videos, you would be asked whether the video is targeted at kids or not. If the video is made for kids, then you should select the relevant prompt, as YouTube would improve the overall visibility of your videos in this case.
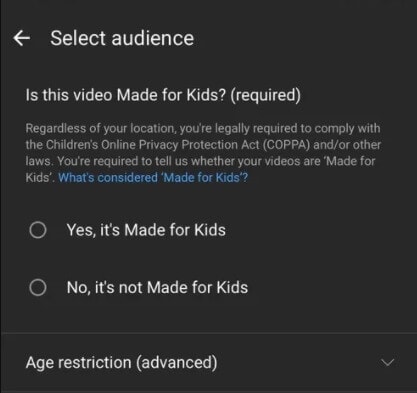
Though, if your videos are targeted at adults, then you should go with the second option instead. This would help you reach out to your target audience on YouTube easily.
Tip 9: Post Your YouTube Shorts the Right Way
Apart from setting the audience preferences of your YouTube Shorts videos, you should also take care of a couple of other things. For instance, you can consider making the visibility of your final video “Public” so that anyone on YouTube can watch it.
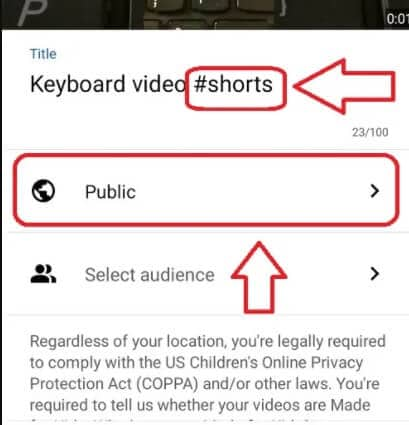
Besides that, it is also recommended to have the keyword “#Shorts” in the title of the video. You can also make the title of the video attractive and can even add a short description that would make your audience click on your YouTube video for sure.
Tip 10: Promote Your YouTube Shorts Video on Other Places
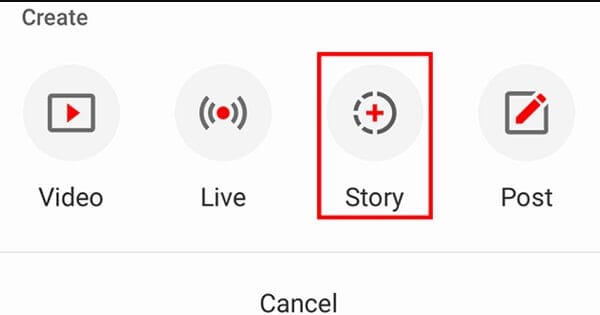
Lastly, posting the YouTube Shorts video is not enough, as you should also promote it to get more views. One of the best YouTube Shorts tips for promotion would be posting the snippet of the video as your Stories on YouTube.
You can also post your YouTube Shorts on other popular social media platforms like Facebook, Twitter, Reddit, WhatsApp, Instagram, etc. by sharing their link. In this way, you can easily redirect your audience from other platforms and increase the visibility of your video.
Bonus Tip: Use a Professional Editor for Your YouTube Shorts Videos
As you can see after going through these YouTube Shorts tricks that the native tool of the app has limited editing options. Therefore, if you want to come up with better videos, then consider using a professional tool like Wondershare Filmora.


The desktop video editing tool has hundreds of filters, transitions, captions, stickers, and other effects to elevate the overall visual appeal of your videos. You can also access numerous AI-integrated features in Filmora and can directly export your videos in YouTube-compatible formats.
Conclusion
That’s a wrap, everyone! I’m sure that after following these expert YouTube Shorts tips and tricks, you can make the most of this newly added YouTube feature. You can consider following the above-listed YouTube Shorts tips to record your videos and make them interesting by adding sound and caption effects.
Though, if you want to make your videos even more appealing, then consider using a reliable and smart video editor like Wondershare Filmora.
Shanoon Cox
Shanoon Cox is a writer and a lover of all things video.
Follow @Shanoon Cox
Shanoon Cox
Oct 26, 2023• Proven solutions
To make it easier for its audience to find crisp and entertaining content, YouTube has recently come up with a dedicated “Shorts” feature.
Ideally, any YouTube user can find the Shorts option on the app to watch interesting videos of 60 seconds or less. Though, it might take a lot of effort to make your YouTube Shorts videos appealing.
If you also want to go viral, then get to know about these YouTube Shorts tips that every content creator should follow.
YouTube Shorts Feature and Shorts Fund: Things to Know
Before we make you familiar with all kinds of YouTube Shorts tips and tricks, let’s cover some basics. Ideally, YouTube has recently come up with the Shorts feature to focus on short-length videos (and to rival Instagram Reels and TikTok).
You can now find the Shorts icon at the bottom panel on the YouTube app. Using it, you can watch or record short videos on YouTube easily. These are short-form clips of 60 seconds or less that you can create via the Shorts interface of the YouTube app.
The interface would let you record multiple videos at different intervals and add sound to your clips as well. Later, you can post these short clips on your channel to get more views on YouTube.
YouTube Shorts Fund
YouTube Shorts already hosts a massive number of more than 6 billion daily views as of now. To promote it, Google has come up with a YouTube Shorts Fund of $100M that would be rewarded to various content creators each month.
That is, a “Shorts Bonus” would be added to the account of content creators to appreciate their viral content.
Top 10 Tips for YouTube Shorts That You Must Follow
Now when we have covered all the basics, let’s get to know about some effective YouTube Shorts tricks that would help you come up with interesting content and get more audience for it.
Tip 1: Learn How to Shoot YouTube Shorts
Before you start posting videos on YouTube Shorts, you should know how the feature works. Ideally, you can find a dedicated option for Shorts from the bottom panel on the updated YouTube app. From here, you can watch Shorts or simply choose to create them as well.
You can give YouTube access to your smartphone camera before you start recording. To record anything, you can just tap and hold the red button (the recording icon) on the interface.
As you would release it, the recording would be stopped. In this way, you can seamlessly move from one scene to another without worrying about editing in post-production.
Tip 2: Stick to a Selective Niche
To have a consistent growth of audience on YouTube shorts, you should stick to a specific niche. If you search on YouTube, you can find short videos related to funny, inspirational, fitness, romantic, and all kinds of niches.
Most of the prominent content creators already apply these YouTube Shorts tips in which they first identify their target audience. Based on that, you can work on the type of content that you want to create and share to attain consistent growth on YouTube.
Tip 3: Add Appropriate Background Music to Your Short Videos
One of the best things about YouTube Shorts is that it lets us add a snippet of the music in the background, according to our content. Therefore, you must implement these tips for YouTube Shorts to make the most of this free feature of the app.
After recording your videos, you can tap on the “Sound” or the “Add Music” feature from the interface.
Now, YouTube will automatically load all kinds of trending music that you can use for free. If you want, you can enter the name of any song on the search option of YouTube shorts.
As you would select a track, it will automatically be loaded as the background music for your video. Though, you can also select a specific segment of the track and clip it accordingly to place it on your videos the way you like.
Tip 4: Insert Captions and Text Effects on Your Shorts
Apart from music, you can also add all kinds of text effects to make your YouTube Shorts videos appealing. After you have recorded a video, you can just tap on the text option from the bottom/side panel of the app.
You can now type anything and place it on the video to make it more interesting. If you want, you can also implement these YouTube Shorts tips to add subtitles or pre/post video captions without any hassle.
Tip 5: Adjust the Playback Speed of YouTube Shorts
Since a lot of content creators are coming up with YouTube Shorts, you would have to walk an extra mile to make them more appealing. In these YouTube Shorts tricks, I would recommend adjusting the playback speed of the video.
After recording the video, you can tap on the speed icon from the bottom/side panel. Here, you can make your videos play in slow motion or fast forward (in a range of 0.3x to 3x). This will add seamless speed control features to your videos without any technical issues.
Tip 6: Consider the Overall Length of Your Shorts Video
Even though the maximum length of the YouTube Shorts videos is 60 seconds, you don’t have to make it so long. If you look at most of the popular videos on YouTube Shorts, then you will find that they are of less than 30 seconds in length.
Remember, your goal is to come up with crisp and interesting content via YouTube Shorts. To implement these YouTube Shorts tips, you can consider the ideal length of 30-45 seconds and only have essential content in your videos.
Tip 7: Use the Timer Feature to Shoot Your Videos Correctly
A lot of people make the rookie mistake of shooting their videos for too long in Shorts. Therefore, if you want to implement these YouTube Shorts tips and tricks, then consider using the timer feature of the app.
Before shooting the video, you can tap on the timer button from the bottom and set up a preferred duration for it (like 10 or 15 seconds). In this way, you can be sure that you won’t go overboard and keep your videos short automatically.
Tip 8: Set a Preferred Target Audience for YouTube Shorts
Great! Now when you have recorded and edited your video by applying these tips for YouTube Shorts, you are ready to post them. While posting your videos, you would be asked whether the video is targeted at kids or not. If the video is made for kids, then you should select the relevant prompt, as YouTube would improve the overall visibility of your videos in this case.
Though, if your videos are targeted at adults, then you should go with the second option instead. This would help you reach out to your target audience on YouTube easily.
Tip 9: Post Your YouTube Shorts the Right Way
Apart from setting the audience preferences of your YouTube Shorts videos, you should also take care of a couple of other things. For instance, you can consider making the visibility of your final video “Public” so that anyone on YouTube can watch it.
Besides that, it is also recommended to have the keyword “#Shorts” in the title of the video. You can also make the title of the video attractive and can even add a short description that would make your audience click on your YouTube video for sure.
Tip 10: Promote Your YouTube Shorts Video on Other Places
Lastly, posting the YouTube Shorts video is not enough, as you should also promote it to get more views. One of the best YouTube Shorts tips for promotion would be posting the snippet of the video as your Stories on YouTube.
You can also post your YouTube Shorts on other popular social media platforms like Facebook, Twitter, Reddit, WhatsApp, Instagram, etc. by sharing their link. In this way, you can easily redirect your audience from other platforms and increase the visibility of your video.
Bonus Tip: Use a Professional Editor for Your YouTube Shorts Videos
As you can see after going through these YouTube Shorts tricks that the native tool of the app has limited editing options. Therefore, if you want to come up with better videos, then consider using a professional tool like Wondershare Filmora.
The desktop video editing tool has hundreds of filters, transitions, captions, stickers, and other effects to elevate the overall visual appeal of your videos. You can also access numerous AI-integrated features in Filmora and can directly export your videos in YouTube-compatible formats.
Conclusion
That’s a wrap, everyone! I’m sure that after following these expert YouTube Shorts tips and tricks, you can make the most of this newly added YouTube feature. You can consider following the above-listed YouTube Shorts tips to record your videos and make them interesting by adding sound and caption effects.
Though, if you want to make your videos even more appealing, then consider using a reliable and smart video editor like Wondershare Filmora.
Shanoon Cox
Shanoon Cox is a writer and a lover of all things video.
Follow @Shanoon Cox
Step Into the Spectrum: Incorporating Neons in Video Summaries
Your YouTube video, or any other clip published on any forum, gets a larger number of hits if it has an attractive thumbnail. And, the fact is, a thumbnail becomes 10x more attractive when the main character that the image has have a neon border around it.
With that said, in the following sections, you will learn a couple of methods on how to add a YouTube thumbnail border around the main characters and/or objects that are significant to the clip.
In this article
01 Add Glowing Neon Border to YouTube Thumbnail with Filmora
02 Add a Glowing Neon Border in YouTube Thumbnail with Canva
03 Outline a Person in a YouTube Thumbnail with Photoshop
Part 1: How to Add Neon Border to YouTube Thumbnail for Free with Filmora
Being one of the most versatile and intuitive post-production tools available in the market today, Wondershare Filmora X allows you to add a neon border to a YouTube thumbnail quite conveniently. You can learn how to get this done on Windows or Mac by following the steps given below.
For Win 7 or later (64-bit)
For macOS 10.12 or later
Step 1: Define Project Settings and Add Image to the Timeline
Launch Wondershare Filmora X on your PC (a MacBook Pro M1 is used here), ensure that the project aspect ratio is set to 16:9 (Widescreen) on the splash screen, and click New Project. On the main interface, click the Preview quality and display settings icon from the upper-right area of the Timeline, click Change Project Aspect Ratio, click to select 1280 x 720 (HD) from the Resolution menu of the Project Settings box, and click OK to save the custom project settings.

Then select My Media from the menu bar if not already selected, click Project Media from the navigation pane, and click Import from the Media box to select and import the image of the main character or object that you want to use in the thumbnail.

Now, drag the image from the Media box to the Timeline at the bottom.

Step 2: Clear Image Background, Add Border, and Add Custom Background
Go to Effects from the menu bar, click to select the Default tab and then AI Portrait from the navigation pane, and click and drag the Human Segmentation preset from the right box, and place it over the image track in the Timeline.

Double-click the image layer, scroll down the upper-left box to the Video Effects section, and use the Edge Thickness and Edge Feather sliders to adjust the character’s edges to make them as realistic as possible. Click OK when done.

Next, click and drag the Human Border preset over the image track in the Timeline, and follow the same procedure to customize the border. This will give the character a neon border effect.

Now, use the method explained earlier to import a custom image for the background, and drag and place it under the previous track in the Timeline.

If you are running the latest version of Filmora, you will find there are some neon light effects available under AI Portrait as well.

Step 3: Add Titles to Thumbnail
Go to Titles from the menu bar, click to select the Default tab and then Lower 3rds from the navigation pane, and click and drag your preferred lower-third preset from the right window to a separate layer in the Timeline. Double-click the lower-third layer, and use the available options in the upper-left window to change the text, its color, etc., and drag the textbox to place it to your preferred position on the image as well. Click OK to save the changes.
Next, click to select Titles from the navigation pane, and drag your preferred title from the right window to the upper-most track in the Timeline. Now use the method explained earlier to edit the text, its color, position, etc. to make it look professional.

For more tips and tricks for creating YouTube thumbnail, you can check this You Tube thumbnail creating guide.
Step 4: Get the Neon Border Thumbnail
Click the Snapshot (Camera) icon from the upper-right area of the Timeline, go to My Media from the menu bar, right-click the thumbnail of the screenshot you captured, and click Reveal in Finder (on Mac) or Reveal in Explorer (on Windows) to get to the folder the YouTube thumbnail border is saved in.

Part 2: How to Add a Glowing Neon Border in Your YouTube Thumbnail with Canva
Canva is another intuitive editing program that works on the web interface rather than having you download and install an app on your PC. You can add a neon border for YouTube thumbnails using Canva by following the instructions given below:
Step 1: Define Project Settings and Add a Background
After signing in to your Canva account, click Create a design from the top-right corner of the page, click Custom size from the bottom, define 1280 and 720 in the Width and Height fields on the box that appears respectively, and click Create new design.

Now, click to select Background from the navigation bar on the left (if the Background tool is not visible, click More and then choose Background from the expanded list), and click to select a background from the images available in the center pane.

Step 2: Upload an Image and Add Effects
Click Uploads from the navigation bar, click the More icon from the right of the Upload media button present at the top of the center pane, choose your preferred method to upload the image (with the transparent background) that you want to use, upload the image, and drag it from the center pane to the Canvas.
Note: You can use any of the tools available online to remove the background from your image for free.

To add a YouTube thumbnail border, make sure that the image that you added to the Canvas is selected, click the Duplicate icon from the upper-right area, and use the scaling handles of the copy of the image to increase its size a bit. Reposition the image back to its original location as well.
Then, click Edit image from the upper-left corner of the Canvas, click Duotone from the Edit image pane at the center, if need be, click See all, choose your preferred duotone effect to apply on the image, choose your preferred highlight and shadow colors from the box that appears next, and click Back from the top of the pane.

Next, click See all next to the Adjust section from the center pane, and drag the Blur slider to the right to increase the blur effect on the image.

Step 3: Position the Layers
While keeping the duplicate image selected, click the Position button from the upper-right area of the Canvas, and click Background to send the second image behind the first one to get the neon border effect for the photo.

Part 3: How to Outline a Person in a YouTube Thumbnail with Photoshop
Because YouTube thumbnails are nothing but static images, creating YouTube thumbnail border with Adobe Photoshop is comparatively easier. The process of doing this is given below:
Step 1: Define Document Preferences and Import an Image
Launch Adobe Photoshop on your PC, click Create new, and on the New Document customization box, define the width and height values to 1280 and 720 pixels respectively. Select Transparent from the Background Contents menu as well if not already selected. Click Create from the bottom to create a new Photoshop document with the specified document settings. Next, open the folder that contains the source image, drag the photo to Photoshop, and press Enter to place the photo.

Step 2: Remove Background from the Image
Make sure that the image layer is selected in the Layers panel on the right, go to Select from the menu bar at the top, and click Subject. From the bottom of the Layers panel, click the Add a mask icon to get rid of the background, leaving only the human on the Canvas.

Step 3: Add a Custom Background and an Outline Around the Subject
Use the method explained earlier to import a background image of your choice to Photoshop. Drag the background image layer to the bottom in the Layers panel. Double-click the masked layer, click to select Stroke from the left pane of the Layer Style box, and use the options available on the right to manage the size, color, position, etc. of the stroke that has been added around the human subject. Click OK when done, and then export the image normally to use it as a YouTube thumbnail border.

Summary
It is important to know that the default resolution of a YouTube thumbnail is 1280 x 720 pixels that is usually written and referred to as 720p. While adding a YouTube thumbnail border, it is also imperative to have a good sense of color combination and fonts. Furthermore, a decent tool like Wondershare Filmora X must be used to add an appealing neon border around the main subject in the thumbnail image easily and quickly.
02 Add a Glowing Neon Border in YouTube Thumbnail with Canva
03 Outline a Person in a YouTube Thumbnail with Photoshop
Part 1: How to Add Neon Border to YouTube Thumbnail for Free with Filmora
Being one of the most versatile and intuitive post-production tools available in the market today, Wondershare Filmora X allows you to add a neon border to a YouTube thumbnail quite conveniently. You can learn how to get this done on Windows or Mac by following the steps given below.
For Win 7 or later (64-bit)
For macOS 10.12 or later
Step 1: Define Project Settings and Add Image to the Timeline
Launch Wondershare Filmora X on your PC (a MacBook Pro M1 is used here), ensure that the project aspect ratio is set to 16:9 (Widescreen) on the splash screen, and click New Project. On the main interface, click the Preview quality and display settings icon from the upper-right area of the Timeline, click Change Project Aspect Ratio, click to select 1280 x 720 (HD) from the Resolution menu of the Project Settings box, and click OK to save the custom project settings.
Then select My Media from the menu bar if not already selected, click Project Media from the navigation pane, and click Import from the Media box to select and import the image of the main character or object that you want to use in the thumbnail.
Now, drag the image from the Media box to the Timeline at the bottom.
Step 2: Clear Image Background, Add Border, and Add Custom Background
Go to Effects from the menu bar, click to select the Default tab and then AI Portrait from the navigation pane, and click and drag the Human Segmentation preset from the right box, and place it over the image track in the Timeline.
Double-click the image layer, scroll down the upper-left box to the Video Effects section, and use the Edge Thickness and Edge Feather sliders to adjust the character’s edges to make them as realistic as possible. Click OK when done.
Next, click and drag the Human Border preset over the image track in the Timeline, and follow the same procedure to customize the border. This will give the character a neon border effect.
Now, use the method explained earlier to import a custom image for the background, and drag and place it under the previous track in the Timeline.
If you are running the latest version of Filmora, you will find there are some neon light effects available under AI Portrait as well.
Step 3: Add Titles to Thumbnail
Go to Titles from the menu bar, click to select the Default tab and then Lower 3rds from the navigation pane, and click and drag your preferred lower-third preset from the right window to a separate layer in the Timeline. Double-click the lower-third layer, and use the available options in the upper-left window to change the text, its color, etc., and drag the textbox to place it to your preferred position on the image as well. Click OK to save the changes.
Next, click to select Titles from the navigation pane, and drag your preferred title from the right window to the upper-most track in the Timeline. Now use the method explained earlier to edit the text, its color, position, etc. to make it look professional.
For more tips and tricks for creating YouTube thumbnail, you can check this You Tube thumbnail creating guide.
Step 4: Get the Neon Border Thumbnail
Click the Snapshot (Camera) icon from the upper-right area of the Timeline, go to My Media from the menu bar, right-click the thumbnail of the screenshot you captured, and click Reveal in Finder (on Mac) or Reveal in Explorer (on Windows) to get to the folder the YouTube thumbnail border is saved in.
Part 2: How to Add a Glowing Neon Border in Your YouTube Thumbnail with Canva
Canva is another intuitive editing program that works on the web interface rather than having you download and install an app on your PC. You can add a neon border for YouTube thumbnails using Canva by following the instructions given below:
Step 1: Define Project Settings and Add a Background
After signing in to your Canva account, click Create a design from the top-right corner of the page, click Custom size from the bottom, define 1280 and 720 in the Width and Height fields on the box that appears respectively, and click Create new design.
Now, click to select Background from the navigation bar on the left (if the Background tool is not visible, click More and then choose Background from the expanded list), and click to select a background from the images available in the center pane.
Step 2: Upload an Image and Add Effects
Click Uploads from the navigation bar, click the More icon from the right of the Upload media button present at the top of the center pane, choose your preferred method to upload the image (with the transparent background) that you want to use, upload the image, and drag it from the center pane to the Canvas.
Note: You can use any of the tools available online to remove the background from your image for free.
To add a YouTube thumbnail border, make sure that the image that you added to the Canvas is selected, click the Duplicate icon from the upper-right area, and use the scaling handles of the copy of the image to increase its size a bit. Reposition the image back to its original location as well.
Then, click Edit image from the upper-left corner of the Canvas, click Duotone from the Edit image pane at the center, if need be, click See all, choose your preferred duotone effect to apply on the image, choose your preferred highlight and shadow colors from the box that appears next, and click Back from the top of the pane.
Next, click See all next to the Adjust section from the center pane, and drag the Blur slider to the right to increase the blur effect on the image.
Step 3: Position the Layers
While keeping the duplicate image selected, click the Position button from the upper-right area of the Canvas, and click Background to send the second image behind the first one to get the neon border effect for the photo.
Part 3: How to Outline a Person in a YouTube Thumbnail with Photoshop
Because YouTube thumbnails are nothing but static images, creating YouTube thumbnail border with Adobe Photoshop is comparatively easier. The process of doing this is given below:
Step 1: Define Document Preferences and Import an Image
Launch Adobe Photoshop on your PC, click Create new, and on the New Document customization box, define the width and height values to 1280 and 720 pixels respectively. Select Transparent from the Background Contents menu as well if not already selected. Click Create from the bottom to create a new Photoshop document with the specified document settings. Next, open the folder that contains the source image, drag the photo to Photoshop, and press Enter to place the photo.
Step 2: Remove Background from the Image
Make sure that the image layer is selected in the Layers panel on the right, go to Select from the menu bar at the top, and click Subject. From the bottom of the Layers panel, click the Add a mask icon to get rid of the background, leaving only the human on the Canvas.
Step 3: Add a Custom Background and an Outline Around the Subject
Use the method explained earlier to import a background image of your choice to Photoshop. Drag the background image layer to the bottom in the Layers panel. Double-click the masked layer, click to select Stroke from the left pane of the Layer Style box, and use the options available on the right to manage the size, color, position, etc. of the stroke that has been added around the human subject. Click OK when done, and then export the image normally to use it as a YouTube thumbnail border.
Summary
It is important to know that the default resolution of a YouTube thumbnail is 1280 x 720 pixels that is usually written and referred to as 720p. While adding a YouTube thumbnail border, it is also imperative to have a good sense of color combination and fonts. Furthermore, a decent tool like Wondershare Filmora X must be used to add an appealing neon border around the main subject in the thumbnail image easily and quickly.
Also read:
- [New] Audiophiles' Choice Premium ASMR Recording Mics
- Mastering Video Dimensions The Key to YouTube Presence
- Discovering the Most Innovative Youtube Channel Names A Vlogger's Must-Have List (Maximum Length 156 Characters) for 2024
- The Mobile Filmmaker's Blueprint Crafting Viral Thumbnails for YouTubes
- Your Device, Uninterrupted Revealing the Top 7 Android AdBlockers
- Mastering Video Production Essential Lessons for Beginners
- In 2024, Dive Into Digital Fandom Top 6 Interactive Questionnaires to Identify Your YouTube Spirituality
- Generating an Auto-Subscribe Link for YouTube
- [New] Circulating Content The Art of Playlist Sharing
- In 2024, Crafting Your Gaming Channel on YouTube
- Quick and Accurate Audio-to-Text Conversion on YouTube – Free Methods
- 2024 Approved A Compre Written in Code Deciphering YouTube Backlink Building Techniques
- [New] Cost-Effective Strategies to Combine Videos with Text
- Transforming Smartphone Videos Into Earnings A 2024 Guide to Monetization
- Essential Steps for Seamless YouTube Video Loops
- [New] Effortless Music Playlist Creation for YouTube, Anywhere (Web/Mobile)
- In 2024, Converting Videos to Gifs Online The Ultimate YouTube Resource
- [New] 9 Zero Price Programs to Take Your Videos From Average to Amazing
- Streamline Learning Processes with Detailed Chaptering for Educational YouTube Videos
- In 2024, Enhance Engagement Top Tools and Tips for Properly Tagged Videos
- Finding the Sweet Spot Optimal YouTube Video Upload Rates for Growth
- Confirmation Procedures for YouTube Users for 2024
- [Updated] Elevate Video Quality Mastering Aspect Ratio and Size Settings on YouTube
- The Expert's Approach to Inserting Subtitles/CC on YouTube Videos
- The Essentials of Making Viral Haul Videos Online
- [Updated] Elevate Small Screen Experience with These Leading & Affordable Tools to Download YouTubes' Tiny Videos
- In 2024, Elevate Your Marketing Game - Free 50 YouTube Adornments Here
- [New] Chart a Course to Higher Views with Top Optimization Tactics
- Become a Viral Sensation Maximizing Your YouTube Reach for 2024
- [New] Enhance Your Content Creation with These Top 12 Cameras
- Critical Selection The Best 10 Video Cards for Seamless Playback for 2024
- Producing Channel Trailer Synopses A Guide
- Best Selection Turn Your Videos Into Text Fast for 2024
- Unlock Your YouTube Shorts Earnings Potential
- Dive Into iOS Screenshots A Comprehensive YouTube Guide for 2024
- [Updated] Cutting-Edge Design Top 5 3D Intro Makers
- Spoofing Life360 How to Do it on Honor 90? | Dr.fone
- Updated How to Make Discord GIF PFP? Solved for 2024
- The Magnificent Art of Pokemon Go Streaming On Samsung Galaxy A54 5G? | Dr.fone
- In 2024, 2023'S Premier Storytelling Channels on YouTube
- Can I use iTools gpx file to catch the rare Pokemon On Oppo A1 5G | Dr.fone
- Tips and Tricks for Setting Up your Vivo X Fold 2 Phone Pattern Lock
- How to Update Apple iPhone SE (2020) to the Latest iOS Version? | Dr.fone
- Bypass Activation Lock On iPhone 8 Plus - 4 Easy Ways
- In 2024, How to Bypass FRP from Vivo T2x 5G?
- New Advanced Audio Technology for High-Fidelity Video Broadcasting
- 2024 Approved ASMR Mic Spectacular Exceptional Sound for a Good Deal
- New 5 Methods to Denoise a Video for 2024
- Updated In 2024, The Ultimate Guide 10 Best WebM to MP4 Converter Software
- Dynamic Camera Setup Best Microphone List
- [Updated] Cutting-Edge Tools to Make Your FB Cover Photo Stand Out for 2024
- [Updated] Premier Online Calling Apps - All Free & User-Friendly for 2024
- [Updated] Ultimate Collection Optimal FB Lite Videos
- Title: "2024 Approved Cut Through the Noise with These Top 10 YT Short Standout Strategies"
- Author: Kevin
- Created at : 2024-05-25 14:25:42
- Updated at : 2024-05-26 14:25:42
- Link: https://youtube-videos.techidaily.com/2024-approved-cut-through-the-noise-with-these-top-10-yt-short-standout-strategies/
- License: This work is licensed under CC BY-NC-SA 4.0.
