
:max_bytes(150000):strip_icc()/how-to-watch-the-crow-movies-in-order-742a37ba4e0748e3a691420484c36796.jpg)
"2024 Approved Creating Memorable Beginnings IMovie Tips for YouTube Videos"
Creating Memorable Beginnings: IMovie Tips for YouTube Videos
How to Make a Cool YouTube Video Intro in iMovie (Step-by-Step)

Shanoon Cox
Mar 27, 2024• Proven solutions
A YouTube video intro is a short clip shown at the beginning of your YouTube video, which introduces the main topic and the vlog poster.
YouTube intro videos have the necessary info about the name and logo of the channel. Your YouTube video intro is one of the best chances to make a great first impression on your viewers within a few short minutes of your video.
It is important to have the right intro maker to create impressive video intros. So, in this article, we will introduce how to make a cool and free YouTube Intro with Apple iMovie and with an iMovie Alternative in an easier way.
- Part 1: An Easier Way to Make YouTube Video Intro with iMovie Alternative
- Part 2: How to Make YouTube Video Intro in iMovie (step-by-step)
Part 1: How to Make a Video Intro Using an iMovie Alternative - Wondershare Filmora
While iMovie is a dynamic tool to make a high-impact intro, you can actually find it a little complicated to follow through with all the options and buttons on the interface to complete the process.
Filmora on the other hand simplifies the process and giving even beginners and amateurs a chance to make great intro videos. It is available for both Mac users and Windows users.
Let’s watch the tutorial about how to make your YouTube intro first.
 Download Mac Version ](https://tools.techidaily.com/wondershare/filmora/download/ )
If the tutorial above is not enough for you, you can refer to the steps (for Mac) below to make your YouTube intro now.
Related:
How to Make a YouTube Intro Video Step-by-step?
Step 1. Simply drag and drop your intro clip to the media library.

Step 2. Add your video to the timeline and go to the Effects tab to apply a great effect (such as the Filter 007 series) to your intro clip.

Step 3. Then switch to the Titles tab, and you will see a great variety of text templates. You can choose and drag the text template you want and apply it to your intro clip.

Step 4. Double-click the text box in the timeline, select Advanced, and input the text you want. Then you can switch to the Animation tab to get more than 50 kinds of text animations, and finally, you can apply the animation you like to your text and make your video more vivid.

If you have any questions about the steps above, you can read more detailed information on Filmora Editing Tips . And you can also watch the video below and download the Filmora trial version to start your editing.

Part 2: How to Make Video Intro in iMovie?
An important aspect of intro making is that it usually contains tile cards and opening credit info within the shot. The key is to find a YouTube intro maker that works best with the text and video edit both.
iMovie is a great program for editing simple yet high-impact on professional video intros. You can use the simple process outlined below to create your YouTube intro with iMovie.
Step 1. Open the interface and click on the menu displaying “File and Open project” to choose the video you want to attach the intro to.
Step 2. Click on the Titles tab on the right side of the interface and check for the black review box to appear.

Step 3. The customization bar for the effects you can place on your video will appear just under the black preview box. Experiment with the effects to get the perfect combination for your video.
Step 4. Type in the correct words in the text box below the effects bar. Different effects allow different space for phrases, so experiment with both effects and text until you get it right.

Step 5. You can also edit the font color, speed of transitions, and background.
Step 6. Finally, drag the intro onto the clip viewer and the iMovie interface will automatically turn it into a video clip to be inserted at certain places on the main video timeline.
You may also like: How to Add Video Effects in iMovie
You can click on help to get directions if you are stuck at any part of the process. Do not over-apply multiple effects and keep the colors bright but subtle. Check the tutorial below about how to make a good YouTube intro with iMovie.
If you want to learn more iMovie editing tips, please check Top 10 iMovie Tips You Should Know .
Related: Add Transitions between Video Clips in iMovie
Shanoon Cox
Shanoon Cox is a writer and a lover of all things video.
Follow @Shanoon Cox
Shanoon Cox
Mar 27, 2024• Proven solutions
A YouTube video intro is a short clip shown at the beginning of your YouTube video, which introduces the main topic and the vlog poster.
YouTube intro videos have the necessary info about the name and logo of the channel. Your YouTube video intro is one of the best chances to make a great first impression on your viewers within a few short minutes of your video.
It is important to have the right intro maker to create impressive video intros. So, in this article, we will introduce how to make a cool and free YouTube Intro with Apple iMovie and with an iMovie Alternative in an easier way.
- Part 1: An Easier Way to Make YouTube Video Intro with iMovie Alternative
- Part 2: How to Make YouTube Video Intro in iMovie (step-by-step)
Part 1: How to Make a Video Intro Using an iMovie Alternative - Wondershare Filmora
While iMovie is a dynamic tool to make a high-impact intro, you can actually find it a little complicated to follow through with all the options and buttons on the interface to complete the process.
Filmora on the other hand simplifies the process and giving even beginners and amateurs a chance to make great intro videos. It is available for both Mac users and Windows users.
Let’s watch the tutorial about how to make your YouTube intro first.
Download Mac Version ](https://tools.techidaily.com/wondershare/filmora/download/ )
If the tutorial above is not enough for you, you can refer to the steps (for Mac) below to make your YouTube intro now.
Related:
How to Make a YouTube Intro Video Step-by-step?
Step 1. Simply drag and drop your intro clip to the media library.
Step 2. Add your video to the timeline and go to the Effects tab to apply a great effect (such as the Filter 007 series) to your intro clip.
Step 3. Then switch to the Titles tab, and you will see a great variety of text templates. You can choose and drag the text template you want and apply it to your intro clip.
Step 4. Double-click the text box in the timeline, select Advanced, and input the text you want. Then you can switch to the Animation tab to get more than 50 kinds of text animations, and finally, you can apply the animation you like to your text and make your video more vivid.
If you have any questions about the steps above, you can read more detailed information on Filmora Editing Tips . And you can also watch the video below and download the Filmora trial version to start your editing.
Part 2: How to Make Video Intro in iMovie?
An important aspect of intro making is that it usually contains tile cards and opening credit info within the shot. The key is to find a YouTube intro maker that works best with the text and video edit both.
iMovie is a great program for editing simple yet high-impact on professional video intros. You can use the simple process outlined below to create your YouTube intro with iMovie.
Step 1. Open the interface and click on the menu displaying “File and Open project” to choose the video you want to attach the intro to.
Step 2. Click on the Titles tab on the right side of the interface and check for the black review box to appear.
Step 3. The customization bar for the effects you can place on your video will appear just under the black preview box. Experiment with the effects to get the perfect combination for your video.
Step 4. Type in the correct words in the text box below the effects bar. Different effects allow different space for phrases, so experiment with both effects and text until you get it right.
Step 5. You can also edit the font color, speed of transitions, and background.
Step 6. Finally, drag the intro onto the clip viewer and the iMovie interface will automatically turn it into a video clip to be inserted at certain places on the main video timeline.
You may also like: How to Add Video Effects in iMovie
You can click on help to get directions if you are stuck at any part of the process. Do not over-apply multiple effects and keep the colors bright but subtle. Check the tutorial below about how to make a good YouTube intro with iMovie.
If you want to learn more iMovie editing tips, please check Top 10 iMovie Tips You Should Know .
Related: Add Transitions between Video Clips in iMovie
Shanoon Cox
Shanoon Cox is a writer and a lover of all things video.
Follow @Shanoon Cox
Cutting Edge Creativity: Choosing High-Quality Camera Lenses
Best Camera Lenses for YouTube

Richard Bennett
Mar 27, 2024• Proven solutions
A DSLR is the ideal camera for some vlogs, and using a DSLR means you get to customize the look of your vlog by choosing the perfect lens. Choosing the best camera lens for your YouTube channel can be tricky because there are so many options. This article will walk you through some of them, and make two recommendations of great vlogging lenses. If you already have a good understanding of how camera lenses work then feel free to scroll down to the lens recs.
Part 1. Understanding Lenses: Zoom lens, Fixed lens, aperture, f-stop
There are two main categories of camera lenses: ‘zoom’ – lenses that allow you to zoom in and out – and ‘fixed’. If your lenses are tools then zoom lenses are Swiss army knives; they are very versatile. Fixed lenses, also called prime lenses, have more specific purposes. Do you need a tool that can do a lot of things, or a tool that is perfect for one specific job? Sometimes it is useful to have access to both.
We have explained the differences between Fixed lens and Zoom lens and advantages of using each lens, check this article: Zoom Lens vs. Fixed Lenses: Which one is best for YouTuber? for the detailed information.
Before we get into the recommendations here is a little background information on lenses in general:
Beginner’s Guide to Aperture and F-Stops
In order to be able to select the lens you’ll be using to record your YouTube videos, you first need to understand a few very basic concepts, such as aperture or f-stops.
1.What is a lens’s aperture?
The aperture of your lens is the hole through which light reaches your camera’s sensor, or the film if you are using a film camera. The wider your aperture is the more light you are letting into your camera. In low light it is better to have a wide aperture, and when you are working with a lot of light it is better to have a narrow aperture so your footage is not overexposed.
Aperture is simply an opening in the lens that lets the light through. If you want to increase the amount of the light that is reaching the camera’s sensor you need to open up the aperture blades that are located in the lens. The f-values like f/1.2 or f/1.8 indicate that the aperture is wide open and that the camera is receiving the maximum amount of light a lens you’re using can provide.
2.What is an ‘f-stop’?
Light passes through your lens’s aperture on its way to your camera’s sensor, and the f-stop of your lens relates to the amount of light it lets in. The lower your f-stop, the wider your aperture, and the more light you are letting into your camera. The more light you let into your camera the easier it is to achieve a blurred background. A lot of vloggers love blurring their backgrounds because it is a quick way to disguising the rooms they are shooting in.
F-stops are written like ‘f/1.8’ or ‘f/4’ on your lens. For more information on f-stops and blurring your background read “The Best Bokeh Lens - How to Get the Blurred Background for YouTube Videos” and watch Tasha’s video.
F-stops or f-numbers indicate how open the aperture is, so for example if your camera is displaying f/32 value it means that your camera is letting very little light to get through to the camera’s sensor. The f-number depends on a few other parameters such as shutter speed, exposure or ISO values. Large apertures provide a shallow depth of field which creates a smooth and artistic background blur, while a small aperture enables you to keep both the background and the foreground of your shot in focus.
Part 2: Types of Camera Lenses
The visual aspect of a video may not be the only thing you’ll have to dedicate special attention to while recording your YouTube video, but it is surely one of the most important factors of the video production process. A lens you are using will largely contribute to the aesthetics of the video. That’s why you need to know which type of lens will deliver the best results when shooting different types of scenes. Here are some of the most common types of lenses you’ll encounter.
Standard lenses
These lenses are featured in almost all camera kits, so the chances are that if you have a DSLR camera you already have a standard, mid-range lens. These lenses commonly have a fixed 50mm focal length, although zoom lenses with focal lengths in the range between 35mm and 75mm are also considered standard. You can use them to capture medium shots, single or multiple figure shots, and in some cases establishing shots, because they offer enough versatility to cover a multitude of different scenes. Standard lenses often have large apertures, which makes them quite useful if you often shoot videos under light conditions you can’t control.
Macro lenses
Details, product shots or any other subject that can be filmed from close proximity looks better if they are recorded with macro lenses. The high contrast and sharpness these lenses provide allow you to create stunning close-ups of all hosts, guests or actors in your YouTube videos. What’s more, if you are presenting a new product to your audience you can use the macro lens to make some captivating shots that will attract more audience. Zoom lenses can also be used for macro photography and video, although prime macro lenses produce better results.
Telephoto lenses
The subjects of your videos don’t always have to be in your immediate surroundings, because telephoto lenses let you capture scenes that are several miles away from you. Wildlife or sports videographers frequently use telephoto lenses because they don’t have another way of getting close to their subjects. However, telephoto lenses with 70-300mm focal length can also be used to take stunning portraits or close up shots. The biggest downside of telephoto lenses is their weight because the lenses with higher focal lengths can weigh up to 10lbs, which makes them a bit inconvenient to always carry with you.
Wide-angle lenses
Recording videos of vast open spaces, breathtaking vistas or beautiful city views is much easier if you have a wide-angle lens. The short focal length allows the lens to have a wider field of view which covers more space than standard or telephoto lenses. Wide-angle lenses also have lower apertures than lenses with longer focal lengths which results in images that have a shallow depth of field. Ultra-wide lenses like fisheye distort the view so the videos recorded with these lenses often suffer from the lack of realism.
Specialist lenses
YouTubers who are working on demanding projects can try to solve their troubles by using a specialist lens. Soft-focus lenses can help you take better portraits while tilt-shift lenses allow you to control the perspective. However, it is hard to imagine a scenario in which you’ll need a specialist lense if you are just starting out since even experienced videographers only use special lenses when they have absolutely no better way to record a scene.
Part 3: Recommended Best Camera Lenses for Shooting YouTube Videos
Here are a couple great lenses that might be good fits for you and your YouTube channel. The thing that makes them both ideal for vlogging is that they have low enough f-stops to blur out your background.
| Camera Lens | Type | Price | Aperture | Focal Length |
|---|---|---|---|---|
| Canon EF-S 10-18mm f/4.5-5.6 IS STM Lens | Wide angle | $279 | f/4.5-5.6 | 10 -18mm |
| Rokinon 8mm f/3.5 | Fisheye | $249 | f/3.5 | 8mm |
| Canon 50mm f/1.8 STM Lens | Prime | $125 | f/1.8 | 50mm |
| Canon EF 135mm f/2L USM Lens | Telephoto | $999 | f/2 | 135mm |
| Tamron SP AF 17-50mm f/2.8 | Standard Zoom | $299 | f/2.8 | 17 -50mm |
| Sony 30mm f/3.5 Macro | Macro | $278 | f/3.5 | 30mm |
1.Canon EF-S 10-18mm f/4.5-5.6 IS STM Lens
Canon released this lens in 2014 and shortly after it has gained the reputation of one of the most reliable wide to ultra-wide lenses for Canon cameras. Like most STM lenses, it offers incredibly fast autofocus technology that makes it a great choice for fast-paced action videos. The lens is equipped with an image stabilization system which guarantees that your videos are going to remain sharp even if the camera wasn’t perfectly still while you were recording. Somewhat smaller aperture range makes this lens poor choice for low light scenes, although you can get decent results if you manage to keep the camera still.
2. Rokinon 8mm Ultra Wide f/3.5 Fisheye Lens
Outdoor videos look much cooler when they are recorded with a wide-angle lens because the wider field of view enables you to capture more space in a shot. Fisheye lenses were made popular by GoPro cameras because they make the videos look more fun while producing high image quality. Rokinon 8mm lens allows you to adjust focus and aperture manually so you can fine-tune your shot before hitting the record button. To make things even better this model is compatible with a wide range of cameras including Pentax, Canon or Nikon DSLRs. It has a relatively fast aperture that enables it to deliver solid performances under low light conditions.
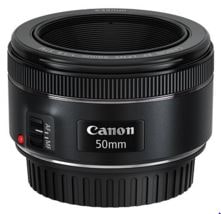
3.Canon EF 50mm f/1.8 STM Lens
The EF 50mm is a fixed lens with an f-stop of 1.8, which means it is great for blurring your background and performs well even in poorer lighting conditions. This is a really great lens for an opinion or beauty vlog, where you do not need to move around. You can stay put right where the focus is sharpest and stand out by blurring everything behind you. If you tend to reuse the same sets then you do not really need a zoom feature. If your shooting conditions rarely change then it is just as easy to use a reliable fixed lens like the EF 50mm since you will not need to be rethinking your set up and adjusting.
If you are looking for an inexpensive prime lens that lets you create sharp videos with shallow depth of field, you should look no further. This model is one of three Canon’s 50mm prime lenses, although the 50mm f/1.4 USM and 50mm f/1.2 ‘L’ USM models are much more expensive. You can use it to record a lot of different types of YouTube videos, like product reviews or makeup tutorials. The 50 mm f/1.8 STM lens doesn’t have image stabilization technology so you should try to be as still as you can possibly be when shooting handheld videos in order to avoid recording footage that has a lot of camera shakes.
4.Canon EF 135mm f/2L USM Lens
Recording moving objects from a distance requires you to have a lens that allows you to smoothly track their movements while keeping the subject in focus. The Canon EF 135mm f2/L USM lens is perhaps one of the best telephoto lenses on the market because it uses L glass that is widely accepted as the best in the industry. The Canon’s telephoto lens is compatible with ASP-C and Full Frame EF mount cameras. Keep in mind that this is also a prime lens and you can’t increase or decrease its focal length, but even so, it is a perfect choice for documentary-style videos.
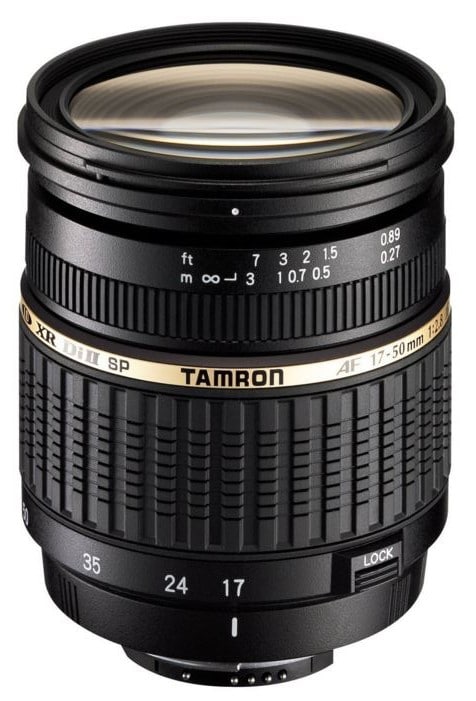
5.Tamron SP AF 17-50mm f/2.8 XR Di II LD Aspherical (IF) Lens
The Tamron’s standard zoom lens offers good value at a very reasonable price. The maximum aperture is f/2.8, while the minimum aperture value this lens supports is f/32, which means that its users can easily experiment with different depths of field. The lens is compatible with most Canon cameras so if you have a camera from another manufacturer you may have to use the lens adapter in order to mount it onto your camera. Like most standard zoom lenses, Tamron SP AF model is highly versatile and you can use it to record a wide range of different scenes.
A lot of zoom lenses do not have wide enough apertures to create blurred backgrounds, but this Tamron lens is an exception at f/2.8. This low f-stop also means that it performs better in poor lighting conditions than a lot of other zoom lenses. If your shooting conditions change a lot – if you often change locations, for example – then it will be good to have a sturdy, well-built, zoom lens like the AF 17-mm that can be quickly adapted to new angles and distances.
6.Sony 30mm f/3.5 Macro
All Sony’s APS-C format E mount cameras are compatible with this multi-purpose lens. When mounted the 30mm lens provides a 45mm focal length equivalent, which means that you can use it to take macro shots of products or to record medium or close-up shots. This is a prime lens, so changing the focal length isn’t really an option, but the 1:1 life-size magnification, as well as the 0.9-inch working distance, allow you to get close to the subjects in the video. The aperture range is between f/3.5 and f/22 which means that you can choose how shallow the depth of field in your shot should be.
If you are using a 4k camera to shoot your YouTube video, check out best camera lens for 4k professional production.
Richard Bennett
Richard Bennett is a writer and a lover of all things video.
Follow @Richard Bennett
Richard Bennett
Mar 27, 2024• Proven solutions
A DSLR is the ideal camera for some vlogs, and using a DSLR means you get to customize the look of your vlog by choosing the perfect lens. Choosing the best camera lens for your YouTube channel can be tricky because there are so many options. This article will walk you through some of them, and make two recommendations of great vlogging lenses. If you already have a good understanding of how camera lenses work then feel free to scroll down to the lens recs.
Part 1. Understanding Lenses: Zoom lens, Fixed lens, aperture, f-stop
There are two main categories of camera lenses: ‘zoom’ – lenses that allow you to zoom in and out – and ‘fixed’. If your lenses are tools then zoom lenses are Swiss army knives; they are very versatile. Fixed lenses, also called prime lenses, have more specific purposes. Do you need a tool that can do a lot of things, or a tool that is perfect for one specific job? Sometimes it is useful to have access to both.
We have explained the differences between Fixed lens and Zoom lens and advantages of using each lens, check this article: Zoom Lens vs. Fixed Lenses: Which one is best for YouTuber? for the detailed information.
Before we get into the recommendations here is a little background information on lenses in general:
Beginner’s Guide to Aperture and F-Stops
In order to be able to select the lens you’ll be using to record your YouTube videos, you first need to understand a few very basic concepts, such as aperture or f-stops.
1.What is a lens’s aperture?
The aperture of your lens is the hole through which light reaches your camera’s sensor, or the film if you are using a film camera. The wider your aperture is the more light you are letting into your camera. In low light it is better to have a wide aperture, and when you are working with a lot of light it is better to have a narrow aperture so your footage is not overexposed.
Aperture is simply an opening in the lens that lets the light through. If you want to increase the amount of the light that is reaching the camera’s sensor you need to open up the aperture blades that are located in the lens. The f-values like f/1.2 or f/1.8 indicate that the aperture is wide open and that the camera is receiving the maximum amount of light a lens you’re using can provide.
2.What is an ‘f-stop’?
Light passes through your lens’s aperture on its way to your camera’s sensor, and the f-stop of your lens relates to the amount of light it lets in. The lower your f-stop, the wider your aperture, and the more light you are letting into your camera. The more light you let into your camera the easier it is to achieve a blurred background. A lot of vloggers love blurring their backgrounds because it is a quick way to disguising the rooms they are shooting in.
F-stops are written like ‘f/1.8’ or ‘f/4’ on your lens. For more information on f-stops and blurring your background read “The Best Bokeh Lens - How to Get the Blurred Background for YouTube Videos” and watch Tasha’s video.
F-stops or f-numbers indicate how open the aperture is, so for example if your camera is displaying f/32 value it means that your camera is letting very little light to get through to the camera’s sensor. The f-number depends on a few other parameters such as shutter speed, exposure or ISO values. Large apertures provide a shallow depth of field which creates a smooth and artistic background blur, while a small aperture enables you to keep both the background and the foreground of your shot in focus.
Part 2: Types of Camera Lenses
The visual aspect of a video may not be the only thing you’ll have to dedicate special attention to while recording your YouTube video, but it is surely one of the most important factors of the video production process. A lens you are using will largely contribute to the aesthetics of the video. That’s why you need to know which type of lens will deliver the best results when shooting different types of scenes. Here are some of the most common types of lenses you’ll encounter.
Standard lenses
These lenses are featured in almost all camera kits, so the chances are that if you have a DSLR camera you already have a standard, mid-range lens. These lenses commonly have a fixed 50mm focal length, although zoom lenses with focal lengths in the range between 35mm and 75mm are also considered standard. You can use them to capture medium shots, single or multiple figure shots, and in some cases establishing shots, because they offer enough versatility to cover a multitude of different scenes. Standard lenses often have large apertures, which makes them quite useful if you often shoot videos under light conditions you can’t control.
Macro lenses
Details, product shots or any other subject that can be filmed from close proximity looks better if they are recorded with macro lenses. The high contrast and sharpness these lenses provide allow you to create stunning close-ups of all hosts, guests or actors in your YouTube videos. What’s more, if you are presenting a new product to your audience you can use the macro lens to make some captivating shots that will attract more audience. Zoom lenses can also be used for macro photography and video, although prime macro lenses produce better results.
Telephoto lenses
The subjects of your videos don’t always have to be in your immediate surroundings, because telephoto lenses let you capture scenes that are several miles away from you. Wildlife or sports videographers frequently use telephoto lenses because they don’t have another way of getting close to their subjects. However, telephoto lenses with 70-300mm focal length can also be used to take stunning portraits or close up shots. The biggest downside of telephoto lenses is their weight because the lenses with higher focal lengths can weigh up to 10lbs, which makes them a bit inconvenient to always carry with you.
Wide-angle lenses
Recording videos of vast open spaces, breathtaking vistas or beautiful city views is much easier if you have a wide-angle lens. The short focal length allows the lens to have a wider field of view which covers more space than standard or telephoto lenses. Wide-angle lenses also have lower apertures than lenses with longer focal lengths which results in images that have a shallow depth of field. Ultra-wide lenses like fisheye distort the view so the videos recorded with these lenses often suffer from the lack of realism.
Specialist lenses
YouTubers who are working on demanding projects can try to solve their troubles by using a specialist lens. Soft-focus lenses can help you take better portraits while tilt-shift lenses allow you to control the perspective. However, it is hard to imagine a scenario in which you’ll need a specialist lense if you are just starting out since even experienced videographers only use special lenses when they have absolutely no better way to record a scene.
Part 3: Recommended Best Camera Lenses for Shooting YouTube Videos
Here are a couple great lenses that might be good fits for you and your YouTube channel. The thing that makes them both ideal for vlogging is that they have low enough f-stops to blur out your background.
| Camera Lens | Type | Price | Aperture | Focal Length |
|---|---|---|---|---|
| Canon EF-S 10-18mm f/4.5-5.6 IS STM Lens | Wide angle | $279 | f/4.5-5.6 | 10 -18mm |
| Rokinon 8mm f/3.5 | Fisheye | $249 | f/3.5 | 8mm |
| Canon 50mm f/1.8 STM Lens | Prime | $125 | f/1.8 | 50mm |
| Canon EF 135mm f/2L USM Lens | Telephoto | $999 | f/2 | 135mm |
| Tamron SP AF 17-50mm f/2.8 | Standard Zoom | $299 | f/2.8 | 17 -50mm |
| Sony 30mm f/3.5 Macro | Macro | $278 | f/3.5 | 30mm |
1.Canon EF-S 10-18mm f/4.5-5.6 IS STM Lens
Canon released this lens in 2014 and shortly after it has gained the reputation of one of the most reliable wide to ultra-wide lenses for Canon cameras. Like most STM lenses, it offers incredibly fast autofocus technology that makes it a great choice for fast-paced action videos. The lens is equipped with an image stabilization system which guarantees that your videos are going to remain sharp even if the camera wasn’t perfectly still while you were recording. Somewhat smaller aperture range makes this lens poor choice for low light scenes, although you can get decent results if you manage to keep the camera still.
2. Rokinon 8mm Ultra Wide f/3.5 Fisheye Lens
Outdoor videos look much cooler when they are recorded with a wide-angle lens because the wider field of view enables you to capture more space in a shot. Fisheye lenses were made popular by GoPro cameras because they make the videos look more fun while producing high image quality. Rokinon 8mm lens allows you to adjust focus and aperture manually so you can fine-tune your shot before hitting the record button. To make things even better this model is compatible with a wide range of cameras including Pentax, Canon or Nikon DSLRs. It has a relatively fast aperture that enables it to deliver solid performances under low light conditions.
3.Canon EF 50mm f/1.8 STM Lens
The EF 50mm is a fixed lens with an f-stop of 1.8, which means it is great for blurring your background and performs well even in poorer lighting conditions. This is a really great lens for an opinion or beauty vlog, where you do not need to move around. You can stay put right where the focus is sharpest and stand out by blurring everything behind you. If you tend to reuse the same sets then you do not really need a zoom feature. If your shooting conditions rarely change then it is just as easy to use a reliable fixed lens like the EF 50mm since you will not need to be rethinking your set up and adjusting.
If you are looking for an inexpensive prime lens that lets you create sharp videos with shallow depth of field, you should look no further. This model is one of three Canon’s 50mm prime lenses, although the 50mm f/1.4 USM and 50mm f/1.2 ‘L’ USM models are much more expensive. You can use it to record a lot of different types of YouTube videos, like product reviews or makeup tutorials. The 50 mm f/1.8 STM lens doesn’t have image stabilization technology so you should try to be as still as you can possibly be when shooting handheld videos in order to avoid recording footage that has a lot of camera shakes.
4.Canon EF 135mm f/2L USM Lens
Recording moving objects from a distance requires you to have a lens that allows you to smoothly track their movements while keeping the subject in focus. The Canon EF 135mm f2/L USM lens is perhaps one of the best telephoto lenses on the market because it uses L glass that is widely accepted as the best in the industry. The Canon’s telephoto lens is compatible with ASP-C and Full Frame EF mount cameras. Keep in mind that this is also a prime lens and you can’t increase or decrease its focal length, but even so, it is a perfect choice for documentary-style videos.
5.Tamron SP AF 17-50mm f/2.8 XR Di II LD Aspherical (IF) Lens
The Tamron’s standard zoom lens offers good value at a very reasonable price. The maximum aperture is f/2.8, while the minimum aperture value this lens supports is f/32, which means that its users can easily experiment with different depths of field. The lens is compatible with most Canon cameras so if you have a camera from another manufacturer you may have to use the lens adapter in order to mount it onto your camera. Like most standard zoom lenses, Tamron SP AF model is highly versatile and you can use it to record a wide range of different scenes.
A lot of zoom lenses do not have wide enough apertures to create blurred backgrounds, but this Tamron lens is an exception at f/2.8. This low f-stop also means that it performs better in poor lighting conditions than a lot of other zoom lenses. If your shooting conditions change a lot – if you often change locations, for example – then it will be good to have a sturdy, well-built, zoom lens like the AF 17-mm that can be quickly adapted to new angles and distances.
6.Sony 30mm f/3.5 Macro
All Sony’s APS-C format E mount cameras are compatible with this multi-purpose lens. When mounted the 30mm lens provides a 45mm focal length equivalent, which means that you can use it to take macro shots of products or to record medium or close-up shots. This is a prime lens, so changing the focal length isn’t really an option, but the 1:1 life-size magnification, as well as the 0.9-inch working distance, allow you to get close to the subjects in the video. The aperture range is between f/3.5 and f/22 which means that you can choose how shallow the depth of field in your shot should be.
If you are using a 4k camera to shoot your YouTube video, check out best camera lens for 4k professional production.
Richard Bennett
Richard Bennett is a writer and a lover of all things video.
Follow @Richard Bennett
Also read:
- Navigating Content Distribution A Close Look at IGTV and YouTube
- Effortlessly Embedding Visual Media in Free Content Creation for 2024
- 2024 Approved Comprehensive Guide to Embedding YouTube Playlists Online
- [Updated] Achieving YouTube Earnings Excellence - Strategies and Beyond
- [New] Effortlessly Convert YouTube Audio - Top 4 Low-Cost Apps
- Enhancing Visuals Using Chroma Key Effectively for 2024
- Navigating Through Digital Profit Landscapes
- 2024 Approved Digital Footprint and Interactive Iconography Honors
- [Updated] Capturing Attention Striking Shots for YouTube Success
- 2024 Approved Capturing Live Sounds Directly From YouTube Videos
- How Do YouTube Channels Get Paid Regularly?
- Zippy Typography Two Approaches to Liven Up Your Letters
- Unveil Your Video Potential Streaming Google Meet to YouTube Guide
- [Updated] Adjust Cutting Room Time for YouTube
- [Updated] Banishing Dark Pixels From YouTube Views
- Top Ten Historical Educational Video Streams (For Students)
- Can You Legally Capture Video From YouTube, In 2024
- Unleashing Video Popularity Leading Trackers for YouTube
- 2024 Approved Effortless Free Extraction of YouTube Desktops
- Flourishing on a Beauty YouTube Channel
- 2024 Approved Enhancing Your Game Time with YouTube Live Broadcasts
- Harness YouTube Opportunities via Strategic Creator Studio Application
- Elevate Engagement, Amplify Audience (YouTube Marketing) for 2024
- [New] 15 Best Sites to Find & Download Royalty-Free Music for YouTube
- In 2024, Bursting Boundaries, Breaking Barriers The Top Ten Reasons for Your YouTube Viewer Void
- Script to Screen Your Guide to YouTube Storytelling
- Decoding the Visual Language of Live Videos on YouTube
- Perfecting Your Valorant Thumbnails A Comprehensive Tutorial
- [New] Decoding Dangerous Subscriber Scams Online
- [Updated] Channel Choices Youtube vs TikTok Battle
- Cut to Perfection 10 Premier Online Video Editors Ranked for 2024
- Master Your Hashtags The Path to 6-Figure Youtube Success
- [Updated] 5-Star Channel Cutting Long URLs Down for YouTube Videos
- Boosting Engagement Customizing Your Shorts' First Impressions for 2024
- [New] Accelerated Steps to Unsettle YouTube Playlists
- [New] Blur the Borders Enhancing Your Video's Appeal on YT
- Earnings Engineering Crafting a High Yield Strategy for Your YouTube Channel for 2024
- The Ultimate Youtube Strategy for Simultaneous Synchronization
- In 2024, Amplify Your Content Navigating the World of YouTube Backlinks
- [New] Capture YouTube in Full - Free Screencast Tutorials You Need Right Now
- [Updated] Essential Guide to Uploading High-Res Videos on Youtube
- [New] The Complete Guide to Enthralling Boomers on Snapchat
- In 2024, Mastering Instagram 4 Pro Tips for Looped Video Content
- [Updated] In 2024, The Social Strategist's Guide to Capturing Feedback via Instagram Story Polls
- [New] In 2024, Mastering the Art of Adding Unique Emojis to Your Discord Avatar (PC/Mobile)
- Updated Online Video Editing Made Easy Trimming with Kapwing Editor for 2024
- [Updated] Streamlining Your Site Facebook LIVE Integration Guide for 2024
- Still Using Pattern Locks with Xiaomi Civi 3? Tips, Tricks and Helpful Advice
- Mastering Gaming Excellence with DiscoNitro A Step-by-Step Guide for 2024
- In 2024, Is Your Apple iPhone 12 Pro in Security Lockout? Proper Ways To Unlock
- In 2024, Life360 Circle Everything You Need to Know On Poco M6 Pro 5G | Dr.fone
- Apply These Techniques to Improve How to Detect Fake GPS Location On Vivo G2 | Dr.fone
- In 2024, How to Unlock Motorola Moto G24 Phone without Google Account?
- Best Fixes For Samsung Galaxy F15 5G Hard Reset | Dr.fone
- [Updated] Circling Success How to Captivate Your Instagram Audience
- [Updated] 2024 Approved Quest Masters' Choice Celebrating Gaming Epics Anew
- New The Ultimate Guide to Free Video Editing on 32-Bit Windows Top Software
- Does P60 has native HEVC support?
- What's Grabbing Twitter Users' Attention for 2024
- [Updated] In 2024, Real-Time Broadcasting Excellence Connecting via Wirecast to Facebook
- LibreCam X Live Streaming Experience Analyzed for 2024
- 8 Solutions to Fix Find My Friends Location Not Available On Honor 90 Pro | Dr.fone
- Updated In 2024, Elevate Your Viewing Experience Top-Rated VR Video Conversion Software
- Top 6 Apps/Services to Trace Any Samsung Galaxy A34 5G Location By Mobile Number | Dr.fone
- Advanced Lighting Strategies for Superior iPhone Photos for 2024
- Top 6 Substitutes Best Periscope Rivals on Mobile Devices
- [New] 2024 Approved Social Screen Grabber Kit
- [Updated] Best Free and Paid Drawing Apps for Windows
- Updated In 2024, Techniques for Sound Isolation Preventing Noise Contamination in Audio Capture
- In 2024, Advanced PSD Color Grading
- Will MOV files play on Samsung Galaxy A05 ?
- [New] In 2024, Compact Guide Setting up Snapchat macOS-Style
- Updated In 2024, Create Engaging Content 10 Leading Animated Text Generator Options
- Title: "2024 Approved Creating Memorable Beginnings IMovie Tips for YouTube Videos"
- Author: Kevin
- Created at : 2024-05-25 14:25:09
- Updated at : 2024-05-26 14:25:09
- Link: https://youtube-videos.techidaily.com/2024-approved-creating-memorable-beginnings-imovie-tips-for-youtube-videos/
- License: This work is licensed under CC BY-NC-SA 4.0.
