
:max_bytes(150000):strip_icc()/001_is-disneyplus-worth-it-eb19753faecb4525adaf6e4cd29c3ad1.jpg)
"2024 Approved Crafting the Ideal Set of Keywords for Your Youtube Videos"
Crafting the Ideal Set of Keywords for Your Youtube Videos
What is YouTube Tag and How to Find Great Tags For Your Videos?

Richard Bennett
Oct 26, 2023• Proven solutions
There are a huge number of videos uploaded to YouTube every day, and that is why it is so important to make sure your videos are sorted properly by the site using YouTube tags. If you don’t, potential viewers will miss out on the chance to discover and enjoy your videos.
Instead of forcing yourself through a painful brainstorming session, it can be easier to identify the best tags using these techniques that experienced content managers use to populate their tag lists.
In this article, I will show you how to find great tags for your YouTube videos as well as some answers to the frequently asked questions about YouTube Tags.
Part 1: How to Find YouTube Tags [3 Effective Ways]
1. Use YouTube’s Auto-Suggest Tool to Get Tags
YouTube’s search engine can be your best ally on the quest for great tags. This tool was created to aid users who are looking for content on the platform, and content creators can benefit from it as well. By typing the general topic of your video, or a few words vaguely related to your video, into the search bar on YouTube you can see suggestions that reflect what viewers are searching for and take some of those suggestions into consideration for your tags. With every new phrase (and even every additional character you type), new options will appear. By playing around with this tool you will gain valuable insight into the searching habits of YouTube viewers.
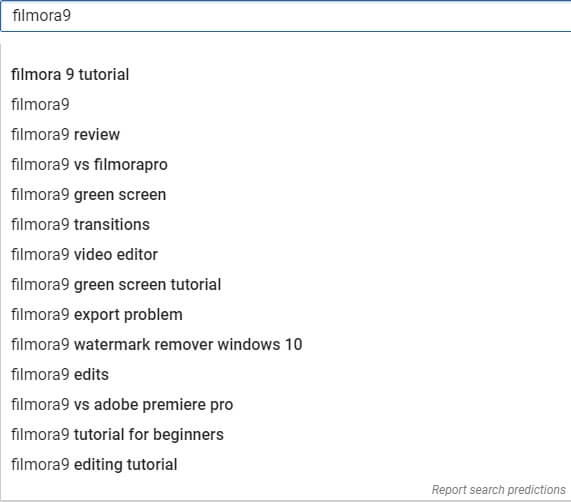
This method may not be too precise, but the idea is to quickly gather information and perhaps get some inspiration for more creative or complex tags. Most of the suggestions will be logical, but there can be a few unexpected combinations you’d never think of. Be very careful when translating the findings to your own situation, since the fact that some terms are popular doesn’t mean they are relevant for your video. Another problem is that slightly altered terminology can significantly change the effectiveness of the tag, so you should ideally use the suggested phrases in the exact form as you found them or not at all. If you do make adjustments, you should test the new tag through the same auto-complete tool and see how it fares.
2. Try YouTube Tag Generators
If you’d like to dig a little deeper, there are multiple dedicated tools that can assist you in picking the most suitable YouTube tags for every video you upload. Let’s examine a few of them in greater detail:
#1. Keyword Tool
A very simple and reliable web-based tag generator that provides you with 750 frequently searched keywords that would be suitable for your video. The keyword list is based on YouTube’s search tool in a way similar to what we described in the previous chapter. However, since the analysis is automated with the Keyword Tool, you can get a huge list in just a few seconds. This generator is especially useful when you are looking for long-tail keywords that attract niche audiences.
#2. Rapid Tags
This tool is a bit more sophisticated and includes some analytic features on top of tag generating capacities, allowing you to manage your channel more effectively. It’s completely automated, so you won’t have to do any heavy lifting on your own. Just type the URL of your video into the appropriate field and let Rapid Tags do the rest. You can easily switch between the Generator, Analyzer, Ranker, and Tracker tools, so you can acquire a complete picture of the suitability of each tag and a better understanding of the projected performance of your video.
Want more tools to generate YouTube tags? Check our picks of the best YouTube video tag generators .
#3. BetterWaytoWeb
While this free-to-use tool has a very simple interface and won’t require any background knowledge to use, it still provides valuable information. It can suggest suitable tags for your new video based on the main keyword you provide, speeding up your research considerably. It can also analyze the tags placed on an existing YouTube video, which is important for deducing how other authors working in the same category are optimizing their content.
3. Study Your YouTube Rivals’ Tags
YouTube content authors can learn a lot by analyzing their top competitors. No matter what your videos are about, there are probably countless other creators that want to attract the same audiences as you. Only a tiny percentage of them will manage to gain significant viewership, and those are the ones you should be researching in detail.
If you are able to locate the most successful videos with content similar to yours you are already halfway to your goal, but one obstacle still remains. You can’t even see your competitor’s tags them when you click on their videos on YouTube. This type of information is not displayed, but some specialized solutions are able to reveal it upon request. Here is one YouTube certified analytic tool capable of doing that:
1. VidIQ
Currently used to manage more than 30,000 YouTube channels, this powerful video marketing suite can also help with tag selection. It can enlarge your tag library by a factor of 10, and provide you with a direct comparison with your chief competitors. In addition to increasing your views, this app can help you monitor your visibility on social networks, and track detailed statistics that describe the performance of your video. In other words, this is a comprehensive package that will help you manage your channel in a professional way.
What’s your YouTube tag strategy?
Part 2: YouTube Tag FAQs
1. What is YouTube Tag?
YouTube tag is a keyword that you added to help Google and YouTube understand your video context, which is an important ranking factor in YouTube searching. Basically, the better you tag your video, the more views you can get. But you should keep in mind that adding excessive tags to your video description is against YouTube policy.
2. How Many Tags Should You Use on YouTube?
Though there is no restriction about the numbers of the YouTube tags, you should keep the total characters of all tags within 400 characters. In most cases, 5-8 tags are appreciated for a YouTube video. It is recommended to add as many relevant tags as you can, such as brand-specific tags, YouTube auto-suggest tags, or tags created with some tag generator.
3. Do Tags on YouTube Get More Views?
The short answer is Yes. Since Google is encouraging people to use tags to help them understand your video content, then it can recommend the videos to relevant users accordingly. With tags, YouTube can categorize your videos and make them discoverable easier. For example, when you search tag #FilmoraSchoolStory in YouTube, you can see all the videos with the tag in the search result. allowing viewers to find your content more easily.
Retouch YouTube Videos with Filmora
There are lots of filters, overlays and effects pre-programmed in Wondershare Filmora video editor , you can improve YouTube videos without costing any extra fees if you’ve subscribed to Filmora.


Richard Bennett
Richard Bennett is a writer and a lover of all things video.
Follow @Richard Bennett
Richard Bennett
Oct 26, 2023• Proven solutions
There are a huge number of videos uploaded to YouTube every day, and that is why it is so important to make sure your videos are sorted properly by the site using YouTube tags. If you don’t, potential viewers will miss out on the chance to discover and enjoy your videos.
Instead of forcing yourself through a painful brainstorming session, it can be easier to identify the best tags using these techniques that experienced content managers use to populate their tag lists.
In this article, I will show you how to find great tags for your YouTube videos as well as some answers to the frequently asked questions about YouTube Tags.
Part 1: How to Find YouTube Tags [3 Effective Ways]
1. Use YouTube’s Auto-Suggest Tool to Get Tags
YouTube’s search engine can be your best ally on the quest for great tags. This tool was created to aid users who are looking for content on the platform, and content creators can benefit from it as well. By typing the general topic of your video, or a few words vaguely related to your video, into the search bar on YouTube you can see suggestions that reflect what viewers are searching for and take some of those suggestions into consideration for your tags. With every new phrase (and even every additional character you type), new options will appear. By playing around with this tool you will gain valuable insight into the searching habits of YouTube viewers.
This method may not be too precise, but the idea is to quickly gather information and perhaps get some inspiration for more creative or complex tags. Most of the suggestions will be logical, but there can be a few unexpected combinations you’d never think of. Be very careful when translating the findings to your own situation, since the fact that some terms are popular doesn’t mean they are relevant for your video. Another problem is that slightly altered terminology can significantly change the effectiveness of the tag, so you should ideally use the suggested phrases in the exact form as you found them or not at all. If you do make adjustments, you should test the new tag through the same auto-complete tool and see how it fares.
2. Try YouTube Tag Generators
If you’d like to dig a little deeper, there are multiple dedicated tools that can assist you in picking the most suitable YouTube tags for every video you upload. Let’s examine a few of them in greater detail:
#1. Keyword Tool
A very simple and reliable web-based tag generator that provides you with 750 frequently searched keywords that would be suitable for your video. The keyword list is based on YouTube’s search tool in a way similar to what we described in the previous chapter. However, since the analysis is automated with the Keyword Tool, you can get a huge list in just a few seconds. This generator is especially useful when you are looking for long-tail keywords that attract niche audiences.
#2. Rapid Tags
This tool is a bit more sophisticated and includes some analytic features on top of tag generating capacities, allowing you to manage your channel more effectively. It’s completely automated, so you won’t have to do any heavy lifting on your own. Just type the URL of your video into the appropriate field and let Rapid Tags do the rest. You can easily switch between the Generator, Analyzer, Ranker, and Tracker tools, so you can acquire a complete picture of the suitability of each tag and a better understanding of the projected performance of your video.
Want more tools to generate YouTube tags? Check our picks of the best YouTube video tag generators .
#3. BetterWaytoWeb
While this free-to-use tool has a very simple interface and won’t require any background knowledge to use, it still provides valuable information. It can suggest suitable tags for your new video based on the main keyword you provide, speeding up your research considerably. It can also analyze the tags placed on an existing YouTube video, which is important for deducing how other authors working in the same category are optimizing their content.
3. Study Your YouTube Rivals’ Tags
YouTube content authors can learn a lot by analyzing their top competitors. No matter what your videos are about, there are probably countless other creators that want to attract the same audiences as you. Only a tiny percentage of them will manage to gain significant viewership, and those are the ones you should be researching in detail.
If you are able to locate the most successful videos with content similar to yours you are already halfway to your goal, but one obstacle still remains. You can’t even see your competitor’s tags them when you click on their videos on YouTube. This type of information is not displayed, but some specialized solutions are able to reveal it upon request. Here is one YouTube certified analytic tool capable of doing that:
1. VidIQ
Currently used to manage more than 30,000 YouTube channels, this powerful video marketing suite can also help with tag selection. It can enlarge your tag library by a factor of 10, and provide you with a direct comparison with your chief competitors. In addition to increasing your views, this app can help you monitor your visibility on social networks, and track detailed statistics that describe the performance of your video. In other words, this is a comprehensive package that will help you manage your channel in a professional way.
What’s your YouTube tag strategy?
Part 2: YouTube Tag FAQs
1. What is YouTube Tag?
YouTube tag is a keyword that you added to help Google and YouTube understand your video context, which is an important ranking factor in YouTube searching. Basically, the better you tag your video, the more views you can get. But you should keep in mind that adding excessive tags to your video description is against YouTube policy.
2. How Many Tags Should You Use on YouTube?
Though there is no restriction about the numbers of the YouTube tags, you should keep the total characters of all tags within 400 characters. In most cases, 5-8 tags are appreciated for a YouTube video. It is recommended to add as many relevant tags as you can, such as brand-specific tags, YouTube auto-suggest tags, or tags created with some tag generator.
3. Do Tags on YouTube Get More Views?
The short answer is Yes. Since Google is encouraging people to use tags to help them understand your video content, then it can recommend the videos to relevant users accordingly. With tags, YouTube can categorize your videos and make them discoverable easier. For example, when you search tag #FilmoraSchoolStory in YouTube, you can see all the videos with the tag in the search result. allowing viewers to find your content more easily.
Retouch YouTube Videos with Filmora
There are lots of filters, overlays and effects pre-programmed in Wondershare Filmora video editor , you can improve YouTube videos without costing any extra fees if you’ve subscribed to Filmora.
Richard Bennett
Richard Bennett is a writer and a lover of all things video.
Follow @Richard Bennett
Effortless YouTube Video to Text Conversion at No Cost
How to Transcribe a YouTube Video for FREE
Richard Bennett
Mar 27, 2024• Proven solutions
If you want to transcribe your videos to make the dialogs and speeches available in text format, you can use YouTube Transcribe feature that the streaming site offers for free. In this article, I’ll share with you a couple of methods to transcribe a YouTube video for free.
- Part 1: Transcribe YouTube Video Automatically for Free [2 Ways]
- Part 2: Transcribe YouTube Video to Text Online with Third-Party Service
- Part 3: Benefits of Transcribing YouTube Videos
- Part 4: YouTube Video Transcription FAQs
Part 1: How to Transcribe YouTube Video Automatically for Free [2 Ways]
Besides the basic video editing features on the YouTube platform, you can now quickly transcribe YouTube videos to the text as well. The good thing is, you can either use the automatic transcription feature that YouTube offers, or upload it manually while adjusting the timing as you go further.
Below are the two methods to transcribe your YouTube videos for free:
Method 1: Use the Automated Transcription Service on YouTube
As the name suggests, YouTube automatic transcription service works automatically. This means you don’t even have to click the ‘Transcribe’ button anymore to transcribe a YouTube video, and the website takes care of it on its own. All you need to do is, choose English as the language of the video when setting up subtitles. You can follow the instructions given below to do so:
Step 1 Upload a Video
Sign in to your YouTube account, click your profile picture from the top-right corner, and click YouTube Studio from the menu. Next, click CREATE from the upper-right corner, click Upload videos from the menu, and drag and drop a video from your computer to the Upload videos box that appears next.

Step 2 Select Transcription Language
On the Details page of the next box that appears, scroll down and click MORE OPTIONS, and select English in the Video language drop-down list under the Language, subtitles, and closed captions (CC) section.

Step 3 Publish the Video
Follow the on-screen instructions from this point to publish the video, and wait while YouTube automatically transcribes and adds the close captions to it.
Note: Depending on the duration of the clip, the time YouTube would take to transcribe may vary.
After YouTube has transcribed the video, you can download the transcription file in your preferred format. The instructions are given below explain how you can do so:
- Get to the Subtitles Window
While on the YouTube Studio page, click Subtitles from the left pane to go to the Channel subtitles page. And then click the video you want to modify.
- Get to Classic Studio
In the video subtitle page of the target video, hover mouse on the Published Automatic status under the Subtitles column, click the Options icon (with three vertical dots) that appears, and click Edit on Classic Studio.

- Download Transcription File
Click and open the Actions drop-down list from the top-left corner of the left pane, click your preferred transcription format including .vtt, .srt and .sbv from the list, and save the file on your local hard disk.

Method 2: Get YouTube Transcription when Watching
In addition, if you are watching any other video, you can make YouTube transcribe that for you as well. You can follow the instructions given below to get the YouTube video to text transcription:
Step 1: Play the Video
Go to the video on YouTube and start playing it. Make sure NOT to get to full-screen mode as doing so would hide the option to transcribe the clip.
Step 2: Enable Transcription
Click the More icon (with three horizontal dots) from under the bottom-right corner of the video player, and click Open transcript to see the video transcription in the Transcript pane that appears in the right.
Step 3: Manage Timestamps
Click the Options icon (with three vertical dots) from the top-right corner of the Transcript pane, and click Toggle timestamp to enable or disable the timestamps in the video transcription.
Limitations of Using YouTube Transcribe
Although YouTube’s automatic transcription is a decent feature that saves you a lot of time, since Google uses machine learning algorithms to convert the speech to text, the level of accuracy may vary depending on the accent of the speaker, and the clarity of the audio the video has. Also, even sometime you may not be satisfied with the end-results.
Alternatively, you can use Kapwing to transcribe a YouTube video and download the transcription file with the below step-by-step instructions:
Step 1: Add YouTube Video
Copy the URL of YouTube video you want to transcribe, go to https://www.kapwing.com/subtitles , paste the URL in the Paste a URL field, wait while Kapwing fetches the content of the video, and opens the Add subtitles to Video page.
Step 2: Transcribe the Video
Click Auto-generate from the right window, and follow the on-screen instructions to transcribe YouTube video to text.

Step 3: Download the Transcription File
Click Download SRT from the left pane, and follow the instructions from there to download the transcription file in *.srt format.

Pros
- Kapwing is free to use
- The auto-transcription process is quick and less tedious
- Kapwing also allows manual transcription and uploading of an existing *.srt file
Cons
- The auto-transcribed text might lack accuracy as the task is done by the speech-to-text tools that work in the background
You can follow the step-by-step instructions to transcribe a YouTube video and download the transcription file using Kapwing:
Step 1: Add YouTube Video
Copy the URL of YouTube video you want to transcribe, go to https://www.kapwing.com/subtitles , paste the URL in the Paste a URL field, wait while Kapwing fetches the content of the video, and opens the Add subtitles to Video page.
Step 2: Transcribe the Video
Click Auto-generate from the right window, and follow the on-screen instructions to transcribe YouTube video to text.
Step 3: Download the Transcription File
Click Download SRT from the left pane, and follow the instructions from there to download the transcription file in *.srt format.
Pros
- Kapwing is free to use
- The auto-transcription process is quick and less tedious
- Kapwing also allows manual transcription and uploading of an existing *.srt file
Cons
- The auto-transcribed text might lack accuracy as the task is done by the speech-to-text tools that work in the background
Part 3: Benefits of Transcribing YouTube Videos
You may need video transcriptions for several reasons, such as analyzing the summary of the entire speech in the video, extracting a single phrase or quote that was spoken in the clip, or making the video helpful even for those suffering from hearing impairment. When you transcribe a YouTube video, the transcript can be useful in many ways. Some of the most common benefits of transcribing a video include:
- Search Engine Optimization
When you add subtitles, the text can appear in Google search results when someone types a similar phrase in the search box. This helps get more views to your videos, thus giving your channel popularity, and you, monetary gains in the long run.
- Accent
If the speaker in the video is from a different region and is using an accent that you are not much comfortable with, you can turn on the subtitles and read the dialogs along with the video.
- Repurposing on Blogs
If you own a blog that you have embedded your video to, the transcription could be used to add text to it so the target audience can get a fair idea of what the video is all about. This is useful because many people prefer reading over watching.
YouTube Video Transcription FAQs
1. How to Transcribe YouTube Video to Text
Usually the transcription files have *.srt extension that are globally accepted and supported by almost all media players. However, there might be instances when you want to have the subtitles in plain text.
That said, to convert an SRT file to TXT, you can:
- Right-click the SRT file
- Go to Rename
- Replace srt with txt and press Enter
- Click OK on the confirmation box that appears next to convert SRT to TXT
After this, you can simply double-click the file, and read and modify the transcribed content as needed.
2. How to Edit and Upload Edited Transcript to YouTube
If you made any modifications to the transcript that was automatically generated by YouTube or any other third-party transcription tool, you can follow the steps given below to upload the new file to the YouTube video:
- Go to YouTube Studio and then to the Channel subtitles page as explained earlier
- Expand the Languages column of the target video
- Click the Options icon that appears under the Subtitles column when you hover mouse on to it
- Click Edit on Classic Studio
- On the next page, click Edit from the top-right corner

- Click to open the Actions drop-down list from the upper-left corner
- Click Upload a file
- Follow the on-screen instructions from there to upload the modified transcription file
- Click Save Changes from the top-right corner of the page when done
Conclusion
If you are looking for a quick and easy way of adding subtitles to your videos, letting YouTube transcribe for you could be a good approach. However, because these auto-generated transcriptions are created by machine learning algorithms, their accuracy cannot be counted on. Therefore, the best way to get the job done accurately is, let YouTube auto-transcribe your video, download the transcription file, make the necessary changes to it, and then upload the file back to the video.
Richard Bennett
Richard Bennett is a writer and a lover of all things video.
Follow @Richard Bennett
Richard Bennett
Mar 27, 2024• Proven solutions
If you want to transcribe your videos to make the dialogs and speeches available in text format, you can use YouTube Transcribe feature that the streaming site offers for free. In this article, I’ll share with you a couple of methods to transcribe a YouTube video for free.
- Part 1: Transcribe YouTube Video Automatically for Free [2 Ways]
- Part 2: Transcribe YouTube Video to Text Online with Third-Party Service
- Part 3: Benefits of Transcribing YouTube Videos
- Part 4: YouTube Video Transcription FAQs
Part 1: How to Transcribe YouTube Video Automatically for Free [2 Ways]
Besides the basic video editing features on the YouTube platform, you can now quickly transcribe YouTube videos to the text as well. The good thing is, you can either use the automatic transcription feature that YouTube offers, or upload it manually while adjusting the timing as you go further.
Below are the two methods to transcribe your YouTube videos for free:
Method 1: Use the Automated Transcription Service on YouTube
As the name suggests, YouTube automatic transcription service works automatically. This means you don’t even have to click the ‘Transcribe’ button anymore to transcribe a YouTube video, and the website takes care of it on its own. All you need to do is, choose English as the language of the video when setting up subtitles. You can follow the instructions given below to do so:
Step 1 Upload a Video
Sign in to your YouTube account, click your profile picture from the top-right corner, and click YouTube Studio from the menu. Next, click CREATE from the upper-right corner, click Upload videos from the menu, and drag and drop a video from your computer to the Upload videos box that appears next.
Step 2 Select Transcription Language
On the Details page of the next box that appears, scroll down and click MORE OPTIONS, and select English in the Video language drop-down list under the Language, subtitles, and closed captions (CC) section.
Step 3 Publish the Video
Follow the on-screen instructions from this point to publish the video, and wait while YouTube automatically transcribes and adds the close captions to it.
Note: Depending on the duration of the clip, the time YouTube would take to transcribe may vary.
After YouTube has transcribed the video, you can download the transcription file in your preferred format. The instructions are given below explain how you can do so:
- Get to the Subtitles Window
While on the YouTube Studio page, click Subtitles from the left pane to go to the Channel subtitles page. And then click the video you want to modify.
- Get to Classic Studio
In the video subtitle page of the target video, hover mouse on the Published Automatic status under the Subtitles column, click the Options icon (with three vertical dots) that appears, and click Edit on Classic Studio.
- Download Transcription File
Click and open the Actions drop-down list from the top-left corner of the left pane, click your preferred transcription format including .vtt, .srt and .sbv from the list, and save the file on your local hard disk.
Method 2: Get YouTube Transcription when Watching
In addition, if you are watching any other video, you can make YouTube transcribe that for you as well. You can follow the instructions given below to get the YouTube video to text transcription:
Step 1: Play the Video
Go to the video on YouTube and start playing it. Make sure NOT to get to full-screen mode as doing so would hide the option to transcribe the clip.
Step 2: Enable Transcription
Click the More icon (with three horizontal dots) from under the bottom-right corner of the video player, and click Open transcript to see the video transcription in the Transcript pane that appears in the right.
Step 3: Manage Timestamps
Click the Options icon (with three vertical dots) from the top-right corner of the Transcript pane, and click Toggle timestamp to enable or disable the timestamps in the video transcription.
Limitations of Using YouTube Transcribe
Although YouTube’s automatic transcription is a decent feature that saves you a lot of time, since Google uses machine learning algorithms to convert the speech to text, the level of accuracy may vary depending on the accent of the speaker, and the clarity of the audio the video has. Also, even sometime you may not be satisfied with the end-results.
Alternatively, you can use Kapwing to transcribe a YouTube video and download the transcription file with the below step-by-step instructions:
Step 1: Add YouTube Video
Copy the URL of YouTube video you want to transcribe, go to https://www.kapwing.com/subtitles , paste the URL in the Paste a URL field, wait while Kapwing fetches the content of the video, and opens the Add subtitles to Video page.
Step 2: Transcribe the Video
Click Auto-generate from the right window, and follow the on-screen instructions to transcribe YouTube video to text.
Step 3: Download the Transcription File
Click Download SRT from the left pane, and follow the instructions from there to download the transcription file in *.srt format.
Pros
- Kapwing is free to use
- The auto-transcription process is quick and less tedious
- Kapwing also allows manual transcription and uploading of an existing *.srt file
Cons
- The auto-transcribed text might lack accuracy as the task is done by the speech-to-text tools that work in the background
You can follow the step-by-step instructions to transcribe a YouTube video and download the transcription file using Kapwing:
Step 1: Add YouTube Video
Copy the URL of YouTube video you want to transcribe, go to https://www.kapwing.com/subtitles , paste the URL in the Paste a URL field, wait while Kapwing fetches the content of the video, and opens the Add subtitles to Video page.
Step 2: Transcribe the Video
Click Auto-generate from the right window, and follow the on-screen instructions to transcribe YouTube video to text.
Step 3: Download the Transcription File
Click Download SRT from the left pane, and follow the instructions from there to download the transcription file in *.srt format.
Pros
- Kapwing is free to use
- The auto-transcription process is quick and less tedious
- Kapwing also allows manual transcription and uploading of an existing *.srt file
Cons
- The auto-transcribed text might lack accuracy as the task is done by the speech-to-text tools that work in the background
Part 3: Benefits of Transcribing YouTube Videos
You may need video transcriptions for several reasons, such as analyzing the summary of the entire speech in the video, extracting a single phrase or quote that was spoken in the clip, or making the video helpful even for those suffering from hearing impairment. When you transcribe a YouTube video, the transcript can be useful in many ways. Some of the most common benefits of transcribing a video include:
- Search Engine Optimization
When you add subtitles, the text can appear in Google search results when someone types a similar phrase in the search box. This helps get more views to your videos, thus giving your channel popularity, and you, monetary gains in the long run.
- Accent
If the speaker in the video is from a different region and is using an accent that you are not much comfortable with, you can turn on the subtitles and read the dialogs along with the video.
- Repurposing on Blogs
If you own a blog that you have embedded your video to, the transcription could be used to add text to it so the target audience can get a fair idea of what the video is all about. This is useful because many people prefer reading over watching.
YouTube Video Transcription FAQs
1. How to Transcribe YouTube Video to Text
Usually the transcription files have *.srt extension that are globally accepted and supported by almost all media players. However, there might be instances when you want to have the subtitles in plain text.
That said, to convert an SRT file to TXT, you can:
- Right-click the SRT file
- Go to Rename
- Replace srt with txt and press Enter
- Click OK on the confirmation box that appears next to convert SRT to TXT
After this, you can simply double-click the file, and read and modify the transcribed content as needed.
2. How to Edit and Upload Edited Transcript to YouTube
If you made any modifications to the transcript that was automatically generated by YouTube or any other third-party transcription tool, you can follow the steps given below to upload the new file to the YouTube video:
- Go to YouTube Studio and then to the Channel subtitles page as explained earlier
- Expand the Languages column of the target video
- Click the Options icon that appears under the Subtitles column when you hover mouse on to it
- Click Edit on Classic Studio
- On the next page, click Edit from the top-right corner
- Click to open the Actions drop-down list from the upper-left corner
- Click Upload a file
- Follow the on-screen instructions from there to upload the modified transcription file
- Click Save Changes from the top-right corner of the page when done
Conclusion
If you are looking for a quick and easy way of adding subtitles to your videos, letting YouTube transcribe for you could be a good approach. However, because these auto-generated transcriptions are created by machine learning algorithms, their accuracy cannot be counted on. Therefore, the best way to get the job done accurately is, let YouTube auto-transcribe your video, download the transcription file, make the necessary changes to it, and then upload the file back to the video.
Richard Bennett
Richard Bennett is a writer and a lover of all things video.
Follow @Richard Bennett
Also read:
- PremierPC Sync Visuals & Vibrant Tunes Unite
- In 2024, Cost-Effective Recorder Selections for YouTube Vloggers
- [Updated] Elevating Engagement The Complete Guide to YouTubing and FB Posting
- In 2024, Creating Compelling, Cost-Free YouTube Intros
- Step Up Your Content Learn How to Make Captivating YouTube Shorts
- Crafting Captivating Cinematic Experiences in YouTube Videos
- Video Journey Mastery 10 Leading Apps to Up Your Youtube Short Game
- In 2024, Awe-Inspiring Allure Top YouTube Magic Editing Wonders
- 2024 Approved 10 Comprehensible & Cost-Free Subtitle Downloader Sites
- In 2024, Capture Clarity High-Quality Screen Recordings for YouTubers (PC/Mac)
- [Updated] Breaking Into Livestrances A Gamers' Guide to YouTube Success
- Rookie Recommendations Simple, Profitable YouTube Purchases
- 10 Best Desktop & Online GIF Tools Ranked
- [Updated] Banishing Black Edges on Your YouTube Video
- [New] Enhance Listening Pleasure Constructing a YouTube Playlist
- [Updated] Compare and Contrast The Crème De La Crème of Free Edits
- 2024 Approved Boosting Yield Strategies for Successful Money-Making on Mobile YouTube
- [Updated] Creating a Viral YouTube Sensation Simplified Action Plan
- Elevate Your YouTube Presence with Optimal Post Times
- Unlock Video Potential Leading Tools Turning YouTubes to Avis
- YouTube in the Classroom Best Practices and Tips for Educators
- Conquer Massive Content Views on YouTube Efficiently for 2024
- Discover How to Craft Videos Flawlessly in 8 Tools
- [New] Cross-Platform Multistreaming for Enhanced Viewership
- Superior Streaming Made Simple Enabling AV1 in YouTube
- 2024 Approved Essential Tips for Crafting YouTube Image Marketing
- [New] Boost YouTube Video Performance with Rapid Rendering Methods
- Game Masters YouTube Money Hacks
- 2024 Approved Crafting Visibility on YouTube The Ultimate Guide to Featured Channel Placement
- [New] Breakthrough YouTube Success Essential Tips From Creator Studio Guide
- Navigating the World of YouTube Live Visuals
- Enchanting Vistas Thumbnail Visuals for 2024
- Navigating Netizen Networks Examining Your and Competing Channels
- [New] Demystifying YouTube SEO Terminology and Tactics
- [New] Dissecting the Income From a Million on YouTube
- In 2024, Bridging Creativity & Engagement - Anime Subscribe Buttons with Filmora
- [New] Culinary Callings Innovative Naming for Foodie Channels
- 2024 Approved Elevate Your Online Presence A Guide to Thriving YouTube Branding
- [Updated] Best YouTube Video Ideas to Spark Inspiration
- Best Free YouTube Ending Creators - Top 6 Picks!
- In 2024, Essential YouTube to Mp3 Conversion Apps Reviewed
- 2024 Approved Constructing YouTube Playlists Made Simple
- 2024 Approved A Step-by-Step on YouTube Annotations
- [Updated] Climbing the YouTube Search Rankings Key SEO Strategies Unveiled
- New 2024 Approved Generate Speech From Text at No Charge - Ranking of Best 9 Free Services, 2023
- How to Update Apple iPhone 7 Plus without iTunes? | Dr.fone
- [New] Captivating Images Mastering the Art of Motion Blur in PS
- New 2024 Approved Unlock Twitter Video Aspect Ratios in Seconds
- What are Location Permissions Life360 On Tecno Pova 5? | Dr.fone
- In 2024, 3 Ways to Unlock iPhone 6 Plus without Passcode or Face ID | Dr.fone
- New In 2024, The Ultimate Guide to Video Editing on Windows 11 Free & Paid Tools
- How to convert AVCHD MTS to MP4 for Redmi 12 5G?
- In 2024, 4 Most-Known Ways to Find Someone on Tinder For Vivo Y78 5G by Name | Dr.fone
- Immediate Access Best 5 Convertors, No Download Required
- Retro Revival Simple Steps to Achieve a VHS Look in FCP for 2024
- In 2024, How to Bypass Apple iPhone 14 Pro Max Passcode Easily Video Inside | Dr.fone
- In 2024, How to Transfer Data from Asus ROG Phone 8 to Samsung Phone | Dr.fone
- Updated 2024 Approved Add a Touch of Pro Best Bokeh Effect Apps for iPhone and Android
- Decoding Instagram's Max Video Length Rule
- Elevating Your Audio Experience with the Best Microphones for MacOS
- Enchanted Realms on Reels
- Simple ways to get recent calls back from ZTE Nubia Flip 5G
- In 2024, 3 Effective Ways to Unlock iCloud Account Without Password From Apple iPhone 7
- In 2024, Resolving Social Media Puzzle Zippy FB Videos Not in View
- Title: "2024 Approved Crafting the Ideal Set of Keywords for Your Youtube Videos"
- Author: Kevin
- Created at : 2024-05-25 14:24:46
- Updated at : 2024-05-26 14:24:46
- Link: https://youtube-videos.techidaily.com/2024-approved-crafting-the-ideal-set-of-keywords-for-your-youtube-videos/
- License: This work is licensed under CC BY-NC-SA 4.0.
