
:max_bytes(150000):strip_icc()/is-godaddy-down-or-is-it-just-you-5069837-9623a5accdec4372a4b5e8353c43adea.jpg)
"2024 Approved Crafting Animation Dynamic, Bouncy Text Techniques"
Crafting Animation: Dynamic, Bouncy Text Techniques
How to Create Animated Bouncing Text

Liza Brown
Mar 27, 2024• Proven solutions
Earlier, you learned how to have a bounce text effect in Adobe After Effects . However, because AE is a complex application and has a steep learning curve, this section explains the two alternative ways to get the same effect on your existing video footage.
Method 1: How to Create Bouncing Text in Filmora Video Editor?
When talking about Wondershare Filmora , the application is populated with several presets for texts and titles, animations, effects, filters, and much more.
These pre-built templates not only make your task easier, they also save your decent amount of time that you would spend while working with After Effects or any other similar app that requires you to build things from scratch.
You can follow the instructions given below to add animated bounce text to any of your video footages with Filmora:
Step 1: Add a Footage to Timeline
Launch Wondershare Filmora on your Windows or Mac PC. By default, the aspect ratio of the project is set to 16:9. Click anywhere inside the Media window at the upper-left section, and select and import footage you want to add bounce text to.
Step 2: Insert Text and Add Bounce Effect
Click Titles from the standard toolbar at the top, and click and drag your preferred title template from the Library to the timeline. In case you don’t want any specific animation or style on the title, you can use the default title.
In the timeline, double-click the title you just added, use the upper-left section to edit the text, go to the Animation tab from the left pane, scroll down the list, and double-click the Up Down 1 or Up Down 2 preset to apply the bounce effect to the credits. Click OK to save the changes and to get back to the main window.

Step 3: Add Shake Filters
Go to Effects from the standard toolbar, expand the Filters category from the left pane, and click Shake. From the Library window, click and drag your preferred shake filter to the timeline. Here, I will choose Mild.

You can customize the default effect by double-clicking the shake filter in the timeline, using the sliders in the upper-left area of the interface to make necessary adjustments, and then clicking OK to save the changes and to get back to the previous interface.

Step 4: Export the Final Output
Click EXPORT from the top of the interface, go to the Local tab in the Export box, choose your preferred output format from the list in the left, make required customizations from the right pane, and click EXPORT from the bottom-right corner to export the video.

Now, you can add the bouncing text video and the background video to the timeline, and then place the bouncing text video above the background video track.
Double click the text track, go to the Chroma Key effect, select the Color Picker tool, and click anywhere in the Preview window to get things right. Finally, export the entire project to your preferred output format as explained in Step 4.
As explained before, Wondeshare Filmora makes the entire process of creating and adding bounce text effect pretty simple. With all the pre-build templates, and the versatility of the options that can be used to customize those presets, you can come up with the effects that are usually obtained when you start generating them from the scratch.


Method 2: Generate Animated Bouncing Texts Online
If you don’t want any heavy and resource-intensive app on your PC merely for some special text effects, you can try any of the online solutions instead. The benefit of using any such web app is that all the processing is done on site’s server, and it is only a web browser and an Internet connection that you need to have at your side.
Some most trusted websites to generate bounce text are listed below:
1. ENGFTO
Website: https://engfto.com/index/create%5Fanimated%5Fbouncing%5Ftext/0-26

You can follow the instructions given below to use Engfto to generate bouncing text for your footages:
Step 1: Get to the Animated Bouncing Text Page
Launch your favorite web browser, and go to the link given above to get to the Engfto’s animated bouncing text page.
Step 2: Customize Text and Preferences
Modify the values in the fields under the SIZE AREA and TEXT sections to customize the text area, the text itself, its size, and font. Next, adjust the values in the fields under the EFFECT PARAMETERS section to get the required bounce effect. Also, use the fields under the BACKGROUND section to either change the background color, or pick a background image from your PC.
Step 3: Obtain the Animated Text
Click the SAVE GIF ANIMATION button from the lower section of the page to download the animated text to your PC.
2. Loading.io
The instructions given below explain how to use Loading.io to get animated bounce text effect for your footages:
Step 1: Get to the Loading.io Webpage
Launch your favorite web browser and go to https://loading.io/animation/text/ .
Step 2: Customize the Text and Choose Animation Effect

Use the options available on the webpage to type your text, and change its font, color, background, transparency level etc. Select Bounce (or any of its variants) from the Animation drop-down list, and adjust the speed using the Speed slider.
Step 3: Obtain the Text
Click your preferred option from next to the Download As section to download the animated text to your PC.
Note: Regardless of the web solution you choose to generate and obtain animated bounce text, you will still need a post-production tool to add the downloaded text to your footage.
Conclusion
Generating bounce text effect is much simpler when you use Wondershare Filmora or any of the online solutions as explained in Method 2. While the former gives you more flexibility when it comes to customizations, the latter doesn’t require any app to be installed on your PC. In addition, many times the web apps offer their services for free, and therefore they are preferred by the novice users who are not much into post-production processes.
Liza Brown
Liza Brown is a writer and a lover of all things video.
Follow @Liza Brown
Liza Brown
Mar 27, 2024• Proven solutions
Earlier, you learned how to have a bounce text effect in Adobe After Effects . However, because AE is a complex application and has a steep learning curve, this section explains the two alternative ways to get the same effect on your existing video footage.
Method 1: How to Create Bouncing Text in Filmora Video Editor?
When talking about Wondershare Filmora , the application is populated with several presets for texts and titles, animations, effects, filters, and much more.
These pre-built templates not only make your task easier, they also save your decent amount of time that you would spend while working with After Effects or any other similar app that requires you to build things from scratch.
You can follow the instructions given below to add animated bounce text to any of your video footages with Filmora:
Step 1: Add a Footage to Timeline
Launch Wondershare Filmora on your Windows or Mac PC. By default, the aspect ratio of the project is set to 16:9. Click anywhere inside the Media window at the upper-left section, and select and import footage you want to add bounce text to.
Step 2: Insert Text and Add Bounce Effect
Click Titles from the standard toolbar at the top, and click and drag your preferred title template from the Library to the timeline. In case you don’t want any specific animation or style on the title, you can use the default title.
In the timeline, double-click the title you just added, use the upper-left section to edit the text, go to the Animation tab from the left pane, scroll down the list, and double-click the Up Down 1 or Up Down 2 preset to apply the bounce effect to the credits. Click OK to save the changes and to get back to the main window.
Step 3: Add Shake Filters
Go to Effects from the standard toolbar, expand the Filters category from the left pane, and click Shake. From the Library window, click and drag your preferred shake filter to the timeline. Here, I will choose Mild.
You can customize the default effect by double-clicking the shake filter in the timeline, using the sliders in the upper-left area of the interface to make necessary adjustments, and then clicking OK to save the changes and to get back to the previous interface.
Step 4: Export the Final Output
Click EXPORT from the top of the interface, go to the Local tab in the Export box, choose your preferred output format from the list in the left, make required customizations from the right pane, and click EXPORT from the bottom-right corner to export the video.
Now, you can add the bouncing text video and the background video to the timeline, and then place the bouncing text video above the background video track.
Double click the text track, go to the Chroma Key effect, select the Color Picker tool, and click anywhere in the Preview window to get things right. Finally, export the entire project to your preferred output format as explained in Step 4.
As explained before, Wondeshare Filmora makes the entire process of creating and adding bounce text effect pretty simple. With all the pre-build templates, and the versatility of the options that can be used to customize those presets, you can come up with the effects that are usually obtained when you start generating them from the scratch.
Method 2: Generate Animated Bouncing Texts Online
If you don’t want any heavy and resource-intensive app on your PC merely for some special text effects, you can try any of the online solutions instead. The benefit of using any such web app is that all the processing is done on site’s server, and it is only a web browser and an Internet connection that you need to have at your side.
Some most trusted websites to generate bounce text are listed below:
1. ENGFTO
Website: https://engfto.com/index/create%5Fanimated%5Fbouncing%5Ftext/0-26
You can follow the instructions given below to use Engfto to generate bouncing text for your footages:
Step 1: Get to the Animated Bouncing Text Page
Launch your favorite web browser, and go to the link given above to get to the Engfto’s animated bouncing text page.
Step 2: Customize Text and Preferences
Modify the values in the fields under the SIZE AREA and TEXT sections to customize the text area, the text itself, its size, and font. Next, adjust the values in the fields under the EFFECT PARAMETERS section to get the required bounce effect. Also, use the fields under the BACKGROUND section to either change the background color, or pick a background image from your PC.
Step 3: Obtain the Animated Text
Click the SAVE GIF ANIMATION button from the lower section of the page to download the animated text to your PC.
2. Loading.io
The instructions given below explain how to use Loading.io to get animated bounce text effect for your footages:
Step 1: Get to the Loading.io Webpage
Launch your favorite web browser and go to https://loading.io/animation/text/ .
Step 2: Customize the Text and Choose Animation Effect
Use the options available on the webpage to type your text, and change its font, color, background, transparency level etc. Select Bounce (or any of its variants) from the Animation drop-down list, and adjust the speed using the Speed slider.
Step 3: Obtain the Text
Click your preferred option from next to the Download As section to download the animated text to your PC.
Note: Regardless of the web solution you choose to generate and obtain animated bounce text, you will still need a post-production tool to add the downloaded text to your footage.
Conclusion
Generating bounce text effect is much simpler when you use Wondershare Filmora or any of the online solutions as explained in Method 2. While the former gives you more flexibility when it comes to customizations, the latter doesn’t require any app to be installed on your PC. In addition, many times the web apps offer their services for free, and therefore they are preferred by the novice users who are not much into post-production processes.
Liza Brown
Liza Brown is a writer and a lover of all things video.
Follow @Liza Brown
A Step-by-Step Approach to Generating Income with Trailers
How to Create a YouTube Channel Trailer to Increase Revenue

Richard Bennett
Mar 27, 2024• Proven solutions
Many YouTube content creators assume that no one checks out their channel trailer . Some may not even know about the concept of a trailer, while others are not sure how to create one. We will explain the concept of a YouTube channel trailer, how to make a great trailer, and how to get more subscribers and views through a quality trailer on your YouTube channel.
- Part1: What is a YouTube Channel Trailer
- Part2: How to Add YouTube Trailer to Channel
- Part3: Best YouTube Trailer Maker
- Part4: 5 Tips for Creating a Great Trailer
Part 1: What is a YouTube Channel Trailer?
Think of a channel trailer as an introduction to a movie or television show. You can choose to show the trailer to anyone who is not subscribe to your channel, when they land on your channel page.
The objective of a trailer is to hook the audience, promote your personality and content, and convince them it will be worth their time to check out some of your videos. And you must do all these things within 30 to 45 seconds !
Most content creators can benefit from creating a channel trailer. Unless you are a famous personality through a sports/acting/television/singing career, people who land on your channel may have no idea who you are. A proper trailer gives them an introduction to your personality and content.
Part 2: How to Add YouTube Trailer to Channel
After you know how to create a YouTube trail, why not add your new created trailer to YouTube channel right now. Here is the right steps.
Step 1: Go to channel
Log in your YouTube account. Then click your users icon to find My channel. At the top right corner, click CUSTOMIZE CHANNEL and then choose For new visitors.
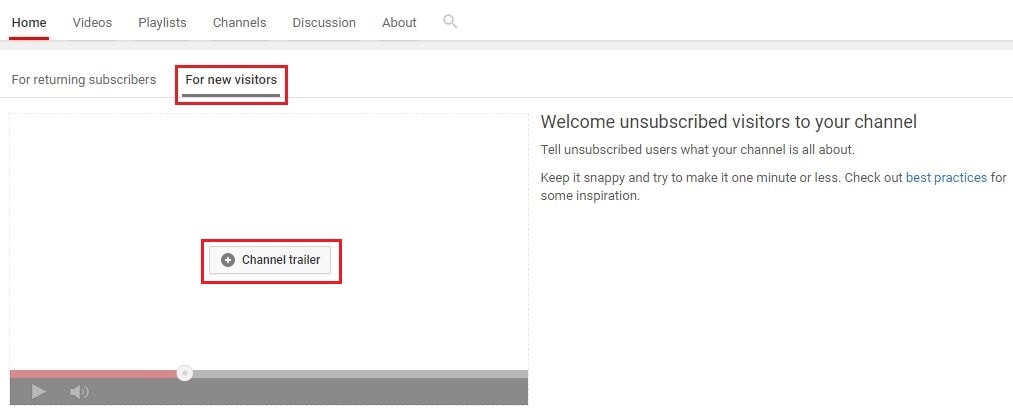
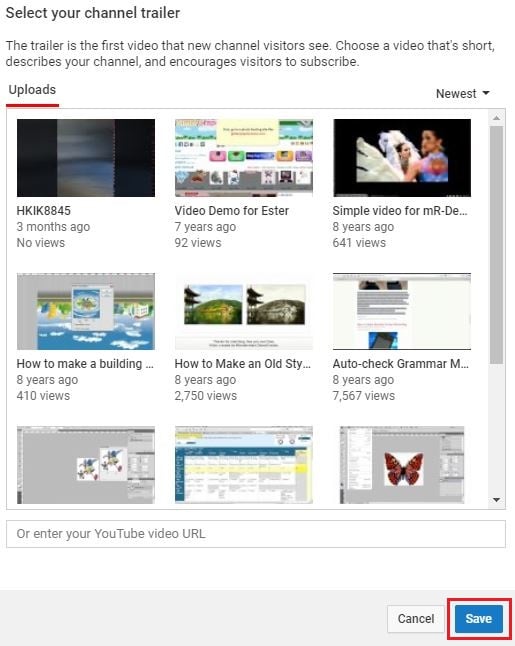
Step 2: Add trailer to YouTube
After clicking plus icon in the middle to add your amazing trailer, a playlist window will appear. Now select the trailer you want to use. Click Save. Then you will see a trailer is added. You can also change trailer or remove trailer.
Part 3: Best Channel YouTube Trailer Maker
1. Wondershare Filmora
Searching for a free and powerful video editing tool that you can use on both Windows and Mac computers? Wondershare Filmora may be the ideal program for you. It is very easy to use, even for beginners who do not have that much editing experience.
Features:
- It is free and very easy to add captions to the trailer video.
- There are many interesting options for adding video effects within the program.
- It features a modern interface that is intuitive and easy to operate. All the important controls and settings are easily accessible through the menus and submenus.
- The program operates smoothly, even on older machines.
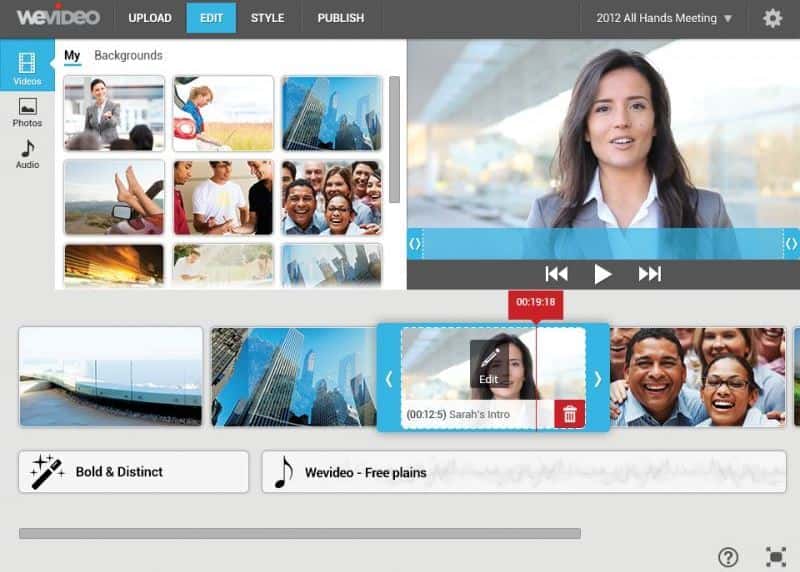
2. WeVideo
Hoping to edit content while you are on the go? By using a less powerful laptop, library computer or a friend’s device, you could edit your trailer within a couple hours. WeVideo is an online video editor that makes it so easy to edit videos in up to 4K resolution.
Features:
- The program is fast and very easy to use. It does not even require any downloads.
- As it is an online program, there are no compatibility issues with Windows, Mac or even Chromebook devices.
- It is possible to mix and match up to 600 different formats for graphics, audio, video and other effects.
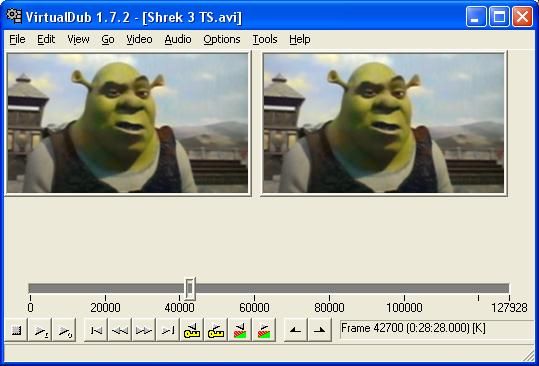
3. Virtual Dub
If you are seeking something that is open source and free, you may be interested in Virtual Dub. It is a completely free and open source program that you can use for quick capturing, encoding and editing video.
While it is not going to give you the same power and options as some of the other editors, it is a very simple tool that can be effective for specific use cases. If you are just hoping to record, encode and quickly put together a 30 second YouTube trailer, it is the ideal program.
Features:
- Offers the ability to capture videos on Windows, Mac and Linux computers.
- Works best with AVI files, but it is possible to use other video formats such as MKV and MP4 as well.
- It is possible to create video using a series of image files - or merge image files into existing video content.
Part 4: 5 Tips for Creating a Great Trailer
1. Let Viewers Know What is Coming
People appreciate routine. You can mention how many times a week you create content and the days when you publish. You can also have a brief overview of the type of videos you make, which will tell a new viewer what to expect if they subscribe to your channel!
2. Keep It Short
YouTube trailers that are more than a minute long will not succeed. People have a very short attention span. They want to be hooked immediately. 30 to 45 seconds is the sweet spot, with 30 seconds preferable! It may sound overwhelming to condense everything about your channel into 30 seconds, but that is where a great video script can help! However, sometimes both short videos and long videos work.
3. Use Some Fun Annotations
YouTube is great for having unique and helpful graphics on the screen while your video is playing. Having some fun and useful annotations, such as the days you make videos or a subscribe icon, during the intro video can be very helpful to new viewers. They also help to boost viewer engagement with your content!

4. Assume You Have New Viewers
Do not create a YouTube channel trailer with inside jokes or comments. This trailer is for people who know nothing about you or your channel. You are trying to hook them into your content, not provide a few laughs to existing subscribers.
5. Update Your Trailer Regularly
As a content creator, you may find that your brand changes every six months to a year. Maybe you change up your look, type of content, frequency of uploads or other parts of the channel. Ensure you are updating your trailer each time you make significant changes to your channel!
Conclusion
Creating a channel trailer for your YouTube page is a wonderful way to introduce a new audience to your content. They learn about you and the topics that you are passionate about. It convinces them to watch one of your videos and subscribe to your channel. And by using one of the YouTube Trailer Maker software options above, you will be creating quality trailers for your channel in no time!
Richard Bennett
Richard Bennett is a writer and a lover of all things video.
Follow @Richard Bennett
Richard Bennett
Mar 27, 2024• Proven solutions
Many YouTube content creators assume that no one checks out their channel trailer . Some may not even know about the concept of a trailer, while others are not sure how to create one. We will explain the concept of a YouTube channel trailer, how to make a great trailer, and how to get more subscribers and views through a quality trailer on your YouTube channel.
- Part1: What is a YouTube Channel Trailer
- Part2: How to Add YouTube Trailer to Channel
- Part3: Best YouTube Trailer Maker
- Part4: 5 Tips for Creating a Great Trailer
Part 1: What is a YouTube Channel Trailer?
Think of a channel trailer as an introduction to a movie or television show. You can choose to show the trailer to anyone who is not subscribe to your channel, when they land on your channel page.
The objective of a trailer is to hook the audience, promote your personality and content, and convince them it will be worth their time to check out some of your videos. And you must do all these things within 30 to 45 seconds !
Most content creators can benefit from creating a channel trailer. Unless you are a famous personality through a sports/acting/television/singing career, people who land on your channel may have no idea who you are. A proper trailer gives them an introduction to your personality and content.
Part 2: How to Add YouTube Trailer to Channel
After you know how to create a YouTube trail, why not add your new created trailer to YouTube channel right now. Here is the right steps.
Step 1: Go to channel
Log in your YouTube account. Then click your users icon to find My channel. At the top right corner, click CUSTOMIZE CHANNEL and then choose For new visitors.
Step 2: Add trailer to YouTube
After clicking plus icon in the middle to add your amazing trailer, a playlist window will appear. Now select the trailer you want to use. Click Save. Then you will see a trailer is added. You can also change trailer or remove trailer.
Part 3: Best Channel YouTube Trailer Maker
1. Wondershare Filmora
Searching for a free and powerful video editing tool that you can use on both Windows and Mac computers? Wondershare Filmora may be the ideal program for you. It is very easy to use, even for beginners who do not have that much editing experience.
Features:
- It is free and very easy to add captions to the trailer video.
- There are many interesting options for adding video effects within the program.
- It features a modern interface that is intuitive and easy to operate. All the important controls and settings are easily accessible through the menus and submenus.
- The program operates smoothly, even on older machines.
2. WeVideo
Hoping to edit content while you are on the go? By using a less powerful laptop, library computer or a friend’s device, you could edit your trailer within a couple hours. WeVideo is an online video editor that makes it so easy to edit videos in up to 4K resolution.
Features:
- The program is fast and very easy to use. It does not even require any downloads.
- As it is an online program, there are no compatibility issues with Windows, Mac or even Chromebook devices.
- It is possible to mix and match up to 600 different formats for graphics, audio, video and other effects.
3. Virtual Dub
If you are seeking something that is open source and free, you may be interested in Virtual Dub. It is a completely free and open source program that you can use for quick capturing, encoding and editing video.
While it is not going to give you the same power and options as some of the other editors, it is a very simple tool that can be effective for specific use cases. If you are just hoping to record, encode and quickly put together a 30 second YouTube trailer, it is the ideal program.
Features:
- Offers the ability to capture videos on Windows, Mac and Linux computers.
- Works best with AVI files, but it is possible to use other video formats such as MKV and MP4 as well.
- It is possible to create video using a series of image files - or merge image files into existing video content.
Part 4: 5 Tips for Creating a Great Trailer
1. Let Viewers Know What is Coming
People appreciate routine. You can mention how many times a week you create content and the days when you publish. You can also have a brief overview of the type of videos you make, which will tell a new viewer what to expect if they subscribe to your channel!
2. Keep It Short
YouTube trailers that are more than a minute long will not succeed. People have a very short attention span. They want to be hooked immediately. 30 to 45 seconds is the sweet spot, with 30 seconds preferable! It may sound overwhelming to condense everything about your channel into 30 seconds, but that is where a great video script can help! However, sometimes both short videos and long videos work.
3. Use Some Fun Annotations
YouTube is great for having unique and helpful graphics on the screen while your video is playing. Having some fun and useful annotations, such as the days you make videos or a subscribe icon, during the intro video can be very helpful to new viewers. They also help to boost viewer engagement with your content!
4. Assume You Have New Viewers
Do not create a YouTube channel trailer with inside jokes or comments. This trailer is for people who know nothing about you or your channel. You are trying to hook them into your content, not provide a few laughs to existing subscribers.
5. Update Your Trailer Regularly
As a content creator, you may find that your brand changes every six months to a year. Maybe you change up your look, type of content, frequency of uploads or other parts of the channel. Ensure you are updating your trailer each time you make significant changes to your channel!
Conclusion
Creating a channel trailer for your YouTube page is a wonderful way to introduce a new audience to your content. They learn about you and the topics that you are passionate about. It convinces them to watch one of your videos and subscribe to your channel. And by using one of the YouTube Trailer Maker software options above, you will be creating quality trailers for your channel in no time!
Richard Bennett
Richard Bennett is a writer and a lover of all things video.
Follow @Richard Bennett
Also read:
- [Updated] Elite Visionaries Video Realm
- Earnings Breakdown Youtube's AdSense Payments by Thousands of Views for 2024
- Deciphering How T-Series Earns via Youtube for 2024
- No Entry Fees for Films – The Top 10 Free Movie Picks Streaming on YouTube
- Bring Your Spotify Mixes Online 5 Top Playlist Conversion Apps for YouTube
- Top YouTube Networks for Breaking News
- [New] Bridging Worlds New Titles for App Exploration
- Grasp a Wider Audience by Multistreaming on Youtube and Twitch
- [Updated] Designing a Trailer Blueprint to Amplify Channel Income
- 2024 Approved Chuckle Chronicles Top 10 Humoristic YouTube Video Plans
- [Updated] Crafting Your YouTube Content for Specific Crowds
- [New] Convert Spotify Playlist To YouTube 5 Best Tools
- The Premier Selection of 11 Costless YT Moniker Makers
- IPhone/Android Exclusive The Top 10 Non-YouTube Video Platforms
- Becoming a Filmora FCC The Pathway Explained
- Ignite Views Effective Strategies for Optimizing YouTube Collaborations
- Excellent 10 Tech Choices for Livestream Monitoring
- [Updated] Craft a Vibrant Youtube Experience with Tracks
- Skyrocket Your YouTube Rankings with These Insider Moves
- The Essential Toolkit 3D Video Entrances Ranked
- [Updated] Channel Transformation From Zero to Thousand Followers
- Maximizing Engagement Ideal YouTube Thumbnail Dimensions
- Mastering Cross-Platform Collaboration Your YouTube & TikTok Guide
- Mastering YouTube Ultimate Guide to Live 360-Degree Streams
- Resizing YouTube Images Step-by-Step Guide
- Elevate Your Video Rankings with Effective SEO Tactics for 2024
- Skyrocket Your Video Discovery with These Essential YouTube SEO Insights
- 2024 Approved Effortlessly Download Your Favorite YouTube Playlists
- The Ultimate Guide to YouTube Thumbnail Sizes
- [Updated] Decoding the Cost Per Thousand Views on YouTube for Successful Earning
- Leading Free Platforms for YouTube Openings
- In 2024, Brighten Up Your Image Previews Introducing Luminous Frames
- [Updated] 10 Best Non-YouTube Video Platforms IPhone/Android Edition
- Effortless Resolution of Mac's Green Screen Problem for YouTubers
- Skyrocketing Subscribers on YouTube Step-by-Step
- A Guide to Profit Sharing for Creators of Video Clips for 2024
- Essential Video Stock Investment Guides for 2024
- Utilizing Cross-Platform Strategies for Video Success
- Breaking Even on YouTube Key View Figures Explored for 2024
- Avoid These 8 Steps that Newcomers Often Miss on YouTube for 2024
- [New] Elite Channel Explorer Discover Prime Video Status
- Cutting-Edge Tools Free YouTube Intro Creators for 2024
- [Updated] Arcade Avenue A Million Paths in Play
- [New] In 2024, Expand Your Online Horizons Upload 360 Photos with Ease on Mobile Platforms
- Updated The Best of the Best Top Video Editors for Windows 11 PCs
- [Updated] Hide & Discover Instagram Stories Leaders for 2024
- Essential 20 Copyright-Free PUBG Background Galleries
- Calming Harmonics Windows/Mac Direction for 2024
- 2024 Approved Cutting Edge Livestreaming Options Outside of OBS
- In 2024, Wireless Methods to MirrorApple iPhone 13 Pro Max & iPad to Fire Stick With Ease | Dr.fone
- New In 2024, If You Are Looking for a Free Tool to Slow Down the Playback Speed of a Film Clip without Installing Any Program on Your Computer, Kapwing Is One of the Best Online Video Editors that Can Help You Get the Job Done Proficiently
- How To Bypass the Required Apple Store Verification For Apple iPhone 14 Plus
- [Updated] Mastering MP3 Capture Skype Calls, No Cost
- Are Video Reviews of Goods Paid For by Creators for 2024
- New Replace Sony Vegas with These Powerful Windows Video Editing Tools for 2024
- In 2024, Expert-Approved Free FLV Video Editing Solutions
- In 2024, Crafting a Visual Identity A Guide to Perfect Pfp on Discord
- Thinking About Changing Your Netflix Region Without a VPN On Vivo S18? | Dr.fone
- In 2024, How to Unlock Apple iPhone 8 Without Passcode?
- [New] In 2024, A Beginner's Guide to Vimeo Caption Addition
- In 2024, Revolutionizing Video Recording - Insights on CamStudio's Latest Release
- Title: "2024 Approved Crafting Animation Dynamic, Bouncy Text Techniques"
- Author: Kevin
- Created at : 2024-05-25 14:24:19
- Updated at : 2024-05-26 14:24:19
- Link: https://youtube-videos.techidaily.com/2024-approved-crafting-animation-dynamic-bouncy-text-techniques/
- License: This work is licensed under CC BY-NC-SA 4.0.
