
"2024 Approved Cost-Effective Strategies to Combine Videos with Text"
Cost-Effective Strategies to Combine Videos with Text
How to Add Video to Text

Liza Brown
Mar 27, 2024• Proven solutions
It may be challenging to capture the attention of your audience if the video openings or PowerPoint presentations contain too much text. Striking a perfect balance between the visual and textual elements isn’t always easy, especially if the text is the only way to convey essential information to the audience.
Luckily, video editing and presentation software products offer the tools you will need to combine video and text. In this article, we are going to show you how to add a video to text in PowerPoint and Filmora.
Part 1: How to Add Video to Text for Free with PowerPoint?
An effective PowerPoint presentation should contain proportionate amounts of textual and visual elements. Using too many images, videos or animations can make following a presentation difficult, just as too much text can render a presentation too static.
Adding videos to titles or subtitles you include in a slideshow you’re creating in PowerPoint can help you create a presentation that is both informative and visually entertaining. The process of combining videos with text in PowerPoint isn’t overly complicated, but you will still need to go through it several times in order to become familiar with it.
You should start by creating a new slide and adding a textbox to it. Proceed to type the word or phrase into the textbox and go on to format the text. Pick the font that matches the style of your presentation and make sure that the text size is large enough for the video to be visible.
Head over to the Insert tab, select Rectangle from the Shapes menu, and create a rectangular shape over the entire slide. Right-click on the slide and choose the Send to Back option from the menu. In this manner, you will position the rectangle you created behind the textbox.

The next step you will have to take is to create the cut-out of the text within the rectangle. Select both the text and shape you placed in the background before clicking on the Format tab that is located near the end of PowerPoint’s ribbon.
Find the Insert Shape option and choose Subtract from the Merge Shapes drop-down menu. The shape of the text in the textbox will be applied to the object in the background, which enables you to add a video to that text.

Click on the Insert tab, and then choose the Video option from the Media menu. You can insert a video that is stored on a local hard drive or the Internet to PowerPoint. The video will cover the entire slide, so you must right-click on it and select the Send to Back option.
You can then fine-tune the video playback settings from the Playback tab. Preview the results before you move on to the next slide in your presentation, and make necessary adjustments if you don’t like how the video merged with the text.
Part 2: Adding Video to Text in Filmora
Besides presentation software, you can also use video editing software products to add a video to text. Filmora lets you add a video to text in just a few simple steps. You can first make a text video with animation first, and then use the picture in picture feature to add the video to text. Here are the detailed information about how to add a video to text in Filmora.


You should start by creating a new project in Filmora and importing the video you want to add to the text into the project. Click on the Titles tab, and choose the title that matches the visual style of your project.

Set the preferred duration of the title by dragging one of its ends to the left or right after you place it on the timeline, and then double-click on it to customize it. Click on the Advanced button once the Text tab opens and insert the text into the Input Text box.

Proceed to select a font and adjust the text size before deciding if you want to animate the text . When done, you should export the title as a video file, and then import it back into your project.
Now it’s time to add the text video and the background video to the project media library, and then place the two videos one above the other. Since we’re adding video to text, the text video should be placed above the background video.

Click on the video that contains text to gain access to the Video tab of the Editor panel and then expand the Compositing menu. Change the Blending Mode to Multiply, and the text in the overlaying video should be filled with the parts of the footage from the video below it.
Optionally you can enhance the colors in the background video or adjust the size of the text before exporting your project from Filmora.
Conclusion
There are so many different ways to create visually striking content, and adding videos to text is just one among numerous techniques that enable you to make a PowerPoint presentation or an opening of a video more interesting to watch.
Merging text with video is equally easy in PowerPoint and Filmora, so you just have to choose which software better suits your needs and select the materials that fit the style of your project. Learning how to add a video to text won’t take too much of your time, as this process can be completed in just a few quick steps. Which software are you using to add a video to text? Leave a comment below and let us know.
Liza Brown
Liza Brown is a writer and a lover of all things video.
Follow @Liza Brown
Liza Brown
Mar 27, 2024• Proven solutions
It may be challenging to capture the attention of your audience if the video openings or PowerPoint presentations contain too much text. Striking a perfect balance between the visual and textual elements isn’t always easy, especially if the text is the only way to convey essential information to the audience.
Luckily, video editing and presentation software products offer the tools you will need to combine video and text. In this article, we are going to show you how to add a video to text in PowerPoint and Filmora.
Part 1: How to Add Video to Text for Free with PowerPoint?
An effective PowerPoint presentation should contain proportionate amounts of textual and visual elements. Using too many images, videos or animations can make following a presentation difficult, just as too much text can render a presentation too static.
Adding videos to titles or subtitles you include in a slideshow you’re creating in PowerPoint can help you create a presentation that is both informative and visually entertaining. The process of combining videos with text in PowerPoint isn’t overly complicated, but you will still need to go through it several times in order to become familiar with it.
You should start by creating a new slide and adding a textbox to it. Proceed to type the word or phrase into the textbox and go on to format the text. Pick the font that matches the style of your presentation and make sure that the text size is large enough for the video to be visible.
Head over to the Insert tab, select Rectangle from the Shapes menu, and create a rectangular shape over the entire slide. Right-click on the slide and choose the Send to Back option from the menu. In this manner, you will position the rectangle you created behind the textbox.
The next step you will have to take is to create the cut-out of the text within the rectangle. Select both the text and shape you placed in the background before clicking on the Format tab that is located near the end of PowerPoint’s ribbon.
Find the Insert Shape option and choose Subtract from the Merge Shapes drop-down menu. The shape of the text in the textbox will be applied to the object in the background, which enables you to add a video to that text.
Click on the Insert tab, and then choose the Video option from the Media menu. You can insert a video that is stored on a local hard drive or the Internet to PowerPoint. The video will cover the entire slide, so you must right-click on it and select the Send to Back option.
You can then fine-tune the video playback settings from the Playback tab. Preview the results before you move on to the next slide in your presentation, and make necessary adjustments if you don’t like how the video merged with the text.
Part 2: Adding Video to Text in Filmora
Besides presentation software, you can also use video editing software products to add a video to text. Filmora lets you add a video to text in just a few simple steps. You can first make a text video with animation first, and then use the picture in picture feature to add the video to text. Here are the detailed information about how to add a video to text in Filmora.
You should start by creating a new project in Filmora and importing the video you want to add to the text into the project. Click on the Titles tab, and choose the title that matches the visual style of your project.
Set the preferred duration of the title by dragging one of its ends to the left or right after you place it on the timeline, and then double-click on it to customize it. Click on the Advanced button once the Text tab opens and insert the text into the Input Text box.
Proceed to select a font and adjust the text size before deciding if you want to animate the text . When done, you should export the title as a video file, and then import it back into your project.
Now it’s time to add the text video and the background video to the project media library, and then place the two videos one above the other. Since we’re adding video to text, the text video should be placed above the background video.
Click on the video that contains text to gain access to the Video tab of the Editor panel and then expand the Compositing menu. Change the Blending Mode to Multiply, and the text in the overlaying video should be filled with the parts of the footage from the video below it.
Optionally you can enhance the colors in the background video or adjust the size of the text before exporting your project from Filmora.
Conclusion
There are so many different ways to create visually striking content, and adding videos to text is just one among numerous techniques that enable you to make a PowerPoint presentation or an opening of a video more interesting to watch.
Merging text with video is equally easy in PowerPoint and Filmora, so you just have to choose which software better suits your needs and select the materials that fit the style of your project. Learning how to add a video to text won’t take too much of your time, as this process can be completed in just a few quick steps. Which software are you using to add a video to text? Leave a comment below and let us know.
Liza Brown
Liza Brown is a writer and a lover of all things video.
Follow @Liza Brown
How to Edit the Length of a Video on YouTube
How to Edit the Length of a Video on YouTube

Richard Bennett
Mar 27, 2024• Proven solutions
Apart from providing video hosting and sharing features, the YouTube platform also has an online editor which is going to provide you with the possibility to make changes and additions online without having to download any particular program. In this guide, we are going to show you how to make your video shorter or longer with YouTube online video editor.
A Better Alternative on How to Edit YouTube Video Length - Wondershare Filmora is a perfect alternative to edit every single clip frame by frame. Not just to shorten or lengthen the video. It offers quite a lot of opportunities. Watch the video below to know more:
Download Mac Version ](https://tools.techidaily.com/wondershare/filmora/download/ )
For instance, the application is offering non-linear ripple video editing. This is going to allow you to combine multiple video clips and pin them together conveniently. What is more, you can also apply PIP and Green Screen professional effects with just a few clicks. Sure, the YouTube video editor is a perfect solution for those who don’t want to achieve professional quality, but if you do, Wondershare Filmora is without a doubt the far better alternative. This is something that’s going to enable you to edit and re-touch your videos as well as to size them appropriately. Instead of dragging two bars together, you will be able to touch every single frame and size it according to your own particular needs. This is going to result in flawless videos.
How to Edit YouTube Video Length Using the built-in Video Editor
The YouTube video editor is easy to use, and you can easily learn how to do all sorts of changes to your video. Let’s see the things that you need to go through in order to edit the length.
Note: From 20th September 2017 users will no longer be able to use the complimentary editing suite. Check the best YouTube video editor alternatives from this complete guide.
Step 1 Get to the video editor

In order to do so, you would have to go ahead and login into your account. Then, go to the “My Channel” panel and select the video that you want to cut. Once you’ve done this, click on the “Video manager” option and click on the “create” tab which should be located on the right side for the page. There, you will be able to find the “Video Editor”. Of course, you can also add “/editor” to YouTube’s URL, and you would be good to go.
Step 2 Import Your Video
Once you’ve done all of the above, you would have to drag your video in order to cut it’s time. Keep in mind that the videos are made out of a maximum of 50 clips. The site is going to save every single video that you upload as a particular clip which could be properly combined with the rest in order to make one larger video. This is important.
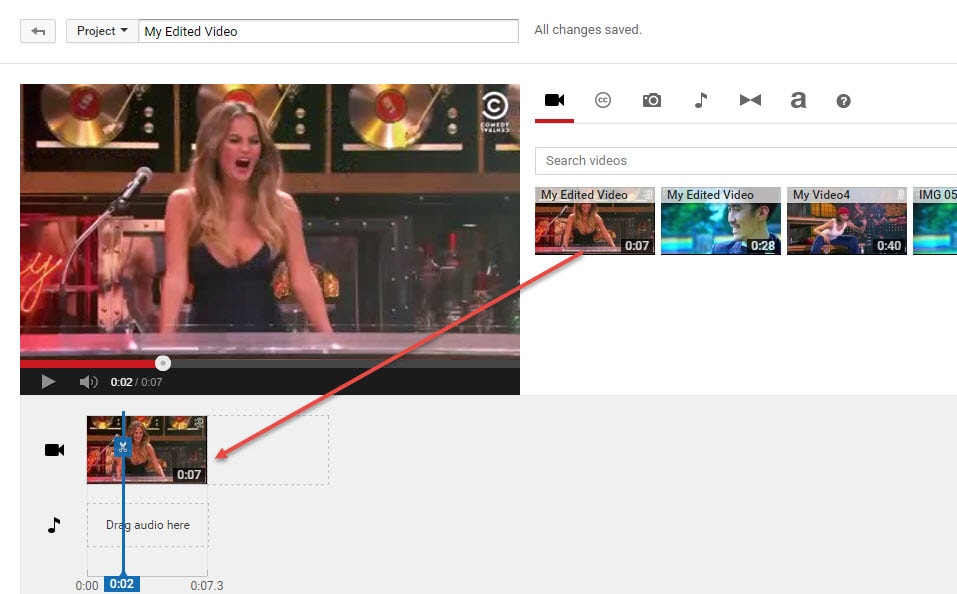
Step 3 Edit the Length
This is the part where you actually get to edit the length of your video. In order to do so effectively, you have to drag the bar at either end of your clip towards the other end in order to shorten the clip conveniently.
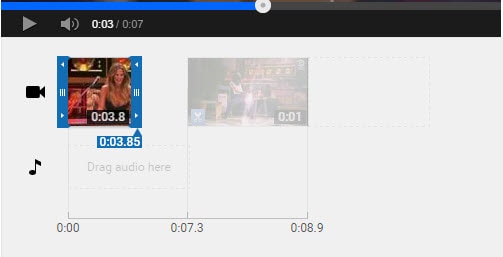
What is more, if you want to increase the length, you have to drag the bar to the opposite end – outwards. There is going to be an indicator which is going to appear at the bottom of the clip, and it’s going to show you the overall duration of the file, and it’s going to adjust itself as you slide the bars accordingly.
Step 4 Save the Clip
Of course, you would have to save the clip in order for the changes to reflect. Even though this might seem like a particularly obvious thing to do, you would be surprise to find out that a lot of people get everything done and then discard the changes by forgetting to save them and their effort goes to waste.
Richard Bennett
Richard Bennett is a writer and a lover of all things video.
Follow @Richard Bennett
Richard Bennett
Mar 27, 2024• Proven solutions
Apart from providing video hosting and sharing features, the YouTube platform also has an online editor which is going to provide you with the possibility to make changes and additions online without having to download any particular program. In this guide, we are going to show you how to make your video shorter or longer with YouTube online video editor.
A Better Alternative on How to Edit YouTube Video Length - Wondershare Filmora is a perfect alternative to edit every single clip frame by frame. Not just to shorten or lengthen the video. It offers quite a lot of opportunities. Watch the video below to know more:
Download Mac Version ](https://tools.techidaily.com/wondershare/filmora/download/ )
For instance, the application is offering non-linear ripple video editing. This is going to allow you to combine multiple video clips and pin them together conveniently. What is more, you can also apply PIP and Green Screen professional effects with just a few clicks. Sure, the YouTube video editor is a perfect solution for those who don’t want to achieve professional quality, but if you do, Wondershare Filmora is without a doubt the far better alternative. This is something that’s going to enable you to edit and re-touch your videos as well as to size them appropriately. Instead of dragging two bars together, you will be able to touch every single frame and size it according to your own particular needs. This is going to result in flawless videos.
How to Edit YouTube Video Length Using the built-in Video Editor
The YouTube video editor is easy to use, and you can easily learn how to do all sorts of changes to your video. Let’s see the things that you need to go through in order to edit the length.
Note: From 20th September 2017 users will no longer be able to use the complimentary editing suite. Check the best YouTube video editor alternatives from this complete guide.
Step 1 Get to the video editor
In order to do so, you would have to go ahead and login into your account. Then, go to the “My Channel” panel and select the video that you want to cut. Once you’ve done this, click on the “Video manager” option and click on the “create” tab which should be located on the right side for the page. There, you will be able to find the “Video Editor”. Of course, you can also add “/editor” to YouTube’s URL, and you would be good to go.
Step 2 Import Your Video
Once you’ve done all of the above, you would have to drag your video in order to cut it’s time. Keep in mind that the videos are made out of a maximum of 50 clips. The site is going to save every single video that you upload as a particular clip which could be properly combined with the rest in order to make one larger video. This is important.
Step 3 Edit the Length
This is the part where you actually get to edit the length of your video. In order to do so effectively, you have to drag the bar at either end of your clip towards the other end in order to shorten the clip conveniently.
What is more, if you want to increase the length, you have to drag the bar to the opposite end – outwards. There is going to be an indicator which is going to appear at the bottom of the clip, and it’s going to show you the overall duration of the file, and it’s going to adjust itself as you slide the bars accordingly.
Step 4 Save the Clip
Of course, you would have to save the clip in order for the changes to reflect. Even though this might seem like a particularly obvious thing to do, you would be surprise to find out that a lot of people get everything done and then discard the changes by forgetting to save them and their effort goes to waste.
Richard Bennett
Richard Bennett is a writer and a lover of all things video.
Follow @Richard Bennett
Also read:
- [New] 5-Second Stories Explained Well
- [New] A Step-by-Step Guide to Using YouTube's Creative Commons License
- [Updated] In 2024, Elevating Your Channel's Identity with Titles
- [Updated] Youtube's Monetization Metrics for A Million Viewers
- 2024 Approved Decoding the Economic Incentives Behind YouTube's Shorts Programme
- Analyzing TSeries Earnings via YouTube Engagement
- Convert Microsoft Word Documents to FREE PDF Files with Simple Online Tools - No Cost at All!
- CRIACR's Compact FM Transmitter (CP24) with Built-In Bluetooth - A Thorough Review for Audio Enthusiasts
- Curating Your Music Collection The Easy Guide to YouTube Playlist Creation (Web/App) for 2024
- Dailymotion vs YouTube Monetization Which Is More Profitable?
- Enhancing Your Video Impact A Compreranble Plan for YouTube Success
- How to Detect and Stop mSpy from Spying on Your Samsung Galaxy A54 5G | Dr.fone
- Master the Motion Personalized Animation Techniques
- Realme 10T 5G Bootloop Problem, How to Fix it Without Data Loss | Dr.fone
- Solving the Corsair iCUE Compatibility Issues in Windows 10 & 11
- Top IMEI Unlokers for Your Xiaomi Redmi A2+ Phone
- Turn Video to Sound YouTube to MP3 with AppleOS
- Ultimate List of FREE Windows 10/11 Disk Copy Tools: Find Your Perfect Match
- Updated Create Music for Free Top 10 Recording Software Options
- Title: 2024 Approved Cost-Effective Strategies to Combine Videos with Text
- Author: Kevin
- Created at : 2024-11-01 01:19:02
- Updated at : 2024-11-05 06:51:54
- Link: https://youtube-videos.techidaily.com/2024-approved-cost-effective-strategies-to-combine-videos-with-text/
- License: This work is licensed under CC BY-NC-SA 4.0.