
"2024 Approved Convenient Viewing Setting Up YouTube on Large TV Panels"
Convenient Viewing: Setting Up YouTube on Large TV Panels
Loop is a YouTube video format that allows viewers to watch a continuous sequence of videos. Loop is similar to traditional YouTube videos, but it can be played on a TV screen like a traditional TV show. Loop is a great way to keep viewers engaged with your content. It’s like a one-stop shop for all your content needs. You can use it to promote your latest video series.
Why looping YouTube videos on a TV is a great idea? First, it can be a fun way to watch your favorite videos without having to worry about the time. Second, it can be a way to save money on your cable. By watching your favorite videos on loop, you can cut down on the number of times you need to watch them.
If you are watching a series of videos, for example, looping them can help you to remember what happened in each one. Secondly, it can help you to learn new information more easily. If you are watching a tutorial or a video about a new topic, looping can help you to remember the details better.
Free Download For Win 7 or later(64-bit)
Free Download For macOS 10.14 or later


 WonderFox DVD Ripper Pro
Part 1: How to Create a Loop Video for YouTube
There is a lot of debate around whether or not creating a loop video is necessary for success on YouTube. Some people believe that it’s not necessary, while others believe that it is a must. The main benefit of creating a loop video is that it helps to keep your audience engaged. It also helps to create a sense of continuity between your videos.
Creating a loop video for your YouTube channel increases engagement because viewers can watch the video over and over again. This can lead to more clicks on your ads, which can lead to more revenue. It can also increase your subscribers and views. Maybe some people want to watch the same video multiple times in a row without having to keep pressing the play button on the remote.
Filmora is the best video loop editor:
If you need a powerful video editing tool that will let you create high-quality clips with multiple loops, look no further than Filmora . This software allows you to make various loops of your videos for use in social media, on your website or wherever desired. Plus, with Filmora, there is no limit on the number of loops you can create.
Loop video works well for corporate presentations, tutorials, explainer videos, and much more. You can create looping videos by choosing from one of Filmora’s many templates or creating your own. It’s easy to get started with looping video editing in Filmora! Some people want to watch a video while they do other things, like work on the computer.
Filmora is incredibly easy to use. You can quickly create videos by importing footage, editing and adding effects, and exporting your videos. Plus, the software has several built-in tools that let you customize your videos further. It has many features that make it an excellent choice for anyone looking to create high-quality videos quickly and easily.
How can we loop a video on Filmora? Follow these steps to create a looping video on Filmora:
Step 1 Download the Filmora and create a project
Free Download For Win 7 or later(64-bit)
Free Download For macOS 10.14 or later
You can download the Filmora for free. After installation of this software open it and click on Create New Project. Filmora is not only the video maker or editor, you can also add text and music to your videos, and share them on social media or with friends.

Step 2 Open the video and make copies
Open the video in your timeline. All you need to do is right-click on the video and click on copy. Then simply click or press Ctrl+V on your keyboard and do that for times. You can make as many copies as you want. Then you will have the same clip over and over again which creates the loop effect.
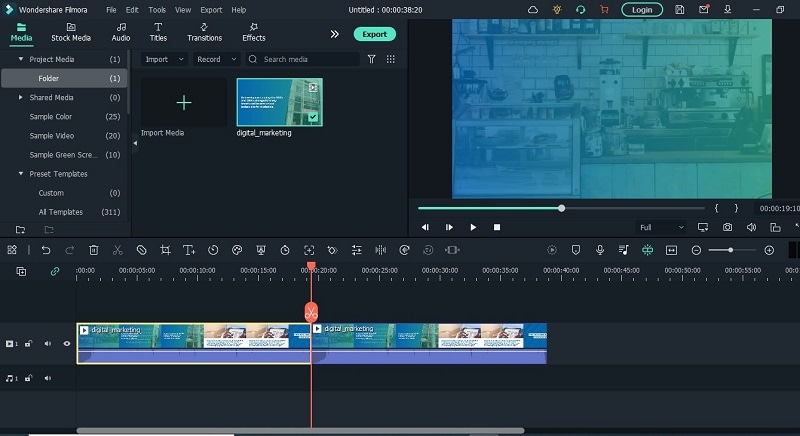
Step 3 Add Transition or any title in the video
After making copies of your video. Add some transitions in your video. Adding transitions to videos can help to keep your videos looking polished and professional. Not only do transitions add an extra layer of visual interest, but they can also help to underscore specific points in your video.
.png) Kanto Player Professional
Kanto Player Professional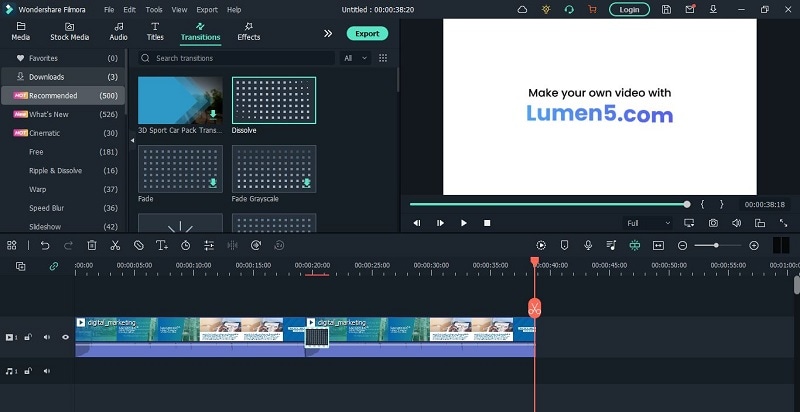
Benefits to create loop video on Filmora
There are many benefits to creating looping videos, especially when using a tool like Filmora. Loop videos are great for social media since they can be set to play on a loop and are viewable without sound. They’re also perfect for short attention spans since you can watch them over and over again without getting bored.
This can be useful for marketing purposes, as it can keep people interested in your video content. Additionally, looping can create a more engaging video experience for viewers, as it keeps them engaged by playing the same clip over and over again. You can easily add captions, and titles to your loop video.
When viewers can pause, rewind, and playback a video over and over again, they are more engaged with it. This increases the chances that they will watch the entire video, and may even share it with friends. You can create a sense of community and connection with your customers. And best of all? You can keep the magic going by adding sound effects and music!
Part 2: Loop a YouTube Video on TV from a Mobile
One of the great features of YouTube is that you can loop YouTube videos on your TV. This means that you can watch a video over and over again without having to fast forward through it. This is great for kids who are constantly asking to watch the same video over and over again. You can also use this feature to watch videos that you have missed.
There is something about relaxing music on the loop that can help to take the edge off. Whether it’s to help you wind down before bed, or to help you relax after a long day, there’s no doubt that looping YouTube on TV can be helpful. Whether you’re looking for something light and calming, or something to help you wind down after a long day, there’s sure to be something on YouTube that can fit the bill.
Let’s have a look at some steps that how to repeat YouTube videos on smart TV.
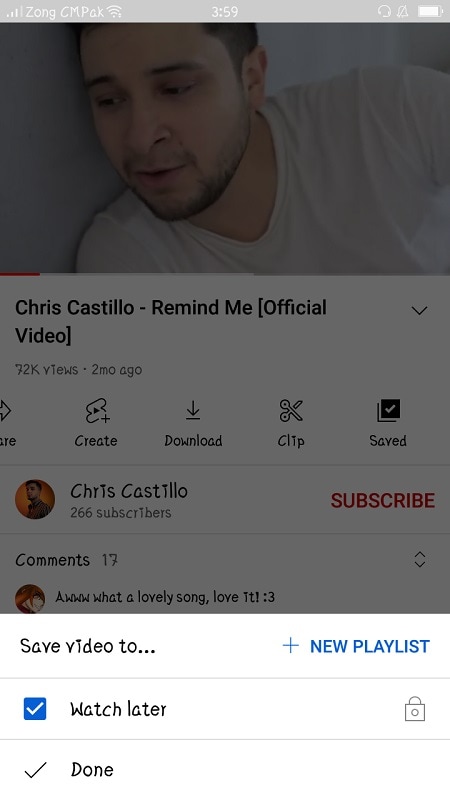
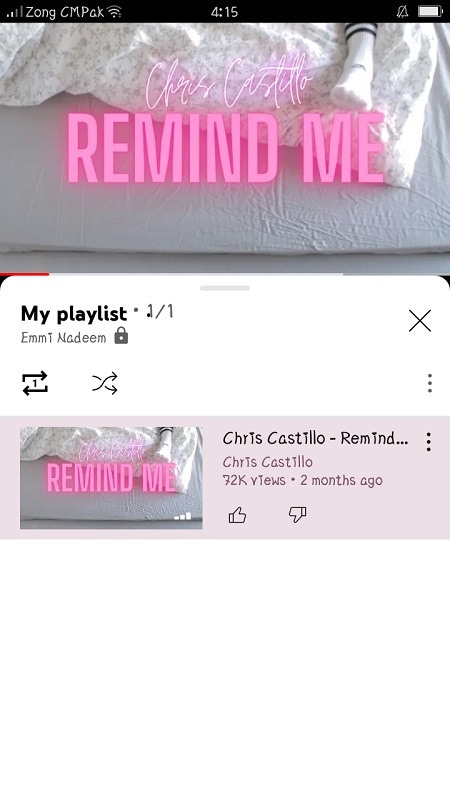
Step 1 Create a Playlist of one or multiple videos
The YouTube app is available on the google play store. You can easily download it from your mobile phones, android, etc. When you open a video on YouTube, several options will appear (like, share, subscribe). You can save the video in your existing playlist or you can create a new playlist.
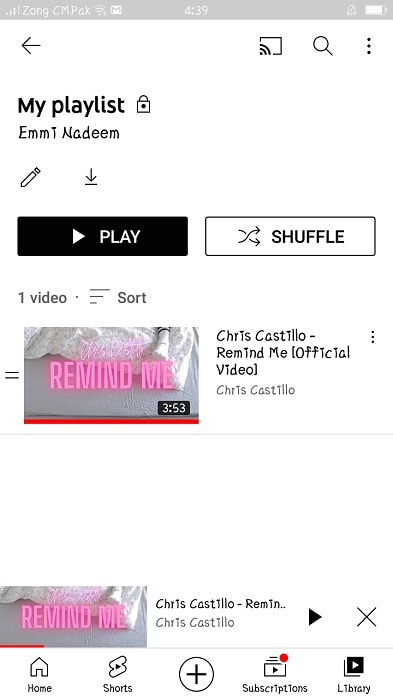
Step 2 Go to the library and select the loop symbol
Click on library this will take you to a list of libraries that have YouTube collections. This can be a great way to find new material to watch, or to find old material that you may have missed. Play back the playlist that you want to loop on the smart TV.
 Lyric Video Creator Professional Version
Step 3 Loop the playlist and send the list to the TV
Play the list and click on the loop symbol. At last, launch the YouTube video on your TV. The video will start playing in a loop. It can only be stopped from your mobile phone on which you start playing the list.
Why you might want to loop a YouTube video on a smart TV?
Some people want to watch a video over and over again without having to wait for it to load each time. Looping in a YouTube video can help you do this. Another reason to loop a YouTube video on your TV is if you want to watch it while you are doing something else. YouTube only loops the playlist.
Looping a YouTube video on your TV can also be useful if you have a lot of videos that you want to watch but don’t have enough time for. Looping YouTube videos on your television is a great way to keep your young ones entertained and engaged. Not only are they getting their daily dose of educational content, but they are also being kept enertained.
Wondershare Filmora Loop YouTube videos on PC and Mac with simple clicks.
Free Download Free Download Learn More

![]()
 vMix Pro - Software based live production. vMix Pro includes everything in vMix 4K plus 8 channels of Replay and 8 vMix Call
Conclusion
Looping YouTube videos on smart TV is an excellent way to watch the content you love, no matter where you are. While it may be true that loop YouTube videos on a smart TV are not imminent, there are some major benefits to be gained from implementing the new technology.
It’s easy to do, and it can be a great way to spend time with family members and friends. Looping YouTube videos on a smart TV is a great way to add some fun and excitement to your experience. The best part is, there are no limitations or restrictions you can loop as many videos as you want, and watch them in any order For Win 7 or later(64-bit)
Free Download For macOS 10.14 or later
![]() FX PRO (Gold Robot + Silver Robot(Basic Package))
FX PRO (Gold Robot + Silver Robot(Basic Package))
Part 1: How to Create a Loop Video for YouTube
There is a lot of debate around whether or not creating a loop video is necessary for success on YouTube. Some people believe that it’s not necessary, while others believe that it is a must. The main benefit of creating a loop video is that it helps to keep your audience engaged. It also helps to create a sense of continuity between your videos.
Creating a loop video for your YouTube channel increases engagement because viewers can watch the video over and over again. This can lead to more clicks on your ads, which can lead to more revenue. It can also increase your subscribers and views. Maybe some people want to watch the same video multiple times in a row without having to keep pressing the play button on the remote.
Filmora is the best video loop editor:
If you need a powerful video editing tool that will let you create high-quality clips with multiple loops, look no further than Filmora . This software allows you to make various loops of your videos for use in social media, on your website or wherever desired. Plus, with Filmora, there is no limit on the number of loops you can create.
Loop video works well for corporate presentations, tutorials, explainer videos, and much more. You can create looping videos by choosing from one of Filmora’s many templates or creating your own. It’s easy to get started with looping video editing in Filmora! Some people want to watch a video while they do other things, like work on the computer.
Filmora is incredibly easy to use. You can quickly create videos by importing footage, editing and adding effects, and exporting your videos. Plus, the software has several built-in tools that let you customize your videos further. It has many features that make it an excellent choice for anyone looking to create high-quality videos quickly and easily.
How can we loop a video on Filmora? Follow these steps to create a looping video on Filmora:
Step 1 Download the Filmora and create a project
Free Download For Win 7 or later(64-bit)
Free Download For macOS 10.14 or later
You can download the Filmora for free. After installation of this software open it and click on Create New Project. Filmora is not only the video maker or editor, you can also add text and music to your videos, and share them on social media or with friends.
Step 2 Open the video and make copies
Open the video in your timeline. All you need to do is right-click on the video and click on copy. Then simply click or press Ctrl+V on your keyboard and do that for times. You can make as many copies as you want. Then you will have the same clip over and over again which creates the loop effect.
Step 3 Add Transition or any title in the video
After making copies of your video. Add some transitions in your video. Adding transitions to videos can help to keep your videos looking polished and professional. Not only do transitions add an extra layer of visual interest, but they can also help to underscore specific points in your video.
Benefits to create loop video on Filmora
There are many benefits to creating looping videos, especially when using a tool like Filmora. Loop videos are great for social media since they can be set to play on a loop and are viewable without sound. They’re also perfect for short attention spans since you can watch them over and over again without getting bored.
This can be useful for marketing purposes, as it can keep people interested in your video content. Additionally, looping can create a more engaging video experience for viewers, as it keeps them engaged by playing the same clip over and over again. You can easily add captions, and titles to your loop video.
When viewers can pause, rewind, and playback a video over and over again, they are more engaged with it. This increases the chances that they will watch the entire video, and may even share it with friends. You can create a sense of community and connection with your customers. And best of all? You can keep the magic going by adding sound effects and music!
Part 2: Loop a YouTube Video on TV from a Mobile
One of the great features of YouTube is that you can loop YouTube videos on your TV. This means that you can watch a video over and over again without having to fast forward through it. This is great for kids who are constantly asking to watch the same video over and over again. You can also use this feature to watch videos that you have missed.
There is something about relaxing music on the loop that can help to take the edge off. Whether it’s to help you wind down before bed, or to help you relax after a long day, there’s no doubt that looping YouTube on TV can be helpful. Whether you’re looking for something light and calming, or something to help you wind down after a long day, there’s sure to be something on YouTube that can fit the bill.
Let’s have a look at some steps that how to repeat YouTube videos on smart TV.
Step 1 Create a Playlist of one or multiple videos
The YouTube app is available on the google play store. You can easily download it from your mobile phones, android, etc. When you open a video on YouTube, several options will appear (like, share, subscribe). You can save the video in your existing playlist or you can create a new playlist.
Step 2 Go to the library and select the loop symbol
Click on library this will take you to a list of libraries that have YouTube collections. This can be a great way to find new material to watch, or to find old material that you may have missed. Play back the playlist that you want to loop on the smart TV.
Step 3 Loop the playlist and send the list to the TV
Play the list and click on the loop symbol. At last, launch the YouTube video on your TV. The video will start playing in a loop. It can only be stopped from your mobile phone on which you start playing the list.

Why you might want to loop a YouTube video on a smart TV?
Some people want to watch a video over and over again without having to wait for it to load each time. Looping in a YouTube video can help you do this. Another reason to loop a YouTube video on your TV is if you want to watch it while you are doing something else. YouTube only loops the playlist.
Looping a YouTube video on your TV can also be useful if you have a lot of videos that you want to watch but don’t have enough time for. Looping YouTube videos on your television is a great way to keep your young ones entertained and engaged. Not only are they getting their daily dose of educational content, but they are also being kept enertained.
Wondershare Filmora Loop YouTube videos on PC and Mac with simple clicks.
Free Download Free Download Learn More
 Project Manager - Asset Browser for 3Ds Max
![]()
Conclusion
Looping YouTube videos on smart TV is an excellent way to watch the content you love, no matter where you are. While it may be true that loop YouTube videos on a smart TV are not imminent, there are some major benefits to be gained from implementing the new technology.
It’s easy to do, and it can be a great way to spend time with family members and friends. Looping YouTube videos on a smart TV is a great way to add some fun and excitement to your experience. The best part is, there are no limitations or restrictions you can loop as many videos as you want, and watch them in any order!
Designing Powerful YouTube Screens: A Step-by-Step Guide
How to Add YouTube End Screen and Cards Effectively

Richard Bennett
Mar 27, 2024• Proven solutions
The traditional annotation’s features are replaced by its successor YouTube Cards and End Screen. The annotations performed poorly on mobile and thus, the new changes are for good. The annotations had become outdated and were completely unbefitting. On the contrary, the YouTube cards and end screen offers great access to both desktop and mobiles with easier and faster implementation. Are you still looking for Annotations? Stop your search and try considering YouTube end screen. In this article, learn how to use Youtube end screen and cards.
- Part1: Why You Need to Add End Screens To Videos
- Part2: How To Use Youtube End Screen
- Part3: How To Use Youtube Cards
Wondershare Filmstock Gaming Video Editing Skils ](https://filmstock.wondershare.com/creative-theme-game?source%5Fchannel=seo%5Farticle&spm=rs.filmora%5Fweb )
Part 1: Why You Need to Add End Screens and Cards to Videos
There are several reasons that make the YouTube end screen and cards a great tool when added to the videos. The new channel builtin features, donation choices, embedded polls and more are some of the best interactive and powerful features of YouTube end screen that’s when added to the video can drive in users to your channel. It is a strong tool to build viewership of your channel. When you use YouTube end screen at the end of the video, it helps in directing the users to other channels, playlists, and videos and also helps in promoting crowdfunding campaigns, merchandise and website. The YouTube end screen is a part of the video and to have an end screen on your video, it must be around 25seconds long.
Part 2: How To Use Youtube End Screen
Do you wish to add YouTube end screen to your video? Just follow the steps and get going.
- Go to Creator Studio and check the left side to find the Video Manager, click on it.
- Wherever you wish to add the end screen on the video, click on it.
- Click End Screen & Annotations at the top.
- From end screen and annotations, you can add or configure elements.
- Check how the end screen will appear to the visitors.
- Click on blue color add element’s button to find four options available there:
Playlist or Videos- This element allows to play the suggested video on the same tab when the user clicks on it.
Subscribe- This allows the users to quickly subscribe to the channel. You may change the appearance of the icon and how your brand name looks.
Channel- Click on this element to promote other YouTube Channel. You may also customize it with a message.
Link- This element helps in sending the users directly to your website. Although, Google has restricted other link addition in the video. In order to add, you must have an Adsense account and permit monetization.
Part 3: How To Use Youtube Cards
YouTube Cards is more interactive. Users can add images and other linkes. Here are the steps.
- Click on the “Video Manager” tab.
- If you want to add cards, Click “Edit” tab under it. Then click “cards”.
- Choose the cards type you want to make on “Add Card” drop down menu.
- Click “create” button. Select the timeline. In the end, apply.

The types of YouTube cards
- Video or playlist: links to other videos/the complete palylist on YouTube related or non-related to that specific videolinks to further purchase websites or specific product.
- Channel: promote another YouTube channel, one of the most common methods to collaborate with other YouTubers
- Poll: Encourage viewers to participate in a poll (vote)
- Link: links to a website which compliments whatever content is in the video.

4 Tips for Using YouTube Cards
1. You might be used to pointing to the part of your screen where you intend to put an annotation, but when you use YouTube Cards they might switch locations depending on what device a viewer is watching on.
2. Use three or less cards per video. Viewers are more likely to click your cards if there are fewer of them, and more likely to start ignoring them if it seems like they’re always popping up. Also, do not have all three of these cards appear at once and make people choose between them. Stagger them throughout your video.
3. Your cards should be related to what you are saying in your vlog. Avoid posting completely random links in the middle of your video because a viewer who clicks on them will get confused. You can post any type of link you want at the very end of your video, though.
4. The end of your video is always a great place to link viewers to another of your videos, whether you use a card or an end screen. If somebody liked your video enough to watch until the end they’ll probably welcome a chance to consume similar content.
Conclusion
Now, that you are aware how to add YouTube end screen to your video, make use of the amazing features of YouTube end screen and cards and let driving in traffic to your site be easy and fruitful.
Richard Bennett
Richard Bennett is a writer and a lover of all things video.
Follow @Richard Bennett
Richard Bennett
Mar 27, 2024• Proven solutions
The traditional annotation’s features are replaced by its successor YouTube Cards and End Screen. The annotations performed poorly on mobile and thus, the new changes are for good. The annotations had become outdated and were completely unbefitting. On the contrary, the YouTube cards and end screen offers great access to both desktop and mobiles with easier and faster implementation. Are you still looking for Annotations? Stop your search and try considering YouTube end screen. In this article, learn how to use Youtube end screen and cards.
- Part1: Why You Need to Add End Screens To Videos
- Part2: How To Use Youtube End Screen
- Part3: How To Use Youtube Cards
Wondershare Filmstock Gaming Video Editing Skils ](https://filmstock.wondershare.com/creative-theme-game?source%5Fchannel=seo%5Farticle&spm=rs.filmora%5Fweb )

Part 1: Why You Need to Add End Screens and Cards to Videos
There are several reasons that make the YouTube end screen and cards a great tool when added to the videos. The new channel builtin features, donation choices, embedded polls and more are some of the best interactive and powerful features of YouTube end screen that’s when added to the video can drive in users to your channel. It is a strong tool to build viewership of your channel. When you use YouTube end screen at the end of the video, it helps in directing the users to other channels, playlists, and videos and also helps in promoting crowdfunding campaigns, merchandise and website. The YouTube end screen is a part of the video and to have an end screen on your video, it must be around 25seconds long.
Part 2: How To Use Youtube End Screen
Do you wish to add YouTube end screen to your video? Just follow the steps and get going.
- Go to Creator Studio and check the left side to find the Video Manager, click on it.
- Wherever you wish to add the end screen on the video, click on it.
- Click End Screen & Annotations at the top.
- From end screen and annotations, you can add or configure elements.
- Check how the end screen will appear to the visitors.
- Click on blue color add element’s button to find four options available there:
Playlist or Videos- This element allows to play the suggested video on the same tab when the user clicks on it.
Subscribe- This allows the users to quickly subscribe to the channel. You may change the appearance of the icon and how your brand name looks.
Channel- Click on this element to promote other YouTube Channel. You may also customize it with a message.
Link- This element helps in sending the users directly to your website. Although, Google has restricted other link addition in the video. In order to add, you must have an Adsense account and permit monetization.
 Power Tools add-on for Google Sheets, 12-month subscription
Part 3: How To Use Youtube Cards
YouTube Cards is more interactive. Users can add images and other linkes. Here are the steps.
- Click on the “Video Manager” tab.
- If you want to add cards, Click “Edit” tab under it. Then click “cards”.
- Choose the cards type you want to make on “Add Card” drop down menu.
- Click “create” button. Select the timeline. In the end, apply.

The types of YouTube cards
- Video or playlist: links to other videos/the complete palylist on YouTube related or non-related to that specific videolinks to further purchase websites or specific product.
- Channel: promote another YouTube channel, one of the most common methods to collaborate with other YouTubers
- Poll: Encourage viewers to participate in a poll (vote)
- Link: links to a website which compliments whatever content is in the video.
 PaperScan Professional: PaperScan Scanner Software is a powerful TWAIN & WIA scanning application centered on one idea: making document acquisition an unparalleled easy task for anyone.
4 Tips for Using YouTube Cards
1. You might be used to pointing to the part of your screen where you intend to put an annotation, but when you use YouTube Cards they might switch locations depending on what device a viewer is watching on.
2. Use three or less cards per video. Viewers are more likely to click your cards if there are fewer of them, and more likely to start ignoring them if it seems like they’re always popping up. Also, do not have all three of these cards appear at once and make people choose between them. Stagger them throughout your video.
3. Your cards should be related to what you are saying in your vlog. Avoid posting completely random links in the middle of your video because a viewer who clicks on them will get confused. You can post any type of link you want at the very end of your video, though.
4. The end of your video is always a great place to link viewers to another of your videos, whether you use a card or an end screen. If somebody liked your video enough to watch until the end they’ll probably welcome a chance to consume similar content.
Conclusion
Now, that you are aware how to add YouTube end screen to your video, make use of the amazing features of YouTube end screen and cards and let driving in traffic to your site be easy and fruitful.
Richard Bennett
Richard Bennett is a writer and a lover of all things video.
Follow @Richard Bennett
Richard Bennett
Mar 27, 2024• Proven solutions
The traditional annotation’s features are replaced by its successor YouTube Cards and End Screen. The annotations performed poorly on mobile and thus, the new changes are for good. The annotations had become outdated and were completely unbefitting. On the contrary, the YouTube cards and end screen offers great access to both desktop and mobiles with easier and faster implementation. Are you still looking for Annotations? Stop your search and try considering YouTube end screen. In this article, learn how to use Youtube end screen and cards.
- Part1: Why You Need to Add End Screens To Videos
- Part2: How To Use Youtube End Screen
- Part3: How To Use Youtube Cards
Wondershare Filmstock Gaming Video Editing Skils ](https://filmstock.wondershare.com/creative-theme-game?source%5Fchannel=seo%5Farticle&spm=rs.filmora%5Fweb )
 Video Converter Factory Pro
Part 1: Why You Need to Add End Screens and Cards to Videos
There are several reasons that make the YouTube end screen and cards a great tool when added to the videos. The new channel builtin features, donation choices, embedded polls and more are some of the best interactive and powerful features of YouTube end screen that’s when added to the video can drive in users to your channel. It is a strong tool to build viewership of your channel. When you use YouTube end screen at the end of the video, it helps in directing the users to other channels, playlists, and videos and also helps in promoting crowdfunding campaigns, merchandise and website. The YouTube end screen is a part of the video and to have an end screen on your video, it must be around 25seconds long.
Part 2: How To Use Youtube End Screen
Do you wish to add YouTube end screen to your video? Just follow the steps and get going.
- Go to Creator Studio and check the left side to find the Video Manager, click on it.
- Wherever you wish to add the end screen on the video, click on it.
- Click End Screen & Annotations at the top.
- From end screen and annotations, you can add or configure elements.
- Check how the end screen will appear to the visitors.
- Click on blue color add element’s button to find four options available there:
Playlist or Videos- This element allows to play the suggested video on the same tab when the user clicks on it.
Subscribe- This allows the users to quickly subscribe to the channel. You may change the appearance of the icon and how your brand name looks.
Channel- Click on this element to promote other YouTube Channel. You may also customize it with a message.
Link- This element helps in sending the users directly to your website. Although, Google has restricted other link addition in the video. In order to add, you must have an Adsense account and permit monetization.

Part 3: How To Use Youtube Cards
YouTube Cards is more interactive. Users can add images and other linkes. Here are the steps.
- Click on the “Video Manager” tab.
- If you want to add cards, Click “Edit” tab under it. Then click “cards”.
- Choose the cards type you want to make on “Add Card” drop down menu.
- Click “create” button. Select the timeline. In the end, apply.
The types of YouTube cards
- Video or playlist: links to other videos/the complete palylist on YouTube related or non-related to that specific videolinks to further purchase websites or specific product.
- Channel: promote another YouTube channel, one of the most common methods to collaborate with other YouTubers
- Poll: Encourage viewers to participate in a poll (vote)
- Link: links to a website which compliments whatever content is in the video.
4 Tips for Using YouTube Cards
1. You might be used to pointing to the part of your screen where you intend to put an annotation, but when you use YouTube Cards they might switch locations depending on what device a viewer is watching on.
2. Use three or less cards per video. Viewers are more likely to click your cards if there are fewer of them, and more likely to start ignoring them if it seems like they’re always popping up. Also, do not have all three of these cards appear at once and make people choose between them. Stagger them throughout your video.
3. Your cards should be related to what you are saying in your vlog. Avoid posting completely random links in the middle of your video because a viewer who clicks on them will get confused. You can post any type of link you want at the very end of your video, though.
4. The end of your video is always a great place to link viewers to another of your videos, whether you use a card or an end screen. If somebody liked your video enough to watch until the end they’ll probably welcome a chance to consume similar content.

Conclusion
Now, that you are aware how to add YouTube end screen to your video, make use of the amazing features of YouTube end screen and cards and let driving in traffic to your site be easy and fruitful.
Richard Bennett
Richard Bennett is a writer and a lover of all things video.
Follow @Richard Bennett
Richard Bennett
Mar 27, 2024• Proven solutions
The traditional annotation’s features are replaced by its successor YouTube Cards and End Screen. The annotations performed poorly on mobile and thus, the new changes are for good. The annotations had become outdated and were completely unbefitting. On the contrary, the YouTube cards and end screen offers great access to both desktop and mobiles with easier and faster implementation. Are you still looking for Annotations? Stop your search and try considering YouTube end screen. In this article, learn how to use Youtube end screen and cards.
- Part1: Why You Need to Add End Screens To Videos
- Part2: How To Use Youtube End Screen
- Part3: How To Use Youtube Cards
Wondershare Filmstock Gaming Video Editing Skils ](https://filmstock.wondershare.com/creative-theme-game?source%5Fchannel=seo%5Farticle&spm=rs.filmora%5Fweb )
Part 1: Why You Need to Add End Screens and Cards to Videos
There are several reasons that make the YouTube end screen and cards a great tool when added to the videos. The new channel builtin features, donation choices, embedded polls and more are some of the best interactive and powerful features of YouTube end screen that’s when added to the video can drive in users to your channel. It is a strong tool to build viewership of your channel. When you use YouTube end screen at the end of the video, it helps in directing the users to other channels, playlists, and videos and also helps in promoting crowdfunding campaigns, merchandise and website. The YouTube end screen is a part of the video and to have an end screen on your video, it must be around 25seconds long.
Part 2: How To Use Youtube End Screen
Do you wish to add YouTube end screen to your video? Just follow the steps and get going.
- Go to Creator Studio and check the left side to find the Video Manager, click on it.
- Wherever you wish to add the end screen on the video, click on it.
- Click End Screen & Annotations at the top.
- From end screen and annotations, you can add or configure elements.
- Check how the end screen will appear to the visitors.
- Click on blue color add element’s button to find four options available there:
Playlist or Videos- This element allows to play the suggested video on the same tab when the user clicks on it.
Subscribe- This allows the users to quickly subscribe to the channel. You may change the appearance of the icon and how your brand name looks.
Channel- Click on this element to promote other YouTube Channel. You may also customize it with a message.
Link- This element helps in sending the users directly to your website. Although, Google has restricted other link addition in the video. In order to add, you must have an Adsense account and permit monetization.
Part 3: How To Use Youtube Cards
YouTube Cards is more interactive. Users can add images and other linkes. Here are the steps.
- Click on the “Video Manager” tab.
- If you want to add cards, Click “Edit” tab under it. Then click “cards”.
- Choose the cards type you want to make on “Add Card” drop down menu.
- Click “create” button. Select the timeline. In the end, apply.
The types of YouTube cards
- Video or playlist: links to other videos/the complete palylist on YouTube related or non-related to that specific videolinks to further purchase websites or specific product.
- Channel: promote another YouTube channel, one of the most common methods to collaborate with other YouTubers
- Poll: Encourage viewers to participate in a poll (vote)
- Link: links to a website which compliments whatever content is in the video.
4 Tips for Using YouTube Cards
1. You might be used to pointing to the part of your screen where you intend to put an annotation, but when you use YouTube Cards they might switch locations depending on what device a viewer is watching on.
2. Use three or less cards per video. Viewers are more likely to click your cards if there are fewer of them, and more likely to start ignoring them if it seems like they’re always popping up. Also, do not have all three of these cards appear at once and make people choose between them. Stagger them throughout your video.
3. Your cards should be related to what you are saying in your vlog. Avoid posting completely random links in the middle of your video because a viewer who clicks on them will get confused. You can post any type of link you want at the very end of your video, though.
4. The end of your video is always a great place to link viewers to another of your videos, whether you use a card or an end screen. If somebody liked your video enough to watch until the end they’ll probably welcome a chance to consume similar content.

company, user or members of the same household. Action! - screen and game recorder</a>
Conclusion
Now, that you are aware how to add YouTube end screen to your video, make use of the amazing features of YouTube end screen and cards and let driving in traffic to your site be easy and fruitful.
Richard Bennett
Richard Bennett is a writer and a lover of all things video.
Follow @Richard Bennett
- Title: 2024 Approved Convenient Viewing Setting Up YouTube on Large TV Panels
- Author: Kevin
- Created at : 2024-08-03 03:41:20
- Updated at : 2024-08-04 03:41:20
- Link: https://youtube-videos.techidaily.com/2024-approved-convenient-viewing-setting-up-youtube-on-large-tv-panels/
- License: This work is licensed under CC BY-NC-SA 4.0.