
:max_bytes(150000):strip_icc():format(webp)/GettyImages-970157966-65f3dd434f3e4dc98e28a635b8cacc87.jpg)
"2024 Approved Channeling Success Emulating Top Video Bloggers' Techniques"
Channeling Success: Emulating Top Video Bloggers’ Techniques
8 Tips on How to Vlog Confidently Like Popular YouTubers

Richard Bennett
Oct 26, 2023• Proven solutions
For most people, vlogging is not something that comes naturally. Like any skill, it takes practice to improve. When someone is good at vlogging, they make it look easy.
When we watch the most popular YouTubers, the traits that make them successful are often invisible, because we are so consumed by their vlog. In this article, I’ll highlight 8 tips from the most accomplished vloggers on the Internet, so that you can vlog confidently and make the best YouTube videos.
1. Be Authentic
People opt to watch vlogs because they want to see something real.
Vlogging is about honesty, telling a story that is truthful and showing your personality. The most popular vloggers are likable because they don’t deceive the audience, they befriend them. Vloggers treat their audience with respect and that comes from being honest.
There will be an urge for you to mimic other vloggers, talking and acting the way they do, but savvy YouTube viewers will be able to see your faux personality pretty quickly.
Don’t focus on your image, but instead focus on your voice. What makes you different? That is how you will build a proper reputation.
2. Tell A Story
A vlog is not an assortment of footage haphazardly put together. A successful vlog must have a story: a conflict told with a beginning, middle, and end.
When you are casually telling a story to a friend, you are not thinking about the structure or the plot. You are focused on what happened and you want to communicate it as accurately as you can. While vlogging, you should approach it much the same way. Ad-libbing is fine. Stumbling is fine. Going back and repeating a part of the story is fine. By simply getting your story on camera, you now have all the pieces.
Once all the pieces of the story are captured — including your storytelling, b-roll, and other supportive footage — you must now cut out all the irrelevant or repetitive parts and edit it so it can be enjoyed as one cohesive tale.
Take a look at this example from Tiffany Alvord and notice how there are jump cuts both to skip information that can be assumed by the audience and add the tension to the story she’s telling.
3. Surprise and Delight Your Audience
There is a saying that a great ending to a story is that it is surprising, yet inevitable .
The ending needs to be justified even if there is a twist. Everything before that had worked to build up the tension and when it concludes it needs to be logical. However, the ending cannot be something that the audience can guess. Remember those mystery movies where you know who the murderer is after the first few scenes? Yeah… those aren’t satisfying. A good story ends with a surprise, and with everything prior leading up to it.
The gold standard example of a surprising, yet inevitable end is Casey Neistat’s bike lane video. Everything in the video is leading up to the end, but when you watch it the first time it’s unexpected, and that’s why it’s so good.
4. Be Inviting
A common trait of successful vloggers is that they are welcoming. They share their passion and encourage others to join in. Vlogging is about being a guide. It doesn’t matter if you are leading a tour of your home or showing your viewer an interesting new skill, it is important for you to approach the whole process with open arms.
Unlike being invited to a party, there is no obligation when it comes to YouTube. Your viewers can continue to live vicariously through you or they may be inspired by your experience and dare to try it themselves.
The opposite of inviting is rejecting, and when you are a vlogger, you don’t want to reject anyone from enjoying your videos.
5. Compose the Shot
Vlogging is a visual medium, and while the story is important, what is captured in the frame will play an impactful role in the video as well.
In a way, every vlogger needs to have a director’s eye for cinematography. I’m not saying that you need to be Wes Anderson to be an awesome vlogger, but knowing what is in the frame with you, the angle of the shot, the movement of the camera, and the quality of light will help the product look better.
The great thing about vlogging is that you will get a lot of practice framing shots, so I encourage you to learn the basics of video editing .
Check out this example from Rosanna Pansino , where she gives a tour of her bedroom.
The camera follows her fluidly throughout the video, but it is her eyes that guide both the camera moves and what she wants our attention to be directed to. Don’t hesitate to let the viewer know what you want them to see.
6. Be Prepared
While you can pick up a camera and start vlogging on the fly, being prepared enables you to produce the best video possible. Take a few minutes before you hit record simply to outline the key points you want to talk about and how the video will end, ensuring that after filming you haven’t forgotten a crucial part.
Additionally, knowing what to say makes you a better host for your vlog. Watch your favorite vlogger, I bet when they are speaking on camera, their speech is not littered with umms and ahhs…
Good preparation includes having all your gear ready for filming when you need it. There is nothing worse than being set to shoot and running out of battery or memory.
Take a look at Ashley Nichole in this vlog and notice that although she sounds spontaneous, it is also evident that she knows what she is going to talk about next.
7. Be Expressive
Remember those teachers that drone on and on, without adding any expression or passion to what they are lecturing? While they might have been perfectly suitable as teachers, they wouldn’t make good vloggers.
If you speak on camera in a monotone voice, you are not being expressive. Your facial and body language will match your lackluster performance. Even if you are talking about something you are excited about, if your demeanor doesn’t match that, then the video is going to be lifeless. Vlogging is a presentation, a performance. There needs to be energy.
Consider your audience: they are coming home from school or work, where there were classes and meetings, and the last thing they want to watch is a video of your speaking without energy.
Want to see a vlogger that is awesome at being expressive on camera? Check out Emma Chamberlain , if you haven’t already. Every word she says in her video is layered with emotion. We know exactly how she feels.
8. Stay Organized
The same way you should prepare before filming, it’s also important to be organized comes the editing phase. Editing is arguably the most time-consuming part of the vlogging process, so have a system for categorizing and finding your footages.
This is especially important when you have multiple video and audio files and if you are capturing footage over a number of days or in different locations.
Additionally, while filming your vlog, you are going to mess up. It’s also helpful to add a cue after you messed up, this can be a sound cue that causes the levels to spike (clapping or snapping your fingers work) or a video cue such as a dramatic gesture to the camera. When skipping through your footage to find the part where you messed up, later on, it’s easier to have a mark to help you locate it.
Vlogging is hard, so don’t make more work for yourself. Learn little tricks to make life easier for yourself at every step.
The more organized you are the more attention you can put into the creative aspect of vlogging, and less time finding a video file or syncing audio to video.
There you have it, 8 tips to help you vlog like the pros. Anyone can vlog. But only until you point a camera at yourself in public for the first time, do you realize how uncomfortable vlogging can be.
Even filming yourself in your room with the door closed — and nobody is in the house with you — can be a challenge for beginning vloggers. If you find watching your first few videos to be cringy, don’t be discouraged. There are fears of vlogging, but you can overcome them .
Take a look at some of the first videos from popular YouTubers and you can see that everyone had a starting point.
Do you have any vlogging tricks of your own? Leave a comment below.
If you want to find a video editing solution that empowers your imagination and creativity yet takes less effort, please try this robust and user-friendly video editing software Wondershare Filmora, which will definitely enhance your productivity and helps you to make money by making videos much easier.


Richard Bennett
Richard Bennett is a writer and a lover of all things video.
Follow @Richard Bennett
Richard Bennett
Oct 26, 2023• Proven solutions
For most people, vlogging is not something that comes naturally. Like any skill, it takes practice to improve. When someone is good at vlogging, they make it look easy.
When we watch the most popular YouTubers, the traits that make them successful are often invisible, because we are so consumed by their vlog. In this article, I’ll highlight 8 tips from the most accomplished vloggers on the Internet, so that you can vlog confidently and make the best YouTube videos.
1. Be Authentic
People opt to watch vlogs because they want to see something real.
Vlogging is about honesty, telling a story that is truthful and showing your personality. The most popular vloggers are likable because they don’t deceive the audience, they befriend them. Vloggers treat their audience with respect and that comes from being honest.
There will be an urge for you to mimic other vloggers, talking and acting the way they do, but savvy YouTube viewers will be able to see your faux personality pretty quickly.
Don’t focus on your image, but instead focus on your voice. What makes you different? That is how you will build a proper reputation.
2. Tell A Story
A vlog is not an assortment of footage haphazardly put together. A successful vlog must have a story: a conflict told with a beginning, middle, and end.
When you are casually telling a story to a friend, you are not thinking about the structure or the plot. You are focused on what happened and you want to communicate it as accurately as you can. While vlogging, you should approach it much the same way. Ad-libbing is fine. Stumbling is fine. Going back and repeating a part of the story is fine. By simply getting your story on camera, you now have all the pieces.
Once all the pieces of the story are captured — including your storytelling, b-roll, and other supportive footage — you must now cut out all the irrelevant or repetitive parts and edit it so it can be enjoyed as one cohesive tale.
Take a look at this example from Tiffany Alvord and notice how there are jump cuts both to skip information that can be assumed by the audience and add the tension to the story she’s telling.
3. Surprise and Delight Your Audience
There is a saying that a great ending to a story is that it is surprising, yet inevitable .
The ending needs to be justified even if there is a twist. Everything before that had worked to build up the tension and when it concludes it needs to be logical. However, the ending cannot be something that the audience can guess. Remember those mystery movies where you know who the murderer is after the first few scenes? Yeah… those aren’t satisfying. A good story ends with a surprise, and with everything prior leading up to it.
The gold standard example of a surprising, yet inevitable end is Casey Neistat’s bike lane video. Everything in the video is leading up to the end, but when you watch it the first time it’s unexpected, and that’s why it’s so good.
4. Be Inviting
A common trait of successful vloggers is that they are welcoming. They share their passion and encourage others to join in. Vlogging is about being a guide. It doesn’t matter if you are leading a tour of your home or showing your viewer an interesting new skill, it is important for you to approach the whole process with open arms.
Unlike being invited to a party, there is no obligation when it comes to YouTube. Your viewers can continue to live vicariously through you or they may be inspired by your experience and dare to try it themselves.
The opposite of inviting is rejecting, and when you are a vlogger, you don’t want to reject anyone from enjoying your videos.
5. Compose the Shot
Vlogging is a visual medium, and while the story is important, what is captured in the frame will play an impactful role in the video as well.
In a way, every vlogger needs to have a director’s eye for cinematography. I’m not saying that you need to be Wes Anderson to be an awesome vlogger, but knowing what is in the frame with you, the angle of the shot, the movement of the camera, and the quality of light will help the product look better.
The great thing about vlogging is that you will get a lot of practice framing shots, so I encourage you to learn the basics of video editing .
Check out this example from Rosanna Pansino , where she gives a tour of her bedroom.
The camera follows her fluidly throughout the video, but it is her eyes that guide both the camera moves and what she wants our attention to be directed to. Don’t hesitate to let the viewer know what you want them to see.
6. Be Prepared
While you can pick up a camera and start vlogging on the fly, being prepared enables you to produce the best video possible. Take a few minutes before you hit record simply to outline the key points you want to talk about and how the video will end, ensuring that after filming you haven’t forgotten a crucial part.
Additionally, knowing what to say makes you a better host for your vlog. Watch your favorite vlogger, I bet when they are speaking on camera, their speech is not littered with umms and ahhs…
Good preparation includes having all your gear ready for filming when you need it. There is nothing worse than being set to shoot and running out of battery or memory.
Take a look at Ashley Nichole in this vlog and notice that although she sounds spontaneous, it is also evident that she knows what she is going to talk about next.
7. Be Expressive
Remember those teachers that drone on and on, without adding any expression or passion to what they are lecturing? While they might have been perfectly suitable as teachers, they wouldn’t make good vloggers.
If you speak on camera in a monotone voice, you are not being expressive. Your facial and body language will match your lackluster performance. Even if you are talking about something you are excited about, if your demeanor doesn’t match that, then the video is going to be lifeless. Vlogging is a presentation, a performance. There needs to be energy.
Consider your audience: they are coming home from school or work, where there were classes and meetings, and the last thing they want to watch is a video of your speaking without energy.
Want to see a vlogger that is awesome at being expressive on camera? Check out Emma Chamberlain , if you haven’t already. Every word she says in her video is layered with emotion. We know exactly how she feels.
8. Stay Organized
The same way you should prepare before filming, it’s also important to be organized comes the editing phase. Editing is arguably the most time-consuming part of the vlogging process, so have a system for categorizing and finding your footages.
This is especially important when you have multiple video and audio files and if you are capturing footage over a number of days or in different locations.
Additionally, while filming your vlog, you are going to mess up. It’s also helpful to add a cue after you messed up, this can be a sound cue that causes the levels to spike (clapping or snapping your fingers work) or a video cue such as a dramatic gesture to the camera. When skipping through your footage to find the part where you messed up, later on, it’s easier to have a mark to help you locate it.
Vlogging is hard, so don’t make more work for yourself. Learn little tricks to make life easier for yourself at every step.
The more organized you are the more attention you can put into the creative aspect of vlogging, and less time finding a video file or syncing audio to video.
There you have it, 8 tips to help you vlog like the pros. Anyone can vlog. But only until you point a camera at yourself in public for the first time, do you realize how uncomfortable vlogging can be.
Even filming yourself in your room with the door closed — and nobody is in the house with you — can be a challenge for beginning vloggers. If you find watching your first few videos to be cringy, don’t be discouraged. There are fears of vlogging, but you can overcome them .
Take a look at some of the first videos from popular YouTubers and you can see that everyone had a starting point.
Do you have any vlogging tricks of your own? Leave a comment below.
If you want to find a video editing solution that empowers your imagination and creativity yet takes less effort, please try this robust and user-friendly video editing software Wondershare Filmora, which will definitely enhance your productivity and helps you to make money by making videos much easier.
Richard Bennett
Richard Bennett is a writer and a lover of all things video.
Follow @Richard Bennett
Top Choices: Excellent YouTubers’ Screen Recording Tools
Best YouTube Livestreaming Screen Recorders
Richard Bennett
Oct 26, 2023• Proven solutions
The global pandemic has changed the way we live for the time being, and right now, we cannot attend events in the same way we did at the beginning of the year.
A growing number of cultural organizations, businesses, and influential YouTubers are turning towards YouTube’s Live feature because it provides a simple way of broadcasting different types of content in real-time. YouTube Live is by no means a new option, since the platform first introduced live streaming features in 2008, and some twelve years later, the feature has never been more popular.
However, the live streams you broadcast on YouTube are stored for just a brief period of time, which means you have to search for alternative methods of saving them. That’s why in this article we are going to take you through the best YouTube Live screen recorders you can use to capture the video content you are sharing with your followers.
Note: We resolutely oppose all forms of copyright-infringing downloads. This tutorial is only for downloading YouTube videos/audio materials from your own channel.
Top 10+ YouTube Live Screen Recorders
The maximum resolution in which you can record computer screen , audio recording options, or customization of the recording area are some of the most important features you need to consider while choosing a YouTube Live screen recorder.
We have selected some of the best YouTube Live screen recorders that enable you to do much more than just record live streams. So, let’s take a look at what they have to offer.
1. OBS Studio
Price: Free
Compatibility: Windows, Linux, macOS
The vast majority of live streams you can find on Twitch and YouTube are made with OBS Studio, but besides broadcasting videos, the software also gives you access to screencasting tools. This means that you can specify the area of the screen you want to record, choose the recording’s resolution and frame rate, or adjust the audio recording options.
OBS Studio is the best free, open-source screen recording program you can download. You shouldn’t use a software just because it’s free, but OBS Studio is also an extremely versatile tool. You can both record and stream in high definition and it comes with the ability to record either through your webcam or through your screen. It records directly through the graphics card , which means it can capture games even when in full-screen mode whereas a lot of other screen-recording software forces you to play games in windowed mode. The high quality can be seen easily in whatever you choose to broadcast.
OBS Studio allows you to record videos from a variety of sources, which makes it a perfect option for capturing the content you share through YouTube Live since you can select a browser window you want to capture in just a few clicks. What’s more, this open-source software is equipped with basic video editing tools, which enables you to preview the video you recorded before publishing it, apply transitions between cuts, or perform basic color correction.
Check the detailed guide to How to Record with OBS .
2. XSplit
Price: $24.95 for a three-month license
Compatibility: Windows
This is yet another broadcasting software that is equipped with powerful screen recording tools. Setting up a new screencasting session with XSplit is a simple and intuitive process that is not going to take much more than a few moments of your time.
All you need to do is define a workspace, then pick the preferred resolution and frame rate. The software allows you to capture screens in 4K resolution and at 60 fps, but it also offers a variety of resolution and frame rate options so that you can choose the one that best fits your needs. Furthermore, you can record the computer audio, which enables you to capture the live stream’s audio in excellent quality. Besides YouTube Live, XSplit can be used with Zoom , Skype, Google Hangouts, and numerous other live streaming and video calling apps.
3. Filmora
Price: Free, pricing plans start at $49.99/year
Compatibility: macOS, Windows
If you are looking for a screen recorder that is stacked with powerful video editing features, then Filmora is a great option for you. Customizing a YouTube Live or any other screencasting session with this video editing software is easy, and you can choose the resolution, frame rate, or even if you want to show mouse clicks in the recording.
Capturing the webcam feed and the computer’s screen simultaneously is also an option, while you can also decide whether or not you want to record audio from a microphone, computer audio, or both at the same time.
What’s more Filmora lets you set up the maximum duration of a screen recording and you start, pause, resume or stop a screen recording session by using hotkeys. Once you are done recording the live stream you shared on YouTube, you can edit the footage you created before uploading it to your YouTube channel.
4. Wondershare DemoCreator
Compatibility: Windows
Price: Start from $9.99
DemoCreator is a recorder that focuses its overall user experience. It is able to easily record high-quality videos at up to 120 FPS (60 FPS for Mac) and allows you to simultaneously record both your screen and webcam. This software is incredibly user friendly and makes for an easy experience for new streamers. The dual recording makes it great for gamers who are also looking to film their reactions.
5. CloudApp
Price: Free, $10 per month for an individual user
Compatibility: Windows, macOS, Linux, Chrome
Starting a new screen capturing session with the CloudApp requires you to just specify the portion of the screen you want to capture and hit the record button. Moreover, you can choose if you want to record with or without a webcam and you have the option to enable or disable the audio recording option.
However, you can only create 90-second screen recordings with the free version of the CloudApp and you cannot set resolution or frame rate of the recording. That’s why you need to upgrade to the Pro version if you want to use it to record live streams on YouTube. The Pro subscription model also grants you access to basic video editing tools and a variety of file sharing options. In addition, CloudApp lets you create and annotate still images and GIFs, which makes it a great option for digital marketers.
6. Techsmith Camtasia
Price: Free trial, $269.05 one-time fee
Compatibility: Windows, macOS
You don’t need years of video editing experience to start a new screen recording session in Camtasia. In fact, you just have to click on the Record button that is located in the software’s tool panel and then customize the settings.
Camtasia lets you choose if you want to record the full screen or just a selected portion of the screen or decide if you want to switch the webcam or the microphone off. You should make sure that the System Audio feature is enabled in order to record the sound of the live stream you’re sharing on YouTube. Pausing or stopping a screencasting session requires you to either click on the appropriate buttons or use the keyboard-based hotkeys. After you are done recording a live stream you can edit the footage using Camtasia’s video editing tools.
7. ScreenRec
Price: Free
Compatibility: Windows, macOS, Linux
Recording any live stream or TV show you play on your computer with ScreenRec is a straightforward process that can be completed in just a few clicks. Simply drag the mouse cursor over the area you want to record, then hit the Record button when you are ready and ScreenRec will start capturing the computer screen.
Once the screencasting session is completed you will get a sharable link that can be embedded to a website or used to save an MP4 file on your hard drive. Furthermore, ScreenRec is equipped with analytics tools that show you how many views your videos attracted or for how long each visitor watched them. All of these features make ScreenRec an excellent option for anyone who wants to record a live stream on YouTube or any other on-screen activity.
8. Flashback Express
Price: Free
Compatibility: Windows
Flashback Express is a simple screen recorder that lets you create high-res videos effortlessly. Setting up a new screencasting session requires you to just specify the area of the screen you want to record, choose whether or not you want to record the webcam feed and hit the Record button.
There are no restrictions in terms of the duration of screen recordings you can make with Flashback Express and the software doesn’t watermark the video you create.
However, you can only save the files in MP4, AVI, or WMW formats and you cannot adjust the video’s frame rate or resolution. What’s more, editing videos or applying effects with Flashback Express isn’t possible and you must upgrade to FlashBack Pro if you want to edit the live streams you broadcast on YouTube.
This piece of software is user friendly, but it doesn’t have as many features as other products on the market. Having said that, it is still an excellent tool that will help you live stream gameplay easily. Although it doesn’t come with built-in video editing software, it is possible to download another program to do this for you (i.e. Filmora). Flashback Express has the ability to record through your headset or microphone as well.
9. VLC
Price: Free
Compatibility: macOS, Linux, Windows
This is an iconic media player that became famous for its versatility and support for nearly all video file formats. Besides being one of the best media players ever created, VLC is also equipped with screen recording and video editing tools.
In order to start a new screencasting session, you will have to go to the Media menu and then select the Open Capture Device option. Once the new window pops up on the screen you should change the Capture Mode to Desktop and then adjust the frame rate in accordance with your needs.
Click on the Play button, and then hit the Record button after the screen recording window appears on the screen. You can only record the entire screen with VLC, since customizing the recording area isn’t an option, and all your files will be captured in the RAW format which means that you may have to resize them before you upload them to YouTube.
10. Screencast-o-matic
Price: Free, pricing options start at $1.65 per month
Compatibility: macOS, Windows
As its name suggests, this software product makes the screen recording process almost automatic. You can choose if you want to record an entire screen or just a window you selected. In addition, Screencast-o-matic lets you record the desktop and webcam footage at the same time, and you can even zoom in while the screencasting session is still in progress.
The free version of the software offers only a basic set of features that doesn’t include the option to record system audio. This means that you have to opt for one of the available subscription models if you want to record your live streams on YouTube with Screencast-o-matic. What’s more, you will be to create videos that are longer than 15 minutes, create recordings without watermarks or add music to your recordings if you opt for Deluxe or Premiere pricing options.
11. QuickTime Player
Price: Free
Compatibility: macOS, Windows
Mac users who want to record content that is broadcasted via YouTube Live can do so without having to install a third-party app. Apple ceased the support for the Windows-based version of QuickTime Player in 2016 and PC users can only capture their screens with this software if they have some of its earlier versions.
In order to start a new screen recording session in QuickTime Player, you just have to go to the File menu and select the New Screen Recording option. The Screen Recording window where you can choose if you want to record audio or show mouse click in the recording will pop up on the screen. QuickTime Player lets you choose if you want to capture the entire screen or just a portion of it, and you can click on the Record button to start a new screencasting session. In order to save a video file you created, you just have to go to the File menu and pick the Save option.
How to Record a YouTube Live Stream with Filmora
Recording a YouTube Live stream with Filmora is easy even if you never went through this process before. You can set up a new screencasting session in just a few easy steps that won’t take more than a few moments to complete. Here’s what you need to do:
Step 1: Launch Filmora and create a new project. Go to the Media tab once the video editor’s main window loads and click on the Record drop-down menu that is located next to the Import drop-down menu.
Choose the Record PC Screen option and then proceed to customize the settings for your screencasting session.

Step 2: Click on the Rectangular icon in the upper left corner of the Wondershare Filmora Scrn window and choose either Full Screen, Custom, or Target Window option, depending on how you want to record a YouTube Live stream to define the area of the screen that is going to be recorded.
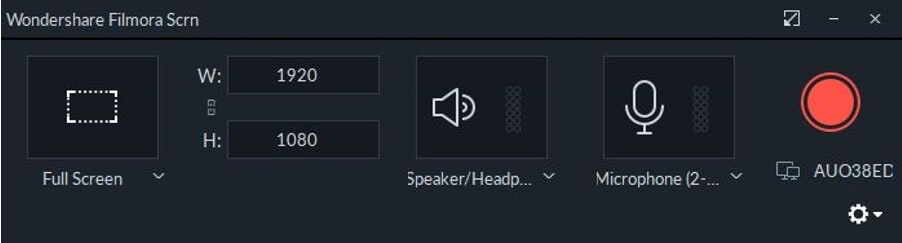
You can then proceed to insert the resolution your screen recording is going to have, and choose if you want to record system audio and sound from an external microphone.
Step 3: Click on the Gear icon below the Record button to gain access to additional settings, and then proceed to set the frame rate, adjust the video’s quality or activate the Show Mouse Clicks in Recording option.
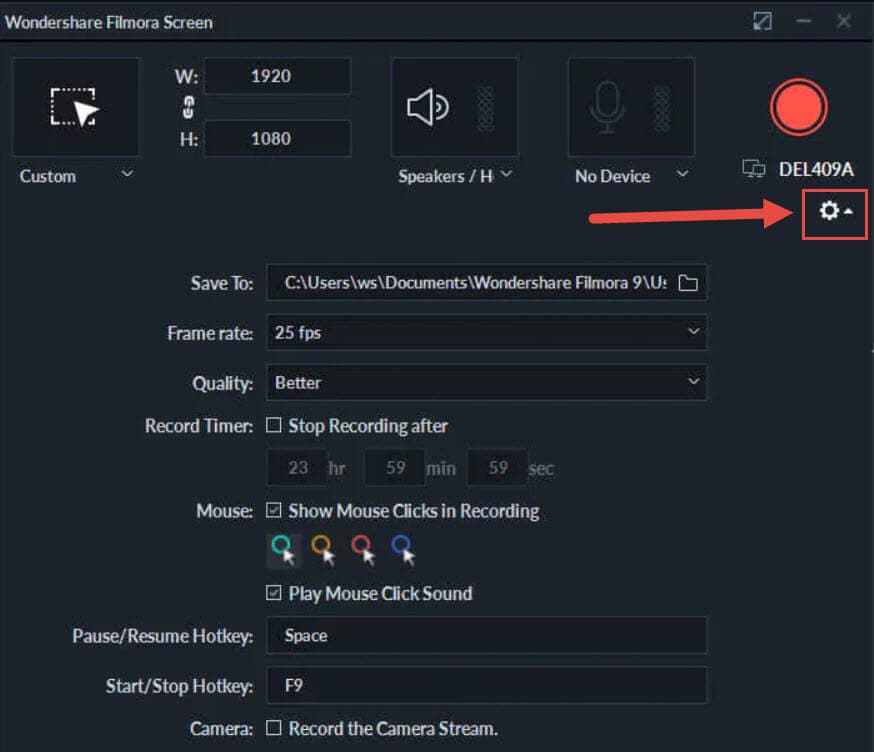
Make sure that the checkbox next to the Record the Camera Stream is marked if you want to record webcam feed and computer desktop at the same time.
Step 4: Press the red Record button in the upper right corner of the window and jump to the live stream. Once the broadcast is completed, you should click on the Stop button and use Filmora’s editing tools to remove all imperfections from the recording.
Filmora allows you to export all of your projects directly to your YouTube channel immediately after the rendering process is completed.
Frequently Asked Questions about YouTube Live Screen Recorders
1. Does YouTube Save Live Videos?
Stream Now, Mobile, Webcam, and Events streams can be stored automatically for 12 hours after they end. You can access all of your live streams by clicking on the Videos menu in the YouTube Studio and selecting the Live option and then change the Privacy setting in the Visibility menu.
2. How to use YouTube to Archive a Live Stream?
Once the live stream ends, you should go to the Dashboard and click on the Live feature, and then choose the Stream option. Check the Make Archive Unlisted When Complete checkbox and the live stream video will be saved accordingly.
Richard Bennett
Richard Bennett is a writer and a lover of all things video.
Follow @Richard Bennett
Richard Bennett
Oct 26, 2023• Proven solutions
The global pandemic has changed the way we live for the time being, and right now, we cannot attend events in the same way we did at the beginning of the year.
A growing number of cultural organizations, businesses, and influential YouTubers are turning towards YouTube’s Live feature because it provides a simple way of broadcasting different types of content in real-time. YouTube Live is by no means a new option, since the platform first introduced live streaming features in 2008, and some twelve years later, the feature has never been more popular.
However, the live streams you broadcast on YouTube are stored for just a brief period of time, which means you have to search for alternative methods of saving them. That’s why in this article we are going to take you through the best YouTube Live screen recorders you can use to capture the video content you are sharing with your followers.
Note: We resolutely oppose all forms of copyright-infringing downloads. This tutorial is only for downloading YouTube videos/audio materials from your own channel.
Top 10+ YouTube Live Screen Recorders
The maximum resolution in which you can record computer screen , audio recording options, or customization of the recording area are some of the most important features you need to consider while choosing a YouTube Live screen recorder.
We have selected some of the best YouTube Live screen recorders that enable you to do much more than just record live streams. So, let’s take a look at what they have to offer.
1. OBS Studio
Price: Free
Compatibility: Windows, Linux, macOS
The vast majority of live streams you can find on Twitch and YouTube are made with OBS Studio, but besides broadcasting videos, the software also gives you access to screencasting tools. This means that you can specify the area of the screen you want to record, choose the recording’s resolution and frame rate, or adjust the audio recording options.
OBS Studio is the best free, open-source screen recording program you can download. You shouldn’t use a software just because it’s free, but OBS Studio is also an extremely versatile tool. You can both record and stream in high definition and it comes with the ability to record either through your webcam or through your screen. It records directly through the graphics card , which means it can capture games even when in full-screen mode whereas a lot of other screen-recording software forces you to play games in windowed mode. The high quality can be seen easily in whatever you choose to broadcast.
OBS Studio allows you to record videos from a variety of sources, which makes it a perfect option for capturing the content you share through YouTube Live since you can select a browser window you want to capture in just a few clicks. What’s more, this open-source software is equipped with basic video editing tools, which enables you to preview the video you recorded before publishing it, apply transitions between cuts, or perform basic color correction.
Check the detailed guide to How to Record with OBS .
2. XSplit
Price: $24.95 for a three-month license
Compatibility: Windows
This is yet another broadcasting software that is equipped with powerful screen recording tools. Setting up a new screencasting session with XSplit is a simple and intuitive process that is not going to take much more than a few moments of your time.
All you need to do is define a workspace, then pick the preferred resolution and frame rate. The software allows you to capture screens in 4K resolution and at 60 fps, but it also offers a variety of resolution and frame rate options so that you can choose the one that best fits your needs. Furthermore, you can record the computer audio, which enables you to capture the live stream’s audio in excellent quality. Besides YouTube Live, XSplit can be used with Zoom , Skype, Google Hangouts, and numerous other live streaming and video calling apps.
3. Filmora
Price: Free, pricing plans start at $49.99/year
Compatibility: macOS, Windows
If you are looking for a screen recorder that is stacked with powerful video editing features, then Filmora is a great option for you. Customizing a YouTube Live or any other screencasting session with this video editing software is easy, and you can choose the resolution, frame rate, or even if you want to show mouse clicks in the recording.
Capturing the webcam feed and the computer’s screen simultaneously is also an option, while you can also decide whether or not you want to record audio from a microphone, computer audio, or both at the same time.
What’s more Filmora lets you set up the maximum duration of a screen recording and you start, pause, resume or stop a screen recording session by using hotkeys. Once you are done recording the live stream you shared on YouTube, you can edit the footage you created before uploading it to your YouTube channel.
4. Wondershare DemoCreator
Compatibility: Windows
Price: Start from $9.99
DemoCreator is a recorder that focuses its overall user experience. It is able to easily record high-quality videos at up to 120 FPS (60 FPS for Mac) and allows you to simultaneously record both your screen and webcam. This software is incredibly user friendly and makes for an easy experience for new streamers. The dual recording makes it great for gamers who are also looking to film their reactions.
5. CloudApp
Price: Free, $10 per month for an individual user
Compatibility: Windows, macOS, Linux, Chrome
Starting a new screen capturing session with the CloudApp requires you to just specify the portion of the screen you want to capture and hit the record button. Moreover, you can choose if you want to record with or without a webcam and you have the option to enable or disable the audio recording option.
However, you can only create 90-second screen recordings with the free version of the CloudApp and you cannot set resolution or frame rate of the recording. That’s why you need to upgrade to the Pro version if you want to use it to record live streams on YouTube. The Pro subscription model also grants you access to basic video editing tools and a variety of file sharing options. In addition, CloudApp lets you create and annotate still images and GIFs, which makes it a great option for digital marketers.
6. Techsmith Camtasia
Price: Free trial, $269.05 one-time fee
Compatibility: Windows, macOS
You don’t need years of video editing experience to start a new screen recording session in Camtasia. In fact, you just have to click on the Record button that is located in the software’s tool panel and then customize the settings.
Camtasia lets you choose if you want to record the full screen or just a selected portion of the screen or decide if you want to switch the webcam or the microphone off. You should make sure that the System Audio feature is enabled in order to record the sound of the live stream you’re sharing on YouTube. Pausing or stopping a screencasting session requires you to either click on the appropriate buttons or use the keyboard-based hotkeys. After you are done recording a live stream you can edit the footage using Camtasia’s video editing tools.
7. ScreenRec
Price: Free
Compatibility: Windows, macOS, Linux
Recording any live stream or TV show you play on your computer with ScreenRec is a straightforward process that can be completed in just a few clicks. Simply drag the mouse cursor over the area you want to record, then hit the Record button when you are ready and ScreenRec will start capturing the computer screen.
Once the screencasting session is completed you will get a sharable link that can be embedded to a website or used to save an MP4 file on your hard drive. Furthermore, ScreenRec is equipped with analytics tools that show you how many views your videos attracted or for how long each visitor watched them. All of these features make ScreenRec an excellent option for anyone who wants to record a live stream on YouTube or any other on-screen activity.
8. Flashback Express
Price: Free
Compatibility: Windows
Flashback Express is a simple screen recorder that lets you create high-res videos effortlessly. Setting up a new screencasting session requires you to just specify the area of the screen you want to record, choose whether or not you want to record the webcam feed and hit the Record button.
There are no restrictions in terms of the duration of screen recordings you can make with Flashback Express and the software doesn’t watermark the video you create.
However, you can only save the files in MP4, AVI, or WMW formats and you cannot adjust the video’s frame rate or resolution. What’s more, editing videos or applying effects with Flashback Express isn’t possible and you must upgrade to FlashBack Pro if you want to edit the live streams you broadcast on YouTube.
This piece of software is user friendly, but it doesn’t have as many features as other products on the market. Having said that, it is still an excellent tool that will help you live stream gameplay easily. Although it doesn’t come with built-in video editing software, it is possible to download another program to do this for you (i.e. Filmora). Flashback Express has the ability to record through your headset or microphone as well.
9. VLC
Price: Free
Compatibility: macOS, Linux, Windows
This is an iconic media player that became famous for its versatility and support for nearly all video file formats. Besides being one of the best media players ever created, VLC is also equipped with screen recording and video editing tools.
In order to start a new screencasting session, you will have to go to the Media menu and then select the Open Capture Device option. Once the new window pops up on the screen you should change the Capture Mode to Desktop and then adjust the frame rate in accordance with your needs.
Click on the Play button, and then hit the Record button after the screen recording window appears on the screen. You can only record the entire screen with VLC, since customizing the recording area isn’t an option, and all your files will be captured in the RAW format which means that you may have to resize them before you upload them to YouTube.
10. Screencast-o-matic
Price: Free, pricing options start at $1.65 per month
Compatibility: macOS, Windows
As its name suggests, this software product makes the screen recording process almost automatic. You can choose if you want to record an entire screen or just a window you selected. In addition, Screencast-o-matic lets you record the desktop and webcam footage at the same time, and you can even zoom in while the screencasting session is still in progress.
The free version of the software offers only a basic set of features that doesn’t include the option to record system audio. This means that you have to opt for one of the available subscription models if you want to record your live streams on YouTube with Screencast-o-matic. What’s more, you will be to create videos that are longer than 15 minutes, create recordings without watermarks or add music to your recordings if you opt for Deluxe or Premiere pricing options.
11. QuickTime Player
Price: Free
Compatibility: macOS, Windows
Mac users who want to record content that is broadcasted via YouTube Live can do so without having to install a third-party app. Apple ceased the support for the Windows-based version of QuickTime Player in 2016 and PC users can only capture their screens with this software if they have some of its earlier versions.
In order to start a new screen recording session in QuickTime Player, you just have to go to the File menu and select the New Screen Recording option. The Screen Recording window where you can choose if you want to record audio or show mouse click in the recording will pop up on the screen. QuickTime Player lets you choose if you want to capture the entire screen or just a portion of it, and you can click on the Record button to start a new screencasting session. In order to save a video file you created, you just have to go to the File menu and pick the Save option.
How to Record a YouTube Live Stream with Filmora
Recording a YouTube Live stream with Filmora is easy even if you never went through this process before. You can set up a new screencasting session in just a few easy steps that won’t take more than a few moments to complete. Here’s what you need to do:
Step 1: Launch Filmora and create a new project. Go to the Media tab once the video editor’s main window loads and click on the Record drop-down menu that is located next to the Import drop-down menu.
Choose the Record PC Screen option and then proceed to customize the settings for your screencasting session.
Step 2: Click on the Rectangular icon in the upper left corner of the Wondershare Filmora Scrn window and choose either Full Screen, Custom, or Target Window option, depending on how you want to record a YouTube Live stream to define the area of the screen that is going to be recorded.
You can then proceed to insert the resolution your screen recording is going to have, and choose if you want to record system audio and sound from an external microphone.
Step 3: Click on the Gear icon below the Record button to gain access to additional settings, and then proceed to set the frame rate, adjust the video’s quality or activate the Show Mouse Clicks in Recording option.
Make sure that the checkbox next to the Record the Camera Stream is marked if you want to record webcam feed and computer desktop at the same time.
Step 4: Press the red Record button in the upper right corner of the window and jump to the live stream. Once the broadcast is completed, you should click on the Stop button and use Filmora’s editing tools to remove all imperfections from the recording.
Filmora allows you to export all of your projects directly to your YouTube channel immediately after the rendering process is completed.
Frequently Asked Questions about YouTube Live Screen Recorders
1. Does YouTube Save Live Videos?
Stream Now, Mobile, Webcam, and Events streams can be stored automatically for 12 hours after they end. You can access all of your live streams by clicking on the Videos menu in the YouTube Studio and selecting the Live option and then change the Privacy setting in the Visibility menu.
2. How to use YouTube to Archive a Live Stream?
Once the live stream ends, you should go to the Dashboard and click on the Live feature, and then choose the Stream option. Check the Make Archive Unlisted When Complete checkbox and the live stream video will be saved accordingly.
Richard Bennett
Richard Bennett is a writer and a lover of all things video.
Follow @Richard Bennett
Also read:
- Top 15 YouTube Playlists Catering to Musicians
- 10 Must-Have Keyword Gurus for Video Success
- [New] Delightful Digests A List of Top Food Channels
- In 2024, Dialing Up Deliverables A Comprehensive Guide to Gainful Vlogging
- 2024 Approved A Step-by-Step Guide to Elevate Your Stream on YouTube
- Solving YouTube Pixel Monotony A Quick Guide
- [Updated] Early Bird's Youtube Strategies for Channel and Revenue
- 2024 Approved Above the Mainstage Significant YouTube Meetings
- 2024 Approved 10+ Free Apps to Convert YouTube Videos on Demand
- 2024 Approved Crafting Impactful Try-On Hauls for Maximum Views
- Stop Algorithmic YouTube Video Selections
- Ultimate Guide Prime Video Stabilizers
- YouTube Mastery Creating Quality Videos on Phones
- In 2024, Closing with Panache Free YouTube's #1 Six
- 2024 Approved Building a Successful YouTube Channel Sidestep These 8 Frequent Faux Pas
- Annual Roundup Top No-Money Video Editing Software Reviewed for 2024
- Dispatching Dreadful Green Screen Distortion on Mac-Editing Sessions for 2024
- Free YouTube End Screen Templates
- In 2024, 20 YouTube Time Savers That Will Skyrocket Engagement Rates
- 2024 Approved A Comprehensive Look at Editing and Uploading Virtual Reality Videos to YouTube
- Minute-by-Minute Mastery The Top Ten on YouTube Daily
- [New] Engage and Inspire Audiences Professional-Level Tips for YouTube Edits
- In 2024, Co-Production Strategies for Online Content Proliferation
- Visionary Voices Celebrating Innovative Female Creators on YouTube
- [New] How to Download Part of a YouTube Videos?
- Spark Your Audience with Best Video Content Ideas
- [New] Earnings Analysis YouTube Views vs Financial Gain
- In 2024, Awakening with Animation The Cutest and Brightest Channels
- [New] Elevating the End Scene in YouTube Productions
- Step-by-Step to Success Joining YouTube's Partner Program
- In 2024, Boost Views Strategic Partnerships on YouTube for Rapid Growth
- [New] Boredom's Ender The Ultimate List of Jovial YouTube Content
- In 2024, Efficient Video Marketing Incorporating Timestamps Effectively
- In 2024, Crafting Visual Narratives with YouTube Studio's Editing Suite
- [Updated] Elevate Engagement Crafting Effective YouTube Shorts
- Shielding Your Media What Does Unlisted Mean in YouTube?
- 2024 Approved Easy Steps for Exporting Videos From YouTube to Dailymotion
- Exploring Income Average Creator Revenue From Adverts on YouTube?
- In 2024, Downloading the Latest Tracks A Guide to Free Extractors for PC Users
- 2024 Approved Capturing Moving Images Mirrorless Versus DSLR
- Closing Your Vlog Right Top 6 Free YouTube Outro Tools
- [Updated] DSLR or Mirrorless for High-Quality Video Recording?
- 2024 Approved Analyzing Video Platforms Vimeo and YouTube
- [New] Enhance Every Viewing Moment with These Top 6 Free Platforms for YouTube Short Downloads
- Understanding YouTube's Monetization Schedule
- What Should Consider when You Convert MP3 Into MP4 for 2024
- In 2024, Your Pathway to Perfect IGTV Footage From Phone to DSLR
- New Unbiased Review of AVS Video Editor Features, Pricing, and More
- New 2024 Approved Come And Pick! Best MOV to GIF Converters
- [Updated] VRecorder Basics Seamless Installation for 2024
- In 2024, Apple ID Locked for Security Reasons From iPhone SE? Find the Best Solution Here
- 9 Best Phone Monitoring Apps for Motorola Edge 40 Pro | Dr.fone
- How does the stardust trade cost In pokemon go On Vivo Y200e 5G? | Dr.fone
- [New] Ideal Tools for Capturing Your Next Google Meet Success for 2024
- In 2024, How to Cast Oppo Reno 9A to Computer for iPhone and Android? | Dr.fone
- In 2024, How to Bypass Google FRP Lock from Oppo Reno 10 Pro 5G Devices
- How to Stop Life360 from Tracking You On Xiaomi Redmi Note 12 5G? | Dr.fone
- Unmasking the Innovators Who Revolutionized Discord Chat for 2024
- [New] Elevate Your Photo Grids on IG with These Premium Tools
- [Updated] Adhering to Correct Aspect Ratio in Twitter Videos
- Undelete lost photos from Realme C67 4G.
- [Updated] 2024 Approved Crafting Memorable Visual Narratives with Instagram Captions
- In 2024, Instagram Video Magic Templates & Insights
- [New] X-Sound Engineer Desktop Suite for 2024
- [New] 2024 Approved Step-by-Step Guide to Pinning in Discord Dialogues
- Mold and Share Custom Internet Comedy Pieces
- Updated Essential Audio Frequency Templates The Top 8 Selection for Video Editors for 2024
- How to Bypass FRP from OnePlus Nord N30 5G?
- In 2024, Top IMEI Unlokers for iPhone 11 Pro and Android Phones
- [New] The Essence of Vimeo User-Friendly Video Service for 2024
- [Updated] Uncovering the Most Recent Facebook Changes
- In 2024, 5 Best Route Generator Apps You Should Try On Samsung Galaxy S24+ | Dr.fone
- FRP Hijacker by Hagard Download and Bypass your Vivo Y17s FRP Locks
- [New] 2024 Approved Unrivaled Public Domain Screenshots & Video Tools Guide
- Adjust Background to Black for Your Product Review Video for 2024
- Repair Video Tool - Repair all your damaged video files of Moto G Stylus (2023) on Mac
- Peak PSD Layer Magic
- 2024 Approved Add MP3 Elements to PPT Display Panels
- Updated 2024 Approved Prime Video Picture Format Guide
- Creating Stunning Videos on Mac A Beginners Guide to Movie Maker Software
- In 2024, Unova Stone Pokémon Go Evolution List and How Catch Them For Motorola Moto G13 | Dr.fone
- Transform Your Reddit Presence with These Tactics
- Title: "2024 Approved Channeling Success Emulating Top Video Bloggers' Techniques"
- Author: Kevin
- Created at : 2024-05-25 14:22:18
- Updated at : 2024-05-26 14:22:18
- Link: https://youtube-videos.techidaily.com/2024-approved-channeling-success-emulating-top-video-bloggers-techniques/
- License: This work is licensed under CC BY-NC-SA 4.0.
