

"2024 Approved Capture the Essence Extracting YouTube Audio Directly"
Capture the Essence: Extracting YouTube Audio Directly
How to Record Audio from YouTube 
Max Wales
Mar 27, 2024• Proven solutions
It happens several times when we are watching some videos on YouTube and the background music of the videos appeal us the most. We go online and start searching for that unknown but heart touching song. Unfortunately, the song is not available online. But it doesn’t mean that you cannot add that song to your playlist. The great news is that there are so many advanced audio recording software tools that allow users to record audios directly from YouTube videos.
Sometimes, we are interested to play our favorite music during a long hour journey, but the missing internet connectivity does not allow us to stream it online. In such a situation also, you can get your free music easily on your iPad, iPhone, or any handheld device and it can be later burnt into CD as well. Now you might be interested to know how all this can happen without the “Record Audio” button on YouTube. Don’t worry! Below we have highlighted three simple methods to do this task:
- Method 1: Capture Audio from YouTube with Online YouTube2MP3 Converter
- Method 2: Recording YouTube Audio with Audacity
- Method 3: Recording Sound with Streaming Audio Recorder
- Method 4: Record Audio with Filmora
Note: We resolutely oppose all forms of copyright-infringing downloads. This tutorial is only for downloading YouTube videos/audio materials from your own channel.
![]()

The All-in-One Screen Recorder & Video Editor
- Record desktop screen , voiceover, and webcam simultaneously
- Edit recorded clips quickly with a wide range of professional tools
- Built-in plentiful templates and effects
- Export to MP4, MOV, MKV, GIF and multiple formats
For Win 7 or later (64-bit)
For macOS 10.12 or later  Secure Download
Method 1: Capture Audio from YouTube with Online YouTube2MP3 Converter
The simplest technique to record audio from YouTube videos is to use a trustworthy online application that can perform the conversion from video to MP3 file . In this article, I am going to show you how to capture audio from YouTube with the assist of a free online convert tool named YouTube to MP3. To do this, simply follow these simple steps:

- Visit the YouTube video page and copy the URL of the video whose audio you want to get in form of an MP3
- Go to the internet and open the online YouTube to MP3 converter tool.
- Paste your video URL in the text field available at the top of the website page.
- Choose your output file format as mp3.
- Hit the Convert conversion button.
- When the conversion is done, you will get a download button on the screen. Hit the Download button and soon your file will be saved to your device.
If you think using YouTube to MP3 Converter to capture audio from YouTube meets your needs, you can visit this online converter: youtubetomp3music.com . While, if you find need a better solution, then keep reading.
Method 2: Recording Sound from YouTube with Audacity
In case if you are interested to record yourself or want to capture just a small portion of the video’s sound, it is good to start with the Audacity program. Following simple steps will assist you to complete your recording process with this handy tool:
- First, download the Audacity program on your system. Note that it is available for free, so anyone can get it easily from the internet.
- Run the setup to begin the installation process and follow on-screen guidelines to finish the process.
- Open Audacity software on your system and from the top menu bar hit the Edit option and then go to Preferences.

- In the Device section of Preferences window, switch to the Recording section.
- Choose Stereo Mix option. In case if it is disabled by default, you may need to enable it first. To do this, go to the control panel of your computer, go to Hardware and Sound section and then switch to Sound section. Now go to Recording tab and right click with the mouse on the blank space of the screen. From the drop-down menu choose Show Disabled Devices option. You will find Stereo Mix Device option on the screen; right click on this device and hit Enable option.

- Hit Ok to save the new sound settings. After these settings, you will have to open the Audacity program again to work with Stereo Mix option.
- It is time to open your YouTube video and hit the record button. Make sure the connection is fast enough to play video without any interruption, otherwise keep it loaded in advance. Play the video and when done, hit the stop button on Audacity program.
- This file can be exported and saved to a device with the MP3 file format.
Method 3: Recording Sound with Streaming Audio Recorder
The third choice for recording YouTube audios is using Streaming Audio Recorder . The great news is that this software cannot only record audios for you rather at the same time it is loaded with advanced editor tool that allows easy cutting and splicing of sounds for the creation of customized videos. With Streaming Audio Recorder, you can also convert your videos into various file formats.
You will be happy to hear that this recorder is not just dedicated to YouTube platform only rather it can also work perfectly with Grooveshark, Jango, and Spotify. Below are few simple steps that you can use to complete the audio recording task with Streaming Audio Recorder:

- Go to the internet and download Streaming Audio Recorder. Install and open the program.
- Hit gear icon on the main interface and then move to settings. Set source of the audio input as System Sound.
- Start playing your desired YouTube video and on recorder, hit the record button instantly.
- As soon as the recording task is complete, hit the Stop button and your recorded audio will be soon saved to the targeted folder.
Recommended: Record Audio and Save to MP3 Format with Wondershare Filmora


You can also use Filmora to record your YouTube audio and then save the recorded audio or the video to MP3 format at exporting and then you can listen to the recorded audio and music even when there is no network connection.
With these advanced tools, the audio recording task becomes quite simple and easy. Even beginners can handle with without any trouble. If you are interested to capture your favorite tracks from online videos, it is right time to choose any of the above suitable methods and start recording your audio.
You can change the voice in audio , or add fade in and fade out effects, or edit the recorded audio file with more tools. The recorded media files can be further customized as well as shared on other social media platforms. It is a great idea for today’s creative young generation. These handy tools can make your audio recording task quite easier and resultant files can be saved in a variety of file formats for further sharing.
If you want to edit the record audio further, like adjust the audio pitch, remove background noise, mix the audio balance, equalize the audio, you can also try Filmora. It allows you to record the audio, webcam and desktop screen automatically . And it works on 64-bit Windows7/8/10, and Mac OS X 10.11 El Capitan and late.

Max Wales
Max Wales is a writer and a lover of all things video.
Follow @Max Wales
Max Wales
Mar 27, 2024• Proven solutions
It happens several times when we are watching some videos on YouTube and the background music of the videos appeal us the most. We go online and start searching for that unknown but heart touching song. Unfortunately, the song is not available online. But it doesn’t mean that you cannot add that song to your playlist. The great news is that there are so many advanced audio recording software tools that allow users to record audios directly from YouTube videos.
Sometimes, we are interested to play our favorite music during a long hour journey, but the missing internet connectivity does not allow us to stream it online. In such a situation also, you can get your free music easily on your iPad, iPhone, or any handheld device and it can be later burnt into CD as well. Now you might be interested to know how all this can happen without the “Record Audio” button on YouTube. Don’t worry! Below we have highlighted three simple methods to do this task:
- Method 1: Capture Audio from YouTube with Online YouTube2MP3 Converter
- Method 2: Recording YouTube Audio with Audacity
- Method 3: Recording Sound with Streaming Audio Recorder
- Method 4: Record Audio with Filmora
Note: We resolutely oppose all forms of copyright-infringing downloads. This tutorial is only for downloading YouTube videos/audio materials from your own channel.
![]()
The All-in-One Screen Recorder & Video Editor
- Record desktop screen , voiceover, and webcam simultaneously
- Edit recorded clips quickly with a wide range of professional tools
- Built-in plentiful templates and effects
- Export to MP4, MOV, MKV, GIF and multiple formats
For Win 7 or later (64-bit)
For macOS 10.12 or later Secure Download
Method 1: Capture Audio from YouTube with Online YouTube2MP3 Converter
The simplest technique to record audio from YouTube videos is to use a trustworthy online application that can perform the conversion from video to MP3 file . In this article, I am going to show you how to capture audio from YouTube with the assist of a free online convert tool named YouTube to MP3. To do this, simply follow these simple steps:
- Visit the YouTube video page and copy the URL of the video whose audio you want to get in form of an MP3
- Go to the internet and open the online YouTube to MP3 converter tool.
- Paste your video URL in the text field available at the top of the website page.
- Choose your output file format as mp3.
- Hit the Convert conversion button.
- When the conversion is done, you will get a download button on the screen. Hit the Download button and soon your file will be saved to your device.
If you think using YouTube to MP3 Converter to capture audio from YouTube meets your needs, you can visit this online converter: youtubetomp3music.com . While, if you find need a better solution, then keep reading.
Method 2: Recording Sound from YouTube with Audacity
In case if you are interested to record yourself or want to capture just a small portion of the video’s sound, it is good to start with the Audacity program. Following simple steps will assist you to complete your recording process with this handy tool:
- First, download the Audacity program on your system. Note that it is available for free, so anyone can get it easily from the internet.
- Run the setup to begin the installation process and follow on-screen guidelines to finish the process.
- Open Audacity software on your system and from the top menu bar hit the Edit option and then go to Preferences.
- In the Device section of Preferences window, switch to the Recording section.
- Choose Stereo Mix option. In case if it is disabled by default, you may need to enable it first. To do this, go to the control panel of your computer, go to Hardware and Sound section and then switch to Sound section. Now go to Recording tab and right click with the mouse on the blank space of the screen. From the drop-down menu choose Show Disabled Devices option. You will find Stereo Mix Device option on the screen; right click on this device and hit Enable option.
- Hit Ok to save the new sound settings. After these settings, you will have to open the Audacity program again to work with Stereo Mix option.
- It is time to open your YouTube video and hit the record button. Make sure the connection is fast enough to play video without any interruption, otherwise keep it loaded in advance. Play the video and when done, hit the stop button on Audacity program.
- This file can be exported and saved to a device with the MP3 file format.
Method 3: Recording Sound with Streaming Audio Recorder
The third choice for recording YouTube audios is using Streaming Audio Recorder . The great news is that this software cannot only record audios for you rather at the same time it is loaded with advanced editor tool that allows easy cutting and splicing of sounds for the creation of customized videos. With Streaming Audio Recorder, you can also convert your videos into various file formats.
You will be happy to hear that this recorder is not just dedicated to YouTube platform only rather it can also work perfectly with Grooveshark, Jango, and Spotify. Below are few simple steps that you can use to complete the audio recording task with Streaming Audio Recorder:
- Go to the internet and download Streaming Audio Recorder. Install and open the program.
- Hit gear icon on the main interface and then move to settings. Set source of the audio input as System Sound.
- Start playing your desired YouTube video and on recorder, hit the record button instantly.
- As soon as the recording task is complete, hit the Stop button and your recorded audio will be soon saved to the targeted folder.
Recommended: Record Audio and Save to MP3 Format with Wondershare Filmora
You can also use Filmora to record your YouTube audio and then save the recorded audio or the video to MP3 format at exporting and then you can listen to the recorded audio and music even when there is no network connection.
With these advanced tools, the audio recording task becomes quite simple and easy. Even beginners can handle with without any trouble. If you are interested to capture your favorite tracks from online videos, it is right time to choose any of the above suitable methods and start recording your audio.
You can change the voice in audio , or add fade in and fade out effects, or edit the recorded audio file with more tools. The recorded media files can be further customized as well as shared on other social media platforms. It is a great idea for today’s creative young generation. These handy tools can make your audio recording task quite easier and resultant files can be saved in a variety of file formats for further sharing.
If you want to edit the record audio further, like adjust the audio pitch, remove background noise, mix the audio balance, equalize the audio, you can also try Filmora. It allows you to record the audio, webcam and desktop screen automatically . And it works on 64-bit Windows7/8/10, and Mac OS X 10.11 El Capitan and late.
Max Wales
Max Wales is a writer and a lover of all things video.
Follow @Max Wales
From Camera Roll to YouTube: Posting Short Clips Seamlessly
How to Upload Shorts Video on YouTube? [2024]

Richard Bennett
Mar 27, 2024• Proven solutions
Quite recently, YouTube launched Shorts to compete with Tik Tok. At the time of this writing, the users in India have access to the fully functional version of the app. Although YouTube Shorts is available for both Android and iOS platforms, its functions are limited as the application is still in its Beta phase for the remaining part of the globe.
With that said, the following sections explain the step-by-step process on how to upload a short video on YouTube Shorts both from your smartphone and a PC.
Part 1: How to Upload Short Video on YouTube from PC?
The fact is, if you are using a computer to upload short videos to YouTube, the process is identical to publishing your other, regular footage. However, there are a few guidelines that your clips must comply with so that the streaming platform could specifically identify them as YouTube Shorts. These norms include:
- Your videos must not be more than 60 seconds long in duration
- They must be shot in portrait orientation, ideally in the 9:16 aspect ratio
- The title or the description must contain ‘#Shorts’ (without quotes) in it
Once you have a video recorded using the first two guidelines from the above list, you can use the instructions given below to upload the media on YouTube:
Step 1: Select a Short Video to Upload
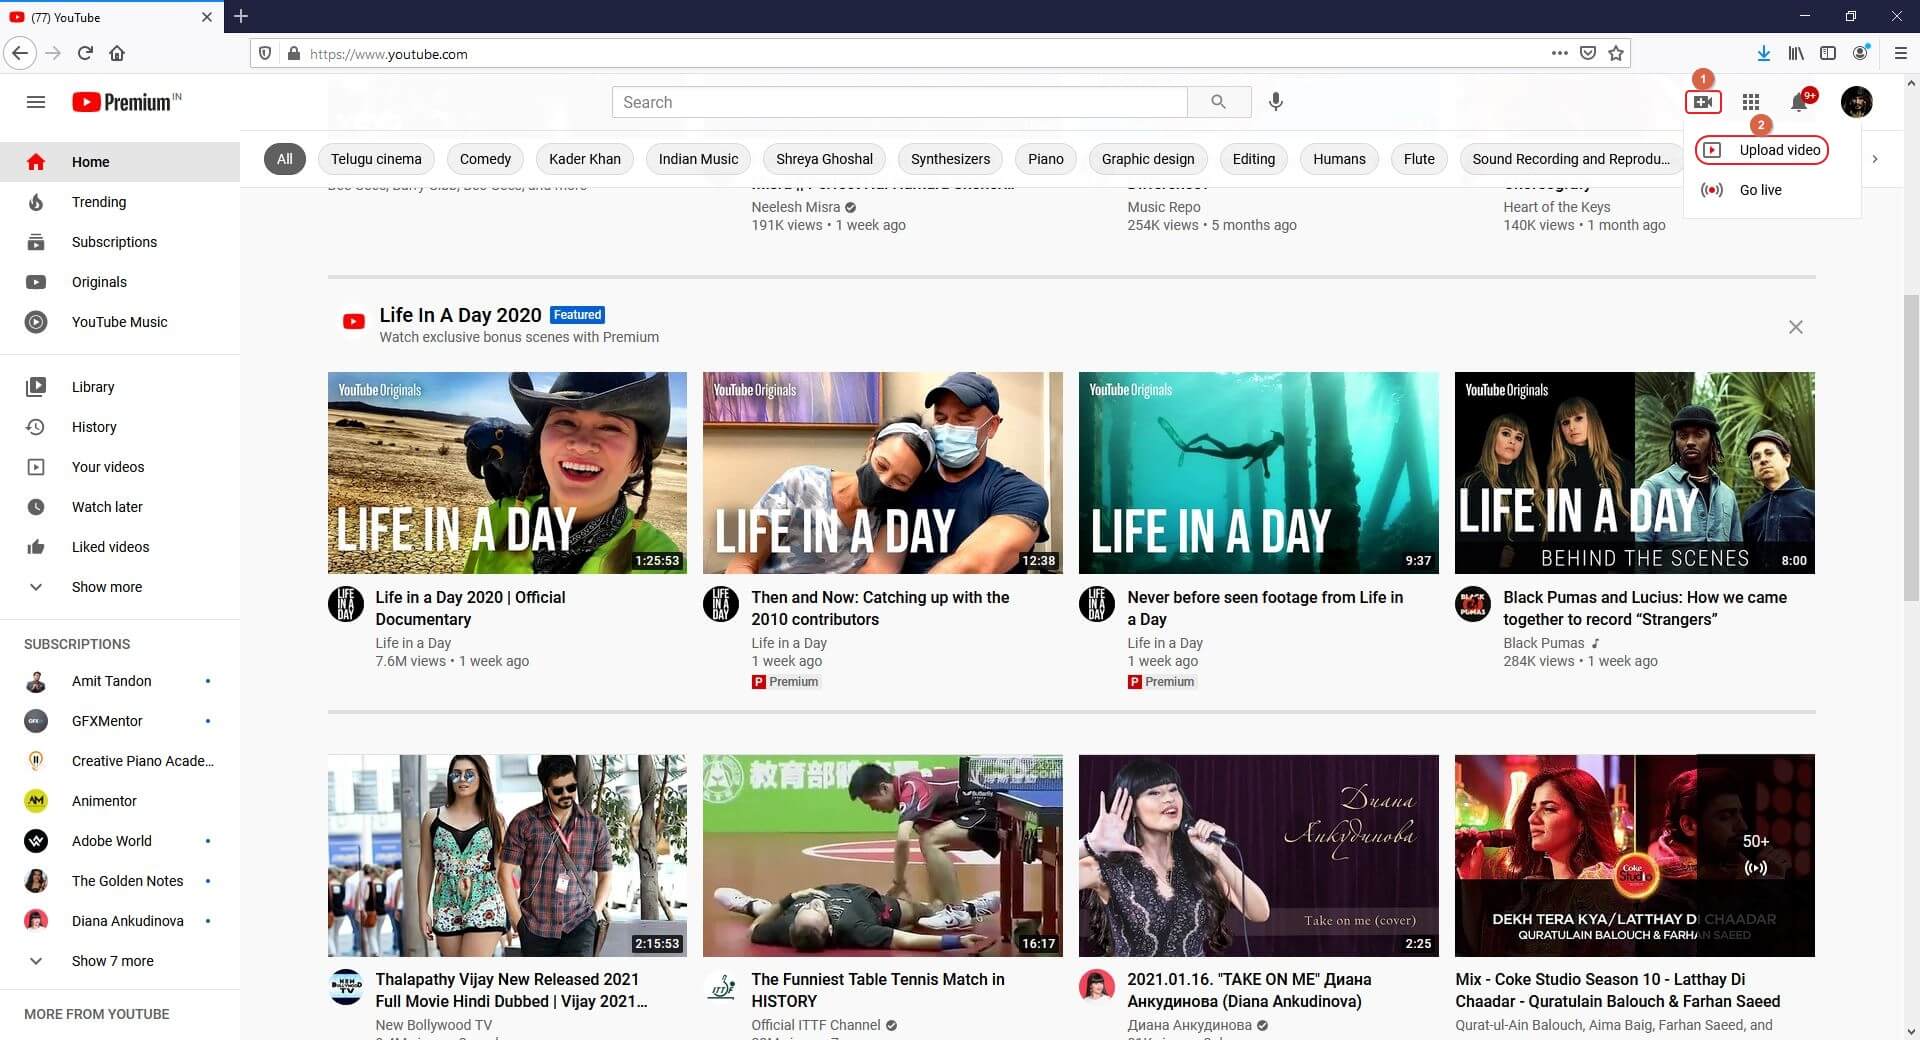
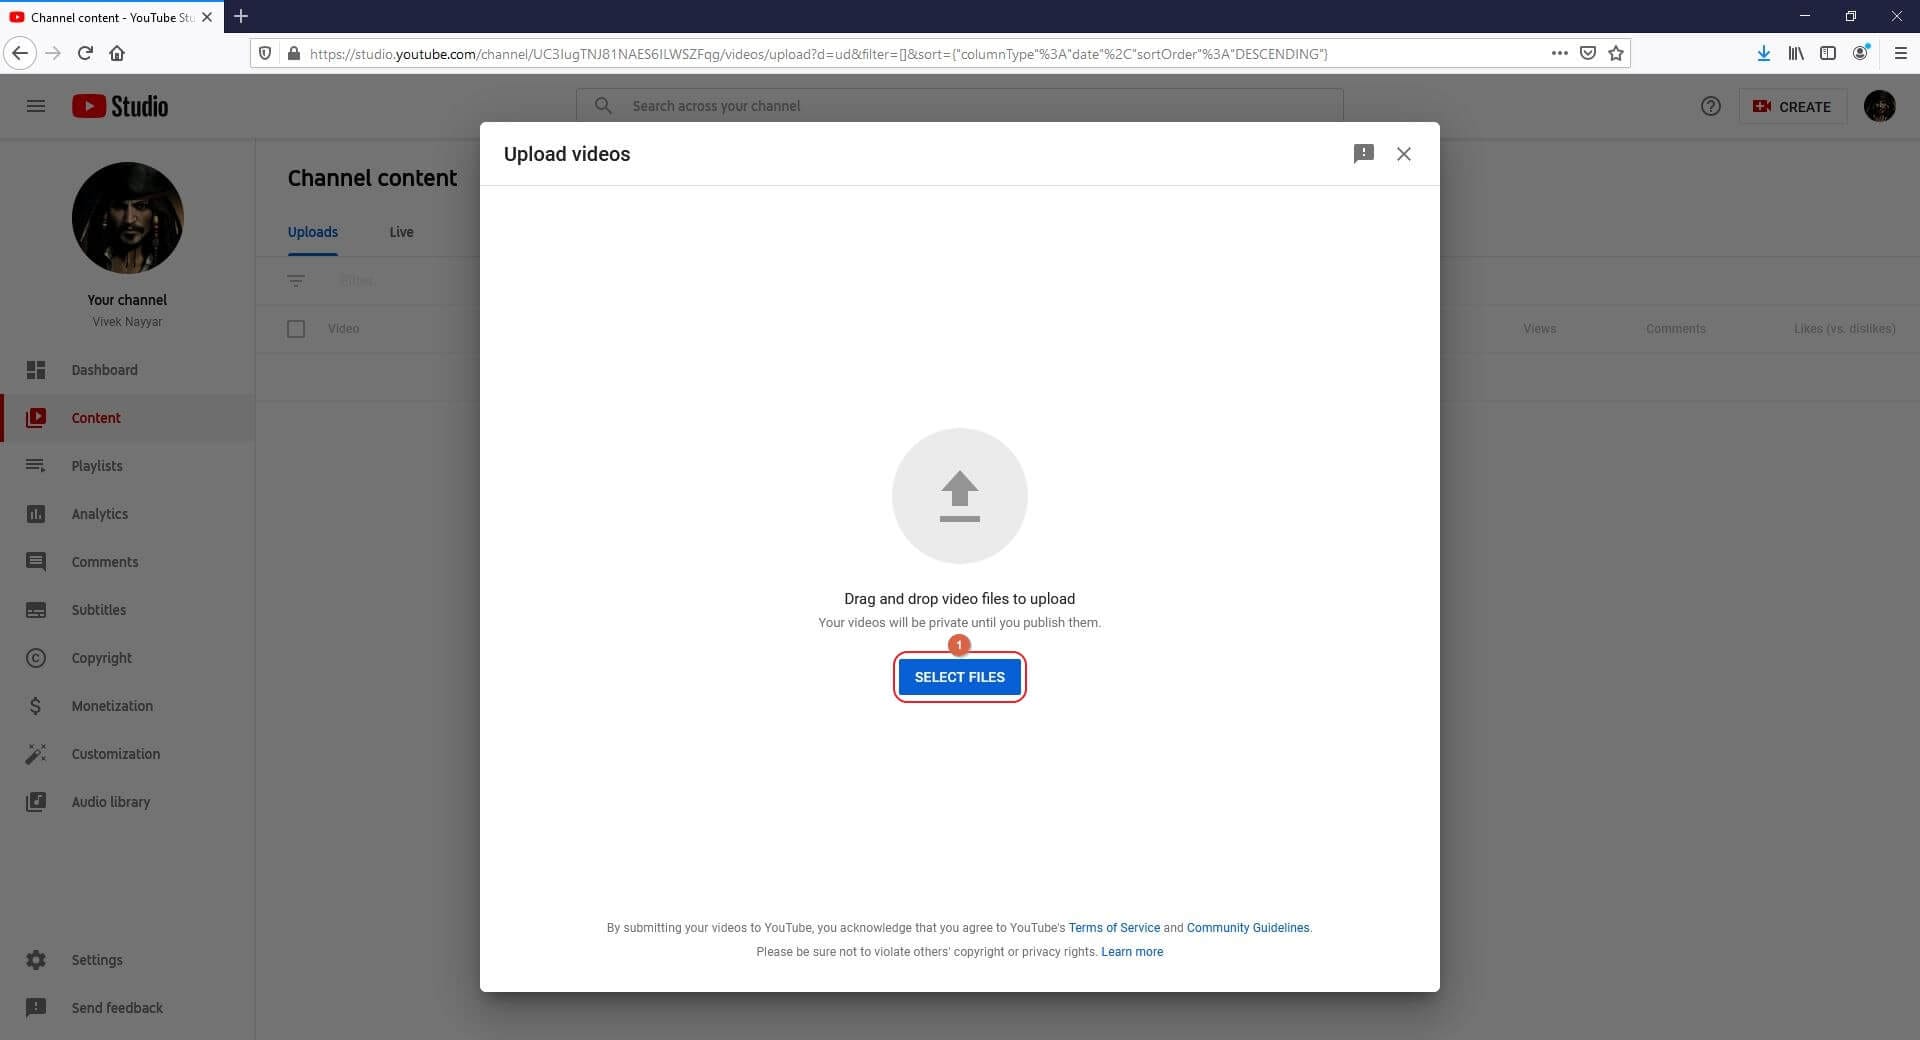
Launch your favorite web browser on your PC, go to YouTube, make sure to sign in to your YouTube account, click the Create (Camera) icon from the top-right corner of the web page, click SELECT FILES on the Upload videos window, and locate, select, and upload a short video from your PC to the portal.
Step 2: Mark the Video as Short
On the Details window that appears, add #Shorts in the Title or Description field, optionally pick a thumbnail from the suggested images present under the Thumbnail section (or upload a custom picture from your PC), select your preferred radio button from under the Audience section, make the other necessary changes if need be, and click NEXT. When the Video elements window comes up, choose your preferred options and elements, click NEXT.

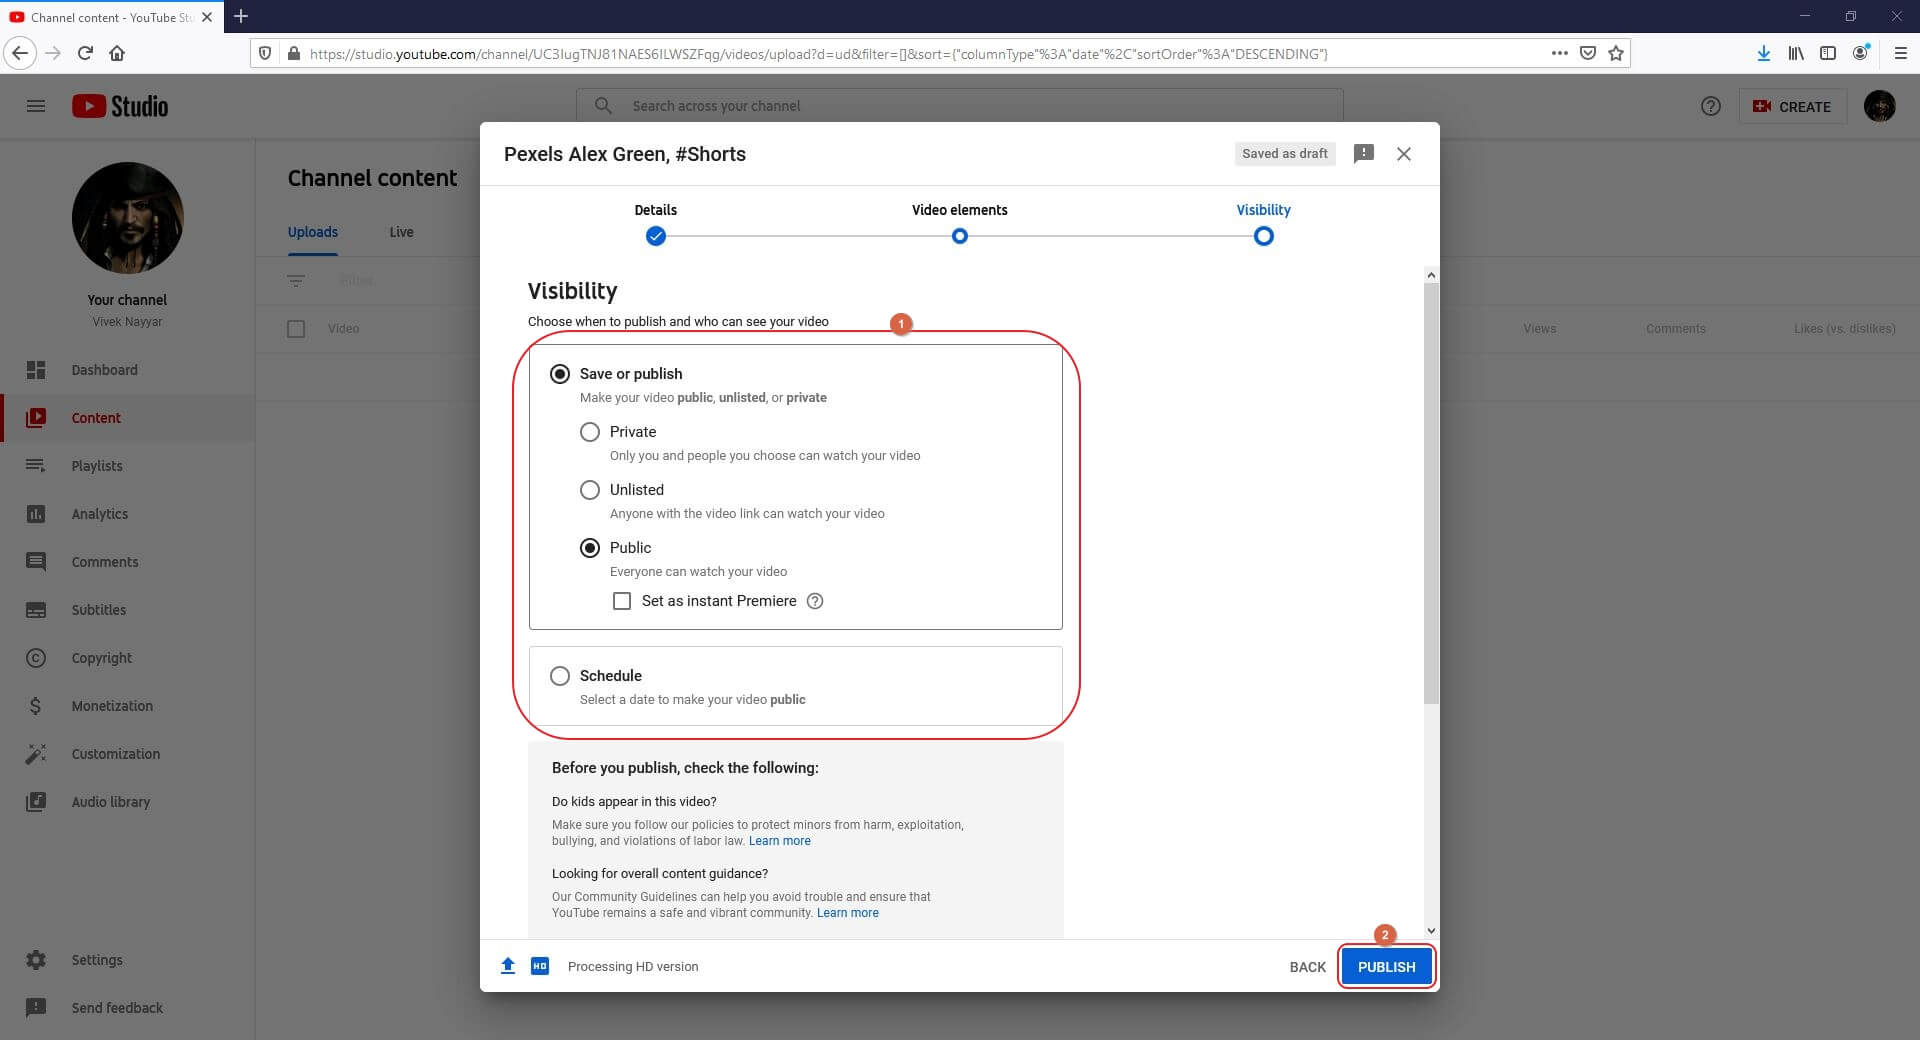
Step 3: Publish the Short Video
On the Visibility window, choose your preferred radio button from under the Save or publish section or select Schedule to set a different time when the short video should be published automatically. Finally, click SAVE to publish the clip as a short video on YouTube from your computer.
To sum up, uploading YouTube Shorts video from desktop has nothing different from uploading regular YouTube video besides the requirements listed at the beginning of this article. If you prefer to edit videos for YouTube Shortson a computer, I recommend you to try our video editor Filmora , which is an ideal solution for YouTubers. Download the free trial version below and get started.
For Win 7 or later (64-bit)
 Secure Download
For macOS 10.12 or later Secure Download
Part 2: How to Upload Short Video on YouTube Mobile App?
The process of uploading YouTube Shorts from the mobile app is fairly simple compared to the method used on a computer. While using the app, you can either upload an existing video or shoot a new one from within the program itself then and there, add music and text, and upload it right away. Both these methods are explained below in detail:
Note: The guidelines for creating and uploading short videos to YouTube remain the same, regardless of the platform or device you use.
Method 1: Upload an Existing Short Video
Note: Make sure to have the target video on the smartphone and that you have downloaded, installed, and signed in to the YouTube app before proceeding.
Step 1: Select a Video to Upload

On your Android or iOS smartphone, launch the YouTube app, tap the + (Create) icon from the bottom, tap Create a Short from the Create box that pops up from the bottom, tap Upload from the bottom-right corner of the next screen, and select and upload a short, 60 seconds video recorded in portrait orientation from your device’s storage to the app.
Step 2: Add Details
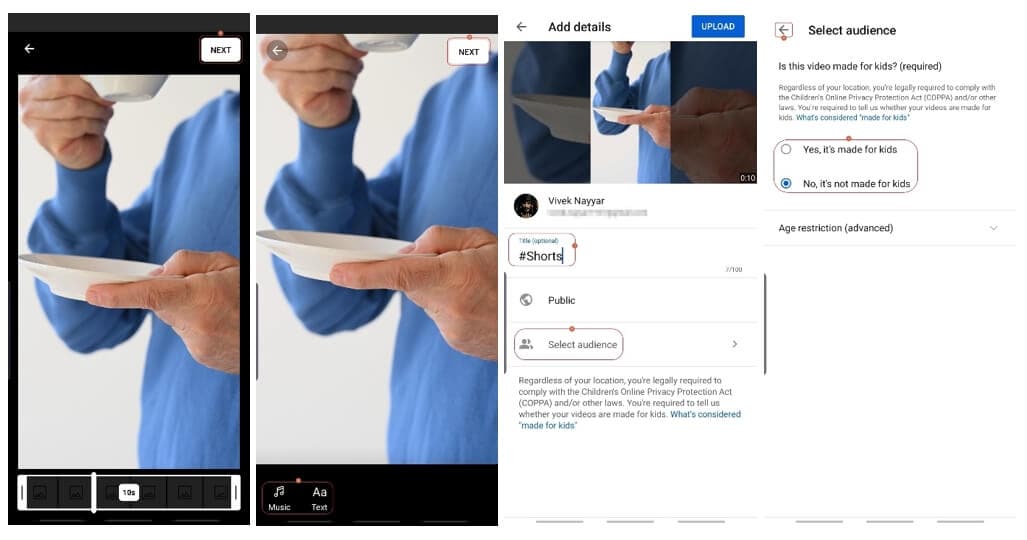
On the next screen, tap NEXT, user the Music and Text icons at the bottom-left corner to add a background music and caption to the video respectively, and tap NEXT from the top-right corner. On the next screen, enter a name for the video in the Title field along with the #Shorts tag, and tap Select audience to choose your preferred audience.
Step 3: Upload the Video
Finally tap UPLOAD from the top-right corner to upload the short video on YouTube.
Method 2: Record a Short Video and Upload
Step 1: Record Shorts Video
Previously, I have introduced how to record and upload YouTube Shorts videos , so I will keep the content concise here.
Please note you will not see the Create a Short option if you are outsides of India.

In the YouTube app, tap the + (Add) button and select Create a Short. Please note you will not see the Create a Short option if you are outsides of India.
Next, use the Speed and Timer icons to set the speed of the video and the countdown timer duration before the app starts recording the video when you press the Record button respectively.
Now tap the Record button from the bottom to start recording a video and stop to stop the recording. Make sure to shoot the footage in the portrait mode (ideally in the 9:16 aspect ratio). Tap NEXT from the bottom-right corner to proceed to the next step.
Step 2: Add Text and Music to the Short Video
On the next window, use the Music and Text buttons from the bottom-left corner to add a background music and caption to the video, and tap NEXT from the top-right corner.
Step 3: Upload and Post the Short Video
On the Add details window, enter a name for the video along with the #Shorts tag in the Create a title field, tap Select audience to select the target audience, and tap UPLOAD from the top-right corner to upload the short video on YouTube.
Conclusion
Learning the process of how to post short videos on YouTube is fairly simple as long as you have the video recorded in the portrait orientation, it is up to 60 seconds long, and contains the ‘#Shorts’ tag (without quotes) in the title or description. The good thing is, if you don’t have access to the YouTube app on your smartphone, the method for how to upload short video on YouTube explained in the first section can be followed while using your desktop computer.
Richard Bennett
Richard Bennett is a writer and a lover of all things video.
Follow @Richard Bennett
Richard Bennett
Mar 27, 2024• Proven solutions
Quite recently, YouTube launched Shorts to compete with Tik Tok. At the time of this writing, the users in India have access to the fully functional version of the app. Although YouTube Shorts is available for both Android and iOS platforms, its functions are limited as the application is still in its Beta phase for the remaining part of the globe.
With that said, the following sections explain the step-by-step process on how to upload a short video on YouTube Shorts both from your smartphone and a PC.
Part 1: How to Upload Short Video on YouTube from PC?
The fact is, if you are using a computer to upload short videos to YouTube, the process is identical to publishing your other, regular footage. However, there are a few guidelines that your clips must comply with so that the streaming platform could specifically identify them as YouTube Shorts. These norms include:
- Your videos must not be more than 60 seconds long in duration
- They must be shot in portrait orientation, ideally in the 9:16 aspect ratio
- The title or the description must contain ‘#Shorts’ (without quotes) in it
Once you have a video recorded using the first two guidelines from the above list, you can use the instructions given below to upload the media on YouTube:
Step 1: Select a Short Video to Upload
Launch your favorite web browser on your PC, go to YouTube, make sure to sign in to your YouTube account, click the Create (Camera) icon from the top-right corner of the web page, click SELECT FILES on the Upload videos window, and locate, select, and upload a short video from your PC to the portal.
Step 2: Mark the Video as Short
On the Details window that appears, add #Shorts in the Title or Description field, optionally pick a thumbnail from the suggested images present under the Thumbnail section (or upload a custom picture from your PC), select your preferred radio button from under the Audience section, make the other necessary changes if need be, and click NEXT. When the Video elements window comes up, choose your preferred options and elements, click NEXT.
Step 3: Publish the Short Video
On the Visibility window, choose your preferred radio button from under the Save or publish section or select Schedule to set a different time when the short video should be published automatically. Finally, click SAVE to publish the clip as a short video on YouTube from your computer.
To sum up, uploading YouTube Shorts video from desktop has nothing different from uploading regular YouTube video besides the requirements listed at the beginning of this article. If you prefer to edit videos for YouTube Shortson a computer, I recommend you to try our video editor Filmora , which is an ideal solution for YouTubers. Download the free trial version below and get started.
For Win 7 or later (64-bit)
Secure Download
For macOS 10.12 or later Secure Download
Part 2: How to Upload Short Video on YouTube Mobile App?
The process of uploading YouTube Shorts from the mobile app is fairly simple compared to the method used on a computer. While using the app, you can either upload an existing video or shoot a new one from within the program itself then and there, add music and text, and upload it right away. Both these methods are explained below in detail:
Note: The guidelines for creating and uploading short videos to YouTube remain the same, regardless of the platform or device you use.
Method 1: Upload an Existing Short Video
Note: Make sure to have the target video on the smartphone and that you have downloaded, installed, and signed in to the YouTube app before proceeding.
Step 1: Select a Video to Upload
On your Android or iOS smartphone, launch the YouTube app, tap the + (Create) icon from the bottom, tap Create a Short from the Create box that pops up from the bottom, tap Upload from the bottom-right corner of the next screen, and select and upload a short, 60 seconds video recorded in portrait orientation from your device’s storage to the app.
Step 2: Add Details
On the next screen, tap NEXT, user the Music and Text icons at the bottom-left corner to add a background music and caption to the video respectively, and tap NEXT from the top-right corner. On the next screen, enter a name for the video in the Title field along with the #Shorts tag, and tap Select audience to choose your preferred audience.
Step 3: Upload the Video
Finally tap UPLOAD from the top-right corner to upload the short video on YouTube.
Method 2: Record a Short Video and Upload
Step 1: Record Shorts Video
Previously, I have introduced how to record and upload YouTube Shorts videos , so I will keep the content concise here.
Please note you will not see the Create a Short option if you are outsides of India.
In the YouTube app, tap the + (Add) button and select Create a Short. Please note you will not see the Create a Short option if you are outsides of India.
Next, use the Speed and Timer icons to set the speed of the video and the countdown timer duration before the app starts recording the video when you press the Record button respectively.
Now tap the Record button from the bottom to start recording a video and stop to stop the recording. Make sure to shoot the footage in the portrait mode (ideally in the 9:16 aspect ratio). Tap NEXT from the bottom-right corner to proceed to the next step.
Step 2: Add Text and Music to the Short Video
On the next window, use the Music and Text buttons from the bottom-left corner to add a background music and caption to the video, and tap NEXT from the top-right corner.
Step 3: Upload and Post the Short Video
On the Add details window, enter a name for the video along with the #Shorts tag in the Create a title field, tap Select audience to select the target audience, and tap UPLOAD from the top-right corner to upload the short video on YouTube.
Conclusion
Learning the process of how to post short videos on YouTube is fairly simple as long as you have the video recorded in the portrait orientation, it is up to 60 seconds long, and contains the ‘#Shorts’ tag (without quotes) in the title or description. The good thing is, if you don’t have access to the YouTube app on your smartphone, the method for how to upload short video on YouTube explained in the first section can be followed while using your desktop computer.
Richard Bennett
Richard Bennett is a writer and a lover of all things video.
Follow @Richard Bennett
Also read:
- Investigating Prominently Displayed YouTube Comments
- 2024 Approved Digital Dreamland Gamers' Income Evolution
- Beginning with YouTube Essential Steps to Create Your Space
- Ensuring Your Shorts Video's Thumbnail Shows Up for 2024
- In 2024, Cutting-Edge Tips Designing Immersive Educational Videos for Online Learning
- 2024 Approved Designing Memorable Try-On Videos for Online Audiences
- Cutting Down on Workload The Ultimate Mac MP4 Apps List
- Chart a Course for Success Top 5 Effective Video Marketing Strategies on YouTube for 2024
- Elevate Engagement Personalized YouTube Thumbnail Guide
- [New] YouTube Shorts Description Everything You Need to Know
- Best Sound Transforming Apps for YouTube Vloggers
- [New] Comic Crafting Mastering 7 Cheeky Content Strategies
- Mastering Video Dimensions The Key to YouTube Presence
- [Updated] Boosting Your Channels' Viewer Loyalty Essential Tactics Unveiled
- 2024 Approved Creating a Viral Traction with 6 Strategic Steps in YouTube Marketing
- The 12-Step YouTube SEO Guide for Beginners Who Want More Views
- [Updated] Boosting Your Channel Strategies for Skyrocketing View Counts
- 2024 Approved A Step-by-Step Guide for Creating Channel Trailers that Convert Viewers Into Customers
- 2024 Approved Earnings Escalation Leveraging Your YouTube Channel on Mobile Devices
- [Updated] 2024 Approved Optimal Low-Price Nintendo Simulations
- Updated Best Way To Color Grading & Color Correction in Filmora for 2024
- Advanced Mac Audio Division Toolkit - Latest 2024 Features
- Network Locked SIM Card Inserted On Your Samsung Galaxy S24 Ultra Phone? Unlock It Now
- Two Ways to Track My Boyfriends Motorola Razr 40 without Him Knowing | Dr.fone
- [New] Seamless OBS Broadcast Setup on FB for 2024
- 2024 Approved Get Smart Capturing Your Screen in Minutes
- [New] Crafting Visual Wonders in Lightroom's HDR Workflow
- 2024 Approved SpectraSafe UV-Censor Webcam Shield
- In 2024, Complete Critique GoPro HERO4 Silver Sensor
- Play HEVC H.265 on 14, is it possible?
- In 2024, Lock Your Xiaomi Redmi K70 Phone in Style The Top 5 Gesture Lock Screen Apps
- Silence the Microphone A Complete Blueprint to Remove Vocals From Tracks in Adobe Audition for 2024
- Title: "2024 Approved Capture the Essence Extracting YouTube Audio Directly"
- Author: Kevin
- Created at : 2024-06-26 14:16:51
- Updated at : 2024-06-27 14:16:51
- Link: https://youtube-videos.techidaily.com/2024-approved-capture-the-essence-extracting-youtube-audio-directly/
- License: This work is licensed under CC BY-NC-SA 4.0.
