
:max_bytes(150000):strip_icc()/panos-sakalakis-525108-unsplash-5c76011f46e0fb00019b8cda.jpg)
"2024 Approved Best YouTube Video to Text Converters On-Line"
Best YouTube Video to Text Converters On-Line
Have you ever wondered why there is a need to transcribe YouTube videos? Well, let us enlighten you! Turning content from YouTube to text is essential for numerous content creators as it allows them to gain more views. Recent studies have shown that around 33% of the audience watching YouTube videos do not necessarily watch them in English. So, by converting them to text, translation becomes a whole lot easier and subtitles can be generated more efficiently.
In this article, we will explore the procedure through how one can convert a YouTube video to text, and learn about numerous effective online YouTube video to text software.
In this article
01 How to Convert YouTube Video to Texts by Copy/Paste YouTube Transcript
02 Best YouTube Video to Text Converters Online
Part 1: How to Convert YouTube Video to Texts by Copy/Paste YouTube Transcript
When people think “Get the transcript from YouTube” they believe it is going to be a daunting and lengthy procedure. Well, let us tell you that it is certainly not! All you have to do is follow the steps outlined below to transcribe YouTube video to text - that too through the YouTube player itself.
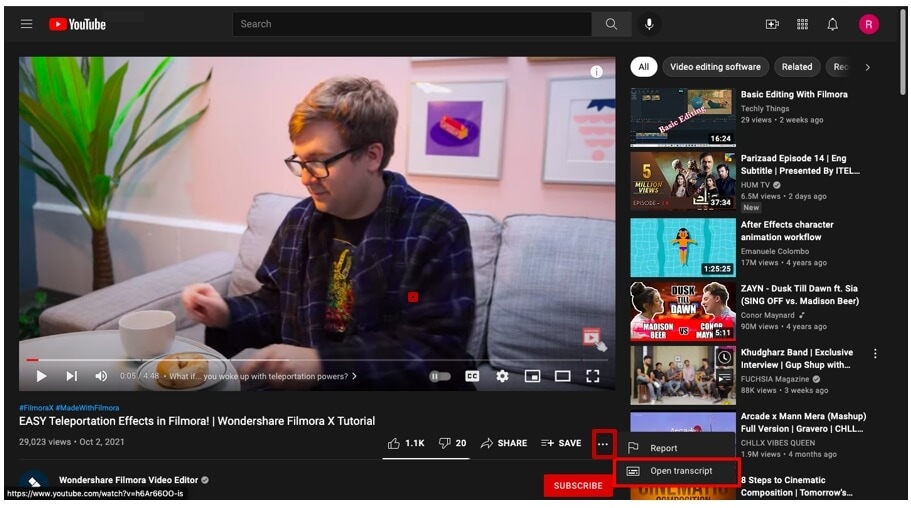
First what you have to do is open YouTube and select any video for which you require the transcript. Once you have selected the video, wait for it to load and then click the three dots located beneath the video, as shown in the image below.
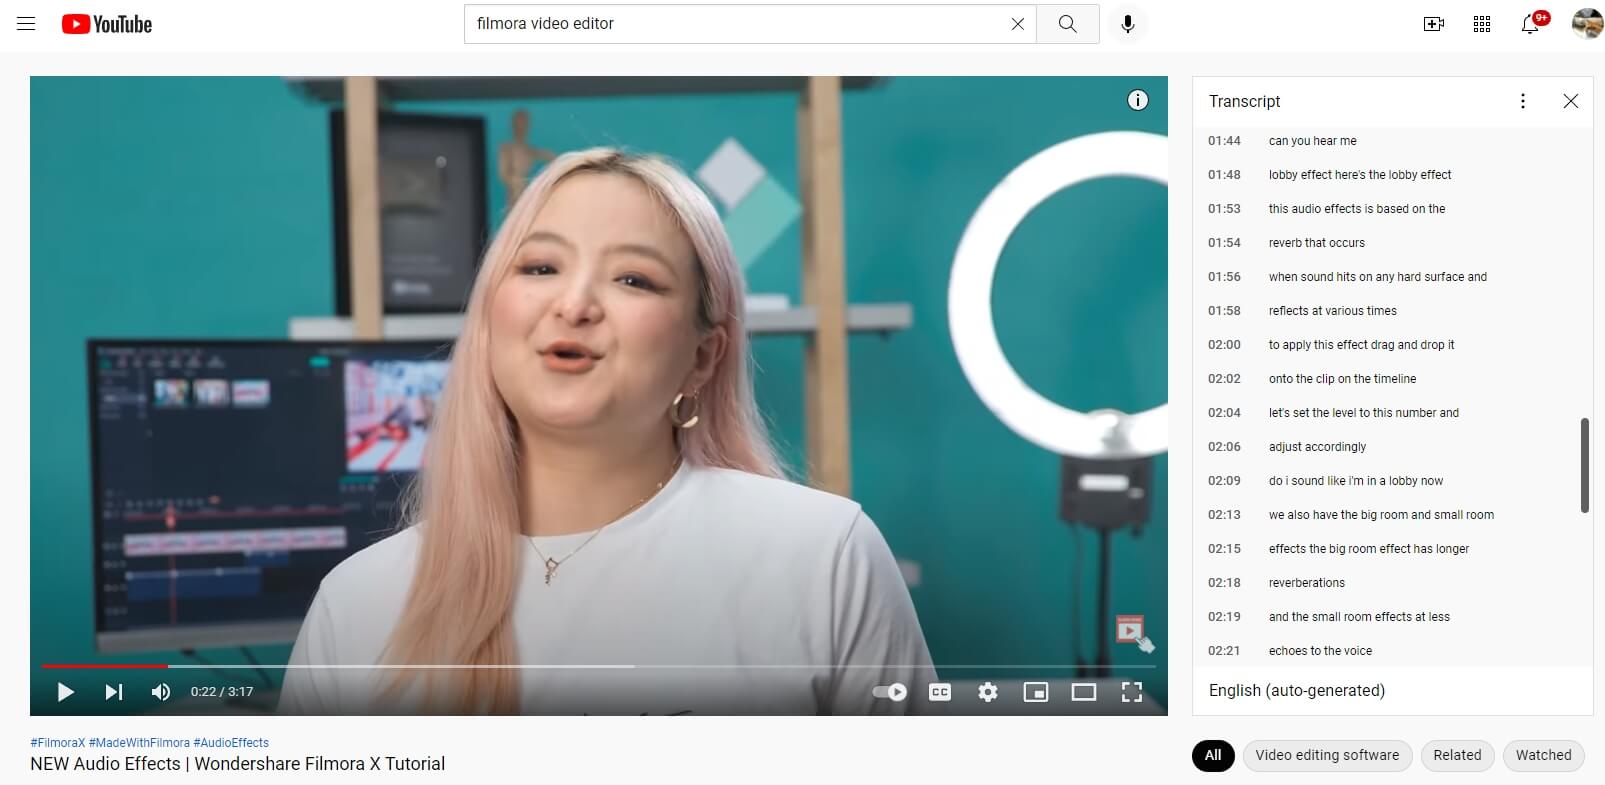
Following that, a menu will appear, just select the “Open Transcript” option and the transcription will open on the top right side of your screen.
Simply select the entire transcript using your mouse, then copy and paste it into a new Word Document or Google Document. If you don’t need the timestamps, you can click the three-dot icon to toggle timestamps off.

By following the steps outlined above, you can convert a YouTube video to text in less than five seconds!
Part 2: Best YouTube Video to Text Converters Online
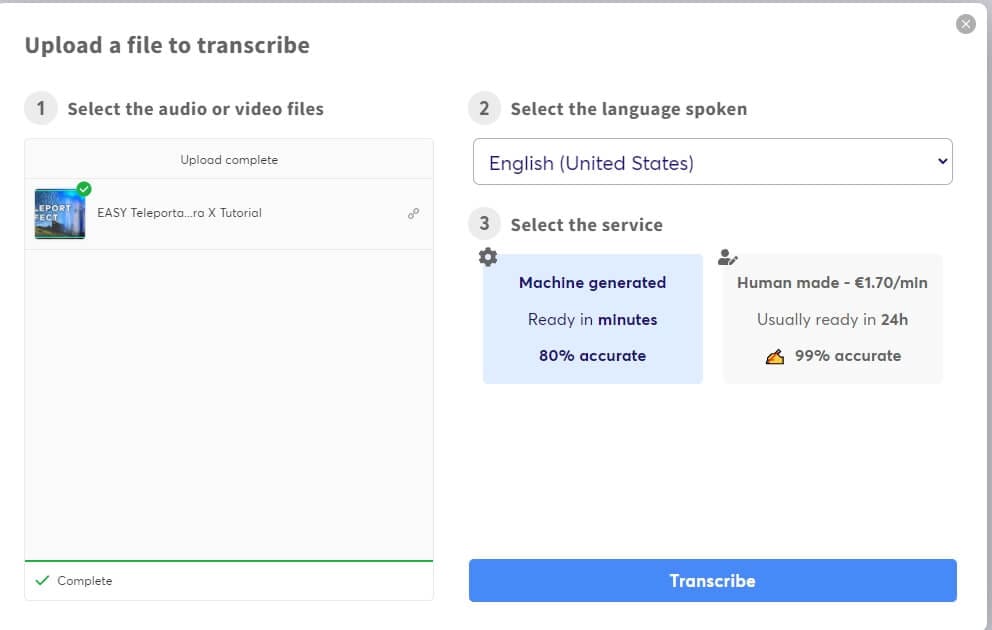
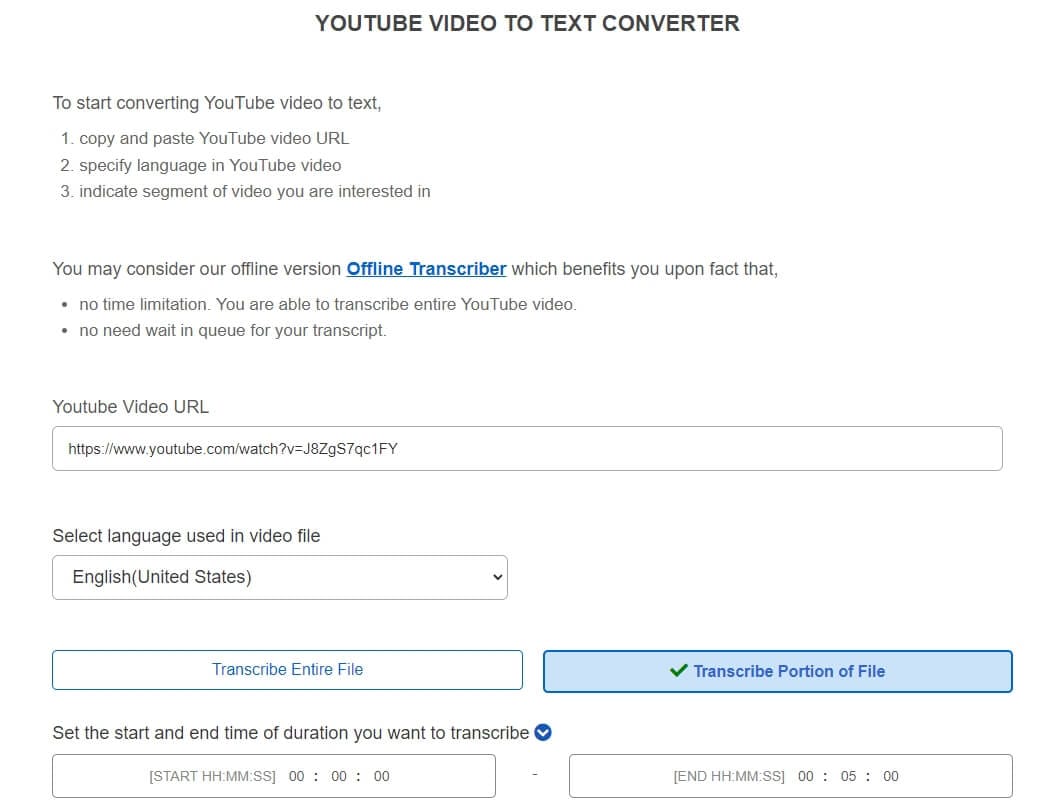
Aside from the basic method of getting the transcription from YouTube itself, many individuals make use of effective YouTube video to text converter online free. This allows them to get the complete video into text, small parts of the video to text, as well as options to convert the text into multiple languages. Below are some of the best software to convert YouTube video to text online.
1. Inqscribe
This high-quality cross-platform tool allows users to transcribe audio and video files into text . Whether it is a meeting recording or a YouTube video - you can convert them all to text. Making use of this free online software is extremely easy, all one has to do is just upload their file and click the process. Then the system will automatically transcribe the video into a text document for you. The software is uni code so all file formats are supported such as txt, XML, HTML, WebVTT, and more. The only drawback of this online software is that video files that are larger than a certain limit cannot be accepted.
2. Sonix
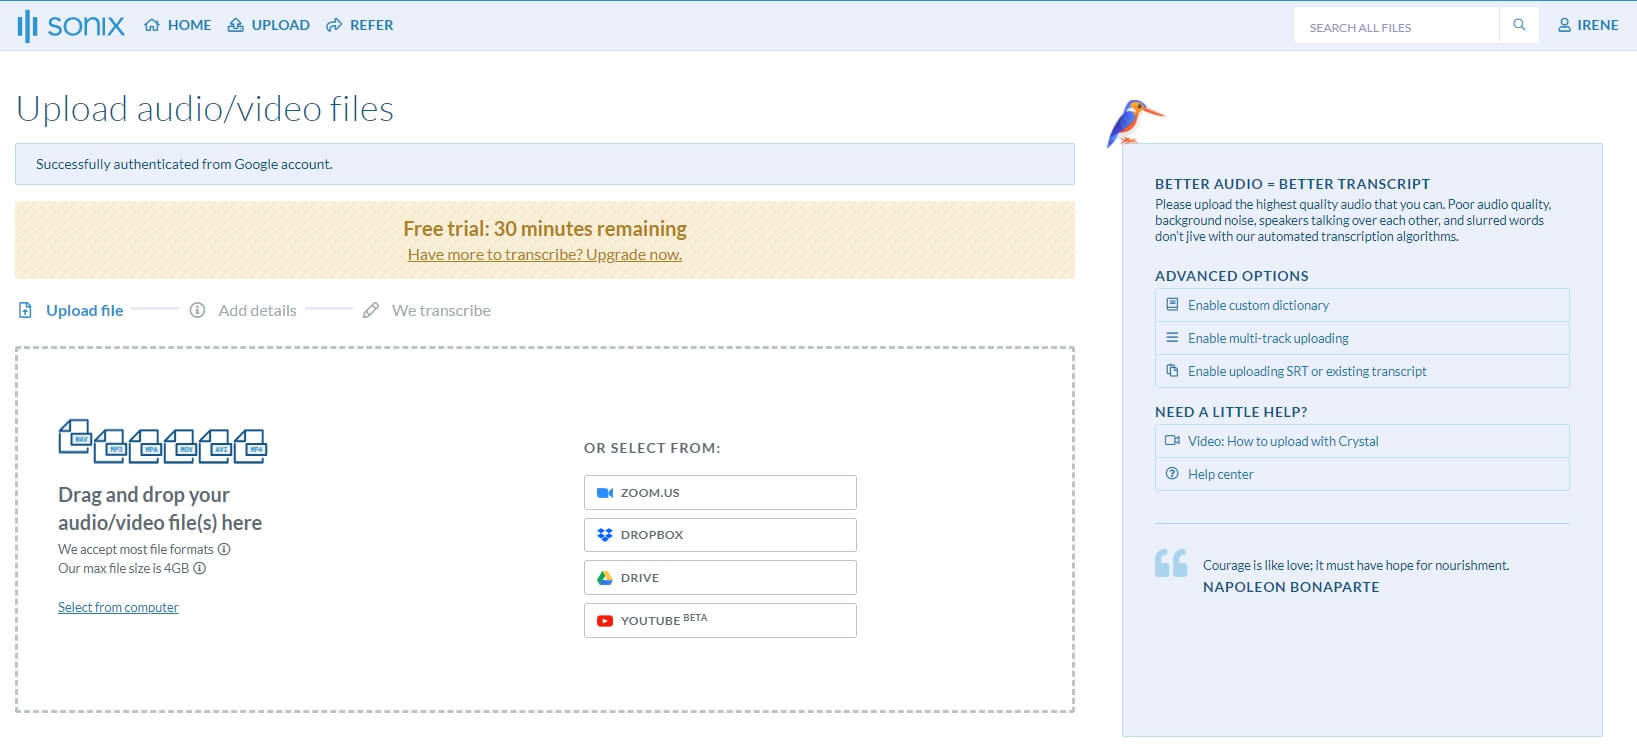
For individuals who have premium quality audio transcription, a tool by the name of Sonix is the right choice for you. This tool enables users to turn all types of YouTube videos into text. All they have to do is simply download the YouTube video they need to transcribe and then upload it to the online interface. From there, this software uses its comprehensive text reader to convert the video to text. This platform supports more than 40 different language choice inputs and outputs. Users are allowed to transcribe up to five videos for free, then they must pay a subscription fee.
3. Otter
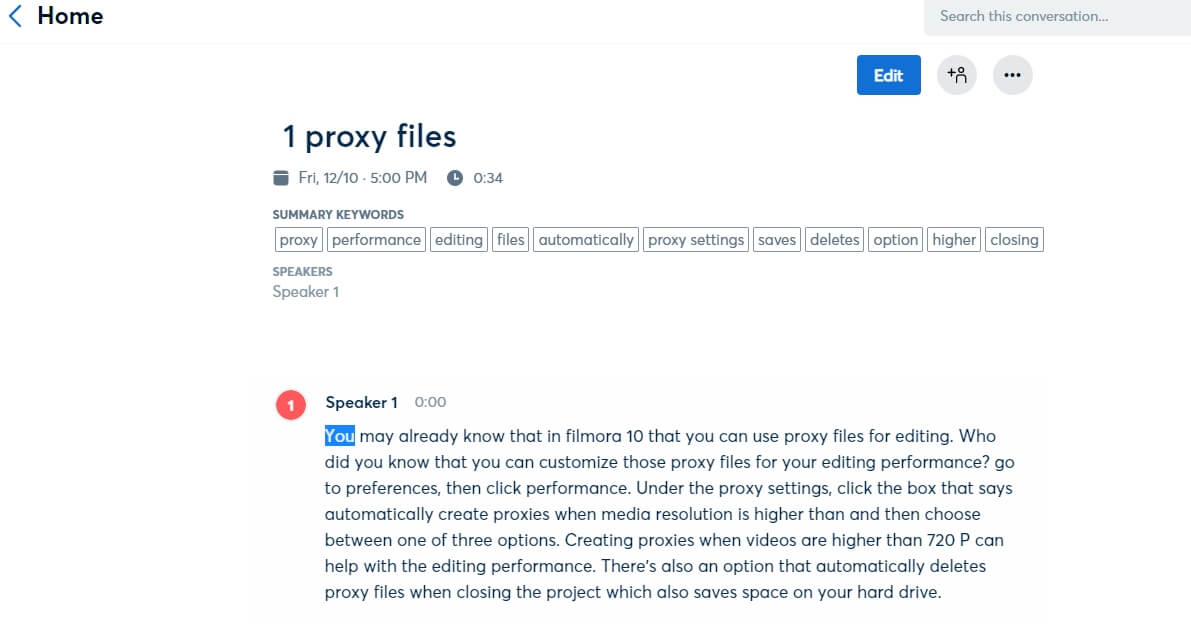
This video-to-text converter works best in real-time. Simply play the audio of a YouTube video and let Otter do its magic. In real-time it will convert audio into text. Moreover, if you would like to only convert some parts of the audio to text, that is possible with this tool as well.
All you need to do is play the audio accordingly and the text will automatically generate itself. The AVI (Ambient Voice Intelligence) of this tool allows it to accurately understand what the audio is saying to transcribe the video. While many do find this tool handy, learning how to use it can be a tiny bit tedious and confusing.
Note: Currently, Otter doesn’t support uploading YouTube video link, you may need to download the YouTube video first and then upload it from desktop.
4. oTranscribe
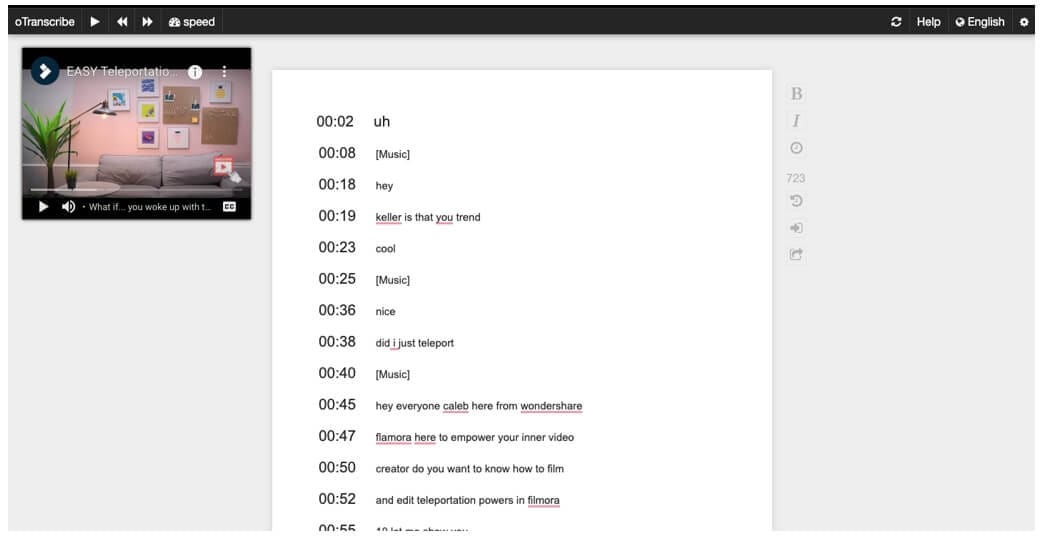
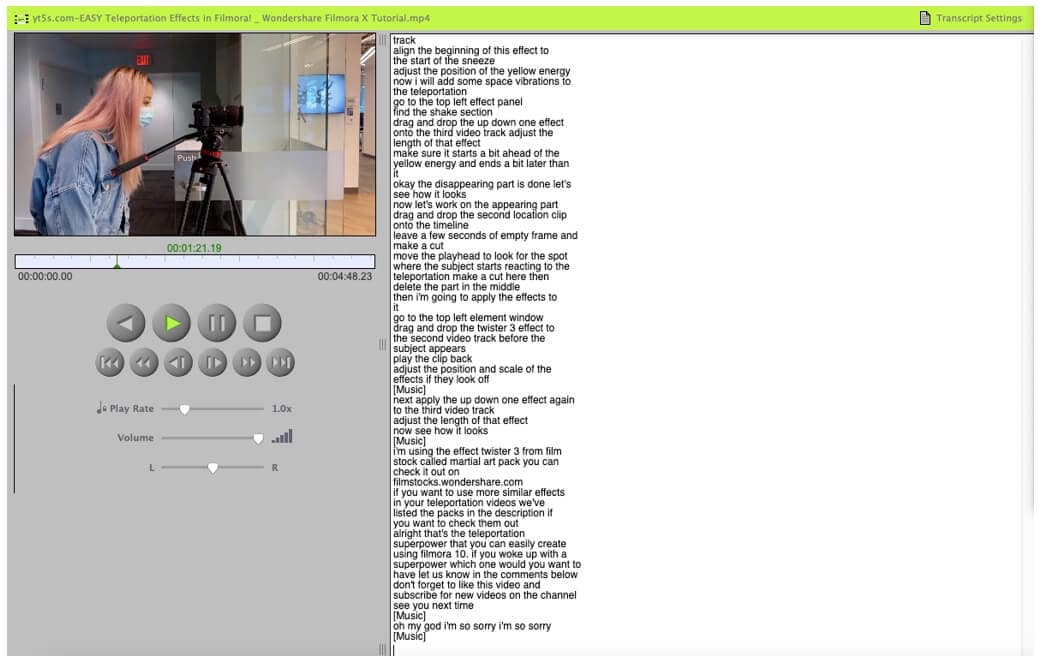
This online transcription tool is extremely easy and convenient to use - and it is entirely free! All you need to do is head on over to its homepage and drop a link to the YouTube video that you would like to transcribe. Then from there, you can access the video and text all at the same time, without having to switch between videos.
The best part is that you can record and translate text according to your need, cut and miss parts that you do not require. This tool supports all file formats which just adds to convince. The only challenge is that it will only accept videos and translate them into English.
5. Go Transcribe
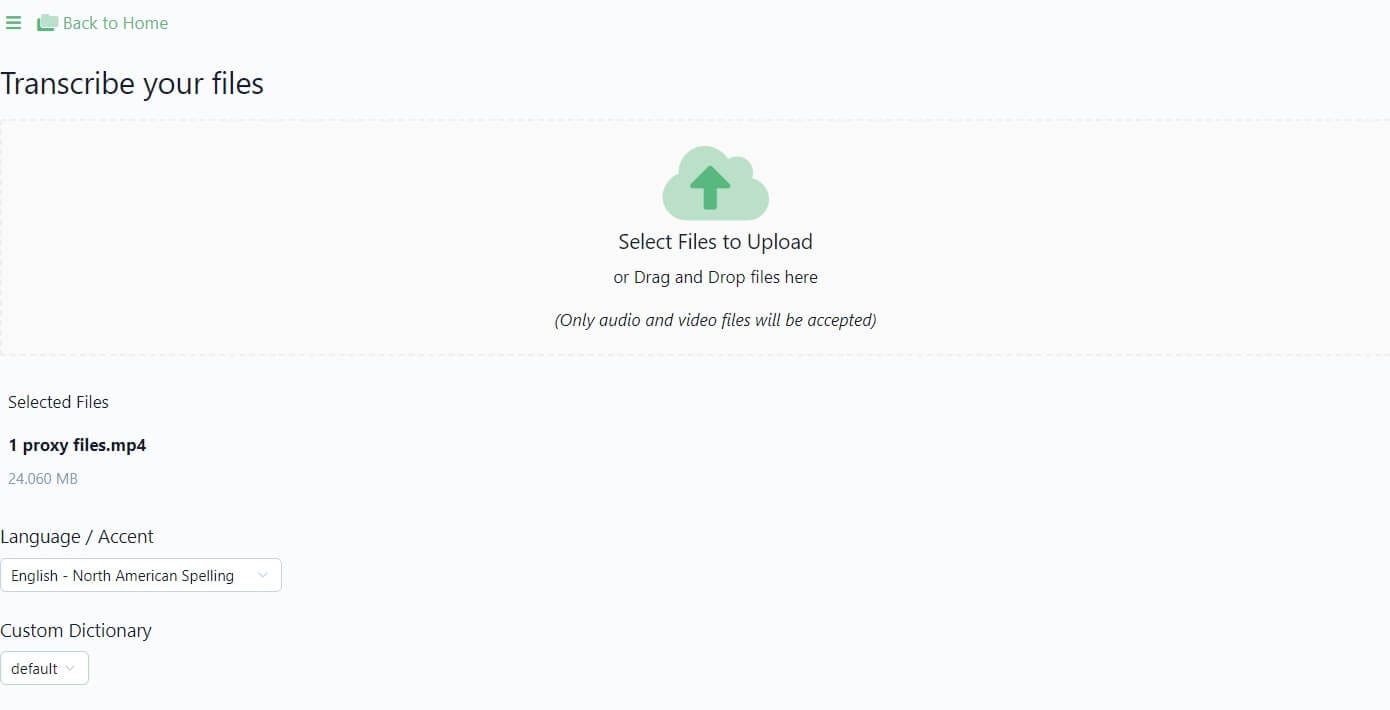
If you are looking to convert any sort of video format to text, then Go Transcribe might just be the tool that you require. This tool makes use of the latest voice technology to convert videos to text - and gives you the output in the form of an SRT, PDF, or DOC, which are all editable. All you need to do is upload the video in one of the formats below,
- 3PG
- FLV
- AVI
- MOV
- MPG
- MPEG
Then simply click the processing options and your video will be generated into a text file within minutes. However, this software may require a subscription fee.
files. Moreover, the output format is PDF which individuals cannot edit unless they convert the PDF to a TXT file online using different software.
6. Trint
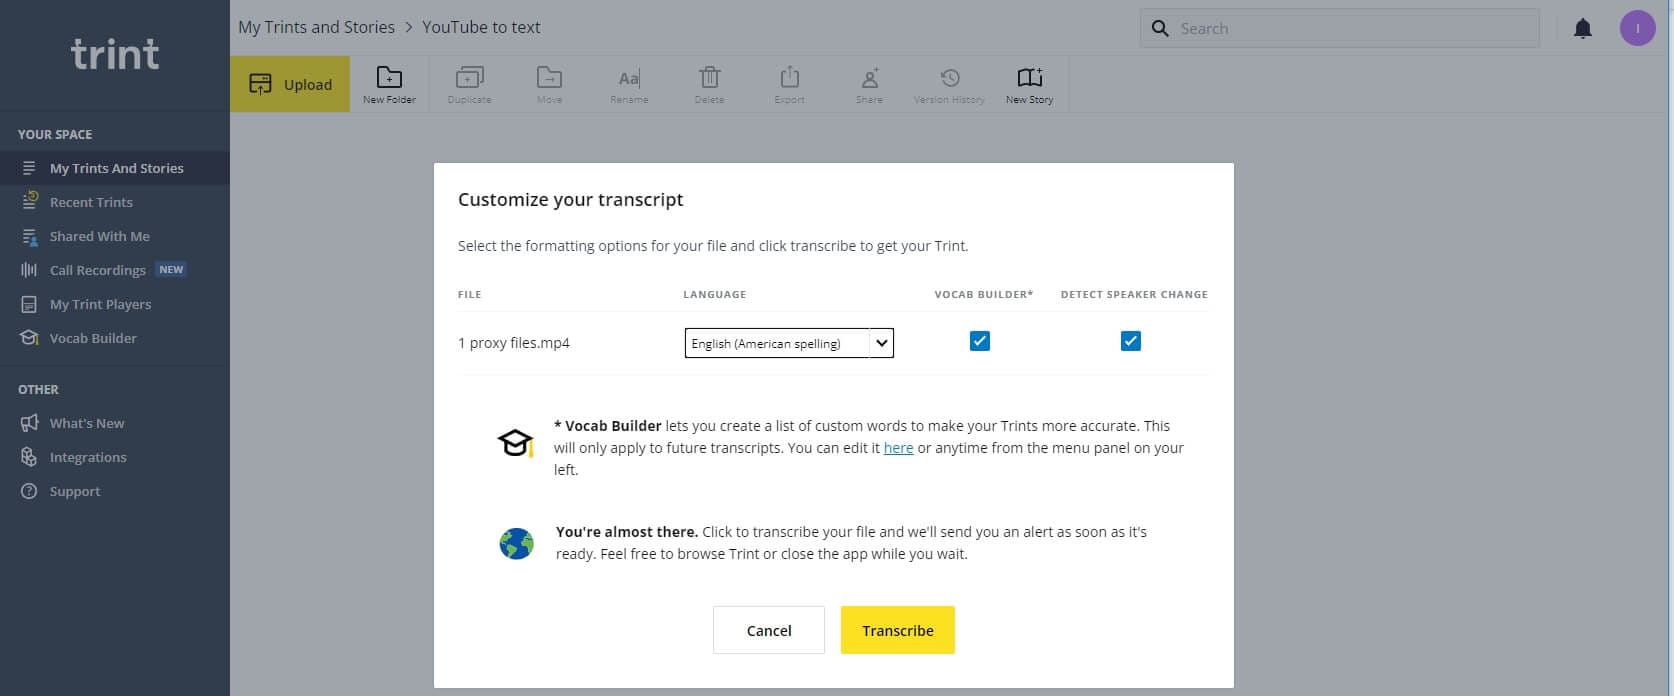
Turn your speech to text through magic - or in other words, through state-of-the-art technology. Trint is an online transcription tool that allows individuals to turn video files into text. People can download and upload numerous video files at once and turn them into text documents.
This is an extremely handy tool to have considering it comes with numerous options such as editing the text, only inducing certain parts of the video in the text, and so much more. This tool only has one shortcoming, it only accepts English language videos.
7. Happy Scribe
If you are wondering how, you will convert YouTube video to text, then we have just the answer for you. Make use of Happy Scribe to automatically transcribe all sorts of audio and video into comprehensive and readable text. You can get numerous features and options in this tool such as advanced grammatical functions as well as timestamps.
If your videos are in different languages, do not worry because Happy Scribe has more than 60 language formats. However, to make use of added features, individuals will need to pay for the tool and upgrade to the pro version.
8. 360Converter
360Converter, as its name suggests is a video to text converter which individuals can use online and offline. All you need to do is download and then upload the YouTube video that you would like to transcribe and the tool will automatically generate the text for you. The supported video formats include 3GP, MP4, MOV, AVI, and many more. This tool uses advanced technology to get accurate language and grammatical transcriptions, so everything is word to word - the exact same as the video. While this tool is extremely user-friendly, many state that it takes a while to process videos to text.
Key Takeaways!
Technology has come a long way which is why we now have numerous options available online to help us convert YouTube videos to text in less than 5-10 minutes. All you have to do is upload the file and let the tool do its magic! You can transcribe in different languages, segments, and so much more now!
Transform Long Videos into Short Ones Instantly
Turn long videos into viral clips. Effortlessly transform lengthy videos into engaging, shareable clips.

02 Best YouTube Video to Text Converters Online
Part 1: How to Convert YouTube Video to Texts by Copy/Paste YouTube Transcript
When people think “Get the transcript from YouTube” they believe it is going to be a daunting and lengthy procedure. Well, let us tell you that it is certainly not! All you have to do is follow the steps outlined below to transcribe YouTube video to text - that too through the YouTube player itself.
First what you have to do is open YouTube and select any video for which you require the transcript. Once you have selected the video, wait for it to load and then click the three dots located beneath the video, as shown in the image below.
Following that, a menu will appear, just select the “Open Transcript” option and the transcription will open on the top right side of your screen.
Simply select the entire transcript using your mouse, then copy and paste it into a new Word Document or Google Document. If you don’t need the timestamps, you can click the three-dot icon to toggle timestamps off.
By following the steps outlined above, you can convert a YouTube video to text in less than five seconds!
Part 2: Best YouTube Video to Text Converters Online
Aside from the basic method of getting the transcription from YouTube itself, many individuals make use of effective YouTube video to text converter online free. This allows them to get the complete video into text, small parts of the video to text, as well as options to convert the text into multiple languages. Below are some of the best software to convert YouTube video to text online.
1. Inqscribe
This high-quality cross-platform tool allows users to transcribe audio and video files into text . Whether it is a meeting recording or a YouTube video - you can convert them all to text. Making use of this free online software is extremely easy, all one has to do is just upload their file and click the process. Then the system will automatically transcribe the video into a text document for you. The software is uni code so all file formats are supported such as txt, XML, HTML, WebVTT, and more. The only drawback of this online software is that video files that are larger than a certain limit cannot be accepted.
2. Sonix
For individuals who have premium quality audio transcription, a tool by the name of Sonix is the right choice for you. This tool enables users to turn all types of YouTube videos into text. All they have to do is simply download the YouTube video they need to transcribe and then upload it to the online interface. From there, this software uses its comprehensive text reader to convert the video to text. This platform supports more than 40 different language choice inputs and outputs. Users are allowed to transcribe up to five videos for free, then they must pay a subscription fee.
3. Otter
This video-to-text converter works best in real-time. Simply play the audio of a YouTube video and let Otter do its magic. In real-time it will convert audio into text. Moreover, if you would like to only convert some parts of the audio to text, that is possible with this tool as well.
All you need to do is play the audio accordingly and the text will automatically generate itself. The AVI (Ambient Voice Intelligence) of this tool allows it to accurately understand what the audio is saying to transcribe the video. While many do find this tool handy, learning how to use it can be a tiny bit tedious and confusing.
Note: Currently, Otter doesn’t support uploading YouTube video link, you may need to download the YouTube video first and then upload it from desktop.
4. oTranscribe
This online transcription tool is extremely easy and convenient to use - and it is entirely free! All you need to do is head on over to its homepage and drop a link to the YouTube video that you would like to transcribe. Then from there, you can access the video and text all at the same time, without having to switch between videos.
The best part is that you can record and translate text according to your need, cut and miss parts that you do not require. This tool supports all file formats which just adds to convince. The only challenge is that it will only accept videos and translate them into English.
5. Go Transcribe
If you are looking to convert any sort of video format to text, then Go Transcribe might just be the tool that you require. This tool makes use of the latest voice technology to convert videos to text - and gives you the output in the form of an SRT, PDF, or DOC, which are all editable. All you need to do is upload the video in one of the formats below,
- 3PG
- FLV
- AVI
- MOV
- MPG
- MPEG
Then simply click the processing options and your video will be generated into a text file within minutes. However, this software may require a subscription fee.
files. Moreover, the output format is PDF which individuals cannot edit unless they convert the PDF to a TXT file online using different software.
6. Trint
Turn your speech to text through magic - or in other words, through state-of-the-art technology. Trint is an online transcription tool that allows individuals to turn video files into text. People can download and upload numerous video files at once and turn them into text documents.
This is an extremely handy tool to have considering it comes with numerous options such as editing the text, only inducing certain parts of the video in the text, and so much more. This tool only has one shortcoming, it only accepts English language videos.
7. Happy Scribe
If you are wondering how, you will convert YouTube video to text, then we have just the answer for you. Make use of Happy Scribe to automatically transcribe all sorts of audio and video into comprehensive and readable text. You can get numerous features and options in this tool such as advanced grammatical functions as well as timestamps.
If your videos are in different languages, do not worry because Happy Scribe has more than 60 language formats. However, to make use of added features, individuals will need to pay for the tool and upgrade to the pro version.
8. 360Converter
360Converter, as its name suggests is a video to text converter which individuals can use online and offline. All you need to do is download and then upload the YouTube video that you would like to transcribe and the tool will automatically generate the text for you. The supported video formats include 3GP, MP4, MOV, AVI, and many more. This tool uses advanced technology to get accurate language and grammatical transcriptions, so everything is word to word - the exact same as the video. While this tool is extremely user-friendly, many state that it takes a while to process videos to text.
Key Takeaways!
Technology has come a long way which is why we now have numerous options available online to help us convert YouTube videos to text in less than 5-10 minutes. All you have to do is upload the file and let the tool do its magic! You can transcribe in different languages, segments, and so much more now!
Transform Long Videos into Short Ones Instantly
Turn long videos into viral clips. Effortlessly transform lengthy videos into engaging, shareable clips.
YouTube Editing Made Easy: Shortening Video Lengths
How to Trim YouTube Videos?

Richard Bennett
Mar 27, 2024• Proven solutions
The world’s largest video sharing platform currently has nearly two billion active monthly users who upload over 400 hours of video content to their channels each minute. It is to see from these statistics why every video aspiring YouTubers post on their channels has to be perfect in every way in order to reach a wide audience. Fortunately, trimming a video even after you’ve uploaded it to YouTube is a quick and easy process, and in this article, we are going to show you a few different methods you can use to trim the videos you upload to YouTube. So, let’s get started.
In this article
- How to Trim a Video After You Upload it to Your YouTube Channel?
- Trimming a Video Before Posting On YouTube with Filmora Video Editor [4 Ways]
- Using Online Video Editing Platforms to Trim YouTube Videos
How to Trim a Video After You Upload it to Your YouTube Channel?
The YouTube Studio is no longer in beta phase, which means that the feature is here to stay. This is good news for all video creators who frequently update their YouTube videos after they upload them, as they no longer have to go through the endless uploads just because they wanted to trim a video.
Make sure that you’re signed into your YouTube channel, then click on your profile picture and select the YouTube Studio (Beta) option. On the left side of the screen, you’ll be able to see a menu that contains different subcategories like Analytics, Dashboard or Videos, so just click on the Videos option and proceed to select a video you’d like to trim. After the Videos submenu appears on the screen you should click on the Editor option and the video you selected will open in the YouTube’s video editor.

Click on the Trim button to start trimming the video and drag the blue bars located at the start and the end of the file to designate the portion of the video you’d like to remove. Preview the changes and confirm what you’ve made by clicking on the Save button located in the upper right corner of the screen and the new shortened version of the video will become available within a couple of hours.

In this way, you don’t need to take down the original video, edit it and re-upload. One of the benefits of trimming YouTube videos with the Trim feature in YouTube Editor is that this will keep your video URL and views and ranks etc.
Trimming a Video Before Posting On YouTube with Filmora Video Editor [4 Ways]


Method 1: Trim on Timeline
YouTubers who don’t want to rely on YouTube’s video editing capabilities can trim their footage with Filmora (to be honest, the Editor in YouTube platform has limited features). Filmora video editing software for PC and Mac computers offers a few different tools for trimming videos. After you’ve created a new project in Filmora, you should import a video clip into the editor by clicking on the Import drop-down menu and select the Import Media Files option. Each file you add to a project will be displayed in the Media tab, and you can just drag and drop it to a video track on the timeline.
All you have to do in order to trim a video after you’ve placed it on the timeline is drag one of its ends to the left or to the right. As you drag one of the clip’s edges the editor will only display the remaining footage while rendering the rest invisible. If at any point you want to access a portion of the video you’ve trimmed you just have to extend the file by dragging it until you’re able to see the segment you’re searching for.

Method 2: Using Filmora Split Tool
Filmora’s Split tool can help you separate the portion of the clip you want to remove from the segment you’d like to keep. Simply place the playhead at the exact location in the video clip where you want to make a cut, and click on the Split icon that looks like a pair of scissors. After the video is split, you should click on the clip you no longer need in order to select it and then hit the Delete button on your keyboard to remove it from the timeline.
Method 3: Using Scene Detection
Wondershare’s video editor also offers an automatic way to split a video clip into a number of separate scenes. Right-click on the video file located in the Filmora’s Media tab, and select the Scene Detection option from the menu and proceed to click on the Detect button, after the Scene Detection window pops up on the screen. The software will then automatically analyze the footage and divide it into separate scenes. Simply click on the Add to Timeline button once the process is completed to continue editing the video clip you’ve just split.

Method 4: Using Instant Cutter Tool
The Instant Cutter Tool enables you to quickly trim or merge high-resolution files recorded on action cameras as soon as you import them into a project in Filmora. Select the Import with Instant Cutter Tool option from the Import drop-down menu and wait for the Filmora Instant Cutter window to appear on the screen. In the upper left corner of this window, you will be able to see Trim and Merge tabs. Make sure that the Trim tab is selected and then click on the Open File button to import a video clip you’d like to trim. You can then use the trimming sliders to designate the parts of the video you’d like to remove or the set the In and Out points by clicking on the Set In Point or Set Out Point icons. Click on the Export button to save the new version of the video clip and click OK to complete the process.

Using Online Video Editing Platforms to Trim YouTube Videos
In case you’re looking for a tool that lets you save extracts of scenes from YouTube to your computer free of charge YT Cutter may be one of your best options.

This online video editing platform is remarkably easy to use since you just have to copy the link to the YouTube video you’d like to trim into YT Cutter’s URL box and then select how long the new video should be. Click on the Start and End buttons to set the duration of the video and click on the Download button to choose if you want to create a video, GIF or an audio file. The trimmed YouTube video will be available for download as soon as the platform processes it, and you just need to specify a folder on your hard drive before clicking on the Save button.
There’re many online video trimmers available on the market, some of them are totally free to use, check our guide about How to Trim Videos for Free Online .
Read More to Get : How to Download YouTube Videos without Any Software Easily >>
Conclusion
Trimming a video online or with a video editing software like Filmora is an effortless task that can be completed in just a couple of minutes. However, it is better to complete the entire video editing process before you upload a video to your YouTube channel because YouTube Studio and other online video editing platforms still offer only a limited amount of video editing tools. Which method of trimming YouTube videos do you like using the most? Leave a comment and share your opinions with us.
Richard Bennett
Richard Bennett is a writer and a lover of all things video.
Follow @Richard Bennett
Richard Bennett
Mar 27, 2024• Proven solutions
The world’s largest video sharing platform currently has nearly two billion active monthly users who upload over 400 hours of video content to their channels each minute. It is to see from these statistics why every video aspiring YouTubers post on their channels has to be perfect in every way in order to reach a wide audience. Fortunately, trimming a video even after you’ve uploaded it to YouTube is a quick and easy process, and in this article, we are going to show you a few different methods you can use to trim the videos you upload to YouTube. So, let’s get started.
In this article
- How to Trim a Video After You Upload it to Your YouTube Channel?
- Trimming a Video Before Posting On YouTube with Filmora Video Editor [4 Ways]
- Using Online Video Editing Platforms to Trim YouTube Videos
How to Trim a Video After You Upload it to Your YouTube Channel?
The YouTube Studio is no longer in beta phase, which means that the feature is here to stay. This is good news for all video creators who frequently update their YouTube videos after they upload them, as they no longer have to go through the endless uploads just because they wanted to trim a video.
Make sure that you’re signed into your YouTube channel, then click on your profile picture and select the YouTube Studio (Beta) option. On the left side of the screen, you’ll be able to see a menu that contains different subcategories like Analytics, Dashboard or Videos, so just click on the Videos option and proceed to select a video you’d like to trim. After the Videos submenu appears on the screen you should click on the Editor option and the video you selected will open in the YouTube’s video editor.
Click on the Trim button to start trimming the video and drag the blue bars located at the start and the end of the file to designate the portion of the video you’d like to remove. Preview the changes and confirm what you’ve made by clicking on the Save button located in the upper right corner of the screen and the new shortened version of the video will become available within a couple of hours.
In this way, you don’t need to take down the original video, edit it and re-upload. One of the benefits of trimming YouTube videos with the Trim feature in YouTube Editor is that this will keep your video URL and views and ranks etc.
Trimming a Video Before Posting On YouTube with Filmora Video Editor [4 Ways]
Method 1: Trim on Timeline
YouTubers who don’t want to rely on YouTube’s video editing capabilities can trim their footage with Filmora (to be honest, the Editor in YouTube platform has limited features). Filmora video editing software for PC and Mac computers offers a few different tools for trimming videos. After you’ve created a new project in Filmora, you should import a video clip into the editor by clicking on the Import drop-down menu and select the Import Media Files option. Each file you add to a project will be displayed in the Media tab, and you can just drag and drop it to a video track on the timeline.
All you have to do in order to trim a video after you’ve placed it on the timeline is drag one of its ends to the left or to the right. As you drag one of the clip’s edges the editor will only display the remaining footage while rendering the rest invisible. If at any point you want to access a portion of the video you’ve trimmed you just have to extend the file by dragging it until you’re able to see the segment you’re searching for.
Method 2: Using Filmora Split Tool
Filmora’s Split tool can help you separate the portion of the clip you want to remove from the segment you’d like to keep. Simply place the playhead at the exact location in the video clip where you want to make a cut, and click on the Split icon that looks like a pair of scissors. After the video is split, you should click on the clip you no longer need in order to select it and then hit the Delete button on your keyboard to remove it from the timeline.
Method 3: Using Scene Detection
Wondershare’s video editor also offers an automatic way to split a video clip into a number of separate scenes. Right-click on the video file located in the Filmora’s Media tab, and select the Scene Detection option from the menu and proceed to click on the Detect button, after the Scene Detection window pops up on the screen. The software will then automatically analyze the footage and divide it into separate scenes. Simply click on the Add to Timeline button once the process is completed to continue editing the video clip you’ve just split.
Method 4: Using Instant Cutter Tool
The Instant Cutter Tool enables you to quickly trim or merge high-resolution files recorded on action cameras as soon as you import them into a project in Filmora. Select the Import with Instant Cutter Tool option from the Import drop-down menu and wait for the Filmora Instant Cutter window to appear on the screen. In the upper left corner of this window, you will be able to see Trim and Merge tabs. Make sure that the Trim tab is selected and then click on the Open File button to import a video clip you’d like to trim. You can then use the trimming sliders to designate the parts of the video you’d like to remove or the set the In and Out points by clicking on the Set In Point or Set Out Point icons. Click on the Export button to save the new version of the video clip and click OK to complete the process.
Using Online Video Editing Platforms to Trim YouTube Videos
In case you’re looking for a tool that lets you save extracts of scenes from YouTube to your computer free of charge YT Cutter may be one of your best options.
This online video editing platform is remarkably easy to use since you just have to copy the link to the YouTube video you’d like to trim into YT Cutter’s URL box and then select how long the new video should be. Click on the Start and End buttons to set the duration of the video and click on the Download button to choose if you want to create a video, GIF or an audio file. The trimmed YouTube video will be available for download as soon as the platform processes it, and you just need to specify a folder on your hard drive before clicking on the Save button.
There’re many online video trimmers available on the market, some of them are totally free to use, check our guide about How to Trim Videos for Free Online .
Read More to Get : How to Download YouTube Videos without Any Software Easily >>
Conclusion
Trimming a video online or with a video editing software like Filmora is an effortless task that can be completed in just a couple of minutes. However, it is better to complete the entire video editing process before you upload a video to your YouTube channel because YouTube Studio and other online video editing platforms still offer only a limited amount of video editing tools. Which method of trimming YouTube videos do you like using the most? Leave a comment and share your opinions with us.
Richard Bennett
Richard Bennett is a writer and a lover of all things video.
Follow @Richard Bennett
Also read:
- PictureCut Studio
- Learn to Record and Save Your Watching Experience on YouTube with Zero Costs
- [Updated] A Bundle of Nine Premium Holiday Treasures Watch for Free on YouTube
- Assessing Social Media Preference The Case for TikTok or YouTubes' Shorts for 2024
- Five Cozy Seasons Ideal Backgrounds to Warm Up Videos
- 2024 Approved Cultivating a Community Building Followers on YouTube Without Spending
- [New] Best Affordable Video Editors in the Market - 2023 Edition
- [New] Elevate Your Video Presentations with Top 30 Free Intra Makers
- Streamline Metadata Ranking of 7 Leading Online Youtube Tag Extractors
- Unlock Video Potential Leading Tools Turning YouTubes to Avis
- Harnessing YouTube Statistics to Increase Subscribers
- Chart Your Course to YouTube Success with These Techniques
- [Updated] Decoding the Best of Beauty YouTube's Elite Artists Showcased
- In 2024, Charting Success Understanding YouTube Insights
- Designing a Memorable YouTube Sign-Off
- [New] Edit Like a Pro with Any of These Top 7 Free Options
- In 2024, Enhance Your Online Skills A Guide to YouTube Editing via Sony Vegas
- 2024 Approved Aspect Ratios Decoded YouTube Edition – A Quick Reference Guide
- Complete Unpacking The World of Virtual Idols
- Ultimate Tutorial Looping Techniques for Maximum Watcher Satisfaction
- YouTube-to-WebM The Finest Video Converters Unveiled
- Video Sharing Protocol Bridging YouTube and TikTok Networks
- Instantaneous Video Downloader Selection Guide
- [Updated] 10 Record Screen and Upload to YouTube Tools [PC, Mac, Online]
- 2024 Approved Breaking the Screens Top 10 Most Popular Female YouTubers
- Leveraging CG Central LUTs for Cinematic Color Enhancement
- In 2024, Top 12 Prominent Oppo F25 Pro 5G Fingerprint Not Working Solutions
- Updated In 2024, Easy Guide to Apply Slow Zoom Effects to Videos
- Spectral Photography Takes a Quantum Leap with Blade 4K
- [Updated] Guide to Share IGTV with Minimal Hassle
- [Updated] Leveraging a 3-Step Writing System for Social Media Success with FB Ads
- Updated Thousands Already Found 15 Best Sites to Watch Cartoons Online Free And So Can You
- In 2024, Native Chrome OS Screen Replay App
- [New] Complete Guide Webinar Software 10 Best Webinar Software for 2024
- In 2024, How to Unlock Xiaomi Redmi Note 12 5G Phone with Broken Screen
- [New] Live Stream Longevity Preventing and Fixing Interruptions on Social Media
- Updated The Ultimate List of Glitch Art Video Editors for Mobile Devices for 2024
- In 2024, A Comprehensive Guide to Apple iPhone 12 Pro Max Blacklist Removal Tips and Tools
- In 2024, How To Unlock A Found Apple iPhone XS?
- [New] Snapshot Safeguarding An Easy Tutorial for Your Phone
- In 2024, Jaycut 101 Unlocking the Power of Free Online Video Editing
- Title: "2024 Approved Best YouTube Video to Text Converters On-Line"
- Author: Kevin
- Created at : 2024-05-25 14:19:44
- Updated at : 2024-05-26 14:19:44
- Link: https://youtube-videos.techidaily.com/2024-approved-best-youtube-video-to-text-converters-on-line/
- License: This work is licensed under CC BY-NC-SA 4.0.
